tire Hyundai Santa Fe 2006 Owner's Manual
[x] Cancel search | Manufacturer: HYUNDAI, Model Year: 2006, Model line: Santa Fe, Model: Hyundai Santa Fe 2006Pages: 281, PDF Size: 8.94 MB
Page 33 of 281
1
FEATURES OF YOUR HYUNDAI
21
!
B160A01A-AATCARE OF SEAT BELTSSeat belt systems should never be disassembled
or modified. In addition, care should be taken to
assure that seat belts and belt hardware are not
damaged by seat hinges, doors or other abuse.
WARNING:
When you return the rear seatback to its
upright position after the rear seatback was
folded down, be careful not to damage the
seat belt webbing or buckle. Be sure that
the webbing or buckle does not get caught
or pinched in the rear seat.
WARNING:
Sitting in a reclined position or lying down
when your vehicle is in motion can be
dangerous. Even if you buckle up, your seat
belts can't do their job when you're re-
clined.
The shoulder belt can't do its job because
it won't be against your body.
Instead, it will be in front of you. In a crash
you could go into it with great force, receiv-
ing serious neck or other injuries.
The lap belt can't do its job either. In a crash
the belt could go up over your abdomen.
The belt forces would be applied there, not
at your strong pelvic bones.
This could cause serious internal injuries.
For proper protection when the vehicle is in
motion, have the seatback upright.
Then sit back in the seat and wear your seat
belt properly. See page 1-22.
B160B01A-AATPeriodic InspectionIt is recommended that all seat belts be in-
spected periodically for wear or damage of any
kind. Parts of the system that are damaged
should be replaced as soon as possible.
B160C01A-AATKeep Belts Clean and DrySeat belts should be kept clean and dry. If belts
become dirty, they can be cleaned by using a
mild soap solution and warm water. Bleach, dye,
strong detergents or abrasives should not be
used because they may damage and weaken
the fabric.B160D01A-AATWhen to Replace Seat BeltsEntire in-use seat belt assembly or assemblies
should be replaced if the vehicle has been
involved in an accident. This should be done
even if no damage is visible. Additional ques-
tions concerning seat belt operation should be
directed to your Hyundai Dealer.
!
Page 43 of 281
1
FEATURES OF YOUR HYUNDAI
31
!
WARNING:
If the child restraint seat is not anchored
properly, the risk of a child being seriously
injured or killed in a collision greatly in-
creases. Follow the child seat manufacturer's instruc-
tions to properly install safety seats with ISOFIX
or ISOFIX-compatible attachments.
Once you have installed the ISOFIX child re-
straint seat, assure that the seat is properly
attached to the ISOFIX and tether anchors.
Also, test the safety seat before you place the
child in it. Tilt the seat from side to side. Also try
to tug the seat forward. Check to see if the
anchors hold the seat in place.
B230G01O-AATChild Restraint System Installation on
Outboard Rear SeatsTo install a child restraint system in the outboard
rear seats, extend the shoulder/lap belt entirely
from its retractor until a "click" is felt. This will
engage the seat belt retractor automatic locking
feature, which allows the seat belt to retract but
not extend. Install the child restraint system,
buckle the seat belt and allow the seat belt to
take up any slack. Make sure that the lap portion
of the belt is tight around the child restraint
system and the shoulder portion of the belt is
positioned so that it can not interfere with the
child's head or neck. Also, double check to be
sure that the retractor has engaged the Auto-
matic Locking feature by trying to extend web-
bing out of the retractor. If the retractor is in the
Automatic Locking mode, the belt will be locked.
B230G01L B230F01JM-AAT
Installation on Rear Seat Center PositionTo install a child restraint system in the center
rear seat, extend the shoulder/lap belt entirely
from its retractor until a "click" is felt. This will
engage the seat belt retractor automatic locking
feature, which allows the seat belt to retract but
not extend. Install the child restraint system,
buckle the seat belt and allow the seat belt to
take up any slack. Make sure that the lap portion
of the belt is tight around the child restraint
system and the shoulder portion of the belt is
positioned so that it can not interfere with the
child's head or neck. Also, double check to be
sure that the retractor has engaged the Auto-
matic Locking feature by trying to extend web-
bing out of the retractor. If the retractor is in the
Automatic Locking mode, the belt will be locked.
B235G01O-A
Page 145 of 281

1
FEATURES OF YOUR HYUNDAI
133
When the eject button is pressed, the receiver
will eject the disc and REMOVE CD will be
displayed. You can now remove the disc. If the
disc is not removed, after 25 seconds, the disc
will be automatically pulled back into the re-
ceiver, If you try to push the disc back into the
receiver, before the 25 second time period is
complete, the receiver will sense an error and
will try to eject the disc several times before
stopping. You cannot repeatedly press the eject
button to eject the disc after you have tried to
push the CD in manually. The receivers 25-
second eject timer will reset at each press of
eject, which will cause the receiver to not eject
the disc until the 25-second time period has
elapsed.
Once the player stops and the disc is ejected,
remove the disc. After removing the disc, press
the VOLUME PWR knob off and then on again.
This will clear the disc-sensing feature and
enable discs to be loaded into the player again.
3. REVERSE ButtonPress and hold this button reverse quickly
within a track. Release it to play the passage.
You will hear sound at a reduced volume. The
display will show elapsed time.
4. FORWARD ButtonPress and hold this button to advance quickly
within a track. Release it to play the passage.
You will hear sound at a reduced volume. The
display will show elapsed time.5. REPEAT ButtonWith repeat button, you can repeat one track or
an entire disc. To use repeat, do the following:
o To repeat the track you are listening to,
press and release the RPT button. RPT
track will appear on the display. Press RPT
again to turn it off.
o To repeat the disc you are listening to, press
and hold the RPT button for two seconds.
Press RPT again to turn it off.6. RANDOM ButtonWith random, you can listen to the tracks in
random, rather than sequential order, on all of
the discs or on one disc.
To use random, do the following:o Press and release the RDM button to play
the tracks on all of the discs that are loaded,
in random order. RDM will appear in the
display. Press RDM to turn if off.
o To play the tracks on the disc you are
listening to in random order, press and hold
RDM for more than two seconds. You will
hear three beeps and RDM will appear on the
display. Press RDM again to turn if off.
7. AUTO EQUALIZERPress AUTO EQ to select the desired preset
equalization setting while playing a compact
disc. The equalization will be automatically set
whenever you play a compact disc.8. SEEK/SCAN BUTTON
SEEKPress the down arrow while playing a CD to go
to the start of the current track if more than ten
seconds have played. Press the up arrow to go
to the next track. If you press the button more
than once, the player will continue moving back-
ward or forward through the disc.
Page 146 of 281
1FEATURES OF YOUR HYUNDAI
134
SCANPress and hold either SEEK SCAN arrow for
more than two seconds until SCAN appears on
the display and you hear a beep. Use SEEK
SCAN to listen to each track for a few seconds.
The sounds will mute while scanning. SCAN will
appear on the display. Press either SEEK SCAN
arrow again, to stop scanning.DISC SCANPress and hold either SEEK SCAN arrow for
more than four seconds until DISC SCAN ap-
pears on the display and you hear a beep. Use
DISC SCAN to listen to the first track, for ten
seconds of each disc loaded. The sound will
mute while scanning to the next track. DISC
SCAN will appear on the display. Press either
SEEK SCAN arrow again, to stop scanning.9. Playing CDo Insert the CD to start CD playback, during
radio operation or cassette tape playing.
o When discs are in the CD deck, if you press
the play button the CD player will begin
playing even if the radio or cassette player
is being used.
10. Using Song List ModeThe integrated 6-disc CD changer has a feature
called song list. This feature is capable of saving
20 track selections.
To save tracks into SONG LIST perform the
following steps:
1. The disc player must be on with at least one
disc loaded. See "LOAD/EJECT" previously
for more information.
2. The disc changer must not be in song list
mode. S-LIST should not appear in the dis-
play. If S-LIST is present, press SONG LIST
to turn it off.
3. Select the desired disc by pressing the
numbered pushbutton and then use the
SEEK SCAN up arrow button to locate the
track that you want to save. The track will
begin to play.
4. Press and hold LIST for two or more sec-
onds to save the track into memory. When
LIST is pressed a beep will be heard imme-
diately. After two seconds of pressing LIST
continuously, two beeps will sound, to con-
firm that the track has been saved.
5. Repeat Steps 3 and 4 for saving other
selections.To play the song list, press LIST. One beep will
be heard and SLIST will appear on the display.
The recorded tracks will begin to play in the
order that they were saved.
You may seek through the song list by using the
SEEK SCAN arrows. Seeking past the last
saved track will return you to the first saved
track.
To delete tracks from SONG LIST perform the
following steps:
1. The disc player must be turned on.
2. Press SONG LIST to turn song list on.
S-LIST will appear on the display.
3. Press the SEEK SCAN arrows to select the
desired track to be deleted.
4. Press and hold the SONG LIST button for
two seconds. When pressing SONG LIST
one beep will be heard immediately. After two
seconds of pressing the SONG LIST button
continuously, two beeps will be heard, to
confirm that the track had been deleted.
5. To delete entire lists, press and hold LIST
button for > 4 seconds when pressing list,
one beep will be heard immediately. After two
seconds of pressing the LIST button con-
tinuously, two beeps will be heard. After 4
seconds, a beep would be heard to confirm
that all the tracks had been deleted and the
display will show SLIST_EMPTY.
Page 154 of 281
2
DRIVING YOUR HYUNDAI
3
RISK OF ROLLOVER
BEFORE STARTING THE ENGINE
!
!
WARNING:
o The 2WD Santa Fe is not designed for
off-road use. The 4WD Santa Fe is de-
signed primarily for use on paved roads.
However, occasional use in off-highway
conditions such as established unpaved
roads and non-challenging off-road
trails is allowed. The 4WD Santa Fe is not
designed for blazing new trails, chal-
lenging off-road conditions, or unpaved
hill climbing. Exceeding the conditions
that were intended for the vehicle's pri-
mary design may result in injury or death.
o Utility vehicle has a significantly higher
collision rate than other type of vehicles.
C020A01O-AATBefore you start the engine, you should always:
1. Look around the vehicle to be sure there are
no flat tires, puddles of oil, water or other
indications of possible trouble.
2. After entering the car, check to be sure the
parking brake is engaged.
3. Check that all windows, and lights are clean.
4. Check that the interior and exterior mirrors
are clean and in position.
5. Check your seat, seatback and headrest to
be sure they are in their proper positions.
6. Lock all the doors.
7. Fasten your seat belt and be sure that all
other occupants have fastened theirs.
8. Turn off all lights and accessories that are
not needed.
9. When you turn the ignition switch to "ON",
check that all appropriate warning lights are
operating and that you have sufficient fuel.
10.Check the operation of warning lights and all
bulbs when key is in the "ON" position. o Sports utility vehicles have higher
ground clearance and a narrower track
to make them capable of performing in
a wide variety of off-road applications.
Specific design characteristics give them
a higher center of gravity than ordinary
cars. An advantage of the higher ground
clearance is a better view of the road
allowing you to anticipate problem. They
are not designed for cornering at the
same speeds as conventional 2-wheel
drive vehicles any more than low-slung
sports cars are designed to perform sat-
isfactorily under off-road conditions. If
at all possible, avoid sharp turns or abrupt
maneuvers. As with other vehicles of
this type, failure to operate this vehicle
correctly may result in loss of control or
vehicle rollover.
o In a collision, an unbelted person is
significantly more likely to be seriously
injured or killed than a person wearing a
seatbelt.
WARNING:
C015A01O-AAT
Page 155 of 281
2
DRIVING YOUR HYUNDAI
4
!!
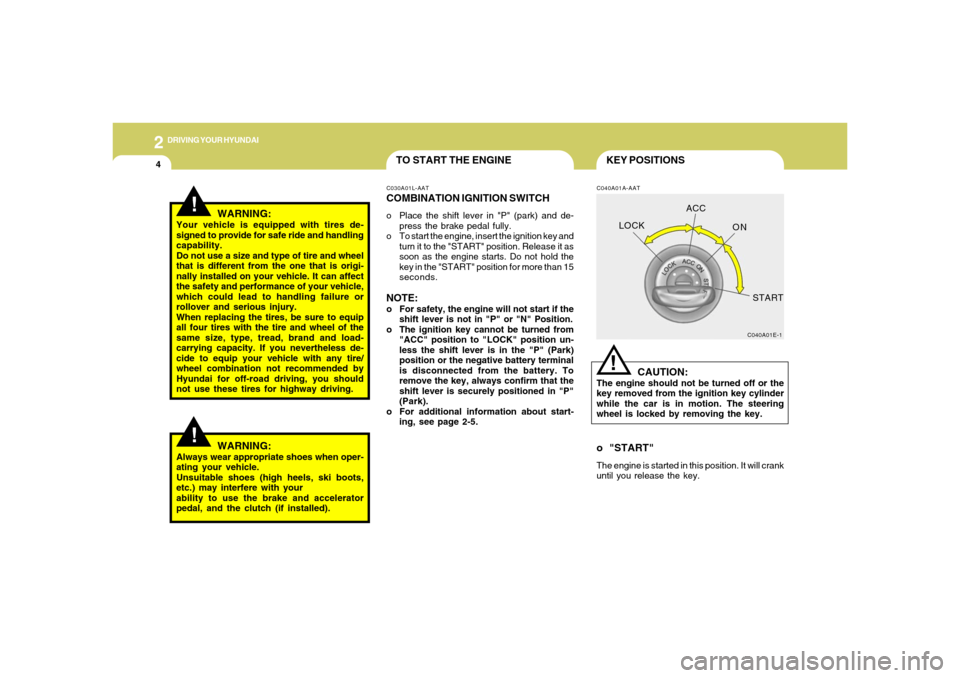
KEY POSITIONSC040A01A-AAT
CAUTION:
The engine should not be turned off or the
key removed from the ignition key cylinder
while the car is in motion. The steering
wheel is locked by removing the key.
C040A01E-1
LOCKACC
ON
START!
o "START"The engine is started in this position. It will crank
until you release the key.
WARNING:
Your vehicle is equipped with tires de-
signed to provide for safe ride and handling
capability.
Do not use a size and type of tire and wheel
that is different from the one that is origi-
nally installed on your vehicle. It can affect
the safety and performance of your vehicle,
which could lead to handling failure or
rollover and serious injury.
When replacing the tires, be sure to equip
all four tires with the tire and wheel of the
same size, type, tread, brand and load-
carrying capacity. If you nevertheless de-
cide to equip your vehicle with any tire/
wheel combination not recommended by
Hyundai for off-road driving, you should
not use these tires for highway driving.
TO START THE ENGINEC030A01L-AATCOMBINATION IGNITION SWITCHo Place the shift lever in "P" (park) and de-
press the brake pedal fully.
o To start the engine, insert the ignition key and
turn it to the "START" position. Release it as
soon as the engine starts. Do not hold the
key in the "START" position for more than 15
seconds.NOTE:o For safety, the engine will not start if the
shift lever is not in "P" or "N" Position.
o The ignition key cannot be turned from
"ACC" position to "LOCK" position un-
less the shift lever is in the "P" (Park)
position or the negative battery terminal
is disconnected from the battery. To
remove the key, always confirm that the
shift lever is securely positioned in "P"
(Park).
o For additional information about start-
ing, see page 2-5.
WARNING:
Always wear appropriate shoes when oper-
ating your vehicle.
Unsuitable shoes (high heels, ski boots,
etc.) may interfere with your
ability to use the brake and accelerator
pedal, and the clutch (if installed).
Page 164 of 281
2
DRIVING YOUR HYUNDAI
13
ANTI-LOCK BRAKE SYSTEM (ABS)C120A02A-AAT(If installed)The Anti-Lock Brake System (ABS) is designed
to prevent wheel lock-up during sudden braking
or on hazardous road surfaces. The ABS con-
trol module monitors the wheel speed and con-
trols the pressure applied to each brake. Thus,
in emergency situations or on slick roads, ABS
will increase vehicle control during braking.NOTE:During ABS operation, a pulsation may be
felt in the brake pedal when the brakes are
applied. Also, a noise may be heard in the
engine compartment while braking. These
conditions are normal and indicate that the
anti-lock brake system is functioning prop-
erly.
BRAKE TRACTION CONTROL SYS-
TEM (BTCS)
!
WARNING:
ABS will not prevent accidents due to im-
proper or dangerous driving maneuvers.
Even though vehicle control is improved
during emergency braking, always main-
tain a safe distance between you and ob-
jects ahead. Vehicle speeds should always
be reduced during extreme road condi-
tions.
The braking distance for cars equipped
with an anti-lock braking system may be
longer than for those without it in the
following road conditions. During these
conditions the vehicle should be driven at
reduced speeds:
o Rough, gravel or snow-covered roads.
o With tire chains installed.
o On roads where the road surface is pit-
ted or has different surface height.
The safety features of an ABS equipped
vehicle should not be tested by high speed
driving or cornering. This could endanger
the safety of yourself or others.
C300A02O-AAT(If installed)On slippery road surfaces, the traction control
system (TCS) limits the drive wheels from
spinning excessively, thus helping the car to
accelerate. It also helps to provide sufficient
driving force and steering performance as the
car turns.SLIP ControlLimits the drive wheels from spinning exces-
sively during starting or while making acceler-
ated turns on slippery roads to avoid losing the
driving force of the driven wheels.Driving HintsTCS does not actively apply brakes. Be sure to
decelerate the car sufficiently before entering
curves.
Page 168 of 281
2
DRIVING YOUR HYUNDAI
17
(5) Do not drive the vehicle through water. (i.e.
streams, rivers, lakes, etc.)
(6) The stopping distance of the full-time 4WD
vehicle differs very little from that of the 2WD
vehicle.
When driving on a snow-covered road or a
slippery, muddy surface, make sure that
you keep a sufficient distance between your
vehicle and the one ahead of you.
(7) Since the driving torque is always applied to
all 4 wheels, the performance of the full-time
4WD vehicle is greatly affected by the con-
dition of the tires. Be sure to equip it with four
tires of the same size and type.
o When replacement of any of the tires or
wheels is necessary, replace all of them
with tires or wheels of the same size type.
o Rotate the tires and check the tire pres-
sure at regular intervals.
!
(8)The full-time 4WD vehicle cannot be
towed by an ordinary tow truck. Make
sure that the vehicle is towed with all
four wheels raised off the ground.
o Roadside Assistance Program:
Off-roading is not covered. To receive
service, the vehicle must be on a publicly
maintained road.
o If the vehicle is towed with only two
wheels raised off the ground, the 4WD
system could be damaged.
o In unavoidable cases, if the vehicle is
being towed with all four wheels on the
ground, it should only be towed forward.
o While towing, check the following items.
1. The ignition switch is in "ACC" or
"ON".
2. Place the shift lever in neutral (For
Automatic Transaxle, "N" position).
3. Release the parking brake.NOTE:To avoid serious damage to your 4WD ve-
hicle, limit towing to 10 mph and not for
more than 1 mile at ANY TIME.
WARNING:
Your vehicle is equipped with tires de-
signed to provide for safe ride and handling
capability.
Do not use a size and type of tire and wheel
that is different from the one that is origi-
nally installed on your vehicle. It can affect
the safety and performance of your vehicle,
which could lead to handling failure or
rollover and serious injury.
When replacing the tires, be sure to equip
all four tires with the tire and wheel of the
same size, type, tread, brand and load-
carrying capacity. If you nevertheless de-
cide to equip your vehicle with any tire/
wheel combination not recommended by
Hyundai for off-road driving, you should
not use these tires for highway driving.
Page 169 of 281
2
DRIVING YOUR HYUNDAI
18
!
CAUTION:
o While the full-time 4WD vehicle is being
raised on a jack, never start the engine or
cause the tires to rotate.
There is danger that rotating tires touch-
ing the ground could cause the vehicle
to go off the jack and to jump forward.
o If one of the front or rear wheels begins
to spin in mud, snow, etc., the vehicle
can sometimes be driven out by de-
pressing the accelerator pedal further;
however, avoid running the engine con-
tinuously at high rpm because doing so
could damage the 4WD system.
(10)When using tire chains, be sure to install the
chains on all wheels.
(11)If the front or rear wheels get stuck in the
mud, do not spin them recklessly. The 4WD
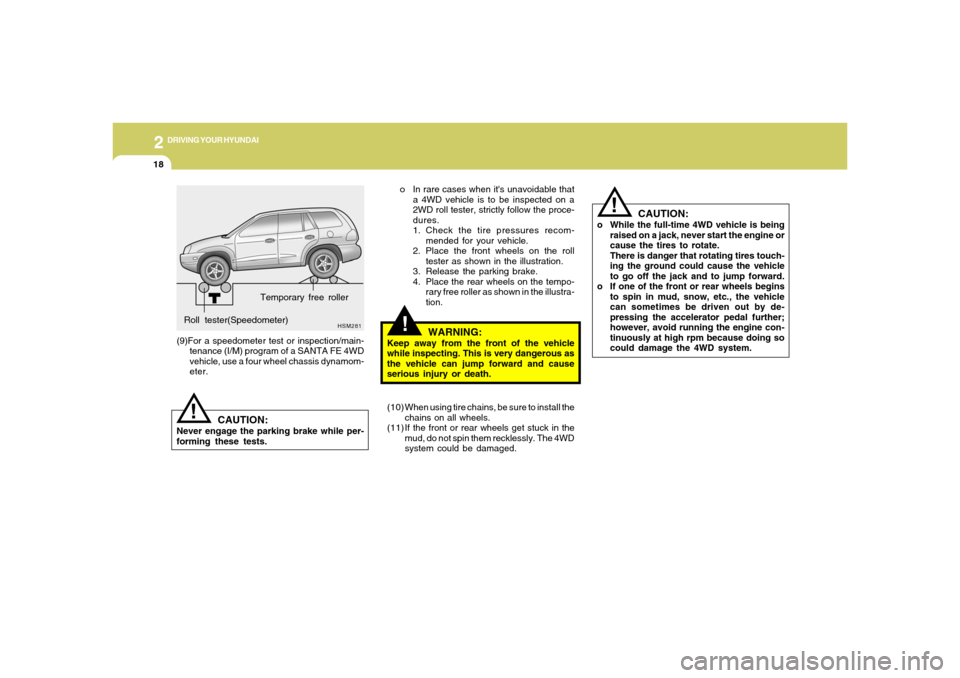
system could be damaged. o In rare cases when it's unavoidable that
a 4WD vehicle is to be inspected on a
2WD roll tester, strictly follow the proce-
dures.
1. Check the tire pressures recom-
mended for your vehicle.
2. Place the front wheels on the roll
tester as shown in the illustration.
3. Release the parking brake.
4. Place the rear wheels on the tempo-
rary free roller as shown in the illustra-
tion.
!
WARNING:
Keep away from the front of the vehicle
while inspecting. This is very dangerous as
the vehicle can jump forward and cause
serious injury or death.
HSM281
Roll tester(Speedometer)Temporary free roller
CAUTION:
Never engage the parking brake while per-
forming these tests.
!
(9)For a speedometer test or inspection/main-
tenance (I/M) program of a SANTA FE 4WD
vehicle, use a four wheel chassis dynamom-
eter.
Page 171 of 281
2
DRIVING YOUR HYUNDAI
20
DRIVING FOR ECONOMYC140A02A-AATYou can save fuel and get more miles from your
car if you follow these suggestions:
o Drive smoothly. Accelerate at a moderate
rate. Don't make "jack-rabbit" starts or full-
throttle shifts and maintain a steady cruising
speed. Don't race between stoplights. Try to
adjust your speed to that of the other traffic
so you don't have to change speeds unnec-
essarily. Avoid heavy traffic whenever pos-
sible. Always maintain a safe distance from
other vehicles so you can avoid unneces-
sary braking. This also reduces brake wear.
o Drive at a moderate speed. The faster you
drive, the more fuel your car uses. Driving at
a moderate speed, especially on the high-
way, is one of the most effective ways to
reduce fuel consumption.
o Don't "ride" the brake or clutch pedal. This
can increase fuel consumption and also
increase wear on these components. In
addition, driving with your foot resting on the
brake pedal may cause the brakes to over-
heat, which reduces their effectiveness and
may lead to more serious consequences.
o Take care of your tires. Keep them inflated
to the recommended pressure. Incorrect
inflation, either too much or too little, results
in unnecessary tire wear. Check the tire
pressures at least once a month. o Under some conditions your parking brake
can freeze in the engaged position. This is
most likely to happen when there is an ac-
cumulation of snow or ice around or near the
rear brakes or if the brakes are wet. If there
is a risk that the parking brake may freeze,
apply it only temporarily while you put the
gear selector lever in "P" and block the rear
wheels so the car cannot roll. Then release
the parking brake.
o Do not hold the vehicle on the upgrade with
the accelerator pedal. This can cause the
transaxle to overheat. Always use the brake
pedal or parking brake. o Don't coast down hills with the car out of gear.
This is extremely hazardous. Keep the car
in gear at all times, use the brakes to slow
down, then shift to a lower gear so that engine
braking will help you maintain a safe speed.
o Don't "ride" the brake pedal. Resting your
foot on the brake pedal while driving can be
dangerous because it can result in the brakes
overheating and losing their effectiveness. It
also increases the wear of the brake com-
ponents.
o If a tire goes flat while you are driving, apply
the brakes gently and keep the car pointed
straight ahead while you slow down. When
you are moving slowly enough for it to be safe
to do so, pull off the road and stop in a safe
place.
o Don't let your car creep forward. To avoid
creeping forward, keep your foot firmly on
the brake pedal when the car is stopped.
o Use caution when parking on a hill. Firmly
engage the parking brake and place the gear
selector lever in "P". If your car is facing
downhill, turn the front wheels into the curb
to help keep the car from rolling. If your car
is facing uphill, turn the front wheels away
from the curb to help keep the car from
rolling. If there is no curb or if it is required by
other conditions to keep the car from rolling,
block the wheels.