seat removal Hyundai Santa Fe 2013 Owner's Manual
[x] Cancel search | Manufacturer: HYUNDAI, Model Year: 2013, Model line: Santa Fe, Model: Hyundai Santa Fe 2013Pages: 711, PDF Size: 14.72 MB
Page 37 of 711
Safety features of your vehicle
12 3
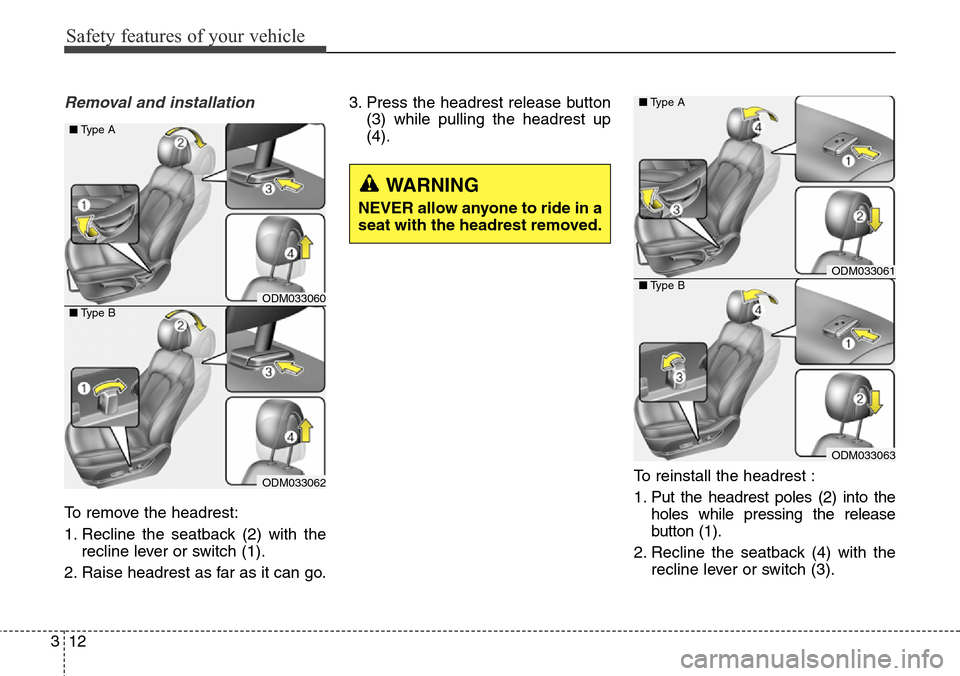
Removal and installation
To remove the headrest:
1. Recline the seatback (2) with the
recline lever or switch (1).
2. Raise headrest as far as it can go.3. Press the headrest release button
(3) while pulling the headrest up
(4).
To reinstall the headrest :
1. Put the headrest poles (2) into the
holes while pressing the release
button (1).
2. Recline the seatback (4) with the
recline lever or switch (3).
WARNING
NEVER allow anyone to ride in a
seat with the headrest removed.
ODM033060
ODM033062 ■Type A
■Type B
ODM033061
ODM033063 ■Type A
■Type B
Page 48 of 711

323
Safety features of your vehicle
Adjusting the height up and down
To raise the headrest :
1. Pull it up to the desired position
(1).
To lower the headrest :
1. Push and hold the release button
(2) on the headrest support
2. Lower the headrest to the desired
position (3).
Removal and installation
To remove the headrest :
1. Raise it as far as it can go.
2. Press the release button (1) while
pulling upward (2).
To reinstall the headrest :
1. Put the headrest poles (3) into the
holes while pressing the release
button (1).
2. Adjust the headrest to the appro-
priate height.
ODM032023ODM032024
(Continued)
• Do not operate the vehicle
with the headrests removed.
Severe injury to an occupant
may occur in the event of an
accident. Headrests may pro-
vide protection against severe
neck injuries when properly
adjusted.
CAUTION
When there is no occupant in
the rear seats, adjust the height
of the headrest to the lowest
position. The rear seat headrest
can reduce the visibility of the
rear area.
Page 569 of 711

619
What to do in an emergency
Then position the wrench as shown
in the drawing and tighten the wheel
nuts. Be sure the socket is seated
completely over the nut. Do not stand
on the wrench handle or use an
extension pipe over the wrench han-
dle.
Go around the wheel tightening
every other nut until they are all tight.
Then double-check each nut for
tightness. After changing wheels, we
recommend that the system be
checked by an authorized HYUNDAI
dealer.Wheel nut tightening torque:
Steel wheel & aluminium alloy wheel:
9~11 kg.m (65~79 lb.ft)
If you have a tire gauge, remove the
valve cap and check the air pressure.
If the pressure is lower than recom-
mended, drive slowly to the nearest
service station and inflate to the cor-
rect pressure. If it is too high, adjust
it until it is correct. Always reinstall
the valve cap after checking or
adjusting tire pressure. If the cap is
not replaced, air may leak from the
tire. If you lose a valve cap, buy
another and install it as soon as pos-
sible.
After you have changed wheels,
always secure the flat tire in its place
and return the jack and tools to their
proper storage locations.
CAUTION
Your vehicle has metric threads
on the wheel studs and nuts.
Make certain during wheel
removal that the same nuts that
were removed are reinstalled -
or, if replaced, that nuts with
metric threads and the same
chamfer configuration are used.
Installation of a non-metric
thread nut on a metric stud or
vice-versa will not secure the
wheel to the hub properly and
will damage the stud so that it
must be replaced.
Note that most lug nuts do not
have metric threads. Be sure to
use extreme care in checking
for thread style before installing
aftermarket lug nuts or wheels.
If in doubt, we recommend that
you consult an authorized
HYUNDAI dealer.
ODM062011