switch Hyundai Santa Fe 2013 Owner's Manual
[x] Cancel search | Manufacturer: HYUNDAI, Model Year: 2013, Model line: Santa Fe, Model: Hyundai Santa Fe 2013Pages: 711, PDF Size: 14.72 MB
Page 16 of 711
Your vehicle at a glance
4 2
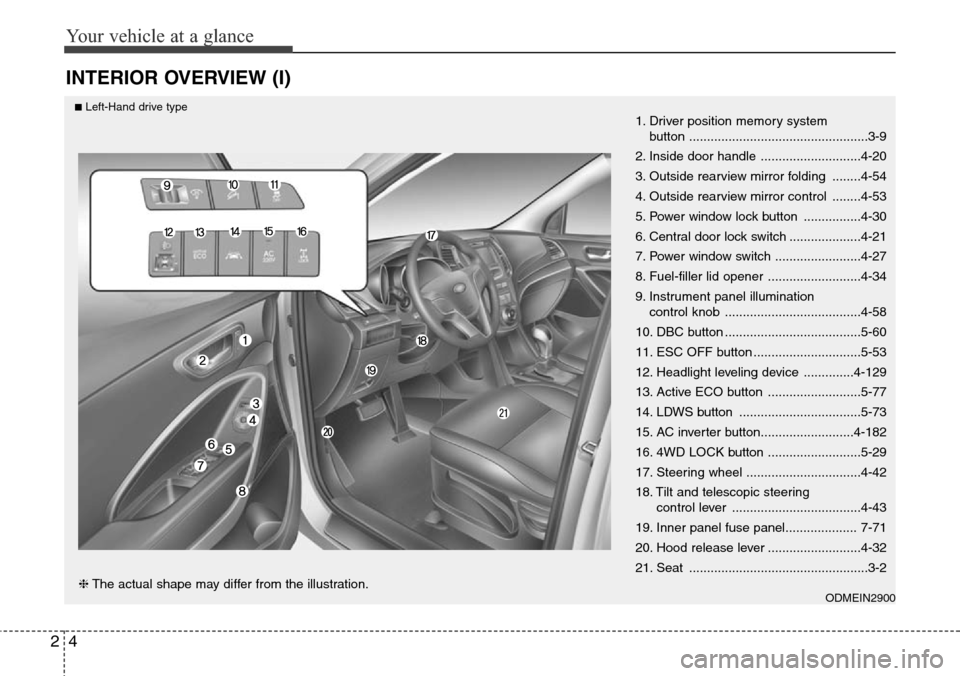
INTERIOR OVERVIEW (I)
1. Driver position memory system
button ..................................................3-9
2. Inside door handle ............................4-20
3. Outside rearview mirror folding ........4-54
4. Outside rearview mirror control ........4-53
5. Power window lock button ................4-30
6. Central door lock switch ....................4-21
7. Power window switch ........................4-27
8. Fuel-filler lid opener ..........................4-34
9. Instrument panel illumination
control knob ......................................4-58
10. DBC button ......................................5-60
11. ESC OFF button ..............................5-53
12. Headlight leveling device ..............4-129
13. Active ECO button ..........................5-77
14. LDWS button ..................................5-73
15. AC inverter button..........................4-182
16. 4WD LOCK button ..........................5-29
17. Steering wheel ................................4-42
18. Tilt and telescopic steering
control lever ....................................4-43
19. Inner panel fuse panel.................... 7-71
20. Hood release lever ..........................4-32
21. Seat ..................................................3-2
ODMEIN2900❈The actual shape may differ from the illustration.
■Left-Hand drive type
Page 17 of 711
25
Your vehicle at a glance
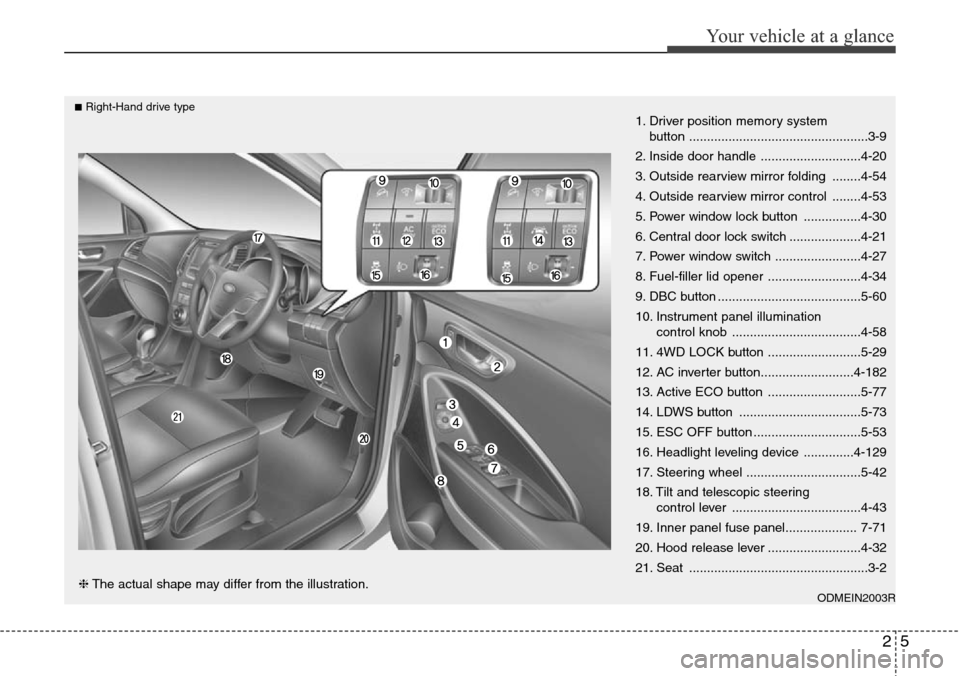
1. Driver position memory system
button ..................................................3-9
2. Inside door handle ............................4-20
3. Outside rearview mirror folding ........4-54
4. Outside rearview mirror control ........4-53
5. Power window lock button ................4-30
6. Central door lock switch ....................4-21
7. Power window switch ........................4-27
8. Fuel-filler lid opener ..........................4-34
9. DBC button ........................................5-60
10. Instrument panel illumination
control knob ....................................4-58
11. 4WD LOCK button ..........................5-29
12. AC inverter button..........................4-182
13. Active ECO button ..........................5-77
14. LDWS button ..................................5-73
15. ESC OFF button ..............................5-53
16. Headlight leveling device ..............4-129
17. Steering wheel ................................5-42
18. Tilt and telescopic steering
control lever ....................................4-43
19. Inner panel fuse panel.................... 7-71
20. Hood release lever ..........................4-32
21. Seat ..................................................3-2
ODMEIN2003R❈The actual shape may differ from the illustration.
■Right-Hand drive type
Page 18 of 711
Your vehicle at a glance
6 2
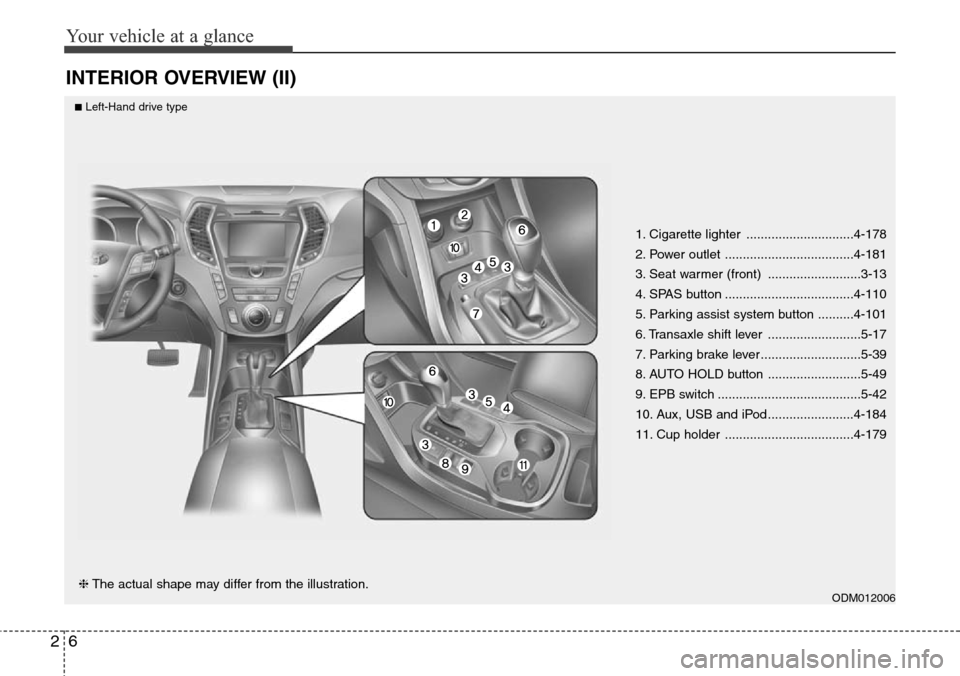
INTERIOR OVERVIEW (II)
1. Cigarette lighter ..............................4-178
2. Power outlet ....................................4-181
3. Seat warmer (front) ..........................3-13
4. SPAS button ....................................4-110
5. Parking assist system button ..........4-101
6. Transaxle shift lever ..........................5-17
7. Parking brake lever ............................5-39
8. AUTO HOLD button ..........................5-49
9. EPB switch ........................................5-42
10. Aux, USB and iPod ........................4-184
11. Cup holder ....................................4-179
ODM012006❈The actual shape may differ from the illustration.
■Left-Hand drive type
Page 19 of 711
27
Your vehicle at a glance
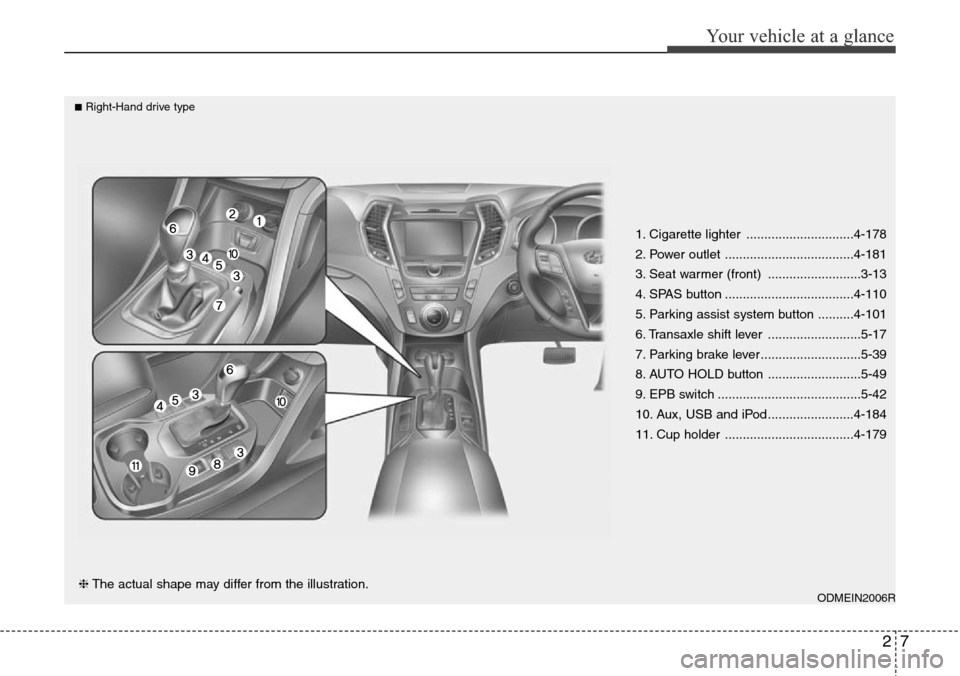
1. Cigarette lighter ..............................4-178
2. Power outlet ....................................4-181
3. Seat warmer (front) ..........................3-13
4. SPAS button ....................................4-110
5. Parking assist system button ..........4-101
6. Transaxle shift lever ..........................5-17
7. Parking brake lever ............................5-39
8. AUTO HOLD button ..........................5-49
9. EPB switch ........................................5-42
10. Aux, USB and iPod ........................4-184
11. Cup holder ....................................4-179
ODMEIN2006R❈The actual shape may differ from the illustration.
■Right-Hand drive type
Page 20 of 711
Your vehicle at a glance
8 2
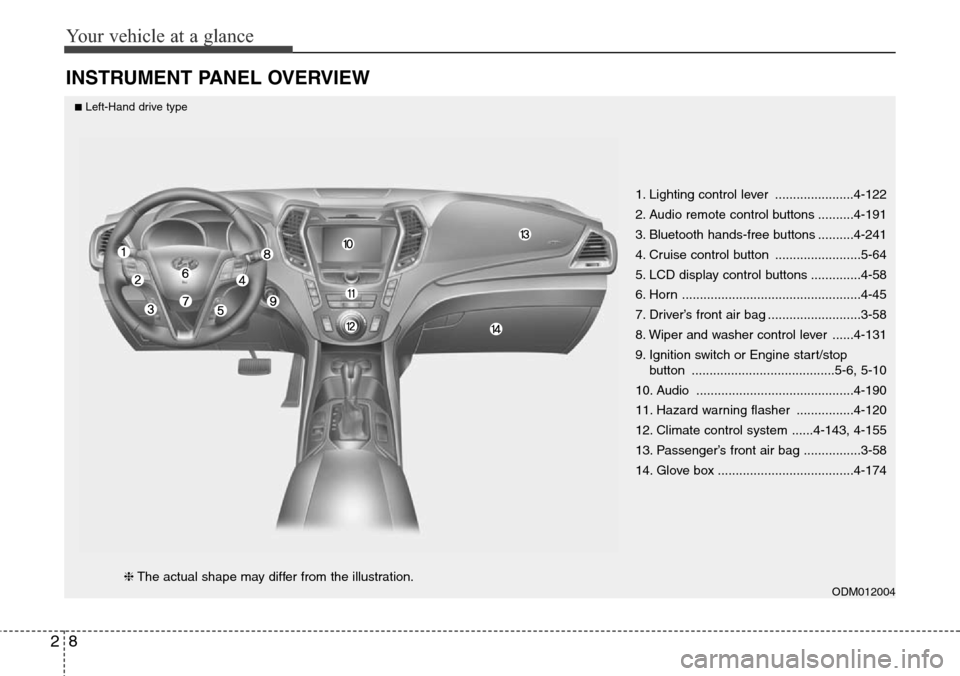
INSTRUMENT PANEL OVERVIEW
1. Lighting control lever ......................4-122
2. Audio remote control buttons ..........4-191
3. Bluetooth hands-free buttons ..........4-241
4. Cruise control button ........................5-64
5. LCD display control buttons ..............4-58
6. Horn ..................................................4-45
7. Driver’s front air bag ..........................3-58
8. Wiper and washer control lever ......4-131
9. Ignition switch or Engine start/stop
button ........................................5-6, 5-10
10. Audio ............................................4-190
11. Hazard warning flasher ................4-120
12. Climate control system ......4-143, 4-155
13. Passenger’s front air bag ................3-58
14. Glove box ......................................4-174
ODM012004❈The actual shape may differ from the illustration.
■Left-Hand drive type
Page 21 of 711
29
Your vehicle at a glance
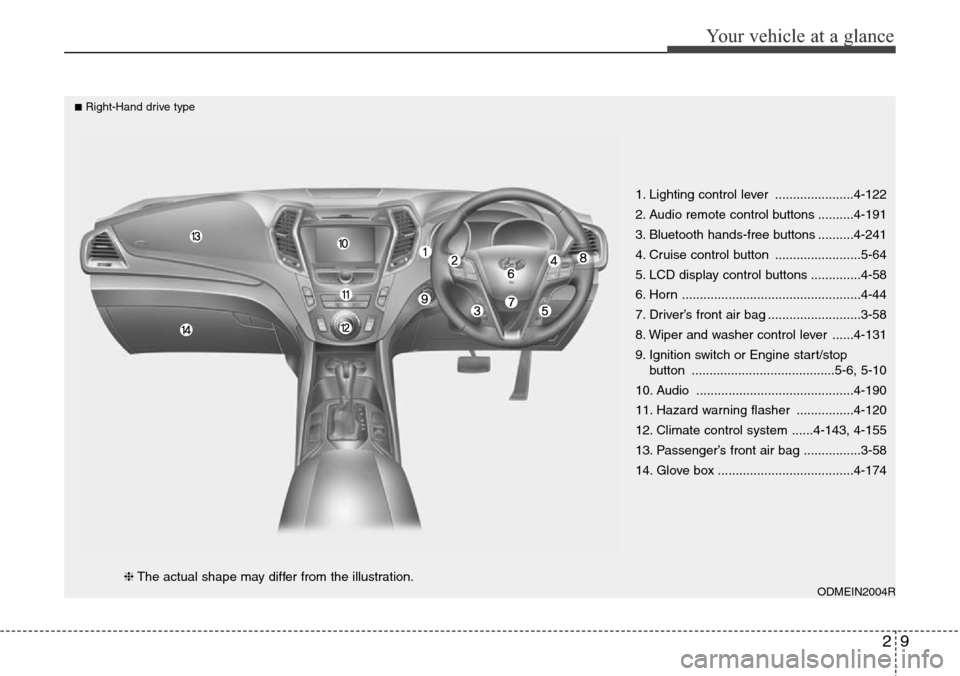
1. Lighting control lever ......................4-122
2. Audio remote control buttons ..........4-191
3. Bluetooth hands-free buttons ..........4-241
4. Cruise control button ........................5-64
5. LCD display control buttons ..............4-58
6. Horn ..................................................4-44
7. Driver’s front air bag ..........................3-58
8. Wiper and washer control lever ......4-131
9. Ignition switch or Engine start/stop
button ........................................5-6, 5-10
10. Audio ............................................4-190
11. Hazard warning flasher ................4-120
12. Climate control system ......4-143, 4-155
13. Passenger’s front air bag ................3-58
14. Glove box ......................................4-174
ODMEIN2004R❈The actual shape may differ from the illustration.
■Right-Hand drive type
Page 31 of 711
Safety features of your vehicle
6 3
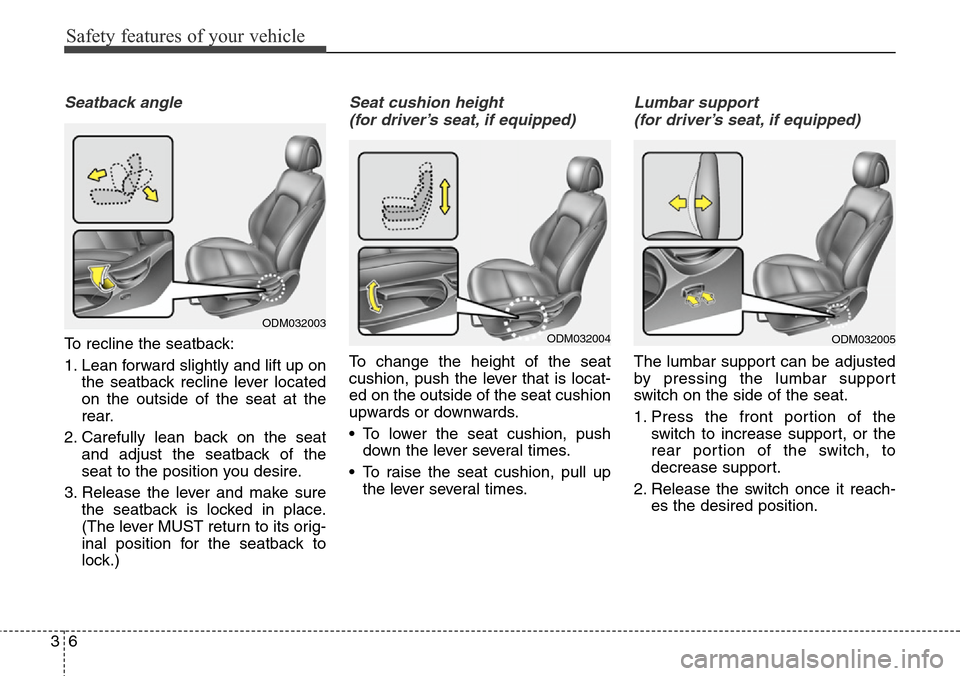
Seatback angle
To recline the seatback:
1. Lean forward slightly and lift up on
the seatback recline lever located
on the outside of the seat at the
rear.
2. Carefully lean back on the seat
and adjust the seatback of the
seat to the position you desire.
3. Release the lever and make sure
the seatback is locked in place.
(The lever MUST return to its orig-
inal position for the seatback to
lock.)
Seat cushion height
(for driver’s seat, if equipped)
To change the height of the seat
cushion, push the lever that is locat-
ed on the outside of the seat cushion
upwards or downwards.
• To lower the seat cushion, push
down the lever several times.
• To raise the seat cushion, pull up
the lever several times.
Lumbar support
(for driver’s seat, if equipped)
The lumbar support can be adjusted
by pressing the lumbar support
switch on the side of the seat.
1. Press the front portion of the
switch to increase support, or the
rear portion of the switch, to
decrease support.
2. Release the switch once it reach-
es the desired position.
ODM032003ODM032004ODM032005
Page 32 of 711
37
Safety features of your vehicle
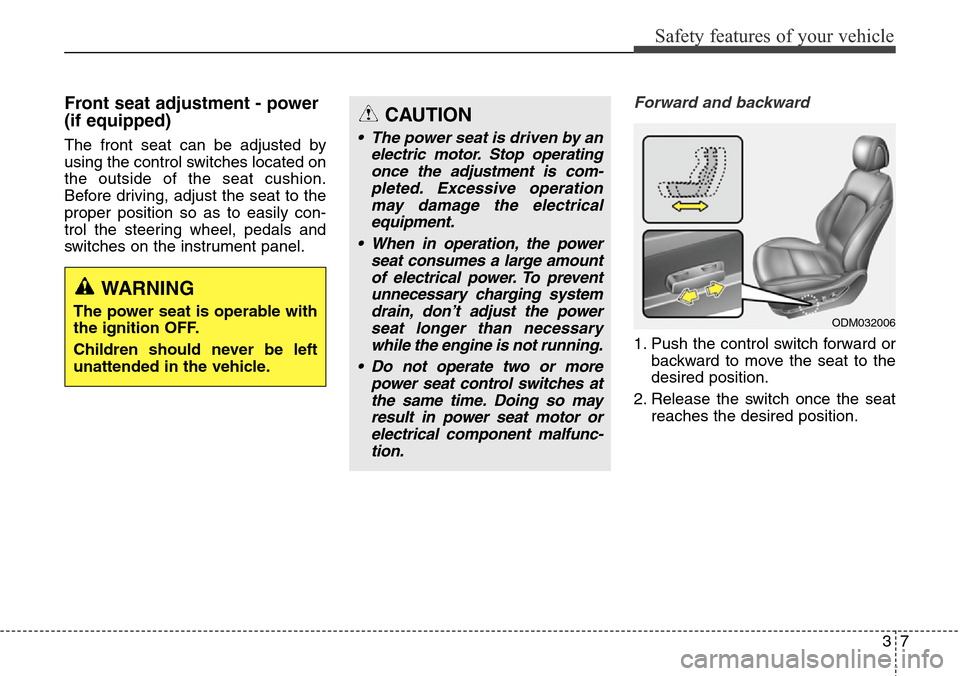
Front seat adjustment - power
(if equipped)
The front seat can be adjusted by
using the control switches located on
the outside of the seat cushion.
Before driving, adjust the seat to the
proper position so as to easily con-
trol the steering wheel, pedals and
switches on the instrument panel.
Forward and backward
1. Push the control switch forward or
backward to move the seat to the
desired position.
2. Release the switch once the seat
reaches the desired position.
CAUTION
• The power seat is driven by an
electric motor. Stop operating
once the adjustment is com-
pleted. Excessive operation
may damage the electrical
equipment.
• When in operation, the power
seat consumes a large amount
of electrical power. To prevent
unnecessary charging system
drain, don’t adjust the power
seat longer than necessary
while the engine is not running.
• Do not operate two or more
power seat control switches at
the same time. Doing so may
result in power seat motor or
electrical component malfunc-
tion.
WARNING
The power seat is operable with
the ignition OFF.
Children should never be left
unattended in the vehicle.ODM032006
Page 33 of 711
Safety features of your vehicle
8 3
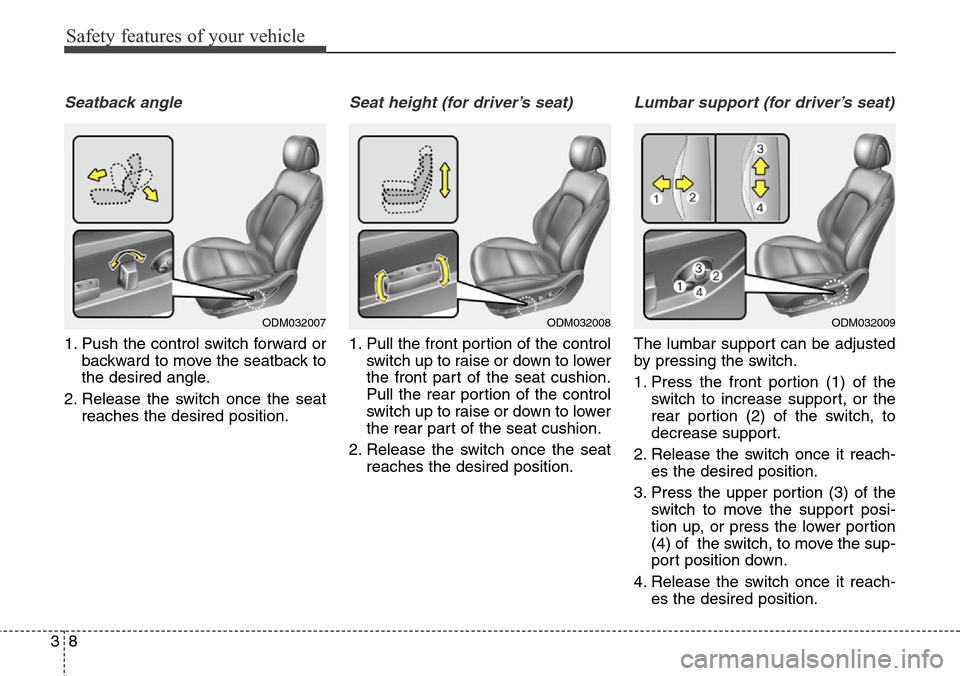
Seatback angle
1. Push the control switch forward or
backward to move the seatback to
the desired angle.
2. Release the switch once the seat
reaches the desired position.
Seat height (for driver’s seat)
1. Pull the front portion of the control
switch up to raise or down to lower
the front part of the seat cushion.
Pull the rear portion of the control
switch up to raise or down to lower
the rear part of the seat cushion.
2. Release the switch once the seat
reaches the desired position.
Lumbar support (for driver’s seat)
The lumbar support can be adjusted
by pressing the switch.
1. Press the front portion (1) of the
switch to increase support, or the
rear portion (2) of the switch, to
decrease support.
2. Release the switch once it reach-
es the desired position.
3. Press the upper portion (3) of the
switch to move the support posi-
tion up, or press the lower portion
(4) of the switch, to move the sup-
port position down.
4. Release the switch once it reach-
es the desired position.
ODM032007ODM032008ODM032009
Page 34 of 711
39
Safety features of your vehicle
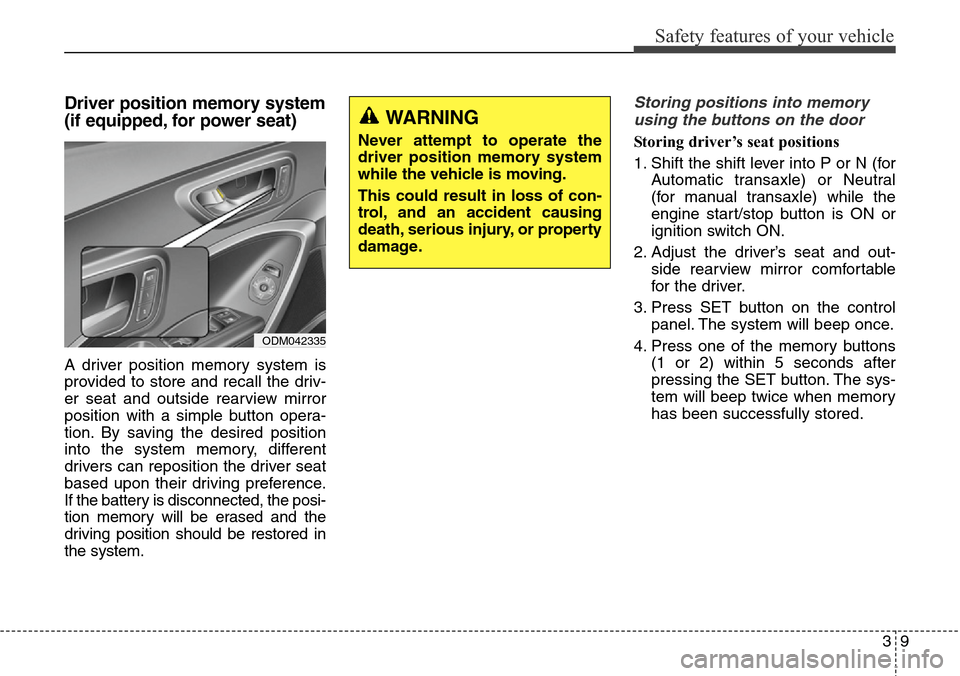
Driver position memory system
(if equipped, for power seat)
A driver position memory system is
provided to store and recall the driv-
er seat and outside rearview mirror
position with a simple button opera-
tion. By saving the desired position
into the system memory, different
drivers can reposition the driver seat
based upon their driving preference.
If the battery is disconnected, the posi-
tion memory will be erased and the
driving position should be restored in
the system.
Storing positions into memory
using the buttons on the door
Storing driver’s seat positions
1. Shift the shift lever into P or N (for
Automatic transaxle) or Neutral
(for manual transaxle) while the
engine start/stop button is ON or
ignition switch ON.
2. Adjust the driver’s seat and out-
side rearview mirror comfortable
for the driver.
3. Press SET button on the control
panel. The system will beep once.
4. Press one of the memory buttons
(1 or 2) within 5 seconds after
pressing the SET button. The sys-
tem will beep twice when memory
has been successfully stored.
WARNING
Never attempt to operate the
driver position memory system
while the vehicle is moving.
This could result in loss of con-
trol, and an accident causing
death, serious injury, or property
damage.
ODM042335