warning lights Hyundai Santa Fe 2016 - RHD (UK, Australia) Owner's Guide
[x] Cancel search | Manufacturer: HYUNDAI, Model Year: 2016, Model line: Santa Fe, Model: Hyundai Santa Fe 2016Pages: 699, PDF Size: 15.65 MB
Page 239 of 699
4141
Features of your vehicle
Headlight levelling device
(if equipped)
Manual type
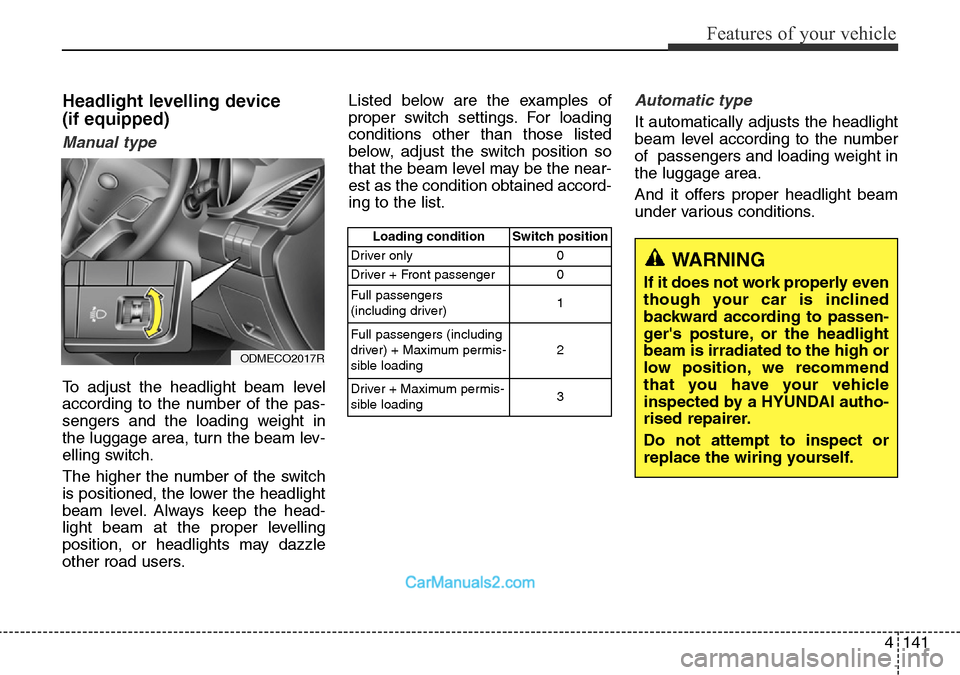
To adjust the headlight beam level
according to the number of the pas-
sengers and the loading weight in
the luggage area, turn the beam lev-
elling switch.
The higher the number of the switch
is positioned, the lower the headlight
beam level. Always keep the head-
light beam at the proper levelling
position, or headlights may dazzle
other road users.Listed below are the examples of
proper switch settings. For loading
conditions other than those listed
below, adjust the switch position so
that the beam level may be the near-
est as the condition obtained accord-
ing to the list.
Automatic type
It automatically adjusts the headlight
beam level according to the number
of passengers and loading weight in
the luggage area.
And it offers proper headlight beam
under various conditions.
ODMECO2017R
Loading condition Switch position
Driver only 0
Driver + Front passenger 0
Full passengers
(including driver)1
Full passengers (including
driver) + Maximum permis-
sible loading2
Driver + Maximum permis-
sible loading 3
WARNING
If it does not work properly even
though your car is inclined
backward according to passen-
ger's posture, or the headlight
beam is irradiated to the high or
low position, we recommend
that you have your vehicle
inspected by a HYUNDAI autho-
rised repairer.
Do not attempt to inspect or
replace the wiring yourself.
Page 244 of 699
Features of your vehicle
146 4
Use this function when the wind-
screen is dirty.
The spray and wiper operation will
continue until you release the lever.
If the washer does not work, check
the washer fluid level. If the fluid level
is not sufficient, you will need to add
appropriate non-abrasive wind-
screen washer fluid to the washer
reservoir.
The reservoir filler neck is located in
the front of the engine compartment
on the driver side.Headlight washer (if equipped)
If your vehicle is equipped with the
headlight washer it will operate at the
same time when you operate the
windshield washer. It will operate
when the headlight low beam is
turned on and the ignition switch or
engine start/stop button is in the ON
position.
The washer fluid will be sprayed on
to the headlights.
✽NOTICE
• Check the headlight washers peri-
odically to confirm that the wash-
er fluid is being sprayed properly
onto the headlight lenses.
• The headlight washer can be oper-
ated 15 minutes after being oper-
ated last time.
CAUTION
• To prevent possible damage
to the wipers or windscreen,
do not operate the wipers
when the windscreen is dry.
• To prevent damage to the
wiper blades, do not use
petrol, kerosene, paint thinner,
or other solvents on or near
them.
• To prevent damage to the
wiper arms and other compo-
nents, do not attempt to move
the wipers manually.
• To prevent possible damage
to the wipers and washer sys-
tem, use anti-freezing washer
fluids in the winter season or
cold weather.
CAUTION
To prevent possible damage to
the washer pump, do not oper-
ate the washer when the fluid
reservoir is empty.
WARNING
Do not use the washer in freez-
ing temperatures without first
warming the windscreen with
the defrosters; the washer solu-
tion could freeze on the wind-
screen and obscure your
vision.
Page 246 of 699
Features of your vehicle
148 4
Interior lamp AUTO cut
• When all entrances are closed, if
you lock the vehicle by using the
transmitter or the smart key, all
interior lamp will be off within 5
seconds.
• If you do not operate anything in
the vehicle after turning off the
engine, the lights will turn off after
20 minutes.
Map lamp
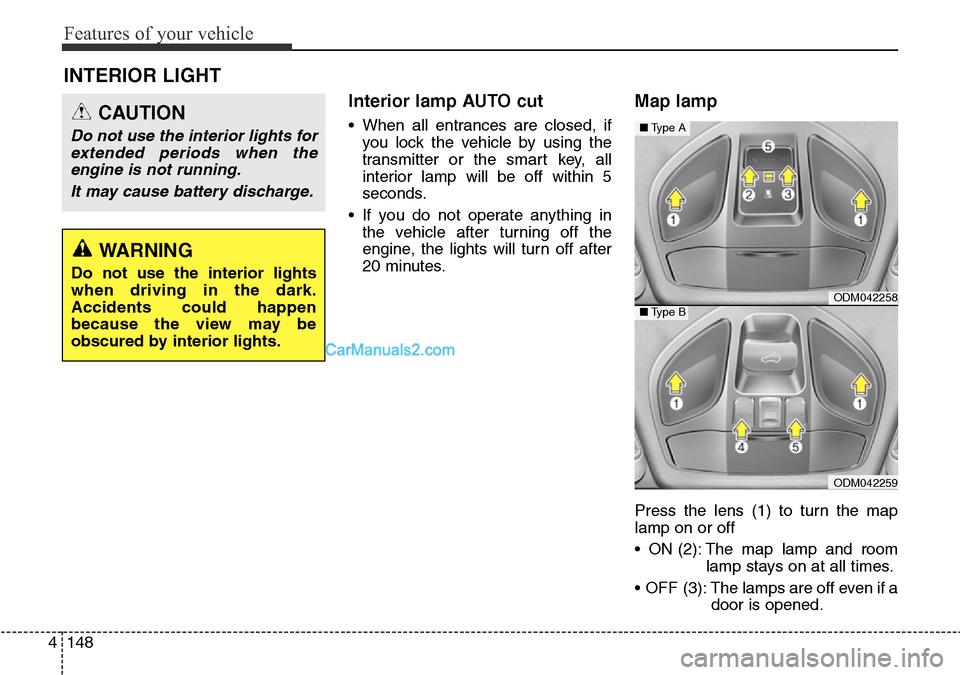
Press the lens (1) to turn the map
lamp on or off
• ON (2): The map lamp and room
lamp stays on at all times.
• OFF (3): The lamps are off even if a
door is opened.
INTERIOR LIGHT
CAUTION
Do not use the interior lights for
extended periods when the
engine is not running.
It may cause battery discharge.
WARNING
Do not use the interior lights
when driving in the dark.
Accidents could happen
because the view may be
obscured by interior lights.
ODM042258
ODM042259
■Type A
■Type B
Page 462 of 699
Driving your vehicle
4 5
Before entering vehicle
• Be sure that all windows, outside
mirror(s), and outside lights are
clean.
• Check the condition of the tyres.
• Check under the vehicle for any
sign of leaks.
• Be sure there are no obstacles
behind you if you intend to back up.
Necessary inspections
Fluid levels, such as engine oil,
engine coolant, brake fluid, and
washer fluid should be checked on a
regular basis, with the exact interval
depending on the fluid. Further
details are provided in section 7,
“Maintenance”.
Before starting
• Close and lock all doors.
• Position the seat so that all con-
trols are easily reached.
• Adjust the inside and outside
rearview mirrors.
• Be sure that all lights work.
• Check all gauges.
• Check the operation of warning
lights when the ignition switch is
turned to the ON position.
• Release the parking brake and
make sure the brake warning light
goes out.
For safe operation, be sure you are
familiar with your vehicle and its
equipment.
BEFORE DRIVING
WARNING
All passengers must be proper-
ly belted whenever the vehicle
is moving. Refer to “Seat belts”
in section 3 for more informa-
tion on their proper use.
WARNING
Driving whilst distracted can
result in a loss of vehicle con-
trol, that may lead to an acci-
dent, severe personal injury,
and death. The driver’s primary
responsibility is in the safe and
legal operation of a vehicle, and
use of any handheld devices,
other equipment, or vehicle sys-
tems which take the driver’s
eyes, attention and focus away
from the safe operation of a
vehicle or which are not permis-
sible by law should never be
used during operation of the
vehicle.
Page 464 of 699

Driving your vehicle
6 5
Illuminated ignition switch
(if equipped)
Whenever a front door is opened, the
ignition switch will be illuminated for
your convenience, provided the igni-
tion switch is not in the ON position.
The light will go off immediately
when the ignition switch is turned on
or go off after about 30 seconds
when the door is closed.
Ignition switch position
LOCK
The steering wheel locks to protect
against theft. The ignition key can be
removed only in the LOCK position.
When turning the ignition switch to
the LOCK position, push the key
inward at the ACC position and turn
the key toward the LOCK position.
ACC (Accessory)
The steering wheel is unlocked and
electrical accessories are operative.
✽NOTICE
If difficulty is experienced turning
the ignition switch to the ACC posi-
tion, turn the key whilst turning the
steering wheel right and left to
release the tension.
ON
The warning lights can be checked
before the engine is started. This is
the normal running position after the
engine is started.
Do not leave the ignition switch ON if
the engine is not running to prevent
battery discharge.
START
Turn the ignition switch to the START
position to start the engine. The
engine will crank until you release
the key; then it returns to the ON
position. The brake warning light can
be checked in this position.
KEY POSITIONS
ODMEDR2019OCM050002
Page 470 of 699

Driving your vehicle
12 5
ON
With manual transaxle
Press the engine start/stop button
when the button is in the ACC posi-
tion without depressing the clutch
pedal.
With automatic transaxle
Press the engine start/stop button
whilst it is in the ACC position without
depressing the brake pedal.
The warning lights can be checked
before the engine is started. Do not
leave the engine start/stop button in
the ON position for a long time. The
battery may discharge, because the
engine is not running.
START/RUN
With manual transaxle
To start the engine, depress the
clutch pedal and brake pedal, then
press the engine start/stop button
with the shift lever in the N (Neutral)
position.
With automatic transaxle
To start the engine, depress the
brake pedal and press the engine
start/stop button with the shift lever in
the P (Park) or the N (Neutral) posi-
tion. For your safety, start the engine
with the shift lever in the P (Park)
position.
✽ NOTICE
If you press the engine start/stop
button without depressing the clutch
pedal for manual transaxle vehicles
or without depressing the brake
pedal for automatic transaxle vehi-
cles, the engine will not start and the
engine start/stop button changes as
follow:
OFF
➔ACC ➔ON ➔OFF or ACC
✽ NOTICE
If you leave the engine start/stop
button in the ACC or ON position
for a long time, the battery will dis-
charge.
Not illuminated Blue
Page 480 of 699
Driving your vehicle
22 5
For smooth operation, depress the
brake pedal when shifting from N
(Neutral) to a forward or reverse
gear.Transaxle ranges
The indicator lights in the instrument
cluster displays the shift lever posi-
tion when the ignition switch is in the
ON position.
P (Park)
Always come to a complete stop
before shifting into P (Park). This
position locks the transaxle and pre-
vents the front wheels from rotating.
WARNING- Automatic
transaxle
• Always check the surrounding
areas near your vehicle for
people, especially children,
before shifting a vehicle into
D (Drive) or R (Reverse).
• Before leaving the driver’s
seat, always make sure the
shift lever is in the P (Park)
position; then set the parking
brake fully and shut the
engine off. Unexpected and
sudden vehicle movement
can occur if these precautions
are not followed in the order
identified.
• Do not use the engine brake
(shifting from a high gear to
lower gear) rapidly on slip-
pery roads. The vehicle may
slip causing an accident.
CAUTION
• To avoid damage to your
transaxle, do not accelerate
the engine in R (Reverse) or
any forward gear position with
the brakes on.
• When stopped on an upgrade,
do not hold the vehicle sta-
tionary with engine power.
Use the service brake or the
parking brake.
• Do not shift from N (Neutral)
or P (Park) into D (Drive), or R
(Reverse) when the engine is
above idle speed.
WARNING
• Shifting into P (Park) whilst
the vehicle is in motion will
cause the drive wheels to lock
which will cause you to lose
control of the vehicle.
• Do not use the P (Park) posi-
tion in place of the parking
brake. Always make sure the
shift lever is latched in the P
(Park) position and set the
parking brake fully.
• Never leave a child unattend-
ed in a vehicle.
Page 506 of 699
Driving your vehicle
48 5
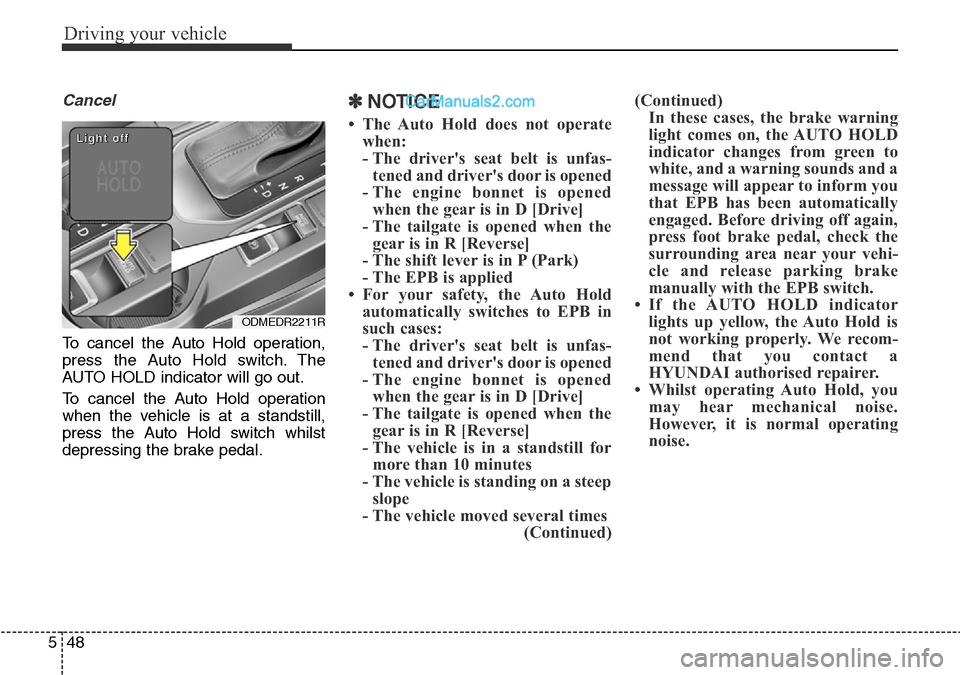
Cancel
To cancel the Auto Hold operation,
press the Auto Hold switch. The
AUTO HOLD indicator will go out.
To cancel the Auto Hold operation
when the vehicle is at a standstill,
press the Auto Hold switch whilst
depressing the brake pedal.
✽NOTICE
• The Auto Hold does not operate
when:
- The driver's seat belt is unfas-
tened and driver's door is opened
- The engine bonnet is opened
when the gear is in D [Drive]
- The tailgate is opened when the
gear is in R [Reverse]
- The shift lever is in P (Park)
- The EPB is applied
• For your safety, the Auto Hold
automatically switches to EPB in
such cases:
- The driver's seat belt is unfas-
tened and driver's door is opened
- The engine bonnet is opened
when the gear is in D [Drive]
- The tailgate is opened when the
gear is in R [Reverse]
- The vehicle is in a standstill for
more than 10 minutes
- The vehicle is standing on a steep
slope
- The vehicle moved several times
(Continued)(Continued)
In these cases, the brake warning
light comes on, the AUTO HOLD
indicator changes from green to
white, and a warning sounds and a
message will appear to inform you
that EPB has been automatically
engaged. Before driving off again,
press foot brake pedal, check the
surrounding area near your vehi-
cle and release parking brake
manually with the EPB switch.
• If the AUTO HOLD indicator
lights up yellow, the Auto Hold is
not working properly. We recom-
mend that you contact a
HYUNDAI authorised repairer.
• Whilst operating Auto Hold, you
may hear mechanical noise.
However, it is normal operating
noise.
ODMEDR2211R
L L
i i
g g
h h
t t
o o
f f
f f
Page 510 of 699
Driving your vehicle
52 5
The Electronic Stability Control
(ESC) system is an electronic sys-
tem designed to help the driver main-
tain vehicle control under adverse
conditions. It is not a substitute for
safe driving practices. Factors includ-
ing speed, road conditions and driv-
er steering input can all affect
whether ESC will be effective in pre-
venting a loss of control. It is still your
responsibility to drive and corner at
reasonable speeds and to leave a
sufficient margin of safety.
When you apply your brakes under
conditions which may lock the
wheels, you may hear a “tik-tik’’
sound from the brakes, or feel a cor-
responding sensation in the brake
pedal. This is normal and it means
your ESC is active.
✽NOTICE
A click sound may be heard in the
engine compartment when the vehi-
cle begins to move after the engine is
started. These conditions are normal
and indicate that the Electronic
Stability Control (ESC) System is
functioning properly.
ESC operation
ESC ON condition
• When the ignition is turned
ON, ESC and ESC OFF
indicator lights illuminate
for approximately 3 sec-
onds, then ESC is turned
on.
• Press the ESC OFF but-
ton for at least half a sec-
ond after turning the igni-
tion ON to turn ESC off.
(ESC OFF indicator will
illuminate). To turn the
ESC on, press the ESC
OFF button (ESC OFF
indicator light will go off).
• When starting the engine,
you may hear a slight tick-
ing sound. This is the ESC
performing an automatic
system self-check and
does not indicate a prob-
lem.
-
WARNING
Never drive too fast for the road
conditions or too quickly when
cornering. Electronic stability
control (ESC) will not prevent
accidents. Excessive speed in
turns, abrupt manoeuvres and
hydroplaning on wet surfaces
can still result in serious acci-
dents. Only a safe and attentive
driver can prevent accidents by
avoiding manoeuvres that
cause the vehicle to lose trac-
tion. Even with ESC installed,
always follow all the normal pre-
cautions for driving - including
driving at safe speeds for the
conditions.
Page 550 of 699
Driving your vehicle
92 5
Turn signals when towing a trailer
When you tow a trailer, your vehicle
has to have a different turn signal
flasher and extra wiring. The green
arrows on your instrument panel will
flash whenever you signal a turn or
lane change. Properly connected,
the trailer lights will also flash to alert
other drivers you’re about to turn,
change lanes, or stop.
When towing a trailer, the green
arrows on your instrument panel will
flash for turns even if the bulbs on
the trailer are burned out. Thus, you
may think drivers behind you are
seeing your signals when, in fact,
they are not. It is important to check
occasionally to be sure the trailer
bulbs are still working. You must also
check the lights every time you dis-
connect and then reconnect the
wires.
Do not connect a trailer lighting sys-
tem directly to your vehicle’s lighting
system. Use only an approved trailer
wiring harness.
A HYUNDAI authorised repairer can
assist you in installing the wiring har-
ness.
Driving on grades
Reduce speed and shift to a lower
gear before you start down a long or
steep downgrade. If you don’t shift
down, you might have to use your
brakes so much that they would get
hot and no longer operate efficiently.
On a long uphill grade, shift down
and reduce your speed to around 45
mph (70 km/h) to reduce the possi-
bility of engine and transaxle over-
heating.
If your trailer weighs more than the
maximum trailer weight without trail-
er brakes and you have an automat-
ic transaxle, you should drive in D
(Drive) when towing a trailer.
Operating your vehicle in D (Drive)
when towing a trailer will minimise
heat build up and extend the life of
your transaxle.WARNING
Failure to use an approved trail-
er wiring harness could result
in damage to the vehicle electri-
cal system and/or personal
injury.