door lock HYUNDAI SANTA FE HYBRID 2021 Service Manual
[x] Cancel search | Manufacturer: HYUNDAI, Model Year: 2021, Model line: SANTA FE HYBRID, Model: HYUNDAI SANTA FE HYBRID 2021Pages: 598, PDF Size: 66.6 MB
Page 225 of 598
05
5-67
OTM050036
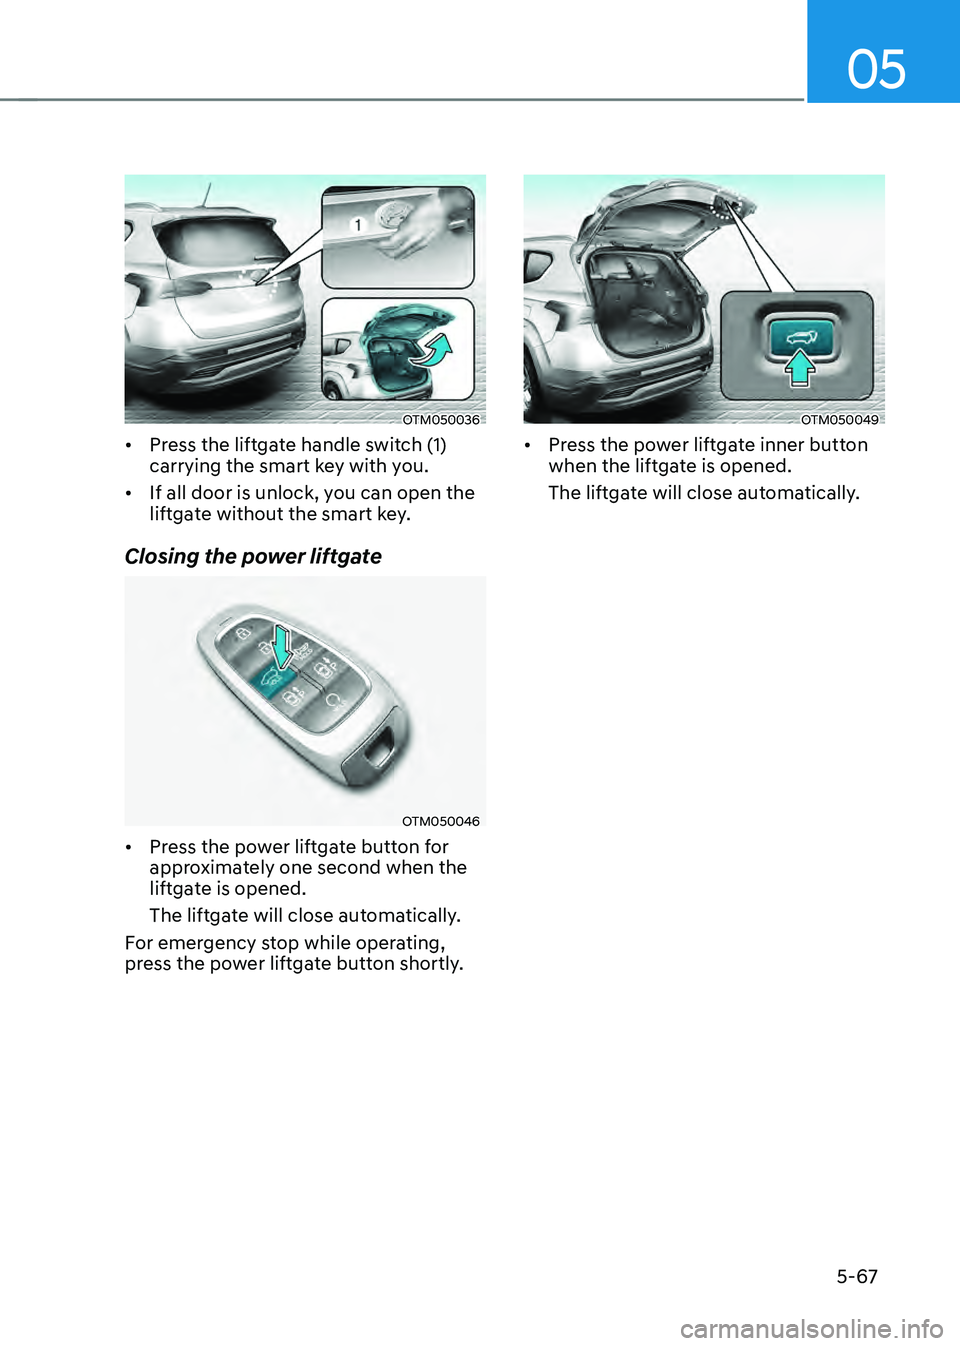
• Press the liftgate handle switch (1)
carrying the smart key with you.
• If all door is unlock, you can open the
liftgate without the smart key.
Closing the power liftgate
OTM050046
• Press the power liftgate button for
approximately one second when the
liftgate is opened.
The liftgate will close automatically.
For emergency stop while operating,
press the power liftgate button shortly.
OTM050049
• Press the power liftgate inner button
when the liftgate is opened.
The liftgate will close automatically.
Page 229 of 598
05
5-71
Smart liftgate (if equipped)
OTM050056
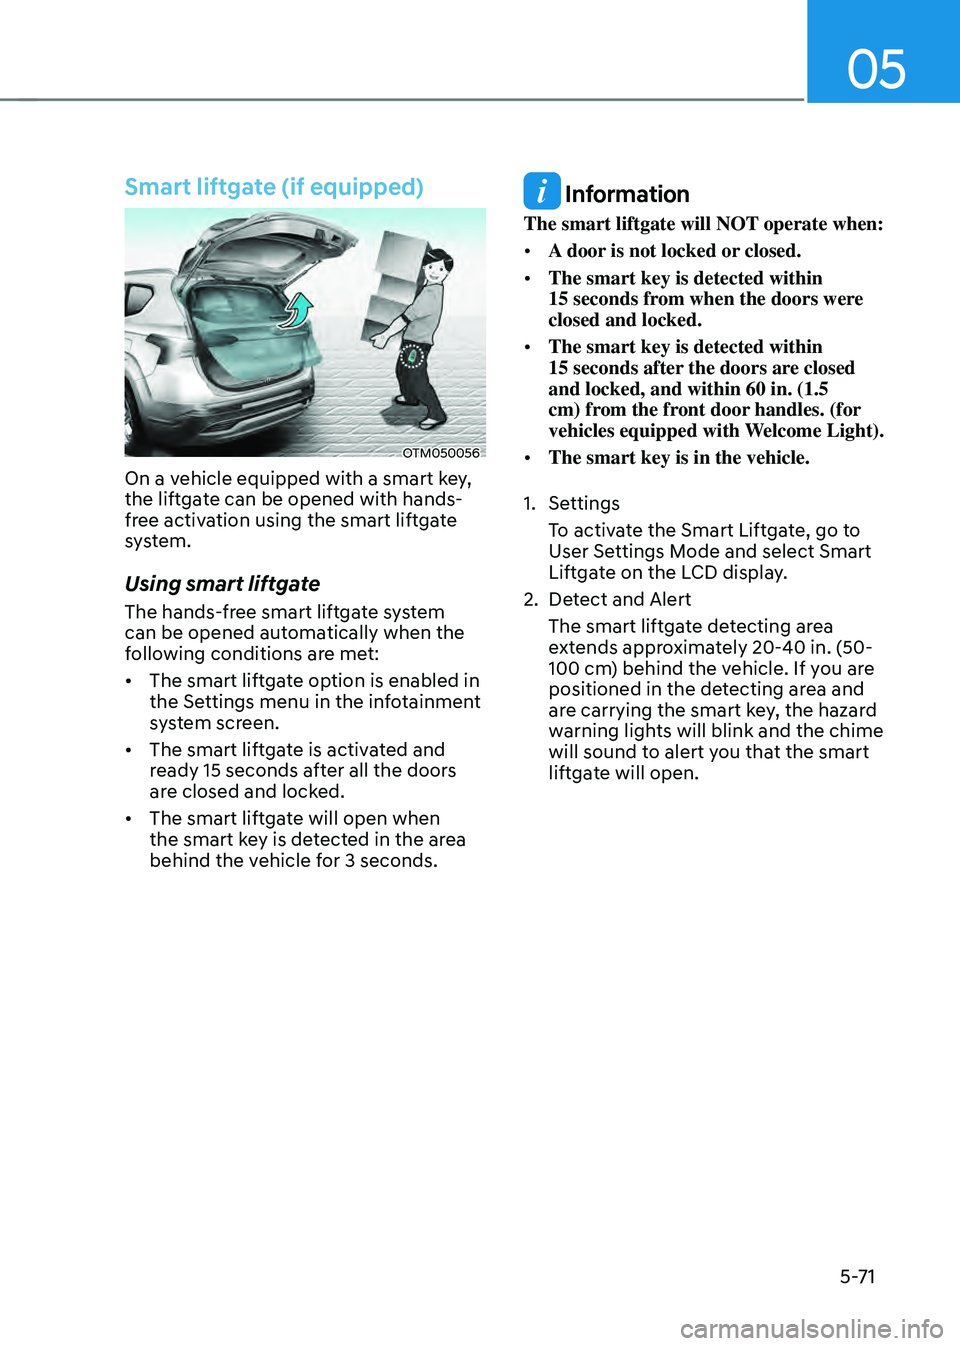
On a vehicle equipped with a smart key,
the liftgate can be opened with hands-
free activation using the smart liftgate
system.
Using smart liftgate
The hands-free smart liftgate system
can be opened automatically when the
following conditions are met:
• The smart liftgate option is enabled in
the Settings menu in the infotainment
system screen.
• The smart liftgate is activated and
ready 15 seconds after all the doors
are closed and locked.
• The smart liftgate will open when
the smart key is detected in the area
behind the vehicle for 3 seconds.
Information
The smart liftgate will NOT operate when:
• A door is not locked or closed.
• The smart key is detected within 15 seconds from when the doors were closed and locked.
• The smart key is detected within 15 seconds after the doors are closed and locked, and within 60 in. (1.5
cm) from the front door handles. (for
vehicles equipped with Welcome Light).
• The smart key is in the vehicle.
1. Settings
To activate the Smart Liftgate, go to
User Settings Mode and select Smart
Liftgate on the LCD display.
2. Detect and Alert
The smart liftgate detecting area
extends approximately 20-40 in. (50-
100 cm) behind the vehicle. If you are
positioned in the detecting area and
are carrying the smart key, the hazard
warning lights will blink and the chime
will sound to alert you that the smart
liftgate will open.
Page 230 of 598
Convenient features
5-72
Information
Do not approach the detecting area if you
do not want the liftgate to open. If you
have unintentionally entered the detecting
area and the hazard warning lights and
chime starts to operate, move away from
the area behind the vehicle with the smart
key. The liftgate will remain closed.
3. Automatic opening
After the hazard warning lights blink
and the chime sounds 6 times, the
smart liftgate will open.
Deactivating smart liftgate
„„Type A„„Type B
OTMA050009OTMA050010
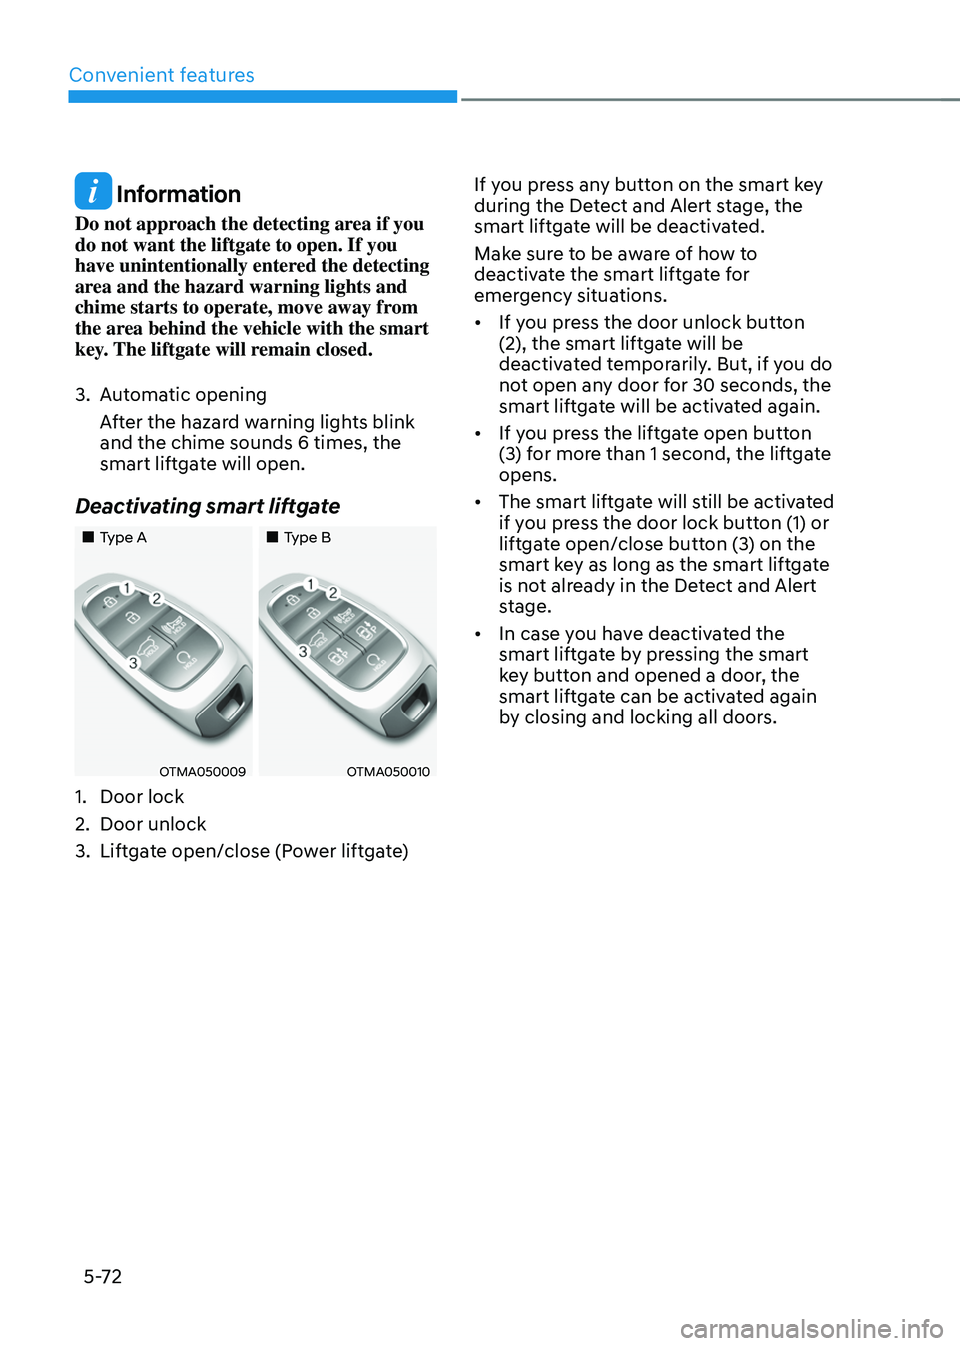
1. Door lock
2. Door unlock
3. Liftgate open/close (Power liftgate)If you press any button on the smart key
during the Detect and Alert stage, the
smart liftgate will be deactivated.
Make sure to be aware of how to
deactivate the smart liftgate for
emergency situations.
• If you press the door unlock button
(2), the smart liftgate will be
deactivated temporarily. But, if you do
not open any door for 30 seconds, the
smart liftgate will be activated again.
• If you press the liftgate open button
(3) for more than 1 second, the liftgate
opens.
• The smart liftgate will still be activated
if you press the door lock button (1) or
liftgate open/close button (3) on the
smart key as long as the smart liftgate
is not already in the Detect and Alert
stage.
• In case you have deactivated the
smart liftgate by pressing the smart
key button and opened a door, the
smart liftgate can be activated again
by closing and locking all doors.
Page 231 of 598
05
5-73
Detecting area
OTMH050002N
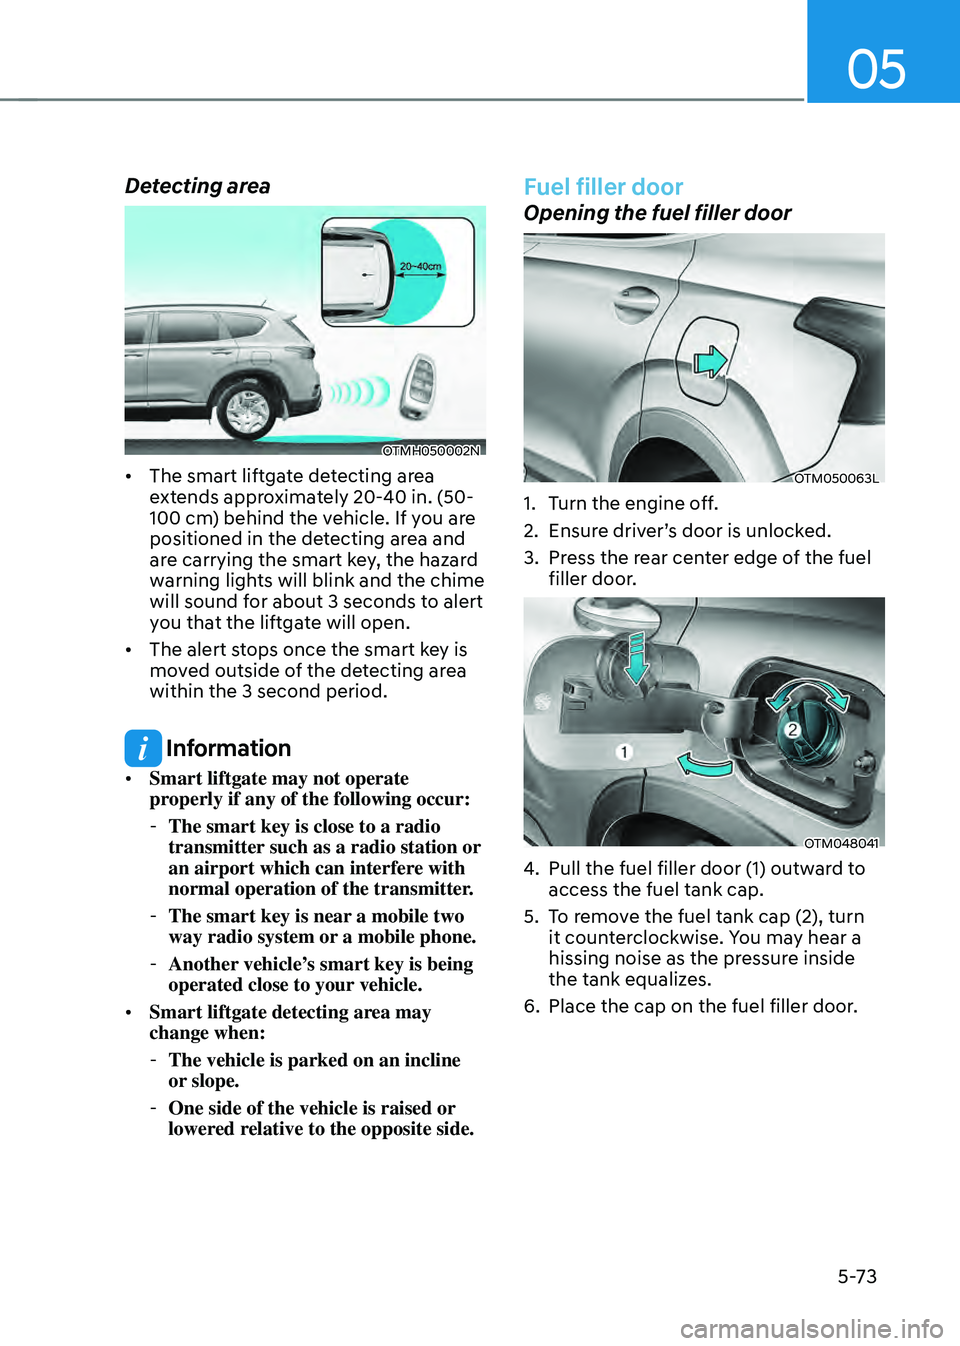
• The smart liftgate detecting area
extends approximately 20-40 in. (50-
100 cm) behind the vehicle. If you are
positioned in the detecting area and
are carrying the smart key, the hazard
warning lights will blink and the chime
will sound for about 3 seconds to alert
you that the liftgate will open.
• The alert stops once the smart key is
moved outside of the detecting area
within the 3 second period.
Information
• Smart liftgate may not operate
properly if any of the following occur:
-The smart key is close to a radio
transmitter such as a radio station or
an airport which can interfere with
normal operation of the transmitter.
-The smart key is near a mobile two
way radio system or a mobile phone.
-Another vehicle’s smart key is being
operated close to your vehicle.
• Smart liftgate detecting area may
change when:
-The vehicle is parked on an incline
or slope.
-One side of the vehicle is raised or
lowered relative to the opposite side.
Fuel filler door
Opening the fuel filler door
OTM050063L
1. Turn the engine off.
2. Ensure driver’s door is unlocked.
3. Press the rear center edge of the fuel
filler door.
OTM048041
4. Pull the fuel filler door (1) outward to
access the fuel tank cap.
5. To remove the fuel tank cap (2), turn
it counterclockwise. You may hear a
hissing noise as the pressure inside
the tank equalizes.
6. Place the cap on the fuel filler door.
Page 232 of 598
Convenient features
5 -74
Information
The fuel filler door will unlock when
driver’s door is unlocked.
To unlock fuel filler door:
• Press the unlock button on your smart
key
• Press the central door unlock button on
armrest trim of driver’s door
The fuel filler door will lock when
driver’s door is locked.
To lock fuel filler door:
• Press the lock button on your smart key
• Press the Central Door lock button on
armrest trim of driver’s door
à All doors will automatically lock after
the vehicle speed exceeds 9 mph. Fuel
filler door is also locked when vehicle
speed exceeds 9 mph.
Information
If the fuel filler door does not open
because ice has formed around it, tap
lightly or push on the door to break the
ice and release the door. Do not pry on the
door. If necessary, spray around the door
with an approved deicer fluid (do not use
radiator antifreeze) or move the vehicle to
a warm place and allow the ice to melt.
Closing the fuel filler door
1. To install the fuel tank cap, turn it
clockwise until it “clicks” one time.
2. Close the fuel filler door until it is
latched securely.
Information
Make the vehicle door to LOCK position
and the fuel filler door completely closed
in order to lock the fuel filler door.
If the fuel filler door is not completely
closed, the fuel filler door will not be
locked.
CAUTION
Keep the door into LOCK position when
the vehicle is being washed.
WARNING
Automotive fuel is highly flammable
and explosive. Failure to follow these
guidelines may result in SERIOUS
INJURY or DEATH:
• Read and follow all warnings posted
at the gas station.
• Before refueling, note the location
of the Emergency Fuel Shut-Off, if
available, at the gas station.
• Before touching the fuel nozzle, you
should eliminate the potential build-
up of static electricity by touching
a metal part of the vehicle, a safe
distance away from the fuel filler
neck, nozzle, or other gas source,
with your bare hand.
• Do not use mobile phones while
refueling. Electric current and/or
electronic interference from cellular
phones can potentially ignite fuel
vapors and cause a fire.
Page 239 of 598
05
5-81
Battery saver function
The purpose of this feature is to prevent
the battery from being discharged.
The system automatically turns off the
position lamp when the driver turns the
vehicle off and opens the driver-side
door.
With this feature, the position lamps will
turn off automatically if the driver parks
on the side of road at night.
If necessary, to keep the lamps on when
the vehicle is turned off, perform the
following:
(1) Open the driver-side door.
(2) Turn the position lamps OFF and ON
again using the headlamp switch on
the steering column.
Headlamp delay function
(if equipped)
If you place the ignition switch to the
ACC position or the OFF position with
the headlamps ON, the headlamps (and/
or position lamps) remain on for about
5 minutes. However, if the driver’s door
is opened and closed, the headlamps
are turned off after 15 seconds. Also,
with the vehicle off if the driver’s door is
opened and closed, the headlamps (and/
or position lamps) are turned off after 15
seconds.
The headlamps (and/or position lamps)
can be turned off by pressing the lock
button on the smart key twice or turning
the headlamp switch to the OFF or AUTO
position.
You can enable the headlamp delay
function by selecting ‘Setup → User
Settings → Lights → Headlight Delay.
NOTICE
If the driver exits the vehicle through
another door besides the driver
door, the battery saver function
does not operate and the headlamp
delay function does not turn OFF
automatically.
This may cause the battery to
discharge. To avoid battery discharge,
turn OFF the headlamps manually from
the headlamp switch before exiting the
vehicle.
Page 243 of 598
05
5-85
INTERIOR LIGHTS
WARNING
Do not use the interior lights when
driving in the dark. The interior lights
may obscure your view and cause an
accident.
NOTICE
Do not use the interior lights for
extended periods when the vehicle is
turned off or the battery will discharge.
Interior lamp AUTO cut
The interior lamps will automatically go
off approximately 10 minutes after the
vehicle is turned off and the doors are
closed. If a door is opened, the lamp
will go off 40 minutes after the vehicle
is turned off. If the doors are locked by
the smart key and the vehicle enters the
armed stage of the theft alarm system,
the lamps will go off five seconds later.
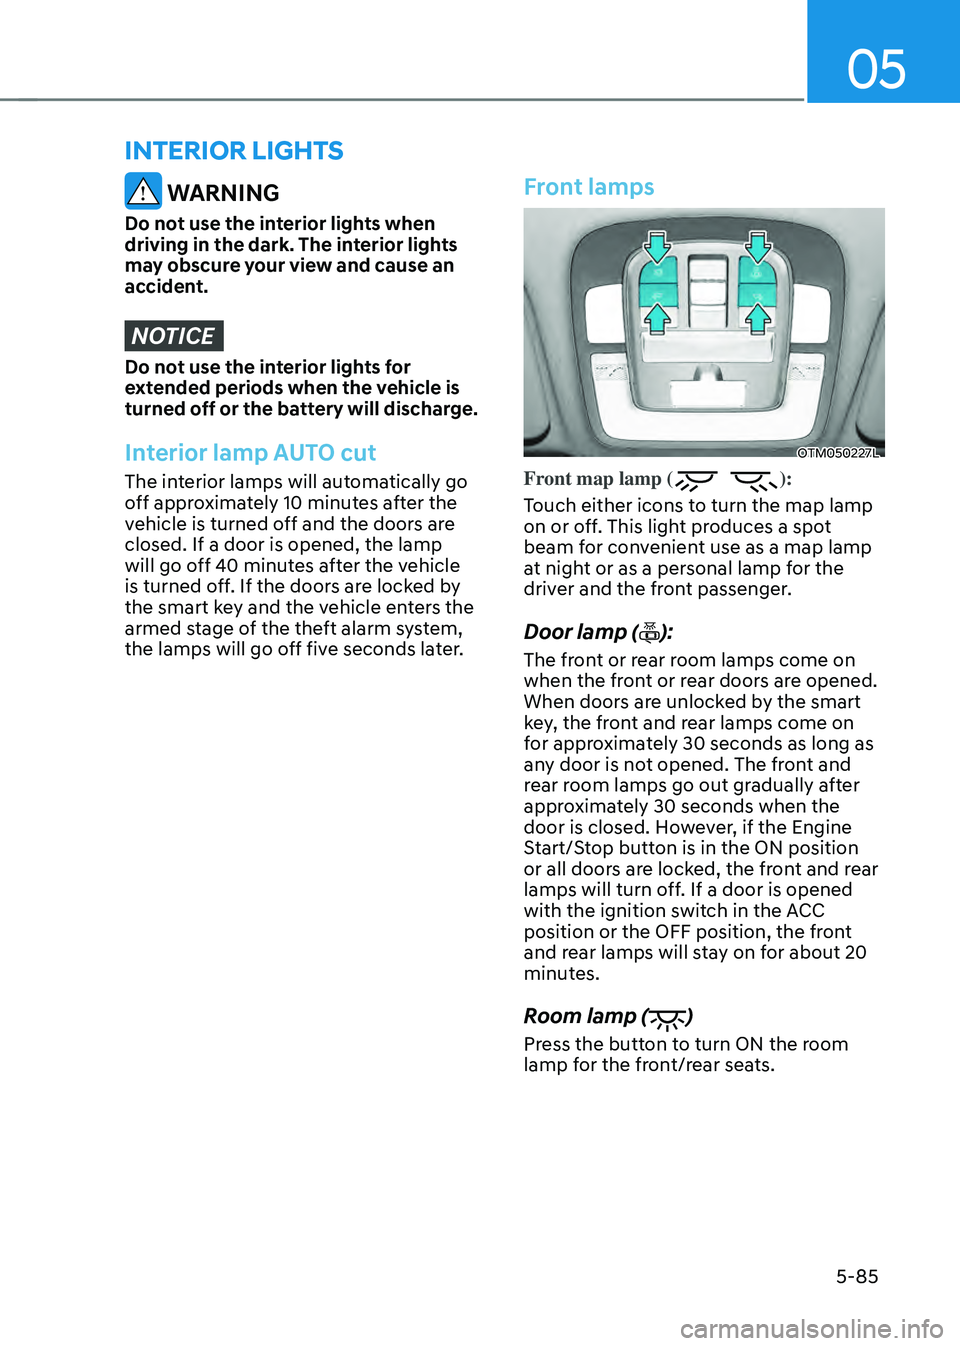
Front lamps
OTM050227L
Front map lamp ():
Touch either icons to turn the map lamp
on or off. This light produces a spot
beam for convenient use as a map lamp
at night or as a personal lamp for the
driver and the front passenger.
Door lamp ():
The front or rear room lamps come on
when the front or rear doors are opened.
When doors are unlocked by the smart
key, the front and rear lamps come on
for approximately 30 seconds as long as
any door is not opened. The front and
rear room lamps go out gradually after
approximately 30 seconds when the
door is closed. However, if the Engine
Start/Stop button is in the ON position
or all doors are locked, the front and rear
lamps will turn off. If a door is opened
with the ignition switch in the ACC
position or the OFF position, the front
and rear lamps will stay on for about 20
minutes.
Room lamp ()
Press the button to turn ON the room
lamp for the front/rear seats.
Page 245 of 598
05
5-87
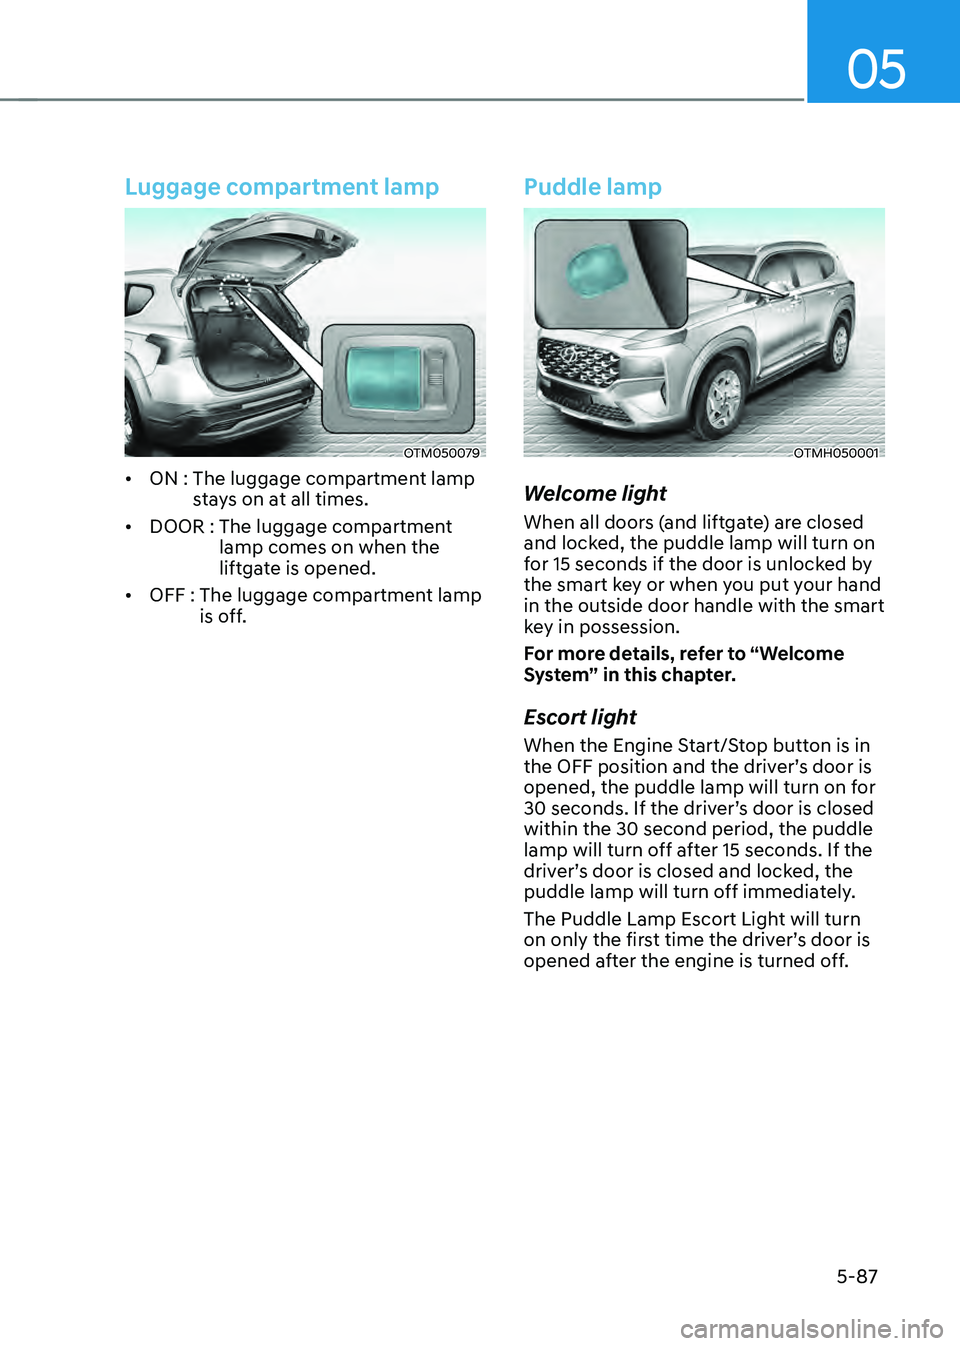
Luggage compartment lamp
OTM050079
• ON : The luggage compartment lamp stays on at all times.
• DOOR : The luggage compartment lamp comes on when the
liftgate is opened.
• OFF : The luggage compartment lamp is off.
Puddle lamp
OTMH050001
Welcome light
When all doors (and liftgate) are closed
and locked, the puddle lamp will turn on
for 15 seconds if the door is unlocked by
the smart key or when you put your hand
in the outside door handle with the smart
key in possession.
For more details, refer to “Welcome
System” in this chapter.
Escort light
When the Engine Start/Stop button is in
the OFF position and the driver’s door is
opened, the puddle lamp will turn on for
30 seconds. If the driver’s door is closed
within the 30 second period, the puddle
lamp will turn off after 15 seconds. If the
driver’s door is closed and locked, the
puddle lamp will turn off immediately.
The Puddle Lamp Escort Light will turn
on only the first time the driver’s door is
opened after the engine is turned off.
Page 246 of 598
Convenient features
5-88
Welcome system
OTMH050003
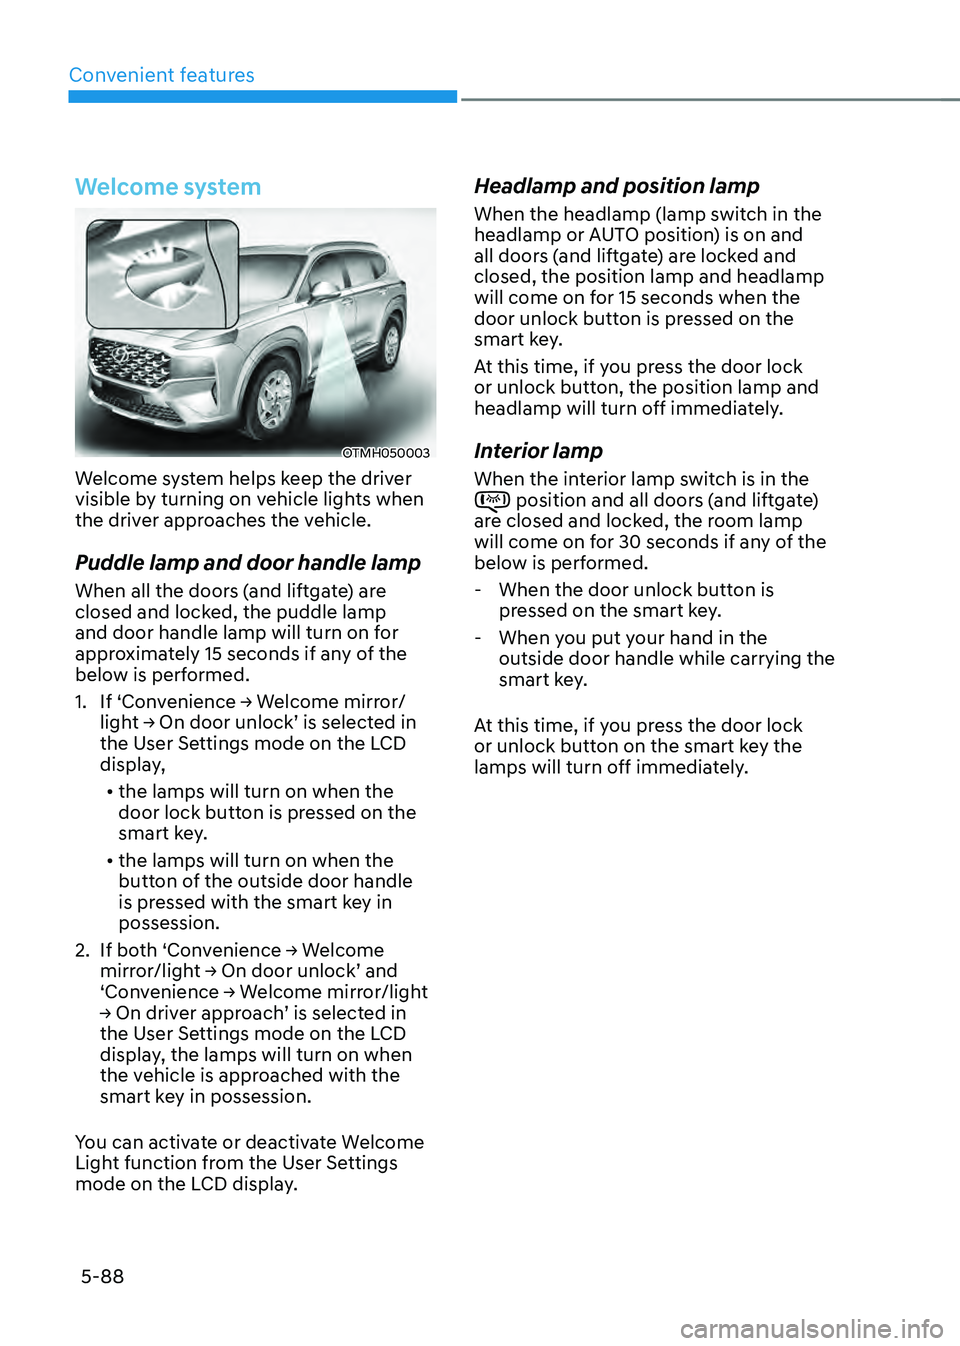
Welcome system helps keep the driver
visible by turning on vehicle lights when
the driver approaches the vehicle.
Puddle lamp and door handle lamp
When all the doors (and liftgate) are
closed and locked, the puddle lamp
and door handle lamp will turn on for
approximately 15 seconds if any of the
below is performed.
1. If ‘Convenience → Welcome mirror/
light → On door unlock’ is selected in
the User Settings mode on the LCD
display,
• the lamps will turn on when the
door lock button is pressed on the
smart key.
• the lamps will turn on when the
button of the outside door handle
is pressed with the smart key in
possession.
2. If both ‘Convenience → Welcome
mirror/light → On door unlock’ and
‘Convenience → Welcome mirror/light
→ On driver approach’ is selected in
the User Settings mode on the LCD
display, the lamps will turn on when
the vehicle is approached with the
smart key in possession.
You can activate or deactivate Welcome
Light function from the User Settings
mode on the LCD display.
Headlamp and position lamp
When the headlamp (lamp switch in the
headlamp or AUTO position) is on and
all doors (and liftgate) are locked and
closed, the position lamp and headlamp
will come on for 15 seconds when the
door unlock button is pressed on the
smart key.
At this time, if you press the door lock
or unlock button, the position lamp and
headlamp will turn off immediately.
Interior lamp
When the interior lamp switch is in the position and all doors (and liftgate) are closed and locked, the room lamp
will come on for 30 seconds if any of the
below is performed.
- When the door unlock button is
pressed on the smart key.
-When you put your hand in the
outside door handle while carrying the
smart key.
At this time, if you press the door lock
or unlock button on the smart key the
lamps will turn off immediately.
Page 275 of 598
05
5-117
The indicator light will blink orange for 10
seconds if there is a malfunction in the
wireless charging system.
In this case, temporarily stop the
charging process, and re-attempt to
charge your smart phone again.
The system warns you with a message on
the LCD display if the smart phone is still
on the wireless charging unit after the
vehicle is turned OFF and the front door
is opened.
For some manufacturer’s smart phones,
the system may not warn you even
though the smart phone is left on the
wireless charging unit. This is due to the
particular characteristic of the smart
phone and not a malfunction of the
wireless charging.
Information
For some manufacturers’ cellular phones,
the system may not warn you even though
the cellular phone is left on the wireless
charging unit. This is due to the particular
characteristic of the cellular phone and
not a malfunction of the wireless charging.
NOTICE
• The wireless smart phone charging
system may not support certain
smart phones, which are not verified
for the Qi specification (
).
• High speed wireless charging can
be activated only when the cellular
phones equipped with a wireless
charging function is on the charging
pad.
• During wireless charging, the
internal fan operates to prevent the
charging pad from becoming hot.
This may cause fan noise.
• When placing your smart phone on
the charging pad, position the phone
in the middle of the mat for optimal
charging performance. If your smart
phone is off to the side, the charging
rate may be less and in some cases
the smart phone may experience
higher heat conduction.
• In some cases, the wireless charging
may stop temporarily when the
smart key is used, either when
starting the vehicle or locking/
unlocking the doors, etc.
• When charging certain smart
phones, the charging indicator may
not change to blue when the smart
phone is fully charged.
• The wireless charging process may
temporarily stop, when temperature
abnormally increases inside the
wireless smart phone charging
system. The wireless charging
process restarts, when temperature
falls to a certain level.
• The wireless charging process may
temporarily stop when there is
any metallic item, such as a coin,
between the wireless smart phone
charging system and smart phone.