radio Hyundai Santa Fe Sport 2016 Owner's Manual
[x] Cancel search | Manufacturer: HYUNDAI, Model Year: 2016, Model line: Santa Fe Sport, Model: Hyundai Santa Fe Sport 2016Pages: 763, PDF Size: 37.75 MB
Page 2 of 763
F2Your Hyundai should not be modified in any way. Such modifications may adversely affect
the performance, safety or durability of your Hyundai and may, in addition, violate conditions
of the limited warranties covering the vehicle. Certain modifications may also be in violation
of regulations established by the U.S. Department of Transportation and other federal or
state agencies.
Your vehicle is equipped with electronic fuel injection and other electronic c\
omponents. It is
possible for an improperly installed/adjusted two-way radio or cellular telephone to adverse-
ly affect electronic systems. For this reason, we recommend that you carefully follow the
radio manufacturer's instructions or consult your Hyundai dealer for precautionary meas-
ures or special instructions if you choose to install one of these devices.
CAUTION: MODIFICATIONS TO YOUR HYUNDAI
TWO-WAY RADIO OR CELLULAR TELEPHONE INSTALLATION
AN HMA FOREWORD.QXP 2015-05-07 ¿ ¨˜ 4:12 Page 2
Page 98 of 763
Features of your vehicle
64
Liftgate (Tailgate) unlock (3)
The liftgate (tailgate) is unlocked if
the button is pressed for more than 1
second.
Also, once the liftgate (tailgate) is
opened and then closed, the liftgate
(tailgate) will be locked automatically.
Panic (4)
The horn sounds and hazard warn-
ing lights flash for about 30 seconds
if this button is pressed for more than
1.5 seconds. To stop the horn and
lights, press any button except the
trunk button on the transmitter.
Transmitter precautions
✽ ✽NOTICE
The transmitter will not work if any
of following occur:
• The ignition key is in the ignition switch.
• You exceed the operating distance limit (about 90 feet [30 m]).
• The battery in the transmitter is weak.
• Other vehicles or objects may be blocking the signal.
• The weather is extremely cold.
• The transmitter is close to a radio transmitter such as a radio substa-
tion or an airport which can inter-
fere with normal operation of the
transmitter.
When the transmitter does not work
correctly, open and close the door
with the ignition key. If you have a
problem with the transmitter, contact
an authorized HYUNDAI dealer. (Continued)(Continued)
• If the transmitter is in close prox-
imity to your mobile phone, the
signal could be blocked by your
mobile phones normal operational
signals. This is especially impor-
tant when the phone is active such
as making and receiving calls, text
messaging, and/or sending/receiv-
ing emails. Avoid placing the
transmitter and your mobile
phone in the same pants or jacket
pocket and always try to maintain
an adequate distance between the
two devices.
CAUTION
Keep the transmitter away from
water or any liquid and fire.
If the inside of the transmittergets damp (due to drinks ormoisture), or is heated, internalcircuit may malfunction, exclud-ing the car from the warranty.
AN HMA 4A.QXP 3/5/2015 3:17 PM Page 6
Page 106 of 763
Features of your vehicle
14
4
Smart key precautions
The smart key will not work if any
of the following occur:
- The smart key is close to a radio transmitter such as a radio sta-
tion or an airport which can inter-
fere with normal operation of the
smart key.
- The smart key is near a mobile two way radio system or a cellu-
lar phone.
- Another vehicle’s smart key is being operated close to your
vehicle.
When the smart key does not work correctly, open and close the door
with the mechanical key and contact
an authorized HYUNDAI dealer. If the smart key is in close proximi-
ty to your cell phone or smart
phone, the signal from the smart
key could be blocked by normal
operation of your cell phone or
smart phone. This is especially
important when the phone is active
such as making a call, receiving
calls, text messaging, and/or send-
ing/receiving emails. Avoid placing
the smart key and your cell phone
or smart phone in the same pants
or jacket pocket and maintain ade-
quate distance between the two
devices.
Smart key immobilizer system
Your vehicle is equipped with an
electronic engine immobilizer system
to reduce the risk of unauthorized
vehicle use.
Your immobilizer system is com-
prised of a small transponder in the
smart key and electronic devices
inside the vehicle.
With the immobilizer system, when-
ever you turn the engine start/stop
button to the ON position by pressing
the button while carrying the smart
key, it verifies if the smart key is valid
or not.
If the key is determined to be valid,
the engine will start.
If the key is determined to be invalid,
the engine will not start.
CAUTION
Keep the smart key away fromwater or any liquid and fire. Ifthe inside of the smart key getsdamp (due to drinks or mois-ture), or is heated, internal cir-cuit may malfunction, excludingthe car from the warranty.
AN HMA 4A.QXP 3/5/2015 3:18 PM Page 14
Page 128 of 763
Features of your vehicle
36
4
✽
✽
NOTICE
• The Smart Liftgate (Smart
Tailgate) function will not work if
any of the following occurs:
- The smart key is close to a radiotransmitter such as a radio sta-
tion or an airport which can
interfere with normal operation
of the transmitter.
- The smart key is near a mobile two way radio system or a cellu-
lar phone.
- Another vehicle's smart key is being operated close to your
vehicle.
• The detecting range may decrease or increase when :
- One side of the tire is raised toreplace a tire or to inspect the
vehicle.
- The vehicle is slantingly parked on a slope or unpaved road, etc.
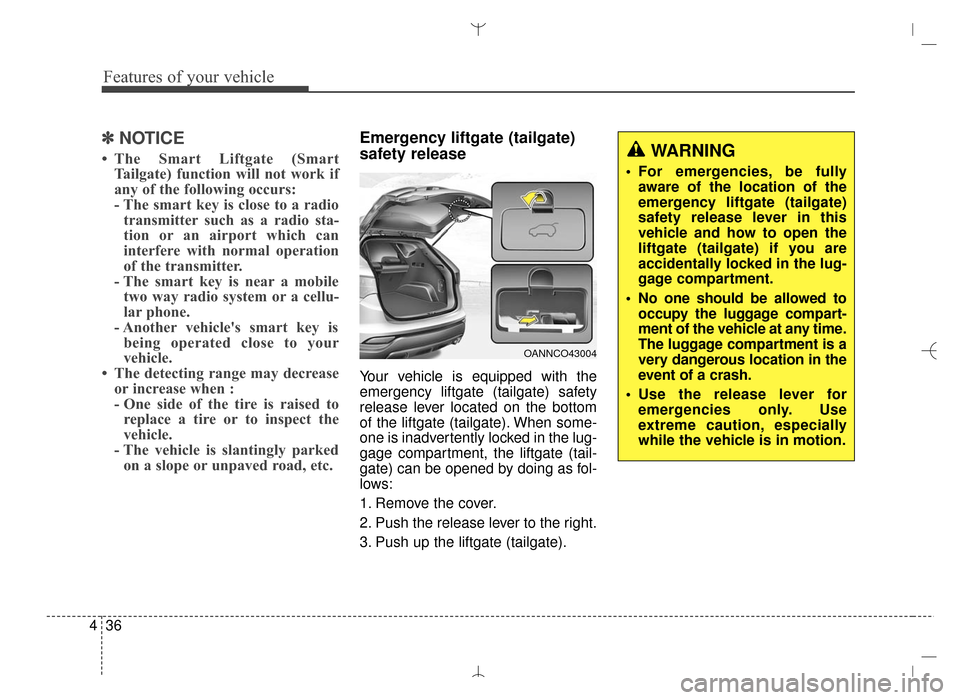
Emergency liftgate (tailgate)
safety release
Your vehicle is equipped with the
emergency liftgate (tailgate) safety
release lever located on the bottom
of the liftgate (tailgate). When some-
one is inadvertently locked in the lug-
gage compartment, the liftgate (tail-
gate) can be opened by doing as fol-
lows:
1. Remove the cover.
2. Push the release lever to the right.
3. Push up the liftgate (tailgate).
WARNING
For emergencies, be fully
aware of the location of the
emergency liftgate (tailgate)
safety release lever in this
vehicle and how to open the
liftgate (tailgate) if you are
accidentally locked in the lug-
gage compartment.
No one should be allowed to occupy the luggage compart-
ment of the vehicle at any time.
The luggage compartment is a
very dangerous location in the
event of a crash.
Use the release lever for emergencies only. Use
extreme caution, especially
while the vehicle is in motion.
OANNCO43004
AN HMA 4A.QXP 3/5/2015 3:18 PM Page 36
Page 156 of 763
Features of your vehicle
64
4
1. Press and hold the button for
more than 6 seconds. When the
compass memory is cleared a "C"
will appear in the display.
2. To calibrate the compass, drive the vehicle in 2 complete circles at
less than 5 mph (8 km/h).
Integrated HomeLink
®Wireless Control
System
The HomeLink
®Wireless Control
System provides a convenient way to
replace up to three hand-held radio-
frequency (RF) transmitters with a
single built-in device. This innovative
feature will learn the radio frequency
codes of most current transmitters to
operate devices such as gate opera-
tors, garage door openers, entry
door locks, security systems, even
home lighting. Both standard and
rolling code-equipped transmitters
can be programmed by following the
outlined procedures. Additional
HomeLink
®information can be found
at: www.homelink.com or by calling
1-800-355-3515. Retain the original transmitter of the
RF device you are programming for
use in other vehicles as well as for
future HomeLink
®programming. It is
also suggested that upon the sale of
the vehicle, the programmed
HomeLink
®buttons be erased for
security purposes.
CAUTION
Before programming HomeLink®
to a garage door opener or gate operator, make sure that peopleand objects are out of the way ofthe device to prevent potentialharm or damage. Do not useHomeLink
®with any garage door
opener that lacks the safety stop and reverse features required byU.S. federal safety standards(this includes any garage dooropener model manufacturedbefore April 1, 1982). A garagedoor that cannot detect an object- signaling the door to stop andreverse - does not meet currentU.S. federal safety standards.Using a garage door opener with-out these features increases therisk of serious injury or death.
AN HMA 4A.QXP 3/5/2015 3:18 PM Page 64
Page 157 of 763
465
Features of your vehicle
Programming HomeLink®
✽
✽NOTICE
• When programming a garage
door opener, it is advised to park
the vehicle outside of the garage.
• It is recommended that a new bat- tery be placed in the hand-held
transmitter of the device being pro-
grammed to HomeLink
®for quick-
er training and accurate transmis-
sion of the radio-frequency signal.
• Some vehicles may require the ignition switch to be turned to the
second (or "accessories") position
for programming and/or opera-
tion of HomeLink.
• In the event that there are still pro- gramming difficulties or questions
after following the programming
steps listed below, contact
HomeLink
®at: www.homelink.com
or 1-800-355-3515.
Standard programming
To train most devices, follow these
instructions:
1. For first-time programming, press
and hold the two outside buttons,
HomeLink
®Channel 1 and Channel
3 Buttons, until the indicator light
begins to flash (after 20 seconds).
Release both buttons. Do not hold
the buttons for longer than 30 sec-
onds.
2. Position the end of your hand-held transmitter 1-3 inches (2-8 cm)
away from the HomeLink
®buttons
while keeping the indicator light in
view.
3. Simultaneously press and hold both the HomeLink
®and hand-
held transmitter button. DO NOT
release the buttons until step 4
has been completed.
4. While continuing to hold the but- tons the red Indicator Status LED
will flash slowly and then rapidly
after HomeLink
®successfully
trains to the frequency signal from
the hand-held transmitter. Release
both buttons. 5. Press and hold the just-trained
HomeLink
®button and observe
the red Status Indicator LED. If the
indicator light stays on constantly,
programming is complete and
your device should activate when
the HomeLink
®button is pressed
and released.
6. To program the remaining two HomeLink
®buttons, follow steps 2
through 5.
AN HMA 4A.QXP 3/5/2015 3:18 PM Page 65
Page 163 of 763
471
Features of your vehicle
To adjust the Zone setting:
1. Determine the desired ZoneNumber based upon your current
location on the Zone Map.
2. Press and hold the button for 6 seconds, the current Zone
Number will appear on the display.
3. Pressing and holding the button again will cause the numbers to
increment (Note: they will repeat
…13, 14, 15, 1, 2, …). Releasing
the button when the desired Zone
Number appears on the display
will set the new Zone.
4. Within about 5 seconds the com- pass will start displaying a com-
pass heading again.
There are some conditions that can
cause changes to the vehicle mag-
nets, such as installing a ski rack or
a CB antenna. Body repair work on
the vehicle can also cause changes
to the vehicle's magnetic field. In
these situations, the compass will
need to be re-calibrated to quickly
correct for these changes. To re-cali-
brate the compass: 1. Press and hold the button for
more than 9 seconds. When the
compass memory is cleared a "C"
will appear in the display.
2. To calibrate the compass, drive the vehicle in 2 complete circles at
less than 5 mph (8 km/h). Integrated HomeLink®Wireless
Control System
The HomeLink
®Wireless Control
System provides a convenient way to
replace up to three hand-held radio-
frequency (RF) transmitters with a
single built-in device. This innovative
feature will learn the radio frequency
codes of most current transmitters to
operate devices such as gate opera-
tors, garage door openers, entry
door locks, security systems, even
home lighting. Both standard and
rolling code-equipped transmitters
can be programmed by following the
outlined procedures. Additional
HomeLink
®information can be found
at: www.homelink.com or by calling
1-800-355-3515.
AN HMA 4A.QXP 3/5/2015 3:18 PM Page 71
Page 164 of 763
Features of your vehicle
72
4
Retain the original transmitter of the
RF device you are programming for
use in other vehicles as well as for
future HomeLink
®programming. It is
also suggested that upon the sale of
the vehicle, the programmed
HomeLink
®buttons be erased for
security purposes. Programming HomeLink
®
✽ ✽
NOTICE
• When programming a garage
door opener, it is advised to park
the vehicle outside of the garage.
• It is recommended that a new bat- tery be placed in the hand-held
transmitter of the device being pro-
grammed to HomeLink
®for quick-
er training and accurate transmis-
sion of the radio-frequency signal.
• Some vehicles may require the ignition switch to be turned to the
second (or "accessories") position
for programming and/or opera-
tion of HomeLink.
• In the event that there are still pro- gramming difficulties or questions
after following the programming
steps listed below, contact
HomeLink
®at: www.homelink.com
or 1-800-355-3515.
WARNING
Before programming HomeLink®
to a garage door opener or gate
operator, make sure that people
and objects are out of the way of
the device to prevent potential
harm or damage. Do not use
HomeLink
®with any garage
door opener that lacks the safe-
ty stop and reverse features
required by U.S. federal safety
standards (this includes any
garage door opener model man-
ufactured before April 1, 1982).
A garage door that cannot
detect an object - signaling the
door to stop and reverse - does
not meet current U.S. federal
safety standards. Using a
garage door opener without
these features increases the
risk of serious injury or death.
AN HMA 4A.QXP 3/5/2015 3:18 PM Page 72
Page 262 of 763
Features of your vehicle
170
4
Steering wheel audio control
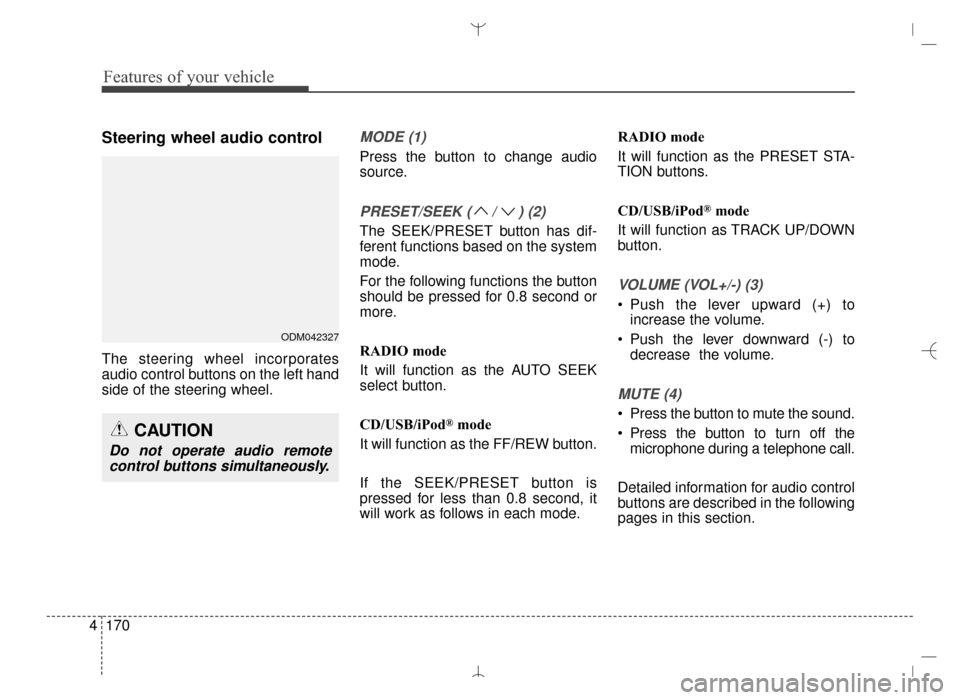
The steering wheel incorporates
audio control buttons on the left hand
side of the steering wheel.
MODE (1)
Press the button to change audio
source.
PRESET/SEEK ( / ) (2)
The SEEK/PRESET button has dif-
ferent functions based on the system
mode.
For the following functions the button
should be pressed for 0.8 second or
more.
RADIO mode
It will function as the AUTO SEEK
select button.
CD/USB/iPod
®mode
It will function as the FF/REW button.
If the SEEK/PRESET button is
pressed for less than 0.8 second, it
will work as follows in each mode. RADIO mode
It will function as the PRESET STA-
TION buttons.
CD/USB/iPod
®mode
It will function as TRACK UP/DOWN
button.
VOLUME (VOL+/-) (3)
• Push the lever upward (+) to increase the volume.
Push the lever downward (-) to decrease the volume.
MUTE (4)
Press the button to mute the sound.
Press the button to turn off themicrophone during a telephone call.
Detailed information for audio control
buttons are described in the following
pages in this section.
CAUTION
Do not operate audio remote control buttons simultaneously.
ODM042327
AN HMA 4C (169~AUDIO 1).QXP 6/25/2015 2:05 PM Page 170
Page 263 of 763
4171
Features of your vehicle
How vehicle audio works
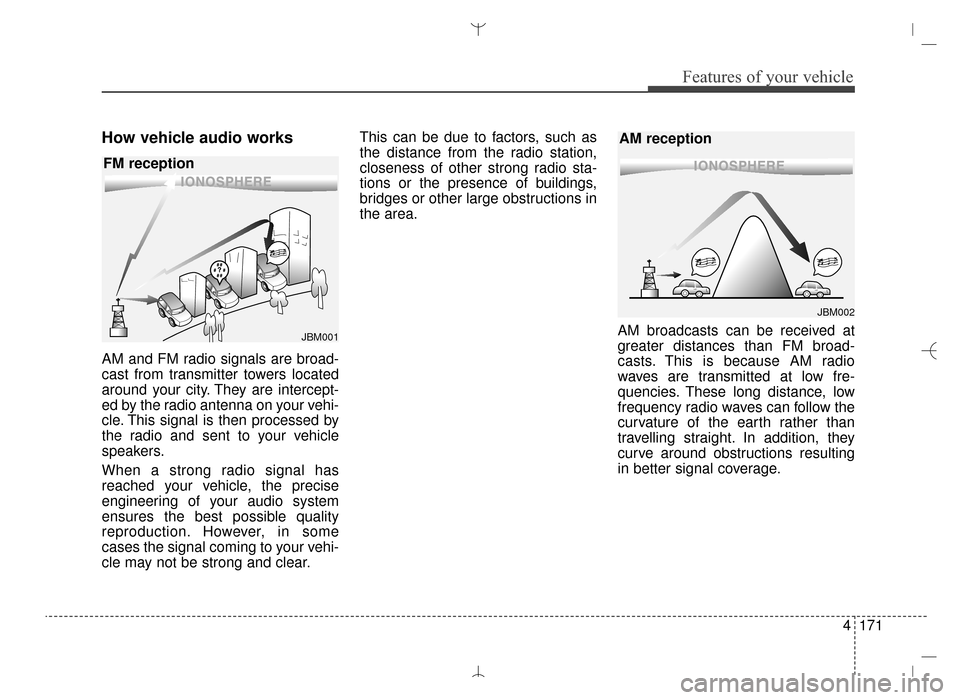
AM and FM radio signals are broad-
cast from transmitter towers located
around your city. They are intercept-
ed by the radio antenna on your vehi-
cle. This signal is then processed by
the radio and sent to your vehicle
speakers.
When a strong radio signal has
reached your vehicle, the precise
engineering of your audio system
ensures the best possible quality
reproduction. However, in some
cases the signal coming to your vehi-
cle may not be strong and clear.This can be due to factors, such as
the distance from the radio station,
closeness of other strong radio sta-
tions or the presence of buildings,
bridges or other large obstructions in
the area.
AM broadcasts can be received at
greater distances than FM broad-
casts. This is because AM radio
waves are transmitted at low fre-
quencies. These long distance, low
frequency radio waves can follow the
curvature of the earth rather than
travelling straight. In addition, they
curve around obstructions resulting
in better signal coverage.
JBM001
FM reception
JBM002
AM reception
AN HMA 4C (169~AUDIO 1).QXP 6/25/2015 2:05 PM Page 171