oil change Hyundai Terracan 2003 Owner's Manual
[x] Cancel search | Manufacturer: HYUNDAI, Model Year: 2003, Model line: Terracan, Model: Hyundai Terracan 2003Pages: 349, PDF Size: 4.56 MB
Page 67 of 349
FEATURES OF YOUR HYUNDAI 1- 59
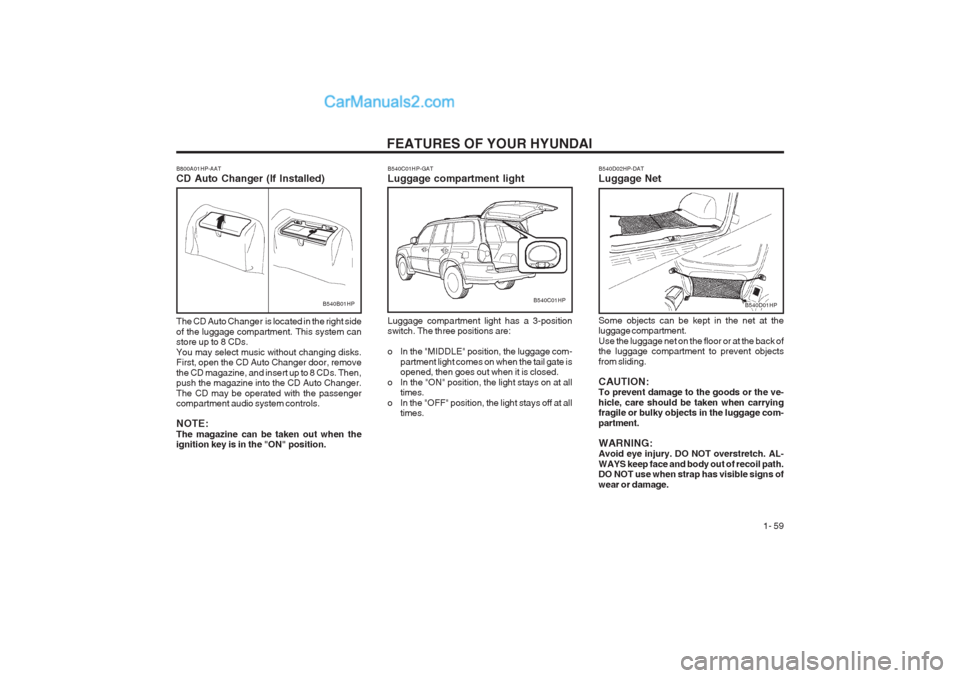
B540B01HPB540C01HP-GAT Luggage compartment light Luggage compartment light has a 3-position switch. The three positions are:
o In the "MIDDLE" position, the luggage com-
partment light comes on when the tail gate is opened, then goes out when it is closed.
o In the "ON" position, the light stays on at all times.
o In the "OFF" position, the light stays off at all times.B540C01HPB540D01HP
B800A01HP-AAT CD Auto Changer (If Installed) The CD Auto Changer is located in the right side of the luggage compartment. This system can store up to 8 CDs. You may select music without changing disks. First, open the CD Auto Changer door, remove the CD magazine, and insert up to 8 CDs. Then, push the magazine into the CD Auto Changer. The CD may be operated with the passenger compartment audio system controls. NOTE: The magazine can be taken out when the ignition key is in the "ON" position. B540D02HP-DAT Luggage Net Some objects can be kept in the net at the luggage compartment. Use the luggage net on the floor or at the back of the luggage compartment to prevent objects from sliding. CAUTION: To prevent damage to the goods or the ve- hicle, care should be taken when carrying fragile or bulky objects in the luggage com- partment. WARNING: Avoid eye injury. DO NOT overstretch. AL- WAYS keep face and body out of recoil path. DO NOT use when strap has visible signs of wear or damage.
Page 100 of 349
FEATURES OF YOUR HYUNDAI
1- 92
H290F02O-GAT
1. CD Select Button
o Insert the CD with the label facing upward.
o Insert the CD to start CD playback, during
radio operation or cassette tape playing.
o When a disc is in the CD deck, if you press the
CD/CDC button the CD player will beginplaying even if the radio or cassette player is being used.
o The CD player can be used when the ignition
switch is in either the "ON" or "ACC" position.
2. FF/REW ( / ) If you want to fast forward or reverse through the compact disc track, push and hold the FF ( ) or REW ( ) button. When you release the button, the compact disc player will resume playing.
3. TRACK UP/DOWN
o The desired track on the disc currently being played can be selected using the track num- ber.
o Press button once to skip forward to the
beginning of the next track. Press button once to skip back to the beginning of the track.
4. REPEAT
o To repeat the track you are currently listening to, press the RPT button. To cancel, press again. o If you do not release RPT operation when the
track ends, it will automatically be replayed. This process will be continued until you push the button again.
5. EQUALIZER Button Press the EQ button to select the CLASSIC, JAZZ, ROCK and DEFEAT MODE for the de- sired tone quality. Each press of the button changes the display as follows; NOTE:
o To assure proper operation of the unit,
keep the vehicle interior temperaturewithin a normal range by using the vehicle's air conditioning or heating sys- tem.
o When replacing the fuse, replace it with a
fuse having the correct capacity.
o The preset station frequencies are all
erased when the car battery is discon- nected. Therefore, all data will have to be set again if this should occur.
o Do not add any oil to the rotating parts.
Keep magnets, screwdrivers and other metallic objects away from the tape mecha- nism and head.
o This equipment is designed to be used
only in a 12 volt DC battery system with negative ground.
o This unit is made of precision parts. Do not attempt to disassemble or adjust any parts.
o When driving your vehicle, be sure to keep
the volume of the unit set low enough to allow you to hear sounds coming from the outside.
o Do not expose this equipment (including
the speakers and tape) to water or exces- sive moisture.
CAUTION: Do not insert warped or poor quality discs into the CD player as damage to the unit may occur.
CLASSIC � JAZZ � ROCK � DEFEAT
�
6. CD EJECT Button When the button is pressed with a CD loaded, the CD will eject.
7. SCAN Button (If installed)
o Press the SCAN button to playback the first 10 seconds of each track.
o Press the SCAN button again within 10 sec. when you have reached the desired track.
Page 107 of 349
DRIVING YOUR HYUNDAI 2- 1
2. DRIVING YOUR HYUNDAI
C010A01O-AAT
WARNING: ENGINE EXHAUST CAN BE DANGEROUS!
Engine exhaust fumes can be extremely dangerous. If, at any time, you smell exhaust fumes inside the vehicle, open the windows immediately. o Do not inhale exhaust fumes. Exhaust fumes contain carbon monoxide, a colorless, odorless gas that can cause unconsciousness and death by asphyxiation. o Be sure the exhaust system does not leak. The exhaust system should be checked whenever the vehicle is raised to change the oil or for any other purpose. If you hear a change in the sound of the exhaust or if you drive over something that strikes the underneath side of the car, have the exhau st
system checked as soon as possible by your Hyundai dealer. o Do not run the engine in an enclosed area. Letting the engine idle in your garage, even with the garage door open, is a hazardous practice. Never run the engine in your garage any longer than it takes to start the engine and back the car out. o Avoid idling the engine for prolonged periods with people inside the car. If it is necessary to idle the engine for a prolonged period with people inside the car, be sure to do so only in an open area with
the air intake set at "Fresh" and fan operating at one of the higher speeds so fresh air is drawn into the interior. If you must drive with the tail gate open because you are carrying objects that make this necessary:1. Close all windows. 2. Open side vents. 3. Set the air intake control at "Fresh", the air flow control at "Floor" or "Face" and the fan at one of the higher speeds.
To assure proper operation of the ventilation system, be sure the ventilation air intakes located just in front of the windshield are kept clear of snow, ice, leaves or other obstructions.
2
Page 120 of 349
DRIVING YOUR HYUNDAI
2- 14 C160C01A-AAT Use High Quality Ethylene Glycol Coolant Your Hyundai is delivered with high quality ethyl- ene glycol coolant in the cooling system. It is the only type of coolant that should be used because it helps prevent corrosion in the cooling system, lubricates the water pump and prevents freezing. Be sure to replace or replenish your coolant in accordance with the maintenance schedule in Section 5. Before winter, have your coolant test- ed to assure that its freezing point is sufficient for the temperatures anticipated during the winter. C160D01A-AAT Check Battery and Cables Winter puts additional burdens on the battery system. Visually inspect the battery and cables as described in Section 6. The level of charge in your battery can be checked by your Hyundai dealer or a service station. C160E01A-AAT Change to "Winter Weight" Oil if Necessary In some climates it is recommended that a lower viscosity "winter weight" oil be used during cold weather. See Section 9 for recommendations. If you aren’t sure what weight oil you should use, consult your Hyundai dealer.
o Remember, your Hyundai does not require
extended warm-up. As soon as the engine is running smoothly, you can drive away. In very cold weather, however, give your engine a slightly longer warm-up period.
o Don't "lug" or "over-rev" the engine. Lugging is driving too slowly in too high a gear result- ing in the engine bucking. If this happens, shift to a lower gear. Over-revving is racing the engine beyond its safe limit. This can be avoided by shifting at the recommended speeds.
o Use your air conditioning sparingly. The air
conditioning system is operated by engine power so your fuel economy is reduced when you use it.
C160A01A-AAT WINTER DRIVING The more severe weather conditions of winter result in greater wear and other problems. To minimize the problems of winter driving, you should follow these suggestions:
C150A01A-AAT SMOOTH CORNERING Avoid braking or gear changing in corners, espe- cially when roads are wet. Ideally, corners should always be taken under gentle acceleration. If you follow these suggestions, tire wear will be held to a minimum. C160B01A-GAT Snowy or Icy Conditions To drive your vehicle in deep snow, it may be necessary to use snow tires or to install tire chains on your tires. If snow tires are needed, it is necessary to select tires equivalent in size and type of the original equipment tires. Failure to do so may adversely affect the safety and handling of your car. Furthermore, speeding, rapid accel- eration, sudden brake applications, and sharp turns are potentially very hazardous practices. During deceleration, use engine braking to the fullest extent. Sudden brake applications on snowy or icy roads may cause skids to occur. You need to keep sufficient distance between the vehicle in operation in front and your vehicle. Also, apply the brake gently. It should be noted that installing tire chains on the tire will provide a greater driving force, but will not prevent side skids. NOTE: Tire chains are not legal in all provinces. Check province laws before fitting tire chains.
Page 140 of 349

VEHICLE MAINTENANCE REQUIREMENTS
5- 2
F030A01A-GAT SCHEDULED MAINTENANCE The following maintenance services must be performed to assure good vehicle control and performance. Keep receipts for all vehi
cle services to protect
your warranty. Where both mileage and time are shown, the frequency of service is determined by whichever occurs first. F030B01HP-GAT R :Replace I : Inspect and, after Inspection, clean, adjust, repair or replace if necessary.
ENGINE CONTROL SYSTEM MAINTENANCE (GASOLINE)
ENGINE OIL AND FILTER See Note (1)DRIVE BELT (ALT, DAMPER, TENSIONER, IDLER)FUEL FILTER (MFI TYPE)FUEL LINES, FUEL HOSES AND CONNECTIONSTIMING BELTVAPOR HOSE AND FUEL FILLER CAPVACUUM AND CRANKCASE VENTILATION HOSESAIR CLEANER FILTERSPARK PLUGSSPARK PLUGS (PLATINUM COATED)
NO. DESCRIPTION
1 2 3 4 5 6 7 8 9 120
96
RRR I I I
R I105
84
R I I I90 72
R I I
R I I
RRR75 60
R I I I I60 48
R I
R I III
R45 36
R I I I
R30 24
R I II I
R I
15 12
R I I IKILOMETERS X 1000 MONTHS
Note: (1) European Community Only - API SG, SG/CD, SH OR SH/CD Except European Community - API SE OR ABOVE In case of Gasoline standard engine as recommended oil (API SE or ABOVE) is difficult to obtain in fieId, following oil recomen ded:
API SD - The engine oil and filter should be changed at every 10,000km or 6 months.
Page 143 of 349
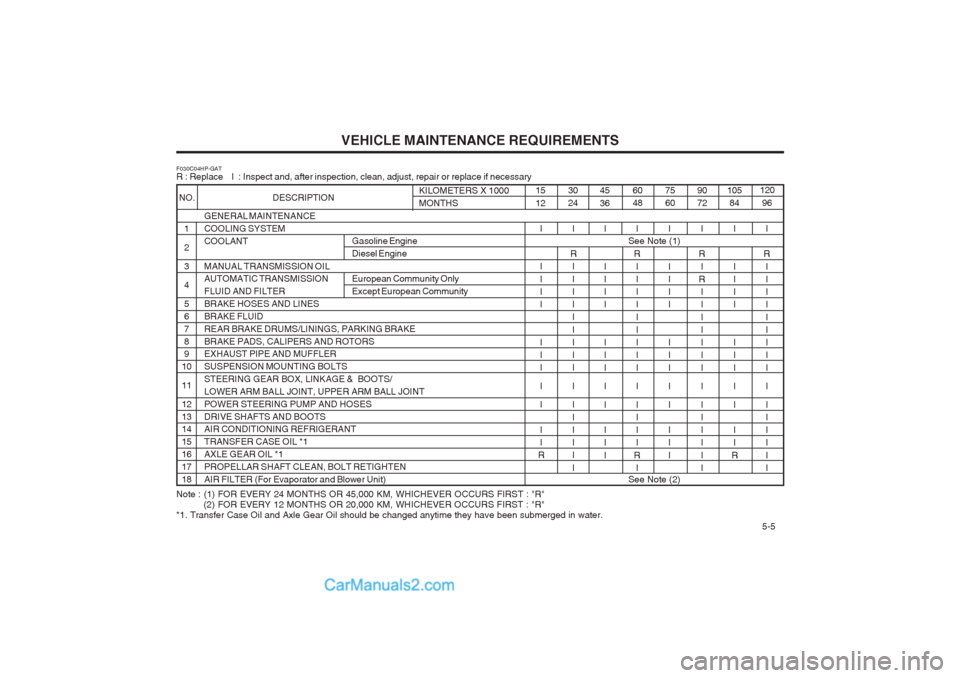
VEHICLE MAINTENANCE REQUIREMENTS 5-5
I
R I III I III I I I III
R I
GENERAL MAINTENANCECOOLING SYSTEMCOOLANT MANUAL TRANSMISSION OIL AUTOMATIC TRANSMISSION FLUID AND FILTERBRAKE HOSES AND LINESBRAKE FLUIDREAR BRAKE DRUMS/LININGS, PARKING BRAKEBRAKE PADS, CALIPERS AND ROTORS EXHAUST PIPE AND MUFFLER SUSPENSION MOUNTING BOLTSSTEERING GEAR BOX, LINKAGE & BOOTS/LOWER ARM BALL JOINT, UPPER ARM BALL JOINTPOWER STEERING PUMP AND HOSESDRIVE SHAFTS AND BOOTS AIR CONDITIONING REFRIGERANT TRANSFER CASE OIL *1AXLE GEAR OIL *1PROPELLAR SHAFT CLEAN, BOLT RETIGHTENAIR FILTER (For Evaporator and Blower Unit)
1 23 4 5 678 9
10 1112 13 14 15161718
F030C04HP-GAT R : Replace I : Inspect and, after inspection, clean, adjust, repair or replace if necessary
Note : (1) FOR EVERY 24 MONTHS OR 45,000 KM, WHICHEVER OCCURS FIRST : "R"
(2) FOR EVERY 12 MONTHS OR 20,000 KM, WHICHEVER OCCURS FIRST : "R"
*1. Transfer Case Oil and Axle Gear Oil should be changed anytime they have been submerged in water.
NO. DESCRIPTION
I
R I III I III I I I III I I15 12 30 24
45 36 60 48
75609072105
84 120
96KILOMETERS X 1000 MONTHS
I
R I I III I III I I I III I I I III I I I I I I I I
I I I II I II I I I I
R I I III I I I I I I I II
R I
R
I I I III I I I III I I I I III I I I I I I I
R
European Community Only Except European Community
See Note (1)Gasoline Engine Diesel Engine
See Note (2)
Page 145 of 349
VEHICLE MAINTENANCE REQUIREMENTS 5-7
F060A01A-AAT EXPLANATION OF SCHEDULED MAIN- TENANCE ITEMS F060M01A-AAT o Engine Oil and FilterThe engine oil and filter should be changed at
the intervals specified in the maintenance sched- ule. If the car is being driven in severe condi- tions, more frequent oil and filter changes are required. F060B01A-AAT
o Drive BeltsInspect all drive belts for evidence of cuts, cracks, excessive wear or oil saturation and replace if necessary. Drive belts should be checked periodically for proper tension and adjusted as necessary. F060C01A-AAT
o Fuel Filter A clogged filter can limit the speed at which the vehicle may be driven, damage the emission system and cause hard starting. If an exces- sive amount of foreign matter accumulates in the fuel tank, the filter may require replacement more frequently.After installing a new filter, run the engine for several minutes, and check for leaks at the connections. Fuel filters should be installed by trained technicians.
F060D01A-AAT
o Fuel Lines, Fuel Hoses and Connec-
tions
Check the fuel lines, fuel hoses and connec- tions for leakage and damage. Have a trained technician replace any damaged or leaking parts immediately. F060E01A-AAT
o Timing BeltInspect all parts related to the timing belt for damage and deformation. Replace any dam- aged parts immediately. F060G01A-AAT
o Vapor Hose and Fuel Filler CapThe vapor hose and fuel filler cap should be inspected at those intervals specified in the maintenance schedule. Make sure that a new vapor hose or fuel filler cap is correctly re- placed. F060F01A-AAT
o Vacuum, Crankcase
Ventilation Hoses
Inspect the surface of hoses for evidence ofheat and/or mechanical damage. Hard and brit- tle rubber, cracking, tears, cuts, abrasions, and excessive swelling indicate deterioration. Par- ticular attention should be paid to examine those hose surfaces nearest to high heat sourc- es, such as the exhaust manifold. Inspect the hose routing to assure that thehoses do not come in contact with any heat source, sharp edges or moving component which might cause heat damage or mechanical wear. Inspect all hose connections, such as clamps and couplings, to make sure they are secure, and that no leaks are present. Hoses should be replaced immediately if there is any evidence of deterioration or damage. F060H01A-AAT o Air Cleaner FilterA Genuine Hyundai air cleaner filter is recom- mended when the filter is replaced. F060J01A-AAT o Spark PlugsMake sure to install new spark plugs of the correct heat range. F070C01A-AAT o Engine CoolantThe coolant should be changed at the intervals specified in the maintenance sched- ule. F070D01A-AAT o Manual Transmission OilInspect the manual transmission oil according to the maintenance schedule. NOTE: If the oil level is low, check for possible leaks before adding oil. Do not overfill.
Page 153 of 349
DO-IT-YOURSELF MAINTENANCE 6-7
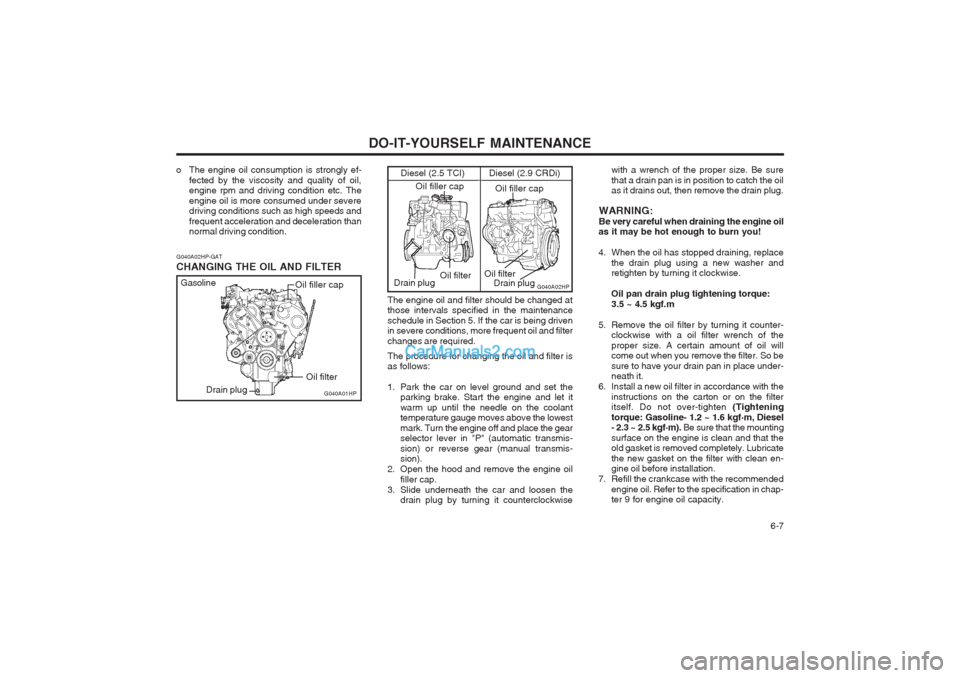
The engine oil and filter should be changed at those intervals specified in the maintenance schedule in Section 5. If the car is being driven in severe conditions, more frequent oil and filter changes are required. The procedure for changing the oil and filter is as follows:
1. Park the car on level ground and set theparking brake. Start the engine and let it warm up until the needle on the coolant temperature gauge moves above the lowest mark. Turn the engine off and place the gear selector lever in "P" (automatic transmis- sion) or reverse gear (manual transmis- sion).
2. Open the hood and remove the engine oil filler cap.
3. Slide underneath the car and loosen the drain plug by turning it counterclockwise with a wrench of the proper size. Be sure that a drain pan is in position to catch the oil as it drains out, then remove the drain plug.
WARNING: Be very careful when draining the engine oil
as it may be hot enough to burn you!
4. When the oil has stopped draining, replace
the drain plug using a new washer and retighten by turning it clockwise. Oil pan drain plug tightening torque: 3.5 ~ 4.5 kgf.m
5. Remove the oil filter by turning it counter- clockwise with a oil filter wrench of theproper size. A certain amount of oil will come out when you remove the filter. So be sure to have your drain pan in place under- neath it.
6. Install a new oil filter in accordance with the instructions on the carton or on the filteritself. Do not over-tighten (Tightening
torque: Gasoline- 1.2 ~ 1.6 kgf .
m, Diesel
- 2.3 ~ 2.5 kgf .
m). Be sure that the mounting
surface on the engine is clean and that theold gasket is removed completely. Lubricate the new gasket on the filter with clean en- gine oil before installation.
7. Refill the crankcase with the recommended engine oil. Refer to the specification in chap-ter 9 for engine oil capacity.
G040A02HP
Diesel (2.9 CRDi)
Diesel (2.5 TCI)
Oil filter
Oil filler cap
Oil filler cap
Drain plug Oil filter
Drain plug
G040A02HP-GAT CHANGING THE OIL AND FILTER
o The engine oil consumption is strongly ef-
fected by the viscosity and quality of oil, engine rpm and driving condition etc. The engine oil is more consumed under severe driving conditions such as high speeds and
frequent acceleration and deceleration than normal driving condition.
G040A01HP
Gasoline
Oil filter
Drain plug Oil filler cap
Page 169 of 349
DO-IT-YOURSELF MAINTENANCE 6-23
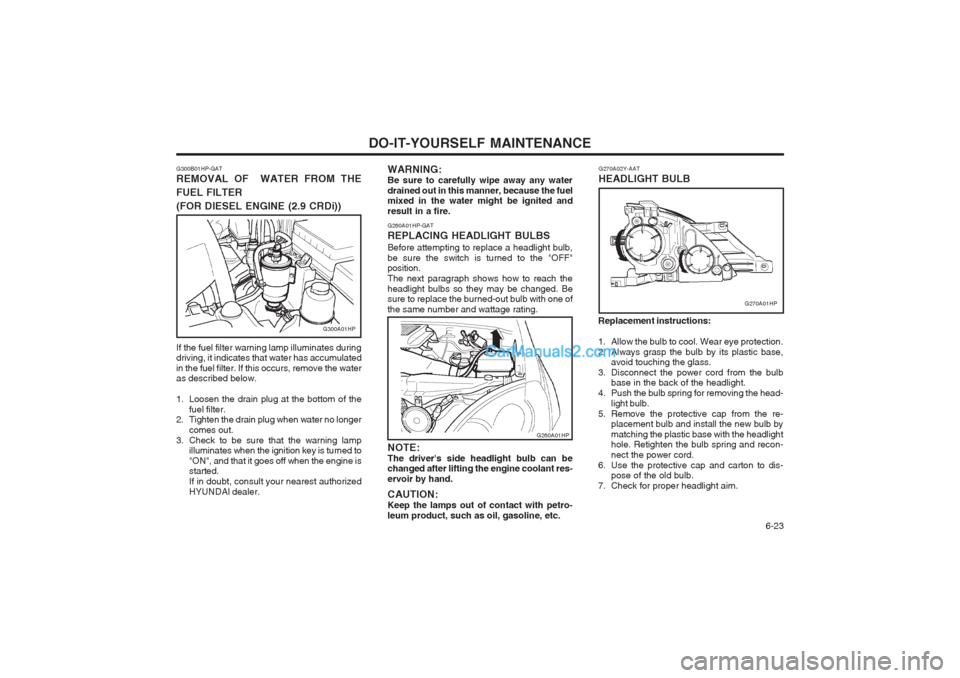
G260A01HP-GAT REPLACING HEADLIGHT BULBSBefore attempting to replace a headlight bulb, be sure the switch is turned to the "OFF" position. The next paragraph shows how to reach theheadlight bulbs so they may be changed. Be sure to replace the burned-out bulb with one of the same number and wattage rating.
WARNING:Be sure to carefully wipe away any waterdrained out in this manner, because the fuel mixed in the water might be ignited and result in a fire. NOTE: The driver's side headlight bulb can be changed after lifting the engine coolant res- ervoir by hand. CAUTION: Keep the lamps out of contact with petro-leum product, such as oil, gasoline, etc.
G260A01HP
Replacement instructions:
1. Allow the bulb to cool. Wear eye protection.
2. Always grasp the bulb by its plastic base,
avoid touching the glass.
3. Disconnect the power cord from the bulb base in the back of the headlight.
4. Push the bulb spring for removing the head-
light bulb.
5. Remove the protective cap from the re- placement bulb and install the new bulb bymatching the plastic base with the headlight hole. Retighten the bulb spring and recon- nect the power cord.
6. Use the protective cap and carton to dis- pose of the old bulb.
7. Check for proper headlight aim. G270A02Y-AAT HEADLIGHT BULB
G270A01HP
G300B01HP-GAT REMOVAL OF WATER FROM THE FUEL FILTER
(FOR DIESEL ENGINE (2.9 CRDi))
G300A01HP
If the fuel filter warning lamp illuminates during driving, it indicates that water has accumulated in the fuel filter. If this occurs, remove the water as described below.
1. Loosen the drain plug at the bottom of the fuel filter.
2. Tighten the drain plug when water no longer
comes out.
3. Check to be sure that the warning lamp illuminates when the ignition key is turned to "ON", and that it goes off when the engine is started. If in doubt, consult your nearest authorizedHYUNDAI dealer.
Page 310 of 349
VEHICLE MAINTENANCE REQUIREMENTS
5- 6
F060B01A-AAT
o Drive belts Inspect all drive belts for evidence of cuts, cracks, excessive wear or oil and replace ifnecessary. Drive belts should be checkedperiodically for proper tension and adjusted asnecessary. F060C01A-AAT
o Fuel filter A clogged filter can limit the speed at which the vehicle may be driven, damage the emissionsystem and cause hard starting. If an exces-sive amount of foreign matter accumulates inthe fuel tank, the filter may require replace-ment more frequently. After installing a new filter, run the engine for several minutes, and check for leaks at theconnections. Fuel filters should be installed bytrained technicians.
F060M01A-AAT o Engine oil and filterThe engine oil and filter should be changed at the intervals specified in the maintenanceschedule. If the car is being driven in severeconditions, more frequent oil and filter changesare required.
F060D01TB-AAT
o Fuel lines, fuel hoses and connec-
tions
Check the fuel lines, fuel hoses and connec-tions for leakage and damage. Have a trainedtechnician replace any damaged or leakingparts immediately.
WARNING (Diesel only): Never work on injection system with en-gine running or within 30 seconds aftershutting off engine. High pressure pump,rail, injectors and high pressure pipes aresubject to high pressure even after theengine stopped. The fuel jet produced byfuel leaks may cause serious injury, if ittouch the body. People using pacemak-ers should not move than 30cm closer tothe ECU or wiring harness within theengine room while engine is running,since the high currents in the CommonRail system produce considerable mag-netic fields. F060E01A-AAT
o Timing beltInspect all parts related to the timing belt for damage and deformation. Replace any dam-aged parts immediately. F060G01A-EAT
o Vapour hose and fuel filler cap The vapour hose and fuel filler cap should be inspected at those intervals specified in themaintenance schedule. Make sure that a newvapour hose or fuel filler cap is correctlyreplaced.
F060F01A-AAT
o Vacuum, crankcase
ventilation hoses
Inspect the surface of hoses for evidence of
heat and/or mechanical damage. Hard andbrittle rubber, cracking, tears, cuts, abrasions,and excessive swelling indicate deterioration.Particular attention should be paid to examinethose hose surfaces nearest to high heatsources, such as the exhaust manifold.
Inspect the hose routing to assure that the
hoses do not come in contact with any heatsource, sharp edges or moving componentwhich might cause heat damage or mechani-cal wear. Inspect all hose connections, suchas clamps and couplings, to make sure theyare secure, and that no leaks are present.Hoses should be replaced immediately if thereis any evidence of deterioration or damage.
F060A01A-AAT
EXPLANATION OF SCHEDULED MAINTENANCE ITEMS