airbag Hyundai Terracan 2004 User Guide
[x] Cancel search | Manufacturer: HYUNDAI, Model Year: 2004, Model line: Terracan, Model: Hyundai Terracan 2004Pages: 361, PDF Size: 4.69 MB
Page 41 of 361
FEATURES OF YOUR HYUNDAI 1- 33
YT10355A
WARNING:
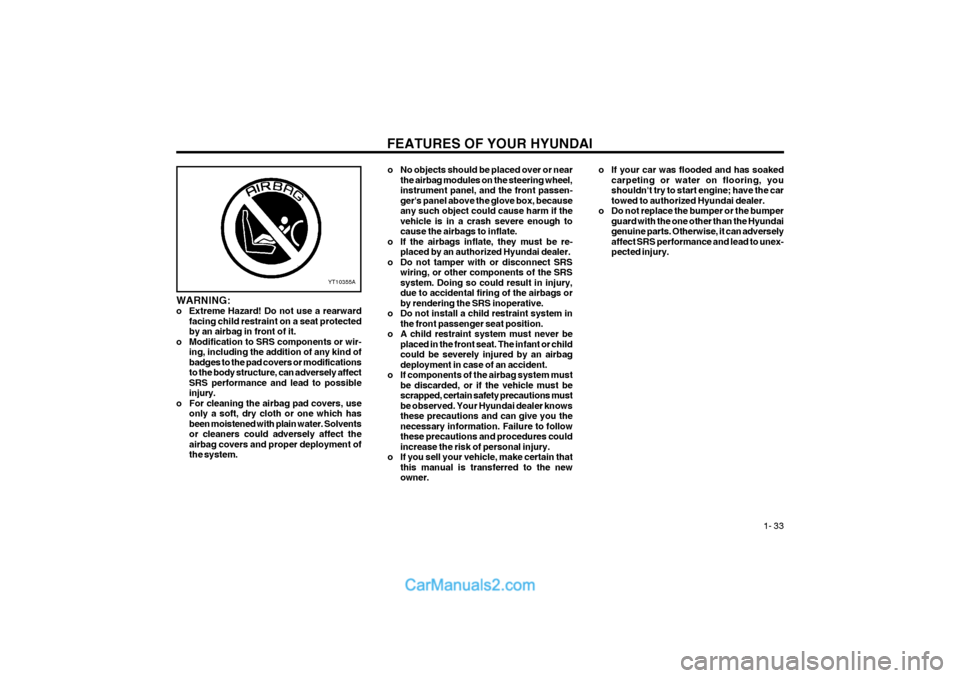
o Extreme Hazard! Do not use a rearwardfacing child restraint on a seat protectedby an airbag in front of it.
o Modification to SRS components or wir- ing, including the addition of any kind ofbadges to the pad covers or modificationsto the body structure, can adversely affectSRS performance and lead to possibleinjury.
o For cleaning the airbag pad covers, use only a soft, dry cloth or one which hasbeen moistened with plain water. Solventsor cleaners could adversely affect theairbag covers and proper deployment ofthe system. o No objects should be placed over or near
the airbag modules on the steering wheel,instrument panel, and the front passen-ger's panel above the glove box, becauseany such object could cause harm if thevehicle is in a crash severe enough tocause the airbags to inflate.
o If the airbags inflate, they must be re- placed by an authorized Hyundai dealer.
o Do not tamper with or disconnect SRS wiring, or other components of the SRSsystem. Doing so could result in injury,due to accidental firing of the airbags orby rendering the SRS inoperative.
o Do not install a child restraint system in the front passenger seat position.
o A child restraint system must never be placed in the front seat. The infant or childcould be severely injured by an airbagdeployment in case of an accident.
o If components of the airbag system must be discarded, or if the vehicle must bescrapped, certain safety precautions mustbe observed. Your Hyundai dealer knowsthese precautions and can give you thenecessary information. Failure to followthese precautions and procedures couldincrease the risk of personal injury.
o If you sell your vehicle, make certain that this manual is transferred to the newowner. o If your car was flooded and has soaked
carpeting or water on flooring, youshouldn't try to start engine; have the cartowed to authorized Hyundai dealer.
o Do not replace the bumper or the bumper guard with the one other than the Hyundaigenuine parts. Otherwise, it can adverselyaffect SRS performance and lead to unex-pected injury.
Page 42 of 361
FEATURES OF YOUR HYUNDAI
1- 34
8
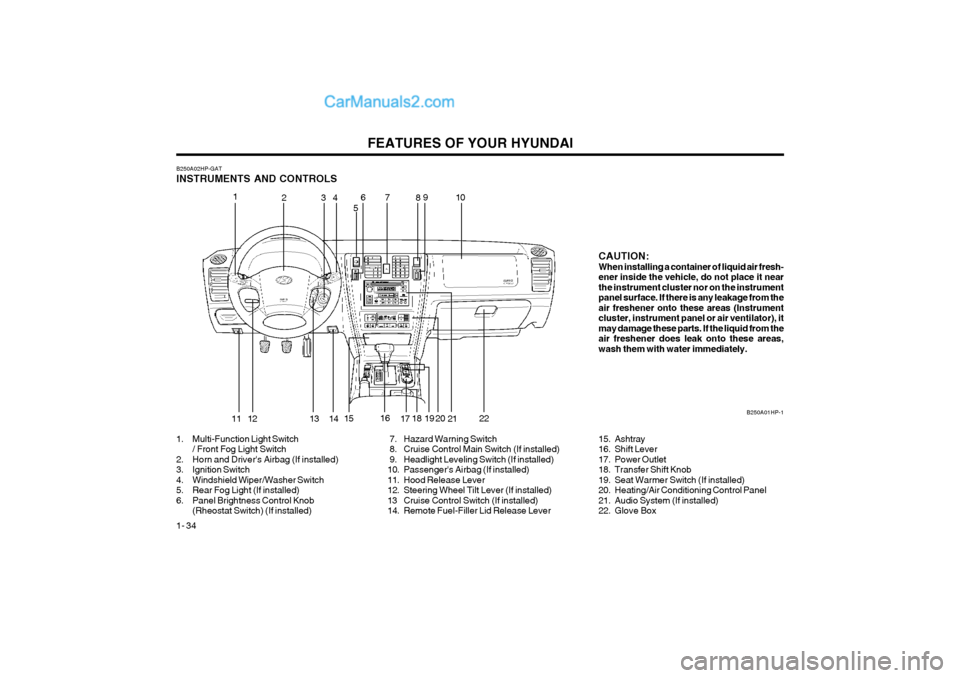
B250A02HP-GAT INSTRUMENTS AND CONTROLS
1. Multi-Function Light Switch
/ Front Fog Light Switch
2. Horn and Driver's Airbag (If installed)
3. Ignition Switch
4. Windshield Wiper/Washer Switch
5. Rear Fog Light (If installed)
6. Panel Brightness Control Knob (Rheostat Switch) (If installed) 7. Hazard Warning Switch
8. Cruise Control Main Switch (If installed)
9. Headlight Leveling Switch (If installed)
10. Passenger's Airbag (If installed)
11. Hood Release Lever
12. Steering Wheel Tilt Lever (If installed)
13 Cruise Control Switch (If installed)
14. Remote Fuel-Filler Lid Release Lever B250A01HP-11
23 4
56
11 7
9
12 13 1516
17
18 1914
15. Ashtray
16. Shift Lever
17. Power Outlet
18. Transfer Shift Knob
19. Seat Warmer Switch (If installed)
20. Heating/Air Conditioning Control Panel
21. Audio System (If installed)
22. Glove Box20
10
2122CAUTION: When installing a container of liquid air fresh-ener inside the vehicle, do not place it nearthe instrument cluster nor on the instrumentpanel surface. If there is any leakage from theair freshener onto these areas (Instrumentcluster, instrument panel or air ventilator), itmay damage these parts. If the liquid from theair freshener does leak onto these areas,wash them with water immediately.
Page 44 of 361
FEATURES OF YOUR HYUNDAI
1- 36
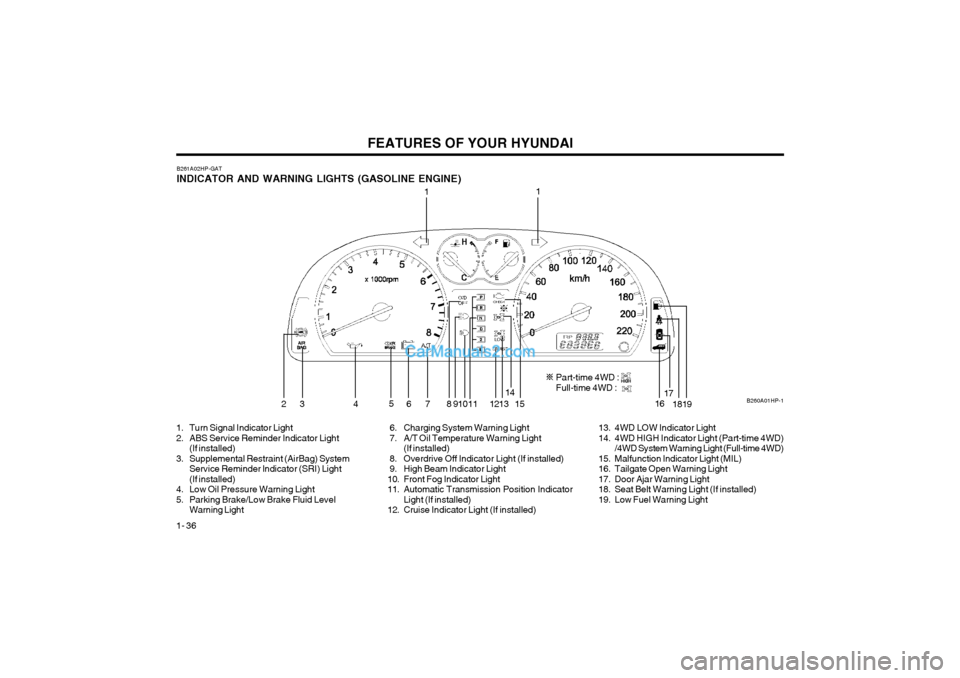
B261A02HP-GAT INDICATOR AND WARNING LIGHTS (GASOLINE ENGINE) B260A01HP-1
11
23 4 5
6 7 8 910 11 1213 14
15 1617
18
19
1. Turn Signal Indicator Light
2. ABS Service Reminder Indicator Light (If installed)
3. Supplemental Restraint (AirBag) System Service Reminder lndicator (SRI) Light(If installed)
4. Low Oil Pressure Warning Light
5. Parking Brake/Low Brake Fluid Level Warning Light 6. Charging System Warning Light
7. A/T Oil Temperature Warning Light
(If installed)
8. Overdrive Off Indicator Light (If installed)
9. High Beam Indicator Light
10. Front Fog Indicator Light
11. Automatic Transmission Position Indicator Light (If installed)
12. Cruise Indicator Light (If installed) 13. 4WD LOW Indicator Light
14. 4WD HIGH Indicator Light (Part-time 4WD)
/4WD System Warning Light (Full-time 4WD)
15. Malfunction Indicator Light (MIL)
16. Tailgate Open Warning Light
17. Door Ajar Warning Light
18. Seat Belt Warning Light (If installed)
19. Low Fuel Warning Light
Part-time 4WD :Full-time 4WD :
Page 46 of 361
FEATURES OF YOUR HYUNDAI
1- 38
B260A02HP-1
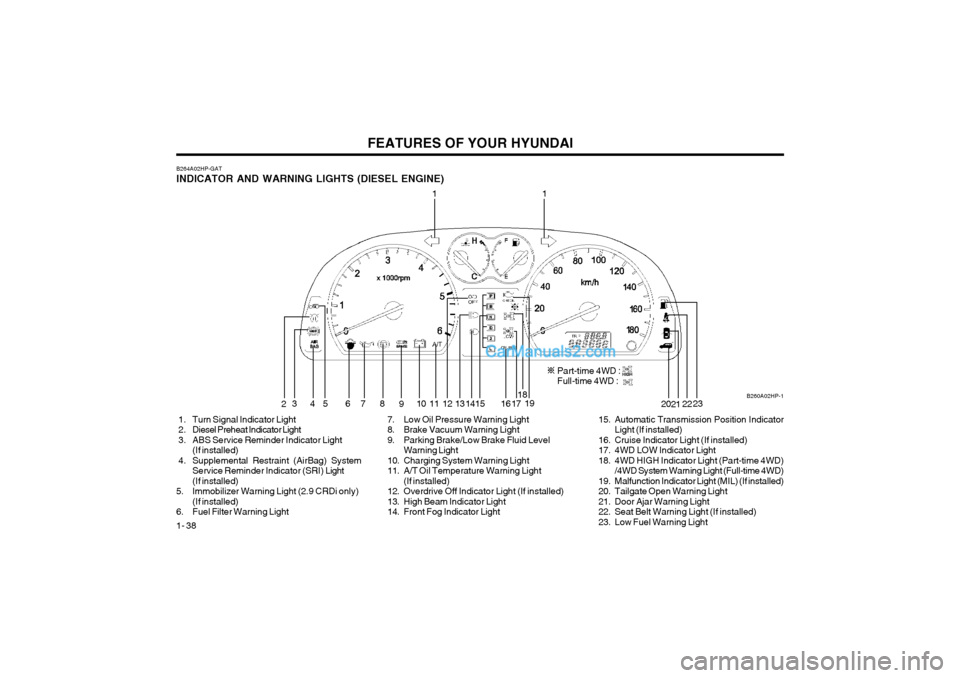
B264A02HP-GAT INDICATOR AND WARNING LIGHTS (DIESEL ENGINE)
1
2 34 67
8
910 11 12 13 14 17 18
19 202122
1
15
1. Turn Signal Indicator Light
2. Diesel Preheat Indicator Light
3. ABS Service Reminder Indicator Light
(If installed)
4. Supplemental Restraint (AirBag) System Service Reminder Indicator (SRI) Light(If installed)
5. Immobilizer Warning Light (2.9 CRDi only) (If installed)
6. Fuel Filter Warning Light 7. Low Oil Pressure Warning Light
8. Brake Vacuum Warning Light
9. Parking Brake/Low Brake Fluid Level
Warning Light
10. Charging System Warning Light
11. A/T Oil Temperature Warning Light (If installed)
12. Overdrive Off Indicator Light (If installed)
13. High Beam Indicator Light
14. Front Fog Indicator Light 15. Automatic Transmission Position Indicator
Light (If installed)
16. Cruise Indicator Light (If installed)
17. 4WD LOW Indicator Light
18. 4WD HIGH Indicator Light (Part-time 4WD) /4WD System Warning Light (Full-time 4WD)
19. Malfunction Indicator Light (MIL) (If installed)
20. Tailgate Open Warning Light
21. Door Ajar Warning Light
22. Seat Belt Warning Light (If installed)
23. Low Fuel Warning Light
Part-time 4WD :Full-time 4WD :
5
23
16
Page 49 of 361
FEATURES OF YOUR HYUNDAI 1- 41
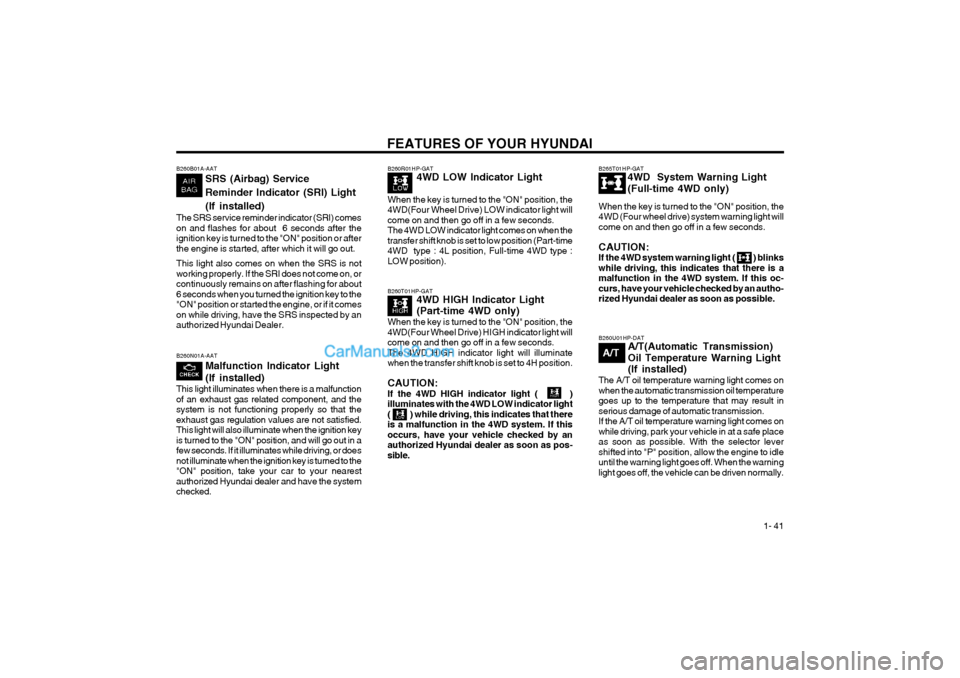
B260T01HP-GAT
4WD HIGH Indicator Light (Part-time 4WD only)
When the key is turned to the "ON" position, the 4WD(Four Wheel Drive) HIGH indicator light willcome on and then go off in a few seconds.The 4WD HIGH indicator light will illuminatewhen the transfer shift knob is set to 4H position. CAUTION: If the 4WD HIGH indicator light ( )illuminates with the 4WD LOW indicator light( ) while driving, this indicates that thereis a malfunction in the 4WD system. If thisoccurs, have your vehicle checked by anauthorized Hyundai dealer as soon as pos-sible.
B260N01A-AAT
Malfunction Indicator Light (If installed)
This light illuminates when there is a malfunction of an exhaust gas related component, and thesystem is not functioning properly so that theexhaust gas regulation values are not satisfied.This light will also illuminate when the ignition keyis turned to the "ON" position, and will go out in afew seconds. If it illuminates while driving, or doesnot illuminate when the ignition key is turned to the"ON" position, take your car to your nearestauthorized Hyundai dealer and have the systemchecked.
B260R01HP-GAT 4WD LOW Indicator Light
When the key is turned to the "ON" position, the
4WD(Four Wheel Drive) LOW indicator light willcome on and then go off in a few seconds.
The 4WD LOW indicator light comes on when thetransfer shift knob is set to low position (Part-time4WD type : 4L position, Full-time 4WD type :LOW position).
B260B01A-AAT
SRS (Airbag) Service Reminder Indicator (SRI) Light(If installed)
The SRS service reminder indicator (SRI) comes on and flashes for about 6 seconds after theignition key is turned to the "ON" position or afterthe engine is started, after which it will go out. This light also comes on when the SRS is not working properly. If the SRI does not come on, orcontinuously remains on after flashing for about6 seconds when you turned the ignition key to the"ON" position or started the engine, or if it comeson while driving, have the SRS inspected by anauthorized Hyundai Dealer.B265T01HP-GAT 4WD System Warning Light (Full-time 4WD only)
When the key is turned to the "ON" position, the 4WD (Four wheel drive) system warning light willcome on and then go off in a few seconds. CAUTION: If the 4WD system warning light ( ) blinkswhile driving, this indicates that there is amalfunction in the 4WD system. If this oc-curs, have your vehicle checked by an autho-rized Hyundai dealer as soon as possible.
B260U01HP-DAT A/T(Automatic Transmission)
Oil Temperature Warning Light(If installed)
The A/T oil temperature warning light comes on when the automatic transmission oil temperaturegoes up to the temperature that may result inserious damage of automatic transmission.If the A/T oil temperature warning light comes onwhile driving, park your vehicle in at a safe place
as soon as possible. With the selector levershifted into "P" position, allow the engine to idleuntil the warning light goes off. When the warninglight goes off, the vehicle can be driven normally.
A/T
Page 211 of 361
CONTROLS AND EQUIPMENT1- 11
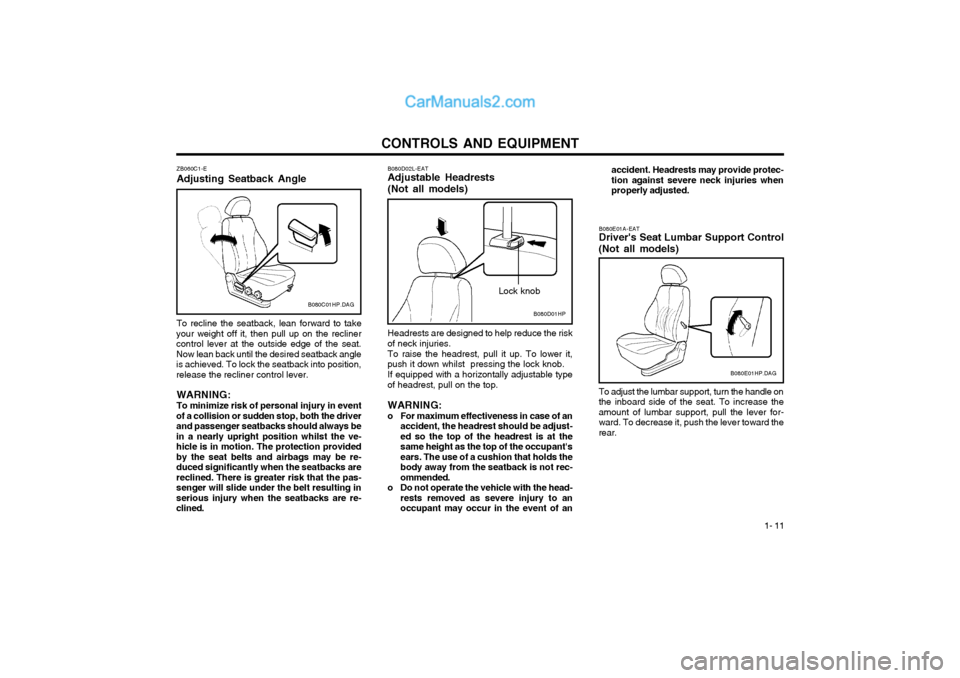
To recline the seatback, lean forward to take
your weight off it, then pull up on the recliner control lever at the outside edge of the seat.Now lean back until the desired seatback angleis achieved. To lock the seatback into position,release the recliner control lever.
WARNING: To minimize risk of personal injury in event
of a collision or sudden stop, both the driver and passenger seatbacks should always bein a nearly upright position whilst the ve-hicle is in motion. The protection providedby the seat belts and airbags may be re-duced significantly when the seatbacks arereclined. There is greater risk that the pas-senger will slide under the belt resulting inserious injury when the seatbacks are re-clined. ZB060C1-E Adjusting Seatback Angle
B080C01HP.DAG
To adjust the lumbar support, turn the handle on the inboard side of the seat. To increase theamount of lumbar support, pull the lever for-ward. To decrease it, push the lever toward therear.
B080D02L-EAT Adjustable Headrests (Not all models) Headrests are designed to help reduce the risk
of neck injuries.
To raise the headrest, pull it up. To lower it,
push it down whilst pressing the lock knob.
If equipped with a horizontally adjustable type
of headrest, pull on the top.
WARNING:
o For maximum effectiveness in case of an accident, the headrest should be adjust- ed so the top of the headrest is at thesame height as the top of the occupant'sears. The use of a cushion that holds thebody away from the seatback is not rec-ommended.
o Do not operate the vehicle with the head- rests removed as severe injury to anoccupant may occur in the event of an B080E01A-EAT Driver's Seat Lumbar Support Control
(Not all models)
B080E01HP.DAG
B080D01HP
Lock knob accident. Headrests may provide protec- tion against severe neck injuries whenproperly adjusted.
Page 212 of 361
CONTROLS AND EQUIPMENT
1- 12
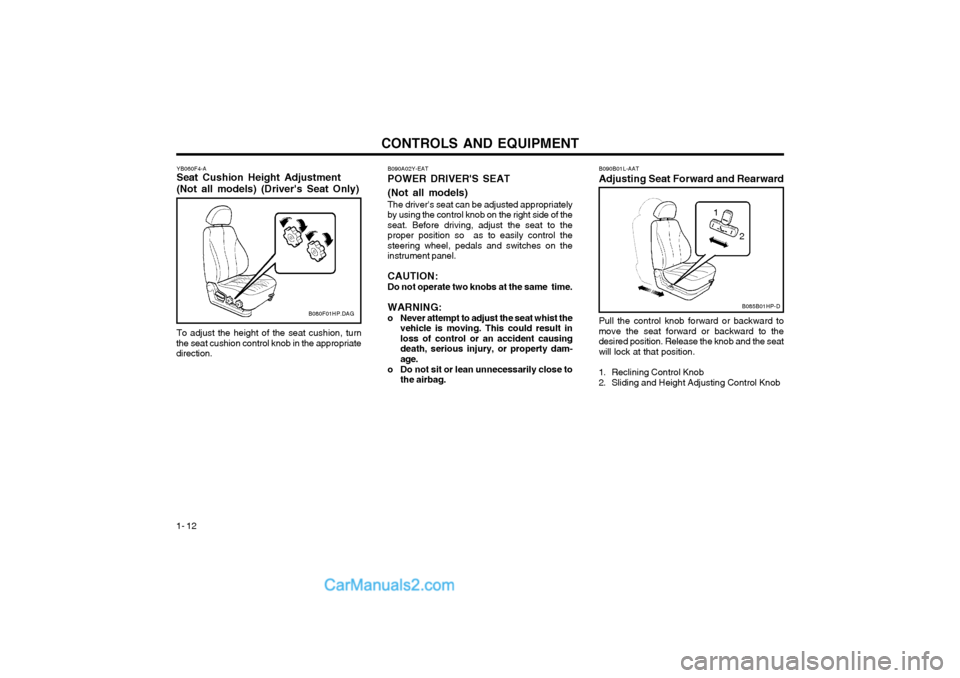
YB060F4-A Seat Cushion Height Adjustment (Not all models) (Driver's Seat Only)
B080F01HP.DAG
To adjust the height of the seat cushion, turn
the seat cushion control knob in the appropriate direction. B090B01L-AAT Adjusting Seat Forward and RearwardPull the control knob forward or backward to move the seat forward or backward to thedesired position. Release the knob and the seatwill lock at that position.
1. Reclining Control Knob
2. Sliding and Height Adjusting Control Knob
B085B01HP-D
1
2
B090A02Y-EAT POWER DRIVER'S SEAT (Not all models) The driver's seat can be adjusted appropriately by using the control knob on the right side of theseat. Before driving, adjust the seat to theproper position so as to easily control thesteering wheel, pedals and switches on theinstrument panel. CAUTION:
Do not operate two knobs at the same time.
WARNING:
o Never attempt to adjust the seat whist the vehicle is moving. This could result in loss of control or an accident causingdeath, serious injury, or property dam-age.
o Do not sit or lean unnecessarily close to the airbag.
Page 213 of 361
CONTROLS AND EQUIPMENT1- 13
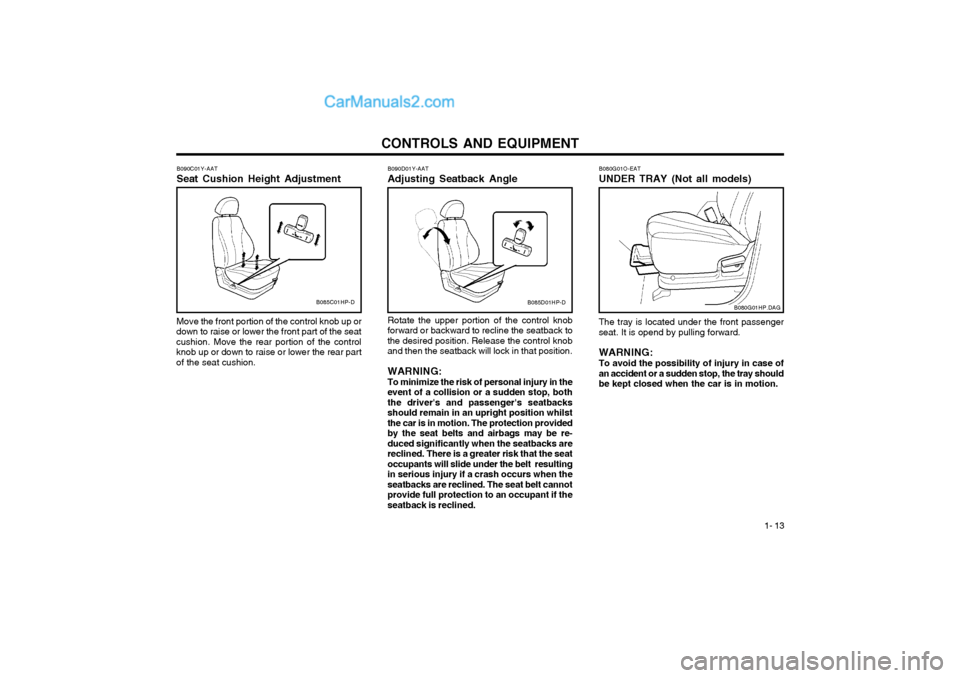
B090C01Y-AAT Seat Cushion Height Adjustment Move the front portion of the control knob up or
down to raise or lower the front part of the seat cushion. Move the rear portion of the controlknob up or down to raise or lower the rear partof the seat cushion.
B085C01HP-D B080G01O-EAT UNDER TRAY (Not all models)B080G01HP.DAG
The tray is located under the front passenger seat. It is opend by pulling forward. WARNING: To avoid the possibility of injury in case of an accident or a sudden stop, the tray shouldbe kept closed when the car is in motion.B085D01HP-D
B090D01Y-AAT Adjusting Seatback Angle Rotate the upper portion of the control knob
forward or backward to recline the seatback to the desired position. Release the control knoband then the seatback will lock in that position.
WARNING: To minimize the risk of personal injury in the
event of a collision or a sudden stop, both the driver's and passenger's seatbacksshould remain in an upright position whilstthe car is in motion. The protection providedby the seat belts and airbags may be re-duced significantly when the seatbacks arereclined. There is a greater risk that the seatoccupants will slide under the belt resultingin serious injury if a crash occurs when theseatbacks are reclined. The seat belt cannotprovide full protection to an occupant if theseatback is reclined.
Page 221 of 361
CONTROLS AND EQUIPMENT1- 21
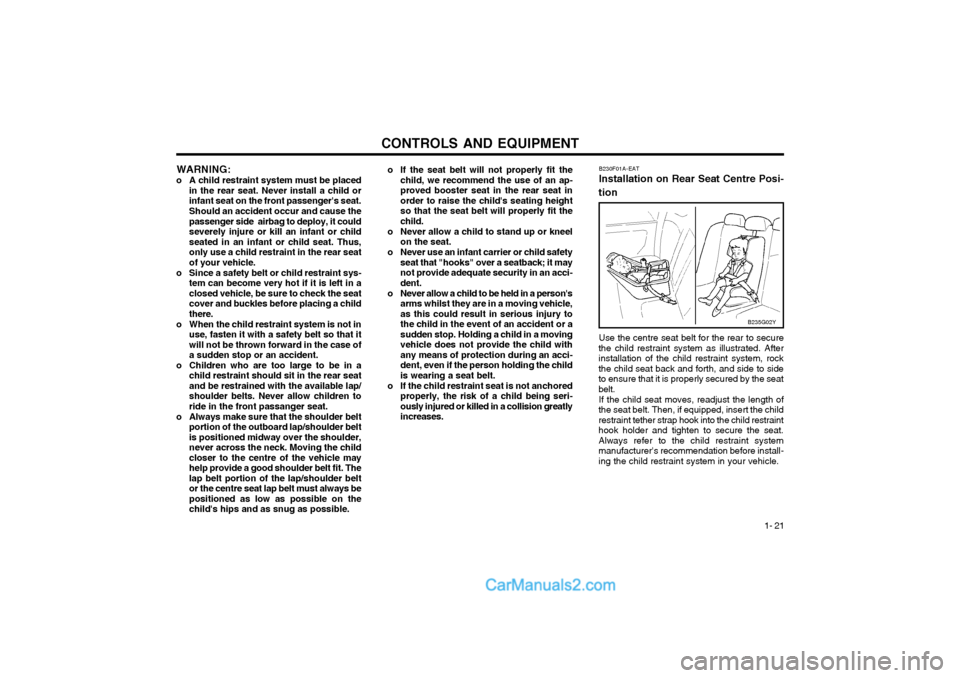
B230F01A-EAT Installation on Rear Seat Centre Posi-
tion
Use the centre seat belt for the rear to secure
the child restraint system as illustrated. After installation of the child restraint system, rockthe child seat back and forth, and side to sideto ensure that it is properly secured by the seatbelt.
If the child seat moves, readjust the length of
the seat belt. Then, if equipped, insert the childrestraint tether strap hook into the child restrainthook holder and tighten to secure the seat.Always refer to the child restraint systemmanufacturer's recommendation before install-ing the child restraint system in your vehicle.
o If the seat belt will not properly fit the
child, we recommend the use of an ap-proved booster seat in the rear seat inorder to raise the child's seating heightso that the seat belt will properly fit thechild.
o Never allow a child to stand up or kneel on the seat.
o Never use an infant carrier or child safety seat that "hooks" over a seatback; it maynot provide adequate security in an acci-dent.
o Never allow a child to be held in a person's arms whilst they are in a moving vehicle,as this could result in serious injury tothe child in the event of an accident or asudden stop. Holding a child in a movingvehicle does not provide the child withany means of protection during an acci-dent, even if the person holding the childis wearing a seat belt.
o If the child restraint seat is not anchored properly, the risk of a child being seri-ously injured or killed in a collision greatlyincreases.
WARNING:
o A child restraint system must be placed in the rear seat. Never install a child orinfant seat on the front passenger's seat. Should an accident occur and cause the passenger side airbag to deploy, it couldseverely injure or kill an infant or childseated in an infant or child seat. Thus,only use a child restraint in the rear seatof your vehicle.
o Since a safety belt or child restraint sys- tem can become very hot if it is left in aclosed vehicle, be sure to check the seatcover and buckles before placing a childthere.
o When the child restraint system is not in use, fasten it with a safety belt so that itwill not be thrown forward in the case ofa sudden stop or an accident.
o Children who are too large to be in a child restraint should sit in the rear seatand be restrained with the available lap/shoulder belts. Never allow children toride in the front passanger seat.
o Always make sure that the shoulder belt portion of the outboard lap/shoulder beltis positioned midway over the shoulder,never across the neck. Moving the childcloser to the centre of the vehicle mayhelp provide a good shoulder belt fit. Thelap belt portion of the lap/shoulder beltor the centre seat lap belt must always bepositioned as low as possible on thechild's hips and as snug as possible.
B235G02Y
Page 222 of 361
CONTROLS AND EQUIPMENT
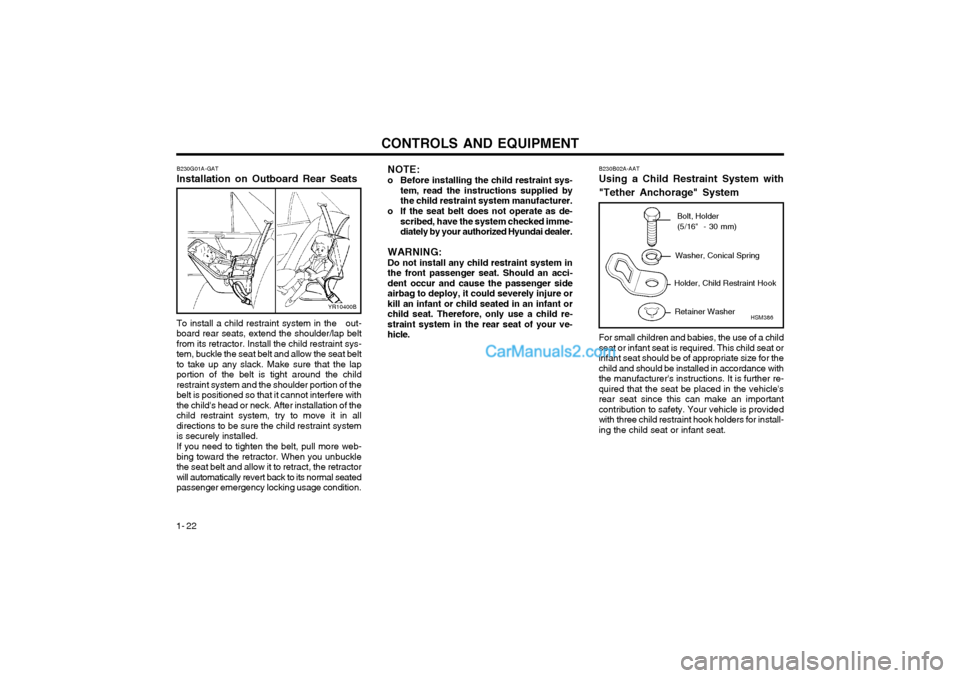
1- 22 B230G01A-GAT Installation on Outboard Rear Seats To install a child restraint system in the out- board rear seats, extend the shoulder/lap beltfrom its retractor. Install the child restraint sys-tem, buckle the seat belt and allow the seat beltto take up any slack. Make sure that the lapportion of the belt is tight around the childrestraint system and the shoulder portion of thebelt is positioned so that it cannot interfere withthe child's head or neck. After installation of thechild restraint system, try to move it in alldirections to be sure the child restraint systemis securely installed. If you need to tighten the belt, pull more web- bing toward the retractor. When you unbucklethe seat belt and allow it to retract, the retractorwill automatically revert back to its normal seatedpassenger emergency locking usage condition.
NOTE:
o Before installing the child restraint sys- tem, read the instructions supplied bythe child restraint system manufacturer.
o If the seat belt does not operate as de- scribed, have the system checked imme-diately by your authorized Hyundai dealer.
WARNING:Do not install any child restraint system inthe front passenger seat. Should an acci-dent occur and cause the passenger sideairbag to deploy, it could severely injure orkill an infant or child seated in an infant orchild seat. Therefore, only use a child re-straint system in the rear seat of your ve-hicle.
YR10400B B230B02A-AAT Using a Child Restraint System with
"Tether Anchorage" System For small children and babies, the use of a child seat or infant seat is required. This child seat orinfant seat should be of appropriate size for thechild and should be installed in accordance withthe manufacturer's instructions. It is further re-quired that the seat be placed in the vehicle'srear seat since this can make an importantcontribution to safety. Your vehicle is providedwith three child restraint hook holders for install-ing the child seat or infant seat. Bolt, Holder (5/16" - 30 mm)
Washer, Conical Spring
Holder, Child Restraint Hook
Retainer WasherHSM386