INFINITI FX 2012 Owners Manual
Manufacturer: INFINITI, Model Year: 2012, Model line: FX, Model: INFINITI FX 2012Pages: 522, PDF Size: 3.51 MB
Page 161 of 522

3-20Pre-driving checks and adjustments
SPA2843
Power lift gate switch—Instrument panel
SPA2877
Lift gate opener switch
SPA2463
Power lift gate button —Intelligent Key
SPA2440
Power lift gate switch —Lift gate
Power open
When the lift gate is fully closed, the lift
gate will fully open automatically by
performing one of the following opera-
tions:
. Pushing the power lift gate switch
*Aon the instrument panel.
. Pushing the lift gate opener switch
*B.
. Pushing the power lift gate button
*Con the Intelligent Key for more than 1
second.
The hazard flashes 4 times and the outside
chime sounds when the lift gate starts
opening.
NOTE:
The lift gate can be opened by the power
lift gate switch
*A, the power lift gate
opener switch
*Bor the power lift gate
button
*Ceven if the lift gate is
locked. The lift gate will individually
unlock and open.
Power close
When the lift gate is fully opened, the lift
gate will fully close automatically by
performing one of the following opera-
tions:
Page 162 of 522

.Pushing the power lift gate switch*Aon the instrument panel.
. Pushing the power lift gate button
*Con the Intelligent Key for more than 1
second.
. Pushing the power lift gate switch
*Don the lower part of the lift gate.
The hazard flashes 4 times and the outside
chime sounds when the lift gate starts
closing.
NOTE:
When the lift gate is closed, it remains
unlocked. Manually lock the lift gate.
Reverse function
The power lift gate will reverse immediately
if one of the following actions is performed
during power open or power close.
. pushing the power lift gate switch
*Aon the instrument panel
. pushing the power lift gate button
*Con the Intelligent Key
. pushing the power lift gate switch
*Don the lower part of the lift gate
The outside chime sounds when the lift
gate starts to reverse.
The power lift gate button
*Con the
Intelligent Key cannot be operated when the ignition switch is in the ON position.
Auto reverse function
The auto-reverse function enables the lift
gate to automatically reverse when some-
thing is caught in the lift gate as it is
opening or closing. When the control unit
detects an obstacle, the lift gate will
reverse and return to the full open or full
close position.
If a second obstacle is detected, the lift
gate motion will stop and the drive motor
will disengage. The lift gate will enter the
manual mode.
A pinch sensor is mounted on each side of
the lift gate. If an obstacle is detected by
the pinch sensor during power close, the
lift gate will reverse and return to the full
open position immediately.
NOTE:
If the pinch sensor is damaged or
removed, the power close function will
not operate.
WARNING
There is a small distance immediately before
the closed position that cannot be detected.
Make sure that all passengers keep their
hands, etc., clear from the lift gate opening
before closing the lift gate.
Pre-driving checks and adjustments3-21
Page 163 of 522

3-22Pre-driving checks and adjustments
SPA2879
SPA2880
*1Lift gate opener switch
*2Power lift gate switch—Lift gate
*3Power lift gate switch —Instrument
panel
*4Power lift gate main switch
Middle stop function
The power lift gate can be set to stop at a
mid-open range. To activate the system,
perform the following procedures.
1. Press the power lift gate main switch
*4to the ON position on the instrument
panel.
2. Push the lift gate opener switch
*1to
open or close the lift gate. 3. Push lift gate opener switch again. The
lift gate will stop at user selected
position when lift gate is opening or
closing.
4. The lift gate will fully open when the lift gate opener switch
*1is pressed
again.
5. The lift gate will fully close when the lift gate switch
*2on the lower part of the
lift gate is pressed.
Garage mode system
The garage mode system allows the lift
gate to open to a user selected position. To
set the garage mode system, perform the
following procedures:
1. Put the selector lever in the P (Park)
position.
2. Make sure the lift gate is fully closed.
3. Press the power lift gate main switch
*4to the ON position on the instrument
panel.
4. Push the lift gate opener switch
*1.
5. Move the lift gate manually or operate the power lift gate from the fully closed
position to the user selected open
position you want to set the system.
Page 164 of 522
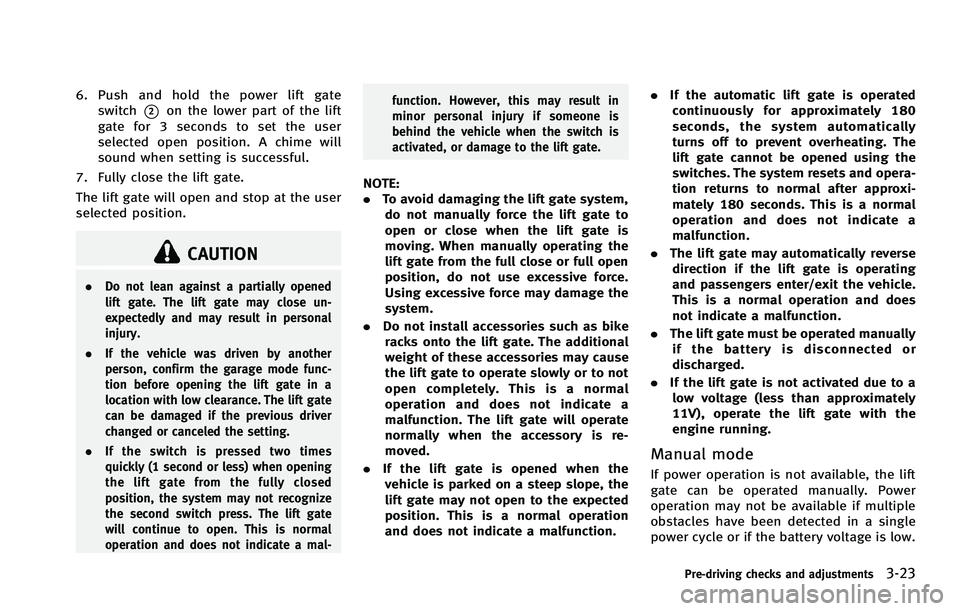
6. Push and hold the power lift gateswitch
*2on the lower part of the lift
gate for 3 seconds to set the user
selected open position. A chime will
sound when setting is successful.
7. Fully close the lift gate.
The lift gate will open and stop at the user
selected position.
CAUTION
. Do not lean against a partially opened
lift gate. The lift gate may close un-
expectedly and may result in personal
injury.
. If the vehicle was driven by another
person, confirm the garage mode func-
tion before opening the lift gate in a
location with low clearance. The lift gate
can be damaged if the previous driver
changed or canceled the setting.
. If the switch is pressed two times
quickly (1 second or less) when opening
the lift gate from the fully closed
position, the system may not recognize
the second switch press. The lift gate
will continue to open. This is normal
operation and does not indicate a mal- function. However, this may result in
minor personal injury if someone is
behind the vehicle when the switch is
activated, or damage to the lift gate.
NOTE:
.
To avoid damaging the lift gate system,
do not manually force the lift gate to
open or close when the lift gate is
moving. When manually operating the
lift gate from the full close or full open
position, do not use excessive force.
Using excessive force may damage the
system.
. Do not install accessories such as bike
racks onto the lift gate. The additional
weight of these accessories may cause
the lift gate to operate slowly or to not
open completely. This is a normal
operation and does not indicate a
malfunction. The lift gate will operate
normally when the accessory is re-
moved.
. If the lift gate is opened when the
vehicle is parked on a steep slope, the
lift gate may not open to the expected
position. This is a normal operation
and does not indicate a malfunction. .
If the automatic lift gate is operated
continuously for approximately 180
seconds, the system automatically
turns off to prevent overheating. The
lift gate cannot be opened using the
switches. The system resets and opera-
tion returns to normal after approxi-
mately 180 seconds. This is a normal
operation and does not indicate a
malfunction.
. The lift gate may automatically reverse
direction if the lift gate is operating
and passengers enter/exit the vehicle.
This is a normal operation and does
not indicate a malfunction.
. The lift gate must be operated manually
if the battery is disconnected or
discharged.
. If the lift gate is not activated due to a
low voltage (less than approximately
11V), operate the lift gate with the
engine running.
Manual mode
If power operation is not available, the lift
gate can be operated manually. Power
operation may not be available if multiple
obstacles have been detected in a single
power cycle or if the battery voltage is low.
Pre-driving checks and adjustments3-23
Page 165 of 522

3-24Pre-driving checks and adjustments
When the power lift gate main switch is in
the OFF position, the lift gate can be
opened manually by pushing the lift gate
opener switch. If the power lift gate opener
switch is pushed during power open or
close, the power operation will be canceled
and the lift gate can be operated manually.
AUTO CLOSURE
If the lift gate is pulled down to a partly
open position, the lift gate will pull itself to
the closed position.
Do not apply excessive force when the
auto closure is operating. Excessive force
applied may cause the mechanism to
malfunction.
CAUTION
.The lift gate will automatically close
from a partly open position. To avoid
pinching, keep hands and fingers away
from lift gate opening.
. Do not let children operate the lift gate.
SPA2522
LIFT GATE RELEASE LEVER
If the lift gate cannot be opened with the
door lock switch due to a discharged
battery, follow these steps.
1. Remove the cover
*Ainside of the lift
gate using a suitable tool.
2. Move the lever
*Bas illustrated to
open the lift gate.
Contact an INFINITI retailer as soon as
possible for repair.
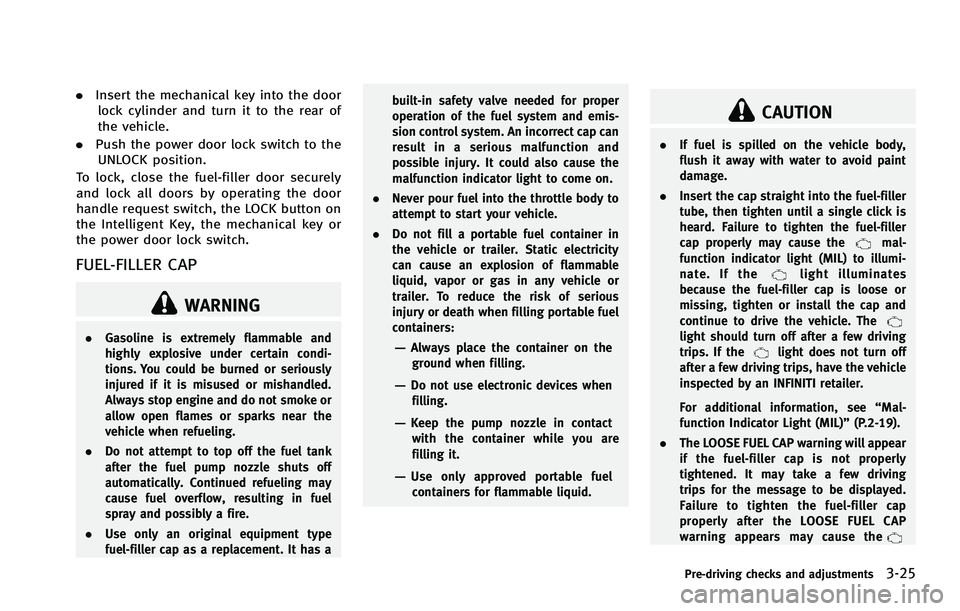
SPA2523
OPENING THE FUEL-FILLER DOOR
To open the fuel-filler door, unlock the fuel-
filler door by using one of the following
operations, then push the left side of the
door.
. Push the driver’s door handle request
switch with the Intelligent Key carried
with you.
. Push the passenger’ s door handle
request switch or lift gate request
switch twice with the Intelligent Key
carried with you.
. Push the UNLOCK button on the Intelli-
gent Key.
FUEL-FILLER DOOR
Page 166 of 522
.Insert the mechanical key into the door
lock cylinder and turn it to the rear of
the vehicle.
. Push the power door lock switch to the
UNLOCK position.
To lock, close the fuel-filler door securely
and lock all doors by operating the door
handle request switch, the LOCK button on
the Intelligent Key, the mechanical key or
the power door lock switch.
FUEL-FILLER CAP
WARNING
. Gasoline is extremely flammable and
highly explosive under certain condi-
tions. You could be burned or seriously
injured if it is misused or mishandled.
Always stop engine and do not smoke or
allow open flames or sparks near the
vehicle when refueling.
. Do not attempt to top off the fuel tank
after the fuel pump nozzle shuts off
automatically. Continued refueling may
cause fuel overflow, resulting in fuel
spray and possibly a fire.
. Use only an original equipment type
fuel-filler cap as a replacement. It has a built-in safety valve needed for proper
operation of the fuel system and emis-
sion control system. An incorrect cap can
result in a serious malfunction and
possible injury. It could also cause the
malfunction indicator light to come on.
. Never pour fuel into the throttle body to
attempt to start your vehicle.
. Do not fill a portable fuel container in
the vehicle or trailer. Static electricity
can cause an explosion of flammable
liquid, vapor or gas in any vehicle or
trailer. To reduce the risk of serious
injury or death when filling portable fuel
containers:—Always place the container on the
ground when filling.
—Do not use electronic devices when
filling.
—Keep the pump nozzle in contactwith the container while you are
filling it.
—Use only approved portable fuelcontainers for flammable liquid.
CAUTION
. If fuel is spilled on the vehicle body,
flush it away with water to avoid paint
damage.
. Insert the cap straight into the fuel-filler
tube, then tighten until a single click is
heard. Failure to tighten the fuel-filler
cap properly may cause the
mal-
function indicator light (MIL) to illumi-
nate. If the
light illuminates
because the fuel-filler cap is loose or
missing, tighten or install the cap and
continue to drive the vehicle. The
light should turn off after a few driving
trips. If thelight does not turn off
after a few driving trips, have the vehicle
inspected by an INFINITI retailer.
For additional information, see “Mal-
function Indicator Light (MIL)” (P.2-19).
. The LOOSE FUEL CAP warning will appear
if the fuel-filler cap is not properly
tightened. It may take a few driving
trips for the message to be displayed.
Failure to tighten the fuel-filler cap
properly after the LOOSE FUEL CAP
warning appears may cause the
Pre-driving checks and adjustments3-25
Page 167 of 522
3-26Pre-driving checks and adjustments
Malfunction Indicator Light (MIL) to
illuminate.
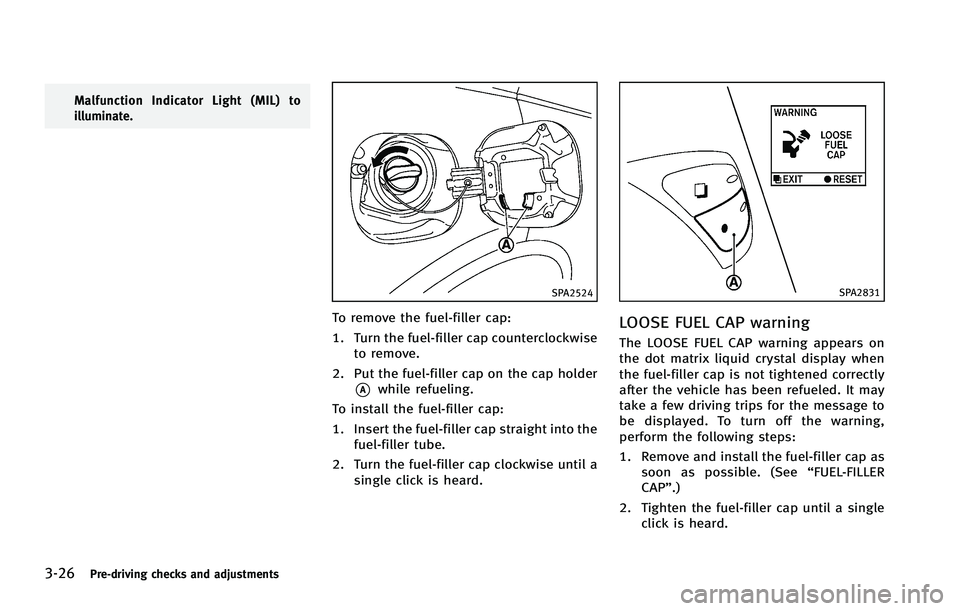
SPA2524
To remove the fuel-filler cap:
1. Turn the fuel-filler cap counterclockwiseto remove.
2. Put the fuel-filler cap on the cap holder
*Awhile refueling.
To install the fuel-filler cap:
1. Insert the fuel-filler cap straight into the fuel-filler tube.
2. Turn the fuel-filler cap clockwise until a single click is heard.
SPA2831
LOOSE FUEL CAP warning
The LOOSE FUEL CAP warning appears on
the dot matrix liquid crystal display when
the fuel-filler cap is not tightened correctly
after the vehicle has been refueled. It may
take a few driving trips for the message to
be displayed. To turn off the warning,
perform the following steps:
1. Remove and install the fuel-filler cap assoon as possible. (See “FUEL-FILLER
CAP”.)
2. Tighten the fuel-filler cap until a single click is heard.
Page 168 of 522
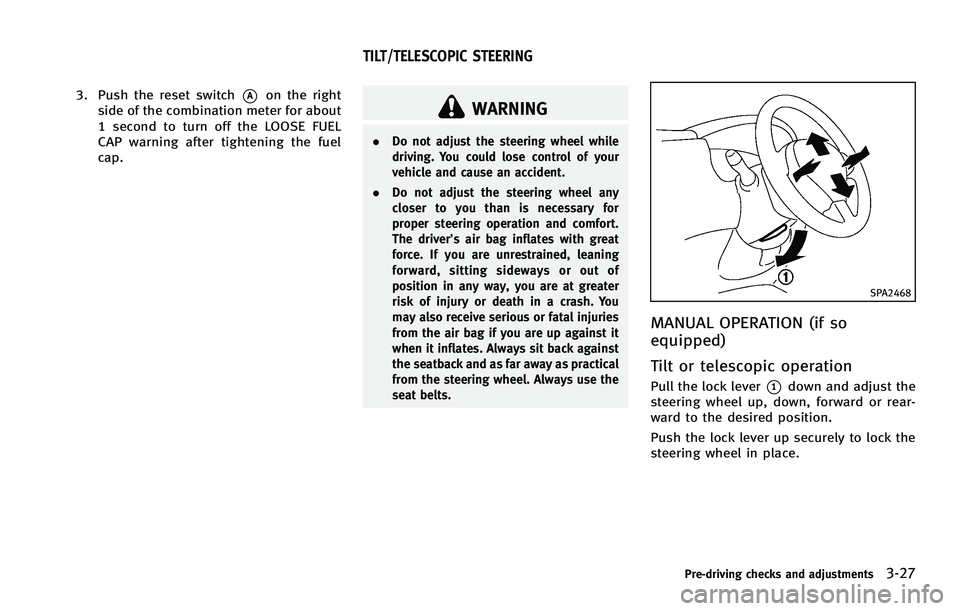
3. Push the reset switch*Aon the right
side of the combination meter for about
1 second to turn off the LOOSE FUEL
CAP warning after tightening the fuel
cap.WARNING
. Do not adjust the steering wheel while
driving. You could lose control of your
vehicle and cause an accident.
. Do not adjust the steering wheel any
closer to you than is necessary for
proper steering operation and comfort.
The driver’s air bag inflates with great
force. If you are unrestrained, leaning
forward, sitting sideways or out of
position in any way, you are at greater
risk of injury or death in a crash. You
may also receive serious or fatal injuries
from the air bag if you are up against it
when it inflates. Always sit back against
the seatback and as far away as practical
from the steering wheel. Always use the
seat belts.
SPA2468
MANUAL OPERATION (if so
equipped)
Tilt or telescopic operation
Pull the lock lever*1down and adjust the
steering wheel up, down, forward or rear-
ward to the desired position.
Push the lock lever up securely to lock the
steering wheel in place.
Pre-driving checks and adjustments3-27
TILT/TELESCOPIC STEERING
Page 169 of 522
3-28Pre-driving checks and adjustments
SPA2456
ELECTRIC OPERATION (if so
equipped)
Tilt or telescopic operation
Move the lever to adjust the steering wheel
up or down, forward or rearward to the
desired position.
Entry/Exit function operation (if so
equipped):
The automatic drive positioner system will
make the steering wheel move up auto-
matically when the driver’s door is opened
with the ignition switch in the LOCK
position. This lets the driver get into andout of the seat more easily.
For more information, see
“Automatic drive
positioner” (P.3-32).
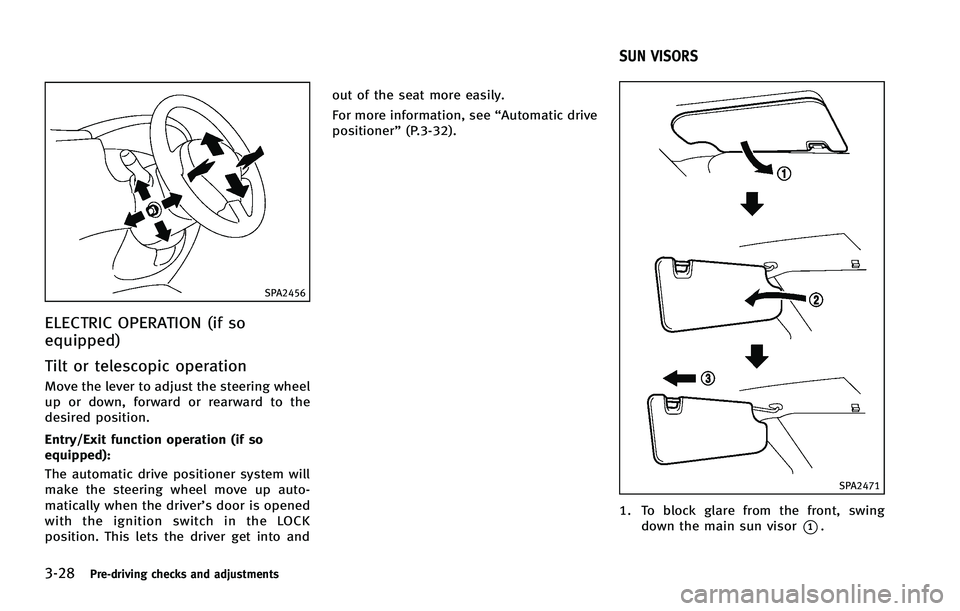
SPA2471
1. To block glare from the front, swing
down the main sun visor
*1.
SUN VISORS
Page 170 of 522

2. To block glare from the side, removethe main sun visor from the center
mount and swing the visor to the side
*2.
3. Slide the sun visor
*3in or out as
needed.
SPA2447
INSIDE MIRROR
Adjust the height and the angle of the
inside mirror to the desired position.
SPA2422A
Type A
SPA2450
Type B
Pre-driving checks and adjustments3-29
MIRRORS