transmission INFINITI G-CONVERTIBLE 2012 Service Manual
[x] Cancel search | Manufacturer: INFINITI, Model Year: 2012, Model line: G-CONVERTIBLE, Model: INFINITI G-CONVERTIBLE 2012Pages: 474, PDF Size: 3.63 MB
Page 355 of 474

5-46Starting and driving
GUID-4DD9A0F8-1386-4A22-899B-3ECDD1F27745
SD1006MA
WARNING
.Do not stop or park the vehicle over
flammable materials such as dry grass,
waste paper or rags. They may ignite and
cause a fire.
. Never leave the engine running while the
vehicle is unattended.
. Do not leave children unattended inside
the vehicle. They could unknowingly
activate switches or controls. Unat-
tended children could become involved
in serious accidents. .
Safe parking procedures require that
both the parking brake be applied and
the transmission placed into P (Park) for
Automatic Transmission (AT) model or in
an appropriate gear for Manual Trans-
mission (MT) model. Failure to do so
could cause the vehicle to move un-
expectedly or roll away and result in an
accident.
. Make sure the automatic transmission
selector lever has been pushed as far
forward as it can go and cannot be
moved without depressing the foot brake pedal.
1. Firmly apply the parking brake.
2.
Automatic transmission models:
Move the selector lever to the P (Park)
position.
Manual transmission models:
Place the shift lever in the R (Reverse)
gear. When parking on an uphill grade,
place the shift lever in the 1st gear.
3. To help prevent the vehicle from rolling into the street when parked on a
sloping drive way, it is a good practice
to turn the wheels as illustrated.
.HEADED DOWNHILL WITH CURB:*1
Turn the wheels into the curb and
move the vehicle forward until the
curb side wheel gently touches the
curb.
.HEADED UPHILL WITH CURB:*2
Turn the wheels away from the curb
and move the vehicle back until the
curb side wheel gently touches the
curb.
.HEADED UPHILL OR DOWNHILL, NO
CURB:
*3
Turn the wheels toward the side of
the road so the vehicle will move
PARKING/PARKING ON HILLS
Page 370 of 474

the tires and increase the likelihood of
tire failure. Serious vehicle damage
could occur and may lead to an accident
and could result in serious personal
injury. Check the tire pressure for all
four tires. Adjust the tire pressure to the
recommended COLD tire pressure shown
on the Tire and Loading Information
label to turn the low tire pressure
warning light OFF. If the light still
illuminates while driving after adjusting
the tire pressure, a tire may be flat. If
you have a flat tire, replace it with a
spare tire as soon as possible.
. When a spare tire is mounted or a wheel
is replaced, the TPMS will not function
and the low tire pressure warning light
will flash for approximately 1 minute.
The light will remain on after 1 minute.
Contact your INFINITI retailer as soon as
possible for tire replacement and/or
system resetting.
. Replacing tires with those not originally
specified by INFINITI could affect the
proper operation of the TPMS.
. Do not inject any tire liquid or aerosol
tire sealant into the tires, as this may
cause a malfunction of the tire pressure
sensors (for models not equipped with the emergency tire puncture repair kit).
. If you used the Emergency Tire Sealant
to repair a minor tire puncture, your
INFINITI retailer will also need to replace
the TPMS sensor in addition to repairing
or replacing the tire (for models
equipped with the emergency tire punc-
ture repair kit).
. INFINITI recommends using only NISSAN
Genuine Emergency Tire Sealant pro-
vided with your vehicle. Other tire
sealants may damage the valve stem
seal which can cause the tire to lose air
pressure (for models equipped with the
emergency tire puncture repair kit).
CHANGING FLAT TIRE (for models
with spare tire)
GUID-9B15550A-ABA1-4A2C-950E-BDED2B28BCB5If you have a flat tire, follow the instruc-
tions below.
Stopping the vehicleGUID-5A5AD417-603B-4670-8520-ECD73BDFFD6C1. Safely move the vehicle off the road
and away from traffic.
2. Turn on the hazard warning flashers.
3. Park on a level surface and apply the parking brake.
4. Automatic Transmission model:
Move the selector lever to the P (Park)
position.
Manual Transmission model:
Move the shift lever to the R (Reverse)
position.
5. Turn off the engine.
6. Raise the hood to warn other traffic, and to signal professional road assis-
tance personnel that you need assis-
tance.
7. Have all passengers get out of the vehicle and stand in a safe place, away
from traffic and clear of the vehicle.
WARNING
. Make sure the parking brake is securely
applied and the manual transmission is
shifted into R (Reverse), or the automatic
In case of emergency6-3
Page 371 of 474
6-4In case of emergency
transmission into P (Park).
. Never change tires when the vehicle is
on a slope, ice or slippery areas. This is
hazardous.
. Never change tires if oncoming traffic is
close to your vehicle. Wait for profes-
sional road assistance.
MCE0001A
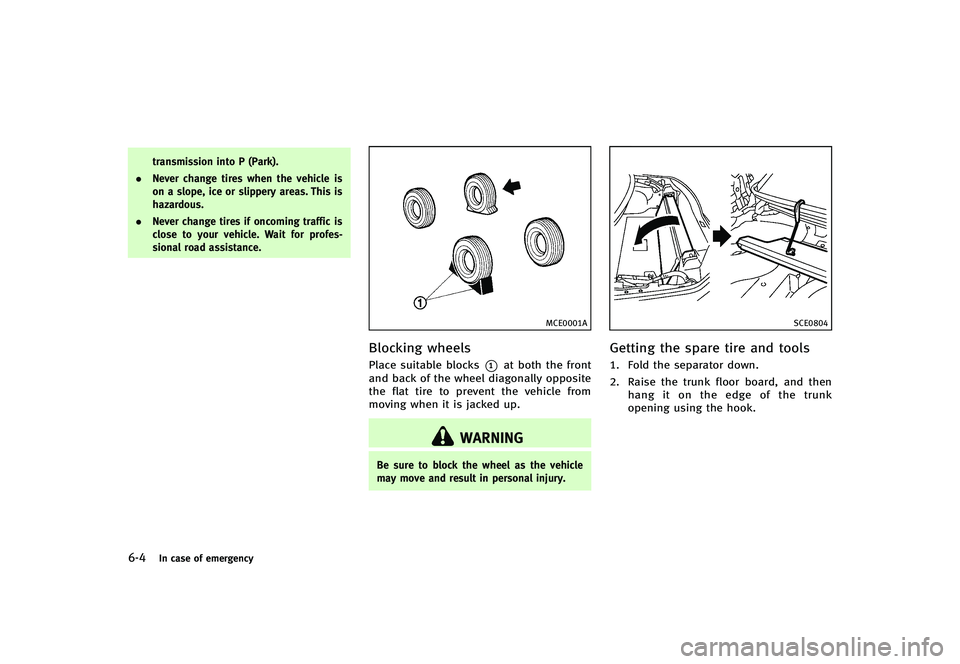
Blocking wheelsGUID-6A1DB770-53B2-4BFA-9588-B3D65FB9B9D7Place suitable blocks*1at both the front
and back of the wheel diagonally opposite
the flat tire to prevent the vehicle from
moving when it is jacked up.
WARNING
Be sure to block the wheel as the vehicle
may move and result in personal injury.
SCE0804
Getting the spare tire and toolsGUID-7DD2B12D-5730-4E55-BF75-F324EB9A62F61. Fold the separator down.
2. Raise the trunk floor board, and then
hang it on the edge of the trunk
opening using the hook.
Page 376 of 474
attached to the bottle)
—when the cut or the puncture isapproximately 0.25 in (6 mm) or
longer
—when the tire sidewall is damaged
—when the vehicle has been drivenwith extremely low tire pressure
—when the tire has come off theinside or the outside of the wheel.
—when the tire wheel is damaged
—when two or more tires are flat
Stopping the vehicleGUID-6C84A54D-4B5D-4178-B441-FBBC7590315C1. Safely move the vehicle off the road
and away from traffic.
2. Turn on the hazard warning flashers.
3. Park on a level surface and apply the parking brake.
4. Automatic Transmission models:
Move the selector lever to the P (Park)
position.
Manual Transmission models:
Move the shift lever to the R (Reverse)
position. 5. Turn off the engine.
6. Raise the hood to warn other traffic and
to signal professional road assistance
personnel that you need assistance.
7. Have all passengers get out of the vehicle and stand in a safe place, away
from traffic and clear of the vehicle.
WARNING
Make sure the parking brake is securely
applied and the manual transmission is
shifted into R (Reverse) or the automatic
transmission into P (Park).
. Never repair tires when the vehicle is on
a slope, ice or slippery areas. This is
hazardous.
. Never repair tires if oncoming traffic is
close to your vehicle. Wait for profes-
sional road assistance.
SCE0887
Getting emergency tire puncture
repair kit
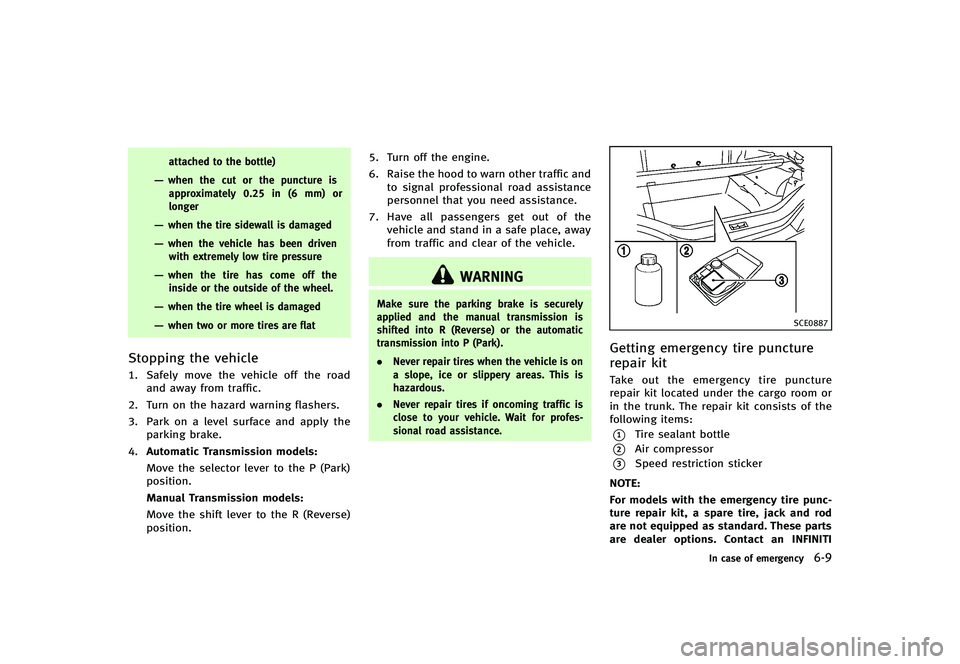
GUID-16CB7F23-E591-4102-B36C-83255DD3FB7FTake out the emergency tire puncture
repair kit located under the cargo room or
in the trunk. The repair kit consists of the
following items:
*1Tire sealant bottle
*2Air compressor
*3Speed restriction sticker
NOTE:
For models with the emergency tire punc-
ture repair kit, a spare tire, jack and rod
are not equipped as standard. These parts
are dealer options. Contact an INFINITI
In case of emergency6-9
Page 381 of 474
6-14In case of emergency
.Whenever working on or near a battery,
always wear suitable eye protectors (for
example, goggles or industrial safety
spectacles) and remove rings, metal
bands, or any other jewelry. Do not lean
over the battery when jump starting.
. Do not attempt to jump start a frozen
battery. It could explode and cause
serious injury.
. Your vehicle has an automatic engine
cooling fan. It could come on at any time.
Keep hands and other objects away from
it.
If needed, Roadside Assistance is avail-
able. Please see your Warranty Information
Booklet or Roadside Assistance I.D. Card
for the toll-free number to call (U.S.) or
Warranty Information Booklet (Canada).
SCE0653
WARNING
Always follow the instructions below. Failure
to do so could result in damage to the
charging system and cause personal injury.
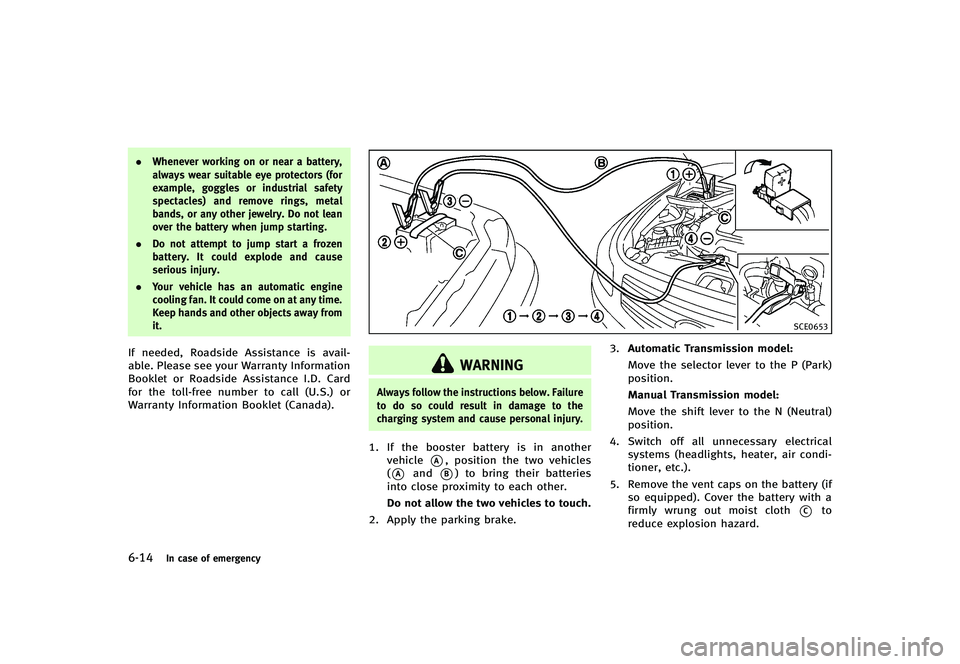
1. If the booster battery is in another
vehicle
*A, position the two vehicles
(
*Aand*B) to bring their batteries
into close proximity to each other.
Do not allow the two vehicles to touch.
2. Apply the parking brake. 3.
Automatic Transmission model:
Move the selector lever to the P (Park)
position.
Manual Transmission model:
Move the shift lever to the N (Neutral)
position.
4. Switch off all unnecessary electrical
systems (headlights, heater, air condi-
tioner, etc.).
5. Remove the vent caps on the battery (if so equipped). Cover the battery with a
firmly wrung out moist cloth
*Cto
reduce explosion hazard.
Page 382 of 474
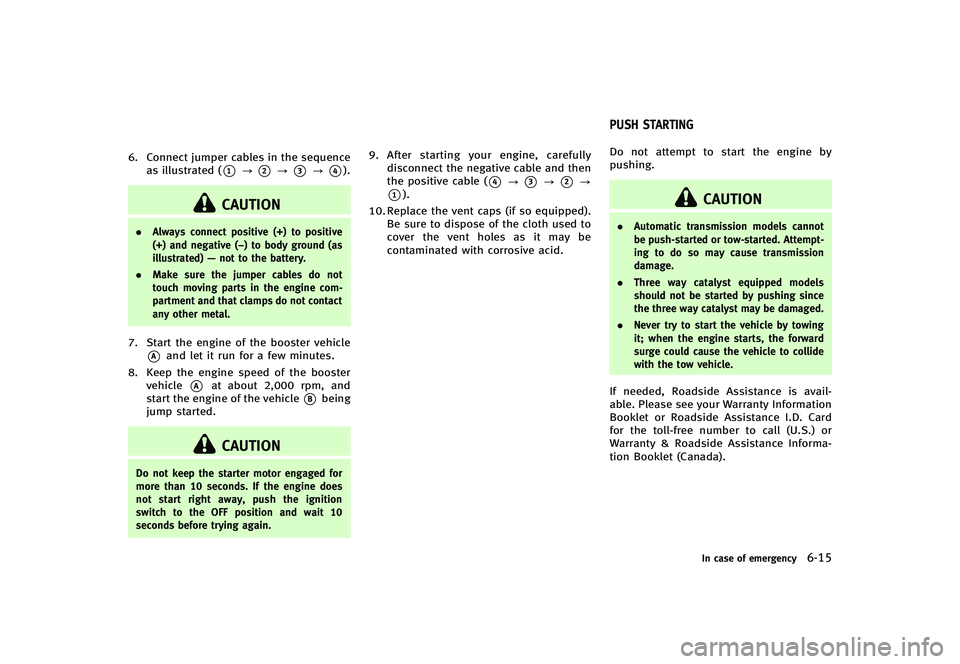
6. Connect jumper cables in the sequenceas illustrated (
*1?*2?*3?*4).
CAUTION
. Always connect positive (+) to positive
(+) and negative (−) to body ground (as
illustrated) —not to the battery.
. Make sure the jumper cables do not
touch moving parts in the engine com-
partment and that clamps do not contact
any other metal.
7. Start the engine of the booster vehicle
*Aand let it run for a few minutes.
8. Keep the engine speed of the booster vehicle
*Aat about 2,000 rpm, and
start the engine of the vehicle
*Bbeing
jump started.
CAUTION
Do not keep the starter motor engaged for
more than 10 seconds. If the engine does
not start right away, push the ignition
switch to the OFF position and wait 10
seconds before trying again.
9. After starting your engine, carefully
disconnect the negative cable and then
the positive cable (
*4?*3?*2?
*1).
10. Replace the vent caps (if so equipped). Be sure to dispose of the cloth used to
cover the vent holes as it may be
contaminated with corrosive acid.
GUID-131551FA-3D80-4698-B819-14F30AFBED38Do not attempt to start the engine by
pushing.
CAUTION
. Automatic transmission models cannot
be push-started or tow-started. Attempt-
ing to do so may cause transmission
damage.
. Three way catalyst equipped models
should not be started by pushing since
the three way catalyst may be damaged.
. Never try to start the vehicle by towing
it; when the engine starts, the forward
surge could cause the vehicle to collide
with the tow vehicle.
If needed, Roadside Assistance is avail-
able. Please see your Warranty Information
Booklet or Roadside Assistance I.D. Card
for the toll-free number to call (U.S.) or
Warranty & Roadside Assistance Informa-
tion Booklet (Canada).
In case of emergency6-15
PUSH STARTING
Page 383 of 474

6-16In case of emergency
GUID-ACE17335-4E03-448D-9AFB-B5A07B6F0C0C
CAUTION
.Do not continue to drive if your vehicle
overheats. Doing so could cause engine
damage or a vehicle fire.
. To avoid the danger of being scalded,
never remove the radiator cap while the
engine is still hot. When the radiator cap
is removed, pressurized hot water will
spurt out, possibly causing serious
injury.
. Do not open the hood if steam is coming
out.
If your vehicle is overheating (indicated by
an extremely high temperature gauge
reading), or if you feel a lack of engine
power, detect abnormal noise, etc., take
the following steps:
1. Move the vehicle safely off the road,
apply the parking brake.
2. Automatic Transmission model:
Move the selector lever to the P (Park)
position.
Manual Transmission model:
Move the shift lever to the N (Neutral)
position. Do not stop the engine.
3. Turn off the air conditioner. Open all the windows, move the heater or air condi-
tioner temperature control to maximum
hot and fan control to high speed.
4. If engine overheating is caused by
climbing a long hill on a hot day, run
the engine at a fast idle (approximately
1,500 rpm) until the temperature gauge
indication returns to normal.
5. Get out of the vehicle. Look and listen for steam or coolant escaping from the
radiator before opening the hood. (If
steam or coolant is escaping, turn off
the engine.) Do not open the hood
further until no steam or coolant can be
seen.
6. Open the engine hood.
WARNING
If steam or water is coming from the engine,
stand clear to prevent getting burned.
7. Visually check the drive belt for damage or looseness. Also check if the cooling
fan is running. The radiator hoses and
radiator should not leak water. If cool- ant is leaking or the cooling fan does
not run, stop the engine.
WARNING
Be careful not to allow your hands, hair,
jewelry or clothing to come into contact
with, or get caught in, engine belts or the
engine cooling fan. The engine cooling fan
can start at any time.
8. After the engine cools down, check the
coolant level in the reservoir with the
engine running. Add coolant to the
reservoir if necessary. Have your vehi-
cle repaired at the nearest INFINITI
retailer.
If needed, Roadside Assistance is avail-
able. Please see your Warranty Information
Booklet or Roadside Assistance I.D. Card
for the toll-free number to call (U.S.) or
Warranty & Roadside Assistance Informa-
tion Booklet (Canada).
IF YOUR VEHICLE OVERHEATS
Page 385 of 474
6-18In case of emergency
SCE0967
TOWING RECOMMENDED BY
INFINITI
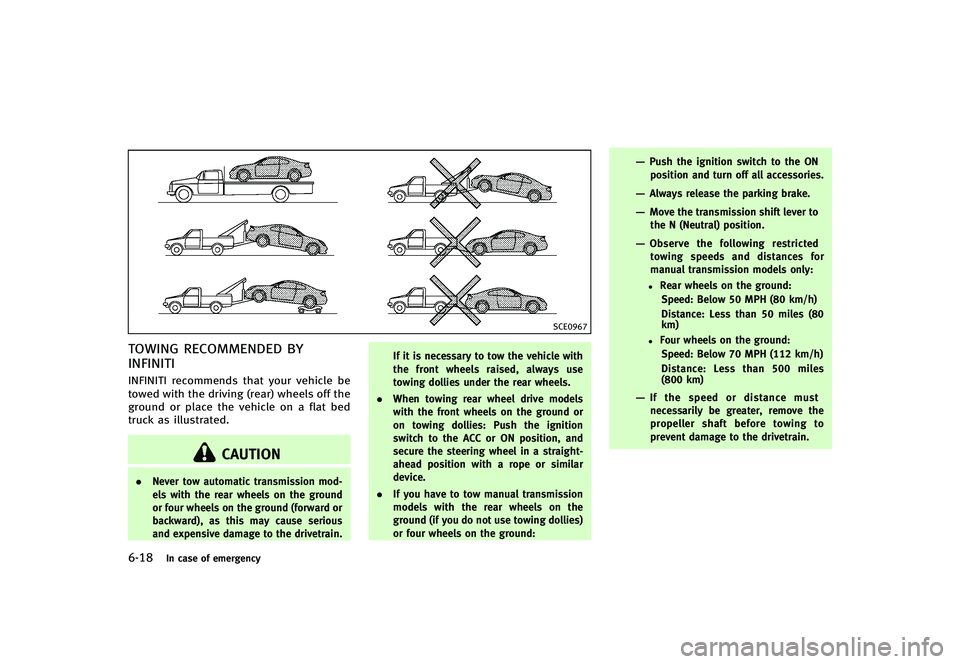
GUID-ED9538D8-F70E-46EA-B7DC-D0B36C79F2F0INFINITI recommends that your vehicle be
towed with the driving (rear) wheels off the
ground or place the vehicle on a flat bed
truck as illustrated.
CAUTION
.Never tow automatic transmission mod-
els with the rear wheels on the ground
or four wheels on the ground (forward or
backward), as this may cause serious
and expensive damage to the drivetrain. If it is necessary to tow the vehicle with
the front wheels raised, always use
towing dollies under the rear wheels.
. When towing rear wheel drive models
with the front wheels on the ground or
on towing dollies: Push the ignition
switch to the ACC or ON position, and
secure the steering wheel in a straight-
ahead position with a rope or similar
device.
. If you have to tow manual transmission
models with the rear wheels on the
ground (if you do not use towing dollies)
or four wheels on the ground:
—Push the ignition switch to the ON
position and turn off all accessories.
—Always release the parking brake.
—Move the transmission shift lever tothe N (Neutral) position.
—Observe the following restricted
towing speeds and distances for
manual transmission models only:
.Rear wheels on the ground:
Speed: Below 50 MPH (80 km/h)
Distance: Less than 50 miles (80
km)
.Four wheels on the ground:
Speed: Below 70 MPH (112 km/h)
Distance: Less than 500 miles
(800 km)
—If the speed or distance mustnecessarily be greater, remove the
propeller shaft before towing to
prevent damage to the drivetrain.
Page 388 of 474

.Never tow a vehicle using the vehicle tie
downs or recovery hooks.
. Always pull the cable straight out from
the front of the vehicle. Never pull on the
vehicle at an angle.
. Pulling devices should be routed so they
do not touch any part of the suspension,
steering, brake or cooling systems.
. Pulling devices such as ropes or canvas
straps are not recommended for use in
vehicle towing or recovery.
Rocking a stuck vehicleGUID-CAB6F3A9-C000-4766-AEE6-0D0457CAACBAIf your vehicle is stuck in sand, snow, mud,
etc., use the following procedure:
1. Turn off the Vehicle Dynamic Control
(VDC) system.
2. Make sure the area in front and behind the vehicle is clear of obstructions.
3. Turn the steering wheel right and left to clear an area around the front tires.
4. Slowly rock the vehicle forward and backward.
.Shift back and forth between R
(Reverse) and D (Drive) (automatic
transmission models) or 1st and R
(Reverse) (manual transmission models).
.Apply the accelerator as little as
possible to maintain the rocking
motion.
.Release the accelerator pedal beforeshifting between R (Reverse) and D
(Drive) (automatic transmission
models) or 1st and R (Reverse)
(manual transmission models).
.Do not spin the tires above 35 MPH(55 km/h).
5. If the vehicle cannot be freed after a few tries, contact a professional towing
service to remove the vehicle.
In case of emergency6-21
Page 398 of 474
8 Maintenance and do-it-yourself
Maintenance requirement...
.................................... 8-2
Scheduled maintenance ...
.................................. 8-2
General maintenance ...
....................................... 8-2
Where to go for service ...
................................... 8-2
General maintenance ...
........................................... 8-3
Explanation of maintenance items ...
................... 8-3
Maintenance precautions ...
..................................... 8-5
Engine compartment check locations ...
................... 8-7
VQ37VHR engine ...
............................................. 8-7
Engine cooling system ...
......................................... 8-8
Checking engine coolant level ...
......................... 8-9
Changing engine coolant ...
................................. 8-9
Engine oil ...
.......................................................... 8-10
Checking engine oil level ...
............................... 8-10
Changing engine oil and filter ...
....................... 8-10
Automatic transmission fluid ...
............................. 8-12
Power steering fluid ...
........................................... 8-13
Brake and clutch fluid ...
....................................... 8-13
Brake fluid ...
.................................................... 8-14
Clutch fluid (if so equipped) ...
.......................... 8-14
Window washer fluid ...
......................................... 8-14
Battery ...
.............................................................. 8-15
Jump starting ...
................................................ 8-17
Variable voltage control system ...
......................... 8-17 Drive belt
...
.......................................................... 8-17
Spark plugs ...
...................................................... 8-18
Replacing spark plugs ...
................................. 8-18
Air cleaner ...
........................................................ 8-19
Windshield wiper blades ...
................................... 8-20
Cleaning ...
...................................................... 8-20
Replacing ...
..................................................... 8-20
Brakes ...
.............................................................. 8-21
Self-adjusting brakes ...
................................... 8-21
Brake pad wear warning ...
.............................. 8-21
Fuses ...
................................................................ 8-22
Engine compartment ...
.................................... 8-22
Passenger compartment ...
............................... 8-23
Intelligent Key battery replacement ...
................... 8-24
Lights ...
................................................................ 8-26
Headlights ...
................................................... 8-26
Exterior and interior lights ...
........................... 8-27
Wheels and tires ...
............................................... 8-29
Tire pressure ...
............................................... 8-29
Tire labeling ...
................................................ 8-32
Types of tires ...
............................................... 8-34
Tire chains ...
................................................... 8-35
Changing wheels and tires ...
........................... 8-35