center console INFINITI M35 2006 Factory Owner's Manual
[x] Cancel search | Manufacturer: INFINITI, Model Year: 2006, Model line: M35, Model: INFINITI M35 2006Pages: 5621, PDF Size: 65.56 MB
Page 3012 of 5621
SQUEAK AND RATTLE TROUBLE DIAGNOSES
EI-7
C
D
E
F
G
H
J
K
L
MA
B
EI
Revision: 2006 January2006 M35/M45
INSULATOR (Light foam block)
80845-71L00: 30 mm (1.18 in) thick, 30
50 mm (1.181.97 in)
FELT CLOTHTAPE
Used to insulate where movement does not occur. Ideal for instrument panel applications.
68370-4B000: 15
25 mm (0.590.98 in) pad/68239-13E00: 5 mm (0.20 in) wide tape roll
The following materials, not found in the kit, can also be used to repair squeaks and rattles.
UHMW (TEFLON) TAPE
Insulates where slight movement is present. Ideal for instrument panel applications.
SILICONE GREASE
Used in place of UHMW tape that will be visible or not fit. Will only last a few months.
SILICONE SPRAY
Use when grease cannot be applied.
DUCT TAPE
Use to eliminate movement.
CONFIRM THE REPAIR
Confirm that the cause of a noise is repaired by test driving the vehicle. Operate the vehicle under the same
conditions as when the noise originally occurred. Refer to the notes on the Diagnostic Worksheet.
Generic Squeak and Rattle TroubleshootingNIS0024B
Refer to Table of Contents for specific component removal and installation information.
INSTRUMENT PANEL
Most incidents are caused by contact and movement between:
1. The cluster lid A and instrument panel
2. Acrylic lens and combination meter housing
3. Instrument panel to front pillar garnish
4. Instrument panel to windshield
5. Instrument panel mounting pins
6. Wiring harnesses behind the combination meter
7. A/C defroster duct and duct joint
These incidents can usually be located by tapping or moving the components to duplicate the noise or by
pressing on the components while driving to stop the noise. Most of these incidents can be repaired by
applying felt cloth tape or silicon spray (in hard to reach areas). Urethane pads can be used to insulate
wiring harness.
CAUTION:
Do not use silicone spray to isolate a squeak or rattle. If you saturate the area with silicone, you
will not be able to recheck the repair.
CENTER CONSOLE
Components to pay attention to include:
1. Shifter assembly cover to finisher
2. A/C control unit and cluster lid C
3. Wiring harnesses behind audio and A/C control unit
The instrument panel repair and isolation procedures also apply to the center console.
DOORS
Pay attention to the:
1. Finisher and inner panel making a slapping noise
2. Inside handle escutcheon to door finisher
3. Wiring harnesses tapping
4. Door striker out of alignment causing a popping noise on starts and stops
Tapping or moving the components or pressing on them while driving to duplicate the conditions can isolate
many of these incidents. You can usually insulate the areas with felt cloth tape or insulator foam blocks from
the Nissan Squeak and Rattle Kit (J-43980) to repair the noise.
Page 3055 of 5621
EI-50
FLOOR TRIM
Revision: 2006 January2006 M35/M45
FLOOR TRIMPFP:74902
Removal and InstallationNIS00252
REMOVAL
1. Remove front seat (LH/RH) and rear seat cushion. Refer to SE-167, "Removal and Installation" and SE-
176, "Removal and Installation" .
2. Remove accelerator pedal pad. Refer to ACC-3, "
ACCELERATOR CONTROL SYSTEM" .
3. Remove rear floor grille and foot grille. Refer to ATC-144, "
DUCTS AND GRILLES" .
4. Remove front seat belt floor anchor bolt (LH/RH). Refer to SB-30, "
Removal and Installation of Front Seat
Belt" .
5. Remove center console. Refer to IP-10, "
INSTRUMENT PANEL ASSEMBLY" .
6. Remove instrument driver lower panel and instrument passenger lower cover. Refer to IP-10, "
INSTRU-
MENT PANEL ASSEMBLY" .
7. Remove floor hook.
8. Remove dash side finisher, front kicking plate inner, center pillar lower garnish, and rear kicking plate
inner, front body side welt (LH/RH), rear body side welt (LH/RH), rear wheel house garnish. Refer to EI-
37, "BODY SIDE TRIM" .
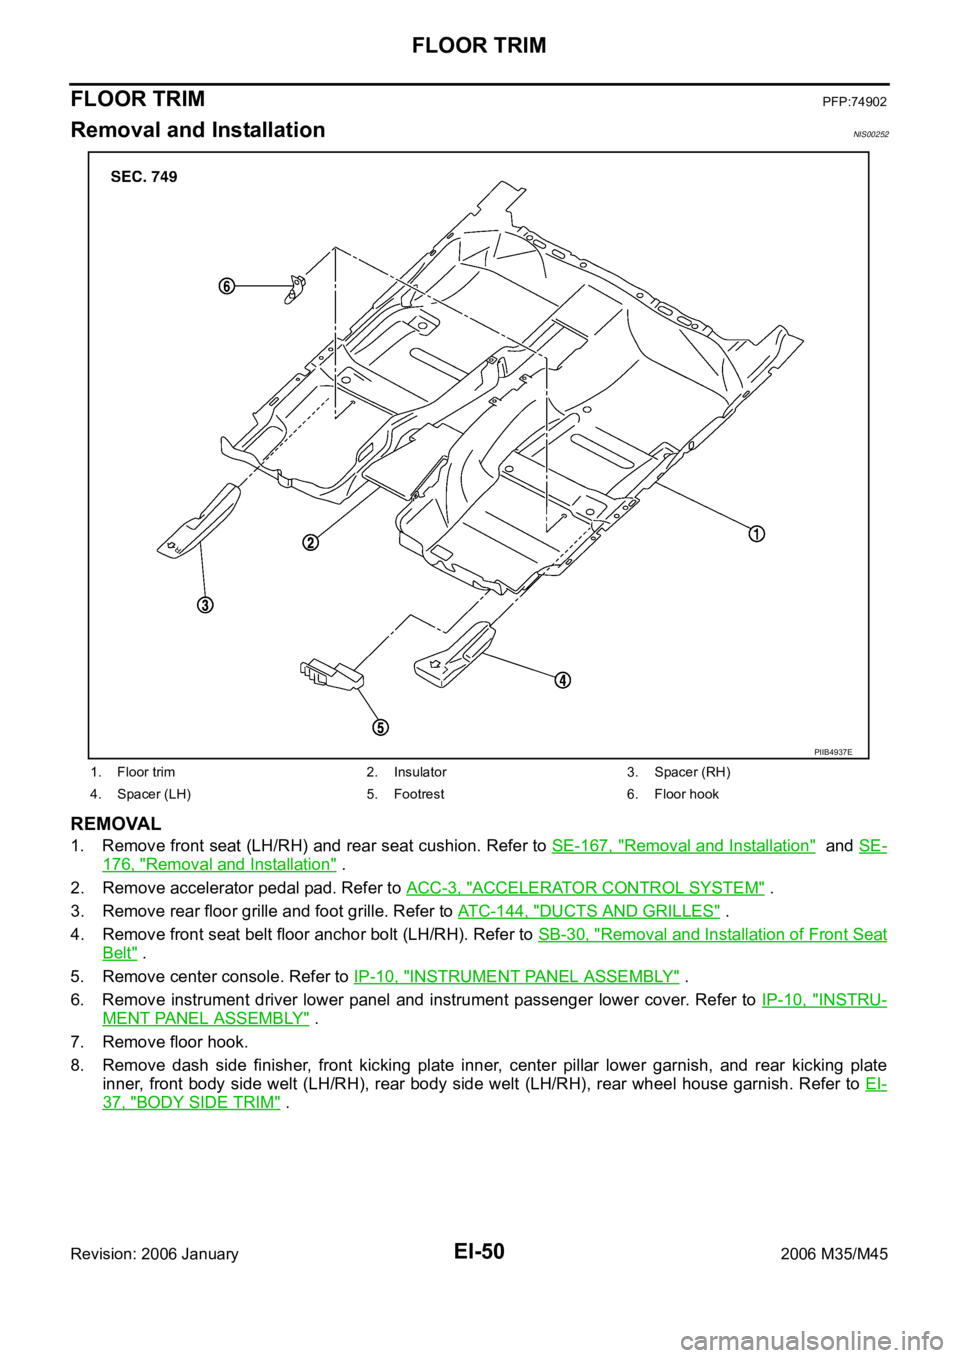
1. Floor trim 2. Insulator 3. Spacer (RH)
4. Spacer (LH) 5. Footrest 6. Floor hook
PIIB4937E
Page 3059 of 5621
EI-54
HEADLINING
Revision: 2006 January2006 M35/M45
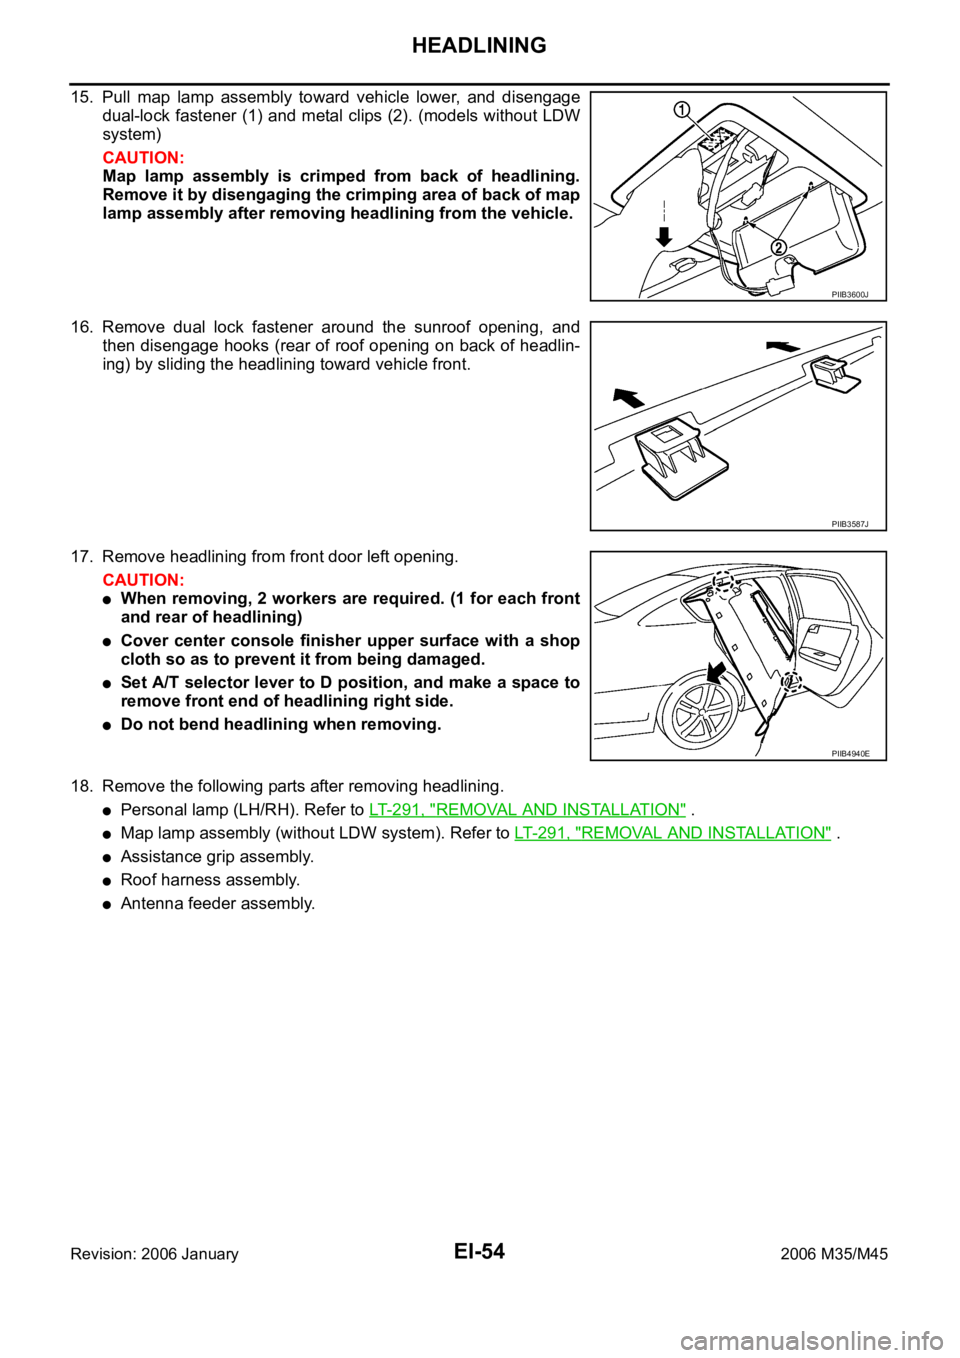
15. Pull map lamp assembly toward vehicle lower, and disengage
dual-lock fastener (1) and metal clips (2). (models without LDW
system)
CAUTION:
Map lamp assembly is crimped from back of headlining.
Remove it by disengaging the crimping area of back of map
lamp assembly after removing headlining from the vehicle.
16. Remove dual lock fastener around the sunroof opening, and
then disengage hooks (rear of roof opening on back of headlin-
ing) by sliding the headlining toward vehicle front.
17. Remove headlining from front door left opening.
CAUTION:
When removing, 2 workers are required. (1 for each front
and rear of headlining)
Cover center console finisher upper surface with a shop
cloth so as to prevent it from being damaged.
Set A/T selector lever to D position, and make a space to
remove front end of headlining right side.
Do not bend headlining when removing.
18. Remove the following parts after removing headlining.
Personal lamp (LH/RH). Refer to LT-291, "REMOVAL AND INSTALLATION" .
Map lamp assembly (without LDW system). Refer to LT- 2 9 1 , "REMOVAL AND INSTALLATION" .
Assistance grip assembly.
Roof harness assembly.
Antenna feeder assembly.
PIIB3600J
PIIB3587J
PIIB4940E
Page 3520 of 5621

GW-1
GLASSES, WINDOW SYSTEM & MIRRORS
I BODY
CONTENTS
C
D
E
F
G
H
J
K
L
M
SECTION GW
A
B
GW
Revision: 2006 January2006 M35/M45
GLASSES, WINDOW SYSTEM & MIRRORS
PRECAUTIONS .......................................................... 3
Precautions for Supplemental Restraint System
(SRS) “AIR BAG” and “SEAT BELT PRE-TEN-
SIONER” .................................................................. 3
Precautions for Procedures without Cowl Top Cover ..... 3
Handling for Adhesive and Primer ........................... 3
PREPARATION ........................................................... 4
Special Service Tools ............................................... 4
Commercial Service Tools ........................................ 4
SQUEAK AND RATTLE TROUBLE DIAGNOSES ..... 5
Work Flow ................................................................ 5
CUSTOMER INTERVIEW ..................................... 5
DUPLICATE THE NOISE AND TEST DRIVE ....... 6
CHECK RELATED SERVICE BULLETINS ........... 6
LOCATE THE NOISE AND IDENTIFY THE
ROOT CAUSE ...................................................... 6
REPAIR THE CAUSE ........................................... 6
CONFIRM THE REPAIR ....................................... 7
Generic Squeak and Rattle Troubleshooting ........... 7
INSTRUMENT PANEL .......................................... 7
CENTER CONSOLE ............................................. 7
DOORS ................................................................. 7
TRUNK .................................................................. 8
SUNROOF/HEADLINING ..................................... 8
SEATS ................................................................... 8
UNDERHOOD ....................................................... 8
Diagnostic Worksheet .............................................. 9
WINDSHIELD GLASS ...............................................11
Removal and Installation ......................................... 11
REMOVAL ........................................................
.... 11
INSTALLATION ................................................... 12
POWER WINDOW SYSTEM .................................... 13
Component Parts and Harness Connector Location ... 13
System Description ................................................ 13
MANUAL OPERATION ....................................... 14
AUTO OPERATION ............................................ 16
POWER WINDOW SERIAL LINK ....................... 16
POWER WINDOW LOCK ................................... 16
RETAINED POWER OPERATION ...................... 16ANTI-PINCH SYSTEM ........................................ 17
INITIALIZATION .................................................. 17
FAIL-SAFE CONTROL ........................................ 18
POWER WINDOW CONTROL BY THE KEY
CYLINDER SWITCH ........................................... 18
CAN Communication System Description .............. 19
CAN Communication Unit ....................................... 19
Schematic ............................................................... 20
Wiring Diagram — WINDOW — ............................. 21
Terminal and Reference Value for BCM ................. 27
Terminal and Reference Value for Power Window
Main Switch ............................................................ 28
Terminal and Reference Value for (Front and Rear)
Power Window Sub-Switch .................................... 29
CONSULT-II Function (BCM) ................................. 30
WORK SUPPORT ............................................... 31
DATE MONITOR ................................................. 31
Work Flow ............................................................... 32
Trouble Diagnosis Symptom Chart ......................... 32
BCM Power Supply and Ground Circuit Check ...... 34
Power Window Main Switch Power Supply Circuit
Check ..................................................................... 35
Power Window Sub-Switch (Front Passenger Side)
Power Supply and Ground Circuit Check ............... 36
Power Window Sub-Switch (Rear LH or RH) Power
Supply and Ground Circuit Check .......................... 37
Power Window Motor (Front Driver Side) Circuit
Check ..................................................................... 38
Power Window Motor (Front Passenger Side) Cir-
cuit Check ............................................................... 39
Power Window Motor (Rear LH or RH) Circuit Check ... 40
Encoder Circuit Check (Driver Side) ....................... 42
Encoder Circuit Check (Passenger Side) ............... 45
Encoder Circuit Check (Rear LH or RH) ................. 48
Door Switch Check ..............................................
... 52
Front Door Key Cylinder Switch Check .................. 54
Power Window Serial Link Check (Passenger Side) ... 56
Power Window Serial Link Check (Rear LH or RH) ... 58
Power Window Lock Switch Check ........................ 58
Page 3526 of 5621
SQUEAK AND RATTLE TROUBLE DIAGNOSES
GW-7
C
D
E
F
G
H
J
K
L
MA
B
GW
Revision: 2006 January2006 M35/M45
INSULATOR (Light foam block)
80845-71L00: 30 mm (1.18 in) thick, 30
50 mm (1.181.97 in)
FELT CLOTHTAPE
Used to insulate where movement does not occur. Ideal for instrument panel applications.
68370-4B000: 15
25 mm (0.590.98 in) pad/68239-13E00: 5 mm (0.20 in) wide tape roll
The following materials, not found in the kit, can also be used to repair squeaks and rattles.
UHMW (TEFLON) TAPE
Insulates where slight movement is present. Ideal for instrument panel applications.
SILICONE GREASE
Used in place of UHMW tape that will be visible or not fit. Will only last a few months.
SILICONE SPRAY
Use when grease cannot be applied.
DUCT TAPE
Use to eliminate movement.
CONFIRM THE REPAIR
Confirm that the cause of a noise is repaired by test driving the vehicle. Operate the vehicle under the same
conditions as when the noise originally occurred. Refer to the notes on the Diagnostic Worksheet.
Generic Squeak and Rattle TroubleshootingNIS0021C
Refer to Table of Contents for specific component removal and installation information.
INSTRUMENT PANEL
Most incidents are caused by contact and movement between:
1. The cluster lid A and instrument panel
2. Acrylic lens and combination meter housing
3. Instrument panel to front pillar garnish
4. Instrument panel to windshield
5. Instrument panel mounting pins
6. Wiring harnesses behind the combination meter
7. A/C defroster duct and duct joint
These incidents can usually be located by tapping or moving the components to duplicate the noise or by
pressing on the components while driving to stop the noise. Most of these incidents can be repaired by apply-
ing felt cloth tape or silicon spray (in hard to reach areas). Urethane pads can be used to insulate wiring har-
ness.
CAUTION:
Do not use silicone spray to isolate a squeak or rattle. If you saturate the area with silicone, you will
not be able to recheck the repair.
CENTER CONSOLE
Components to pay attention to include:
1. Shifter assembly cover to finisher
2. A/C control unit and cluster lid C
3. Wiring harnesses behind audio and A/C control unit
The instrument panel repair and isolation procedures also apply to the center console.
DOORS
Pay attention to the:
1. Finisher and inner panel making a slapping noise
2. Inside handle escutcheon to door finisher
3. Wiring harnesses tapping
4. Door striker out of alignment causing a popping noise on starts and stops
Tapping or moving the components or pressing on them while driving to duplicate the conditions can isolate
many of these incidents. You can usually insulate the areas with felt cloth tape or insulator foam blocks from
the Nissan Squeak and Rattle Kit (J-43980) to repair the noise.
Page 3650 of 5621

IP-1
INSTRUMENT PANEL
I BODY
CONTENTS
C
D
E
F
G
H
J
K
L
M
SECTION IP
A
B
IP
Revision: 2006 January2006 M35/M45
INSTRUMENT PANEL
PRECAUTIONS .......................................................... 2
Precautions for Supplemental Restraint System
(SRS) “AIR BAG” and “SEAT BELT PRE-TEN-
SIONER” .................................................................. 2
Precautions .............................................................. 2
PREPARATION ........................................................... 3
Special Service Tools ............................................... 3
Commercial Service Tools ........................................ 3
SQUEAK AND RATTLE TROUBLE DIAGNOSES ..... 4
Work Flow ................................................................ 4
CUSTOMER INTERVIEW ..................................... 4
DUPLICATE THE NOISE AND TEST DRIVE ....... 5
CHECK RELATED SERVICE BULLETINS ........... 5
LOCATE THE NOISE AND IDENTIFY THE
ROOT CAUSE ...................................................... 5
REPAIR THE CAUSE ........................................... 5
CONFIRM THE REPAIR ....................................... 6
Generic Squeak and Rattle Troubleshooting ........... 6
INSTRUMENT PANEL .......................................... 6
CENTER CONSOLE ............................................. 6
DOORS ................................................................. 6TRUNK .................................................................. 7
SUNROOF/HEADLINING ..................................... 7
SEATS ................................................................... 7
UNDERHOOD ....................................................... 7
Diagnostic Worksheet ............................................... 8
INSTRUMENT PANEL ASSEMBLY ......................... 10
Component Parts Drawing ..................................... 10
Removal and Installation of Instrument Panel & Pad ... 11
REMOVAL ........................................................
... 11
INSTALLATION ................................................... 14
Removal and Installation of Cluster Lid A ............... 15
REMOVAL ........................................................
... 15
INSTALLATION ................................................... 16
Removal and Installation of Cluster Lid C .............. 17
REMOVAL ........................................................
... 17
INSTALLATION ................................................... 18
Removal and Installation of Glove Box Assembly ... 18
REMOVAL ........................................................
... 18
INSTALLATION ................................................... 18
Disassembly and Assembly .................................... 19
CENTER CONSOLE ASSEMBLY ....................... 19
Page 3655 of 5621

IP-6
SQUEAK AND RATTLE TROUBLE DIAGNOSES
Revision: 2006 January2006 M35/M45
INSULATOR (Light foam block)
80845-71L00: 30 mm (1.18 in) thick, 30
50 mm (1.181.97 in)
FELT CLOTHTAPE
Used to insulate where movement does not occur. Ideal for instrument panel applications.
68370-4B000: 15
25 mm (0.590.98 in) pad/68239-13E00: 5 mm (0.20 in) wide tape roll
The following materials, not found in the kit, can also be used to repair squeaks and rattles.
UHMW (TEFLON) TAPE
Insulates where slight movement is present. Ideal for instrument panel applications.
SILICONE GREASE
Used in place of UHMW tape that will be visible or not fit. Will only last a few months.
SILICONE SPRAY
Use when grease cannot be applied.
DUCT TAPE
Use to eliminate movement.
CONFIRM THE REPAIR
Confirm that the cause of a noise is repaired by test driving the vehicle. Operate the vehicle under the same
conditions as when the noise originally occurred. Refer to the notes on the Diagnostic Worksheet.
Generic Squeak and Rattle TroubleshootingNIS0025A
Refer to Table of Contents for specific component removal and installation information.
INSTRUMENT PANEL
Most incidents are caused by contact and movement between:
1. The cluster lid A and instrument panel
2. Acrylic lens and combination meter housing
3. Instrument panel to front pillar garnish
4. Instrument panel to windshield
5. Instrument panel mounting pins
6. Wiring harnesses behind the combination meter
7. A/C defroster duct and duct joint
These incidents can usually be located by tapping or moving the components to duplicate the noise or by
pressing on the components while driving to stop the noise. Most of these incidents can be repaired by apply-
ing felt cloth tape or silicon spray (in hard to reach areas). Urethane pads can be used to insulate wiring har-
ness.
CAUTION:
Do not use silicone spray to isolate a squeak or rattle. If you saturate the area with silicone, you will
not be able to recheck the repair.
CENTER CONSOLE
Components to pay attention to include:
1. Shifter assembly cover to finisher
2. A/C control unit and cluster lid C
3. Wiring harnesses behind audio and A/C control unit
The instrument panel repair and isolation procedures also apply to the center console.
DOORS
Pay attention to the:
1. Finisher and inner panel making a slapping noise
2. Inside handle escutcheon to door finisher
3. Wiring harnesses tapping
4. Door striker out of alignment causing a popping noise on starts and stops
Tapping or moving the components or pressing on them while driving to duplicate the conditions can isolate
many of these incidents. You can usually insulate the areas with felt cloth tape or insulator foam blocks from
the Nissan Squeak and Rattle Kit (J-43980) to repair the noise.
Page 3660 of 5621
INSTRUMENT PANEL ASSEMBLY
IP-11
C
D
E
F
G
H
J
K
L
MA
B
IP
Revision: 2006 January2006 M35/M45
Removal and Installation of Instrument Panel & PadNIS0025D
REMOVAL
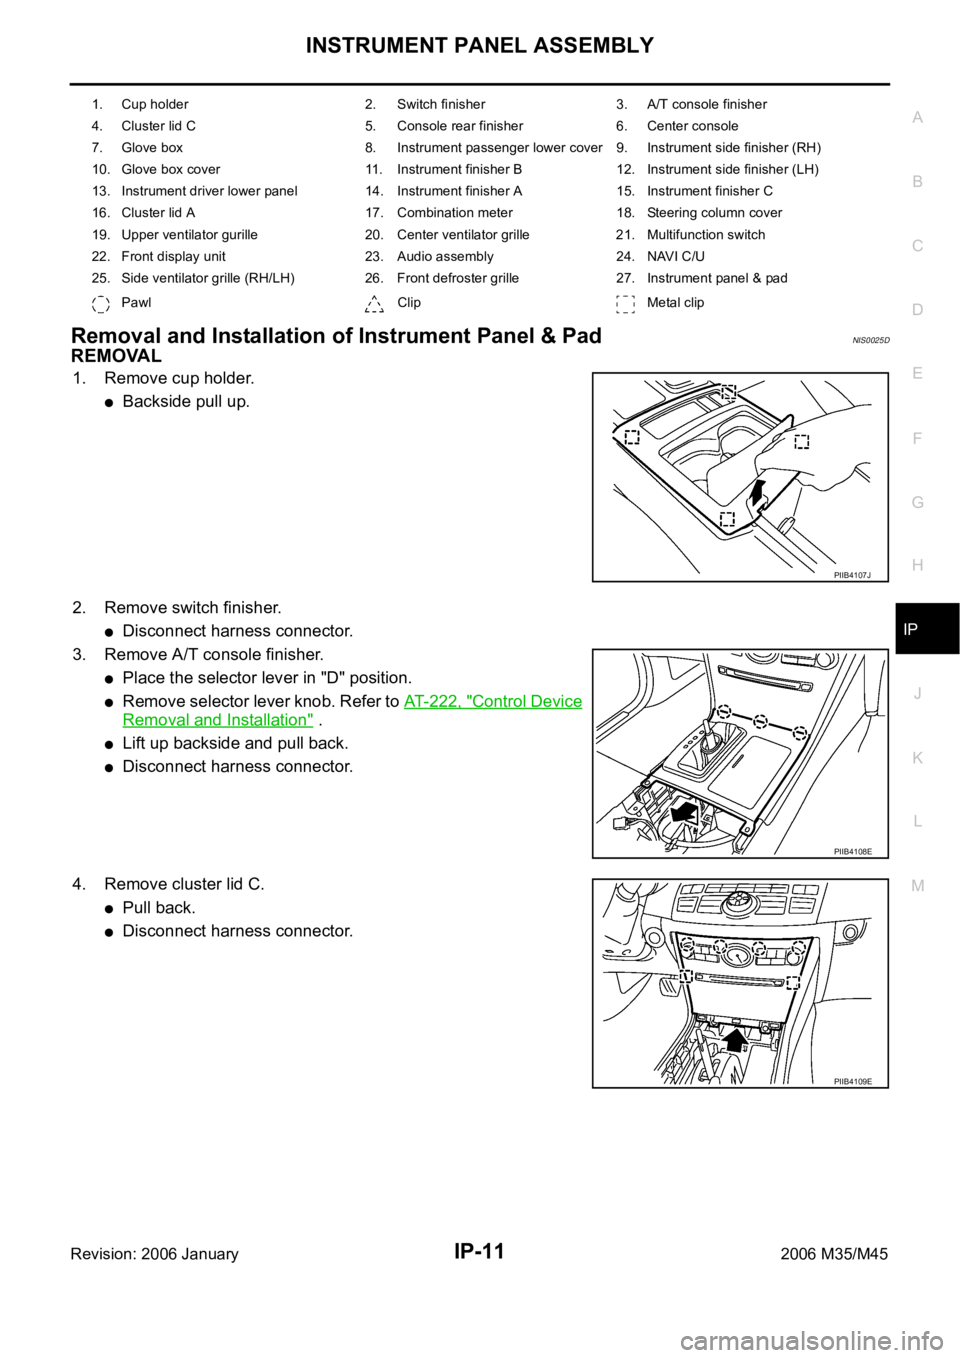
1. Remove cup holder.
Backside pull up.
2. Remove switch finisher.
Disconnect harness connector.
3. Remove A/T console finisher.
Place the selector lever in "D" position.
Remove selector lever knob. Refer to AT- 2 2 2 , "Control Device
Removal and Installation" .
Lift up backside and pull back.
Disconnect harness connector.
4. Remove cluster lid C.
Pull back.
Disconnect harness connector.
1. Cup holder 2. Switch finisher 3. A/T console finisher
4. Cluster lid C 5. Console rear finisher 6. Center console
7. Glove box 8. Instrument passenger lower cover 9. Instrument side finisher (RH)
10. Glove box cover 11. Instrument finisher B 12. Instrument side finisher (LH)
13. Instrument driver lower panel 14. Instrument finisher A 15. Instrument finisher C
16. Cluster lid A 17. Combination meter 18. Steering column cover
19. Upper ventilator gurille 20. Center ventilator grille 21. Multifunction switch
22. Front display unit 23. Audio assembly 24. NAVI C/U
25. Side ventilator grille (RH/LH) 26. Front defroster grille 27. Instrument panel & pad
Pawl Clip Metal clip
PIIB4107J
PIIB4108E
PIIB4109E
Page 3661 of 5621
IP-12
INSTRUMENT PANEL ASSEMBLY
Revision: 2006 January2006 M35/M45
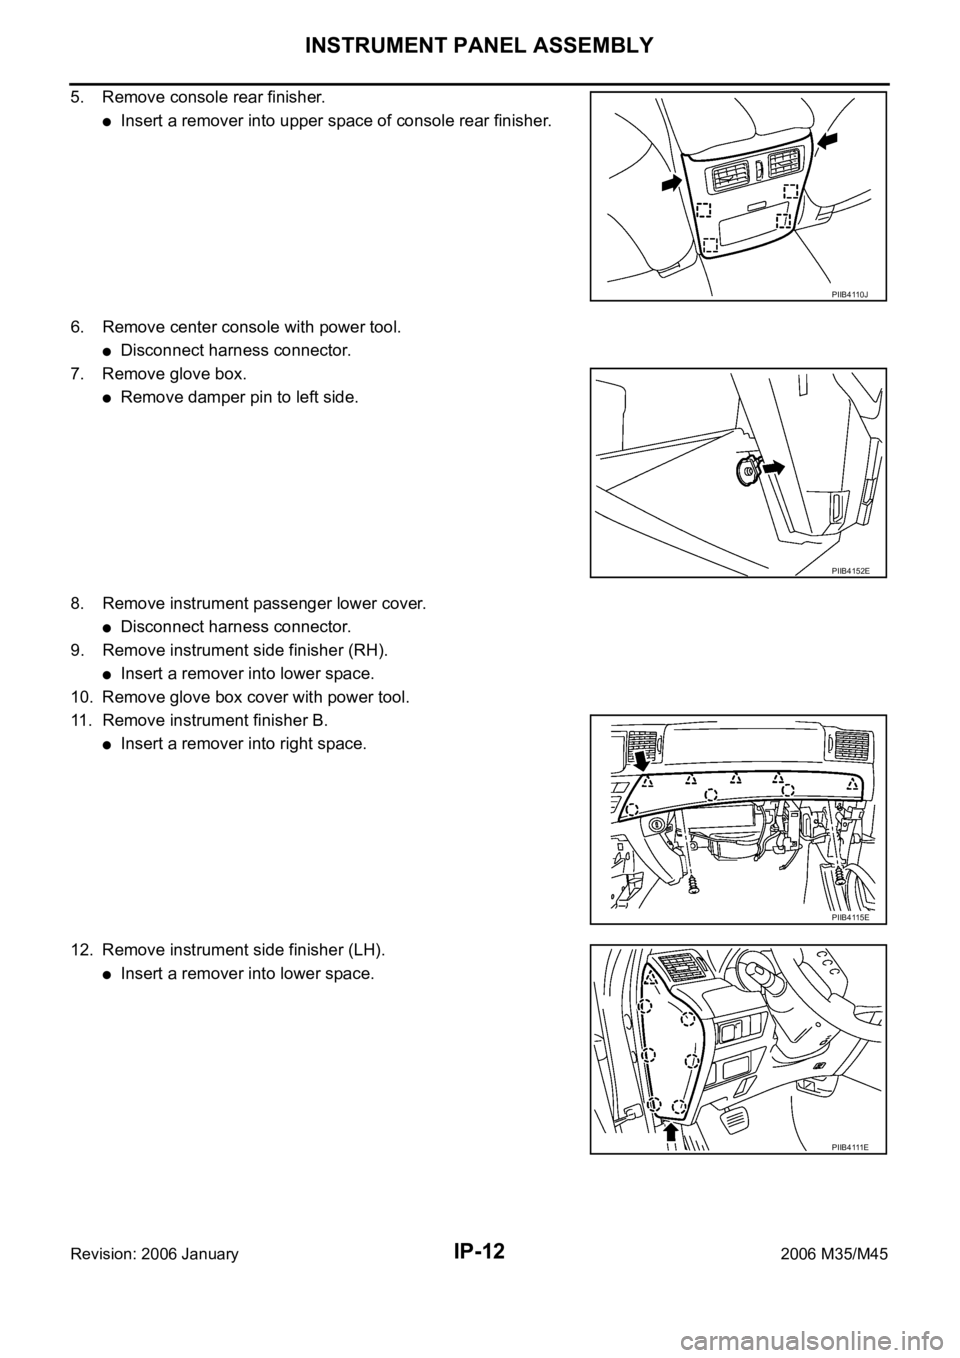
5. Remove console rear finisher.
Insert a remover into upper space of console rear finisher.
6. Remove center console with power tool.
Disconnect harness connector.
7. Remove glove box.
Remove damper pin to left side.
8. Remove instrument passenger lower cover.
Disconnect harness connector.
9. Remove instrument side finisher (RH).
Insert a remover into lower space.
10. Remove glove box cover with power tool.
11. Remove instrument finisher B.
Insert a remover into right space.
12. Remove instrument side finisher (LH).
Insert a remover into lower space.
PIIB4110J
PIIB4152E
PIIB4115E
PIIB4111E
Page 3668 of 5621
INSTRUMENT PANEL ASSEMBLY
IP-19
C
D
E
F
G
H
J
K
L
MA
B
IP
Revision: 2006 January2006 M35/M45
Disassembly and AssemblyNIS0025H
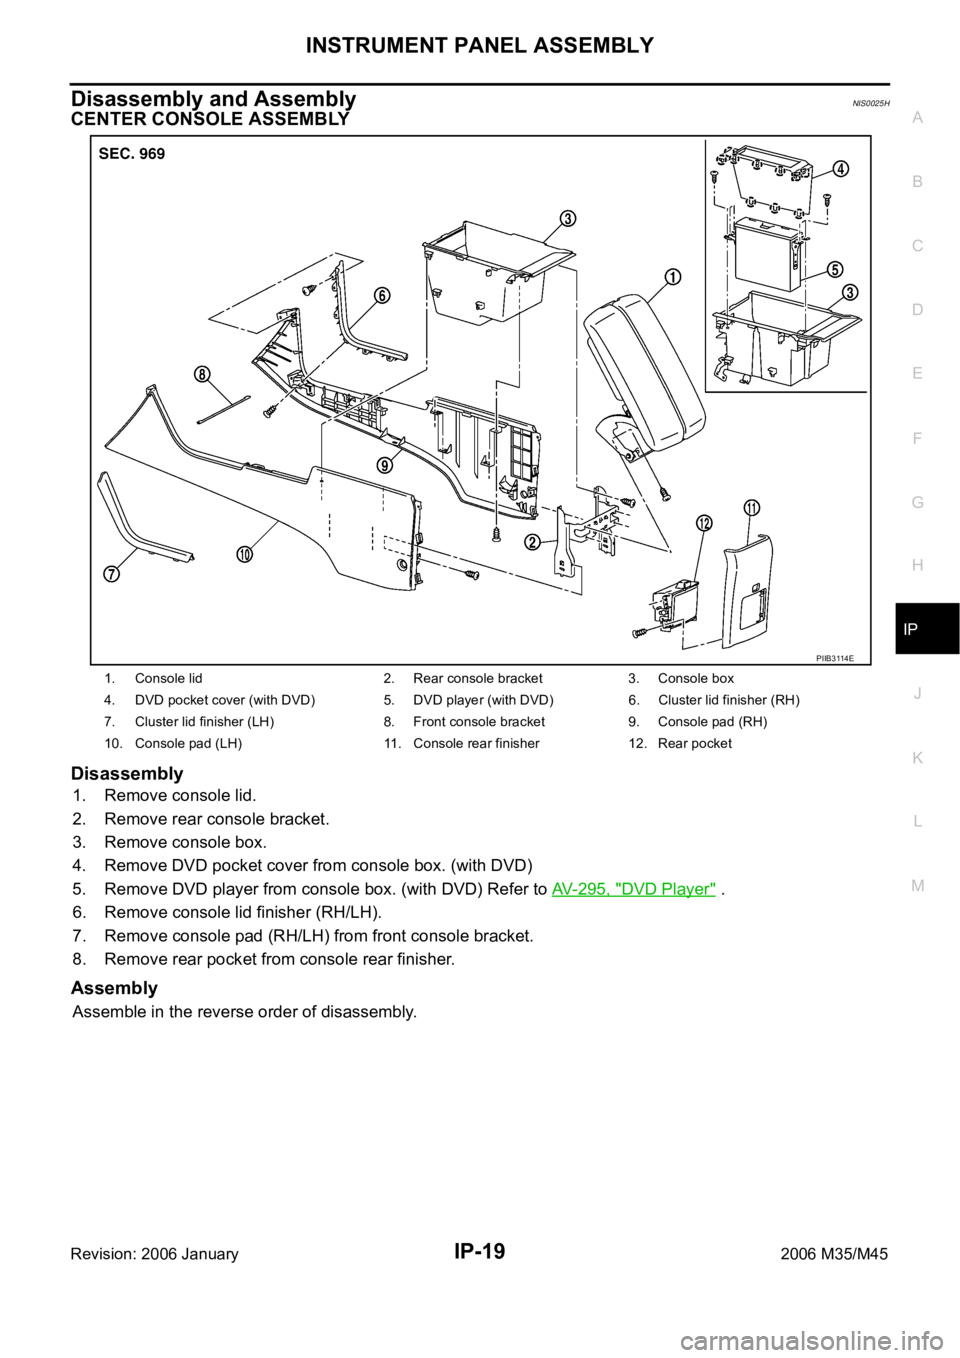
CENTER CONSOLE ASSEMBLY
Disassembly
1. Remove console lid.
2. Remove rear console bracket.
3. Remove console box.
4. Remove DVD pocket cover from console box. (with DVD)
5. Remove DVD player from console box. (with DVD) Refer to AV- 2 9 5 , "
DVD Player" .
6. Remove console lid finisher (RH/LH).
7. Remove console pad (RH/LH) from front console bracket.
8. Remove rear pocket from console rear finisher.
Assembly
Assemble in the reverse order of disassembly.
1. Console lid 2. Rear console bracket 3. Console box
4. DVD pocket cover (with DVD) 5. DVD player (with DVD) 6. Cluster lid finisher (RH)
7. Cluster lid finisher (LH) 8. Front console bracket 9. Console pad (RH)
10. Console pad (LH) 11. Console rear finisher 12. Rear pocket
PIIB3114E