fuel INFINITI M35 2006 Factory Service Manual
[x] Cancel search | Manufacturer: INFINITI, Model Year: 2006, Model line: M35, Model: INFINITI M35 2006Pages: 5621, PDF Size: 65.56 MB
Page 3296 of 5621
![INFINITI M35 2006 Factory Service Manual CYLINDER HEAD
EM-233
[VK45DE]
C
D
E
F
G
H
I
J
K
L
MA
EM
Revision: 2006 January2006 M35/M45
CYLINDER HEADPFP:11041
On-Vehicle ServiceNBS004PF
CHECKING COMPRESSION PRESSURE
1. Warm up engine thoroughly. INFINITI M35 2006 Factory Service Manual CYLINDER HEAD
EM-233
[VK45DE]
C
D
E
F
G
H
I
J
K
L
MA
EM
Revision: 2006 January2006 M35/M45
CYLINDER HEADPFP:11041
On-Vehicle ServiceNBS004PF
CHECKING COMPRESSION PRESSURE
1. Warm up engine thoroughly.](/img/42/57023/w960_57023-3295.png)
CYLINDER HEAD
EM-233
[VK45DE]
C
D
E
F
G
H
I
J
K
L
MA
EM
Revision: 2006 January2006 M35/M45
CYLINDER HEADPFP:11041
On-Vehicle ServiceNBS004PF
CHECKING COMPRESSION PRESSURE
1. Warm up engine thoroughly. Then, stop it.
2. Release fuel pressure. Refer to EC-809, "
FUEL PRESSURE RELEASE" .
a. Remove fuel pump fuse to avoid fuel injection during measure-
ment.
3. Remove engine cover with power tool. Refer to EM-173, "
ENGINE ROOM COVER" .
4. Remove ignition coil and spark plug from each cylinder. Refer to EM-190, "
IGNITION COIL" and EM-191,
"SPARK PLUG (PLATINUM-TIPPED TYPE)" .
5. Connect engine tachometer (not required in use of CONSULT-II).
6. Install compression gauge with adapter (SST or commercial ser-
vice tool) onto spark plug hole.
Use compression gauge adapter (SST) which is required on
No. 7 and 8 cylinders.
Use compression gauge adapter (if no SST is used) whose
picking up end inserted to spark plug hole is smaller than 20
mm (0.79 in) in diameter. Otherwise, it may be caught by cyl-
inder head during removal.
7. With accelerator pedal fully depressed, turn ignition switch to “START” for cranking. When the gauge
pointer stabilizes, read the compression pressure and engine rpm. Perform these steps to check each cyl-
inder.
Compression pressure:
Unit: kPa (kg/cm2 , psi) /rpm
CAUTION:
Always use a fully changed battery to obtain the specified engine speed.
PBIB1482E
PBIC1554E
SBIA0533E
Standard Minimum Deferential limit between cylinders
1,320 (13.5, 191) / 300 1,130 (11.5, 164) / 300 98 (1.0, 14) / 300
Page 3308 of 5621
![INFINITI M35 2006 Factory Service Manual ENGINE ASSEMBLY
EM-245
[VK45DE]
C
D
E
F
G
H
I
J
K
L
MA
EM
Revision: 2006 January2006 M35/M45
Always use the support point specified for lifting.
Use either 2-pole lift type or separate type li INFINITI M35 2006 Factory Service Manual ENGINE ASSEMBLY
EM-245
[VK45DE]
C
D
E
F
G
H
I
J
K
L
MA
EM
Revision: 2006 January2006 M35/M45
Always use the support point specified for lifting.
Use either 2-pole lift type or separate type li](/img/42/57023/w960_57023-3307.png)
ENGINE ASSEMBLY
EM-245
[VK45DE]
C
D
E
F
G
H
I
J
K
L
MA
EM
Revision: 2006 January2006 M35/M45
Always use the support point specified for lifting.
Use either 2-pole lift type or separate type lift as best you can. If board-on type is used for
unavoidable reasons, support at the rear axle jacking point with transmission jack or similar tool
before starting work, in preparation for the backward shift of center of gravity.
For supporting points for lifting and jacking point at rear axle, refer to GI-42, "Garage Jack and
Safety Stand and 2-Pole Lift" .
REMOVAL
Outline
At first, remove engine, transmission assembly with front suspension member from vehicle downward. Then
separate engine from transmission.
Preparation
1. Release fuel pressure. Refer to EC-809, "FUEL PRESSURE RELEASE" .
2. Drain engine coolant from radiator. Refer to CO-40, "
Changing Engine Coolant" .
CAUTION:
Perform this step when engine is cold.
Do not spill engine coolant on drive belts.
3. Disconnect both battery cables. Refer to SC-4, "
BATTERY" .
4. Remove crankshaft position sensor (POS) from transmission.
CAUTION:
Handle carefully to avoid dropping and shocks.
Do not disassemble.
Do not allow metal powder to adhere to magnetic part at sensor tip.
Do not place sensors in a location where they are exposed to magnetism.
5. Remove the following parts:
Front and rear engine undercover (power tool)
Air duct (inlet), air duct and air cleaner case assembly; Refer to EM-177, "AIR CLEANER AND AIR
DUCT" .
Front road wheels and tires (power tool)
Engine Room LH
1. Disconnect heater hoses, and install plugs to avoid leakage of engine coolant.
2. Disconnect wire bonding from exhaust manifold cover to vehicle.
3. Disconnect vacuum hose between vehicle and engine and set it aside.
4. Discharge refrigerant from A/C circuit. Refer to ATC-151, "
REFRIGERANT LINES" .
5. Remove A/C piping from A/C compressor, and temporarily fasten it on vehicle with a rope. Refer to AT C -
151, "REFRIGERANT LINES" .
Engine Room RH
1. Disconnect fuel feed hose and EVAP hose. Refer to EM-193, "FUEL INJECTOR AND FUEL TUBE" .
CAUTION:
Fit plugs onto disconnected hose to prevent fuel leak.
2. Disconnect ground cable (between vehicle and right bank cylinder head).
3. Disconnect vacuum hose between vehicle and engine and set it aside.
4. Disconnect reservoir tank of power steering oil pump from engine, and move it aside for easier work.
CAUTION:
When temporarily securing, keep reservoir tank upright to avoid a fluid leak.
Ve h i c le i n s i d e
Follow procedure below to disconnect engine room harness connectors at passenger room side, and tempo-
rarily secure them on engine.
1. Remove passenger-side kicking plate, dash side finisher, and glove box. Refer to EI-37, "
BODY SIDE
TRIM" and IP-10, "INSTRUMENT PANEL ASSEMBLY" .
2. Disconnect engine room harness connectors at unit sides TCM, ECM and other.
Page 3310 of 5621
![INFINITI M35 2006 Factory Service Manual ENGINE ASSEMBLY
EM-247
[VK45DE]
C
D
E
F
G
H
I
J
K
L
MA
EM
Revision: 2006 January2006 M35/M45
Separation Work
1. Install engine slingers into front of cylinder head (left bank) and
rear of cylinder h INFINITI M35 2006 Factory Service Manual ENGINE ASSEMBLY
EM-247
[VK45DE]
C
D
E
F
G
H
I
J
K
L
MA
EM
Revision: 2006 January2006 M35/M45
Separation Work
1. Install engine slingers into front of cylinder head (left bank) and
rear of cylinder h](/img/42/57023/w960_57023-3309.png)
ENGINE ASSEMBLY
EM-247
[VK45DE]
C
D
E
F
G
H
I
J
K
L
MA
EM
Revision: 2006 January2006 M35/M45
Separation Work
1. Install engine slingers into front of cylinder head (left bank) and
rear of cylinder head (right bank).
2. Remove engine mounting insulators (RH and LH) under side nut with power tool.
3. Lift with hoist and separate engine and transmission assembly from front suspension member.
CAUTION:
Avoid damage to and oil/grease smearing or spills onto engine mounting insulator.
4. Remove alternator. Refer to SC-23, "
CHARGING SYSTEM" .
5. Remove starter motor. Refer to SC-10, "
STARTING SYSTEM" .
6. Separate engine from transmission assembly. Refer to AT-271, "
TRANSMISSION ASSEMBLY" .
7. Remove engine mounting insulators (RH and LH) and brackets (RH and LH) from engine with power tool.
8. Remove rear engine mounting member and engine mounting insulator (rear) from transmission.
INSTALLATION
Note the following, and install in the reverse order of removal.
Do not allow engine mounting insulator to be damage and careful no engine oil gets on it.
For a location with a positioning pin, insert it securely into hole of mating part.
For a part with a specified installation orientation, refer to component figure in EM-244, "Components" .
When installing engine mounting brackets (RH and LH) on cylin-
der block, tighten two upper bolts (shown as “A” in the figure)
first. Then tighten two lower bolts (shown as “B” in the figure).
NOTE:
Figure shows LH bank.
INSPECTION AFTER INSTALLATION
Inspection for Leaks
The following are procedure for checking fluids leak, lubricates leak and exhaust gases leak.
Before starting engine, check oil/fluid levels including engine coolant and engine oil. If less than required
quantity, fill to the specified level. Refer to MA-12, "
RECOMMENDED FLUIDS AND LUBRICANTS" .
Use procedure below to check for fuel leakage.
–Turn ignition switch “ON” (with engine stopped). With fuel pressure applied to fuel piping, check for fuel
leakage at connection points.
–Start engine. With engine speed increased, check again for fuel leakage at connection points.
Run engine to check for unusual noise and vibration.
Warm up engine thoroughly to make sure there is no leakage of fuel, exhaust gases, or any oil/fluids
including engine oil and engine coolant.
Bleed air from lines and hoses of applicable lines, such as in cooling system.
After cooling down engine, again check oil/fluid levels including engine oil and engine coolant. Refill to the
specified level, if necessary.Slinger bolts:
:33.4 Nꞏm (3.4 kg-m, 25 ft-lb)
PBIC2447E
PBIC3305E
Page 3311 of 5621
![INFINITI M35 2006 Factory Service Manual EM-248
[VK45DE]
ENGINE ASSEMBLY
Revision: 2006 January2006 M35/M45
Summary of the inspection items:
* Transmission/transaxle/CVT fluid, power steering fluid, brake fluid, etc. Item Before starting eng INFINITI M35 2006 Factory Service Manual EM-248
[VK45DE]
ENGINE ASSEMBLY
Revision: 2006 January2006 M35/M45
Summary of the inspection items:
* Transmission/transaxle/CVT fluid, power steering fluid, brake fluid, etc. Item Before starting eng](/img/42/57023/w960_57023-3310.png)
EM-248
[VK45DE]
ENGINE ASSEMBLY
Revision: 2006 January2006 M35/M45
Summary of the inspection items:
* Transmission/transaxle/CVT fluid, power steering fluid, brake fluid, etc. Item Before starting engine Engine running After engine stopped
Engine coolant Level Leakage Level
Engine oil Level Leakage Level
Other oils and fluid* Level Leakage Level
Fuel Leakage Leakage Leakage
Exhaust gases — Leakage —
Page 3314 of 5621
![INFINITI M35 2006 Factory Service Manual CYLINDER BLOCK
EM-251
[VK45DE]
C
D
E
F
G
H
I
J
K
L
MA
EM
Revision: 2006 January2006 M35/M45
–Fuel tube and fuel injector assembly; Refer to EM-193, "FUEL INJECTOR AND FUEL TUBE" .
–Ignitio INFINITI M35 2006 Factory Service Manual CYLINDER BLOCK
EM-251
[VK45DE]
C
D
E
F
G
H
I
J
K
L
MA
EM
Revision: 2006 January2006 M35/M45
–Fuel tube and fuel injector assembly; Refer to EM-193, "FUEL INJECTOR AND FUEL TUBE" .
–Ignitio](/img/42/57023/w960_57023-3313.png)
CYLINDER BLOCK
EM-251
[VK45DE]
C
D
E
F
G
H
I
J
K
L
MA
EM
Revision: 2006 January2006 M35/M45
–Fuel tube and fuel injector assembly; Refer to EM-193, "FUEL INJECTOR AND FUEL TUBE" .
–Ignition coil; Refer to EM-190, "IGNITION COIL" .
–Rocker cover; Refer to EM-199, "ROCKER COVER" .
–Other removable brackets
NOTE:
The figure shows an example of widely use engine stand that
can hold mating surface of transmission with drive plate and rear
plate removed.
CAUTION:
Before removing the hanging chains, make sure the engine
stand is stable and there is no risk of overturning.
4. Drain engine oil. Refer to LU-28, "
Changing Engine Oil" .
5. Drain engine coolant from inside engine by removing water
drain plugs “B” as shown in the figure.
6. Remove oil pan and oil strainer; Refer to EM-187, "
OIL PAN AND OIL STRAINER" .
7. Remove crankshaft pulley as follows:
a. Lock crankshaft with a hammer handle or similar tool to loosen
crankshaft bolt.
b. Pull crankshaft pulley with both hands to remove it.
CAUTION:
Do not remove crankshaft pulley bolt. Keep loosened
crankshaft pulley bolt in place to protect removed crank-
shaft pulley from dropping.
Do not remove balance weight (inner hexagon bolt) at the
front of crankshaft pulley.
8. Remove the following parts and related parts (The parts listed in step 3 are not included here.)
Front cover and timing chain; Refer to EM-203, "TIMING CHAIN" .
Camshaft; Refer to EM-215, "CAMSHAFT" .
Cylinder head; Refer to EM-233, "CYLINDER HEAD" .
9. Remove knock sensor.
CAUTION:
Carefully handle sensor, avoiding shocks.
10. Remove piston and connecting rod assembly as follows:
Before removing piston and connecting rod assembly, check the connecting rod side clearance. Refer
to EM-266, "
CONNECTING ROD SIDE CLEARANCE" .
a. Position crankshaft pin corresponding to connecting rod to be removed onto the bottom dead center.
b. Remove connecting rod bearing cap.
PBIC0085E
PBIC1265E
PBIC0053E
Page 3414 of 5621
FL-1
FUEL SYSTEM
B ENGINE
CONTENTS
C
D
E
F
G
H
I
J
K
L
M
SECTION FL
A
FL
Revision: 2006 January2006 M35/M45
FUEL SYSTEM
PREPARATION ........................................................... 2
Commercial Service Tools ........................................ 2
FUEL SYSTEM ........................................................... 3
Checking Fuel Lines ............................................ ..... 3
General Precautions ................................................ 3
FUEL LEVEL SENSOR UNIT, FUEL FILTER AND
FUEL PUMP ASSEMBLY ........................................... 4
Components ............................................................. 4
Removal and Installation .......................................... 4
REMOVAL ........................................................
..... 4
INSTALLATION ..................................................... 6
INSPECTION AFTER INSTALLATION ................. 7Components ............................................................. 8
Disassembly and Assembly ...................................... 8
DISASSEMBLY ..................................................... 8
ASSEMBLY ........................................................... 9
FUEL TANK .............................................................. 10
Components ........................................................... 10
Removal and Installation ........................................ 10
REMOVAL ........................................................
... 10
INSTALLATION ................................................... 11
INSPECTION AFTER INSTALLATION ................ 11
SERVICE DATA AND SPECIFICATIONS (SDS) ...... 13
Standard and Limit .................................................. 13
FUEL TANK ...................................................... ... 13
Page 3416 of 5621
FUEL SYSTEM
FL-3
C
D
E
F
G
H
I
J
K
L
MA
FL
Revision: 2006 January2006 M35/M45
FUEL SYSTEMPFP:17503
Checking Fuel LinesNBS005R8
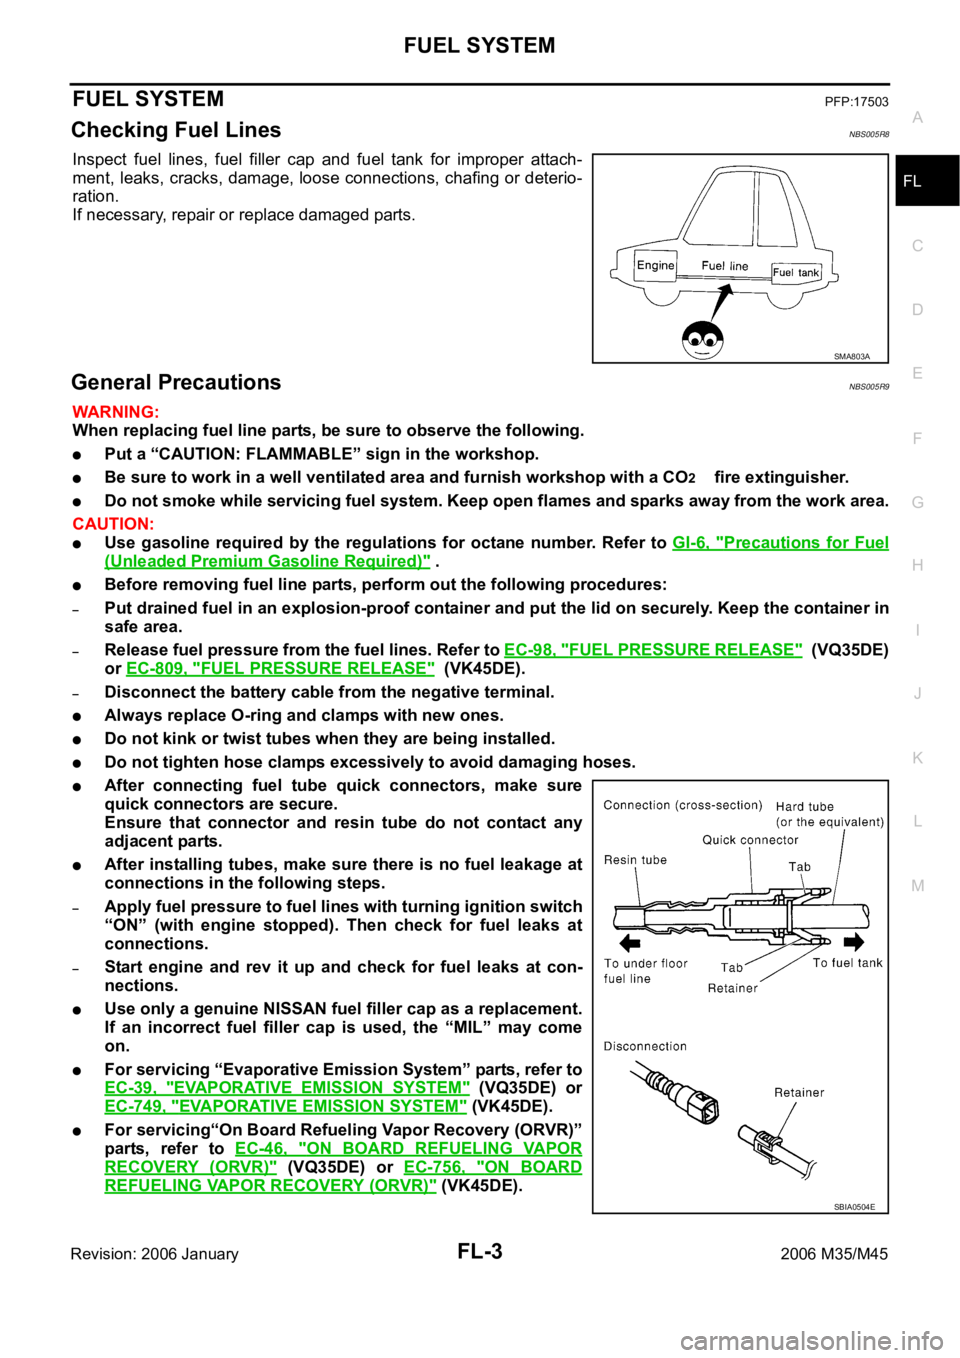
Inspect fuel lines, fuel filler cap and fuel tank for improper attach-
ment, leaks, cracks, damage, loose connections, chafing or deterio-
ration.
If necessary, repair or replace damaged parts.
General PrecautionsNBS005R9
WAR NING :
When replacing fuel line parts, be sure to observe the following.
Put a “CAUTION: FLAMMABLE” sign in the workshop.
Be sure to work in a well ventilated area and furnish workshop with a CO2 fire extinguisher.
Do not smoke while servicing fuel system. Keep open flames and sparks away from the work area.
CAUTION:
Use gasoline required by the regulations for octane number. Refer to GI-6, "Precautions for Fuel
(Unleaded Premium Gasoline Required)" .
Before removing fuel line parts, perform out the following procedures:
–Put drained fuel in an explosion-proof container and put the lid on securely. Keep the container in
safe area.
–Release fuel pressure from the fuel lines. Refer to EC-98, "FUEL PRESSURE RELEASE" (VQ35DE)
or EC-809, "
FUEL PRESSURE RELEASE" (VK45DE).
–Disconnect the battery cable from the negative terminal.
Always replace O-ring and clamps with new ones.
Do not kink or twist tubes when they are being installed.
Do not tighten hose clamps excessively to avoid damaging hoses.
After connecting fuel tube quick connectors, make sure
quick connectors are secure.
Ensure that connector and resin tube do not contact any
adjacent parts.
After installing tubes, make sure there is no fuel leakage at
connections in the following steps.
–Apply fuel pressure to fuel lines with turning ignition switch
“ON” (with engine stopped). Then check for fuel leaks at
connections.
–Start engine and rev it up and check for fuel leaks at con-
nections.
Use only a genuine NISSAN fuel filler cap as a replacement.
If an incorrect fuel filler cap is used, the “MIL” may come
on.
For servicing “Evaporative Emission System” parts, refer to
EC-39, "
EVAPORATIVE EMISSION SYSTEM" (VQ35DE) or
EC-749, "
EVAPORATIVE EMISSION SYSTEM" (VK45DE).
For servicing“On Board Refueling Vapor Recovery (ORVR)”
parts, refer to EC-46, "
ON BOARD REFUELING VAPOR
RECOVERY (ORVR)" (VQ35DE) or EC-756, "ON BOARD
REFUELING VAPOR RECOVERY (ORVR)" (VK45DE).
SMA803A
SBIA0504E
Page 3417 of 5621
FL-4
FUEL LEVEL SENSOR UNIT, FUEL FILTER AND FUEL PUMP ASSEMBLY
Revision: 2006 January2006 M35/M45
FUEL LEVEL SENSOR UNIT, FUEL FILTER AND FUEL PUMP ASSEMBLYPFP:17042
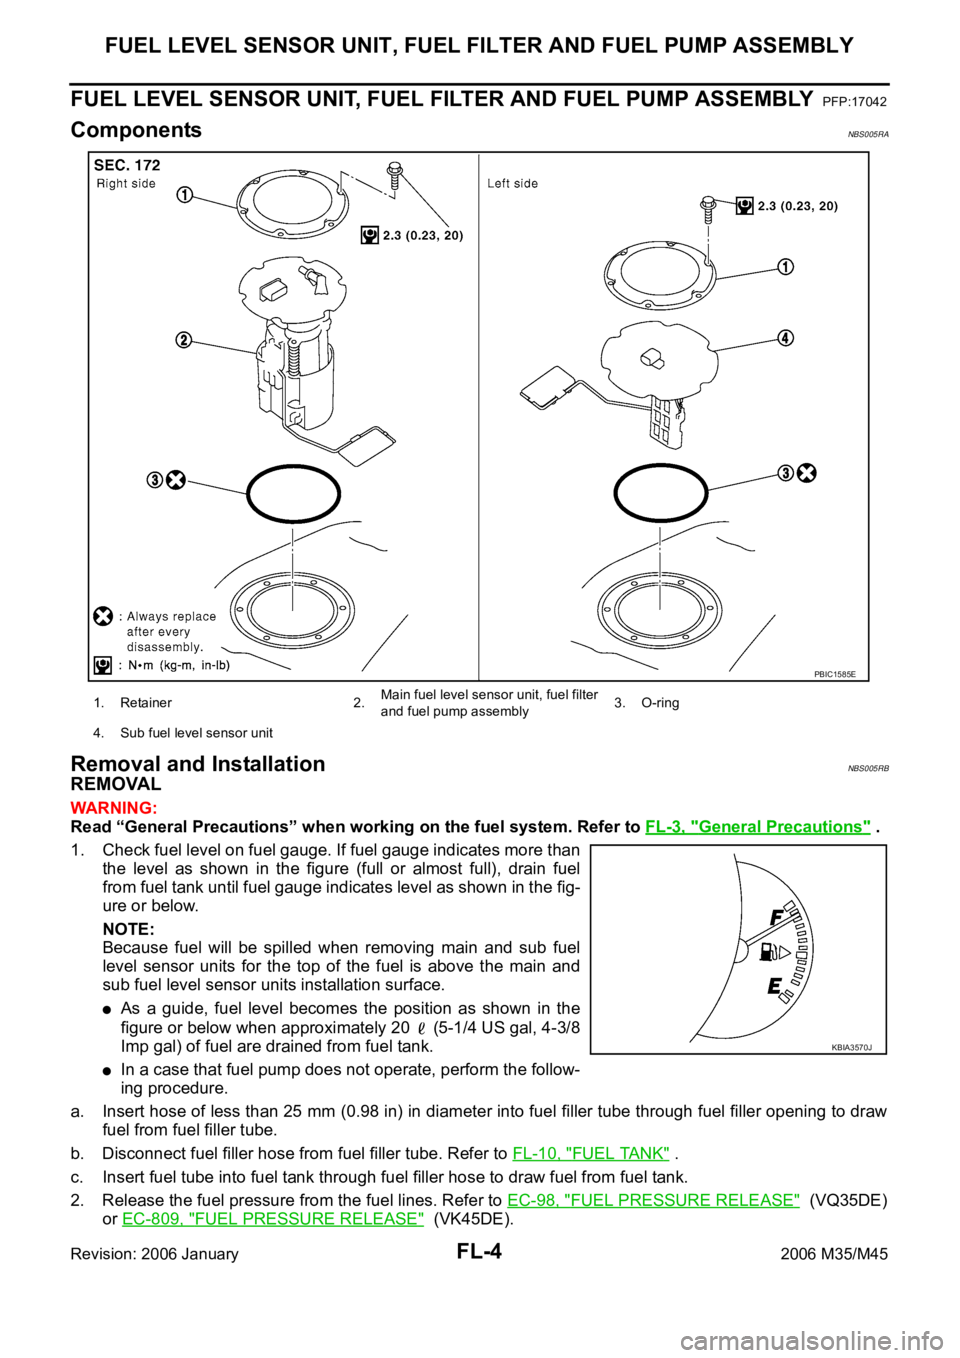
ComponentsNBS005RA
Removal and InstallationNBS005RB
REMOVAL
WAR NING :
Read “General Precautions” when working on the fuel system. Refer to FL-3, "
General Precautions" .
1. Check fuel level on fuel gauge. If fuel gauge indicates more than
the level as shown in the figure (full or almost full), drain fuel
from fuel tank until fuel gauge indicates level as shown in the fig-
ure or below.
NOTE:
Because fuel will be spilled when removing main and sub fuel
level sensor units for the top of the fuel is above the main and
sub fuel level sensor units installation surface.
As a guide, fuel level becomes the position as shown in the
figure or below when approximately 20 (5-1/4 US gal, 4-3/8
Imp gal) of fuel are drained from fuel tank.
In a case that fuel pump does not operate, perform the follow-
ing procedure.
a. Insert hose of less than 25 mm (0.98 in) in diameter into fuel filler tube through fuel filler opening to draw
fuel from fuel filler tube.
b. Disconnect fuel filler hose from fuel filler tube. Refer to FL-10, "
FUEL TANK" .
c. Insert fuel tube into fuel tank through fuel filler hose to draw fuel from fuel tank.
2. Release the fuel pressure from the fuel lines. Refer to EC-98, "
FUEL PRESSURE RELEASE" (VQ35DE)
or EC-809, "
FUEL PRESSURE RELEASE" (VK45DE).
1. Retainer 2.Main fuel level sensor unit, fuel filter
and fuel pump assembly3. O-ring
4. Sub fuel level sensor unit
PBIC1585E
KBIA3570J
Page 3418 of 5621
FUEL LEVEL SENSOR UNIT, FUEL FILTER AND FUEL PUMP ASSEMBLY
FL-5
C
D
E
F
G
H
I
J
K
L
MA
FL
Revision: 2006 January2006 M35/M45
3. Open fuel filler lid.
4. Open filler cap and release the pressure inside fuel tank.
5. Remove rear seat cushion. Refer to SE-172, "
REAR SEAT" .
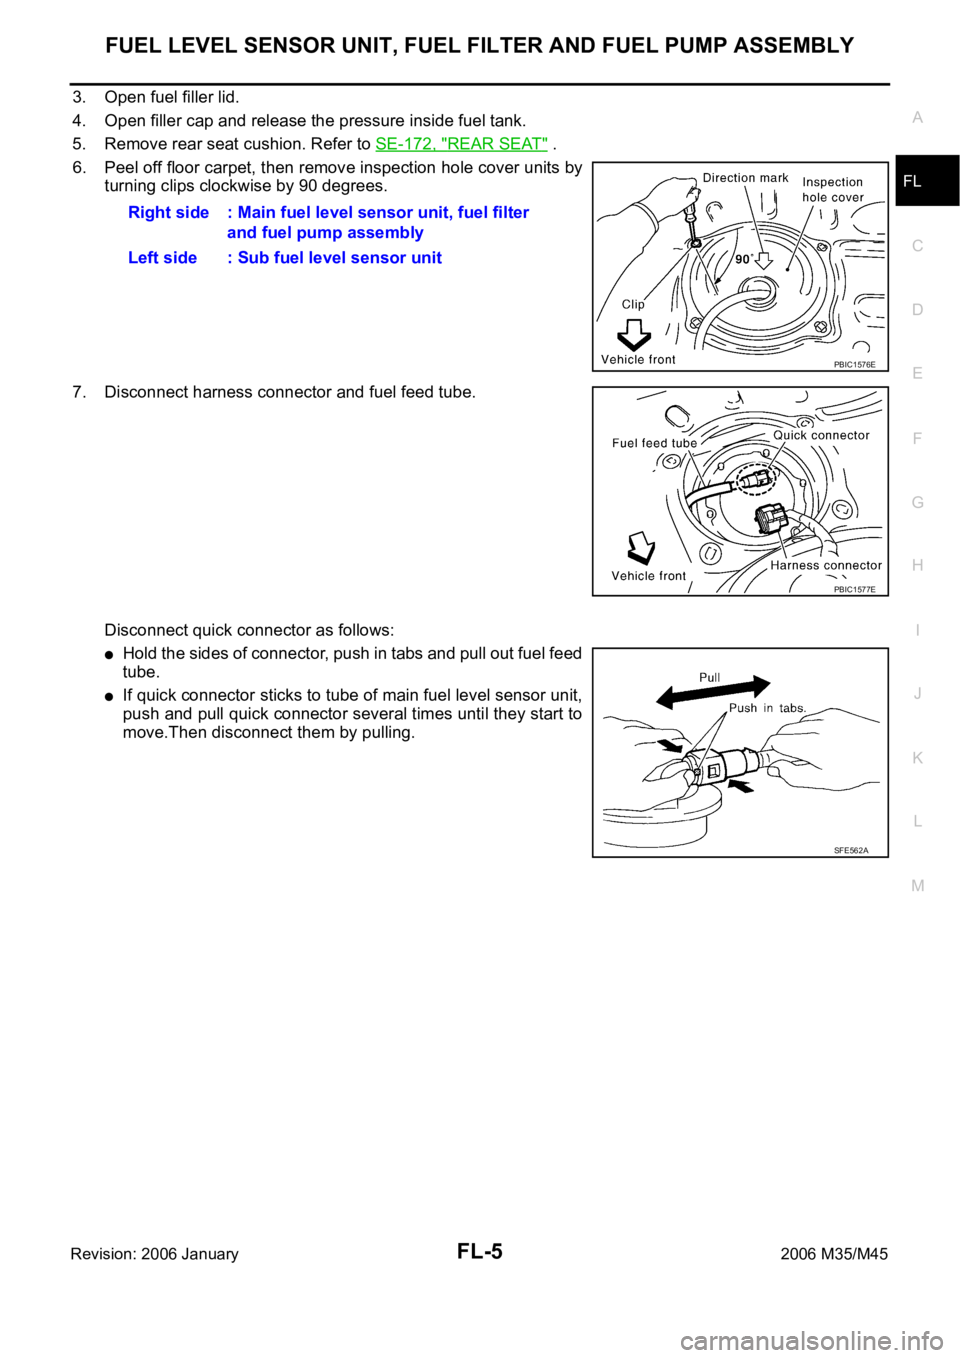
6. Peel off floor carpet, then remove inspection hole cover units by
turning clips clockwise by 90 degrees.
7. Disconnect harness connector and fuel feed tube.
Disconnect quick connector as follows:
Hold the sides of connector, push in tabs and pull out fuel feed
tube.
If quick connector sticks to tube of main fuel level sensor unit,
push and pull quick connector several times until they start to
move.Then disconnect them by pulling.Right side : Main fuel level sensor unit, fuel filter
and fuel pump assembly
Left side : Sub fuel level sensor unit
PBIC1576E
PBIC1577E
SFE562A
Page 3419 of 5621
FL-6
FUEL LEVEL SENSOR UNIT, FUEL FILTER AND FUEL PUMP ASSEMBLY
Revision: 2006 January2006 M35/M45
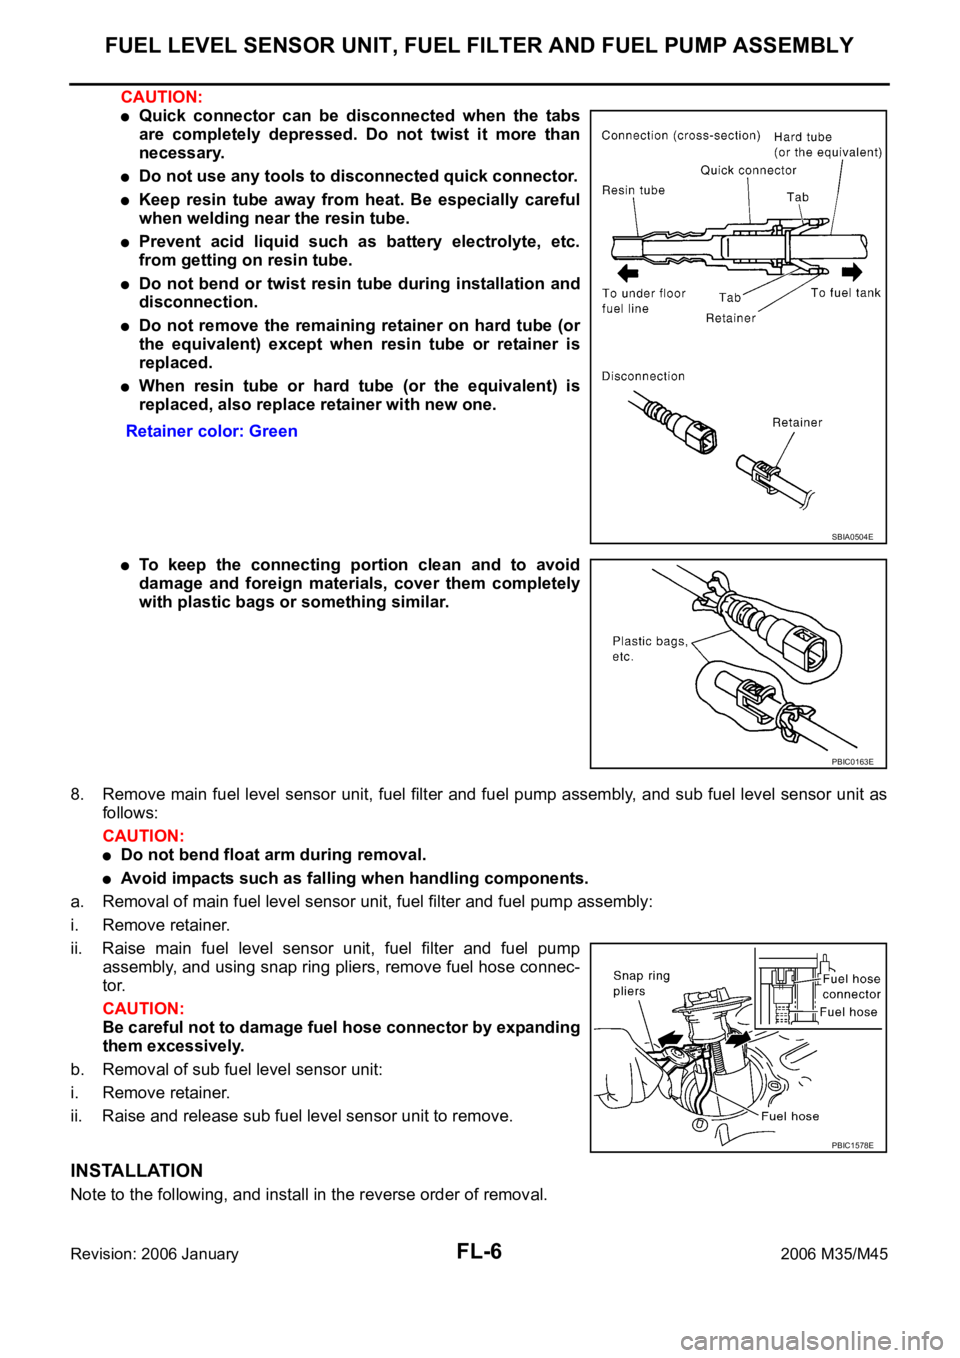
CAUTION:
Quick connector can be disconnected when the tabs
are completely depressed. Do not twist it more than
necessary.
Do not use any tools to disconnected quick connector.
Keep resin tube away from heat. Be especially careful
when welding near the resin tube.
Prevent acid liquid such as battery electrolyte, etc.
from getting on resin tube.
Do not bend or twist resin tube during installation and
disconnection.
Do not remove the remaining retainer on hard tube (or
the equivalent) except when resin tube or retainer is
replaced.
When resin tube or hard tube (or the equivalent) is
replaced, also replace retainer with new one.
To keep the connecting portion clean and to avoid
damage and foreign materials, cover them completely
with plastic bags or something similar.
8. Remove main fuel level sensor unit, fuel filter and fuel pump assembly, and sub fuel level sensor unit as
follows:
CAUTION:
Do not bend float arm during removal.
Avoid impacts such as falling when handling components.
a. Removal of main fuel level sensor unit, fuel filter and fuel pump assembly:
i. Remove retainer.
ii. Raise main fuel level sensor unit, fuel filter and fuel pump
assembly, and using snap ring pliers, remove fuel hose connec-
tor.
CAUTION:
Be careful not to damage fuel hose connector by expanding
them excessively.
b. Removal of sub fuel level sensor unit:
i. Remove retainer.
ii. Raise and release sub fuel level sensor unit to remove.
INSTALLATION
Note to the following, and install in the reverse order of removal. Retainer color: Green
SBIA0504E
PBIC0163E
PBIC1578E