turn signal INFINITI M35 2006 Factory Service Manual
[x] Cancel search | Manufacturer: INFINITI, Model Year: 2006, Model line: M35, Model: INFINITI M35 2006Pages: 5621, PDF Size: 65.56 MB
Page 3572 of 5621

POWER WINDOW SYSTEM
GW-53
C
D
E
F
G
H
J
K
L
MA
B
GW
Revision: 2006 January2006 M35/M45
2. CHECK HARNESS CONTINUITY
1. Turn ignition switch OFF.
2. Disconnect BCM and door switch connector.
3. Check continuity between BCM connector and door switch connector.
4. Check continuity between BCM connector ground.
OK or NG
OK >> GO TO 3.
NG >> Repair or replace harness.
3. CHECK DOOR SWITCH
Check door switches.
OK or NG
OK >> GO TO 4.
NG >> Replace malfunction door switch.
4. CHECK BCM OUTPUT SIGNAL
1. Connect BCM connector.
2. Check voltage between BCM connector ground.
OK or NG
OK >> Further inspection is necessary, Refer to symptom
chart.
NG >> Replace BCM.
AB
Continuity
BCM connector TerminalDoor switch
connectorTerminal
M1 12 B35
2Yes
M3 62 B11
A
GroundContinuity
BCM connector Terminal
M1 12
No
M3 62
PIIB5976E
Terminal
Door switch Continuity
Door switches
2Ground part of
door switchPushed No
Released Yes
PIIB5977E
Terminal
Voltage (V)
(Approx.) (+)
(–)
BCM connector Terminal
M1 12
Ground Battery voltage
M3 62
PIIB5955E
Page 3573 of 5621

GW-54
POWER WINDOW SYSTEM
Revision: 2006 January2006 M35/M45
Front Door Key Cylinder Switch Check NIS00222
1. CHECK DOOR KEY CYLINDER SWITCH INPUT SIGNAL
With CONSULT-II
Check (“KEY CYL LK-SW”, “KEY CYL UN-SW”) in “DATA MONITOR” mode for “POWER DOOR ROCK SYS-
TEM” with CONSULT-II. Refer to GW-31, "
DATE MONITOR"
Without CONSULT-II
1. Turn ignition switch OFF.
2. Check voltage between power window main switch connector and ground.
OK or NG
OK >> Further inspection is necessary. Refer to symptom chart.
NG >> GO TO 2.
2. CHECK HARNESS CONTINUITY
1. Disconnect power window main switch and front door key lock assembly (driver side) connector.
2. Check continuity between power window main switch connector and front door lock assembly (driver side)
connector.
OK or NG
OK >> GO TO 3.
NG >> Repair or replace harness.
Monitor item Condition
KEY CYL LK-SWLock : ON
Neutral / Unlock : OFF
KEY CYL UN-SWUnlock : ON
Neutral / Lock : OFF
PIIA6285E
Te r m i n a l s
Key positionVoltage (V)
(Approx.) (+)
(–) Power window
main switch
connectorTerminal
D104
GroundLock 0
Neutral / Unlock 5
6Unlock 0
Neutral / Lock 5
PIIB5956E
AB
Continuity Power window
main switch
connectorTe r m i n a lFront door lock
assembly
(driver side)
connectorTerminal
D104
D146
Ye s
65
PIIB5973E
Page 3575 of 5621

GW-56
POWER WINDOW SYSTEM
Revision: 2006 January2006 M35/M45
Power Window Serial Link Check (Passenger Side)NIS00223
1. CHECK POWER WINDOW SWITCH OUTPUT SIGNAL
With CONSULT-II
Check (“CDL LOCK SW ”, “CDL UNLOCK SW”) in DATA MONITOR mode for “POWER DOOR LOCK SYS-
TEM” with CONSULT-II. Refer to GW-31, "
DATE MONITOR" .
Without CONSULT-II
1. Remove key from ignition switch, and the door of driver side and passenger side is closed.
2. Check signal between BCM connector and ground with oscilloscope when door lock and unlock switch
(driver side and passenger side) is turned “LOCK” or “UNLOCK”.
3. Make sure signals which are shown in the figure below can be detected during 10 second just after door
lock and unlock switch (driver side and passenger side) is turned “LOCK” or “UNLOCK”.
OK or NG
OK >> Power window serial link is OK.
NG >> GO TO 2.
Monitor item Condition
CDL LOCK SW LOCK : ON
UNLOCK : OFF
CDL UNLOCK SW LOCK : OFF
UNLOCK : ON
PIIA7068E
Terminal
Signal
(Reference value) (+)
(–)
BCM connector Terminal
M1 22 Ground
PIIB5957EPIIA1297E
Page 3577 of 5621

GW-58
POWER WINDOW SYSTEM
Revision: 2006 January2006 M35/M45
Power Window Serial Link Check (Rear LH or RH)NIS00224
1. CHECK POWER WINDOW SWITCH
Change with operative power window sub-switch (rear LH or RH).
Whether operates normally is confirmed?
YES >> Replace power window sub-switch (rear LH or RH).
NO >> GO TO 2.
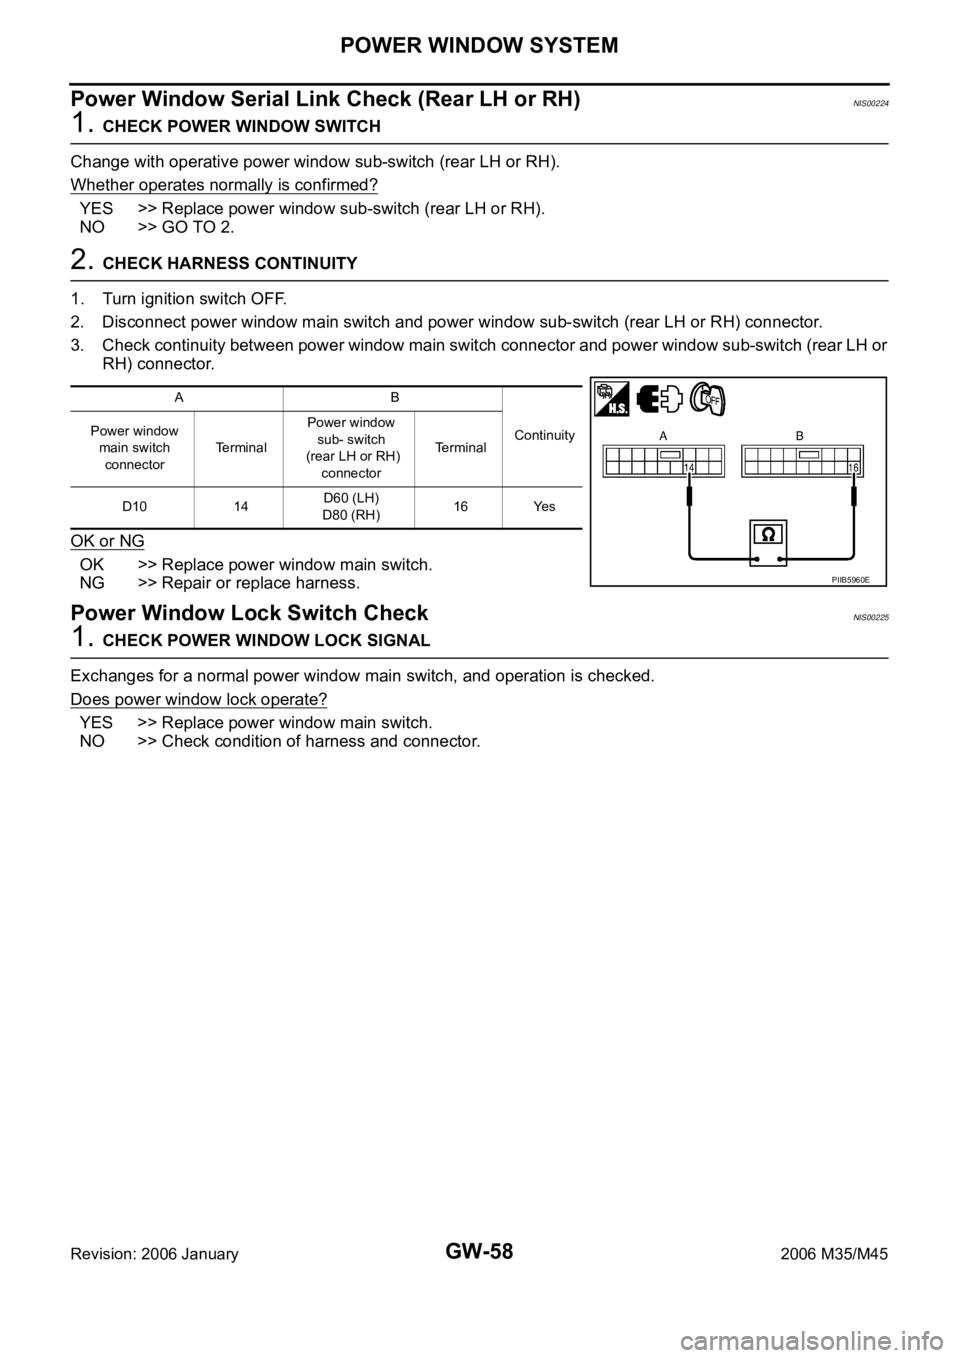
2. CHECK HARNESS CONTINUITY
1. Turn ignition switch OFF.
2. Disconnect power window main switch and power window sub-switch (rear LH or RH) connector.
3. Check continuity between power window main switch connector and power window sub-switch (rear LH or
RH) connector.
OK or NG
OK >> Replace power window main switch.
NG >> Repair or replace harness.
Power Window Lock Switch CheckNIS00225
1. CHECK POWER WINDOW LOCK SIGNAL
Exchanges for a normal power window main switch, and operation is checked.
Does power window lock operate?
YES >> Replace power window main switch.
NO >> Check condition of harness and connector.
AB
Continuity Power window
main switch
connectorTe r m i n a lPower window
sub- switch
(rear LH or RH)
connectorTerminal
D10 14D60 (LH)
D80 (RH)16 Yes
PIIB5960E
Page 3593 of 5621

GW-74
REAR WINDOW DEFOGGER
Revision: 2006 January2006 M35/M45
through 50A fusible link (letter F , located in the fuse and fusible link box)
to BCM terminal 55,
through 10A fuse [No. 21, located in the fuse block (J/B)]
to BCM terminal 42.
With the ignition switch turned to ON or START position,
Power is supplied
through 15A fuse [No. 1, located in the fuse block (J/B)]
to BCM terminal 38.
through 10A fuse [No. 12, located in the fuse block (J/B)]
to rear window defogger relay terminal 1.
With the ignition switch turned to ACC or ON position,
through 10A fuse [No. 6, located in the fuse block (J/B)]
to multi-function switch terminal 2.
Ground is supplied
to BCM terminal 52
through body grounds M16 and M70,
to multi-function switch terminal 14
through body grounds M16 and M70,
to IPDM E/R terminals 38 and 51
through body grounds E22 and E43.
When rear window defogger switch in multi-function switch is turned to ON.
Then multi-function switch recognizes that rear window defogger switch is turned to ON.
Then it sends rear window defogger switch signals to AV control unit (without navigation system) or NAVI con-
trol unit (with navigation system) via AV line.
When AV control unit (without navigation system) or NAVI control unit (with navigation system) receives rear
window defogger switch signals, and display on the screen.
Then AV control unit (without navigation system) or NAVI control unit (with navigation system) recognizes that
rear window defogger switch is turned to ON.
Then it sends rear window defogger switch signal to BCM via DATA LINE (CAN H, CAN L).
Then BCM recognizes that rear window defogger switch signal.
Then it sends rear window defogger request signal to IPDM E/R via DATA LINE (CAN H, CAN L).
When IPDM E/R receives rear window defogger switch signals,
Ground is supplied
to rear window defogger relay terminal 2
through IPDM E/R terminal 57
through IPDM E/R terminal 51
through body grounds E22 and E43.
And then rear window defogger relay is energized.
When rear window defogger relay is turned ON, signals are transmitted.
through rear window defogger relay terminals 5 and 7
through condenser terminal 1
to rear window defogger terminal 1
Rear window defogger terminal 2 is grounded through grounds B702.
With power and ground supplied, rear window defogger filaments heat and defog the rear window.
When rear window defogger relay is turned to ON,
Power is supplied
through rear window defogger relay terminals 5 and 7
through fuse block (J/B) terminal 2C
through 10A fuse [No. 8, located in the fuse block (J/B)] and
through fuse block (J/B) terminal 5B
to door mirror (LH and RH) terminal 4.
Door mirror (LH and RH) terminal 8 is grounded through body grounds M16 and M70.
Page 3607 of 5621

GW-88
REAR WINDOW DEFOGGER
Revision: 2006 January2006 M35/M45
6. CHECK REAR WINDOW DEFOGGER RELAY OUTPUT SIGNAL
1. Connect IPDM E/R connector and rear window defogger relay.
2. Turn ignition switch ON.
3. Check voltage between IPDM E/R connector and ground.
OK or NG
OK >> Check condition of harness and connector.
NG >> Replace IPDM E/R.
Rear Window Defogger Circuit CheckNIS0022U
1. CHECK POWER SUPPLY CIRCUIT
1. Turn ignition switch ON.
2. Check voltage between rear window defogger connector and ground.
OK or NG
OK >> GO TO 2.
NG >> GO TO 3.
2. CHECK GROUND CIRCUIT
1. Turn ignition switch OFF.
2. Disconnect rear window defogger connector.
3. Check continuity between rear window defogger connector and ground.
OK or NG
OK >> Check filament. Refer to GW-94, "Filament Check"
If filament is OK, check condition of harness and con-
nector.
If filament is NG, repair filament.
NG >> Repair or replace harness between rear window defog-
ger and ground.
Terminals
Voltage (V)
(Approx.) (+)
(–)
IPDM E/R
connectorTerminal
E9 57 Ground Battery voltage
PIIB5982E
Te r m i n a l s
Condition of
rear window
defogger switchVoltage (V)
(Approx.) (+)
(–) Rear window
defogger
connectorTerminal
B604 1 GroundON Battery voltage
OFF 0
PIIB5984E
Rear window
defogger
connectorTerminal
GroundContinuity
B701 2 Yes
PIIB5985E
Page 3625 of 5621

GW-106
REVERSE INTERLOCK DOOR MIRROR SYSTEM
Revision: 2006 January2006 M35/M45
CONSULT-II Function (AUTO DRIVE POS.)NIS00238
CONSULT-II can display each diagnostic item using the diagnostic test modes shown following.
*1: For setting automatic drive positioner functions only.
*2: During vehicle driving, do not perform active test.
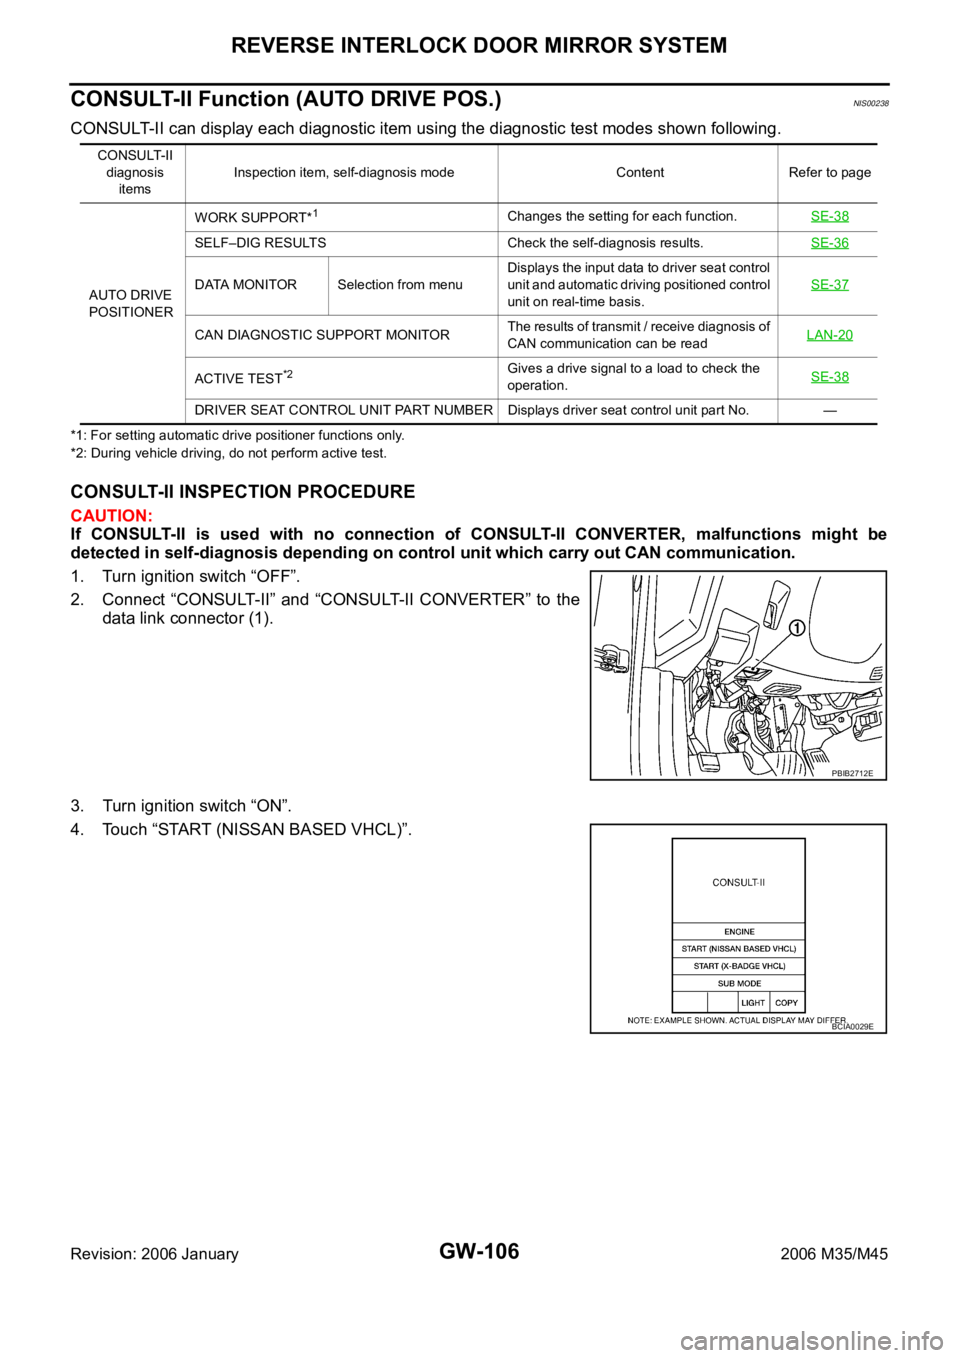
CONSULT-II INSPECTION PROCEDURE
CAUTION:
If CONSULT-II is used with no connection of CONSULT-II CONVERTER, malfunctions might be
detected in self-diagnosis depending on control unit which carry out CAN communication.
1. Turn ignition switch “OFF”.
2. Connect “CONSULT-II” and “CONSULT-II CONVERTER” to the
data link connector (1).
3. Turn ignition switch “ON”.
4. Touch “START (NISSAN BASED VHCL)”.
CONSULT-II
diagnosis
itemsInspection item, self-diagnosis mode Content Refer to page
AUTO DRIVE
POSITIONERWORK SUPPORT*
1Changes the setting for each function.SE-38
SELF–DIG RESULTS Check the self-diagnosis results.SE-36
DATA MONITOR Selection from menuDisplays the input data to driver seat control
unit and automatic driving positioned control
unit on real-time basis.SE-37
CAN DIAGNOSTIC SUPPORT MONITORThe results of transmit / receive diagnosis of
CAN communication can be readLAN-20
ACTIVE TEST*2Gives a drive signal to a load to check the
operation.SE-38
DRIVER SEAT CONTROL UNIT PART NUMBER Displays driver seat control unit part No. —
PBIB2712E
BCIA0029E
Page 3627 of 5621

GW-108
REVERSE INTERLOCK DOOR MIRROR SYSTEM
Revision: 2006 January2006 M35/M45
Display Item List
Work Flow NIS00239
1. Check the symptom and customer's requests.
2. Understand the system description. Refer to GW-96, "
System Description" .
3. According to the trouble diagnosis chart, repair or replace the cause of the malfunction. Refer to GW-109,
"Check Changeover Switch Circuit" .
4. Does reverse interlock door mirror system operate normally?
Yes , GO TO 5.
No, GO TO 3.
5. INSPECTION END
Symptom ChartNIS0023A
Test item Description
MIRROR MOTOR RHThe RH mirror motor moves the mirror UP/DOWN and LEFT/RIGHT by receiving the drive
signal.
MIRROR MOTOR LHThe LH mirror motor moves the mirror UP/DOWN and LEFT/RIGHT by receiving the drive
signal.
Symptom Diagnoses / service procedureReference
page
Reverse interlock door mirror does not operate.1. Check seat set switch circuitSE-80
2. Check changeover switch circuitGW-109
3. Check mirror switch circuitGW-111
4. Check A/T control device R position signal circuitGW-119
5. Check mirror motor circuitGW-113
6. Check mirror sensor circuitGW-116
7. Replace automatic drive positioner control unitSE-11
At reverse interlock door mirror system operation, mir-
ror angle is not in the setting position
After finishing the reverse interlock door mirror system.
Operation, mirror angle does not return to the original
position1. Check mirror sensor circuitGW-1162. Check A/T control device R position signal circuitGW-119
3. Replace automatic drive positioner control unitSE-11
Page 3628 of 5621

REVERSE INTERLOCK DOOR MIRROR SYSTEM
GW-109
C
D
E
F
G
H
J
K
L
MA
B
GW
Revision: 2006 January2006 M35/M45
Check Changeover Switch CircuitNIS0023B
1. CHECK CHANGEOVER SWITCH SIGNAL
With CONSULT-II
Check the operation on (MIR CHNG SW-R” or “MIR CHNG SW-L) in the DATA MONITOR.
Without CONSULT-II
1. Turn ignition switch ON.
2. Check voltage between automatic drive positioner control unit connector and ground.
OK
orNG
OK >> Changeover switch circuit is OK.
NG >> GO TO 2.
Monitor item
[OPERATION or UNIT]Contents
MIR CHNG SW–R“ON/
OFF”ON/OFF status judged from the changeover
switch (switching to RIGHT) signal is displayed.
MIR CHNG SW–L“ON/
OFF”ON/OFF status judged from the changeover
switch (switching to LEFT) signal is displayed.
PIIA0191E
Terminals
Change over switch
conditionVoltage (V)
(Approx.) (+)
(-) Automatic
drive posi-
tioner con-
trol unit
connectorTerminal
M62
GroundRIGHT 0
Other than above 5
18LEFT 0
Other than above 5
PIIB6015E
Page 3630 of 5621

REVERSE INTERLOCK DOOR MIRROR SYSTEM
GW-111
C
D
E
F
G
H
J
K
L
MA
B
GW
Revision: 2006 January2006 M35/M45
5. CHECK AUTOMATIC DRIVE POSITIONER CONTROL UNIT OUTPUT SIGNAL
1. Connect automatic drive positioner control unit connector.
2. Turn ignition switch ON.
3. Check voltage between automatic drive positioner control unit connector and ground.
OK or NG
OK >> Check the condition of harness and connector.
NG >> Replace automatic drive positioner control unit.
Check Mirror Switch Circuit CheckNIS0023C
1. CHECK MIRROR SWITCH SIGNAL
With CONSULT-II
Check the operation on “(MIR CON SW–UP/DN) and (MIR CON SW–RH/LH) in the DATA MONITOR.
Without CONSULT-II
1. Turn ignition switch to ON position.
2. Check voltage between automatic drive positioner control unit connector and ground.
OK or NG
OK >> Mirror switch circuit is OK.
NG >> GO TO 2.
Terminals
Voltage (V)
(Approx.) (+)
(-) Automatic drive
positioner control
unit connectorTerminal
M62
Ground 5
18
PIIB6015E
Monitor item
[OPERATION or UNIT]Contents
MIR CON SW–UP“ON/
OFF”ON/OFF status judged from the mirror switch
(UP) signal is displayed.
MIR CON SW–DN“ON/
OFF”ON/OFF status judged from the mirror switch
(DOWN) signal is displayed.
MIR CON SW–RH“ON/
OFF”ON/OFF status judged from the mirror switch
(RIGHT) signal is displayed.
MIR CON SW–LH“ON/
OFF”ON/OFF status judged from the mirror switch
(LEFT) signal s displayed.
PIIA0199E
Te r m i n a l s
Mirror switch
ConditionVoltage (V)
(Approx.) (+)
(–) Automatic drive
positioner control
unit connectorTerminal
M63
GroundUP 0
Other than above 5
4LEFT 0
Other than above 5
19DOWN 0
Other than above 5
20RIGHT 0
Other than above 5
PIIB6019E