belt INFINITI M35 2006 Factory Workshop Manual
[x] Cancel search | Manufacturer: INFINITI, Model Year: 2006, Model line: M35, Model: INFINITI M35 2006Pages: 5621, PDF Size: 65.56 MB
Page 1466 of 5621

UNIFIED METER AND A/C AMP
DI-33
C
D
E
F
G
H
I
J
L
MA
B
DI
Revision: 2006 January2006 M35/M45
DATA MONITOR
Operation Procedure
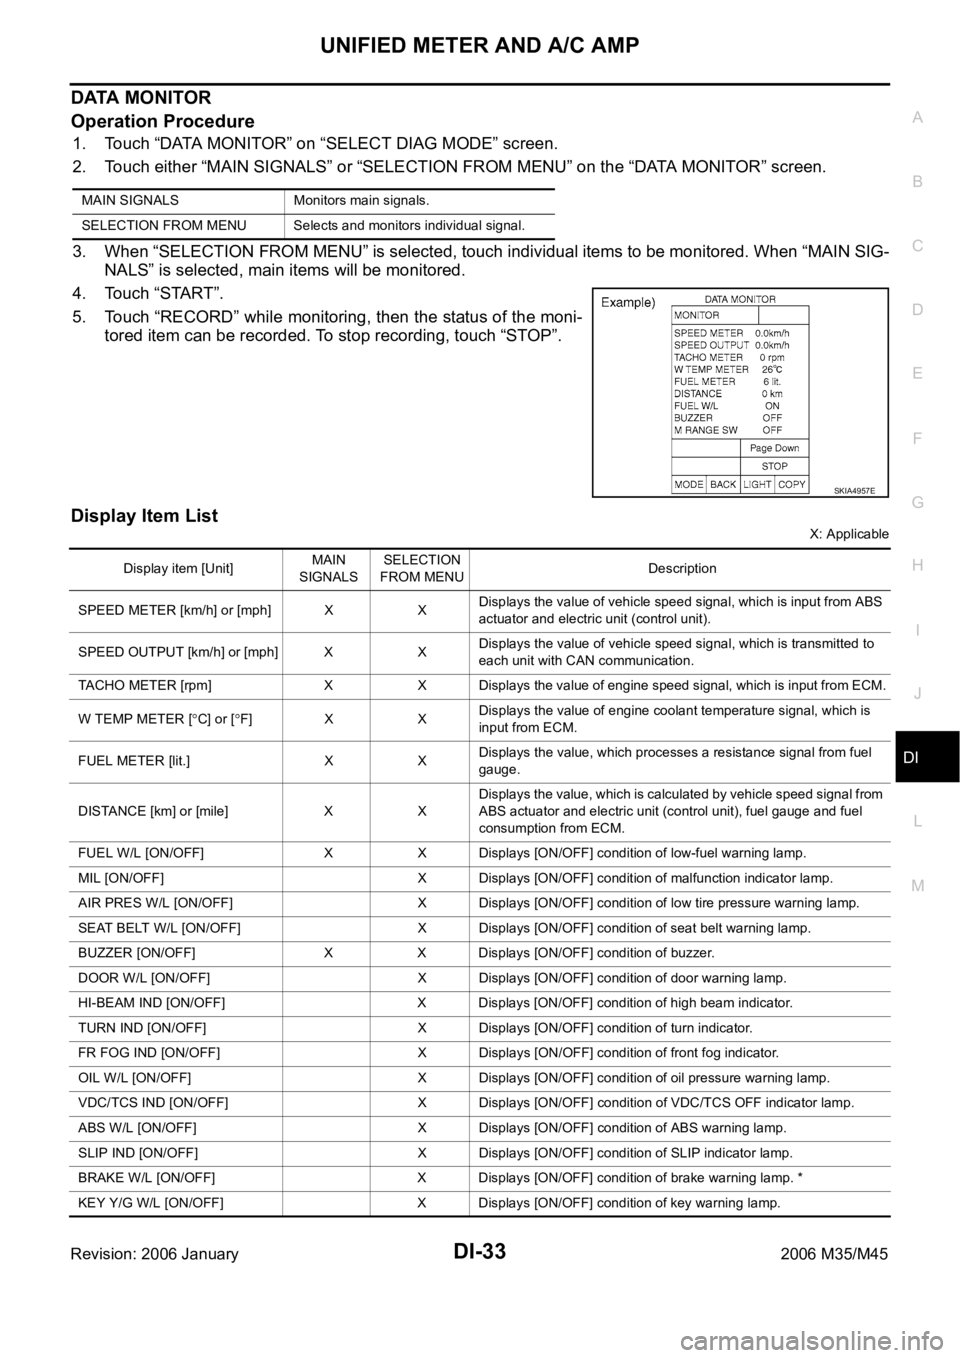
1. Touch “DATA MONITOR” on “SELECT DIAG MODE” screen.
2. Touch either “MAIN SIGNALS” or “SELECTION FROM MENU” on the “DATA MONITOR” screen.
3. When “SELECTION FROM MENU” is selected, touch individual items to be monitored. When “MAIN SIG-
NALS” is selected, main items will be monitored.
4. Touch “START”.
5. Touch “RECORD” while monitoring, then the status of the moni-
tored item can be recorded. To stop recording, touch “STOP”.
Display Item List
X: Applicable MAIN SIGNALS Monitors main signals.
SELECTION FROM MENU Selects and monitors individual signal.
SKIA4957E
Display item [Unit]MAIN
SIGNALSSELECTION
FROM MENUDescription
SPEED METER [km/h] or [mph] X XDisplays the value of vehicle speed signal, which is input from ABS
actuator and electric unit (control unit).
SPEED OUTPUT [km/h] or [mph] X XDisplays the value of vehicle speed signal, which is transmitted to
each unit with CAN communication.
TACHO METER [rpm] X X Displays the value of engine speed signal, which is input from ECM.
W TEMP METER [
C] or [F] X XDisplays the value of engine coolant temperature signal, which is
input from ECM.
FUEL METER [lit.] X XDisplays the value, which processes a resistance signal from fuel
gauge.
DISTANCE [km] or [mile] X XDisplays the value, which is calculated by vehicle speed signal from
ABS actuator and electric unit (control unit), fuel gauge and fuel
consumption from ECM.
FUEL W/L [ON/OFF] X X Displays [ON/OFF] condition of low-fuel warning lamp.
MIL [ON/OFF] X Displays [ON/OFF] condition of malfunction indicator lamp.
AIR PRES W/L [ON/OFF] X Displays [ON/OFF] condition of low tire pressure warning lamp.
SEAT BELT W/L [ON/OFF] X Displays [ON/OFF] condition of seat belt warning lamp.
BUZZER [ON/OFF] X X Displays [ON/OFF] condition of buzzer.
DOOR W/L [ON/OFF] X Displays [ON/OFF] condition of door warning lamp.
HI-BEAM IND [ON/OFF] X Displays [ON/OFF] condition of high beam indicator.
TURN IND [ON/OFF] X Displays [ON/OFF] condition of turn indicator.
FR FOG IND [ON/OFF] X Displays [ON/OFF] condition of front fog indicator.
OIL W/L [ON/OFF] X Displays [ON/OFF] condition of oil pressure warning lamp.
VDC/TCS IND [ON/OFF] X Displays [ON/OFF] condition of VDC/TCS OFF indicator lamp.
ABS W/L [ON/OFF] X Displays [ON/OFF] condition of ABS warning lamp.
SLIP IND [ON/OFF] X Displays [ON/OFF] condition of SLIP indicator lamp.
BRAKE W/L [ON/OFF] X Displays [ON/OFF] condition of brake warning lamp. *
KEY Y/G W/L [ON/OFF] X Displays [ON/OFF] condition of key warning lamp.
Page 1494 of 5621

WARNING CHIME
DI-61
C
D
E
F
G
H
I
J
L
MA
B
DI
Revision: 2006 January2006 M35/M45
IGNITION KEY WARNING CHIME (WITH INTELLIGENT KEY)
Refer to BL-55, "WARNING FUNCTION" in intelligent key system.
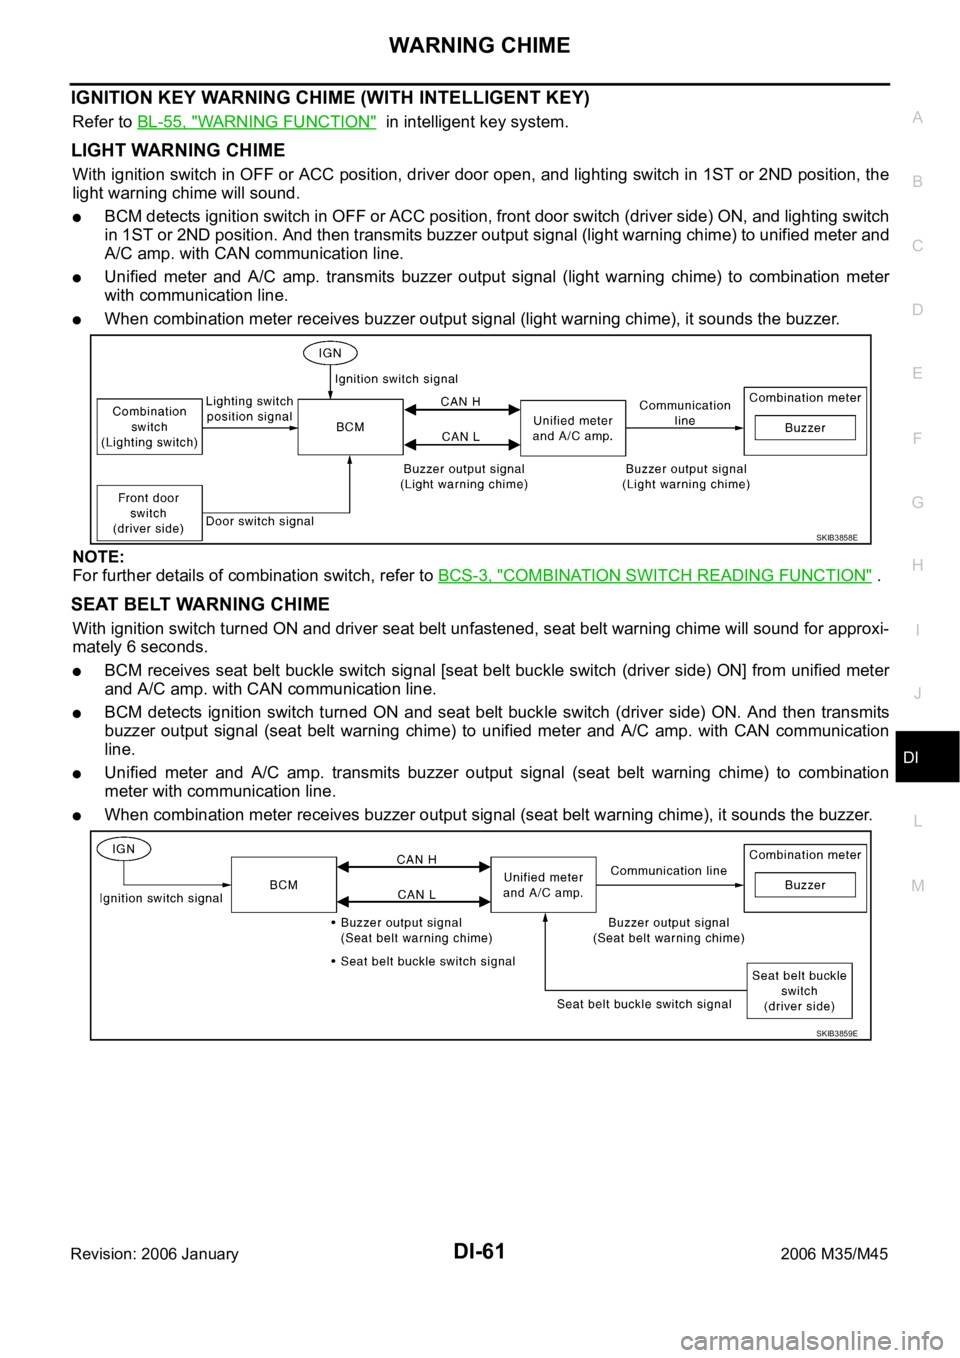
LIGHT WARNING CHIME
With ignition switch in OFF or ACC position, driver door open, and lighting switch in 1ST or 2ND position, the
light warning chime will sound.
BCM detects ignition switch in OFF or ACC position, front door switch (driver side) ON, and lighting switch
in 1ST or 2ND position. And then transmits buzzer output signal (light warning chime) to unified meter and
A/C amp. with CAN communication line.
Unified meter and A/C amp. transmits buzzer output signal (light warning chime) to combination meter
with communication line.
When combination meter receives buzzer output signal (light warning chime), it sounds the buzzer.
NOTE:
For further details of combination switch, refer to BCS-3, "
COMBINATION SWITCH READING FUNCTION" .
SEAT BELT WARNING CHIME
With ignition switch turned ON and driver seat belt unfastened, seat belt warning chime will sound for approxi-
mately 6 seconds.
BCM receives seat belt buckle switch signal [seat belt buckle switch (driver side) ON] from unified meter
and A/C amp. with CAN communication line.
BCM detects ignition switch turned ON and seat belt buckle switch (driver side) ON. And then transmits
buzzer output signal (seat belt warning chime) to unified meter and A/C amp. with CAN communication
line.
Unified meter and A/C amp. transmits buzzer output signal (seat belt warning chime) to combination
meter with communication line.
When combination meter receives buzzer output signal (seat belt warning chime), it sounds the buzzer.
SKIB3858E
SKIB3859E
Page 1500 of 5621

WARNING CHIME
DI-67
C
D
E
F
G
H
I
J
L
MA
B
DI
Revision: 2006 January2006 M35/M45
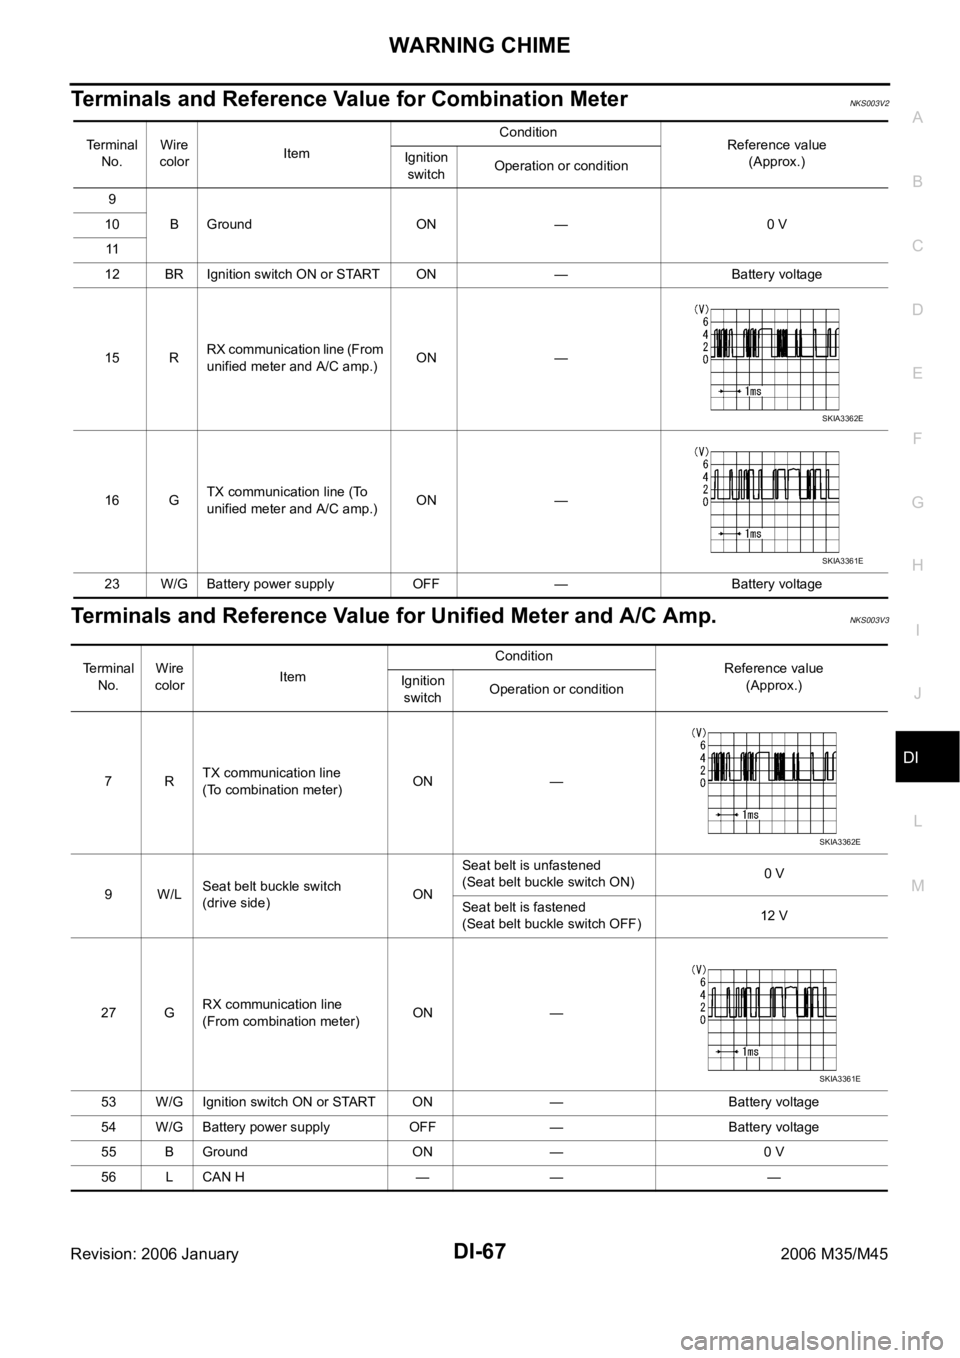
Terminals and Reference Value for Combination MeterNKS003V2
Terminals and Reference Value for Unified Meter and A/C Amp.NKS003V3
Te r m i n a l
No.Wire
colorItemCondition
Reference value
(Approx.) Ignition
switchOperation or condition
9
B Ground ON — 0 V 10
11
12 BR Ignition switch ON or START ON — Battery voltage
15 RRX communication line (From
unified meter and A/C amp.)ON —
16 GTX communication line (To
unified meter and A/C amp.)ON —
23 W/G Battery power supply OFF — Battery voltage
SKIA3362E
SKIA3361E
Terminal
No.Wire
colorItemCondition
Reference value
(Approx.) Ignition
switchOperation or condition
7RTX communication line
(To combination meter)ON —
9W/LSeat belt buckle switch
(drive side)ONSeat belt is unfastened
(Seat belt buckle switch ON)0 V
Seat belt is fastened
(Seat belt buckle switch OFF)12 V
27 GRX communication line
(From combination meter)ON —
53 W/G Ignition switch ON or START ON — Battery voltage
54 W/G Battery power supply OFF — Battery voltage
55 B Ground ON — 0 V
56 L CAN H — — —
SKIA3362E
SKIA3361E
Page 1503 of 5621

DI-70
WARNING CHIME
Revision: 2006 January2006 M35/M45
4. Touch “BUZZER” or “BCM”.
5. Select “DATA MONITOR”, “ACTIVE TEST” or “SELF-DIAG
RESULTS”.
DATA MONITOR
Operation Procedure
1. Touch “BUZZER” on “SELECT TEST ITEM” screen.
2. Touch “DATA MONITOR” on “SELECT DIAG MODE” screen.
3. Touch “ALL SIGNALS” or “SELECTION FROM MENU” on “DATA MONITOR” screen.
4. If “SELECTION FROM MENU” is selected, touch the desired monitor item. If “ALL SIGNALS” is selected,
all items required to control are monitored.
5. Touch “START”.
6. During monitoring, touching “RECORD” can start recording the monitored item status.
Display Item List
: Applicable
PKIB4914E
BCIA0031E
ALL SIGNALS Monitors main items.
SELECTION FROM MENU Selects and monitors items.
Display item [Unit] ALL SIGNALSSELECTION
FROM MENUDescription
IGN ON SW [ON/OFF] X X Displays [ON/OFF] condition of ignition switch.
KEY ON SW [ON/OFF] X X Displays [ON/OFF] condition of key switch.
DOOR SW-DR [ON/OFF] X X Displays [ON/OFF] condition of front door switch (driver side).
TAIL LAMP SW [ON/OFF] X X Displays [ON/OFF] condition of lighting switch.
FR FOG SW [ON/OFF] X X Displays [ON/OFF] condition of front fog lamp switch.
BUCKLE SW [ON/OFF] X X Displays [ON/OFF] condition of seat belt buckle switch (driver side).
Page 1504 of 5621

WARNING CHIME
DI-71
C
D
E
F
G
H
I
J
L
MA
B
DI
Revision: 2006 January2006 M35/M45
ACTIVE TEST
Operation Procedure
1. Touch “BUZZER” on “SELECT TEST ITEM” screen.
2. Touch “ACTIVE TEST” on “SELECT DIAG MODE” screen.
3. Touch the item to be tested, and check the operation.
4. During the operation check, touching “OFF” deactivates the operation.
Display Item List
SELF-DIAG RESULTS
Operation Procedure
1. Touch “BCM” on “SELECT TEST ITEM” screen.
2. Touch “SELF-DIAG RESULTS” on “SELECT DIAG MODE” screen.
3. Self-diagnosis results are displayed.
Display Item List
NOTE:
If “CAN communication [U1000]” is indicated, after printing the monitor item, go to “LAN system”. Refer to
LAN-7, "
Precautions When Using CONSULT-II" .
CONSULT-II Function (METER A/C AMP)NKS003V6
CONSULT-II can display each diagnostic item using the diagnostic test modes shown following.
NOTE:
For the further details, refer to DI-71, "
CONSULT-II Function (METER A/C AMP)" .
Trouble DiagnosisNKS003V7
HOW TO PERFORM TROUBLE DIAGNOSIS
1. Confirm the symptom and customer complaint.
2. Understand the outline of system. Refer to DI-60, "
System Description" .
3. Perform the preliminary inspection. Refer to DI-71, "
PRELIMINARY INSPECTION" .
4. Referring to trouble diagnosis chart, make sure the cause of the malfunction and repair or replace applica-
ble parts. Refer to DI-72, "
SYMPTOM CHART" .
5. Does warning chime system operate normally? If yes, GO TO 6. If no, GO TO 3.
6. INSPECTION END
PRELIMINARY INSPECTION
1. CHECK BCM (CONSULT-II)
Perform self-diagnosis of BCM. Refer to BCS-13, "
CONSULT-II Function (BCM)" .
Self
-diagnostic results content
No malfunction detected>> GO TO 2.
Malfunction detected>> Check applicable parts, and repair or replace corresponding parts.
Display item Description
LIGHT WARN ALM This test is able to check light warning chime operation.
IGN KEY WARN ALM This test is able to check key warning chime operation.
SEAT BELT WARN TEST This test is able to check seat belt warning chime operation.
Display item [Code] Malfunction is detected when...
CAN communication [U1000] Malfunction is detected in CAN communication.
System Diagnosis mode DescriptionReference
page
METER A/C
AMPSELF-DIAG RESULTSUnified meter and A/C amp. checks the conditions and displays
memorized error.DI-32
DATA MONITOR Displays unified meter and A/C amp. input data in real time.DI-33
Page 1505 of 5621

DI-72
WARNING CHIME
Revision: 2006 January2006 M35/M45
2. CHECK UNIFIED METER AND A/C AMP. (CONSULT-II)
Perform self-diagnosis of unified meter and A/C amp. Refer to DI-71, "
CONSULT-II Function (METER A/C
AMP)" .
Self
-diagnostic results content
No malfunction detected>> INSPECTION END
Malfunction detected>> Check applicable parts, and repair or replace corresponding parts.
SYMPTOM CHART
Meter Buzzer Circuit InspectionNKS003V8
1. CHECK OPERATION OF METER BUZZER
1. Select “BUZZER” of “BCM” on CONSULT-II.
2. Perform “LIGHT WARN ALM”, “IGN KEY WARN ALM” or “SEAT
BELT WARN TEST” of “ACTIVE TEST”.
Does meter buzzer beep?
YES >> GO TO 3.
NO >> GO TO 2.
2. CHECK UNIFIED METER AND A/C AMP. INPUT SIGNAL
1. Select “METER A/C AMP” on CONSULT-II.
2. With “DATA MONITOR”, confirm “BUZZER” under the condition
of buzzer input. (Seat belt warning chime, turn signal lamp oper-
ate, etc.)
OK or NG
OK >> Replace combination meter.
NG >> Replace BCM. Refer to BCS-17, "
Removal and Installa-
tion of BCM" .
3. CHECK BATTERY POWER SUPPLY OF COMBINATION METER
Check battery power supply of combination meter. Refer to DI-19, "
Power Supply and Ground Circuit Inspec-
tion" in combination meter.
OK or NG
OK >> GO TO 4.
NG >> Repair battery power supply circuit of combination meter.
Symptom Diagnosis/Service procedure
All warning chime systems do not activate. Perform DI-72, "
Meter Buzzer Circuit Inspection" .
Light warning chime does not activate.Perform the following inspections.
1.DI-73, "
Lighting Switch Signal Inspection"
2.DI-73, "Front Door Switch (Driver Side) Signal Inspection"
Replace BCM, found normal function in the above inspections.
Seat belt warning chime does not activate.Perform DI-74, "
Seat Belt Buckle Switch Signal Inspection" .
Replace BCM, found normal function in the above inspection.
SKIA6331E
“BUZZER”
Under the condition of buzzer input : ON
Except above : OFF
PKIA2063E
Page 1507 of 5621

DI-74
WARNING CHIME
Revision: 2006 January2006 M35/M45
2. CHECK FRONT DOOR SWITCH (DRIVER SIDE) CIRCUIT
1. Turn ignition switch OFF.
2. Disconnect BCM connector and front door switch (driver side)
connector.
3. Check continuity between BCM harness connector (A) and front
door switch (driver side) harness connector (B).
4. Check continuity between BCM harness connector (A) and
ground.
OK or NG
OK >> GO TO 3.
NG >> Repair harness or connector.
3. CHECK FRONT DOOR SWITCH (DRIVER SIDE)
Check front door switch (driver side). Refer to DI-76, "
FRONT DOOR SWITCH (DRIVER SIDE)" .
OK or NG
OK >> Replace BCM. Refer to BCS-17, "Removal and Installation of BCM" .
NG >> Replace front door switch (driver side).
Seat Belt Buckle Switch Signal InspectionNKS003VB
1. CHECK BCM INPUT SIGNAL
1. Select “BCM” on CONSULT-II.
2. With “DATA MONITOR” of “BUZZER”, confirm “BUCKLE SW”
when the seat belt is fastened/unfastened.
OK or NG
OK >> Seat belt buckle switch signal is OK. Return to DI-72,
"SYMPTOM CHART" .
NG >> GO TO 2.
AB
Continuity
Connector Terminal Connector Terminal
M3 62 B11 2 Yes
A
GroundContinuity
Connector Terminal
M3 62 No
PKIB7663E
“BUCKLE SW”
When seat belt is fastened : OFF
When seat belt is unfastened : ON
SKIA8674E
Page 1508 of 5621

WARNING CHIME
DI-75
C
D
E
F
G
H
I
J
L
MA
B
DI
Revision: 2006 January2006 M35/M45
2. CHECK UNIFIED METER AND A/C AMP. INPUT SIGNAL
1. Turn ignition switch ON.
2. Check voltage between unified meter and A/C amp. harness
connector and ground.
OK or NG
OK >> Replace unified meter and A/C amp.
NG >> GO TO 3.
3. CHECK SEAT BELT BUCKLE SWITCH CIRCUIT
1. Turn ignition switch OFF.
2. Disconnect unified meter and A/C amp. connector and seat belt
buckle switch (driver side) connector.
3. Check continuity between unified meter and A/C amp. harness
connector (A) and seat belt buckle switch (driver side) harness
connector (B).
4. Check harness continuity between unified meter and A/C amp.
harness connector (A) and ground.
OK or NG
OK >> GO TO 4.
NG >> Repair harness or connector.
4. CHECK SEAT BELT BUCKLE SWITCH (DRIVER SIDE)
Check seat belt buckle switch (driver side). Refer to DI-76, "
SEAT BELT BUCKLE SWITCH (DRIVER SIDE)" .
OK or NG
OK >> Check seat belt buckle switch (driver side) ground circuit.
NG >> Replace seat belt buckle switch (driver side).
Terminals
Condition
Voltage
(Approx.) (+)
(–)
Unified meter and
A/C amp. connectorTerminalSeat belt
(driver side):
M64 9 GroundFasten 12 V
Unfasten 0 V
PKIB7664E
AB
Continuity
Connector Terminal Connector Terminal
M64 9 B203 1 Yes
A
GroundContinuity
Connector Terminal
M64 9 No
PKIB7666E
Page 1509 of 5621

DI-76
WARNING CHIME
Revision: 2006 January2006 M35/M45
Electrical Component InspectionNKS003VC
FRONT DOOR SWITCH (DRIVER SIDE)
Check continuity between terminal 2 and door switch case ground.
SEAT BELT BUCKLE SWITCH (DRIVER SIDE)
Check continuity between terminals 1 and 2.
Terminal Condition Continuity
2Door switch
case groundWhen door switch is released. Yes
When door switch is pushed. No
PKIC0245E
Terminal Condition Continuity
12When seat belt is unfastened. Yes
When seat belt is fastened. No
PKIB7665E
Page 1544 of 5621

EC-1
ENGINE CONTROL SYSTEM
B ENGINE
CONTENTS
C
D
E
F
G
H
I
J
K
L
M
SECTION EC
A
EC
Revision: 2006 January2006 M35/M45
ENGINE CONTROL SYSTEM
VQ35DE
INDEX FOR DTC ...................................................... 16
DTC No. Index ....................................................... 16
Alphabetical Index .................................................. 20
PRECAUTIONS ........................................................ 24
Precautions for Supplemental Restraint System
(SRS) “AIR BAG” and “SEAT BELT PRE-TEN-
SIONER” ................................................................ 24
Precautions for Procedures without Cowl Top Cover ... 24
On Board Diagnostic (OBD) System of Engine and
A/T .......................................................................... 24
Precaution .............................................................. 25
PREPARATION ......................................................... 28
Special Service Tools ............................................. 28
Commercial Service Tools ...................................... 29
ENGINE CONTROL SYSTEM .................................. 30
System Diagram ..................................................... 30
Multiport Fuel Injection (MFI) System .................... 31
Electronic Ignition (EI) System ............................... 33
Fuel Cut Control (At No Load and High Engine
Speed) .................................................................... 34
AIR CONDITIONING CUT CONTROL ..................... 35
Input/Output Signal Chart ....................................... 35
System Description ................................................ 35
AUTOMATIC SPEED CONTROL DEVICE (ASCD) ... 36
System Description ................................................ 36
Component Description .......................................... 37
CAN COMMUNICATION .......................................... 38
System Description ................................................ 38
EVAPORATIVE EMISSION SYSTEM ....................... 39
Description ............................................................. 39
Component Inspection ........................................... 42
Removal and Installation ........................................ 43
How to Detect Fuel Vapor Leakage ....................... 43
ON BOARD REFUELING VAPOR RECOVERY
(ORVR) ...................................................................... 46
System Description ................................................ 46
Diagnostic Procedure ............................................. 47
Component Inspection ........................................... 49POSITIVE CRANKCASE VENTILATION ................. 51
Description .............................................................. 51
Component Inspection ............................................ 51
IVIS (INFINITI VEHICLE IMMOBILIZER SYSTEM-
NATS) ........................................................................ 53
Description .............................................................. 53
ON BOARD DIAGNOSTIC (OBD) SYSTEM ............ 54
Introduction ..................................................
........... 54
Two Trip Detection Logic ........................................ 54
Emission-Related Diagnostic Information ............... 55
Malfunction Indicator Lamp (MIL) ........................... 69
OBD System Operation Chart ................................ 72
BASIC SERVICE PROCEDURE ............................... 77
Basic Inspection ..................................................... 77
Idle Speed and Ignition Timing Check .................... 82
Idle Mixture Ratio Adjustment ................................. 84
VIN Registration ..................................................... 95
Accelerator Pedal Released Position Learning ...... 95
Throttle Valve Closed Position Learning ................. 95
Idle Air Volume Learning ........................................ 96
Fuel Pressure Check .............................................. 98
TROUBLE DIAGNOSIS ..........................................100
Trouble Diagnosis Introduction .............................100
DTC Inspection Priority Chart ...............................106
Fail-Safe Chart .....................................................108
Symptom Matrix Chart ..........................................109
Engine Control Component Parts Location ..........113
Vacuum Hose Drawing .........................................121
Circuit Diagram .....................................................122
ECM Harness Connector Terminal Layout ...........124
ECM Terminals and Reference Value ...................124
CONSULT-II Function (ENGINE) ..........................133
Generic Scan Tool (GST) Function .......................146
CONSULT-II Reference Value in Data Monitor .....149
Major Sensor Reference Graph in Data Monitor
Mode .....................................................................153
TROUBLE DIAGNOSIS - SPECIFICATION VALUE .155
Description ............................................................155
Testing Condition ..................................................155