wheel torque INFINITI M35 2006 Factory Workshop Manual
[x] Cancel search | Manufacturer: INFINITI, Model Year: 2006, Model line: M35, Model: INFINITI M35 2006Pages: 5621, PDF Size: 65.56 MB
Page 5097 of 5621
RSU-16
REAR LOWER LINK & COIL SPRING
Revision: 2006 January2006 M35/M45
REAR LOWER LINK & COIL SPRINGPFP:551B0
Removal and InstallationNES000JF
REMOVAL
1. Remove tire with a power tool.
2. Set a jack under rear lower link to relieve the coil spring tension.
3. Loosen mounting bolt and nut of rear lower link inside of suspension member, and then remove mounting
bolt and nut inside of axle with a power tool.
4. Slowly lower jack, then remove upper seat, coil spring and rubber sheet from rear lower link.
5. Remove mounting bolt and nut inside of suspension member to remove rear lower link with a power tool.
INSPECTION AFTER REMOVAL
Check rear lower link, bushing and coil spring for deformation, cracks, and damage. Replace rear lower link
and coil spring if there are.
INSTALLATION
Installation is the reverse order of removal. For tightening torque. Refer to RSU-7, "Components" .
CAUTION:
Do not reuse non-reusable parts.
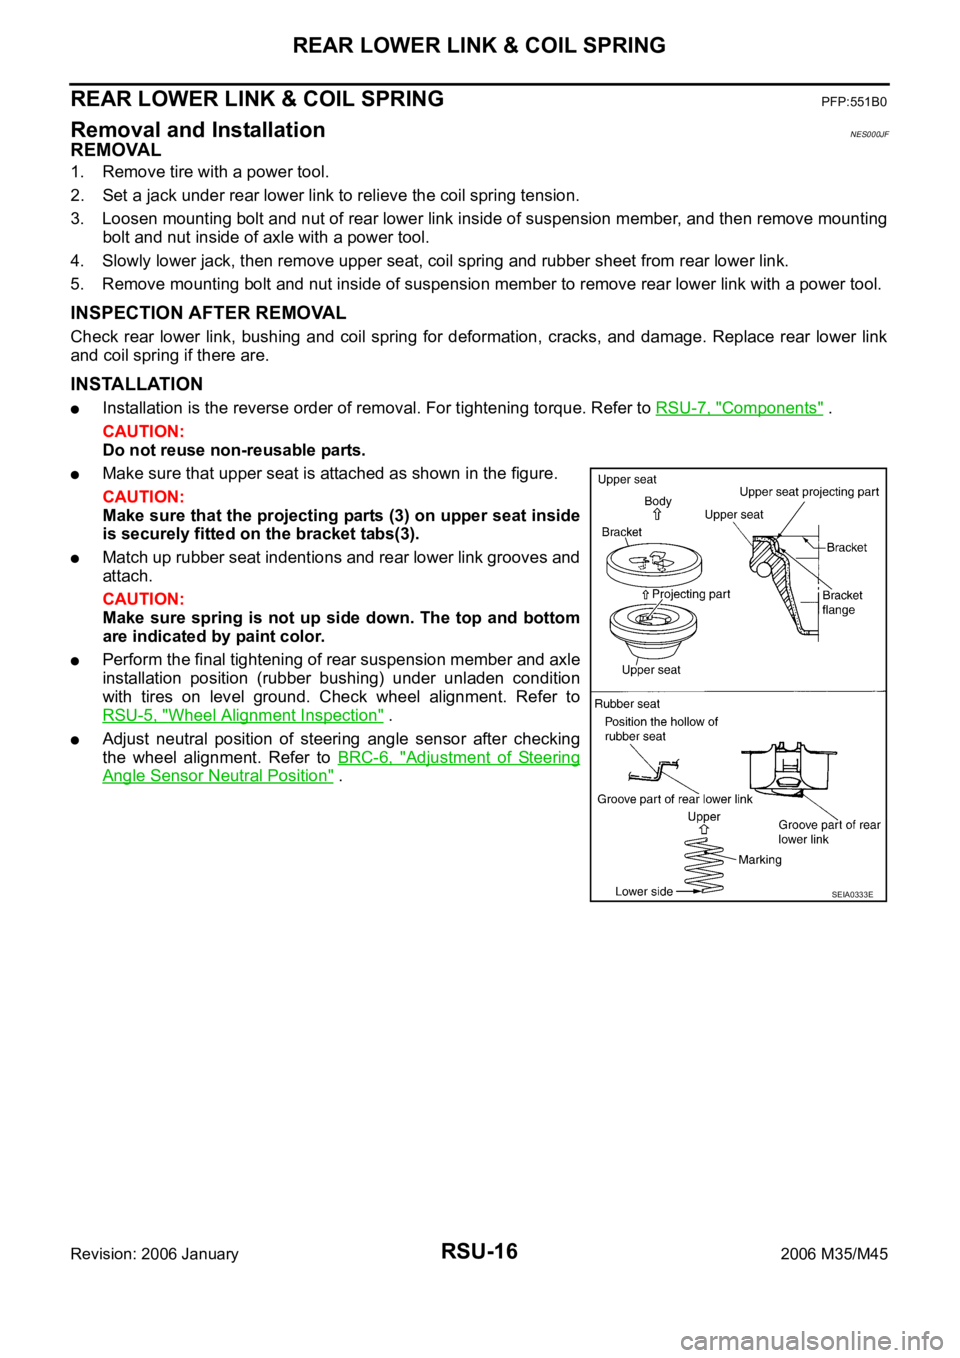
Make sure that upper seat is attached as shown in the figure.
CAUTION:
Make sure that the projecting parts (3) on upper seat inside
is securely fitted on the bracket tabs(3).
Match up rubber seat indentions and rear lower link grooves and
attach.
CAUTION:
Make sure spring is not up side down. The top and bottom
are indicated by paint color.
Perform the final tightening of rear suspension member and axle
installation position (rubber bushing) under unladen condition
with tires on level ground. Check wheel alignment. Refer to
RSU-5, "
Wheel Alignment Inspection" .
Adjust neutral position of steering angle sensor after checking
the wheel alignment. Refer to BRC-6, "
Adjustment of Steering
Angle Sensor Neutral Position" .
SEIA0333E
Page 5099 of 5621
RSU-18
SERVICE DATA
Revision: 2006 January2006 M35/M45
SERVICE DATAPFP:00030
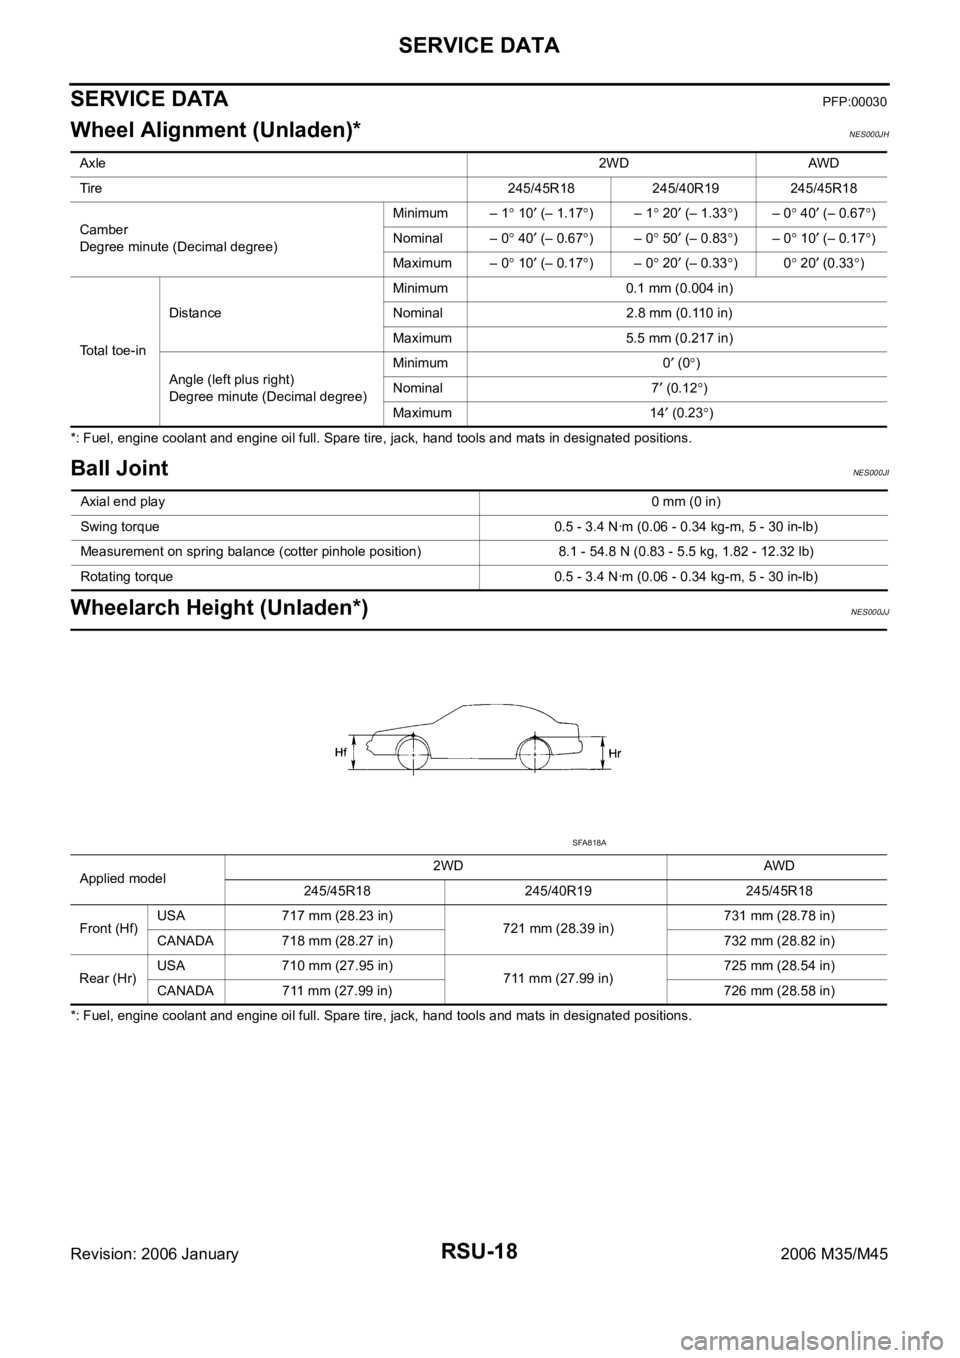
Wheel Alignment (Unladen)*NES000JH
*: Fuel, engine coolant and engine oil full. Spare tire, jack, hand tools and mats in designated positions.
Ball JointNES000JI
Wheelarch Height (Unladen*)NES000JJ
*: Fuel, engine coolant and engine oil full. Spare tire, jack, hand tools and mats in designated positions. Axle2WD AWD
Tire 245/45R18 245/40R19 245/45R18
Camber
Degree minute (Decimal degree)Minimum – 1
10 (– 1.17)– 1 20 (– 1.33)– 0 40 (– 0.67)
Nominal – 0
40 (– 0.67)– 0 50 (– 0.83)– 0 10 (– 0.17)
Maximum – 0
10 (– 0.17)– 0 20 (– 0.33)0 20 (0.33)
Total toe-inDistanceMinimum 0.1 mm (0.004 in)
Nominal 2.8 mm (0.110 in)
Maximum 5.5 mm (0.217 in)
Angle (left plus right)
Degree minute (Decimal degree)Minimum 0
(0)
Nominal 7
(0.12)
Maximum 14
(0.23)
Axial end play0 mm (0 in)
Swing torque 0.5 - 3.4 Nꞏm (0.06 - 0.34 kg-m, 5 - 30 in-lb)
Measurement on spring balance (cotter pinhole position) 8.1 - 54.8 N (0.83 - 5.5 kg, 1.82 - 12.32 lb)
Rotating torque 0.5 - 3.4 Nꞏm (0.06 - 0.34 kg-m, 5 - 30 in-lb)
Applied model2WD AWD
245/45R18 245/40R19 245/45R18
Front (Hf)USA 717 mm (28.23 in)
721 mm (28.39 in)731 mm (28.78 in)
CANADA 718 mm (28.27 in) 732 mm (28.82 in)
Rear (Hr)USA 710 mm (27.95 in)
711 mm (27.99 in)725 mm (28.54 in)
CANADA 711 mm (27.99 in) 726 mm (28.58 in)
SFA818A
Page 5131 of 5621
SB-32
SEAT BELTS
Revision: 2006 January2006 M35/M45
Removal and Installation of Rear Seat Belt NHS0008K
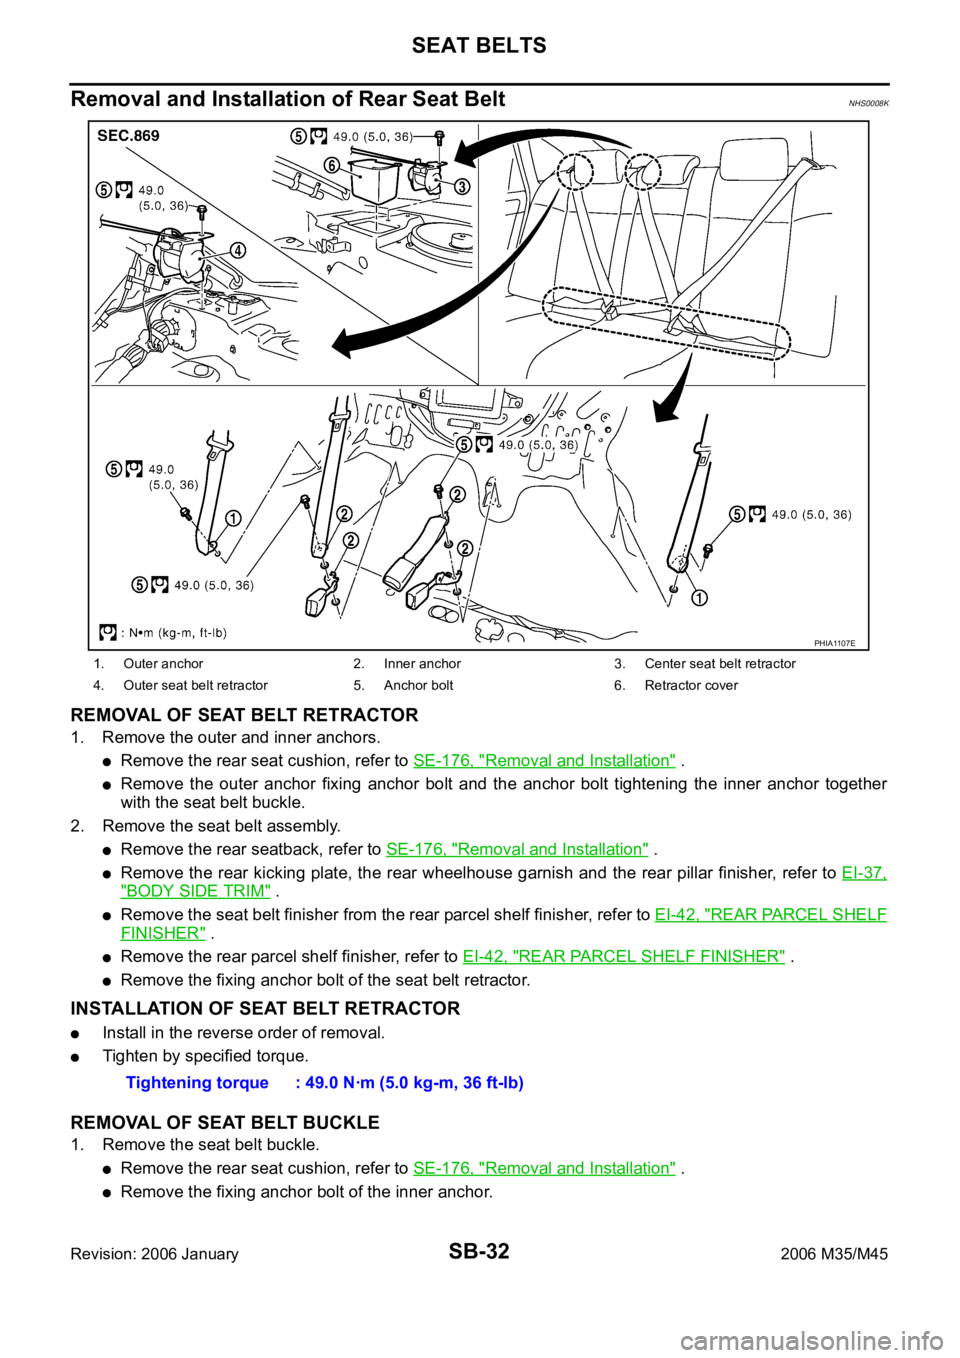
REMOVAL OF SEAT BELT RETRACTOR
1. Remove the outer and inner anchors.
Remove the rear seat cushion, refer to SE-176, "Removal and Installation" .
Remove the outer anchor fixing anchor bolt and the anchor bolt tightening the inner anchor together
with the seat belt buckle.
2. Remove the seat belt assembly.
Remove the rear seatback, refer to SE-176, "Removal and Installation" .
Remove the rear kicking plate, the rear wheelhouse garnish and the rear pillar finisher, refer to EI-37,
"BODY SIDE TRIM" .
Remove the seat belt finisher from the rear parcel shelf finisher, refer to EI-42, "REAR PARCEL SHELF
FINISHER" .
Remove the rear parcel shelf finisher, refer to EI-42, "REAR PARCEL SHELF FINISHER" .
Remove the fixing anchor bolt of the seat belt retractor.
INSTALLATION OF SEAT BELT RETRACTOR
Install in the reverse order of removal.
Tighten by specified torque.
REMOVAL OF SEAT BELT BUCKLE
1. Remove the seat belt buckle.
Remove the rear seat cushion, refer to SE-176, "Removal and Installation" .
Remove the fixing anchor bolt of the inner anchor.
1. Outer anchor 2. Inner anchor 3. Center seat belt retractor
4. Outer seat belt retractor 5. Anchor bolt 6. Retractor cover
PHIA1107E
Tightening torque : 49.0 Nꞏm (5.0 kg-m, 36 ft-lb)
Page 5426 of 5621
![INFINITI M35 2006 Factory Workshop Manual TROUBLE DIAGNOSIS
STC-11
[EPS]
C
D
E
F
H
I
J
K
L
MA
B
STC
Revision: 2006 January2006 M35/M45
4. CHECK POWER STEERING SOLENOID VALVE POWER SUPPLY CIRCUIT
Check continuity between power steering co INFINITI M35 2006 Factory Workshop Manual TROUBLE DIAGNOSIS
STC-11
[EPS]
C
D
E
F
H
I
J
K
L
MA
B
STC
Revision: 2006 January2006 M35/M45
4. CHECK POWER STEERING SOLENOID VALVE POWER SUPPLY CIRCUIT
Check continuity between power steering co](/img/42/57023/w960_57023-5425.png)
TROUBLE DIAGNOSIS
STC-11
[EPS]
C
D
E
F
H
I
J
K
L
MA
B
STC
Revision: 2006 January2006 M35/M45
4. CHECK POWER STEERING SOLENOID VALVE POWER SUPPLY CIRCUIT
Check continuity between power steering control unit harness con-
nector M8 and power steering solenoid valve harness connector F25
(VQ35DE), E211 (VK45DE).
OK or NG
OK >> GO TO 5.
NG >> Open or short in harness. Repair or replace any inoper-
ative parts.
5. CHECK POWER STEERING SOLENOID VALVE GROUND CIRCUIT
Check continuity between power steering solenoid valve harness
connector F25 (VQ35DE), E211 (VK45DE) and ground.
OK or NG
OK >> GO TO 6.
NG >> Open or short in harness. Repair or replace any inoper-
ative parts.
6. CHECK POWER STEERING SOLENOID VALVE
Apply voltage power steering solenoid valve connector, and then
make sure that the operating sound (clicking sound) is heard.
OK or NG
OK >> Perform steering turning torque inspection. Refer to PS-
10, "CHECKING STEERING WHEEL TURNING
FORCE" .
NG >> Power steering solenoid valve is inoperative. Replace.
Power steering control unit Power steering solenoid valve Continuity
Terminal 7 Terminal 1 Yes
SGIA1235E
Terminal 2 – Ground : Continuity exist.
SGIA1236E
Terminal 1 (+) - 2 (–) : Operating sound is heard.
SGIA1284E
Page 5429 of 5621
![INFINITI M35 2006 Factory Workshop Manual STC-14
[RAS]
REAR ACTIVE STEER
Revision: 2006 January2006 M35/M45
Disassembly and AssemblyNGS000E6
COMPONENTS
DISASSEMBLY
1. Remove mounting bolts of RAS motor assembly, and then remove RAS motor asse INFINITI M35 2006 Factory Workshop Manual STC-14
[RAS]
REAR ACTIVE STEER
Revision: 2006 January2006 M35/M45
Disassembly and AssemblyNGS000E6
COMPONENTS
DISASSEMBLY
1. Remove mounting bolts of RAS motor assembly, and then remove RAS motor asse](/img/42/57023/w960_57023-5428.png)
STC-14
[RAS]
REAR ACTIVE STEER
Revision: 2006 January2006 M35/M45
Disassembly and AssemblyNGS000E6
COMPONENTS
DISASSEMBLY
1. Remove mounting bolts of RAS motor assembly, and then remove RAS motor assembly, ground terminal,
O-ring from RAS actuator.
2. Remove mounting bolt of rear wheel steering angle sensor, and then remove rear wheel steering angle
sensor, O-ring from RAS actuator.
INSPECTION AFTER DISASSEMBLY
Check RAS actuator bracket (rear wheel steering angle sensor mounting area) for crush, deformation, cracks,
or other damage. Replace the RAS actuator malfunction is detected.
ASSEMBLY
Assembly is the reverse order of disassembly. For tightening torque, refer to STC-14, "COMPONENTS" .
After assembling RAS actuator assembly (after removing and installing rear wheel angle sensor and RAS
motor), perform the neutral position adjustment.
Neutral Position AdjustmentNGS000E7
Adjust neutral position after performing the following procedure.
Removing and installing or replacing the RAS actuator assembly
Disassembling the RAS actuator assembly (when removing rear wheel steering angle sensor and RAS
motor)
CAUTION:
Perform the neutral position adjustment after installing the RAS actuator assembly to the vehicle.
Before that, remove the rear lower link from the RAS actuator.
1. Disconnect harness connector and remove rear wheel steering angle sensor from the RAS actuator
assembly.
2. Disconnect RAS motor harness connector.
3. Turn ignition switch ON.
1. Ground terminal 2. RAS motor assembly 3. O-ring
4. RAS actuator 5. Rear wheel steering angle sensor
Refer to GI-11, "
Components" , for the symbols in the figure.
SGIA1052J
Page 5430 of 5621
![INFINITI M35 2006 Factory Workshop Manual REAR ACTIVE STEER
STC-15
[RAS]
C
D
E
F
H
I
J
K
L
MA
B
STC
Revision: 2006 January2006 M35/M45
4. Supply 6 V voltage by connecting the four 1.5 V batteries in a
series. Connect them to the RAS motor con INFINITI M35 2006 Factory Workshop Manual REAR ACTIVE STEER
STC-15
[RAS]
C
D
E
F
H
I
J
K
L
MA
B
STC
Revision: 2006 January2006 M35/M45
4. Supply 6 V voltage by connecting the four 1.5 V batteries in a
series. Connect them to the RAS motor con](/img/42/57023/w960_57023-5429.png)
REAR ACTIVE STEER
STC-15
[RAS]
C
D
E
F
H
I
J
K
L
MA
B
STC
Revision: 2006 January2006 M35/M45
4. Supply 6 V voltage by connecting the four 1.5 V batteries in a
series. Connect them to the RAS motor connector (motor side),
and then operate the motor and adjust the rack in the neutral
position (A).
CAUTION:
Do not supply 12 V voltage (battery, etc) to the RAS motor.
NOTE:
For right stroke, connect positive probe to the RAS motor con-
nector terminal 1. For left stroke, connect it to the terminal 2.
5. Install rear wheel steering angle sensor with O-ring to the RAS
actuator assembly. Temporarily tighten the mounting bolts in the specified torque that the sensor can be
moved by hand.
6. Turn and adjust the rear wheel steering angle sensor so as to make each sensor signal of “DATA MONI-
TOR” mode to the following standard with CONSULT-II.
CAUTION:
During DATA MONITOR mode, “MONITORING ERROR” is displayed. But there is not malfunction
in this procedure.
7. Tighten rear wheel steering angle sensor mounting bolts.
8. Perform “ERASE” with CONSULT-II, and then erase the error memory of rear wheel steering angle sen-
sor. Refer to STC-29, "
How to Erase Self-Diagnostic Results" .
9. Perform CONSULT-II “SELF-DIAG RESULTS” again, and then make sure that there is no malfunction.
Refer to STC-28, "
SELF-DIAG RESULT MODE" . Full stroke (B) : 6.8 - 7.2 mm (0.268 - 0.283 in)
STEERING ANG () L - 0, R - 0, N - 0
RR ST ANG-MAI (V) Approx. 2.4
RR ST ANG-SUB (V) Approx. 2.4
RR ST ANG-VOL (V) Approx. 5.0
SGIA1240E
Page 5462 of 5621
![INFINITI M35 2006 Factory Workshop Manual TROUBLE DIAGNOSIS
STC-47
[RAS]
C
D
E
F
H
I
J
K
L
MA
B
STC
Revision: 2006 January2006 M35/M45
3. CHECK POWER STEERING SOLENOID VALVE CONNECTOR
Turn ignition switch OFF, disconnect power steering soleno INFINITI M35 2006 Factory Workshop Manual TROUBLE DIAGNOSIS
STC-47
[RAS]
C
D
E
F
H
I
J
K
L
MA
B
STC
Revision: 2006 January2006 M35/M45
3. CHECK POWER STEERING SOLENOID VALVE CONNECTOR
Turn ignition switch OFF, disconnect power steering soleno](/img/42/57023/w960_57023-5461.png)
TROUBLE DIAGNOSIS
STC-47
[RAS]
C
D
E
F
H
I
J
K
L
MA
B
STC
Revision: 2006 January2006 M35/M45
3. CHECK POWER STEERING SOLENOID VALVE CONNECTOR
Turn ignition switch OFF, disconnect power steering solenoid valve harness connector, and check terminal for
deformation, disconnection, looseness, etc.
OK or NG
OK >> GO TO 4.
NG >> Harness or connector open or shorted. Repair or replace any inoperative parts.
4. CHECK POWER STEERING SOLENOID VALVE POWER SUPPLY CIRCUIT
Check continuity between RAS control unit harness connector B127
and power steering solenoid valve harness connector F25
(VQ35DE), E211 (VK45DE).
OK or NG
OK >> GO TO 5.
NG >> Open or short in harness. Repair or replace any inoper-
ative parts.
5. CHECK POWER STEERING SOLENOID VALVE GROUND CIRCUIT
Check continuity between power steering solenoid valve harness
connector F25 (VQ35DE), E211 (VK45DE) and ground.
OK or NG
OK >> GO TO 6.
NG >> Open or short in harness. Repair or replace any inoper-
ative parts.
6. CHECK POWER STEERING SOLENOID VALVE
Apply voltage power steering solenoid valve connector F25
(VQ35DE), E211 (VK45DE) and then make sure that the operating
sound (clicking sound) is heard.
OK or NG
OK >> Perform steering turning torque inspection. Refer to PS-
10, "CHECKING STEERING WHEEL TURNING
FORCE" .
NG >> Power steering solenoid valve is inoperating. Replace it.
7. CHECK SELF-DIAGNOSIS RESULTS
Perform RAS self-diagnosis.
With CONSULT-II: STC-28, "SELF-DIAG RESULT MODE"
Without CONSULT-II: STC-31, "Diagnosis Procedure with Self-Diagnosis Function (Without CONSULT-
II)"
Are malfunctioning items displayed in self-diagnosis results?
YES >> Repair or replace any malfunctioning items.
NO >> RAS control unit malfunction. Replace it.
RAS C/U Power steering solenoid valve Continuity
Terminal 36 Terminal 1 Yes
SGIA1282E
Terminal 2 – Ground : Continuity exist.
SGIA1283E
Terminal 1 (+) - 2 (-) : Operating sound is heard.
SGIA1284E
Page 5475 of 5621
TF-10
AWD SYSTEM
Revision: 2006 January2006 M35/M45
AWD SYSTEMPFP:41650
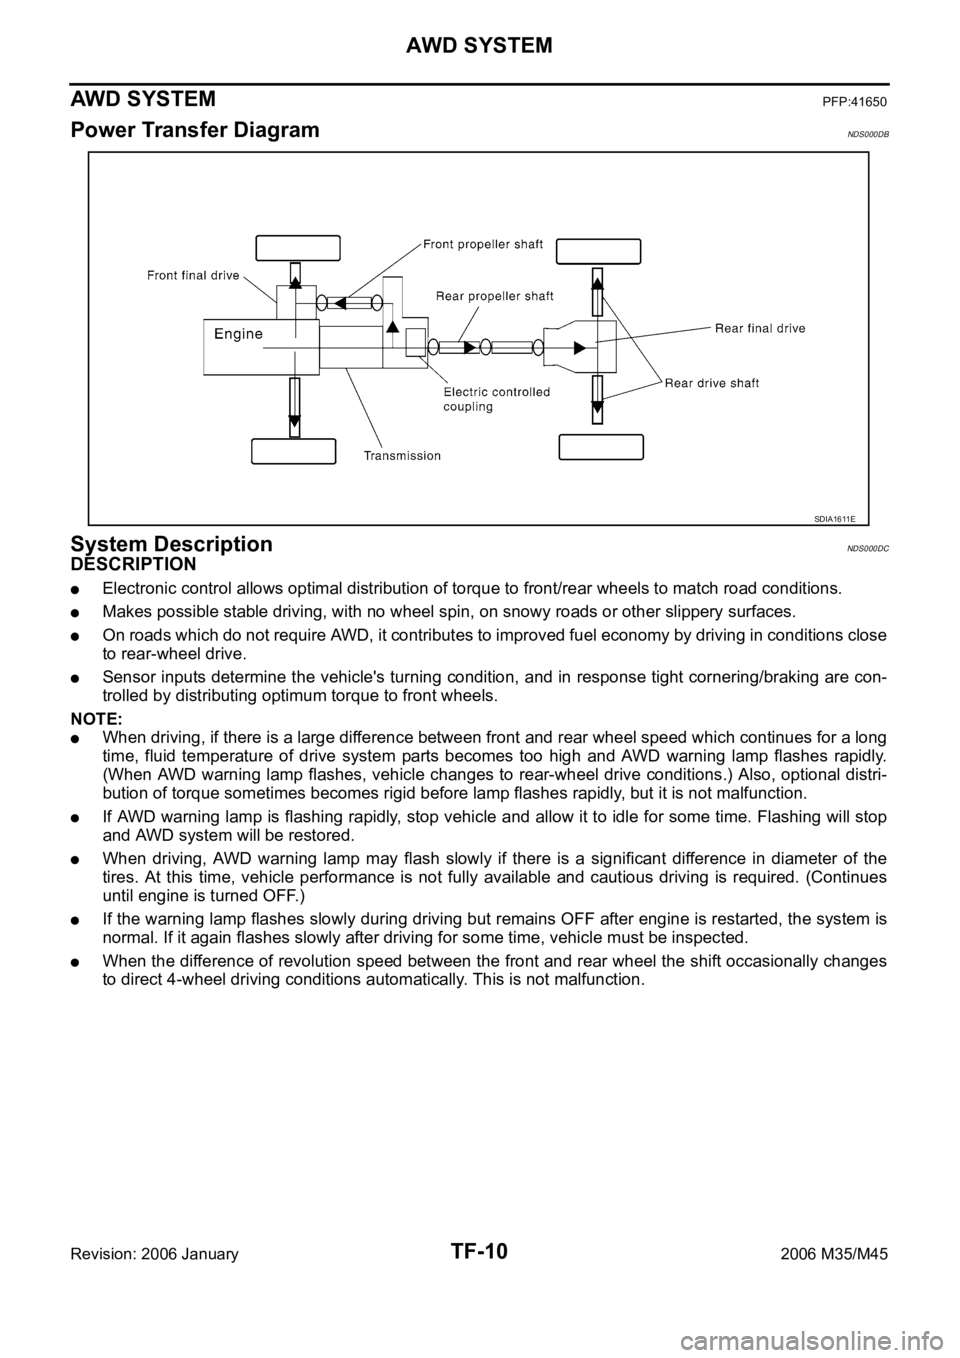
Power Transfer DiagramNDS000DB
System DescriptionNDS000DC
DESCRIPTION
Electronic control allows optimal distribution of torque to front/rear wheels to match road conditions.
Makes possible stable driving, with no wheel spin, on snowy roads or other slippery surfaces.
On roads which do not require AWD, it contributes to improved fuel economy by driving in conditions close
to rear-wheel drive.
Sensor inputs determine the vehicle's turning condition, and in response tight cornering/braking are con-
trolled by distributing optimum torque to front wheels.
NOTE:
When driving, if there is a large difference between front and rear wheel speed which continues for a long
time, fluid temperature of drive system parts becomes too high and AWD warning lamp flashes rapidly.
(When AWD warning lamp flashes, vehicle changes to rear-wheel drive conditions.) Also, optional distri-
bution of torque sometimes becomes rigid before lamp flashes rapidly, but it is not malfunction.
If AWD warning lamp is flashing rapidly, stop vehicle and allow it to idle for some time. Flashing will stop
and AWD system will be restored.
When driving, AWD warning lamp may flash slowly if there is a significant difference in diameter of the
tires. At this time, vehicle performance is not fully available and cautious driving is required. (Continues
until engine is turned OFF.)
If the warning lamp flashes slowly during driving but remains OFF after engine is restarted, the system is
normal. If it again flashes slowly after driving for some time, vehicle must be inspected.
When the difference of revolution speed between the front and rear wheel the shift occasionally changes
to direct 4-wheel driving conditions automatically. This is not malfunction.
SDIA1611E
Page 5476 of 5621
AWD SYSTEM
TF-11
C
E
F
G
H
I
J
K
L
MA
B
TF
Revision: 2006 January2006 M35/M45
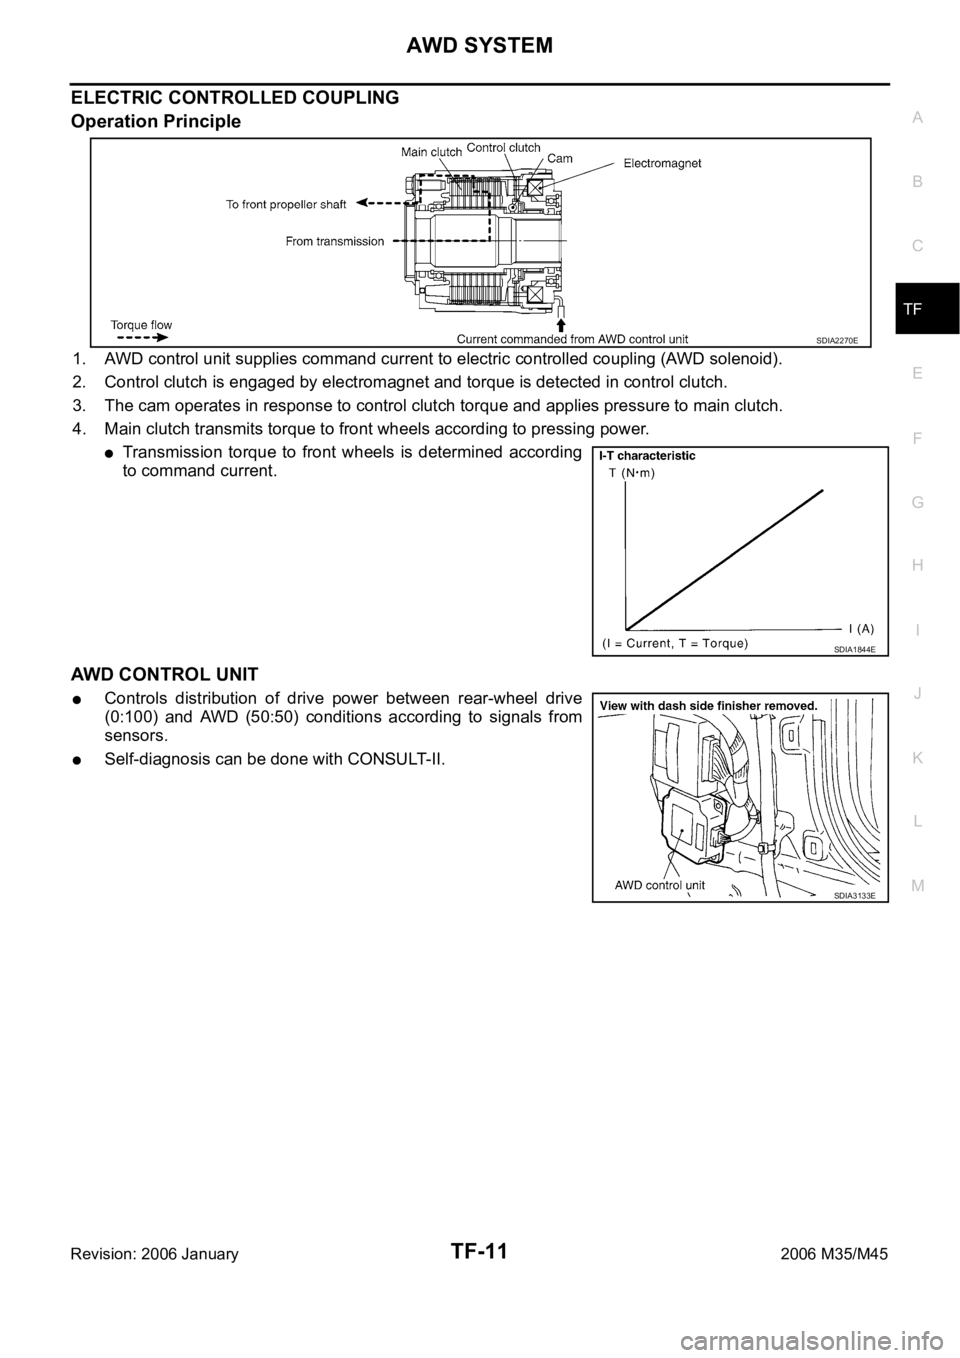
ELECTRIC CONTROLLED COUPLING
Operation Principle
1. AWD control unit supplies command current to electric controlled coupling (AWD solenoid).
2. Control clutch is engaged by electromagnet and torque is detected in control clutch.
3. The cam operates in response to control clutch torque and applies pressure to main clutch.
4. Main clutch transmits torque to front wheels according to pressing power.
Transmission torque to front wheels is determined according
to command current.
AWD CONTROL UNIT
Controls distribution of drive power between rear-wheel drive
(0:100) and AWD (50:50) conditions according to signals from
sensors.
Self-diagnosis can be done with CONSULT-II.
SDIA2270E
SDIA1844E
SDIA3133E
Page 5477 of 5621
TF-12
AWD SYSTEM
Revision: 2006 January2006 M35/M45
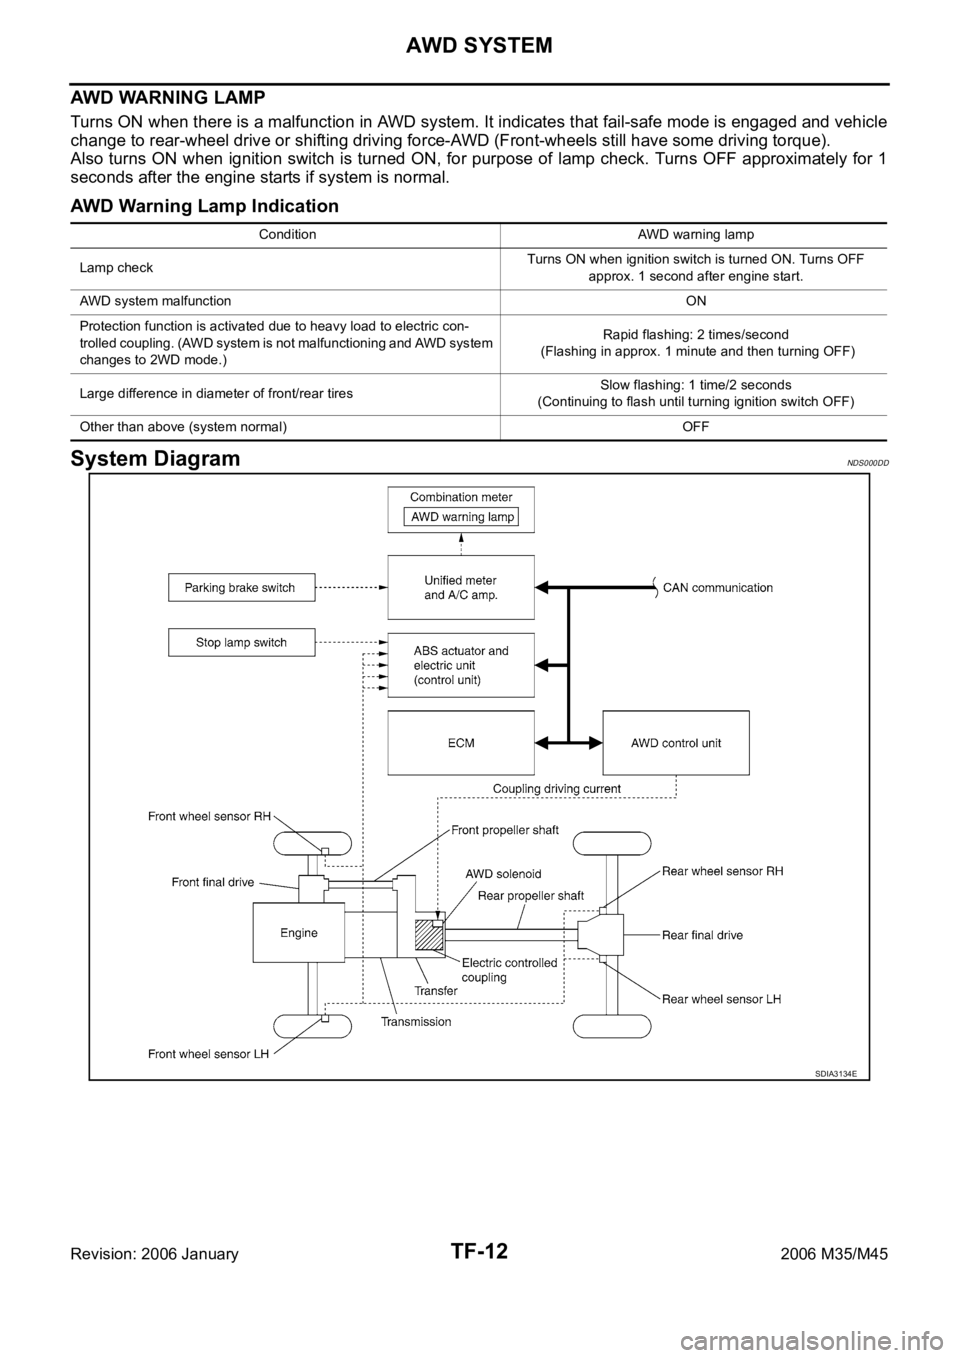
AWD WARNING LAMP
Turns ON when there is a malfunction in AWD system. It indicates that fail-safe mode is engaged and vehicle
change to rear-wheel drive or shifting driving force-AWD (Front-wheels still have some driving torque).
Also turns ON when ignition switch is turned ON, for purpose of lamp check. Turns OFF approximately for 1
seconds after the engine starts if system is normal.
AWD Warning Lamp Indication
System DiagramNDS000DD
Condition AWD warning lamp
Lamp checkTurns ON when ignition switch is turned ON. Turns OFF
approx. 1 second after engine start.
AWD system malfunctionON
Protection function is activated due to heavy load to electric con-
trolled coupling. (AWD system is not malfunctioning and AWD system
changes to 2WD mode.)Rapid flashing: 2 times/second
(Flashing in approx. 1 minute and then turning OFF)
Large difference in diameter of front/rear tiresSlow flashing: 1 time/2 seconds
(Continuing to flash until turning ignition switch OFF)
Other than above (system normal) OFF
SDIA3134E