ECO mode INFINITI Q50 2014 Owner's Manual
[x] Cancel search | Manufacturer: INFINITI, Model Year: 2014, Model line: Q50, Model: INFINITI Q50 2014Pages: 394, PDF Size: 1.99 MB
Page 25 of 394
1-6Safety—Seats, seat belts and supplemental restraint system
seatback and trunk lid securely latched
when not in use, and prevent children’s
access to car keys.
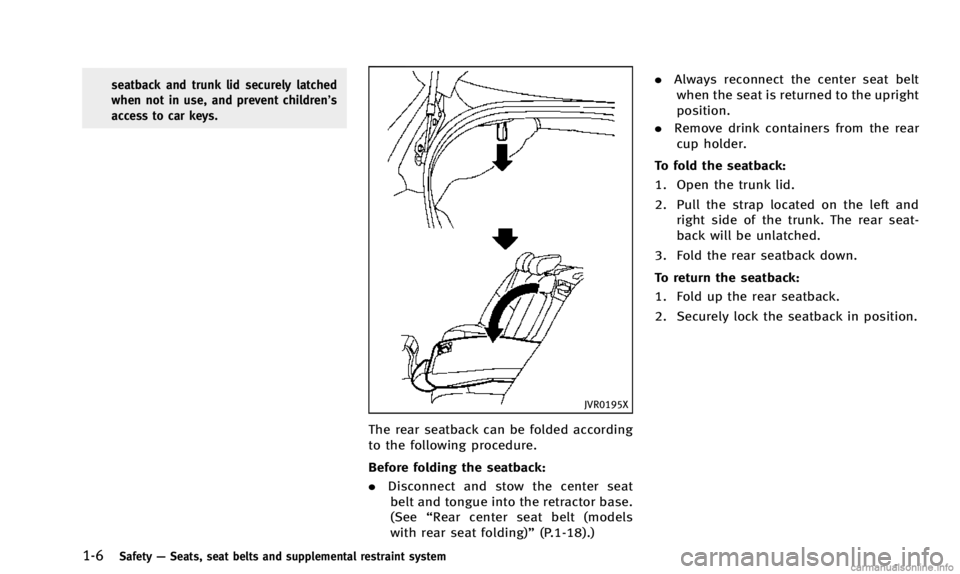
JVR0195X
The rear seatback can be folded according
to the following procedure.
Before folding the seatback:
. Disconnect and stow the center seat
belt and tongue into the retractor base.
(See “Rear center seat belt (models
with rear seat folding)” (P.1-18).).
Always reconnect the center seat belt
when the seat is returned to the upright
position.
. Remove drink containers from the rear
cup holder.
To fold the seatback:
1. Open the trunk lid.
2. Pull the strap located on the left and right side of the trunk. The rear seat-
back will be unlatched.
3. Fold the rear seatback down.
To return the seatback:
1. Fold up the rear seatback.
2. Securely lock the seatback in position.
Page 34 of 394
not be able to retract the seat belt. After a
few minutes, the motor normally reacti-
vates and retracts the seat belt. If the seat
belt still cannot be retracted by the motor,
the pre-crash seat belt system has a
malfunction. Have your INFINITI retailer
check and repair the system.
THREE-POINT TYPE SEAT BELT
WARNING
.Every person who drives or rides in this
vehicle should use a seat belt at all
times.
. Do not ride in a moving vehicle when the
seatback is reclined. This can be danger-
ous. The shoulder belt will not be
against your body. In an accident, you
could be thrown into it and receive neck
or other serious injuries. You could also
slide under the lap belt and receive
serious internal injuries.
. For the most effective protection when
the vehicle is in motion, the seat should
be upright. Always sit well back in the
seat with both feet on the floor and
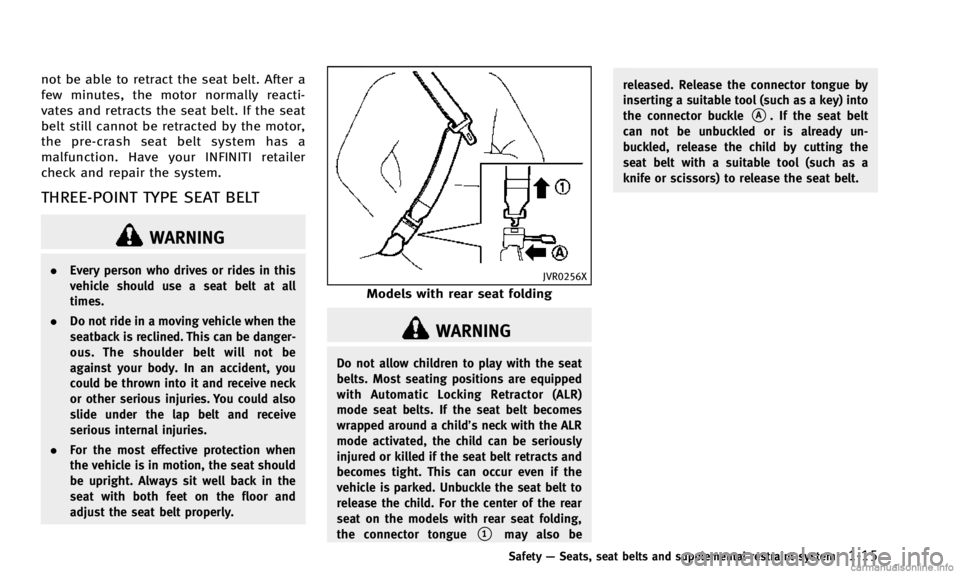
adjust the seat belt properly.JVR0256X
Models with rear seat folding
WARNING
Do not allow children to play with the seat
belts. Most seating positions are equipped
with Automatic Locking Retractor (ALR)
mode seat belts. If the seat belt becomes
wrapped around a child’s neck with the ALR
mode activated, the child can be seriously
injured or killed if the seat belt retracts and
becomes tight. This can occur even if the
vehicle is parked. Unbuckle the seat belt to
release the child. For the center of the rear
seat on the models with rear seat folding,
the connector tongue
*1may also be released. Release the connector tongue by
inserting a suitable tool (such as a key) into
the connector buckle
*A. If the seat belt
can not be unbuckled or is already un-
buckled, release the child by cutting the
seat belt with a suitable tool (such as a
knife or scissors) to release the seat belt.
Safety —Seats, seat belts and supplemental restraint system1-15
Page 41 of 394
1-22Safety—Seats, seat belts and supplemental restraint system
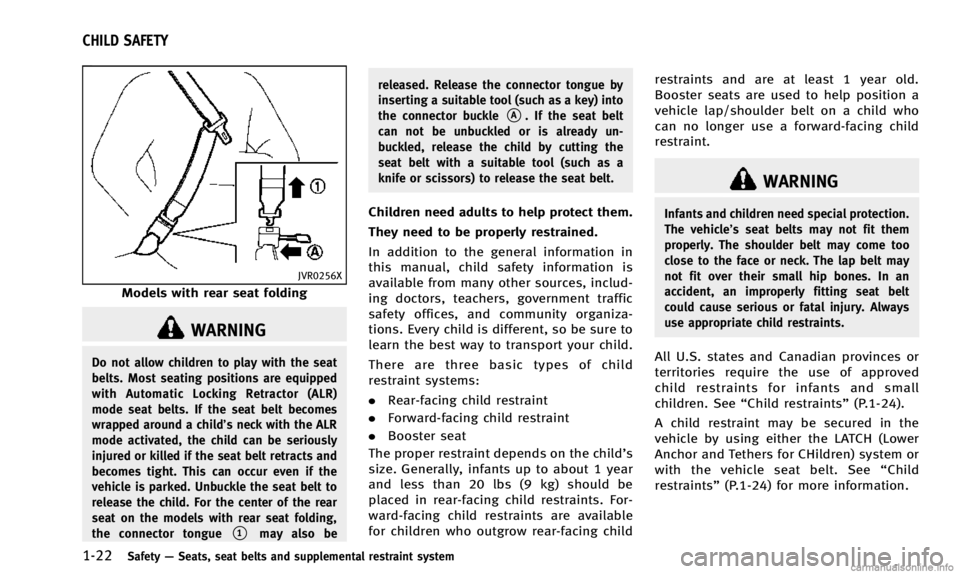
JVR0256X
Models with rear seat folding
WARNING
Do not allow children to play with the seat
belts. Most seating positions are equipped
with Automatic Locking Retractor (ALR)
mode seat belts. If the seat belt becomes
wrapped around a child’s neck with the ALR
mode activated, the child can be seriously
injured or killed if the seat belt retracts and
becomes tight. This can occur even if the
vehicle is parked. Unbuckle the seat belt to
release the child. For the center of the rear
seat on the models with rear seat folding,
the connector tongue
*1may also be released. Release the connector tongue by
inserting a suitable tool (such as a key) into
the connector buckle
*A. If the seat belt
can not be unbuckled or is already un-
buckled, release the child by cutting the
seat belt with a suitable tool (such as a
knife or scissors) to release the seat belt.
Children need adults to help protect them.
They need to be properly restrained.
In addition to the general information in
this manual, child safety information is
available from many other sources, includ-
ing doctors, teachers, government traffic
safety offices, and community organiza-
tions. Every child is different, so be sure to
learn the best way to transport your child.
There are three basic types of child
restraint systems:
. Rear-facing child restraint
. Forward-facing child restraint
. Booster seat
The proper restraint depends on the child ’s
size. Generally, infants up to about 1 year
and less than 20 lbs (9 kg) should be
placed in rear-facing child restraints. For-
ward-facing child restraints are available
for children who outgrow rear-facing child restraints and are at least 1 year old.
Booster seats are used to help position a
vehicle lap/shoulder belt on a child who
can no longer use a forward-facing child
restraint.
WARNING
Infants and children need special protection.
The vehicle’s seat belts may not fit them
properly. The shoulder belt may come too
close to the face or neck. The lap belt may
not fit over their small hip bones. In an
accident, an improperly fitting seat belt
could cause serious or fatal injury. Always
use appropriate child restraints.
All U.S. states and Canadian provinces or
territories require the use of approved
child restraints for infants and small
children. See
“Child restraints” (P.1-24).
A child restraint may be secured in the
vehicle by using either the LATCH (Lower
Anchor and Tethers for CHildren) system or
with the vehicle seat belt. See “Child
restraints” (P.1-24) for more information.
CHILD SAFETY
Page 44 of 394
.When the child restraint is not in use,
keep it secured with the LATCH system
or a seat belt. In a sudden stop or
collision, loose objects can injure occu-
pants or damage the vehicle.
CAUTION
A child restraint in a closed vehicle can
become very hot. Check the seating surface
and buckles before placing a child in the
child restraint.
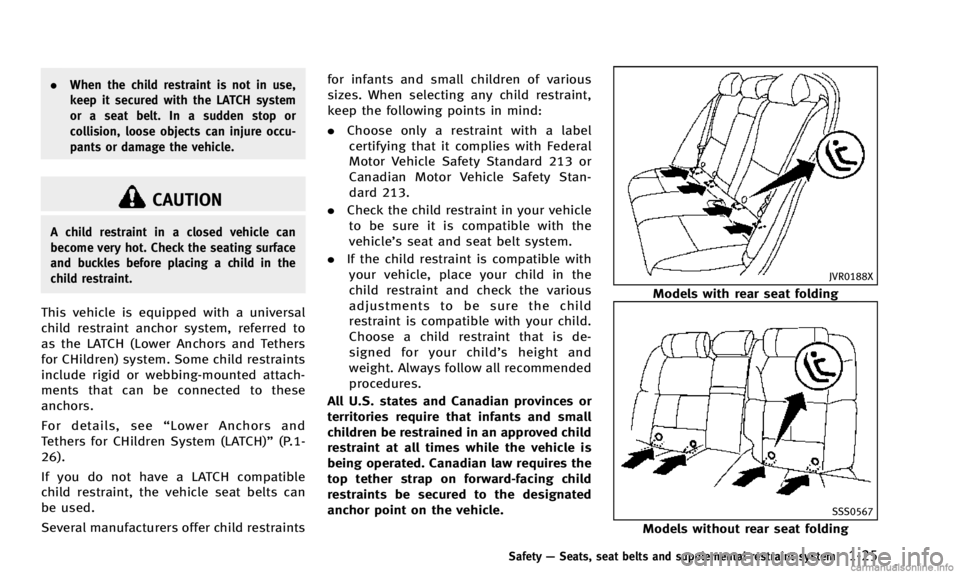
This vehicle is equipped with a universal
child restraint anchor system, referred to
as the LATCH (Lower Anchors and Tethers
for CHildren) system. Some child restraints
include rigid or webbing-mounted attach-
ments that can be connected to these
anchors.
For details, see “Lower Anchors and
Tethers for CHildren System (LATCH)” (P.1-
26).
If you do not have a LATCH compatible
child restraint, the vehicle seat belts can
be used.
Several manufacturers offer child restraints for infants and small children of various
sizes. When selecting any child restraint,
keep the following points in mind:
.
Choose only a restraint with a label
certifying that it complies with Federal
Motor Vehicle Safety Standard 213 or
Canadian Motor Vehicle Safety Stan-
dard 213.
. Check the child restraint in your vehicle
to be sure it is compatible with the
vehicle’s seat and seat belt system.
. If the child restraint is compatible with
your vehicle, place your child in the
child restraint and check the various
adjustments to be sure the child
restraint is compatible with your child.
Choose a child restraint that is de-
signed for your child’ s height and
weight. Always follow all recommended
procedures.
All U.S. states and Canadian provinces or
territories require that infants and small
children be restrained in an approved child
restraint at all times while the vehicle is
being operated. Canadian law requires the
top tether strap on forward-facing child
restraints be secured to the designated
anchor point on the vehicle.
JVR0188X
Models with rear seat folding
SSS0567
Models without rear seat folding
Safety —Seats, seat belts and supplemental restraint system1-25
Page 59 of 394

1-40Safety—Seats, seat belts and supplemental restraint system
LRS0453
. Make sure the child’s head will be
properly supported by the booster seat
or vehicle seat. The seatback must be at
or above the center of the child’s ears.
For example, if a low back booster seat
*1is chosen, the vehicle seatback
must be at or above the center of the
child’s ears. If the seatback is lower
than the center of the child’s ears, a
high back booster seat
*2should be
used.
LRS0464
. If the booster seat is compatible with
your vehicle, place your child in the
booster seat and check the various
adjustments to be sure the booster
seat is compatible with your child.
Always follow all recommended proce-
dures.
All U.S. states and Canadian provinces or
territories require that infants and small
children be restrained in an approved child
restraint at all times while the vehicle is
being operated.
The instructions in this section apply to
booster seat installation in the rear seats
or the front passenger seat.
Booster seat installation
CAUTION
Do not use the lap/shoulder belt Automatic
Locking Retractor (ALR) mode when using a
booster seat with the seat belts.
Refer to all Warnings and Cautions in the
“ Child safety” ,“Child restraints” and
“Booster seats” sections earlier in this
section before installing a child restraint.
Follow these steps to install a booster seat
in the rear seat or in the front passenger
seat:
Page 69 of 394

1-50Safety—Seats, seat belts and supplemental restraint system
operated under some conditions as de-
scribed below as permitted by U.S. regula-
tions. If the front passenger air bag is OFF,
it will not inflate in a crash. The driver air
bag and other air bags in your vehicle are
not part of this system.
The purpose of the regulation is to help
reduce the risk of injury or death from an
inflating air bag to certain front passenger
seat occupants, such as children, by
requiring the air bag to be automatically
turned OFF.
The occupant classification sensors
(weight sensors) are on the seat cushion
frame under the front passenger seat and
are designed to detect an occupant and
objects on the seat. For example, if a child
is in the front passenger seat, the Ad-
vanced Air Bag System is designed to turn
the passenger air bag OFF in accordance
with the regulations. Also, if a child
restraint of the type specified in the
regulations is on the seat, the occupant
classification sensor can detect it and
cause the air bag to turn OFF.
Front passenger seat adult occupants who
are properly seated and using the seat belt
as outlined in this manual should not
cause the passenger air bag to be auto- matically turned OFF. For small adults it
may be turned OFF, however, if the
occupant does not sit in the seat properly
(for example, by not sitting upright, by
sitting on an edge of the seat, or by
otherwise being out of position), this could
cause the sensor to turn the air bag OFF.
Always be sure to be seated and wearing
the seat belt properly for the most effective
protection by the seat belt and supple-
mental air bag.
INFINITI recommends that pre-teens and
children be properly restrained in a rear
seat. INFINITI also recommends that appro-
priate child restraints and booster seats be
properly installed in a rear seat. If this is
not possible, the occupant classification
sensors are designed to operate as de-
scribed above to turn the front passenger
air bag OFF for specified child restraints.
Failing to properly secure child restraints
and to use the ALR mode (child restraint
mode) may allow the restraint to tip or
move in an accident or sudden stop. This
can also result in the passenger air bag
inflating in a crash instead of being OFF.
(See
“Child restraints” (P.1-24) for proper
use and installation.)
If the front passenger seat is not occupied, the passenger air bag is designed not to
inflate in a crash. However, heavy objects
placed on the seat could result in air bag
inflation, because of the object being
detected by the occupant classification
sensor. Other conditions could also result
in air bag inflation, such as if a child is
standing on the seat, or if two children are
on the seat, contrary to the instructions in
this manual. Always be sure that you and
all vehicle occupants are seated and
restrained properly.
Using the passenger air bag status light,
you can monitor when the front passenger
air bag is automatically turned OFF with the
seat occupied. The light will not illuminate
when the front passenger seat is unoccu-
pied.
If an adult occupant is in the seat but the
passenger air bag status light is illumi-
nated (indicating that the air bag is OFF), it
could be that the person is a small adult,
or is not sitting on the seat properly.
If a child restraint must be used in the front
seat, the passenger air bag status light
may or may not be illuminated, depending
on the size of the child and the type of
child restraint being used. If the passenger
air bag status light is not illuminated
Page 94 of 394
onds.
. The supplemental air bag warning light
flashes intermittently.
. The supplemental air bag warning light
does not come on at all.
Unless checked and repaired, the Supple-
mental Restraint Systems and/or the pre-
tensioner seat belt may not function
properly.
For additional information, see “Supple-
mental restraint system” (P.1-42).
WARNING
If the supplemental air bag warning light is
on, it could mean that the supplemental
front air bag, supplemental side air bag,
curtain side-impact air bag systems and/or
pretensioner seat belt will not operate in an
accident. To help avoid injury to yourself or
others, have your vehicle checked by a
retailer as soon as possible.
Vehicle Dynamic Control (VDC)
warning light
The light will blink when the Vehicle
Dynamic Control (VDC) system or the traction control system is operating, thus
alerting the driver that the vehicle is
nearing its traction limits. The road surface
may be slippery.
When the VDC warning light illuminates
when the VDC system is turned on, this
light alerts the driver to the fact that the
VDC system’s fail-safe mode is operating,
for example the VDC, active trace control
function, Brake Force Distribution or hill
start assist system may not be functioning
properly. Have the system checked by an
INFINITI retailer. If a malfunction occurs in
the system, the VDC system function will
be canceled but the vehicle is still drive-
able. For additional information, see
“Ve-
hicle Dynamic Control (VDC) system” (P.5-
108).
INDICATOR LIGHTS
ECO drive indicator light
When the ignition switch is pushed to the
ON position, the light will come on and
then turn off.
When the INFINITI Drive Mode Selector is
turned to the ECO mode, the ECO drive
indicator light will illuminate, blink or
remain off depending on the accelerator
pedal operation to help assist the driver to drive economically. For more details, see
“ECO mode”
(P.5-22).
Exterior light indicator
This indicator illuminates when the head-
light switch is turned to the AUTO,orposition and the front parking lights,
instrument panel lights, rear combination
lights, license plate lights or headlights are
on. The indicator turns off when these
lights are turned off.
Front fog light indicator light
The front fog light indicator light illumi-
nates when the front fog lights are on. (See
“Fog light switch” (P.2-42).)
Front passenger air bag status
light
The front passenger air bag status light
() located on the instrument panel will
be lit and the passenger front air bag will
be OFF depending on how the front
passenger seat is being used.
For front passenger air bag status light
operation, see “INFINITI Advanced Air Bag
System (front seats)” (P.1-47).
Instruments and controls2-17
Page 102 of 394

29. Driver assist system indicator
(if so equipped)
This indicator shows the status of the
following systems.
.Lane Departure Warning (LDW)
. Lane Departure Prevention (LDP)
. Blind Spot Warning (BSW)
. Blind Spot Intervention
TM(BSI)
. Distance Control Assist (DCA)
. Forward emergency braking
. Predictive forward collision warning
For more details, see “Lane Departure
Warning (LDW) system/Lane Departure
Prevention (LDP) system” (P.5-30),“Blind
Spot Warning (BSW) system/Blind Spot
Intervention
TM(BSI) system” (P.5-37),“Dis-
tance Control Assist (DCA) system” (P.5-
79), “Forward emergency braking system”
(P.5-89) and “Predictive forward collision
warning system” (P.5-94).
The figure and color of this indicator will
change depending on the conditions of the
above systems. (In each section, the name
of this indicator is referred to as, “driver
assist system lane indicator” ,“driver
assist system blind spot indicator” or
“driver assist system forward indicator ”
depending on the systems.)
30. INFINITI Drive Mode Selector
indicator
When a driving mode is selected using the
INFINITI Drive Mode Selector, the selected
mode indicator is displayed.
. PERSONAL
. SPORT
. STANDARD
. ECO
. SNOW
(See “INFINITI Drive Mode Selector” (P.5-
21).)
31. Automatic Transmission (AT)
position indicator
This indicator shows the automatic shift
position.
In the manual shift mode, when the
transmission does not shift to the selected
gear due to a transmission protection
mode, the AT position indicator will blink
and a chime will sound.
See “Automatic transmission” (P.5-15) for
further details.
JVI0681M
INDICATORS FOR MAINTENANCE
For setting the indicators for maintenance,
see the Infiniti InTouch Owner’s Manual.
Instruments and controls2-25
Page 105 of 394

2-28Instruments and controls
JVI0642X
TRIP COMPUTER
Switches for the trip computer are located
on the right side of the steering wheel. To
operate the trip computer, push the
switches as shown above.
Each time the
orswitch is pushed,
the display will change.
The display items for trip computer are
changed on the lower display. For details,
see the Infiniti InTouch Owner’s Manual.
1. Current fuel consumption and
average fuel consumption (MPG, l
(liter)/100 km or km/l)
Current fuel consumption:
The current fuel consumption mode shows
the current fuel consumption.
Average fuel consumption:
The average fuel consumption mode shows
the average fuel consumption since the
last reset. Resetting is done by pushing the
orswitch for longer than 1
second.
The average fuel consumption is also reset
on the lower display. See the Infiniti
InTouch Owner’s Manual.
The display is updated every 30 seconds.
At about the first 1/3 mile (500 m) after a
reset, the display shows “——”.
2. Average speed (MPH or km/h)
The average speed mode shows the
average vehicle speed since the last reset.
Resetting is done by pushing the
orswitch for longer than 1 second.
The display is updated every 30 seconds.
The first 30 seconds after a reset, the
display shows “——”.
3. Elapsed time and trip odometer
(mile or km)
Elapsed time:
The elapsed time mode shows the time
since the last reset. Resetting is done by
pushing the
orswitch for longer
than 1 second. (The trip odometer is also
reset at the same time.)
Trip odometer:
The trip odometer mode shows the total
distance the vehicle has been driven since
the last reset. Resetting is done by pushing
the
orswitch for longer than 1
second. (The elapsed time is also reset at
the same time.)
4. Distance to empty (dte —mile or
km)
The distance to empty (dte) mode provides
you with an estimation of the distance that
can be driven before refueling. The dte is
constantly being calculated, based on the
amount of fuel in the fuel tank and the
actual fuel consumption.
The display is updated every 30 seconds.
The dte mode includes a low range warning
feature. If the fuel level is low, the warning
is displayed on the screen.
Page 119 of 394

2-42Instruments and controls
Instrument brightness control
The instrument brightness control switch
can be operated when the ignition switch
is in the ON position. When the switch is
operated, the vehicle information display
switches to the brightness adjustment
mode.
Push the + side of the switch
*Ato
brighten the instrument panel lights. The
bar
*1moves to the + side.
Push the - side of the switch
*Bto dim the
instrument panel lights. The bar
*1moves
to the −side. When the brightness level
reaches the minimum, the instrument
panel lights will turn off during the night-
time.
When the brightness level reaches the
maximum or minimum, a beep will sound.
The vehicle information display returns to
the normal display under the following
conditions:
. when the instrument brightness control
switch is not operated for more than 5
seconds.
. when the
orswitch on the right
side of the steering switch is pushed.
SIC3271
TURN SIGNAL SWITCH
*1Turn signal
Move the lever up or down to signal the
turning direction. When the turn is com-
pleted, the turn signals cancel automati-
cally.
*2Lane change signal
To indicate a lane change, move the lever
up or down to the point where lights begin
flashing.
If the lever is moved back right after
moving up or down, the light will flash 3
times.
SIC3272
FOG LIGHT SWITCH
To turn the fog lights on, turn the headlight
switch to theposition, then turn the
switch to theposition. To turn them
off, turn the switch to the OFF position.
The headlights must be on for the fog
lights to operate.