spare tire INFINITI Q50 2019 User Guide
[x] Cancel search | Manufacturer: INFINITI, Model Year: 2019, Model line: Q50, Model: INFINITI Q50 2019Pages: 468, PDF Size: 2.16 MB
Page 333 of 468

To shut off the engine in an emergency
situation while driving, perform the follow-
ing procedure:
.Rapidly push the push-button ignition
switch 3 consecutive times in less than
1.5 seconds, or
. Push and hold the push-button ignition
switch for more than 2 seconds. If you have a flat tire, follow the instructions
in this section.
TIRE PRESSURE MONITORING
SYSTEM (TPMS)
This vehicle is equipped with the Tire
Pressure Monitoring System (TPMS). It
monitors tire pressure of all tires except the
spare. When the low tire pressure warning
light is lit and the “Tire Pressure Low - Add
Air” warning appears in the vehicle informa-
tion display, one or more of your tires is
significantly under-inflated. If the vehicle is
being driven with low tire pressure, the
TPMS will activate and warn you of it by
the low tire pressure warning light. This
system will activate only when the vehicle is
driven at speeds above 16 MPH (25 km/h).
For more details, see “Warning lights, in-
dicator lights and audible reminders” (P.2-
10) and “Tire Pressure Monitoring System
(TPMS)” (P.5-5).
WARNING
.
Radio waves could adversely affect
electric medical equipment. Those
who use a pacemaker should contact
the electric medical equipment man-
ufacturer for the possible influences
before use. .
If the low tire pressure warning light
illuminates while driving, avoid sud-
den steering maneuvers or abrupt
braking, reduce vehicle speed, pull
off the road to a safe location and
stop the vehicle as soon as possible.
Driving with under-inflated tires may
permanently damage the tires and
increase the likelihood of tire failure.
Serious vehicle damage could occur
and may lead to an accident and
could result in serious personal injury.
Check the tire pressure for all four
tires. Adjust the tire pressure to the
recommended COLD tire pressure
shown on the Tire and Loading
Information label to turn the low tire
pressure warning light OFF. If the
light still illuminates while driving
after adjusting the tire pressure, a
tire may be flat. If you have a flat tire,
replace it with a spare tire (if so
equipped).
. Since the spare tire is not equipped
with the TPMS, when a spare tire is
mounted or a wheel is replaced, the
TPMS will not function and the low
tire pressure warning light will flash
for approximately 1 minute. The light
will remain on after 1 minute. Have
your tires replaced and/or TPMS
system reset as soon as possible. It
In case of emergency6-3
EMERGENCY ENGINE SHUT OFF FLAT TIRE
Page 334 of 468

6-4In case of emergency
is recommended you visit an INFINITI
retailer for these services.
. Replacing tires with those not origin-
ally specified by INFINITI could affect
the proper operation of the TPMS.
. Do not inject any tire liquid or aerosol
tire sealant into the tires, as this may
cause a malfunction of the tire pres-
sure sensors.
RUN-FLAT TIRES (if so equipped)
Run-flat tires are those tires that can be
used temporarily if they are punctured. See
“Run-flat tires” (P.8-40).
Also, refer to “Important Tire Safety Infor-
mation” (US) or “Tire Safety Information”
(Canada) in the INFINITI Warranty Informa-
tion Booklet.
WARNING
.Although you can continue driving
with a punctured run-flat tire, re-
member that vehicle handling stabi-
lity is reduced, which could lead to an
accident and personal injury. Also,
driving a long distance at high speeds
may damage the tires. .
Do not drive at speeds above 50
MPH (80 km/h) and do not drive
more than approximately 93 miles
(150 km) with a punctured run-flat
tire. The actual distance the vehicle
can be driven on a flat tire depends on
outside temperature, vehicle load,
road conditions and other factors.
. Drive safely at reduced speeds. Avoid
hard cornering or braking, which may
cause you to lose control of the
vehicle.
. If you detect any unusual sounds or
vibrations while driving with a punc-
tured run-flat tire, pull off the road
to a safe location and stop the vehicle
as soon as possible. The tire may be
seriously damaged and need to be
replaced.
CAUTION
.Never install tire chains on a punctu-
red run-flat tire, as this could damage
your vehicle.
. Avoid driving over any projection or
pothole, as the clearance between
the vehicle and the ground is smaller
than normal. .
Do not enter an automated car wash
with a punctured run-flat tire.
. It is recommended you have the
punctured tire inspected by an
INFINITI retailer or other authorized
repair shop. Replace the tire as soon
as possible if the tire is seriously
damaged.
CHANGING A FLAT TIRE
If you have a flat tire, follow the instructions
in this section to replace the tire with a spare
tire (if so equipped). For the vehicles with
run-flat tires, you can continue driving to a
safe location even if they are punctured. (See
“Run-flat tires” (P.6-4) and “Run-flat tires”
(P.8-40).)
This section also contains the information
about the vehicle jack-up procedures.
Stopping the vehicle
1. Safely move the vehicle off the road and
away from traffic.
2. Turn on the hazard warning flashers.
3. Park on a level surface and apply the parking brake. Move the shift lever to the
P (Park) position.
4. Turn off the engine.
Page 336 of 468
6-6In case of emergency
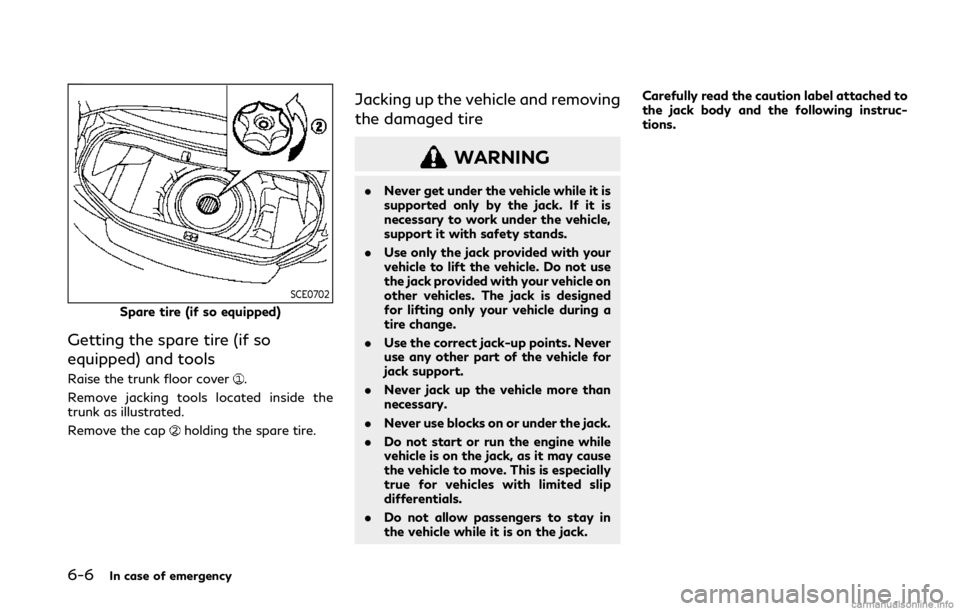
SCE0702
Spare tire (if so equipped)
Getting the spare tire (if so
equipped) and tools
Raise the trunk floor cover.
Remove jacking tools located inside the
trunk as illustrated.
Remove the cap
holding the spare tire.
Jacking up the vehicle and removing
the damaged tire
WARNING
. Never get under the vehicle while it is
supported only by the jack. If it is
necessary to work under the vehicle,
support it with safety stands.
. Use only the jack provided with your
vehicle to lift the vehicle. Do not use
the jack provided with your vehicle on
other vehicles. The jack is designed
for lifting only your vehicle during a
tire change.
. Use the correct jack-up points. Never
use any other part of the vehicle for
jack support.
. Never jack up the vehicle more than
necessary.
. Never use blocks on or under the jack.
. Do not start or run the engine while
vehicle is on the jack, as it may cause
the vehicle to move. This is especially
true for vehicles with limited slip
differentials.
. Do not allow passengers to stay in
the vehicle while it is on the jack. Carefully read the caution label attached to
the jack body and the following instruc-
tions.
Page 338 of 468
6-8In case of emergency
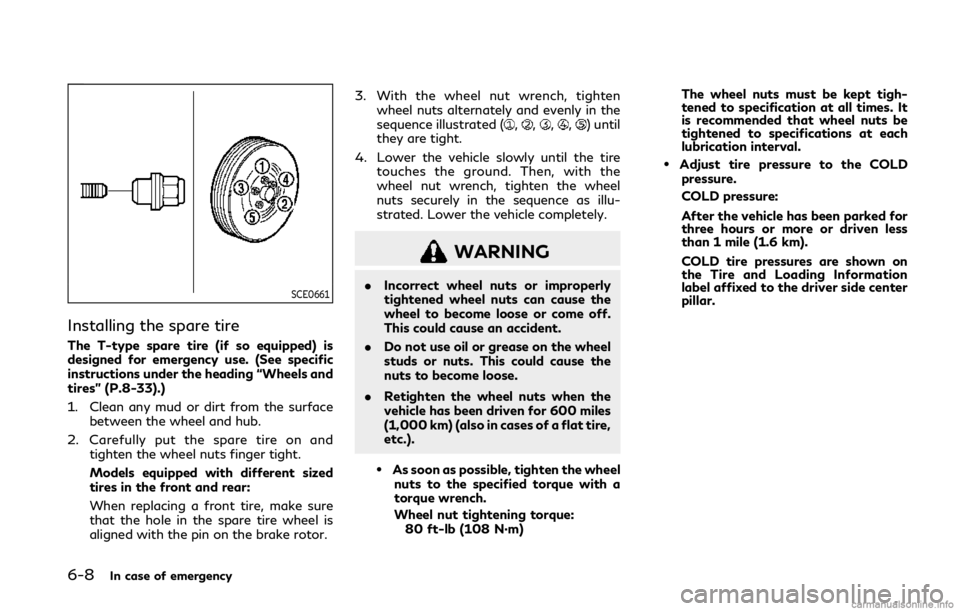
SCE0661
Installing the spare tire
The T-type spare tire (if so equipped) is
designed for emergency use. (See specific
instructions under the heading “Wheels and
tires” (P.8-33).)
1. Clean any mud or dirt from the surfacebetween the wheel and hub.
2. Carefully put the spare tire on and tighten the wheel nuts finger tight.
Models equipped with different sized
tires in the front and rear:
When replacing a front tire, make sure
that the hole in the spare tire wheel is
aligned with the pin on the brake rotor. 3. With the wheel nut wrench, tighten
wheel nuts alternately and evenly in the
sequence illustrated (
,,,,) until
they are tight.
4. Lower the vehicle slowly until the tire touches the ground. Then, with the
wheel nut wrench, tighten the wheel
nuts securely in the sequence as illu-
strated. Lower the vehicle completely.
WARNING
.Incorrect wheel nuts or improperly
tightened wheel nuts can cause the
wheel to become loose or come off.
This could cause an accident.
. Do not use oil or grease on the wheel
studs or nuts. This could cause the
nuts to become loose.
. Retighten the wheel nuts when the
vehicle has been driven for 600 miles
(1,000 km) (also in cases of a flat tire,
etc.).
.As soon as possible, tighten the wheel
nuts to the specified torque with a
torque wrench.
Wheel nut tightening torque: 80 ft-lb (108 N·m) The wheel nuts must be kept tigh-
tened to specification at all times. It
is recommended that wheel nuts be
tightened to specifications at each
lubrication interval.
.Adjust tire pressure to the COLD
pressure.
COLD pressure:
After the vehicle has been parked for
three hours or more or driven less
than 1 mile (1.6 km).
COLD tire pressures are shown on
the Tire and Loading Information
label affixed to the driver side center
pillar.
Page 339 of 468
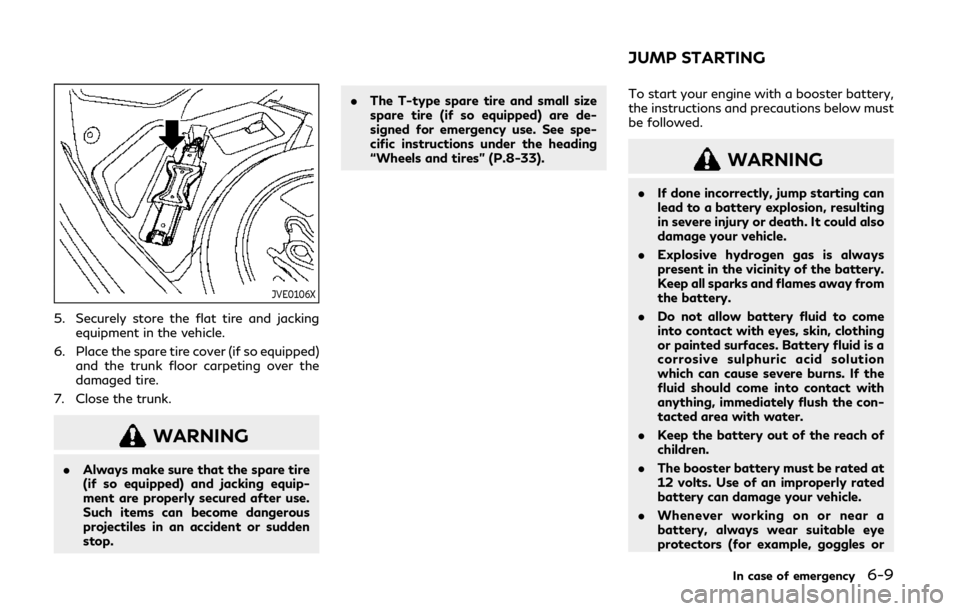
JVE0106X
5. Securely store the flat tire and jackingequipment in the vehicle.
6. Place the spare tire cover (if so equipped) and the trunk floor carpeting over the
damaged tire.
7. Close the trunk.
WARNING
. Always make sure that the spare tire
(if so equipped) and jacking equip-
ment are properly secured after use.
Such items can become dangerous
projectiles in an accident or sudden
stop. .
The T-type spare tire and small size
spare tire (if so equipped) are de-
signed for emergency use. See spe-
cific instructions under the heading
“Wheels and tires” (P.8-33). To start your engine with a booster battery,
the instructions and precautions below must
be followed.
WARNING
.
If done incorrectly, jump starting can
lead to a battery explosion, resulting
in severe injury or death. It could also
damage your vehicle.
. Explosive hydrogen gas is always
present in the vicinity of the battery.
Keep all sparks and flames away from
the battery.
. Do not allow battery fluid to come
into contact with eyes, skin, clothing
or painted surfaces. Battery fluid is a
corrosive sulphuric acid solution
which can cause severe burns. If the
fluid should come into contact with
anything, immediately flush the con-
tacted area with water.
. Keep the battery out of the reach of
children.
. The booster battery must be rated at
12 volts. Use of an improperly rated
battery can damage your vehicle.
. Whenever working on or near a
battery, always wear suitable eye
protectors (for example, goggles or
In case of emergency6-9
JUMP STARTING
Page 391 of 468

SDI1258A
Trunk lightIf you have a flat tire, see “Flat tire” (P.6-3).
TIRE PRESSURE
Tire Pressure Monitoring System
(TPMS)
WARNING
Radio waves could adversely affect
electric medical equipment. Those who
use a pacemaker should contact the
electric medical equipment manufacturer
for the possible influences before use.
This vehicle is equipped with the Tire
Pressure Monitoring System (TPMS). It
monitors tire pressure of all tires except the
spare. When the low tire pressure warning
light is lit and the “Tire Pressure Low - Add
Air” warning appears in the vehicle informa-
tion display, one or more of your tires is
significantly under-inflated.
The TPMS will activate only when the
vehicle is driven at speeds above 16 MPH
(25 km/h). Also, this system may not detect
a sudden drop in tire pressure (for example a
flat tire while driving).
For more details, see “Low tire pressure
warning light” (P.2-12),“Tire Pressure Mon-
itoring System (TPMS)” (P.5-5) and “Tire Pressure Monitoring System (TPMS)” (P.6-
3).
Tire inflation pressure
Check the pressure of the tires (in-
cluding the spare) often and always
prior to long distance trips. The
recommended tire pressure specifica-
tions are shown on the Tire and
Loading Information label under the
“Cold Tire Pressure” heading. The Tire
and Loading Information label is
affixed to the driver side center pillar.
Tire pressures should be checked
regularly because:
.
Most tires naturally lose air over
time.
. Tires can lose air suddenly when
driven over potholes or other ob-
jects or if the vehicle strikes a curb
while parking.
The tire pressures should be checked
when the tires are cold. The tires are
considered COLD after the vehicle
has been parked for 3 or more hours,
or driven less than 1 mile (1.6 km) at
moderate speeds.
Do-it-yourself8-33
WHEELS AND TIRES
Page 393 of 468

SDI2567
Tire and Loading Information label
Seating capacity: The maximum
number of occupants that can be
seated in the vehicle.
Vehicle load limit: See “Vehicle
loading information” (P.10-19).
Original size: The size of the tires
originally installed on the vehicle
at the factory.
Cold tire pressure: Inflate the
tires to this pressure when the
tires are cold. Tires are consid-
ered COLD after the vehicle hasbeen parked for 3 or more hours,
or driven less than 1 mile (1.6 km)
at moderate speeds. The recom-
mended cold tire inflation is set
by the manufacturer to provide
the best balance of tire wear,
vehicle handling, driveability, tire
noise, etc., up to the vehicle’s
GVWR.
Tire size — see “Tire labeling”
(P.8-37).
Spare tire size or compact spare
tire size (if so equipped)
Do-it-yourself8-35
Page 394 of 468

8-36Do-it-yourself
SDI1949
Checking the tire pressure
1. Remove the valve stem cap fromthe tire.
2. Press the pressure gauge squarely onto the valve stem. Do not press
too hard or force the valve stem
sideways, or air will escape. If the
hissing sound of air escaping from
the tire is heard while checking the
pressure, reposition the gauge to
eliminate this leakage.
3. Remove the gauge. 4. Read the tire pressure on the
gauge stem and compare it to the
specification shown on the Tire
and Loading Information label.
5. Add air to the tire as needed. If too much air is added, press the core of
the valve stem briefly with the tip
of the gauge stem to release
pressure. Recheck the pressure
and add or release air as needed.
6. Install the valve stem cap.
7. Check the pressure of all other tires, including the spare.
SIZE COLD
TIRE IN- FLA-
TION
PRES- SURE
FRONT ORIGI- NAL
TIRE P225/55R-
F17 95V
240 kPa,
35 PSI
P225/50R-
F18 94V 240 kPa,
35 PSI
P245/40R-
F19 94V 240 kPa,
35 PSI
245/40RF19
94W 240 kPa,
35 PSI
245/40R19
94Y 240 kPa,
35 PSI
Page 395 of 468

REAR
ORIGI- NAL
TIRE P225/55R-
F17 95V
240 kPa,
35 PSI
P225/50R-
F18 94V 240 kPa,
35 PSI
P245/40R-
F19 94V 240 kPa,
35 PSI
245/40RF19
94W 240 kPa,
35 PSI
265/35R19
94W 240 kPa,
35 PSI
265/35RF19
94W 240 kPa,
35 PSI
SPARE
TIRE (if
so
equip- ped) T145/70R18
107M
420 kPa,
60 PSI
SDI1575
Example
TIRE LABELING
Federal law requires tire manufac-
turers to place standardized informa-
tion on the sidewall of all tires. This
information identifies and describes
the fundamental characteristics of
the tire and also provides the tire
identification number (TIN) for safety
standard certification. The TIN can be
used to identify the tire in case of a
recall.
SDI1606
Example
Tire size (example: P215/60R16
94H)
1. P: The “P” indicates the tire is designed for passenger vehicles.
(Not all tires have this informa-
tion.)
2. Three-digit number (215): This number gives the width in milli-
meters of the tire from sidewall
edge to sidewall edge.
3. Two-digit number (60): This num- ber, known as the aspect ratio,
gives the tire’s ratio of height to
Do-it-yourself8-37
Page 399 of 468
replaced.
CAUTION
.Never install tire chains on a punctu-
red run-flat tire, as this could damage
your vehicle.
. Avoid driving over any projection or
pothole, as the clearance between
the vehicle and the ground is smaller
than normal.
. Do not enter an automated car wash
with a punctured run-flat tire.
. It is recommended you have the
punctured tire inspected by an
INFINITI retailer or other authorized
repair shop. Replace the tire as soon
as possible if the tire is seriously
damaged.
TIRE CHAINS
CAUTION
Tire chains/cables should not be in-
stalled on 265/35R19 and
265/35RF19 tires. Doing so will cause
damage to the vehicle. If you plan to use
tire chains/cables, you should install
245/45RF19 tires on your vehicle.
Use of tire chains may be prohibited accord-
ing to location. Check the local laws before
installing tire chains. When installing tire
chains, make sure they are the proper size
for the tires on your vehicle and are installed
according to the chain manufacturer’s sug-
gestions. Use only SAE Class S chains. Class
“S” chains are used on vehicles with re-
stricted tire to vehicle clearance. Vehicles
that can use Class “S” chains are designed to
meet the SAE standard minimum clearances
between the tire and the closest vehicle
suspension or body component required to
accommodate the use of a winter traction
device (tire chains or cables). The minimum
clearances are determined using the factory
equipped tire size. Other types may damage
your vehicle. Use chain tensioners when
recommended by the tire chain manufac-
turer to ensure a tight fit. Loose end links of the tire chain must be secured or removed to
prevent the possibility of whipping action
damage to the fenders or underbody. If
possible, avoid fully loading your vehicle
when using tire chains. In addition, drive at
a reduced speed. Otherwise, your vehicle
may be damaged and/or vehicle handling
and performance may be adversely affected.
Tire chains must be installed only on the
rear wheels and not on the front wheels.
Never install tire chains on a TEMPORARY
USE ONLY spare tire (if so equipped). Never
install tire chains on a punctured run-flat tire
(if so equipped), as this could damage your
vehicle.
Do not use tire chains on dry roads. Driving
with tire chains in such conditions can cause
damage to the various mechanisms of the
vehicle due to some overstress.
Do-it-yourself8-41