ECO mode INFINITI Q50 2019 Repair Manual
[x] Cancel search | Manufacturer: INFINITI, Model Year: 2019, Model line: Q50, Model: INFINITI Q50 2019Pages: 468, PDF Size: 2.16 MB
Page 338 of 468
6-8In case of emergency
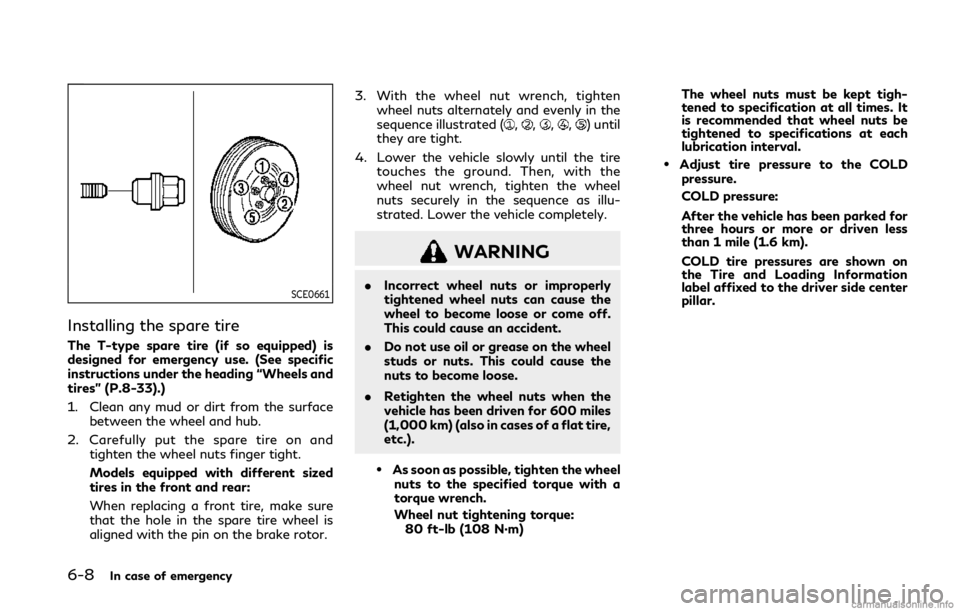
SCE0661
Installing the spare tire
The T-type spare tire (if so equipped) is
designed for emergency use. (See specific
instructions under the heading “Wheels and
tires” (P.8-33).)
1. Clean any mud or dirt from the surfacebetween the wheel and hub.
2. Carefully put the spare tire on and tighten the wheel nuts finger tight.
Models equipped with different sized
tires in the front and rear:
When replacing a front tire, make sure
that the hole in the spare tire wheel is
aligned with the pin on the brake rotor. 3. With the wheel nut wrench, tighten
wheel nuts alternately and evenly in the
sequence illustrated (
,,,,) until
they are tight.
4. Lower the vehicle slowly until the tire touches the ground. Then, with the
wheel nut wrench, tighten the wheel
nuts securely in the sequence as illu-
strated. Lower the vehicle completely.
WARNING
.Incorrect wheel nuts or improperly
tightened wheel nuts can cause the
wheel to become loose or come off.
This could cause an accident.
. Do not use oil or grease on the wheel
studs or nuts. This could cause the
nuts to become loose.
. Retighten the wheel nuts when the
vehicle has been driven for 600 miles
(1,000 km) (also in cases of a flat tire,
etc.).
.As soon as possible, tighten the wheel
nuts to the specified torque with a
torque wrench.
Wheel nut tightening torque: 80 ft-lb (108 N·m) The wheel nuts must be kept tigh-
tened to specification at all times. It
is recommended that wheel nuts be
tightened to specifications at each
lubrication interval.
.Adjust tire pressure to the COLD
pressure.
COLD pressure:
After the vehicle has been parked for
three hours or more or driven less
than 1 mile (1.6 km).
COLD tire pressures are shown on
the Tire and Loading Information
label affixed to the driver side center
pillar.
Page 340 of 468
6-10In case of emergency
industrial safety spectacles) and re-
move rings, metal bands, or any other
jewelry. Do not lean over the battery
when jump starting.
. Do not attempt to jump start a
frozen battery. It could explode and
cause serious injury.
. Your vehicle has an automatic engine
cooling fan. It could come on at any
time. Keep hands and other objects
away from it.
For 2.0L turbo gasoline engine models:
The vehicle has 2 batteries, a main
battery and an auxiliary battery. The
engine cannot be started if either bat-
tery is discharged. First, apply the
following procedure to the main battery
to jump-start the engine.
If the engine does not start, apply the
procedure to the auxiliary battery. For
the position of the batteries, see “Engine
compartment check locations” (P.8-4)
or “Battery” (P.8-16).
. Use the special battery that is dedi-
cated for the Idling Stop System,
with enhanced charge-discharge ca-
pacity and life performance. Using
the non-special battery could cause
early deterioration of the battery
and/or malfunction of the Idling Stop System. For the special battery, it is
recommended to use Genuine
NISSAN parts. For more information,
it is recommended you contact an
INFINITI retailer.
. It may take some time until the Idling
Stop System activates when the
battery is replaced or the battery
terminal is disconnected for extended
periods and then reconnected.
Page 343 of 468
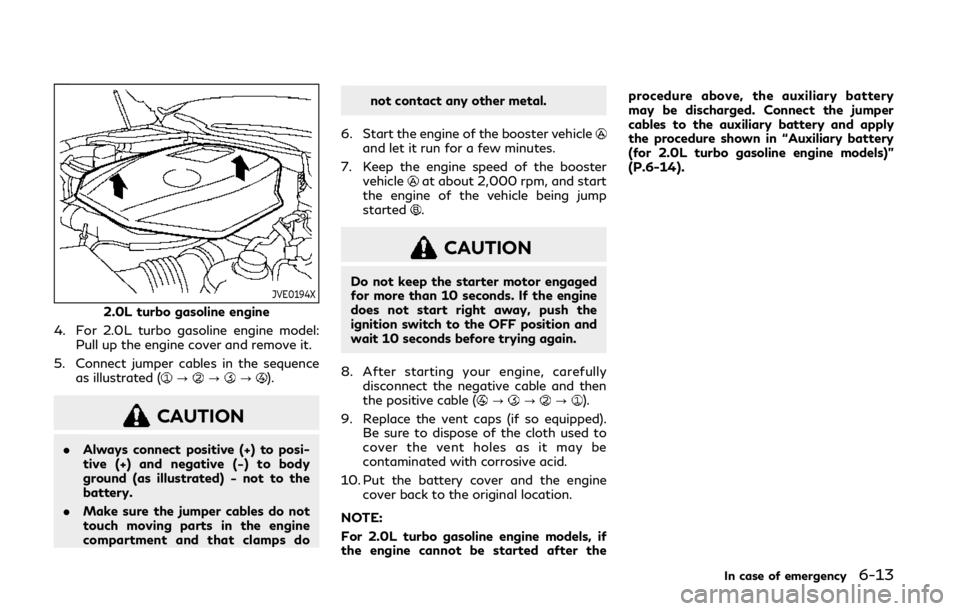
JVE0194X
2.0L turbo gasoline engine
4. For 2.0L turbo gasoline engine model: Pull up the engine cover and remove it.
5. Connect jumper cables in the sequence as illustrated (
???).
CAUTION
.Always connect positive (+) to posi-
tive (+) and negative (−) to body
ground (as illustrated) − not to the
battery.
. Make sure the jumper cables do not
touch moving parts in the engine
compartment and that clamps do not contact any other metal.
6. Start the engine of the booster vehicle
and let it run for a few minutes.
7. Keep the engine speed of the booster vehicle
at about 2,000 rpm, and start
the engine of the vehicle being jump
started
.
CAUTION
Do not keep the starter motor engaged
for more than 10 seconds. If the engine
does not start right away, push the
ignition switch to the OFF position and
wait 10 seconds before trying again.
8. After starting your engine, carefully disconnect the negative cable and then
the positive cable (
???).
9. Replace the vent caps (if so equipped). Be sure to dispose of the cloth used to
cover the vent holes as it may be
contaminated with corrosive acid.
10. Put the battery cover and the engine cover back to the original location.
NOTE:
For 2.0L turbo gasoline engine models, if
the engine cannot be started after the procedure above, the auxiliary battery
may be discharged. Connect the jumper
cables to the auxiliary battery and apply
the procedure shown in “Auxiliary battery
(for 2.0L turbo gasoline engine models)”
(P.6-14).
In case of emergency6-13
Page 348 of 468
6-18In case of emergency
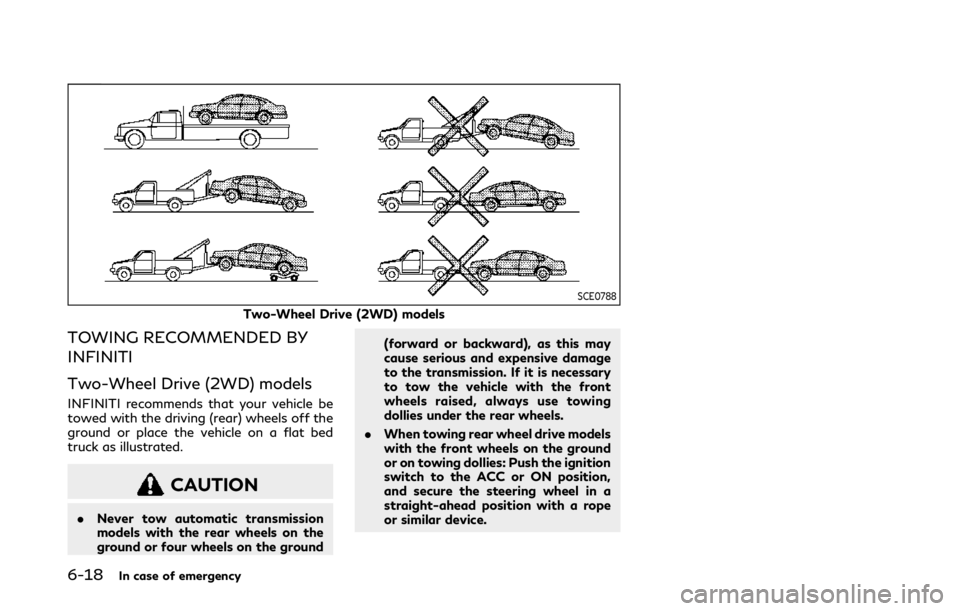
SCE0788
Two-Wheel Drive (2WD) models
TOWING RECOMMENDED BY
INFINITI
Two-Wheel Drive (2WD) models
INFINITI recommends that your vehicle be
towed with the driving (rear) wheels off the
ground or place the vehicle on a flat bed
truck as illustrated.
CAUTION
.Never tow automatic transmission
models with the rear wheels on the
ground or four wheels on the ground (forward or backward), as this may
cause serious and expensive damage
to the transmission. If it is necessary
to tow the vehicle with the front
wheels raised, always use towing
dollies under the rear wheels.
. When towing rear wheel drive models
with the front wheels on the ground
or on towing dollies: Push the ignition
switch to the ACC or ON position,
and secure the steering wheel in a
straight-ahead position with a rope
or similar device.
Page 349 of 468
SCE0488
All-Wheel Drive (AWD) models
Intelligent All-Wheel Drive (AWD)
models
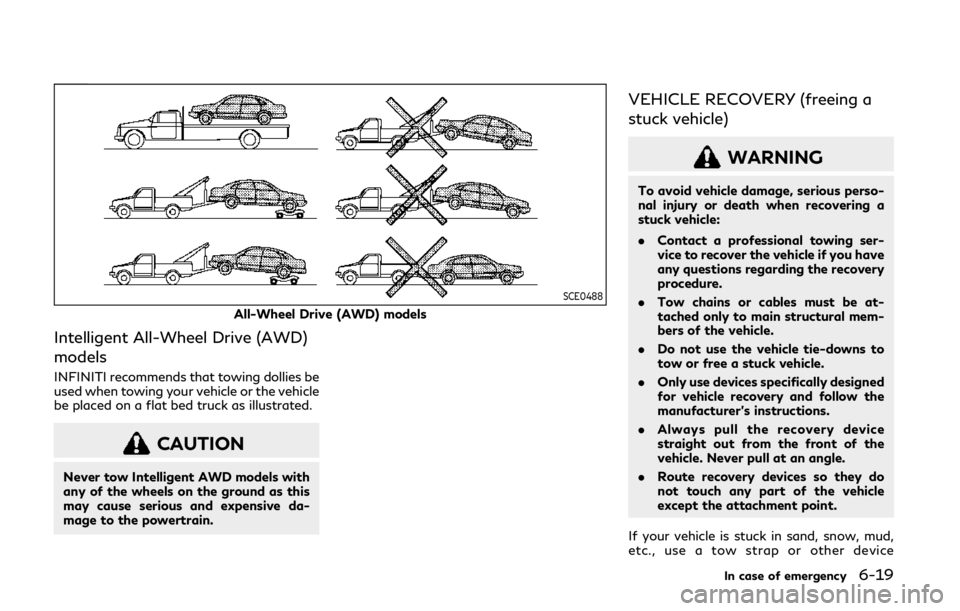
INFINITI recommends that towing dollies be
used when towing your vehicle or the vehicle
be placed on a flat bed truck as illustrated.
CAUTION
Never tow Intelligent AWD models with
any of the wheels on the ground as this
may cause serious and expensive da-
mage to the powertrain.
VEHICLE RECOVERY (freeing a
stuck vehicle)
WARNING
To avoid vehicle damage, serious perso-
nal injury or death when recovering a
stuck vehicle:
.Contact a professional towing ser-
vice to recover the vehicle if you have
any questions regarding the recovery
procedure.
. Tow chains or cables must be at-
tached only to main structural mem-
bers of the vehicle.
. Do not use the vehicle tie-downs to
tow or free a stuck vehicle.
. Only use devices specifically designed
for vehicle recovery and follow the
manufacturer’s instructions.
. Always pull the recovery device
straight out from the front of the
vehicle. Never pull at an angle.
. Route recovery devices so they do
not touch any part of the vehicle
except the attachment point.
If your vehicle is stuck in sand, snow, mud,
etc., use a tow strap or other device
In case of emergency6-19
Page 356 of 468
7-6Appearance and care
.Use only genuine INFINITI floor mats
or equivalent floor mats that are
specifically designed for use in your
vehicle model and model year.
. Properly position the mats in the
floorwell using the floor mat posi-
tioning hook. See “Floor mat installa-
tion” (P.7-6).
. Make sure the floor mat does not
interfere with pedal operation.
. Periodically check the floor mats to
make sure they are properly installed.
. After cleaning the vehicle interior,
check the floor mats to make sure
they are properly installed.
The use of genuine INFINITI floor mats can
extend the life of your vehicle carpet and
make it easier to clean the interior. Mats
should be maintained with regular cleaning
and replaced if they become excessively
worn.
JVA0032X
Floor mat installation
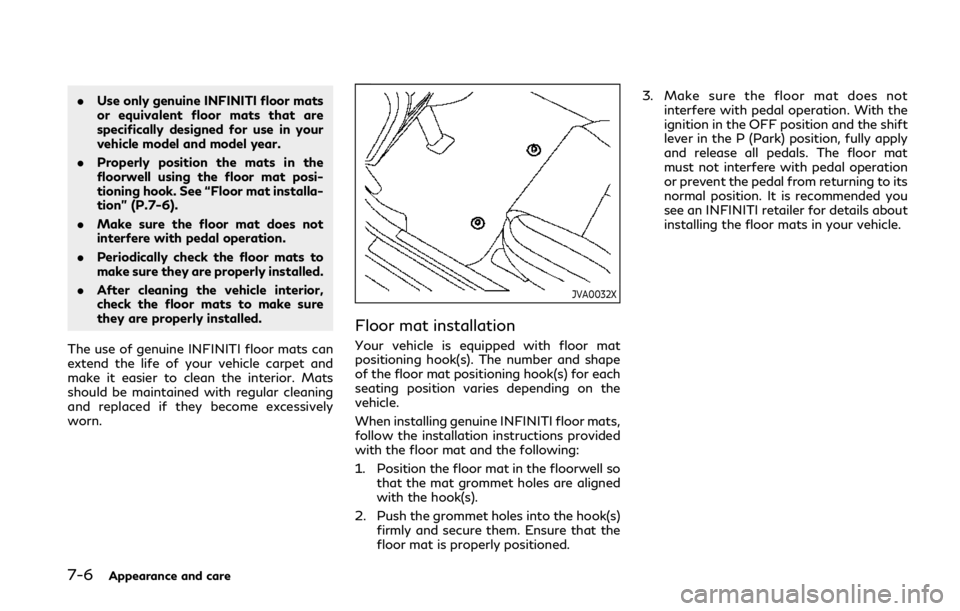
Your vehicle is equipped with floor mat
positioning hook(s). The number and shape
of the floor mat positioning hook(s) for each
seating position varies depending on the
vehicle.
When installing genuine INFINITI floor mats,
follow the installation instructions provided
with the floor mat and the following:
1. Position the floor mat in the floorwell so that the mat grommet holes are aligned
with the hook(s).
2. Push the grommet holes into the hook(s) firmly and secure them. Ensure that the
floor mat is properly positioned. 3. Make sure the floor mat does not
interfere with pedal operation. With the
ignition in the OFF position and the shift
lever in the P (Park) position, fully apply
and release all pedals. The floor mat
must not interfere with pedal operation
or prevent the pedal from returning to its
normal position. It is recommended you
see an INFINITI retailer for details about
installing the floor mats in your vehicle.
Page 366 of 468

8-8Do-it-yourself
The engine cooling system is filled at the
factory with a pre-diluted mixture of 50%
BASF Glysantin
®G48®and 50% water to
provide year-round anti-freeze and coolant
protection. The anti-freeze solution contains
rust and corrosion inhibitors. Additional
engine cooling system additives are not
necessary.
WARNING
Never remove the radiator cap when the
engine is hot. Wait until the engine and
radiator cool down. Serious burns could
be caused by high pressure fluid escaping
from the radiator. See precautions in “If
your vehicle overheats” (P.6-16) of this
manual.
CAUTION
. Never use any cooling system addi-
tives such as radiator sealer. Addi-
tives may clog the cooling system and
cause damage to the engine, trans-
mission and/or cooling system.
. When adding or replacing coolant, be
sure to use only BASF Glysantin
®
G48®or equivalent. BASF Glysantin®
G48®is pre-diluted to provide anti-
freeze protection to −34°F (−37°C). If
additional freeze protection is
needed due to weather where you
operate your vehicle, add BASF Gly-
santin
®G48®concentrate following
the directions on the container. If an
equivalent coolant other than BASF
Glysantin
®G48®is used, follow the
coolant manufacture’s instructions to
maintain minimum antifreeze protec-
tion to −34°F (−37°C). The use of
other types of coolant solutions
other than BASF Glysantin
®G48®
or equivalent may damage the engine
cooling system.
. The life expectancy of the factory-fill
coolant is 120,000 miles (192,000
km) or 10 years. Mixing any other
type of coolant other than BASF
Glysantin
®G48®, or the use of non-
distilled water will reduce the life
expectancy of the factory-fill cool-
ant. Refer to the “9. Maintenance
and schedules” section of this manual
for more details.
JVM0303X
CHECKING ENGINE COOLANT
LEVEL
Check the coolant level in the reservoir when
the engine is running and after it reaches
normal operating temperature. If the coolant
level is below MIN level
, add coolant up to
the MAX level. Tighten the cap securely
after adding engine coolant.
If the cooling system frequently requires
coolant, have it checked. It is recommended
you visit an INFINITI retailer for this
service.
ENGINE COOLING SYSTEM (for
2.0L turbo gasoline engine models)
Page 367 of 468
CHANGING ENGINE COOLANT
It is recommended that major cooling system
repairs be performed by an INFINITI retailer.
The service procedures can be found in the
appropriate INFINITI Service Manual.
Improper servicing can result in reduced
heater performance and engine overheat-
ing.
WARNING
.To avoid the danger of being scalded,
never change the coolant when the
engine is hot.
. Never remove the radiator cap when
the engine is hot. Serious burns could
be caused by high pressure fluid
escaping from the radiator.
. Avoid direct skin contact with used
coolant. If skin contact is made, wash
thoroughly with soap or hand cleaner
as soon as possible.
. Keep coolant out of reach of children
and pets.
Engine coolant must be disposed of prop-
erly. Check your local regulations. The intercooler cooling system is filled at the
factory with a pre-diluted mixture of 50%
Genuine NISSAN Long Life Antifreeze/
Coolant (blue) and 50% water to provide
year-round anti-freeze and coolant protec-
tion. The antifreeze solution contains rust
and corrosion inhibitors. Additional inter-
cooler cooling system additives are not
necessary.
WARNING
.
Never remove the coolant reservoir
cap when the engine is hot. Wait until
the engine cools down. Serious burns
could be caused by high pressure fluid
escaping from the coolant reservoir.
. The intercooler reservoir is equipped
with a pressure type cap. To prevent
engine and intercooler damage, use
only a genuine NISSAN intercooler
reservoir cap.
CAUTION
.Never use any additives in the cool-
ant such as radiator sealer in the
cooling system. This may cause da-
mage to the intercooler. .
When adding or replacing coolant, be
sure to use only Genuine NISSAN
Long Life Antifreeze/Coolant (blue)
or equivalent. Genuine NISSAN Long
Life Antifreeze/Coolant (blue) is pre-
diluted to provide antifreeze protec-
tion to −34°F(−37°C). If additional
freeze protection is needed due to
weather where you operate your
vehicle, add Genuine NISSAN Long
Life Antifreeze/Coolant (blue) con-
centrate following the directions on
the container. If an equivalent cool-
ant other than Genuine NISSAN Long
Life Antifreeze/Coolant (blue) is
used, follow the coolant manufac-
ture’s instructions to maintain mini-
mum antifreeze protection to −34°F
(−37°C). The use of other types of
coolant solutions other than Genuine
NISSAN Long Life Antifreeze/Cool-
ant (blue) or equivalent may damage
the Intercooler cooling system.
Do-it-yourself8-9
INTERCOOLER COOLING SYSTEM
(for VR30DDTT engine models)
Page 369 of 468
JVM0429X
2.0L turbo gasoline engine
CHECKING ENGINE OIL LEVEL
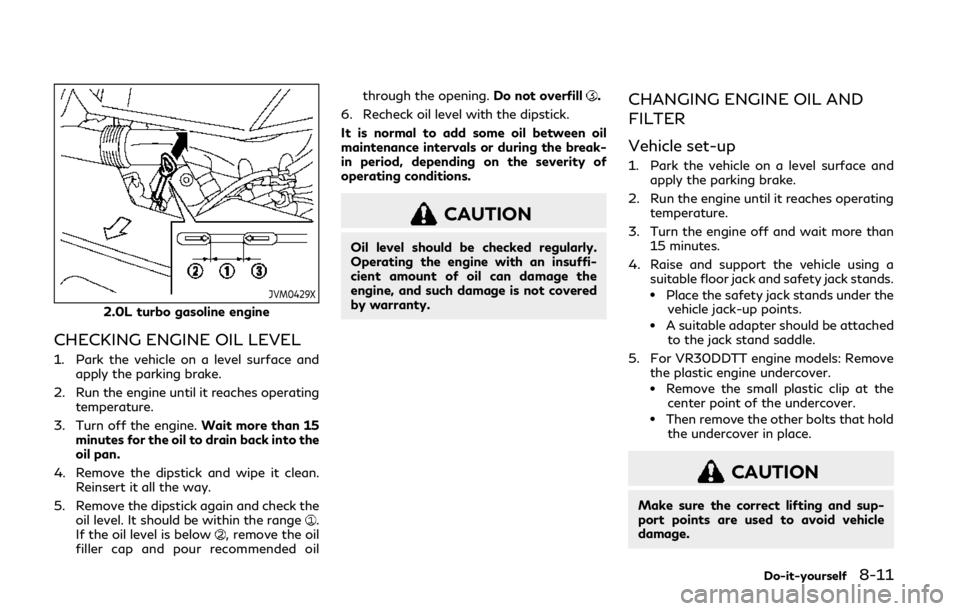
1. Park the vehicle on a level surface andapply the parking brake.
2. Run the engine until it reaches operating temperature.
3. Turn off the engine. Wait more than 15
minutes for the oil to drain back into the
oil pan.
4. Remove the dipstick and wipe it clean. Reinsert it all the way.
5. Remove the dipstick again and check the oil level. It should be within the range
.
If the oil level is below, remove the oil
filler cap and pour recommended oil through the opening.
Do not overfill
.
6. Recheck oil level with the dipstick.
It is normal to add some oil between oil
maintenance intervals or during the break-
in period, depending on the severity of
operating conditions.
CAUTION
Oil level should be checked regularly.
Operating the engine with an insuffi-
cient amount of oil can damage the
engine, and such damage is not covered
by warranty.
CHANGING ENGINE OIL AND
FILTER
Vehicle set-up
1. Park the vehicle on a level surface and apply the parking brake.
2. Run the engine until it reaches operating temperature.
3. Turn the engine off and wait more than 15 minutes.
4. Raise and support the vehicle using a suitable floor jack and safety jack stands.
.Place the safety jack stands under thevehicle jack-up points.
.A suitable adapter should be attachedto the jack stand saddle.
5. For VR30DDTT engine models: Remove the plastic engine undercover.
.Remove the small plastic clip at thecenter point of the undercover.
.Then remove the other bolts that hold
the undercover in place.
CAUTION
Make sure the correct lifting and sup-
port points are used to avoid vehicle
damage.
Do-it-yourself8-11
Page 371 of 468
engine damage.
6. Coat the gasket on the new filter with clean engine oil.
7. For VR30DDTT engine models: Screw in the oil filter clockwise until a slight
resistance is felt, then tighten addition-
ally more than 2/3 turn.
For 2.0L turbo gasoline engine models:
Securely tighten the oil filter. Do not use
excessive force.
Oil filter tightening torque:
VR30DDTT engine models
11 to 15 ft-lb
(14.7 to 20.6 N·m)
2.0L turbo gasoline engine models 19 ft-lb
(25 N·m)
8. Clean and re-install the drain plug with a new washer. Securely tighten the drain
plug with a wrench.
Drain plug tightening torque:
VR30DDTT engine models22 to 29 ft-lb
(29.4 to 39.2 N·m)
2.0L turbo gasoline engine models 22 ft-lb
(30 N·m) Do not use excessive force.
9. Refill engine with recommended oil and install the oil filler cap securely.
See “Capacities and recommended
fluids/lubricants” (P.10-2) for drain and
refill capacity. The drain and refill capa-
city depends on the oil temperature and
drain time. Use these specifications for
reference only. Always use the dipstick
to determine the proper amount of oil in
the engine.
10. Start the engine and check for leakage around the drain plug and the oil filter.
Correct as required.
11. Turn the engine off and wait more than 15 minutes. Check the oil level with the
dipstick. Add engine oil if necessary.
After the operation
1. Install the engine undercover into posi-tion as the following steps.
a. Pull the center of the small plastic clip
out.
b. Hold the engine undercover into posi- tion.
c. Insert the clip through the undercover into the hole in the frame, then push
the center of the clip in to lock the clip
in place. d. Install the other bolts that hold the
undercover in place. Be careful not to
strip the bolts or over-tighten them.
2. Lower the vehicle carefully to the ground.
3. Dispose of waste oil and filter properly.
WARNING
. Prolonged and repeated contact with
used engine oil may cause skin cancer.
. Try to avoid direct skin contact with
used oil. If skin contact is made, wash
thoroughly with soap or hand cleaner
as soon as possible.
. Keep used engine oil out of reach of
children.
Do-it-yourself8-13