Oil sensor INFINITI QX4 2001 Factory Owner's Manual
[x] Cancel search | Manufacturer: INFINITI, Model Year: 2001, Model line: QX4, Model: INFINITI QX4 2001Pages: 2395, PDF Size: 43.2 MB
Page 309 of 2395

SAT676A
Pilot FilterNBAT0118S03ICheck to make sure that filter is not clogged or damaged.
SAT149G
Torque Converter Clutch Solenoid ValveNBAT0118S04ICheck that filter is not clogged or damaged.
IMeasure resistance. Refer to ªComponent Inspectionº, AT-152.
Line Pressure Solenoid ValveNBAT0118S05ICheck that filter is not clogged or damaged.
IMeasure resistance. Refer to ªComponent Inspectionº, AT-167.
SAT095B
3-Unit Solenoid Assembly (Overrun Clutch Solenoid
Valve and Shift Solenoid Valves A and B)
NBAT0118S06IMeasure resistance of each solenoid. Refer to ªComponent
Inspectionº, AT-171, AT-175 and AT-189.
SAT096BA
A/T Fluid Temperature Sensor and SwitchNBAT0118S07IMeasure resistance. Refer to ªComponent Inspectionº, AT-110
and AT-264.
SAT671A
ASSEMBLYNBAT01191. Install upper and lower bodies.
a. Place oil circuit of upper body face up. Install steel balls in their
proper positions.
REPAIR FOR COMPONENT PARTS
Control Valve Assembly (Cont'd)
AT-304
Page 310 of 2395

SAT681A
b. Install reamer bolts from bottom of upper body.
SAT682A
c. Place oil circuit of lower body face up. Install orifice check
spring, orifice check valve and pilot filter.
SAT197B
d. Install lower separator plate on lower body.
e. Install and temporarily tighten support plates, A/T fluid tem-
perature sensor and tube brackets.
SAT198B
f. Temporarily assemble lower and upper bodies, using reamer
bolt as a guide.
IBe careful not to dislocate or drop steel balls, orifice
check spring, orifice check valve and pilot filter.
GI
MA
EM
LC
EC
FE
TF
PD
AX
SU
BR
ST
RS
BT
HA
SC
EL
IDX
REPAIR FOR COMPONENT PARTS
Control Valve Assembly (Cont'd)
AT-305
Page 359 of 2395
SAT010B
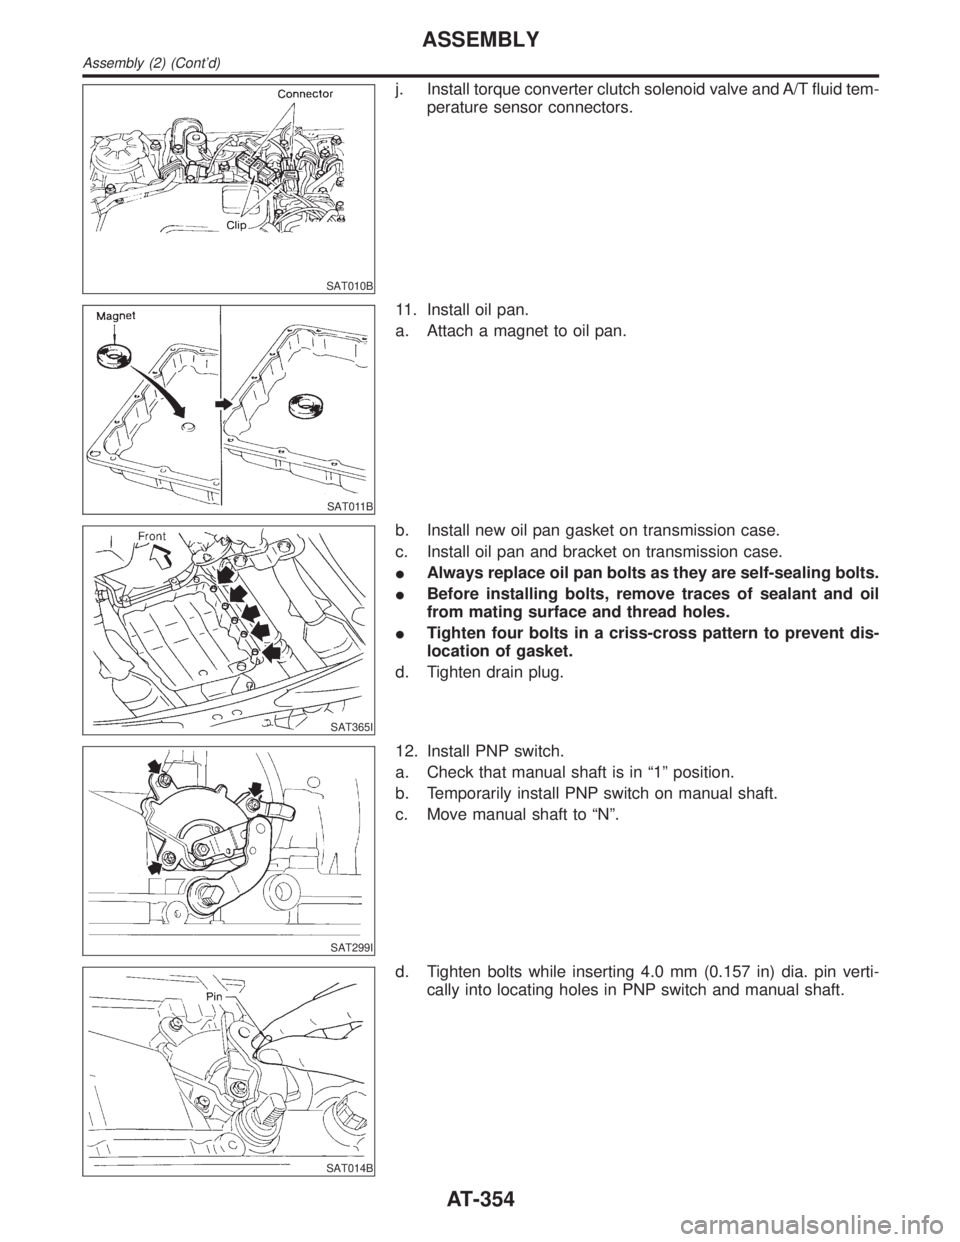
j. Install torque converter clutch solenoid valve and A/T fluid tem-
perature sensor connectors.
SAT011B
11. Install oil pan.
a. Attach a magnet to oil pan.
SAT365I
b. Install new oil pan gasket on transmission case.
c. Install oil pan and bracket on transmission case.
IAlways replace oil pan bolts as they are self-sealing bolts.
IBefore installing bolts, remove traces of sealant and oil
from mating surface and thread holes.
ITighten four bolts in a criss-cross pattern to prevent dis-
location of gasket.
d. Tighten drain plug.
SAT299I
12. Install PNP switch.
a. Check that manual shaft is in ª1º position.
b. Temporarily install PNP switch on manual shaft.
c. Move manual shaft to ªNº.
SAT014B
d. Tighten bolts while inserting 4.0 mm (0.157 in) dia. pin verti-
cally into locating holes in PNP switch and manual shaft.
ASSEMBLY
Assembly (2) (Cont'd)
AT-354
Page 366 of 2395
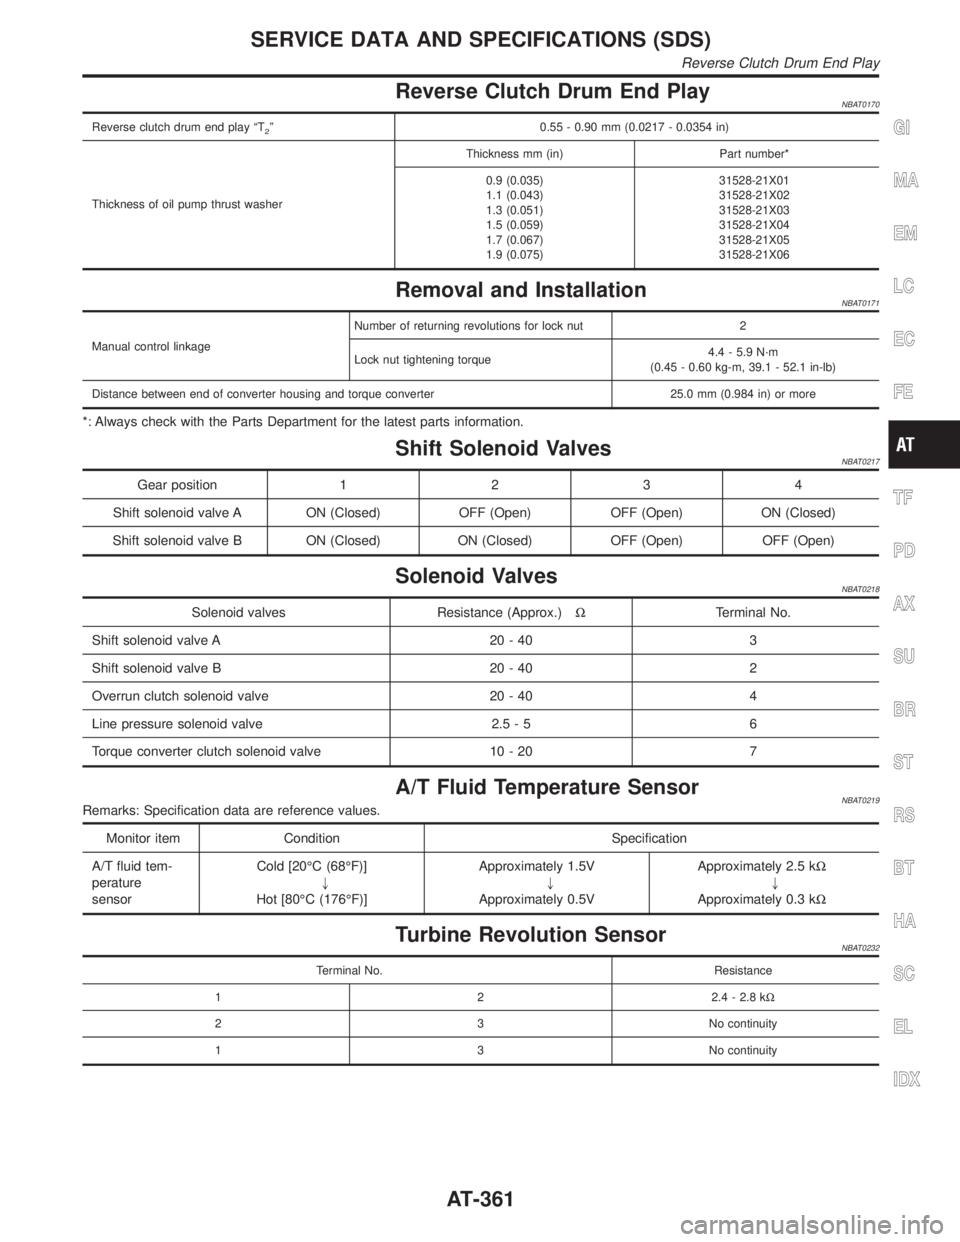
Reverse Clutch Drum End PlayNBAT0170
Reverse clutch drum end play ªT2º 0.55 - 0.90 mm (0.0217 - 0.0354 in)
Thickness of oil pump thrust washerThickness mm (in) Part number*
0.9 (0.035)
1.1 (0.043)
1.3 (0.051)
1.5 (0.059)
1.7 (0.067)
1.9 (0.075)31528-21X01
31528-21X02
31528-21X03
31528-21X04
31528-21X05
31528-21X06
Removal and InstallationNBAT0171
Manual control linkageNumber of returning revolutions for lock nut 2
Lock nut tightening torque4.4 - 5.9 N´m
(0.45 - 0.60 kg-m, 39.1 - 52.1 in-lb)
Distance between end of converter housing and torque converter 25.0 mm (0.984 in) or more
*: Always check with the Parts Department for the latest parts information.
Shift Solenoid ValvesNBAT0217
Gear position1234
Shift solenoid valve A ON (Closed) OFF (Open) OFF (Open) ON (Closed)
Shift solenoid valve B ON (Closed) ON (Closed) OFF (Open) OFF (Open)
Solenoid ValvesNBAT0218
Solenoid valves Resistance (Approx.)WTerminal No.
Shift solenoid valve A 20 - 40 3
Shift solenoid valve B 20 - 40 2
Overrun clutch solenoid valve 20 - 40 4
Line pressure solenoid valve 2.5 - 5 6
Torque converter clutch solenoid valve 10 - 20 7
A/T Fluid Temperature SensorNBAT0219Remarks: Specification data are reference values.
Monitor item Condition Specification
A/T fluid tem-
perature
sensorCold [20ÉC (68ÉF)]
"
Hot [80ÉC (176ÉF)]Approximately 1.5V
"
Approximately 0.5VApproximately 2.5 kW
"
Approximately 0.3 kW
Turbine Revolution SensorNBAT0232
Terminal No. Resistance
1 2 2.4 - 2.8 kW
2 3 No continuity
1 3 No continuity
GI
MA
EM
LC
EC
FE
TF
PD
AX
SU
BR
ST
RS
BT
HA
SC
EL
IDX
SERVICE DATA AND SPECIFICATIONS (SDS)
Reverse Clutch Drum End Play
AT-361
Page 386 of 2395
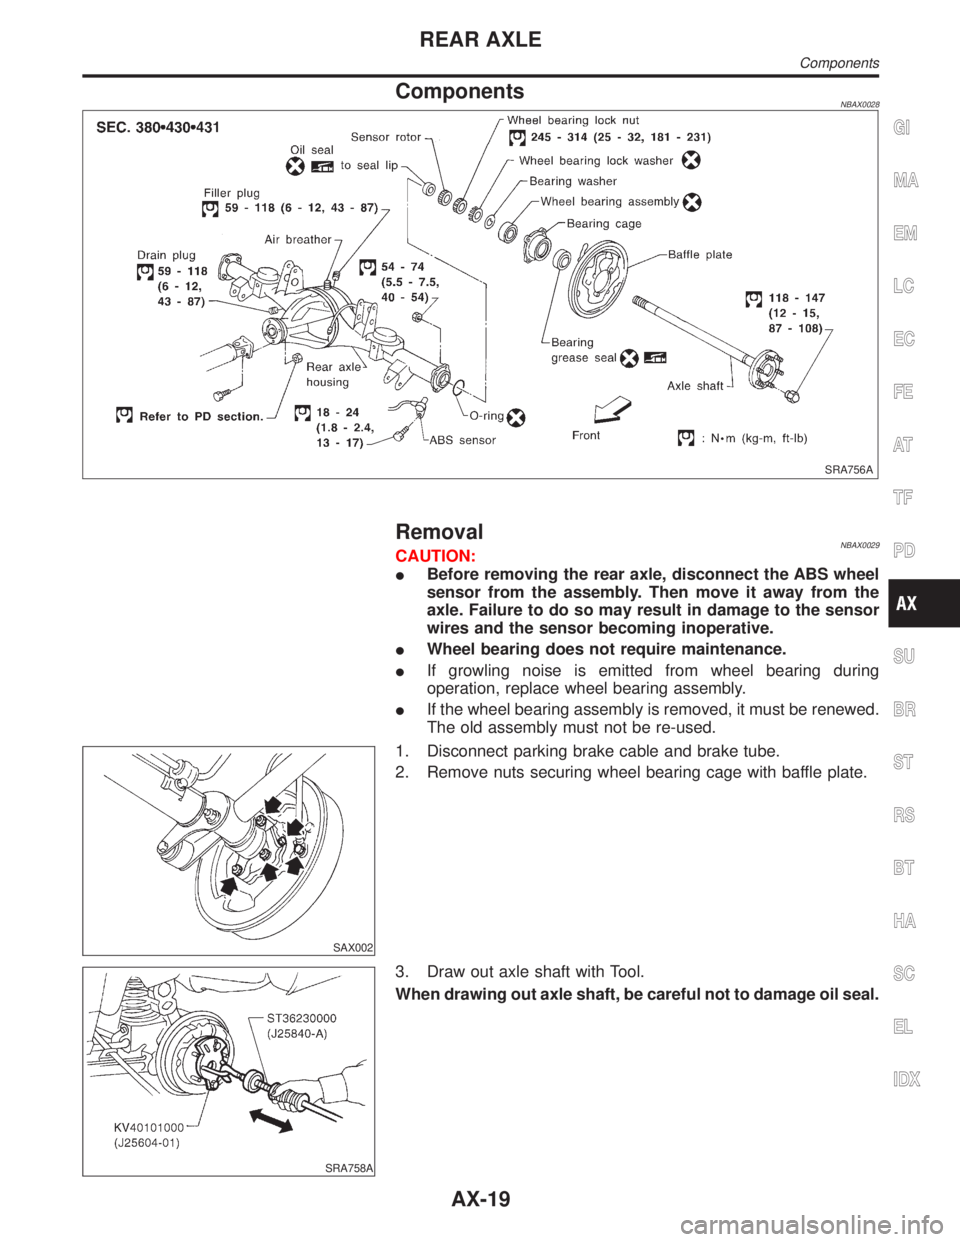
ComponentsNBAX0028
SRA756A
RemovalNBAX0029CAUTION:
IBefore removing the rear axle, disconnect the ABS wheel
sensor from the assembly. Then move it away from the
axle. Failure to do so may result in damage to the sensor
wires and the sensor becoming inoperative.
IWheel bearing does not require maintenance.
IIf growling noise is emitted from wheel bearing during
operation, replace wheel bearing assembly.
IIf the wheel bearing assembly is removed, it must be renewed.
The old assembly must not be re-used.
SAX002
1. Disconnect parking brake cable and brake tube.
2. Remove nuts securing wheel bearing cage with baffle plate.
SRA758A
3. Draw out axle shaft with Tool.
When drawing out axle shaft, be careful not to damage oil seal.
GI
MA
EM
LC
EC
FE
AT
TF
PD
SU
BR
ST
RS
BT
HA
SC
EL
IDX
REAR AXLE
Components
AX-19
Page 387 of 2395
SRA759A
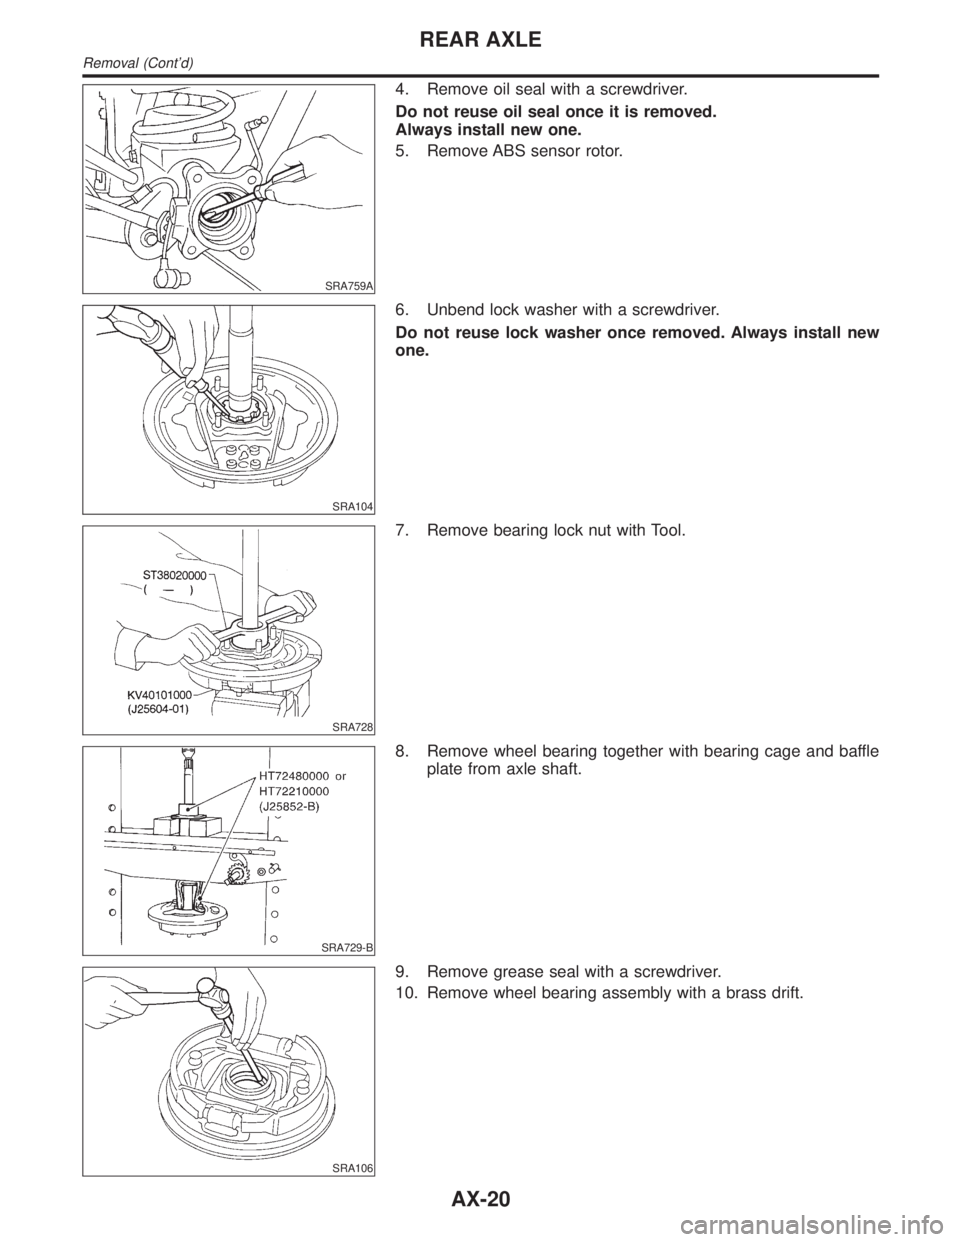
4. Remove oil seal with a screwdriver.
Do not reuse oil seal once it is removed.
Always install new one.
5. Remove ABS sensor rotor.
SRA104
6. Unbend lock washer with a screwdriver.
Do not reuse lock washer once removed. Always install new
one.
SRA728
7. Remove bearing lock nut with Tool.
SRA729-B
8. Remove wheel bearing together with bearing cage and baffle
plate from axle shaft.
SRA106
9. Remove grease seal with a screwdriver.
10. Remove wheel bearing assembly with a brass drift.
REAR AXLE
Removal (Cont'd)
AX-20
Page 389 of 2395
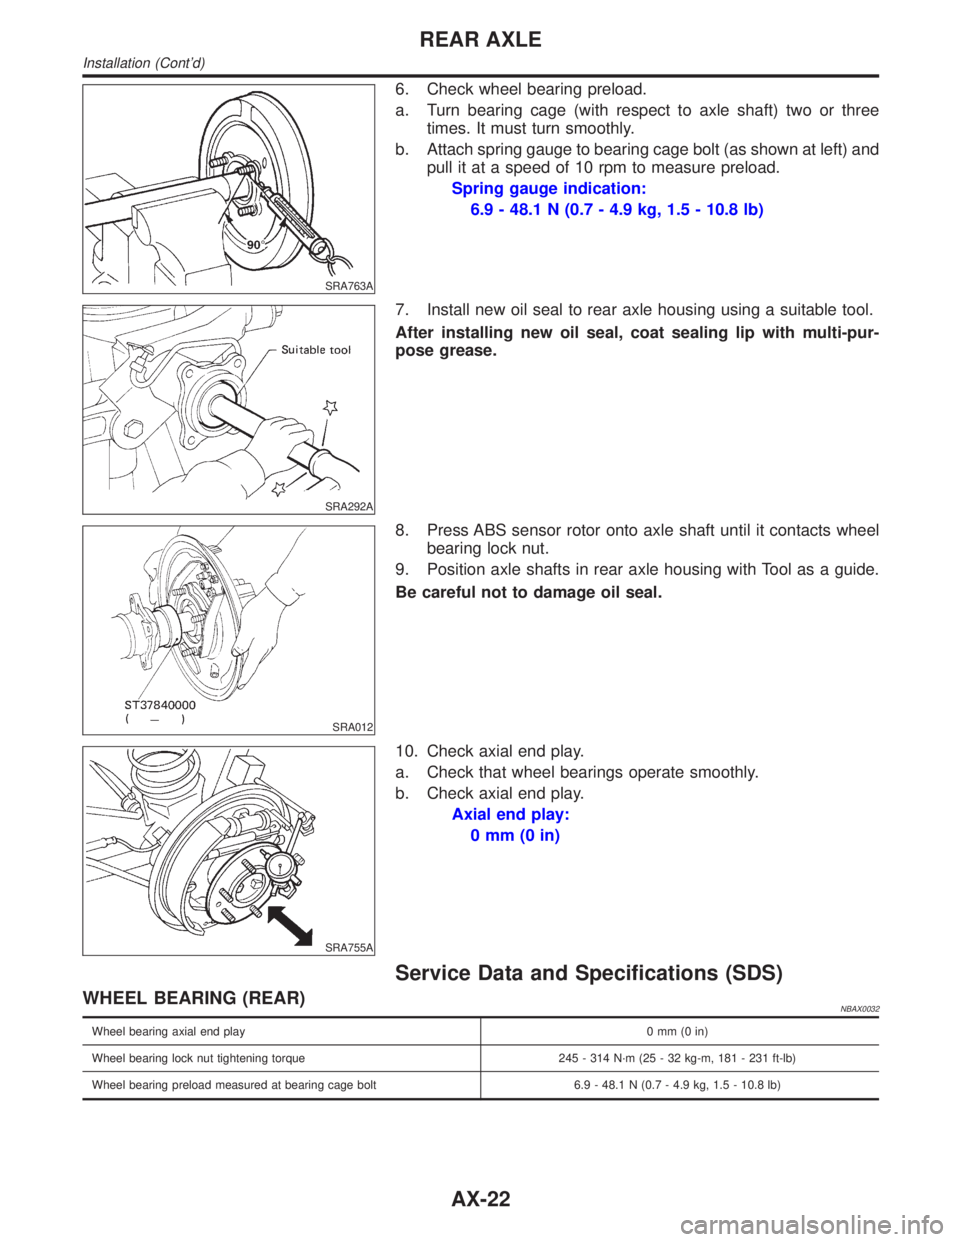
SRA763A
6. Check wheel bearing preload.
a. Turn bearing cage (with respect to axle shaft) two or three
times. It must turn smoothly.
b. Attach spring gauge to bearing cage bolt (as shown at left) and
pull it at a speed of 10 rpm to measure preload.
Spring gauge indication:
6.9 - 48.1 N (0.7 - 4.9 kg, 1.5 - 10.8 lb)
SRA292A
7. Install new oil seal to rear axle housing using a suitable tool.
After installing new oil seal, coat sealing lip with multi-pur-
pose grease.
SRA012
8. Press ABS sensor rotor onto axle shaft until it contacts wheel
bearing lock nut.
9. Position axle shafts in rear axle housing with Tool as a guide.
Be careful not to damage oil seal.
SRA755A
10. Check axial end play.
a. Check that wheel bearings operate smoothly.
b. Check axial end play.
Axial end play:
0mm(0in)
Service Data and Specifications (SDS)
WHEEL BEARING (REAR)NBAX0032
Wheel bearing axial end play0mm(0in)
Wheel bearing lock nut tightening torque 245 - 314 N´m (25 - 32 kg-m, 181 - 231 ft-lb)
Wheel bearing preload measured at bearing cage bolt 6.9 - 48.1 N (0.7 - 4.9 kg, 1.5 - 10.8 lb)
REAR AXLE
Installation (Cont'd)
AX-22
Page 392 of 2395
Supplemental Restraint System (SRS) ªAIR
BAGº and ªSEAT BELT PRE-TENSIONERº
NBBR0001The Supplemental Restraint System such as ªAIR BAGº and ªSEAT BELT PRE-TENSIONERº used along with
a seat belt, helps to reduce the risk or severity of injury to the driver and front passenger for certain types of
collision. The SRS system composition which is available to INFINITI QX4 is as follows:
IFor a frontal collision
The Supplemental Restraint System consists of driver air bag module (located in the center of the steer-
ing wheel), front passenger air bag module (located on the instrument panel on passenger side), seat belt
pre-tensioners, a diagnosis sensor unit, warning lamp, wiring harness and spiral cable.
IFor a side collision
The Supplemental Restraint System consists of side air bag module (located in the outer side of front seat),
satellite sensor, diagnosis sensor unit (one of components of air bags for a frontal collision), wiring harness,
warning lamp (one of components of air bags for a frontal collision).
Information necessary to service the system safely is included in theRS sectionof this Service Manual.
WARNING:
ITo avoid rendering the SRS inoperative, which could increase the risk of personal injury or death
in the event of a collision which would result in air bag inflation, all maintenance must be performed
by an authorized INFINITI dealer.
IImproper maintenance, including incorrect removal and installation of the SRS, can lead to per-
sonal injury caused by unintentional activation of the system. For removal of Spiral Cable and Air
Bag Module, see the RS section.
IDo not use electrical test equipment on any circuit related to the SRS unless instructed to in this
Service Manual. Spiral cable and wiring harnesses covered with yellow insulation tape either just
before the harness connectors or for the complete harness are related to the SRS.
SBR686C
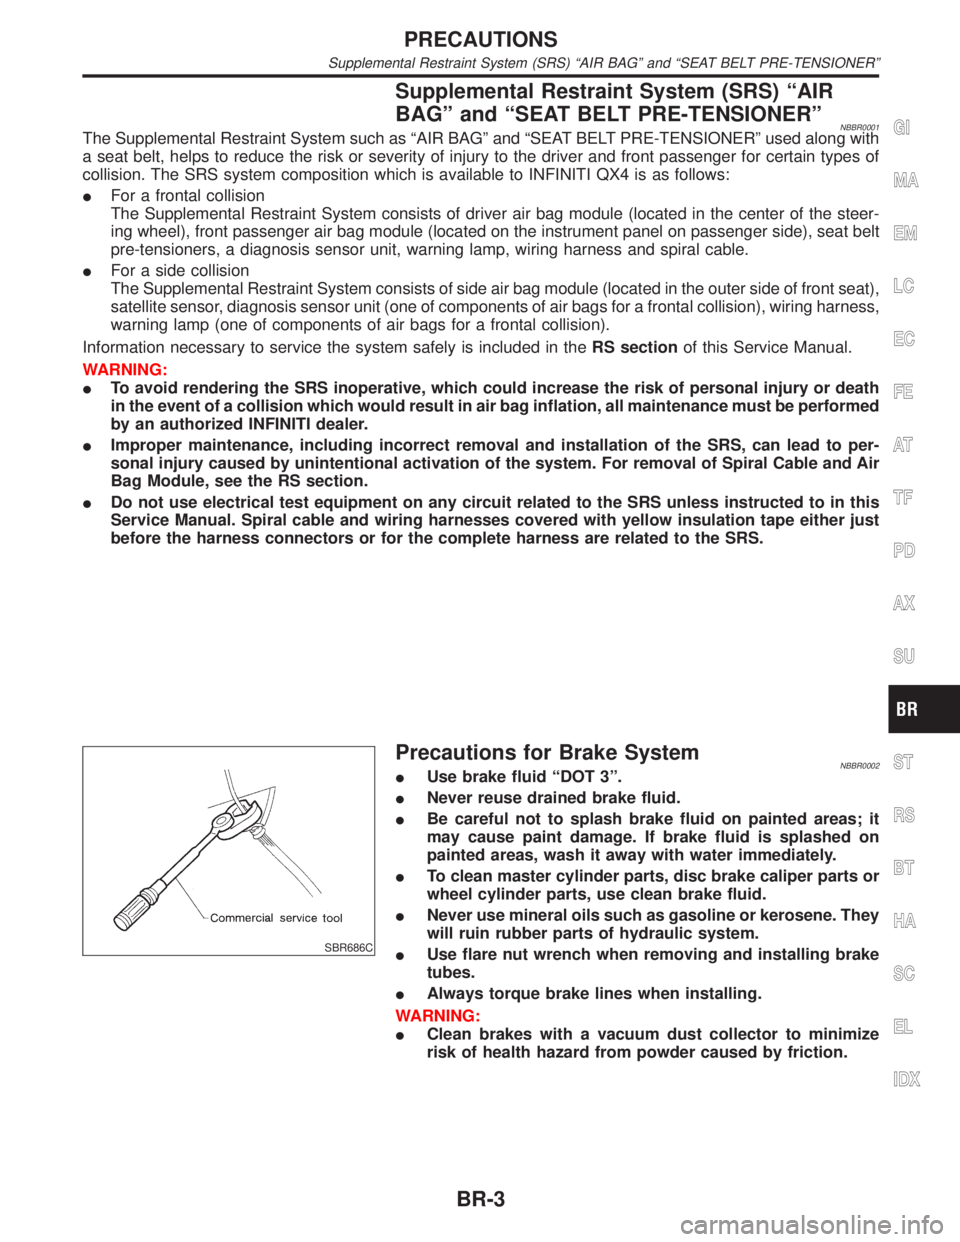
Precautions for Brake SystemNBBR0002IUse brake fluid ªDOT 3º.
INever reuse drained brake fluid.
IBe careful not to splash brake fluid on painted areas; it
may cause paint damage. If brake fluid is splashed on
painted areas, wash it away with water immediately.
ITo clean master cylinder parts, disc brake caliper parts or
wheel cylinder parts, use clean brake fluid.
INever use mineral oils such as gasoline or kerosene. They
will ruin rubber parts of hydraulic system.
IUse flare nut wrench when removing and installing brake
tubes.
IAlways torque brake lines when installing.
WARNING:
IClean brakes with a vacuum dust collector to minimize
risk of health hazard from powder caused by friction.
GI
MA
EM
LC
EC
FE
AT
TF
PD
AX
SU
ST
RS
BT
HA
SC
EL
IDX
PRECAUTIONS
Supplemental Restraint System (SRS) ªAIR BAGº and ªSEAT BELT PRE-TENSIONERº
BR-3
Page 401 of 2395
InspectionNBBR0014CAUTION:
ICarefully monitor brake fluid level at master cylinder.
IUse new brake fluid ªDOT 3º.
IBe careful not to splash brake fluid on painted areas; it
may cause paint damage. If brake fluid is splashed on
paint areas, wash it away with water immediately.
IDepress pedal slowly when raising front brake pressure.
ICheck rear brake pressure 2 seconds after front brake
pressure reaches specified value.
IDisconnect harness connectors from ABS actuator and
electric unit before checking.
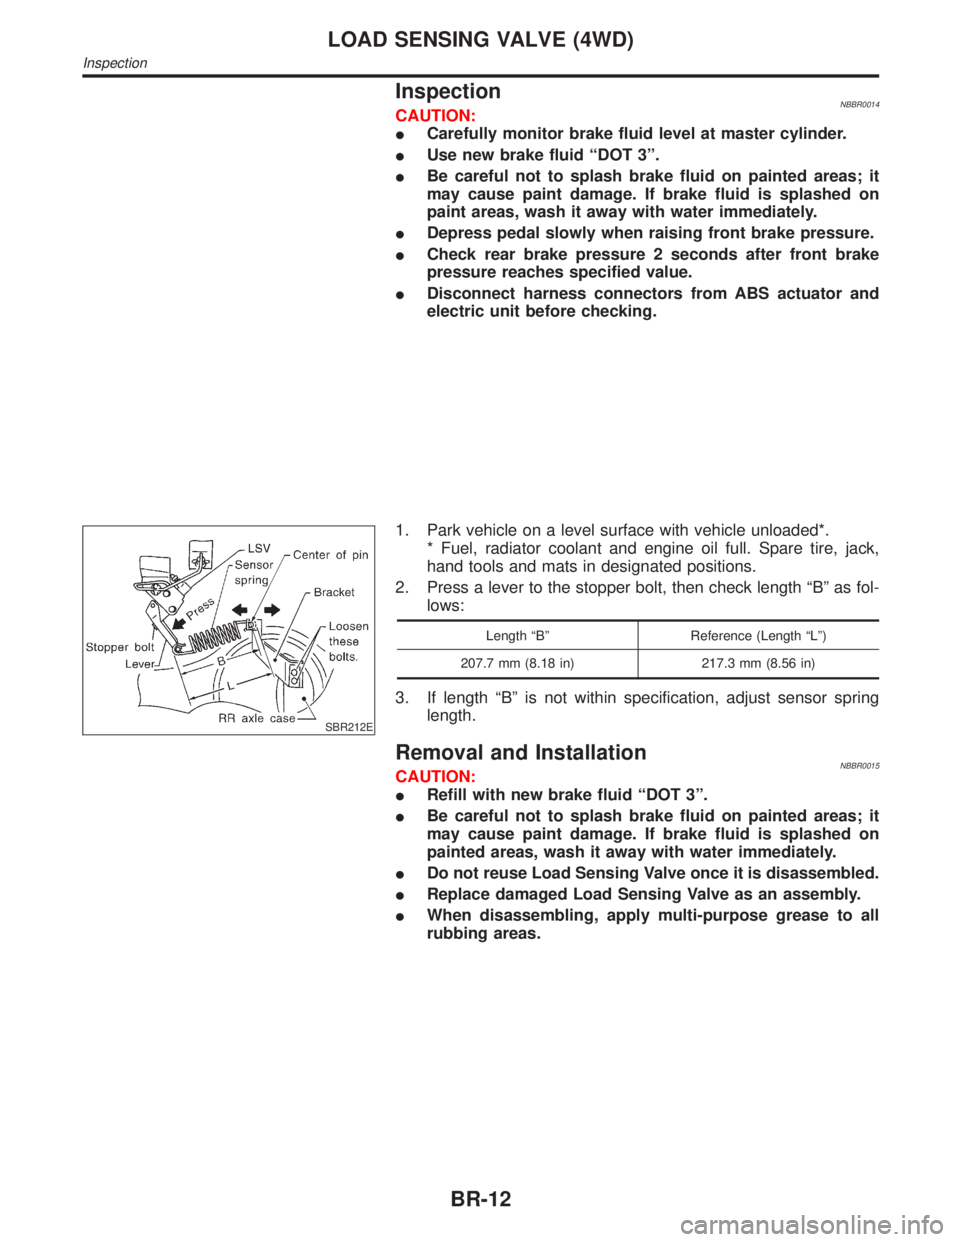
SBR212E
1. Park vehicle on a level surface with vehicle unloaded*.
* Fuel, radiator coolant and engine oil full. Spare tire, jack,
hand tools and mats in designated positions.
2. Press a lever to the stopper bolt, then check length ªBº as fol-
lows:
Length ªBº Reference (Length ªLº)
207.7 mm (8.18 in) 217.3 mm (8.56 in)
3. If length ªBº is not within specification, adjust sensor spring
length.
Removal and InstallationNBBR0015CAUTION:
IRefill with new brake fluid ªDOT 3º.
IBe careful not to splash brake fluid on painted areas; it
may cause paint damage. If brake fluid is splashed on
painted areas, wash it away with water immediately.
IDo not reuse Load Sensing Valve once it is disassembled.
IReplace damaged Load Sensing Valve as an assembly.
IWhen disassembling, apply multi-purpose grease to all
rubbing areas.
LOAD SENSING VALVE (4WD)
Inspection
BR-12
Page 422 of 2395

System ComponentsNBBR0090
SBR447EB
SBR124B
System DescriptionNBBR0091SENSORNBBR0091S01The sensor unit consists of a gear-shaped sensor rotor and a sen-
sor element. The element contains a bar magnet around which a
coil is wound. The front sensors are installed on the front spindles
and the rear sensors are installed on the rear spindles. As the
wheel rotates, the sensor generates a sine-wave pattern. The fre-
quency and voltage increase(s) as the rotating speed increases.
SBR668E
CONTROL UNIT (BUILT-IN ABS ACTUATOR AND
ELECTRIC UNIT)
NBBR0091S02The control unit computes the wheel rotating speed by the signal
current sent from the sensor. Then it supplies a DC current to the
actuator solenoid valve. It also controls ON-OFF operation of the
valve relay and motor relay. If any electrical malfunction should be
detected in the system, the control unit causes the warning lamp
to light up. In this condition, the ABS will be deactivated by the
control unit, and the vehicle's brake system reverts to normal
operation. (For control unit layout, refer to ABS ACTUATOR AND
ELECTRIC UNIT, BR-33.)
SBR482E
ABS ACTUATOR AND ELECTRIC UNITNBBR0091S03The ABS actuator and electric unit contains:
IAn electric motor and pump
ITwo relays
ISix solenoid valves, each inlet and outlet for
Ð LH front
Ð RH front
Ð Rear
IABS control unit
GI
MA
EM
LC
EC
FE
AT
TF
PD
AX
SU
ST
RS
BT
HA
SC
EL
IDX
DESCRIPTIONABS
System Components
BR-33