INFINITI QX56 2008 Factory Service Manual
Manufacturer: INFINITI, Model Year: 2008, Model line: QX56, Model: INFINITI QX56 2008Pages: 4083, PDF Size: 81.73 MB
Page 1821 of 4083
EM-18
< ON-VEHICLE MAINTENANCE >
CAMSHAFT VALVE CLEARANCE
CAMSHAFT VALVE CLEARANCE
Valve ClearanceINFOID:0000000001538810
INSPECTION
NOTE:
Perform the following inspection after removal, installation or replacement of camshaft or valve-related parts,
or if there are unusual engine conditions due to changes in valve clearance over time (starting, idling, and/or
noise).
1. Warm up the engine. Then stop the engine.
2. Remove the engine room cover. Refer to EM-24, "
Removal and Installation".
3. Remove the air cleaner and air duct assembly. Refer to EM-25, "
Removal and Installation".
4. Remove the RH bank and LH bank rocker covers using power tool. Refer to EM-38, "
Removal and Instal-
lation".
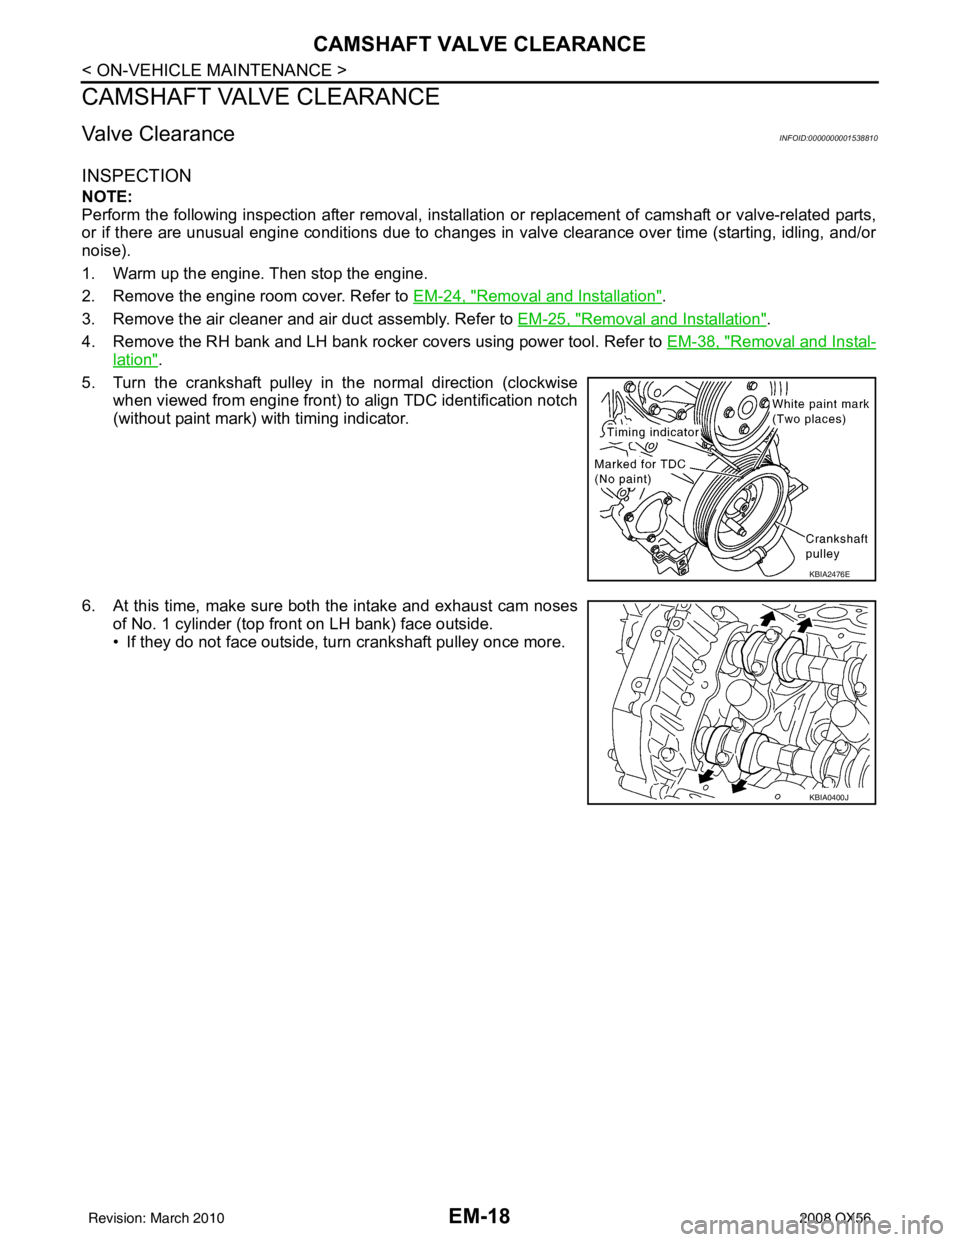
5. Turn the crankshaft pulley in the normal direction (clockwise when viewed from engine front) to align TDC identification notch
(without paint mark) with timing indicator.
6. At this time, make sure both the intake and exhaust cam noses of No. 1 cylinder (top front on LH bank) face outside.
• If they do not face outside, turn crankshaft pulley once more.
KBIA2476E
KBIA0400J
Revision: March 2010 2008 QX56
Page 1822 of 4083
CAMSHAFT VALVE CLEARANCEEM-19
< ON-VEHICLE MAINTENANCE >
C
DE
F
G H
I
J
K L
M A
EM
NP
O
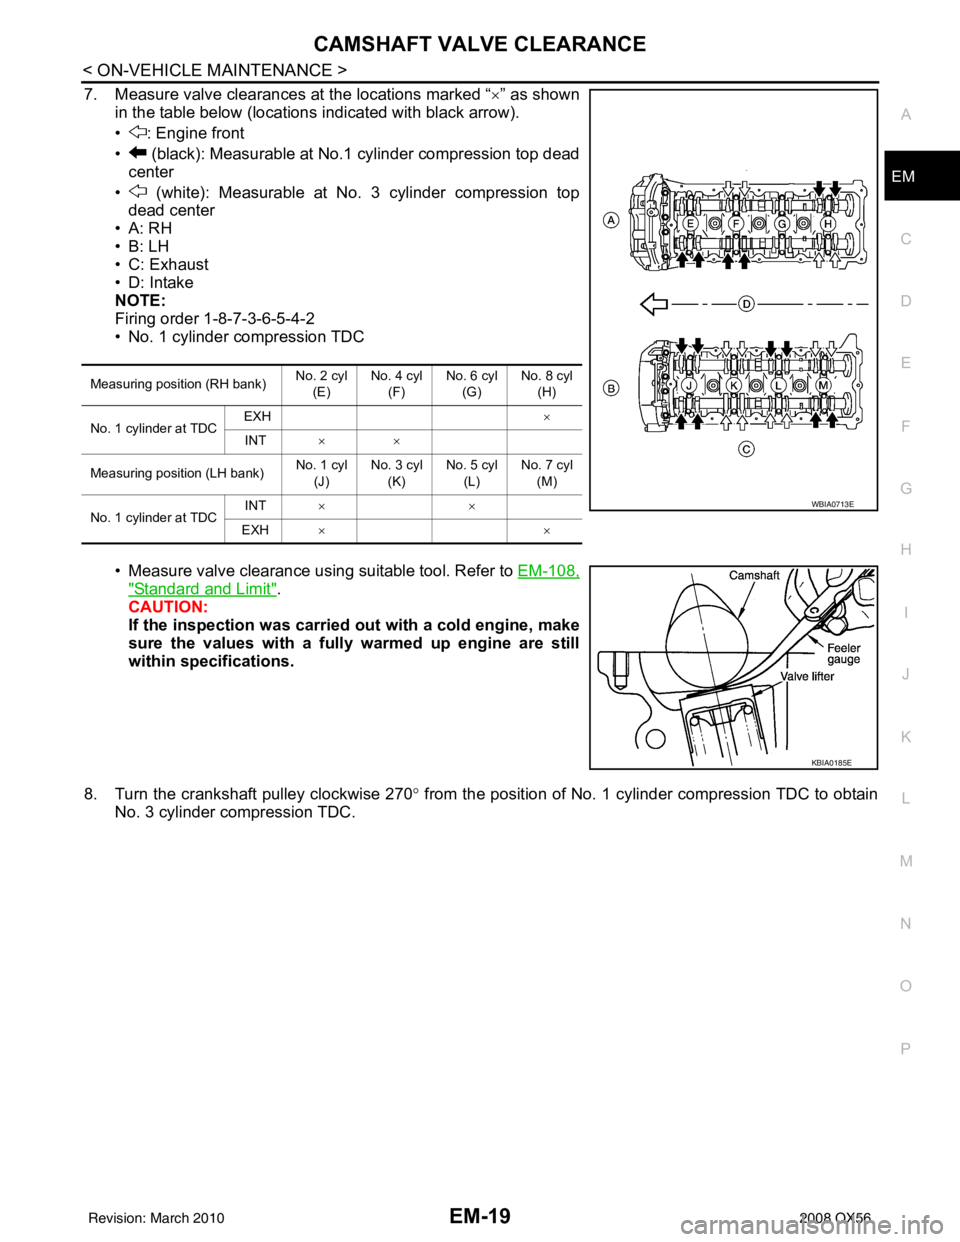
7. Measure valve clearances at the locations marked “×
” as shown
in the table below (locations indicated with black arrow).
• : Engine front
• (black): Measurable at No.1 cylinder compression top dead center
• (white): Measurable at No. 3 cylinder compression top dead center
•A: RH
•B: LH
• C: Exhaust
• D: Intake
NOTE:
Firing order 1-8-7-3-6-5-4-2
• No. 1 cylinder compression TDC
• Measure valve clearance using suitable tool. Refer to EM-108,
"Standard and Limit".
CAUTION:
If the inspection was carried out with a cold engine, make
sure the values with a fully warmed up engine are still
within specifications.
8. Turn the crankshaft pulley clockwise 270 ° from the position of No. 1 cylinder compression TDC to obtain
No. 3 cylinder compression TDC.
Measuring position (RH bank) No. 2 cyl
(E) No. 4 cyl
(F) No. 6 cyl
(G) No. 8 cyl
(H)
No. 1 cylinder at TDC EXH
×
INT ××
Measuring position (LH bank) No. 1 cyl
(J) No. 3 cyl
(K) No. 5 cyl
(L) No. 7 cyl
(M)
No. 1 cylinder at TDC INT
××
EXH ××
WBIA0713E
KBIA0185E
Revision: March 2010 2008 QX56
Page 1823 of 4083
EM-20
< ON-VEHICLE MAINTENANCE >
CAMSHAFT VALVE CLEARANCE
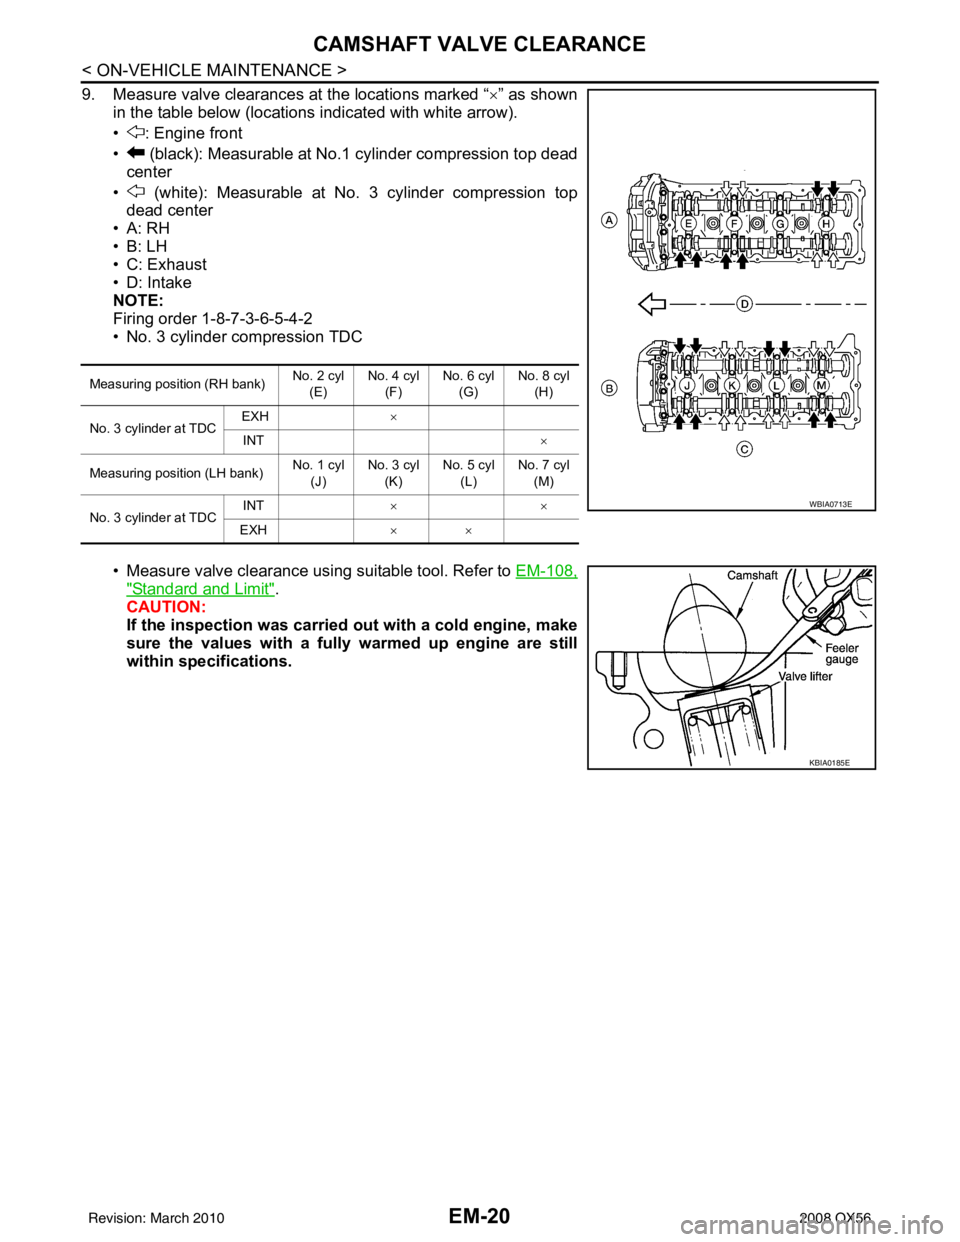
9. Measure valve clearances at the locations marked “×” as shown
in the table below (locations indicated with white arrow).
• : Engine front
• (black): Measurable at No.1 cylinder compression top dead center
• (white): Measurable at No. 3 cylinder compression top dead center
•A: RH
•B: LH
• C: Exhaust
•D: Intake
NOTE:
Firing order 1-8-7-3-6-5-4-2
• No. 3 cylinder compression TDC
• Measure valve clearance using suitable tool. Refer to EM-108,
"Standard and Limit".
CAUTION:
If the inspection was carried out with a cold engine, make
sure the values with a fully warmed up engine are still
within specifications.
Measuring position (RH bank) No. 2 cyl
(E) No. 4 cyl
(F) No. 6 cyl
(G) No. 8 cyl
(H)
No. 3 cylinder at TDC EXH
×
INT ×
Measuring position (LH bank) No. 1 cyl
(J) No. 3 cyl
(K) No. 5 cyl
(L) No. 7 cyl
(M)
No. 3 cylinder at TDC INT
××
EXH ××
WBIA0713E
KBIA0185E
Revision: March 2010 2008 QX56
Page 1824 of 4083
CAMSHAFT VALVE CLEARANCEEM-21
< ON-VEHICLE MAINTENANCE >
C
DE
F
G H
I
J
K L
M A
EM
NP
O
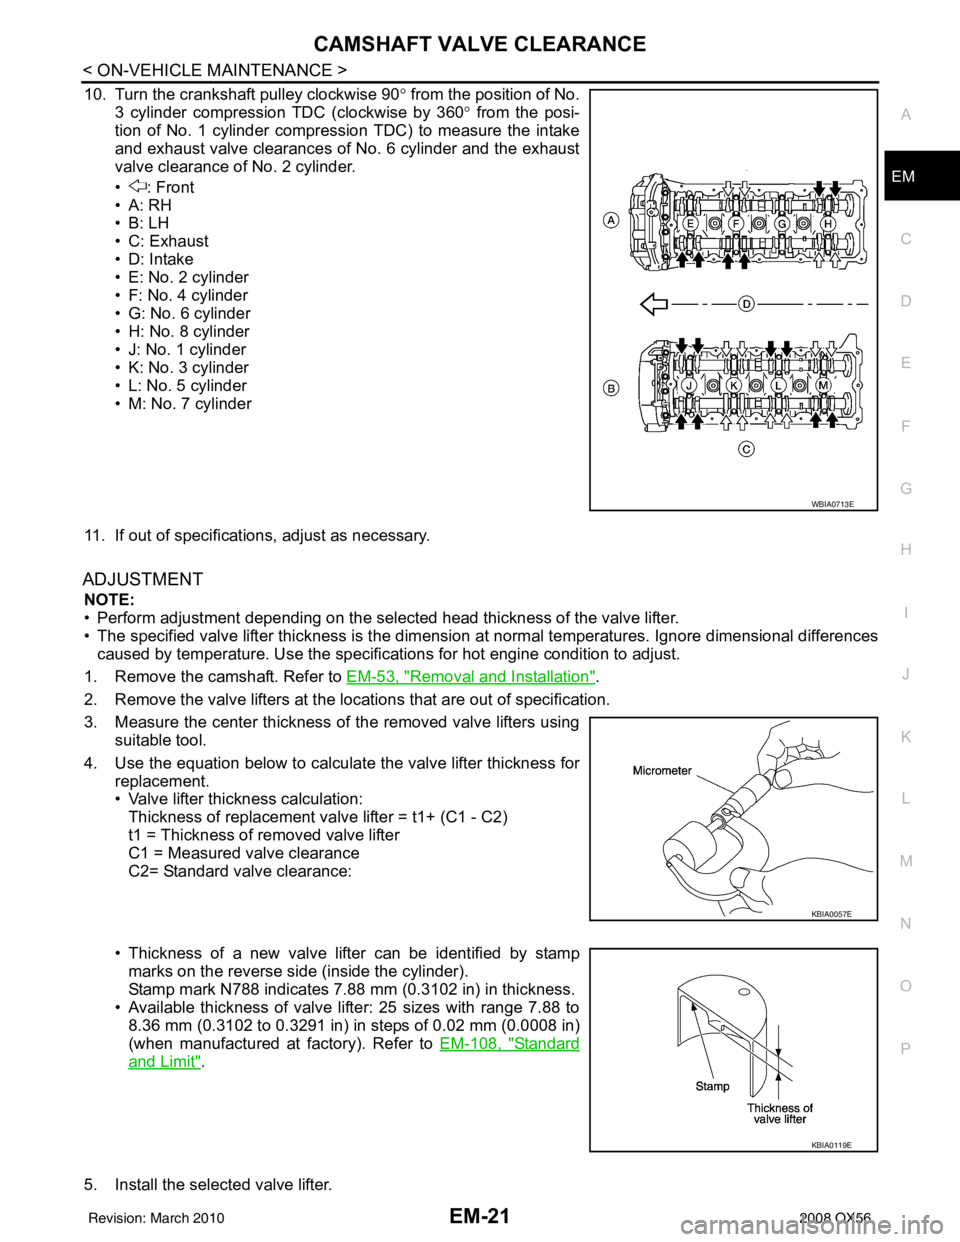
10. Turn the crankshaft pulley clockwise 90°
from the position of No.
3 cylinder compression TDC (clockwise by 360 ° from the posi-
tion of No. 1 cylinder compression TDC) to measure the intake
and exhaust valve clearances of No. 6 cylinder and the exhaust
valve clearance of No. 2 cylinder.
• : Front
•A: RH
•B: LH
• C: Exhaust
• D: Intake
• E: No. 2 cylinder
• F: No. 4 cylinder
• G: No. 6 cylinder
• H: No. 8 cylinder
• J: No. 1 cylinder
• K: No. 3 cylinder
• L: No. 5 cylinder
• M: No. 7 cylinder
11. If out of specifications, adjust as necessary.
ADJUSTMENT
NOTE:
• Perform adjustment depending on the selected head thickness of the valve lifter.
• The specified valve lifter thickness is the dimension at normal temperatures. Ignore dimensional differences
caused by temperature. Us e the specifications for hot engine condition to adjust.
1. Remove the camshaft. Refer to EM-53, "
Removal and Installation".
2. Remove the valve lifters at the locations that are out of specification.
3. Measure the center thickness of the removed valve lifters using suitable tool.
4. Use the equation below to calculate the valve lifter thickness for replacement.
• Valve lifter thickness calculation:Thickness of replacement valve lifter = t1+ (C1 - C2)
t1 = Thickness of removed valve lifter
C1 = Measured valve clearance
C2= Standard valve clearance:
• Thickness of a new valve lifter can be identified by stamp marks on the reverse side (inside the cylinder).
Stamp mark N788 indicates 7.88 mm (0.3102 in) in thickness.
• Available thickness of valve lifter: 25 sizes with range 7.88 to 8.36 mm (0.3102 to 0.3291 in) in steps of 0.02 mm (0.0008 in)
(when manufactured at factory). Refer to EM-108, "
Standard
and Limit".
5. Install the selected valve lifter.
WBIA0713E
KBIA0057E
KBIA0119E
Revision: March 2010 2008 QX56
Page 1825 of 4083
EM-22
< ON-VEHICLE MAINTENANCE >
CAMSHAFT VALVE CLEARANCE
6. Install the camshaft.
7. Manually turn the crankshaft pulley a few turns.
8. Make sure the valve clearances for a cold engine are within specifications. Refer to EM-108, "
Standard
and Limit".
9. After completing the repair, check the valve clearanc es again with the specifications for a warmed engine.
Make sure the values are wit hin specifications. Refer to EM-108, "
Standard and Limit".
Revision: March 2010 2008 QX56
Page 1826 of 4083
COMPRESSION PRESSUREEM-23
< ON-VEHICLE MAINTENANCE >
C
DE
F
G H
I
J
K L
M A
EM
NP
O
COMPRESSION PRESSURE
Checking Compression PressureINFOID:0000000001538811
1. Warm up the engine thoroughly. Then stop the engine.
2. Release the fuel pressure. Refer to EC-494, "
Fuel Pressure Check".
CAUTION:
If CONSULT-III is not used to release fuel pressure leave the fuel pump fuse disconnected until
step 7.
3. Remove the spark plug from each cylinder. Refer to EM-16, "
Removal and Installation".
4. Connect the engine tachometer (not required in use of CONSULT-III).
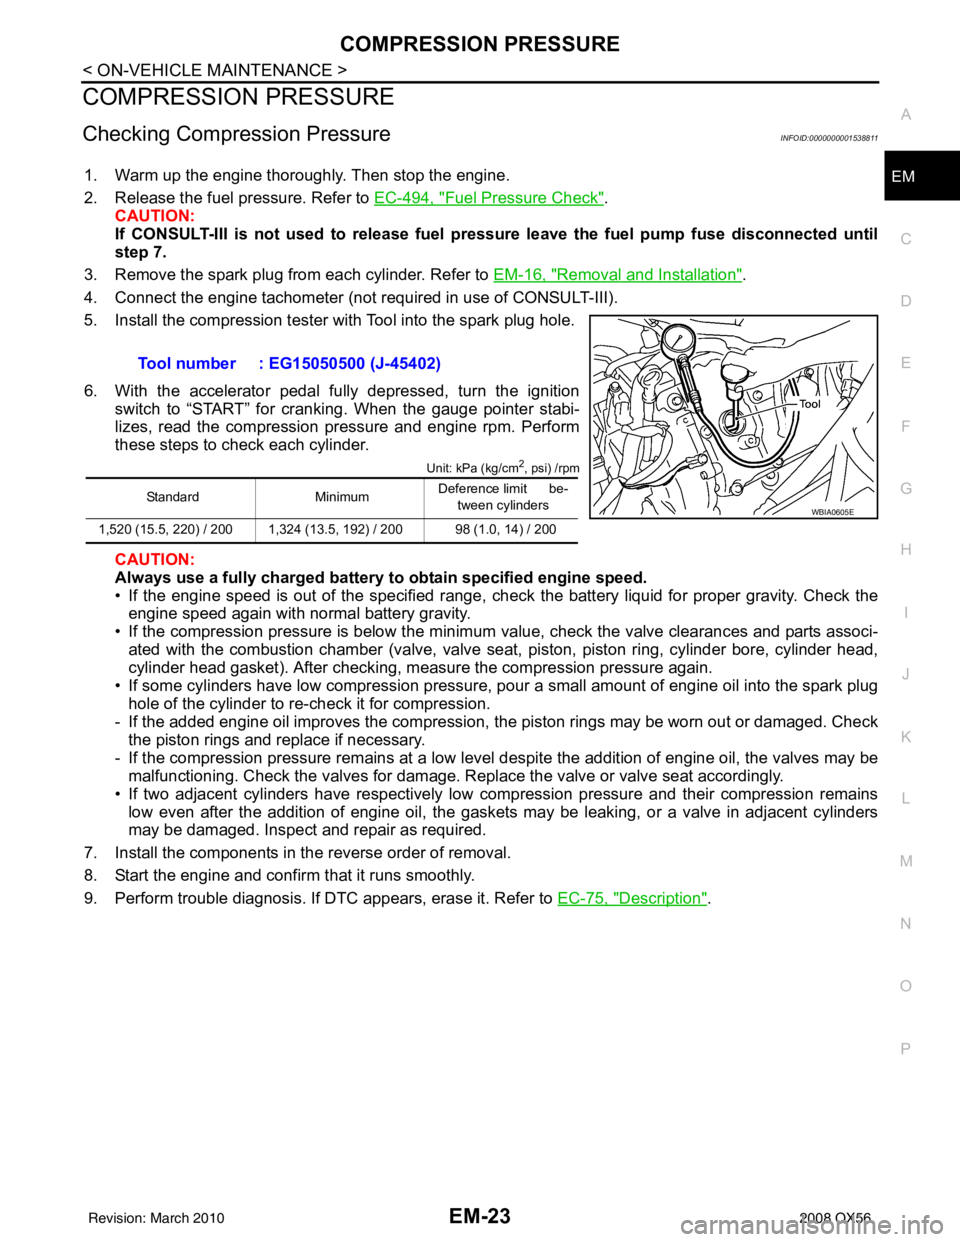
5. Install the compression tester with Tool into the spark plug hole.
6. With the accelerator pedal fully depressed, turn the ignition switch to “START” for cranking. When the gauge pointer stabi-
lizes, read the compression pressure and engine rpm. Perform
these steps to check each cylinder.
Unit: kPa (kg/cm2, psi) /rpm
CAUTION:
Always use a fully charged battery to obtain specified engine speed.
• If the engine speed is out of the specified range, check the battery liquid for proper gravity. Check the engine speed again with normal battery gravity.
• If the compression pressure is below the minimum value, check the valve clearances and parts associ-
ated with the combustion chamber (valve, valve seat , piston, piston ring, cylinder bore, cylinder head,
cylinder head gasket). After checking, measure the compression pressure again.
• If some cylinders have low compression pressure, pour a small amount of engine oil into the spark plug hole of the cylinder to re-check it for compression.
- If the added engine oil improves the compression, t he piston rings may be worn out or damaged. Check
the piston rings and replace if necessary.
- If the compression pressure remains at a low level despite the addition of engine oil, the valves may be malfunctioning. Check the valves for damage. Replace the valve or valve seat accordingly.
• If two adjacent cylinders have respectively low compression pressure and their compression remains low even after the addition of engine oil, the gaskets may be leaking, or a valve in adjacent cylinders
may be damaged. Inspect and repair as required.
7. Install the components in the reverse order of removal.
8. Start the engine and confirm that it runs smoothly.
9. Perform trouble diagnosis. If DTC appears, erase it. Refer to EC-75, "
Description".
Tool number : EG15050500 (J-45402)
Standard
MinimumDeference limit be-
tween cylinders
1,520 (15.5, 220) / 200 1,324 (13.5, 192) / 200 98 (1.0, 14) / 200WBIA0605E
Revision: March 2010 2008 QX56
Page 1827 of 4083
EM-24
< ON-VEHICLE REPAIR >
ENGINE ROOM COVER
ON-VEHICLE REPAIR
ENGINE ROOM COVER
Removal and InstallationINFOID:0000000001538812
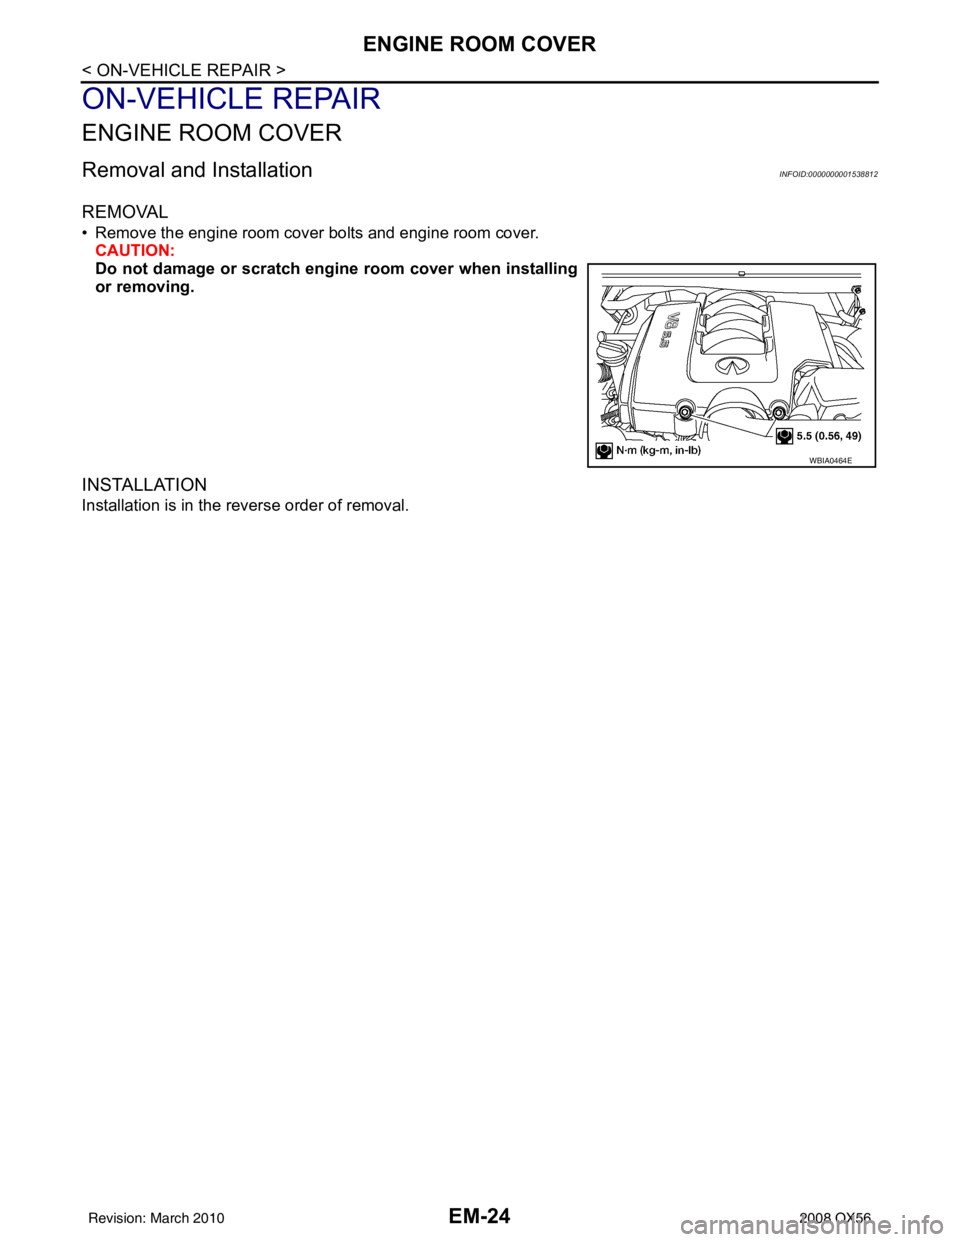
REMOVAL
• Remove the engine room cover bolts and engine room cover.CAUTION:
Do not damage or scratch engi ne room cover when installing
or removing.
INSTALLATION
Installation is in the reverse order of removal.
WBIA0464E
Revision: March 2010 2008 QX56
Page 1828 of 4083
AIR CLEANER AND AIR DUCTEM-25
< ON-VEHICLE REPAIR >
C
DE
F
G H
I
J
K L
M A
EM
NP
O
AIR CLEANER AND AIR DUCT
Removal and InstallationINFOID:0000000001538813
REMOVAL
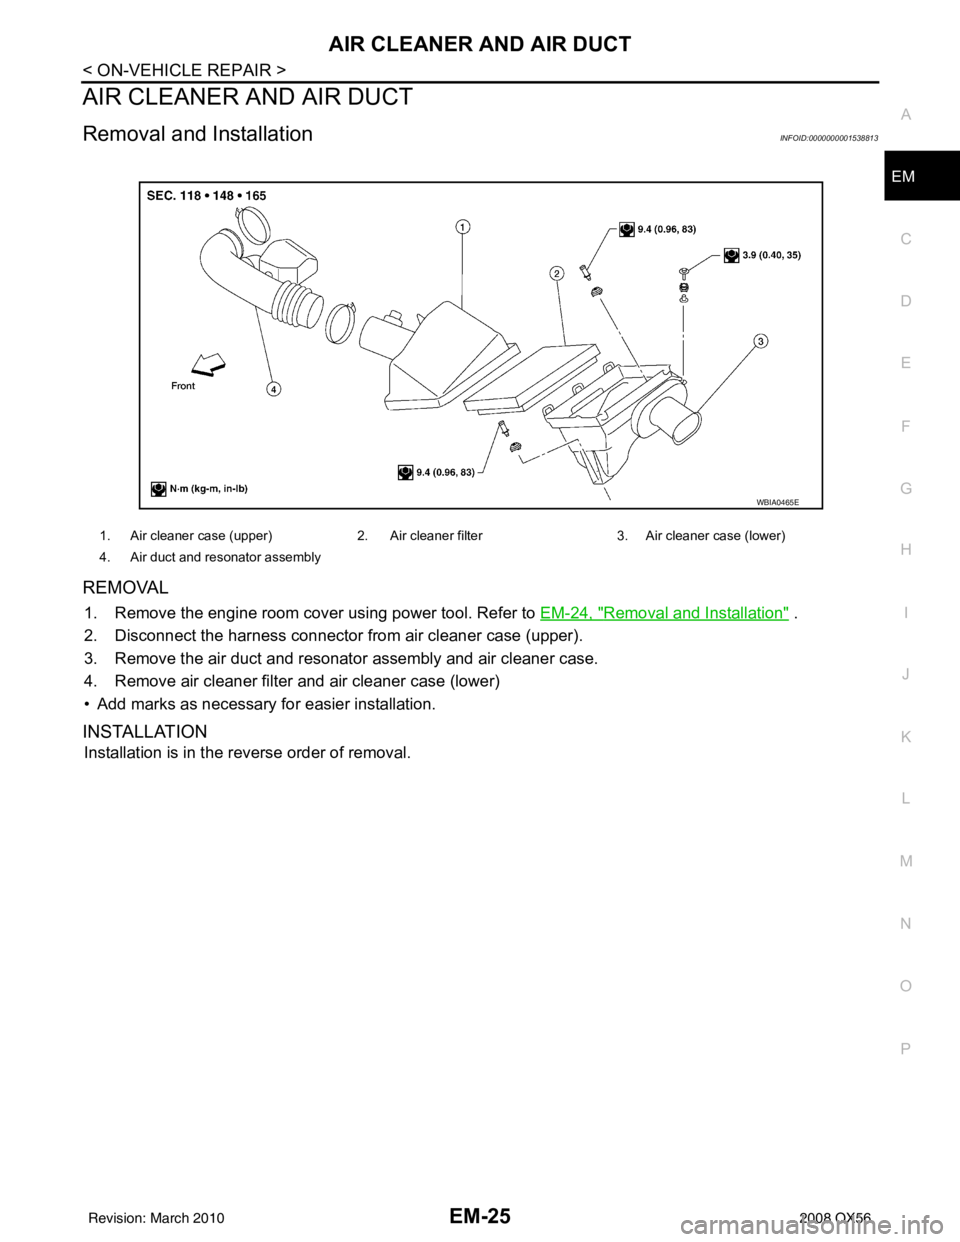
1. Remove the engine room cover using power tool. Refer to
EM-24, "Removal and Installation" .
2. Disconnect the harness connector from air cleaner case (upper).
3. Remove the air duct and resonator assembly and air cleaner case.
4. Remove air cleaner filter and air cleaner case (lower)
• Add marks as necessary for easier installation.
INSTALLATION
Installation is in the reverse order of removal.
1. Air cleaner case (upper) 2. Air cleaner filter 3. Air cleaner case (lower)
4. Air duct and resonator assembly
WBIA0465E
Revision: March 2010 2008 QX56
Page 1829 of 4083
EM-26
< ON-VEHICLE REPAIR >
INTAKE MANIFOLD
INTAKE MANIFOLD
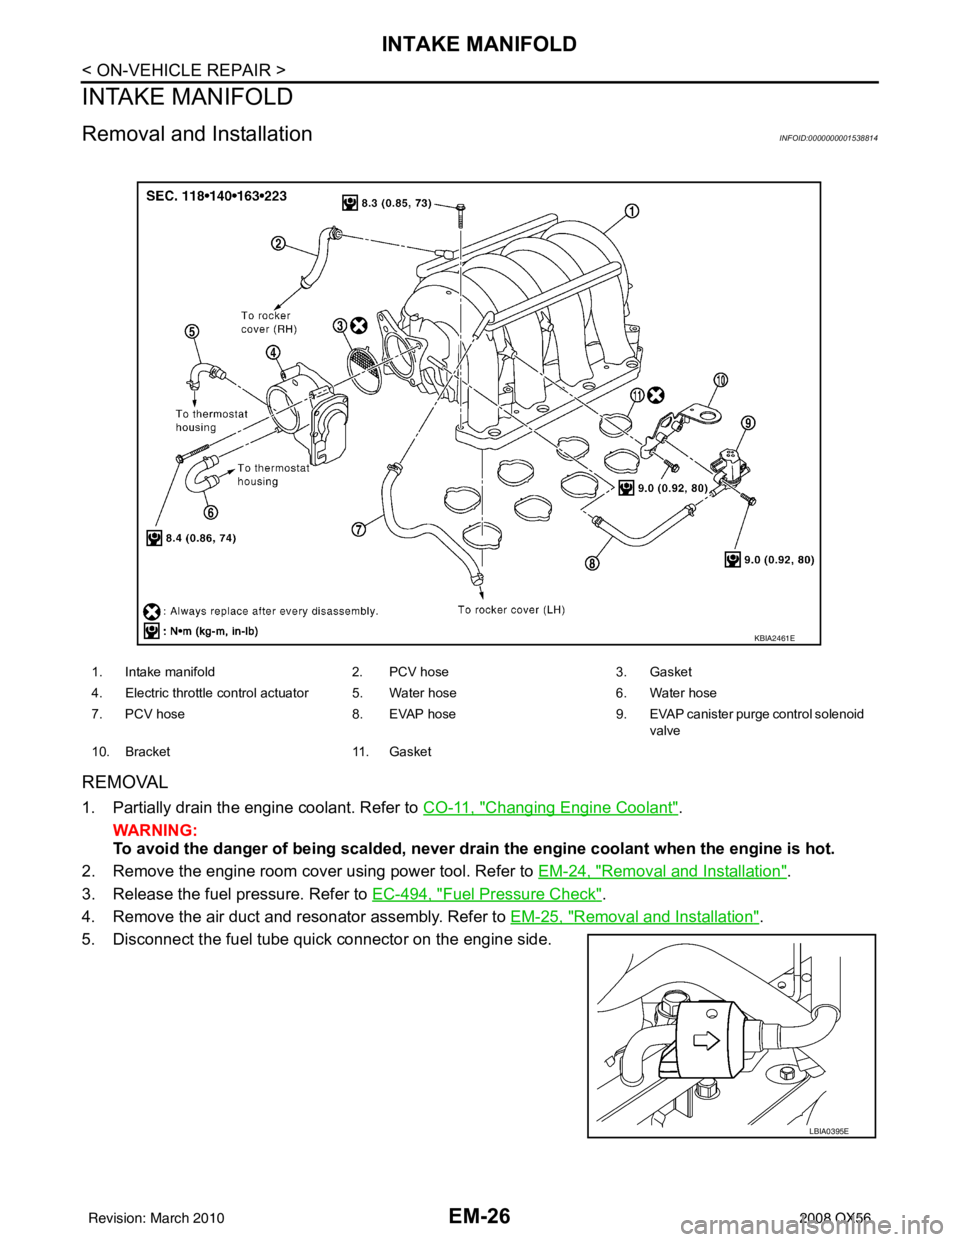
Removal and InstallationINFOID:0000000001538814
REMOVAL
1. Partially drain the engine coolant. Refer to CO-11, "Changing Engine Coolant".
WARNING:
To avoid the danger of being scal ded, never drain the engine coolant when the engine is hot.
2. Remove the engine room cover using power tool. Refer to EM-24, "
Removal and Installation".
3. Release the fuel pressure. Refer to EC-494, "
Fuel Pressure Check".
4. Remove the air duct and resonator assembly. Refer to EM-25, "
Removal and Installation".
5. Disconnect the fuel tube quick connector on the engine side.
1. Intake manifold 2. PCV hose 3. Gasket
4. Electric throttle control actuator 5. Water hose 6. Water hose
7. PCV hose 8. EVAP hose 9. EVAP canister purge control solenoid
valve
10. Bracket 11. Gasket
KBIA2461E
LBIA0395E
Revision: March 2010 2008 QX56
Page 1830 of 4083
INTAKE MANIFOLDEM-27
< ON-VEHICLE REPAIR >
C
DE
F
G H
I
J
K L
M A
EM
NP
O
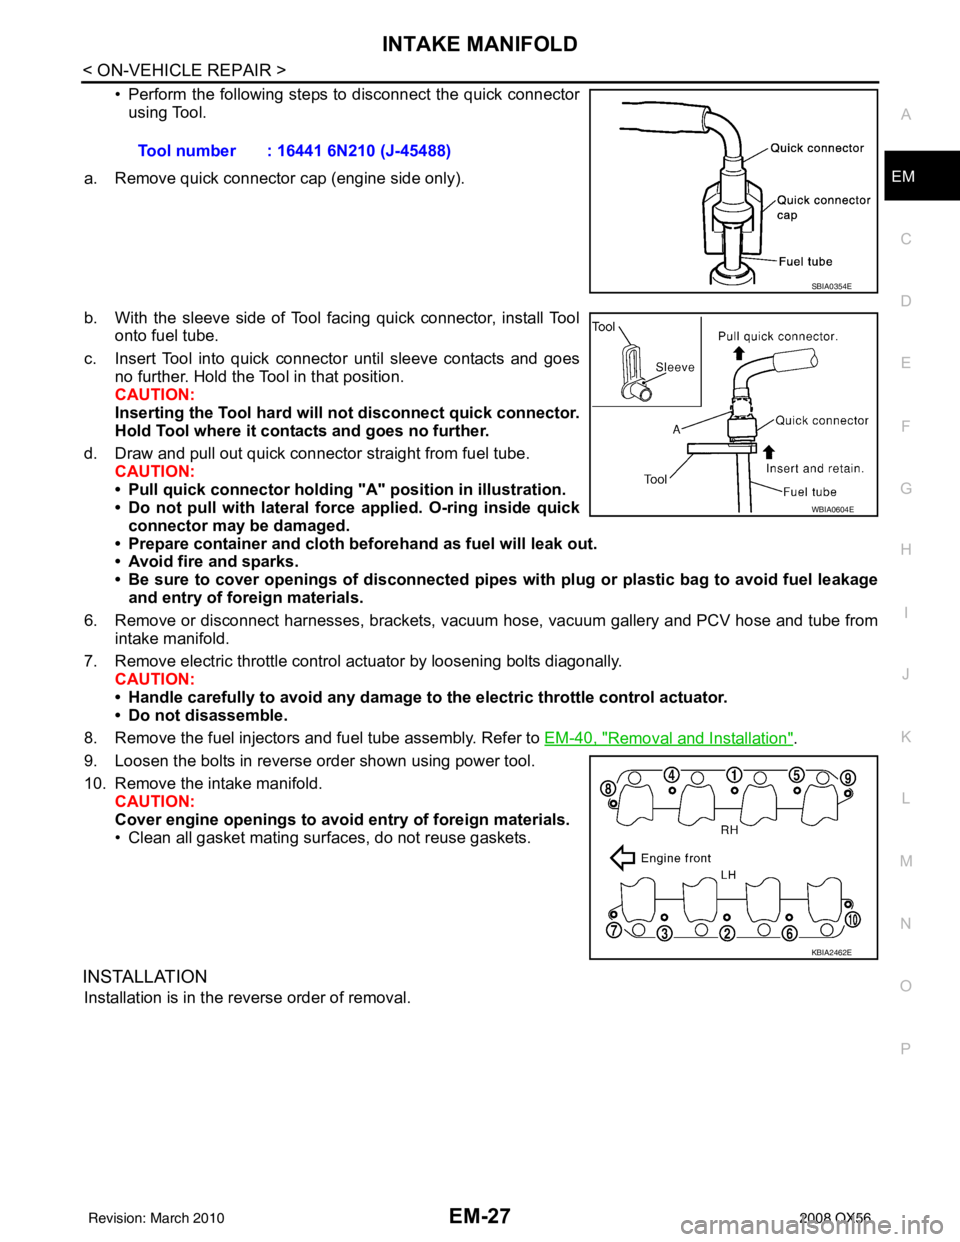
• Perform the following steps to disconnect the quick connector
using Tool.
a. Remove quick connector cap (engine side only).
b. With the sleeve side of Tool facing quick connector, install Tool onto fuel tube.
c. Insert Tool into quick connector until sleeve contacts and goes no further. Hold the Tool in that position.
CAUTION:
Inserting the Tool hard will not disconnect quick connector.
Hold Tool where it cont acts and goes no further.
d. Draw and pull out quick connector straight from fuel tube. CAUTION:
• Pull quick connector holding "A" position in illustration.
• Do not pull with lateral force applied. O-ring inside quickconnector may be damaged.
• Prepare container and cloth be forehand as fuel will leak out.
• Avoid fire and sparks.
• Be sure to cover openings of disconnected pipes with plug or plastic bag to avoid fuel leakage
and entry of foreign materials.
6. Remove or disconnect harnesses, brackets, vac uum hose, vacuum gallery and PCV hose and tube from
intake manifold.
7. Remove electric throttle control actuator by loosening bolts diagonally. CAUTION:
• Handle carefully to avoid any damage to the electric throttle control actuator.
• Do not disassemble.
8. Remove the fuel injectors and fuel tube assembly. Refer to EM-40, "
Removal and Installation".
9. Loosen the bolts in reverse order shown using power tool.
10. Remove the intake manifold. CAUTION:
Cover engine openings to avoid entry of foreign materials.
• Clean all gasket mating surfaces, do not reuse gaskets.
INSTALLATION
Installation is in the reverse order of removal. Tool number : 16441 6N210 (J-45488)
SBIA0354E
WBIA0604E
KBIA2462E
Revision: March 2010
2008 QX56