wheel INFINITI QX56 2009 Factory Service Manual
[x] Cancel search | Manufacturer: INFINITI, Model Year: 2009, Model line: QX56, Model: INFINITI QX56 2009Pages: 4171, PDF Size: 84.65 MB
Page 598 of 4171

BRM-2
< PRECAUTION >
PRECAUTIONS
PRECAUTION
PRECAUTIONS
Precaution for Supplemental Restraint System (SRS) "AIR BAG" and "SEAT BELT
PRE-TENSIONER"
INFOID:0000000005875003
The Supplemental Restraint System such as “A IR BAG” and “SEAT BELT PRE-TENSIONER”, used along
with a front seat belt, helps to reduce the risk or severity of injury to the driver and front passenger for certain
types of collision. This system includes seat belt switch inputs and dual stage front air bag modules. The SRS
system uses the seat belt switches to determine the front air bag deployment, and may only deploy one front
air bag, depending on the severity of a collision and w hether the front occupants are belted or unbelted.
Information necessary to service the system safely is included in the SR and SB section of this Service Man-
ual.
WARNING:
• To avoid rendering the SRS inopera tive, which could increase the risk of personal injury or death in
the event of a collision which would result in air bag inflation, all maintenance must be performed by
an authorized NISSAN/INFINITI dealer.
• Improper maintenance, including in correct removal and installation of the SRS, can lead to personal
injury caused by unintent ional activation of the system. For re moval of Spiral Cable and Air Bag
Module, see the SR section.
• Do not use electrical test equipmen t on any circuit related to the SRS unless instructed to in this
Service Manual. SRS wiring harn esses can be identified by yellow and/or orange harnesses or har-
ness connectors.
PRECAUTIONS WHEN USING POWER TOOLS (AIR OR ELECTRIC) AND HAMMERS
WARNING:
• When working near the Airbag Diagnosis Sensor Unit or other Airbag System sensors with the Igni-
tion ON or engine running, DO NOT use air or electri c power tools or strike near the sensor(s) with a
hammer. Heavy vibration could activate the sensor( s) and deploy the air bag(s), possibly causing
serious injury.
• When using air or electric power tools or hammers , always switch the Ignition OFF, disconnect the
battery, and wait at least 3 minu tes before performing any service.
Precaution Necessary for Steering W heel Rotation After Battery Disconnect
INFOID:0000000005875004
NOTE:
• This Procedure is applied only to models with Intelligent Key system and NATS (NISSAN ANTI-THEFT SYS-
TEM).
• Remove and install all control units after disconnecting both battery cables with the ignition knob in the
″LOCK ″ position.
• Always use CONSULT-III to perform self-diagnosis as a part of each function inspection after finishing work.
If DTC is detected, perform trouble diagnosis according to self-diagnostic results.
For models equipped with the Intelligent Key system and NATS, an electrically controlled steering lock mech-
anism is adopted on the key cylinder.
For this reason, if the battery is disconnected or if the battery is discharged, the steering wheel will lock and
steering wheel rotation will become impossible.
If steering wheel rotation is required when battery pow er is interrupted, follow the procedure below before
starting the repair operation.
OPERATION PROCEDURE
1. Connect both battery cables. NOTE:
Supply power using jumper cables if battery is discharged.
2. Use the Intelligent Key or mechanical key to turn the ignition switch to the ″ACC ″ position. At this time, the
steering lock will be released.
3. Disconnect both battery cables. The steering lock will remain released and the steering wheel can be rotated.
4. Perform the necessary repair operation.
Revision: December 20092009 QX56
Page 607 of 4171

BODY REPAIRBRM-11
< SERVICE INFORMATION >
C
DE
F
G H
I
J
L
M A
B
BRM
N
O P
5. Front pillar hinge brace (RH, LH)
6. Center pillar hinge brace
7. Outer front pillar reinforcement (RH, LH)
8. Center inner pillar (RH, LH)
9. Front inner pillar upper (RH, LH)
10. Inner roof side rail (RH, LH)
11. Roof with sunroof opening
12. Roof
13. Front roof rail
14. Sunroof reinforcement
15. Roof 1st bow
16. Roof 2nd bow
17. Roof 3rd bow
18. Roof 4th bow
19. Rear roof rail
20. Main back pillar (RH, LH)
21. Back pillar reinforcement (RH, LH)
22. Rear inner side panel (RH, LH)
23. Rear wheel housing (RH, LH)
24. Rear body side outer (RH, LH)
25. Front body side outer (RH, LH)
26. Front door assembly (RH, LH)
27. Rear door assembly (RH, LH)
28. Lift gate assembly
Revision: December 20092009 QX56
Page 611 of 4171

BODY REPAIRBRM-15
< SERVICE INFORMATION >
C
DE
F
G H
I
J
L
M A
B
BRM
N
O P
the new parts. Select an excellent anti-corrosive wax which will penetrate after application and has a long shelf
life.
UNDERCOATING
The underside of the floor and wheelhouse are undercoated to prevent rust, vibration, noise and stone chip-
ping. Therefore, when such a panel is replaced or re paired, apply undercoating to that part. Use an undercoat-
ing which is rust preventive, soundproof, vibr ation-proof, shock-resistant, adhesive, and durable.
Precautions in undercoating
1. Do not apply undercoating to any place unless specif ied (such as the areas above the muffler and three
way catalyst which are subjected to heat).
2. Do not undercoat the exhaust pipe or other parts which become hot.
3. Do not undercoat rotating parts.
LIIA0905E
Revision: December 20092009 QX56
Page 634 of 4171

BRM-38
< SERVICE INFORMATION >
BODY REPAIR
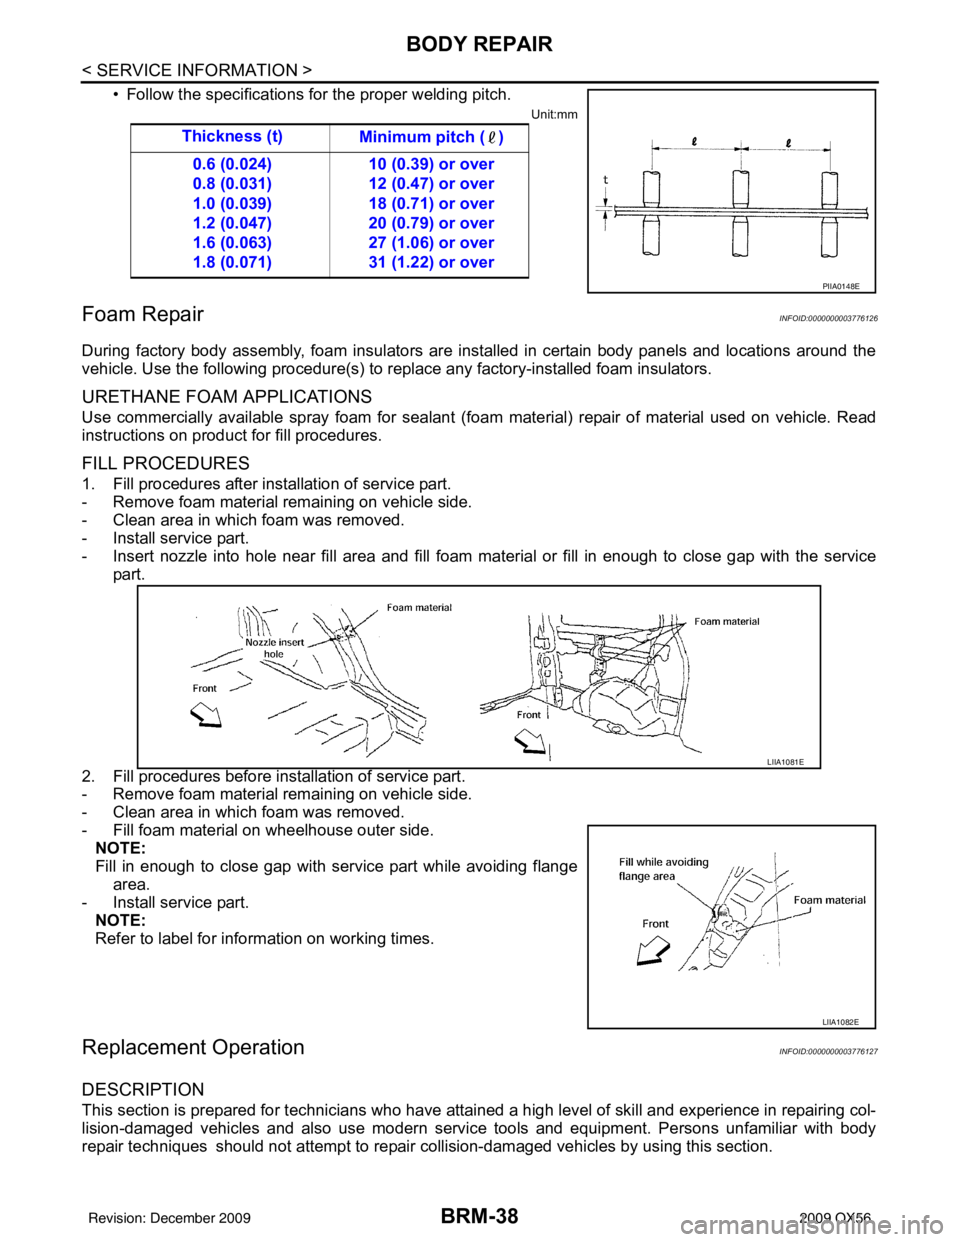
• Follow the specifications for the proper welding pitch.
Unit:mm
Foam RepairINFOID:0000000003776126
During factory body assembly, foam insulators are installed in certain body panels and locations around the
vehicle. Use the following procedure(s) to replace any factory-installed foam insulators.
URETHANE FOAM APPLICATIONS
Use commercially available spray foam for sealant (foam material) repair of material used on vehicle. Read
instructions on product for fill procedures.
FILL PROCEDURES
1. Fill procedures after installation of service part.
- Remove foam material remaining on vehicle side.
- Clean area in which foam was removed.
- Install service part.
- Insert nozzle into hole near fill area and fill foam material or fill in enough to close gap with the service part.
2. Fill procedures before installation of service part.
- Remove foam material remaining on vehicle side.
- Clean area in which foam was removed.
- Fill foam material on wheelhouse outer side. NOTE:
Fill in enough to close gap with service part while avoiding flange
area.
- Install service part.
NOTE:
Refer to label for information on working times.
Replacement OperationINFOID:0000000003776127
DESCRIPTION
This section is prepared for technicians who have attained a high level of skill and experience in repairing col-
lision-damaged vehicles and also use modern servic e tools and equipment. Persons unfamiliar with body
repair techniques should not attempt to repair collision-damaged vehicles by using this section. Thickness (t)
Minimum pitch ( )
0.6 (0.024)
0.8 (0.031)
1.0 (0.039)
1.2 (0.047)
1.6 (0.063)
1.8 (0.071) 10 (0.39) or over
12 (0.47) or over
18 (0.71) or over
20 (0.79) or over
27 (1.06) or over
31 (1.22) or over
PIIA0148E
LIIA1081E
LIIA1082E
Revision: December 20092009 QX56
Page 665 of 4171

CCS-14
< FUNCTION DIAGNOSIS >
INTELLIGENT CRUISE CONTROL SYSTEM
ICC STEERING SWITCH
ICC system is operated by MAIN switch and four control switches, all mounted on the steering wheel.
NOTE:
The on board self-diagnosis function of the ICC system can be started with the RESUME/ACCELERATE
switch and SET/COAST switch. Refer to CCS-17, "
Diagnosis Description".
In Vehicle-To-Vehicle Distance Control Mode
In Conventional (Fixed Speed) Cruise Control Mode
ICC SYSTEM DISPLAY
For information about the ICC system display, refer to the Owner Manual.
1. ACCELERATE/RESUME switch 2. COAST/SET switch 3. CANCEL switch
4. ON/OFF switch 5. DISTANCE switch
ALOIA0013ZZ
No.Switch name Description
1 ACCEL/RES switch Resumes set speed or increases speed incrementally.
2 SET/COAST switch Sets desired cruise speed or reduces speed incrementally.
3 CANCEL switch Deactivates system without erasing set speed.
4 ON/OFF switch Master switch to activate the system.
5 DISTANCE switch Changes the following distance from: Long, Middle, Short.
No.Switch name Description
1 ACCEL/RES switch Resumes set speed or increases speed incrementally.
2 SET/COAST switch Sets desired cruise speed or reduces speed incrementally.
3 CANCEL switch Deactivates system without erasing set speed.
4 ON/OFF switch Master switch to activate the system.
5 DISTANCE switch Ineffective in this mode.
Revision: December 20092009 QX56
Page 669 of 4171

CCS-18
< FUNCTION DIAGNOSIS >
DIAGNOSIS SYSTEM (ICC SENSOR INTEGRATED UNIT)
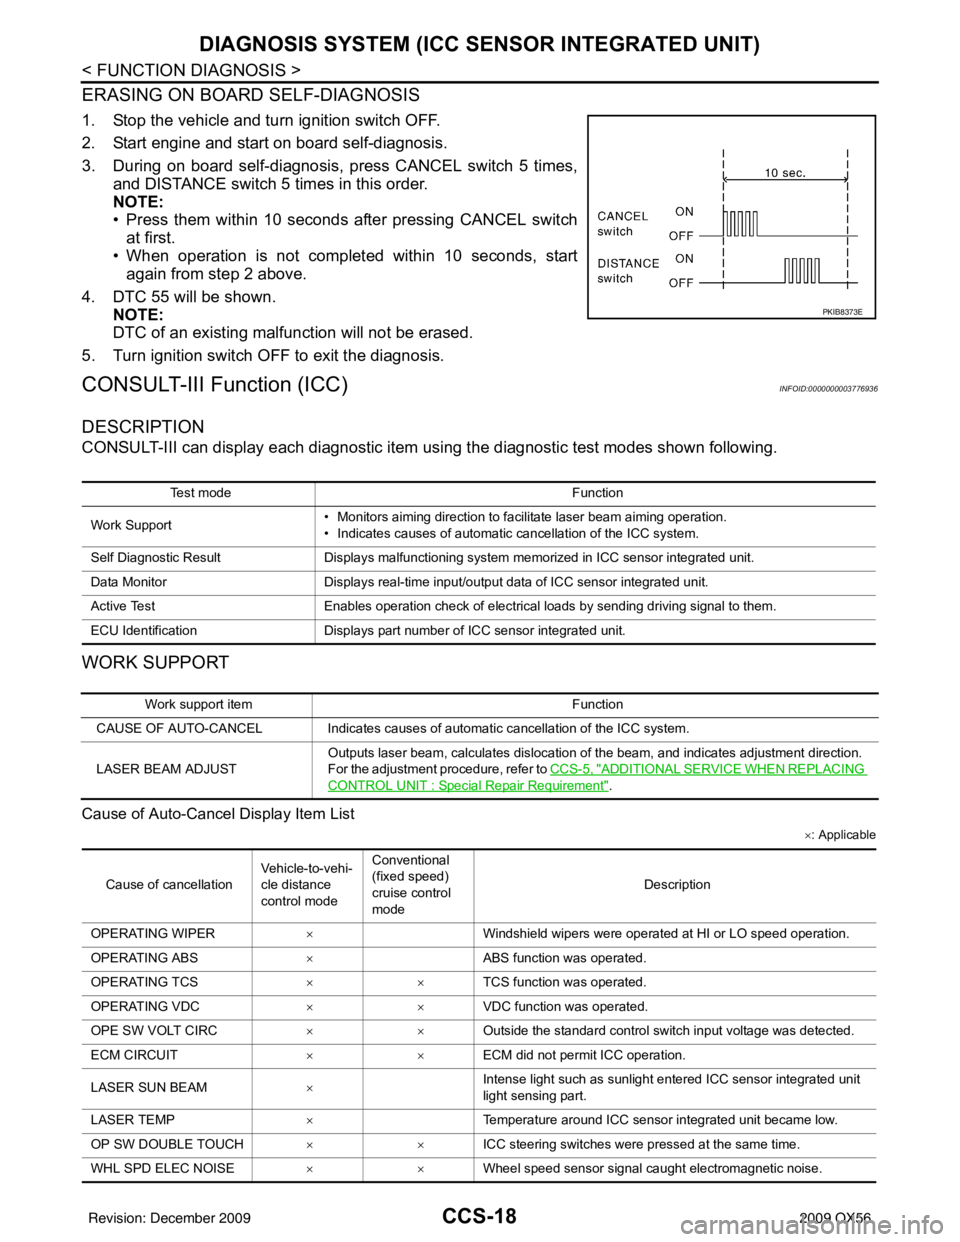
ERASING ON BOARD SELF-DIAGNOSIS
1. Stop the vehicle and turn ignition switch OFF.
2. Start engine and start on board self-diagnosis.
3. During on board self-diagnosis, press CANCEL switch 5 times,
and DISTANCE switch 5 times in this order.
NOTE:
• Press them within 10 seconds after pressing CANCEL switch
at first.
• When operation is not completed within 10 seconds, start again from step 2 above.
4. DTC 55 will be shown. NOTE:
DTC of an existing malfunction will not be erased.
5. Turn ignition switch OFF to exit the diagnosis.
CONSULT-III Function (ICC)INFOID:0000000003776936
DESCRIPTION
CONSULT-III can display each diagnostic item us ing the diagnostic test modes shown following.
WORK SUPPORT
Cause of Auto-Cancel Display Item List
×: Applicable
PKIB8373E
Test mode Function
Work Support • Monitors aiming direction to facilitate laser beam aiming operation.
• Indicates causes of automatic cancellation of the ICC system.
Self Diagnostic Result Displays malfunctioning system memorized in ICC sensor integrated unit.
Data Monitor Displays real-time input/output data of ICC sensor integrated unit.
Active Test Enables operation check of electrical loads by sending driving signal to them.
ECU Identification Displays part number of ICC sensor integrated unit.
Work support item Function
CAUSE OF AUTO-CANCEL Indicates causes of automatic cancellation of the ICC system.
LASER BEAM ADJUST Outputs laser beam, calculates dislocation of the beam, and indicates adjustment direction.
For the adjustment procedure, refer to
CCS-5, "
ADDITIONAL SERVICE WHEN REPLACING
CONTROL UNIT : Special Repair Requirement".
Cause of cancellationVehicle-to-vehi-
cle distance
control modeConventional
(fixed speed)
cruise control
mode
Description
OPERATING WIPER ×Windshield wipers were operated at HI or LO speed operation.
OPERATING ABS ×ABS function was operated.
OPERATING TCS ××TCS function was operated.
OPERATING VDC ××VDC function was operated.
OPE SW VOLT CIRC ××Outside the standard control switch input voltage was detected.
ECM CIRCUIT ××ECM did not permit ICC operation.
LASER SUN BEAM ×Intense light such as sunlight entered ICC sensor integrated unit
light sensing part.
LASER TEMP ×Temperature around ICC sensor integrated unit became low.
OP SW DOUBLE TOUCH ××ICC steering switches were pressed at the same time.
WHL SPD ELEC NOISE ××Wheel speed sensor signal caught electromagnetic noise.
Revision: December 20092009 QX56
Page 670 of 4171

CCS
DIAGNOSIS SYSTEM (ICC SENSOR INTEGRATED UNIT)
CCS-19
< FUNCTION DIAGNOSIS >
C
D E
F
G H
I
J
K L
M B
N P A
• Last five cancel (system cancel) causes are displayed.
• “CAUSE OF AUTO-CANCEL” displays times of ignition switch ON/OFF up to 254 maximum. 254 is kept though the number exceeds 254. The num ber returns to 0 when detecting the same cancellation causes.
SELF DIAGNOSTIC RESULT
For details, refer to CCS-55, "Diagnostic Trouble Code (DTC) Chart".
NOTE:
“DTC RESULTS” and “TIME” are indicated on “Self Diagnostic Result”. “TIME” is used as a reference data of
diagnosis. It shows when malfunction is detected.
“TIME” shows the following.
• 0: malfunction is detected at present (from malfunction detection to ignition switch OFF).
CAN communication ([U1000], [U1010])
• 1 ~ 39: Displays when it is normal at present and finds malfunction in the past. It increases like
0→ 1→ 2...38→ 39 after returning to the normal condition whenever IGN OFF→ ON. If it is over 39, it is fixed to
39 until the self-diagnostic results are erased. It retu rns to 0 when malfunction is detected again in the pro-
cess.
Other than CAN communication (other than [U1000], [U1010])
• 1 ~ 49: Displays when it is normal at present and finds malfunction in the past. It increases like 0→ 1→ 2...48→ 49 after returning to the normal condition whenever IGN OFF→ ON. If it is over 49, it is fixed to
49 until the self-diagnostic results are erased. It retu rns to 0 when malfunction is detected again in the pro-
cess.
DATA MONITOR
× : Applicable
VDC/TCS OFF SW ×VDC OFF switch was pressed.
WHEEL SPD UNMATCH ××Wheel speed became different from A/T vehicle speed.
TIRE SLIP ××Wheel slipped.
IGN LOW VOLT ××Power supply voltage became low.
NO RECORD ××—
Monitored Item [unit]MAIN
SIGNALS SELECTION
FROM
MENU Description
VHCL SPEED SE
[km/h] or [mph] ××Indicates vehicle speed calculated from ICC sensor integrated unit through
CAN communication [ABS actuator and electric unit (control unit) transmits
vehicle speed signal (wheel speed) through CAN communication].
SET VHCL SPD
[km/h] or [mph] ××
Indicates set vehicle speed memorized in ICC sensor integrated unit.
THRTL OPENING
[%] ××Indicates throttle position read from ICC sensor integrated unit through CAN
communication (ECM transmits accelerator pedal position signal through
CAN communication).
THRTL SENSOR
[deg] ××NOTE:
This item is displayed, but cannot monitor.
SET DISTANCE
[SHOR/MID/LONG] ××
Indicates set distance memorized in ICC sensor integrated unit.
MAIN SW
[On/Off] ××
Indicates [On/Off] status as judged from ICC steering switch signal (ECM
transmits ICC steering switch signal through CAN communication).
SET/COAST SW
[On/Off] ××Indicates [On/Off] status as judged from ICC steering switch signal (ECM
transmits ICC steering switch signal through CAN communication).
CANCEL SW
[On/Off] ××Indicates [On/Off] status as judged from ICC steering switch signal (ECM
transmits ICC steering switch signal through CAN communication).
RESUME/ACC SW
[On/Off] ××
Indicates [On/Off] status as judged from ICC steering switch signal (ECM
transmits ICC steering switch signal through CAN communication).
DISTANCE SW
[On/Off] ×Indicates [On/Off] status as judged from ICC steering switch signal (ECM
transmits ICC steering switch signal through CAN communication).
CRUISE OPE
[On/Off] ××
Indicates whether controlling or not (ON means “controlling”).
Revision: December 20092009 QX56
Page 706 of 4171

CCS
ICC UNITCCS-55
< ECU DIAGNOSIS >
C
DE
F
G H
I
J
K L
M B
N P A
Diagnostic Trouble Code (DTC) ChartINFOID:0000000003776959
× :Applicable
DTC
No. CONSULT-III screen terms ICC sys-
tem
warning lamp Fail-safe
Malfunctions detected where... Refer-
ence
page
Veh ic le-
to-vehi-cle dis-
tance
control mode Conven-
tional
(fixed
speed) cruise
control mode Brake as-
sist (with
preview
function)
11 CONTROL UNIT ×××× • ICC unit internal malfunctionCCS-22
12 VDC CONTROL UNIT ×××× • VDC malfunction
• Brake booster signal harness is
open or shorted CCS-23
20 CAN COMM CIRCUIT
×××× • ICC unit detected CAN communi-
cation malfunction CCS-24
31 POWER SUPPLY CIR1
×××× • ICC unit power supply voltage is
excessively low (less than 8V) CCS-25
34 POWER SUPPLY CIR2
×××× • ICC unit power supply voltage is
excessively high. CCS-25
41 VHCL SPEED SE CIRC
×××× • Wheel sensor malfunction
• ABS actuator and electric unit
(control unit) malfunction
• A/T vehicle speed sensor mal-
function
•TCM malfunction CCS-26
43 VDC/TCS/ABS CIRC
×××× • VDC/TCS/ABS system malfunc-
tion CCS-27
45 BRAKE SW/ STOP L SW
×××× • ICC brake switch or stop lamp
switch harness is open or shorted
• ICC brake switch or stop lamp switch is stuck to OFF
• ICC brake switch or stop lamp switch is stuck to ON CCS-28
46 OPERATION SW CIRC
××× • ICC steering switch harness or
spiral cable is open or shorted
• ICC steering switch malfunction CCS-30
74 LASER BEAM OFF CNTR
××ו Laser beam of ICC sensor is off
the aiming point CCS-31
90 STOP LAMP RLY FIX
××ו Normally open terminal of stop
lamp relay is stuck CCS-32
92 ECM CIRCUIT
×××× •ECM malfunction
• Accelerator pedal position sensor
malfunction
• ICC unit malfunction CCS-37
96 NP RANGE
××× • Transmission range switch har-
ness is open or shorted
• Transmission range switch mal- function
•TCM malfunction CCS-38
97 AT CIRCUIT
××× •TCM malfunctionCCS-39
98 GEAR POSITION ××× •TCM malfunction
• Input speed sensor malfunction
• A/T vehicle speed sensor mal-
function CCS-40
102 LASER STAIN
×× × • ICC sensor body window has
contamination CCS-41
Revision: December 20092009 QX56
Page 717 of 4171

CCS-66
< SYMPTOM DIAGNOSIS >
NORMAL OPERATING CONDITION
NORMAL OPERATING CONDITION
DescriptionINFOID:0000000003776969
PRECAUTIONS FOR VEHICLE-TO-VEHICLE DISTANCE CONTROL MODE
• Intelligent Cruise Control is functionally limited. This never support careless driving and low visibility (rain,fog, etc.). Drive the vehicle safely. Keep a safe di stance between vehicles by decreasing the vehicle speed
according to the driving condition etc.
• Intelligent Cruise Control never stop the vehicle autom atically. Intelligent Cruise Control is automatically
released, and the buzzer sounds if any vehicle ahead is not detected when the vehicle speed is approxi-
mately 35 km (21.5 MPH) or less.
• Use this system when the vehicle speed does not extr emely change. This system may not properly function
when any vehicle cuts in, or when the vehicle ahead s uddenly applies the brake. Then, the warning (buzzer
and indication) activates.
• Never use Intelligent Cruise Control in the following conditions.
- A well-trafficed road, and a tight turn. It may cause any accident because the dr iving does not fit to the road condition.
- A slippery road (e.g., freezing, or snowy road) The vehicle may lose the control by wheelspin.
- The vehicle drives in bad whet her (rain, fog, snow etc.).
The distance from the vehicle ahead is not detected pr ecisely if the whether condition is bad. Intelligent
Cruise Control is released automatically if the wiper activates in low or high speed.
- The vehicle receives bright light (sunshine etc.). The distance from the vehicle ahead is not detected pr ecisely if bright light enters in the vehicle.
- Raindrop or snow is on the sensor.
The distance from the vehicle ahead is not detected prec isely if raindrop or snow attaches on the sensor.
- A steep downhill The setting vehicle speed may exceed if Intelligent Cruise Control does not detect the vehicle ahead. The
brake may heat up in the vehicle- to-vehicle distance control mode.
- A repeated uphill and downhill Intelligent Cruise Control may not detect the vehicl e ahead precisely. An accident may occur by tailgating.
- Maintaining proper vehicle distance is difficult due to frequent acceleration/deceleration. It may cause any accident because the driving does not fit to the road condition if keeping a proper vehicle-
to-vehicle distance is difficult.
- When entering in the highway interchange (swerving off the main line),
Unexpected accident may cause if the vehicle ahead drives slower
than the preset vehicle speed. T he vehicle-to-vehicle distance con-
trol mode accelerates automatically because the vehicle ahead is
not detected on the lane if the own vehicle or the vehicle ahead
changes the lane.
• Intelligent Cruise Control does not activate to the parking vehicles, and vehicles driving extremely slow er than the own vehicle. Never
hit the vehicle stopping at a tollgate, or the tail end of traffic jam.
• Intelligent Cruise Control does not activate to the vehicle edging way, and non-vehicle objects (passengers etc.).
• This function detects the reflector of the vehicle ahead. Intelligent Cruise Control may not detect the vehicle
ahead, and keep a proper vehicle-to-vehicle distance in t he following conditions. Drive the vehicle according
to the driving condition.
- The vehicle ahead installs the reflector higher (trailer etc.).
- The rear of the vehicle ahead is extremely dirt.
- The vehicle ahead or vehicle on other lanes splashes water or snow on the road.
- The vehicle ahead provides dark exhaust gas. Smoke blocks the visibility.
- The vehicle ahead attaches film on the reflector. The v ehicle ahead does not install the reflector. The reflec-
tor is broken.
- Extremely heavy load is on the rear seat or in the cargo area.
- The vehicle drives on a repeated uphill and downhill
EL-2980D
Revision: December 20092009 QX56
Page 718 of 4171

CCS
NORMAL OPERATING CONDITIONCCS-67
< SYMPTOM DIAGNOSIS >
C
DE
F
G H
I
J
K L
M B
N P A
• The sensor detection distance is limited if the vehicle-to-vehicle distance is close. The vehicle distance may not maintain properly
because the motorcycle (A) driving on the lane edge is not
detected or detecting the vehicle ahead (cutting in the own vehicle)
delays.
• The sensor dirt is detected automat ically. But it is not perfect. Dirt
is not judged despite the sensor is dirt. Dirt is not detected if snow
or ice is on the sensor.
Keeping the vehicle-to-vehicle distance is difficult. Drive the vehi-
cle safely. Always clean the sensor.
Intelligent Cruise Control is released automatically if dirt is
detected.
• The vehicle ahead may not be detected temporarily, the vehicle or object on the neighboring lane may be
detected or the warning buzzer may sound according to the road shape (curve and narrow road) and the
own vehicle condition (steering, driving lane position, accident , malfunction etc.).
The vehicle ahead is not detected temporarily. The vehicle approaches too close.
PRECAUTIONS FOR CONVENTIONAL (F IXED SPEED) CRUISE CONTROL MODE
• Conventional cruise control mode does neither control the brake nor activate the warning.
Drive the vehicle safely. Keep a safe distance between vehicles by decreasing the vehicle speed according
to the driving condition etc.
• Never use the conventional cruise control mode in the following conditions.
- A well-trafficed road, and a tight turn. It may cause any accident because the driving does not fit to the road condition.
- A slippery road (e.g., freezing, or snowy road) The vehicle may lose the control by wheelspin.
- A steep downhill The engine brake does not activate effectively on a steep downhill. The preset vehicle speed may exceed.
JSOIA0050ZZ
Revision: December 20092009 QX56