air condition INFINITI QX56 2009 Factory Service Manual
[x] Cancel search | Manufacturer: INFINITI, Model Year: 2009, Model line: QX56, Model: INFINITI QX56 2009Pages: 4171, PDF Size: 84.65 MB
Page 2262 of 4171

GW-20
< ON-VEHICLE REPAIR >
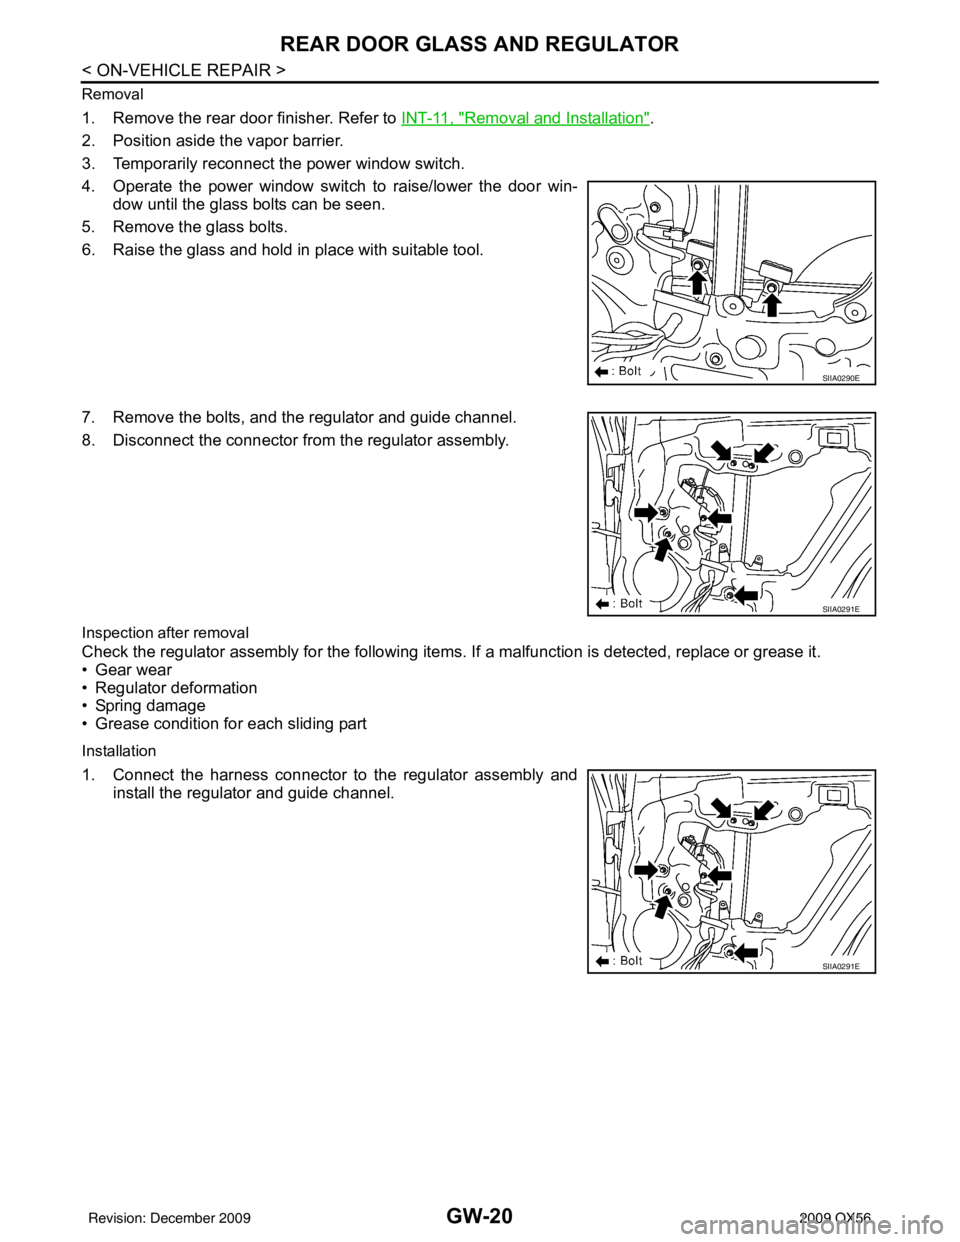
REAR DOOR GLASS AND REGULATOR
Removal
1. Remove the rear door finisher. Refer to INT-11, "Removal and Installation".
2. Position aside the vapor barrier.
3. Temporarily reconnect the power window switch.
4. Operate the power window switch to raise/lower the door win- dow until the glass bolts can be seen.
5. Remove the glass bolts.
6. Raise the glass and hold in place with suitable tool.
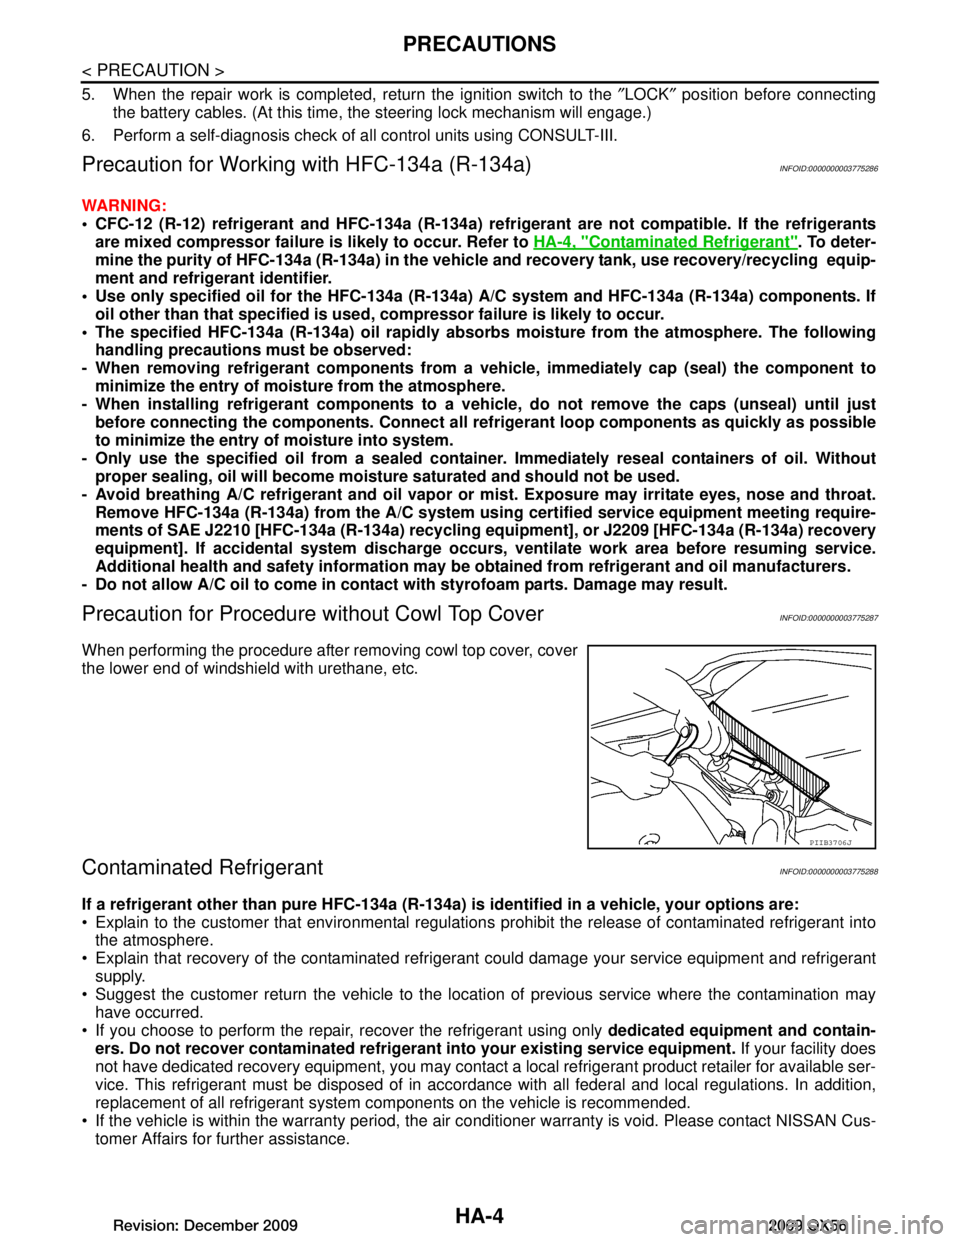
7. Remove the bolts, and the regulator and guide channel.
8. Disconnect the connector from the regulator assembly.
Inspection after removal
Check the regulator assembly for the following items. If a malfunction is detected, replace or grease it.
• Gear wear
• Regulator deformation
• Spring damage
• Grease condition for each sliding part
Installation
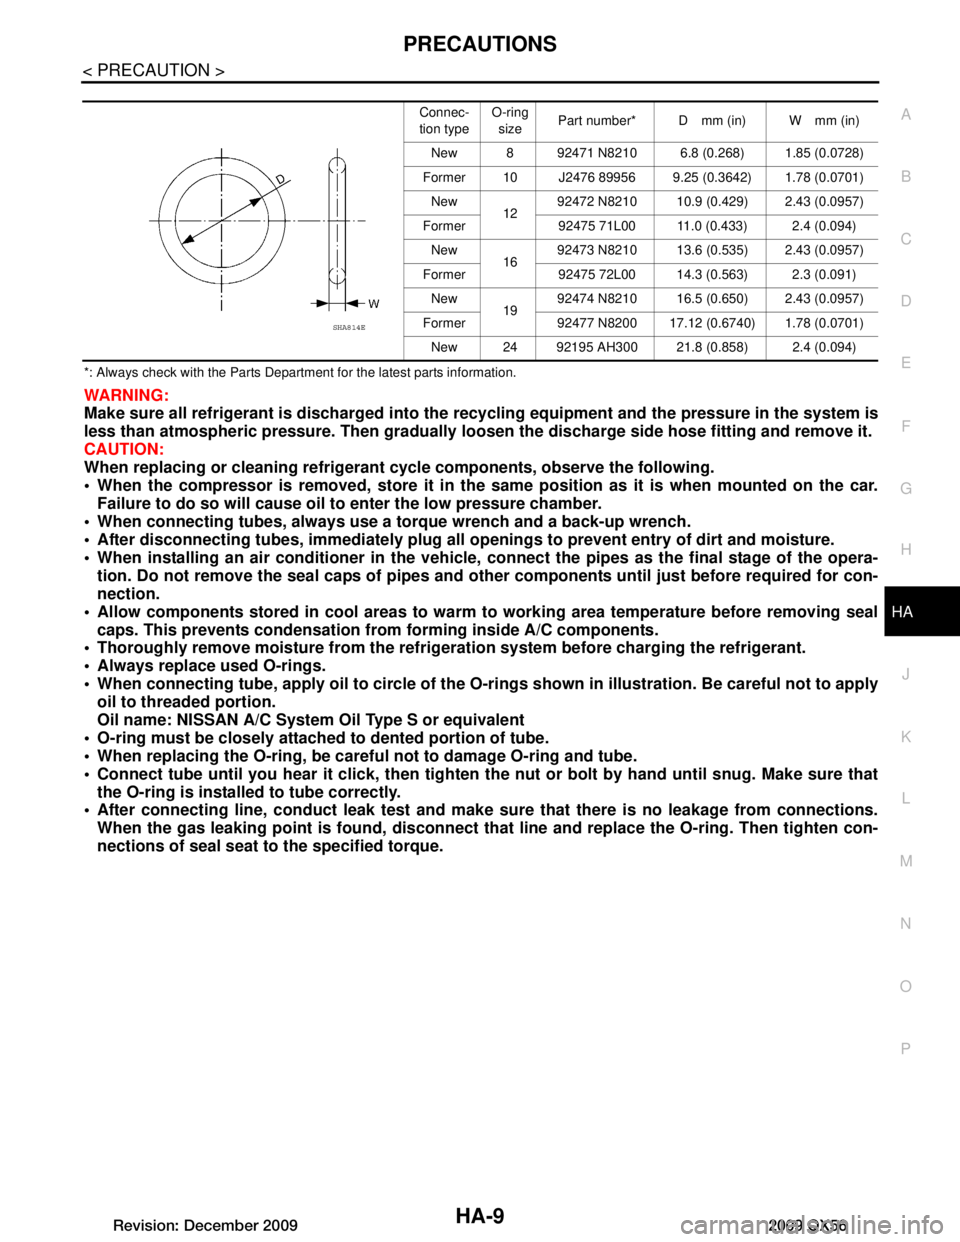
1. Connect the harness connector to the regulator assembly and install the regulator and guide channel.
SIIA0290E
SIIA0291E
SIIA0291E
Revision: December 20092009 QX56
Page 2265 of 4171

HA-1
VENTILATION, HEATER & AIR CONDITIONER
C
DE
F
G H
J
K L
M
SECTION HA
A
B
HA
N
O P
CONTENTS
HEATER & AIR CONDITIONING SYSTEM
PRECAUTION ................ ...............................3
PRECAUTIONS .............................................. .....3
Precaution for Supplemental Restraint System
(SRS) "AIR BAG" and "SEAT BELT PRE-TEN-
SIONER" ............................................................. ......
3
Precaution Necessary for Steering Wheel Rota-
tion After Battery Disconnect .....................................
3
Precaution for Working with HFC-134a (R-134a) ......4
Precaution for Procedure without Cowl Top Cover ......4
Contaminated Refrigerant .........................................4
General Refrigerant Precaution ................................5
Precaution for Leak Detection Dye ...........................5
A/C Identification Label .............................................5
Precaution for Refrigerant Connection ......................5
Precaution for Service of Compressor ....................10
Precaution for Service Equipment ...........................10
PREPARATION ...........................................13
PREPARATION .............................................. ....13
Special Service Tool ........................................... ....13
HFC-134a (R-134a) Service Tool and Equipment ....13
Commercial Service Tool ........................................16
FUNCTION DIAGNOSIS ..............................17
REFRIGERATION SYSTEM .......................... ....17
Refrigerant Cycle ................................................ ....17
Refrigerant System Protection ................................17
OIL ......................................................................19
Maintenance of Oil in Compressor ...................... ....19
ON-VEHICLE MAINTENANCE ....................20
REFRIGERATION SYSTEM .......................... ....20
HFC-134a (R-134a) Service Procedure .............. ....20
OIL ......................................................................22
Maintenance of Oil Quantity in Compressor ....... ....22
FLUORESCENT LEAK DETECTOR ................24
Checking of Refrigerant Leaks ............................ ....24
Checking System for Leaks Using the Fluorescent
Dye Leak Detector ...................................................
24
Dye Injection ............................................................24
ELECTRICAL LEAK DETECTOR ....................26
Checking of Refrigerant Leaks ................................26
Electronic Refrigerant Leak Detector .......................26
ON-VEHICLE REPAIR .................................29
REFRIGERATION SYSTEM .............................29
Component .......................................................... ....29
COMPRESSOR .................................................31
Removal and Installation for Compressor ...............31
Removal and Installation for Compressor Clutch ....32
LOW-PRESSURE FLEXIBLE HOSE ................36
Removal and Installation for Low-Pressure Flexi-
ble Hose ..................................................................
36
LOW-PRESSURE PIPE ....................................37
Removal and Installation for Low-Pressure Pipe .....37
Removal and Installation for Rear High- and Low-
Pressure A/C and Heater Core Pipes ......................
37
Removal and Installation for Underfloor Rear
High- and Low-Pressure A/C and Heater Core
Pipes ........................................................................
38
HIGH-PRESSURE FLEXIBLE HOSE ...............40
Removal and Installation for High-Pressure Flexi-
ble Hose ..................................................................
40
HIGH-PRESSURE PIPE ....................................41
Removal and Installation for High-Pressure Pipe ....41
Removal and Installation for Rear High- and Low-
Pressure A/C and Heater Core Pipes ......................
41
Removal and Installation for Underfloor Rear
High- and Low-Pressure A/C and Heater Core
Pipes ........................................................................
42
Revision: December 20092009 QX56
Page 2268 of 4171

HA-4
< PRECAUTION >
PRECAUTIONS
5. When the repair work is completed, return the ignition switch to the ″LOCK ″ position before connecting
the battery cables. (At this time, the steering lock mechanism will engage.)
6. Perform a self-diagnosis check of a ll control units using CONSULT-III.
Precaution for Working with HFC-134a (R-134a)INFOID:0000000003775286
WARNING:
CFC-12 (R-12) refrigerant and HFC-134a (R-134a) refr igerant are not compatible. If the refrigerants
are mixed compressor failure is likely to occur. Refer to HA-4, "Contaminated Refrigerant"
. To deter-
mine the purity of HFC-134a (R-134a) in the vehicle and recovery tank, use recovery/recycling equip-
ment and refrigerant identifier.
Use only specified oil for the HFC-134a (R-134a) A/C system and HFC-134a (R-134a) components. If
oil other than that specified is used , compressor failure is likely to occur.
The specified HFC-134a (R-134a) oi l rapidly absorbs moisture from the atmosphere. The following
handling precautions must be observed:
- When removing refrigerant components from a vehicle, immediately cap (seal) the component to
minimize the entry of moisture from the atmosphere.
- When installing refrigerant co mponents to a vehicle, do not remove the caps (unseal) until just
before connecting the components . Connect all refrigerant loop components as quickly as possible
to minimize the entry of moisture into system.
- Only use the specified oil from a sealed container. Immediately reseal containers of oil. Without
proper sealing, oil will become moisture saturat ed and should not be used.
- Avoid breathing A/C refrigerant and oil vapor or mist. Exposure may irritate eyes, nose and throat.
Remove HFC-134a (R-134a) from the A/C system usin g certified service equipment meeting require-
ments of SAE J2210 [HFC-134a (R-134a) recycling equipment], or J2209 [HFC-134a (R-134a) recovery
equipment]. If accidental system discharge occurs , ventilate work area before resuming service.
Additional health and safety in formation may be obtained from refrigerant and oil manufacturers.
- Do not allow A/C oil to come in contact with styrofoam parts. Damage may result.
Precaution for Procedure without Cowl Top CoverINFOID:0000000003775287
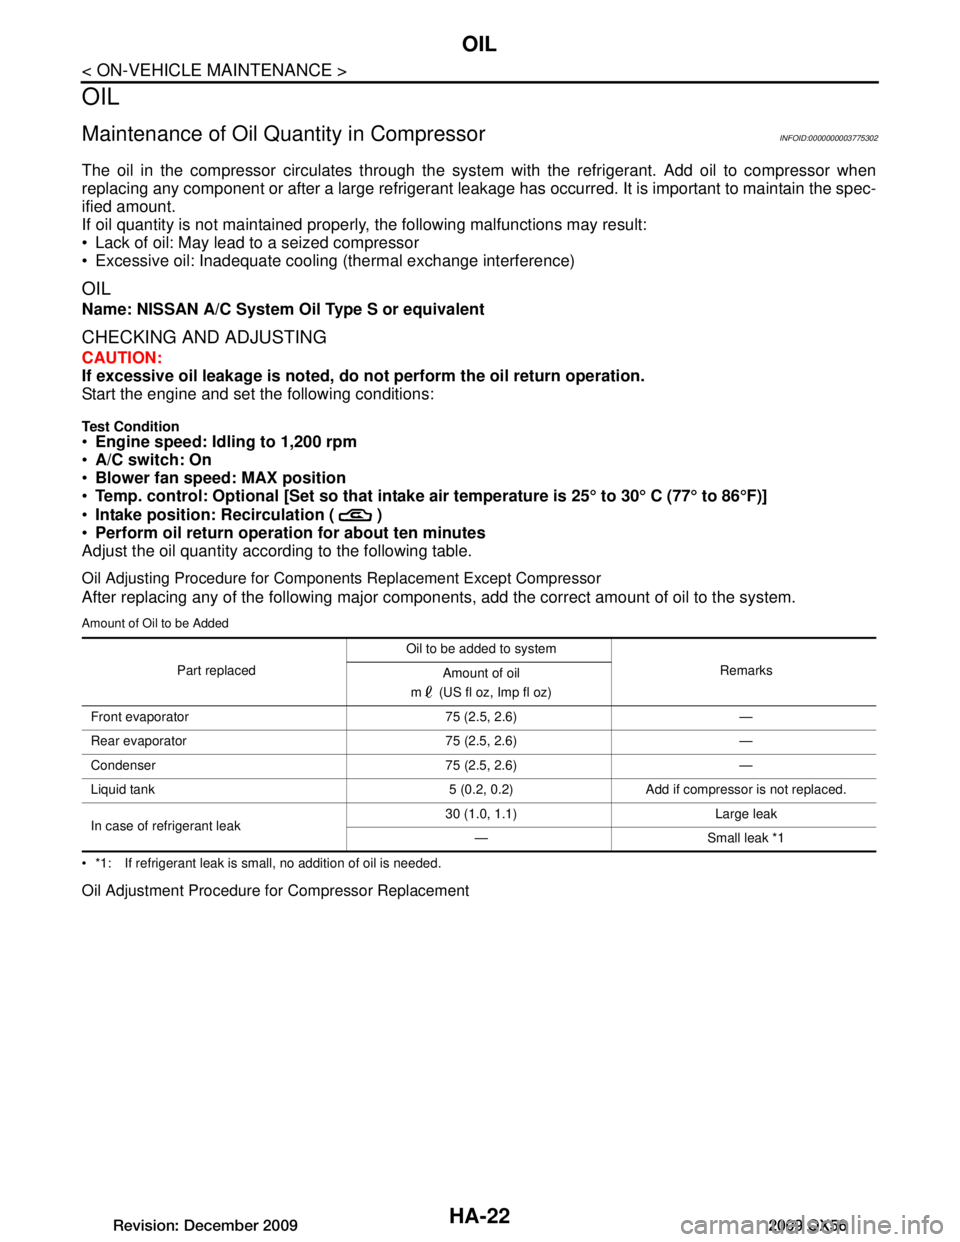
When performing the procedure after removing cowl top cover, cover
the lower end of windshield with urethane, etc.
Contaminated RefrigerantINFOID:0000000003775288
If a refrigerant other than pure HFC-134a (R-134a) is identified in a vehicle, your options are:
Explain to the customer that environmental regulations prohibit the release of contaminated refrigerant into
the atmosphere.
Explain that recovery of the contaminated refri gerant could damage your service equipment and refrigerant
supply.
Suggest the customer return the vehicle to the locati on of previous service where the contamination may
have occurred.
If you choose to perform the repair, recover the refrigerant using only dedicated equipment and contain-
ers. Do not recover contamin ated refrigerant into your existing service equipment. If your facility does
not have dedicated recovery equipment, you may contact a local refrigerant product retailer for available ser-
vice. This refrigerant must be disposed of in acco rdance with all federal and local regulations. In addition,
replacement of all refrigerant system components on the vehicle is recommended.
If the vehicle is within the warranty period, the air conditioner warranty is void. Please contact NISSAN Cus-
tomer Affairs for further assistance.
PIIB3706J
Revision: December 20092009 QX56
Page 2269 of 4171

PRECAUTIONSHA-5
< PRECAUTION >
C
DE
F
G H
J
K L
M A
B
HA
N
O P
General Refrigerant PrecautionINFOID:0000000003775289
WARNING:
Do not release refrigerant into the air. Use appr oved recovery/recycling equipment to capture the
refrigerant every time an air co nditioning system is discharged.
Always wear eye and hand protection (goggles and gloves) when working with any refrigerant or air
conditioning system.
Do not store or heat refrigerant containers above 52 °C (125 °F).
Do not heat a refrigerant containe r with an open flame; if container warming is required, place the
bottom of the container in a warm pail of water.
Do not intentionally drop, puncture, or incinerate refrigerant containers.
Keep refrigerant away from open flames: poison ous gas will be produced if refrigerant burns.
Refrigerant will displace oxygen, therefore be certa in to work in well ventilated areas to prevent suf-
focation.
Do not pressure test or leak test HFC-134a (R-134a) service equipment and/or vehicle air condition-
ing systems with compressed air during repair. Some mixtures of air and HFC-134a (R-134a) have
been shown to be combustible at elevated pressures. These mixtures, if ignited, may cause injury or
property damage. Additional health and safety info rmation may be obtained from refrigerant manu-
facturers.
Precaution for Leak Detection DyeINFOID:0000000003775290
The A/C system contains a fluorescent leak detection dy e used for locating refrigerant leaks. An ultraviolet
(UV) lamp is required to illuminate the dye when inspecting for leaks.
Always wear fluorescence enhancing UV safety goggles to protect your eyes and enhance the visibility of
the fluorescent dye.
The fluorescent dye leak detector is not a replacement for an electronic refrigerant leak detector. The fluo-
rescent dye leak detector should be used in conjuncti on with an electronic refrigerant leak detector (J-
41995).
For your safety and the customer's satisfaction, r ead and follow all manufacturer's operating instructions and
precautions prior to performing work.
A compressor shaft seal should not be repaired because of dye seepage. The compressor shaft seal should
only be repaired after confirming the leak with an electronic refrigerant leak detector (J-41995).
Always remove any dye from the leak area after repairs are complete to avoid a misdiagnosis during a future service.
Do not allow dye to come into contact with paint ed body panels or interior components. If dye is spilled,
clean immediately with the approved dye cleaner. Fluores cent dye left on a surface for an extended period of
time cannot be removed .
Do not spray the fluorescent dye cleaning agent on hot surfaces (engine exhaust manifold, etc.).
Do not use more than one refrigerant dye bot tle (1/4 ounce / 7.4 cc) per A/C system.
Leak detection dyes for HFC-134a (R-134a) and CFC-12 (R -12) A/C systems are different. Do not use HFC-
134a (R-134a) leak detection dye in CFC-12 (R-12) A/ C systems or CFC-12 (R-12) leak detection dye in
HFC-134a (R-134a) A/C systems or A/C system damage may result.
The fluorescent properties of the dye will remain for over three (3) years unless a compressor failure occurs.
A/C Identification LabelINFOID:0000000003775291
Vehicles with factory installed fluorescent dye have this identification label on the underside of hood.
Precaution for Refrigerant ConnectionINFOID:0000000003775292
A new type refrigerant connection has been introduced to all refrigerant lines except the following locations.
Expansion valve to cooling unit
Evaporator pipes to evaporator (inside cooling unit)
Refrigerant pressure sensor
FEATURES OF NEW TYPE REFRIGERANT CONNECTION
The O-ring has been relocated. It has also been provided with a groove for proper installation. This reduces the possibility of the O-ring being caught in, or damaged by , the mating part. The sealing direction of the O-
ring is now set vertically in relation to the contacting surface of the mating part to improve sealing character-
istics.
Revision: December 20092009 QX56
Page 2273 of 4171

PRECAUTIONSHA-9
< PRECAUTION >
C
DE
F
G H
J
K L
M A
B
HA
N
O P
*: Always check with the Parts Department for the latest parts information.
WARNING:
Make sure all refrigerant is discharged into the recycling equipment and the pressure in the system is
less than atmospheric pressure. Then gradually loo sen the discharge side hose fitting and remove it.
CAUTION:
When replacing or cleaning refrigerant cycle components, observe the following.
When the compressor is removed, st ore it in the same position as it is when mounted on the car.
Failure to do so will cause oil to enter the low pressure chamber.
When connecting tubes, always use a to rque wrench and a back-up wrench.
After disconnecting tubes, immediately plug all op enings to prevent entry of dirt and moisture.
When installing an air conditioner in the vehicle, connect the pipes as the final stage of the opera-
tion. Do not remove the seal caps of pipes and other components until just before required for con-
nection.
Allow components stored in cool areas to warm to working area temperature before removing seal
caps. This prevents condensation from forming inside A/C components.
Thoroughly remove moisture from the refriger ation system before charging the refrigerant.
Always replace used O-rings.
When connecting tube, apply oil to circle of the O-ri ngs shown in illustration. Be careful not to apply
oil to threaded portion.
Oil name: NISSAN A/C System Oil Type S or equivalent
O-ring must be closely attached to dented portion of tube.
When replacing the O-ring, be careful not to damage O-ring and tube.
Connect tube until you hear it cl ick, then tighten the nut or bolt by hand until snug. Make sure that
the O-ring is installed to tube correctly.
After connecting line, conduct leak test and make sure that there is no leakage from connections.
When the gas leaking point is f ound, disconnect that line and replace the O-ring. Then tighten con-
nections of seal seat to the specified torque.
Connec-
tion type O-ring
size Part number* D mm (in) W mm (in)
New 8 92471 N8210 6.8 (0.268) 1.85 (0.0728)
Former 10 J2476 89956 9.25 (0.3642) 1.78 (0.0701) New 1292472 N8210 10.9 (0.429) 2.43 (0.0957)
Former 92475 71L00 11.0 (0.433) 2.4 (0.094) New 1692473 N8210 13.6 (0.535) 2.43 (0.0957)
Former 92475 72L00 14.3 (0.563) 2.3 (0.091) New 1992474 N8210 16.5 (0.650) 2.43 (0.0957)
Former 92477 N8200 17.12 (0.6740) 1.78 (0.0701) New 24 92195 AH300 21.8 (0.858) 2.4 (0.094)
SHA814E
Revision: December 20092009 QX56
Page 2286 of 4171

HA-22
< ON-VEHICLE MAINTENANCE >
OIL
OIL
Maintenance of Oil Quantity in CompressorINFOID:0000000003775302
The oil in the compressor circulates through the system with the refrigerant. Add oil to compressor when
replacing any component or after a large refrigerant leakage has occurred. It is important to maintain the spec-
ified amount.
If oil quantity is not maintained properly, the following malfunctions may result:
Lack of oil: May lead to a seized compressor
Excessive oil: Inadequate cooling (thermal exchange interference)
OIL
Name: NISSAN A/C System Oil Type S or equivalent
CHECKING AND ADJUSTING
CAUTION:
If excessive oil leakage is noted, do no t perform the oil return operation.
Start the engine and set the following conditions:
Test Condition
Engine speed: Idling to 1,200 rpm
A/C switch: On
Blower fan speed: MAX position
Temp. control: Optional [Set so that intake air temperature is 25 ° to 30 ° C (77 ° to 86 °F)]
Intake position: Recirculation ( )
Perform oil return operation for about ten minutes
Adjust the oil quantity according to the following table.
Oil Adjusting Procedure for Components Replacement Except Compressor
After replacing any of the following major component s, add the correct amount of oil to the system.
Amount of Oil to be Added
*1: If refrigerant leak is small, no addition of oil is needed.
Oil Adjustment Procedure for Compressor Replacement
Part replacedOil to be added to system
Remarks
Amount of oil
m (US fl oz, Imp fl oz)
Front evaporator 75 (2.5, 2.6) —
Rear evaporator 75 (2.5, 2.6) —
Condenser 75 (2.5, 2.6) —
Liquid tank 5 (0.2, 0.2) Add if compressor is not replaced.
In case of refrigerant leak 30 (1.0, 1.1) Large leak
— Small leak *1
Revision: December 20092009 QX56
Page 2314 of 4171

HAC-1
VENTILATION, HEATER & AIR CONDITIONER
C
DE
F
G H
J
K L
M
SECTION HAC
A
B
HAC
N
O P
CONTENTS
HEATER & AIR CONDITIONING CONTROL SYSTEM
AUTOMATIC AIR CONDITIONER
BASIC INSPECTION ....... .............................
3
DIAGNOSIS AND REPAIR WORKFLOW ..... .....3
How to Perform Trouble Diagnosis For Quick And
Accurate Repair ........................................................
3
INSPECTION AND ADJUSTMENT ................ .....4
Operational Check (Front) ................................... ......4
Operational Check (Rear) .........................................5
FUNCTION DIAGNOSIS ...............................7
FUNCTION INFORMATION ........................... .....7
Component Part Location ................................... ......7
Symptom Table .........................................................9
REFRIGERATION SYSTEM ..............................11
Refrigerant Cycle ................................................ ....11
Refrigerant System Protection ................................11
AUTOMATIC AIR CONDITIONER SYSTEM . ....13
Control System Diagram ..................................... ....13
Control System Description .....................................13
Discharge Air Flow (Front) ......................................16
Discharge Air Flow (Rear) .......................................16
Switches And Their Control Function (Front) ..........18
Switches And Their Control Function (Rear) ...........19
DIAGNOSIS SYSTEM (HVAC) ..........................20
CONSULT-III Function (HVAC) ........................... ....20
DIAGNOSIS SYSTEM (BCM) ............................21
CONSULT-III Function (BCM - COMMON ITEM) ....21
CONSULT-III Function (BCM - AUTO AIR CON-
DITIONER) ..............................................................
21
SELF-DIAGNOSIS FUNCTION ..........................23
A/C Auto Amp. Self-Diagnosis ................................23
A/C and AV Switch Asse mbly Self-Diagnosis .........23
A/C System Self-Diagnosis Code Chart .............. ....24
COMPONENT DIAGNOSIS .........................25
MODE DOOR MOTOR ......................................25
System Description .............................................. ....25
Mode Door Motor (Front) Component Function
Check ......................................................................
26
Mode Door Motor (Front) Diagnosis Procedure ......27
AIR MIX DOOR MOTOR ...................................31
System Description ..................................................31
Air Mix Door Motor Component Function Check .....32
Air Mix Door Motor (Driver) Diagnosis Procedure ....33
Air Mix Door Motor (Passenger) Diagnosis Proce-
dure .........................................................................
36
INTAKE DOOR MOTOR ...................................41
System Description ..................................................41
Intake Door Motor Component Function Check ......42
Intake Door Motor Diagnosis Procedure .................43
DEFROSTER DOOR MOTOR CIRCUIT ...........45
System Description ..................................................45
Defroster Door Motor Component Function Check
....
46
Defroster Door Motor Diagnosis Procedure ............46
BLOWER MOTOR CONTROL SYSTEM ..........50
System Description ..................................................50
Front Blower Motor Component Function Check ....51
Front Blower Motor Diagnosis Procedure ................52
Front Blower Motor Component Inspection .............55
Rear Blower Motor Description ................................56
Rear Blower Motor Component Function Check .....57
Rear Air Control (Front) Diagnosis Procedure #1 ....58
Rear Air Control (Rear) Diagnosis Procedure #2 ....59
Rear Blower Motor Component Inspection ..............60
REAR AIR CONTROL SYSTEM .......................62
Rear Air Control System Description .......................62
Rear Air Control Component Function Check .........62
Air Mix Door Motor (Rear) Diagnosis Procedure .....63
Mode Door Motor (Rear) Diagnosis Procedure .......67
Revision: December 20092009 QX56
Page 2315 of 4171

HAC-2
MAGNET CLUTCH ............................................72
System Description .............................................. ...72
Magnet Clutch Component Function Check ........ ...72
Magnet Clutch Diagnosis Procedure ................... ...73
WATER VALVE CIRCUIT ..................................77
Description ........................................................... ...77
Water Valve Diagnosis Procedure ..........................77
AMBIENT SENSOR ...........................................79
Component Description ....................................... ...79
Ambient Sensor Diagnosis Procedure ....................79
Ambient Sensor Component Inspection .................80
IN-VEHICLE SENSOR .......................................82
Component Description ....................................... ...82
In-Vehicle Sensor Diagnosis Procedure .................82
In-Vehicle Sensor Component Inspection ..............84
OPTICAL SENSOR ...........................................85
Component Description ..........................................85
Optical Sensor Diagnosis Procedure ......................85
INTAKE SENSOR ..............................................87
System Description .............................................. ...87
Intake Sensor Diagnosis Procedure .......................87
Intake Sensor Component Inspection ................. ...88
POWER SUPPLY AND GROUND CIRCUIT
FOR CONTROLLER ..........................................
89
Component Description ....................................... ...89
A/C Auto Amp. Component Function Check ..........89
A/C Auto Amp Power and Ground Diagnosis Pro-
cedure .....................................................................
90
ECU DIAGNOSIS .......................................91
AIR CONDITIONER CONTROL ..................... ...91
A/C Auto Amp. Terminals Reference Values ..........91
Wiring Diagram .................................................... ...93
SYMPTOM DIAGNOSIS ...........................109
AIR CONDITIONER CONTROL ..................... ..109
Symptom Matrix Chart ........................................ .109
INSUFFICIENT COOLING ................................110
Component Function Check ................................ .110
Diagnostic Work Flow ...........................................111
Performance Chart ................................................113
Trouble Diagnoses for Abnormal Pressure ...........114
INSUFFICIENT HEATING ................................118
Component Function Check .................................118
NOISE ...............................................................120
Component Function Check ................................ .120
MEMORY FUNCTION DOES NOT OPERATE ..122
Memory Function Check ...................................... .122
PRECAUTION ...........................................123
PRECAUTIONS .............................................. ..123
Precaution for Supplemental Restraint System
(SRS) "AIR BAG" and "SEAT BELT PRE-TEN-
SIONER" .............................................................. .
123
Working with HFC-134a (R-134a) ........................ .123
Precaution for Service Equipment ........................124
Revision: December 20092009 QX56
Page 2316 of 4171
![INFINITI QX56 2009 Factory Service Manual DIAGNOSIS AND REPAIR WORKFLOWHAC-3
< BASIC INSPECTION > [AUTOMATIC AIR CONDITIONER]
C
D
E
F
G H
J
K L
M A
B
HAC
N
O P
BASIC INSPECTION
DIAGNOSIS AND REPAIR WORKFLOW
How to Perform Trouble Diagnosis F INFINITI QX56 2009 Factory Service Manual DIAGNOSIS AND REPAIR WORKFLOWHAC-3
< BASIC INSPECTION > [AUTOMATIC AIR CONDITIONER]
C
D
E
F
G H
J
K L
M A
B
HAC
N
O P
BASIC INSPECTION
DIAGNOSIS AND REPAIR WORKFLOW
How to Perform Trouble Diagnosis F](/img/42/57031/w960_57031-2315.png)
DIAGNOSIS AND REPAIR WORKFLOWHAC-3
< BASIC INSPECTION > [AUTOMATIC AIR CONDITIONER]
C
D
E
F
G H
J
K L
M A
B
HAC
N
O P
BASIC INSPECTION
DIAGNOSIS AND REPAIR WORKFLOW
How to Perform Trouble Diagnosis For Quick And Accurate RepairINFOID:0000000003775324
WORK FLOW
1.LISTEN TO CUSTOMER COMPLAINT
Listen to customer complaint. Get detailed information about the conditions and environment when the symp-
tom occurs.
>> GO TO 2
2.CHECK FOR SERVICE BULLETINS
Check for any service bulletins.
>> GO TO 3.
3.VERIFY THE SYMPTOM WITH OPERATIONAL CHECK
Verify the symptom with operational check. Refer to HAC-4, "
Operational Check (Front)".
Can a symptom be duplicated?
YES >> GO TO 4
NO >> GO TO 5
4.GO TO APPROPRIATE TROUBLE DIAGNOSIS
Go to appropriate trouble diagnosis. Refer to HAC-109, "
SymptomMatrixChart".
Can a symptom be duplicated?
>> GO TO 5.
5.PERFORM THE A/C AUTO AMP SELF-DIAGNOSIS
Perform A/C auto amp. self-diagnosis. Refer to HAC-23, "
A/C Auto Amp. Self-Diagnosis".
>> If any diagnostic trouble codes set. Refer to HAC-24, "
A/C System Self-Diagnosis Code Chart".
>> Confirm the repair by perform ing operational check. Refer to HAC-4, "
Operational Check (Front)".
Revision: December 20092009 QX56
Page 2317 of 4171
![INFINITI QX56 2009 Factory Service Manual HAC-4
< BASIC INSPECTION >[AUTOMATIC AIR CONDITIONER]
INSPECTION AND ADJUSTMENT
INSPECTION AND ADJUSTMENT
Operational Check (Front)INFOID:0000000003775325
The purpose of the operational check is to
c INFINITI QX56 2009 Factory Service Manual HAC-4
< BASIC INSPECTION >[AUTOMATIC AIR CONDITIONER]
INSPECTION AND ADJUSTMENT
INSPECTION AND ADJUSTMENT
Operational Check (Front)INFOID:0000000003775325
The purpose of the operational check is to
c](/img/42/57031/w960_57031-2316.png)
HAC-4
< BASIC INSPECTION >[AUTOMATIC AIR CONDITIONER]
INSPECTION AND ADJUSTMENT
INSPECTION AND ADJUSTMENT
Operational Check (Front)INFOID:0000000003775325
The purpose of the operational check is to
confirm that the system operates properly.
CHECKING MEMORY FUNCTION
1. Set the temperature to 32 ° (90 °F).
2. Press the OFF switch.
3. Turn ignition switch OFF.
4. Turn ignition switch ON.
5. Press the AUTO switch.
6. Confirm that the set temperature remains at previous temperature.
7. Press the OFF switch.
If NG, go to trouble diagnosis procedure for HAC-122, "
Memory Function Check".
If OK, continue with next check.
CHECKING BLOWER
1. Press the blower speed control switch (+) once, blower should operate on low speed. The fan display should have one bar lit (on display).
2. Press the blower speed control switch (+) again, and continue checking blower speed and fan display until
all speeds are checked.
3. Leave blower on maximum speed.
If NG, go to trouble diagnosis procedure for HAC-52, "
Front Blower Motor Diagnosis Procedure".
If OK, continue with next check.
CHECKING DISCHARGE AIR
1. Press MODE switch four times and the DEF switch.
2. Each position indicator should change shape (on display).
3. Confirm that discharge air comes out according to the air distribution table. Refer to HAC-16, "
Discharge
Air Flow (Front)".
Mode door position is checked in the next step.
If NG, go to trouble diagnosis procedure for HAC-27, "
Mode Door Motor (Front) Diagnosis Procedure".
If OK, continue the check.
NOTE:
Confirm that the compressor clutch is engaged (sound or visual inspection) and intake door position is at
fresh when the DEF or D/F is selected.
CHECKING RECIRCULATION ( , ONLY)
1. Press recirculation ( ) switch one time. Recirculation indicator should illuminate.
2. Press recirculation ( ) switch one more time. Recirculation indicator should go off.
3. Listen for intake door position change (blower sound should change slightly).
If NG, go to trouble diagnosis procedure for HAC-43, "
Intake Door Motor Diagnosis Procedure".
If OK, continue the check.
NOTE:
Confirm that the compressor clutch is engaged (sound or vis ual inspection) and intake door position is at fresh
when the DEF or D/F is selected. REC ( ) is not allowed in DEF ( ) D/F ( ) or FOOT ( ).
CHECKING TEMPERATURE DECREASE
1. Rotate temperature control dial (drive or passenger) counterclockwise until 18° C (60°F) is displayed.
2. Check for cold air at appropriate discharge air outlets. Conditions : Engine running and at normal operating temperature
Revision: December 20092009 QX56