ESP INFINITI QX56 2009 Factory Manual Online
[x] Cancel search | Manufacturer: INFINITI, Model Year: 2009, Model line: QX56, Model: INFINITI QX56 2009Pages: 4171, PDF Size: 84.65 MB
Page 2525 of 4171
INT-2
< SYMPTOM DIAGNOSIS >
SQUEAK AND RATTLE TROUBLE DIAGNOSES
SYMPTOM DIAGNOSIS
SQUEAK AND RATTLE TROUBLE DIAGNOSES
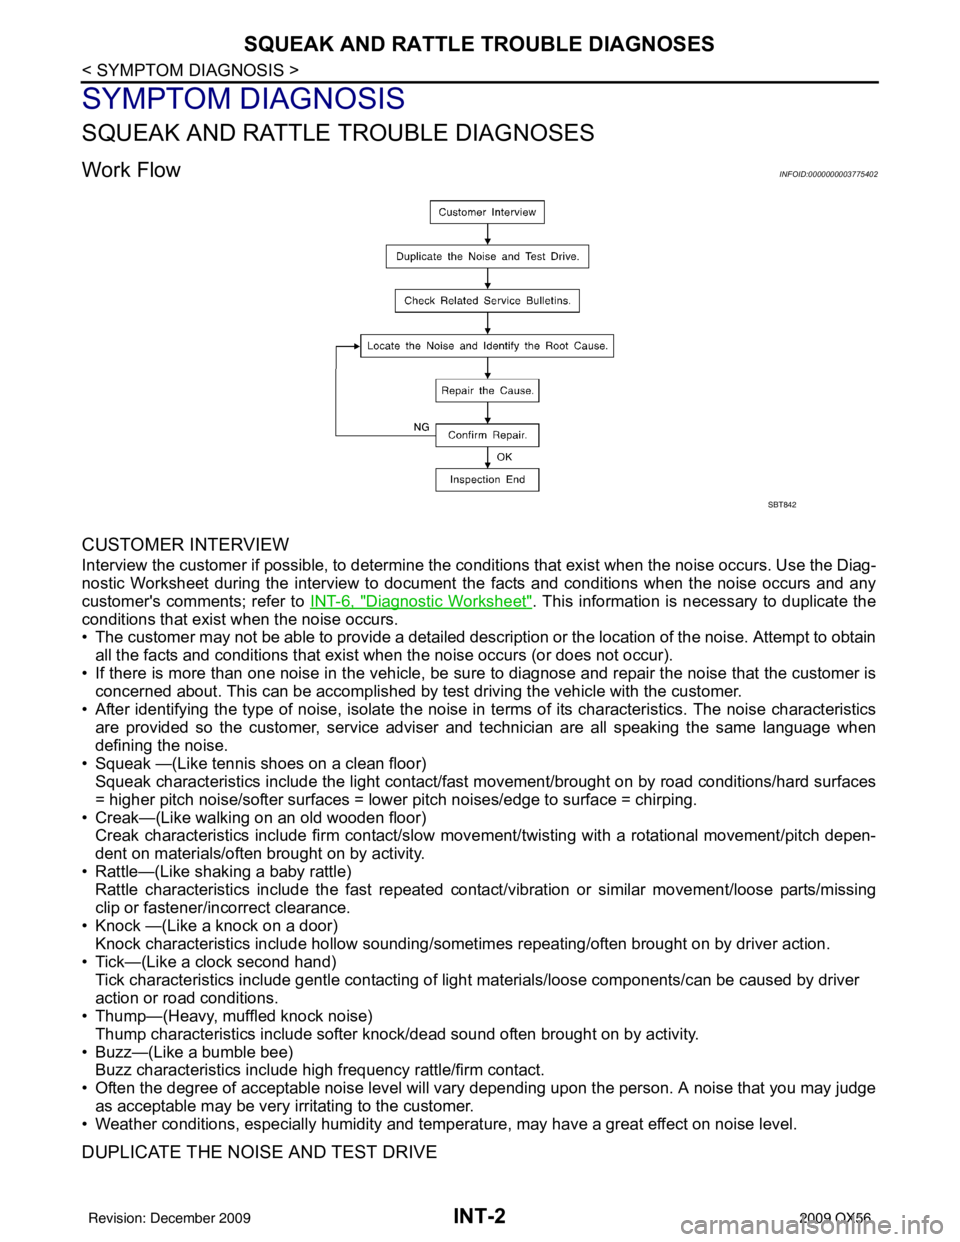
Work FlowINFOID:0000000003775402
CUSTOMER INTERVIEW
Interview the customer if possible, to determine the conditions that exist when the noise occurs. Use the Diag-
nostic Worksheet during the interview to document the facts and conditions when the noise occurs and any
customer's comments; refer to INT-6, "
Diagnostic Worksheet". This information is necessary to duplicate the
conditions that exist when the noise occurs.
• The customer may not be able to provide a detailed description or the location of the noise. Attempt to obtain
all the facts and conditions that exist w hen the noise occurs (or does not occur).
• If there is more than one noise in the vehicle, be sure to diagnose and repair the noise that the customer is
concerned about. This can be accomplished by test driving the vehicle with the customer.
• After identifying the type of noise, isolate the noise in terms of its characteristics. The noise characteristics
are provided so the customer, service adviser and technician are all speaking the same language when
defining the noise.
• Squeak —(Like tennis shoes on a clean floor) Squeak characteristics include the light contact/fast movement/brought on by road conditions/hard surfaces
= higher pitch noise/softer surfaces = lower pitch noises/edge to surface = chirping.
• Creak—(Like walking on an old wooden floor) Creak characteristics include firm contact/slow mo vement/twisting with a rotational movement/pitch depen-
dent on materials/often brought on by activity.
• Rattle—(Like shaking a baby rattle) Rattle characteristics include the fast repeated contac t/vibration or similar movement/loose parts/missing
clip or fastener/incorrect clearance.
• Knock —(Like a knock on a door) Knock characteristics include hollow sounding/someti mes repeating/often brought on by driver action.
• Tick—(Like a clock second hand) Tick characteristics include gentle contacting of light materials/loose components/can be caused by driver
action or road conditions.
• Thump—(Heavy, muffled knock noise)
Thump characteristics include softer k nock/dead sound often brought on by activity.
• Buzz—(Like a bumble bee) Buzz characteristics include hi gh frequency rattle/firm contact.
• Often the degree of acceptable noise level will vary depending upon the person. A noise that you may judge as acceptable may be very irritating to the customer.
• Weather conditions, especially humidity and temperat ure, may have a great effect on noise level.
DUPLICATE THE NOISE AND TEST DRIVE
SBT842
Revision: December 20092009 QX56
Page 2550 of 4171
IP-6
< SYMPTOM DIAGNOSIS >
SQUEAK AND RATTLE TROUBLE DIAGNOSES
SYMPTOM DIAGNOSIS
SQUEAK AND RATTLE TROUBLE DIAGNOSES
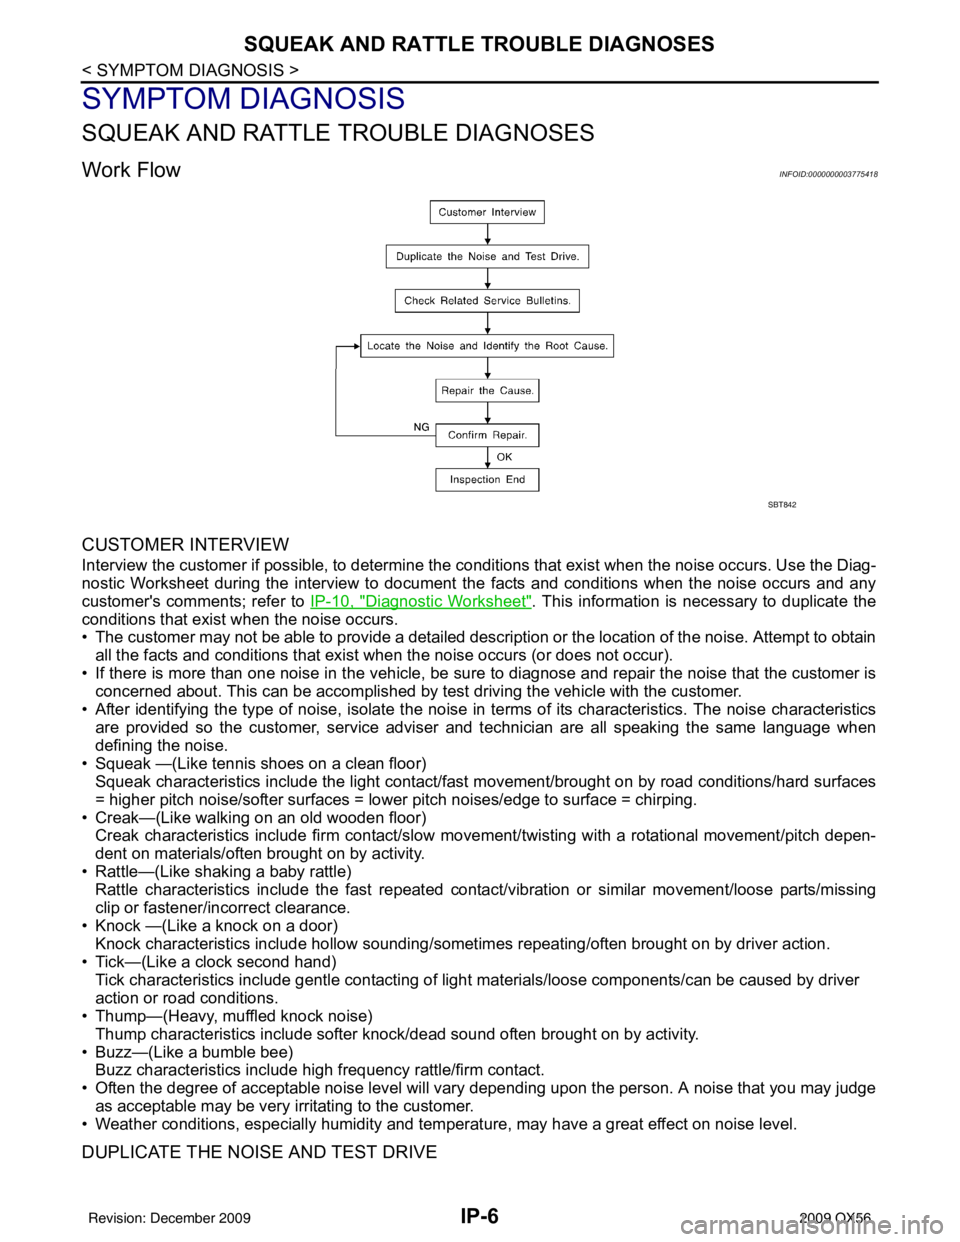
Work FlowINFOID:0000000003775418
CUSTOMER INTERVIEW
Interview the customer if possible, to determine the conditions that exist when the noise occurs. Use the Diag-
nostic Worksheet during the interview to document the facts and conditions when the noise occurs and any
customer's comments; refer to IP-10, "
Diagnostic Worksheet". This information is necessary to duplicate the
conditions that exist when the noise occurs.
• The customer may not be able to provide a detailed description or the location of the noise. Attempt to obtain
all the facts and conditions that exist w hen the noise occurs (or does not occur).
• If there is more than one noise in the vehicle, be sure to diagnose and repair the noise that the customer is
concerned about. This can be accomplished by test driving the vehicle with the customer.
• After identifying the type of noise, isolate the noise in terms of its characteristics. The noise characteristics
are provided so the customer, service adviser and technician are all speaking the same language when
defining the noise.
• Squeak —(Like tennis shoes on a clean floor) Squeak characteristics include the light contact/fast movement/brought on by road conditions/hard surfaces
= higher pitch noise/softer surfaces = lower pitch noises/edge to surface = chirping.
• Creak—(Like walking on an old wooden floor) Creak characteristics include firm contact/slow mo vement/twisting with a rotational movement/pitch depen-
dent on materials/often brought on by activity.
• Rattle—(Like shaking a baby rattle) Rattle characteristics include the fast repeated contac t/vibration or similar movement/loose parts/missing
clip or fastener/incorrect clearance.
• Knock —(Like a knock on a door) Knock characteristics include hollow sounding/someti mes repeating/often brought on by driver action.
• Tick—(Like a clock second hand) Tick characteristics include gentle contacting of light materials/loose components/can be caused by driver
action or road conditions.
• Thump—(Heavy, muffled knock noise)
Thump characteristics include softer k nock/dead sound often brought on by activity.
• Buzz—(Like a bumble bee) Buzz characteristics include hi gh frequency rattle/firm contact.
• Often the degree of acceptable noise level will vary depending upon the person. A noise that you may judge as acceptable may be very irritating to the customer.
• Weather conditions, especially humidity and temperat ure, may have a great effect on noise level.
DUPLICATE THE NOISE AND TEST DRIVE
SBT842
Revision: December 20092009 QX56
Page 2938 of 4171
PG
HARNESS CONNECTORPG-67
< COMPONENT DIAGNOSIS >
C
DE
F
G H
I
J
K L
B A
O P
N
HARNESS CONNECTOR
DescriptionINFOID:0000000003776573
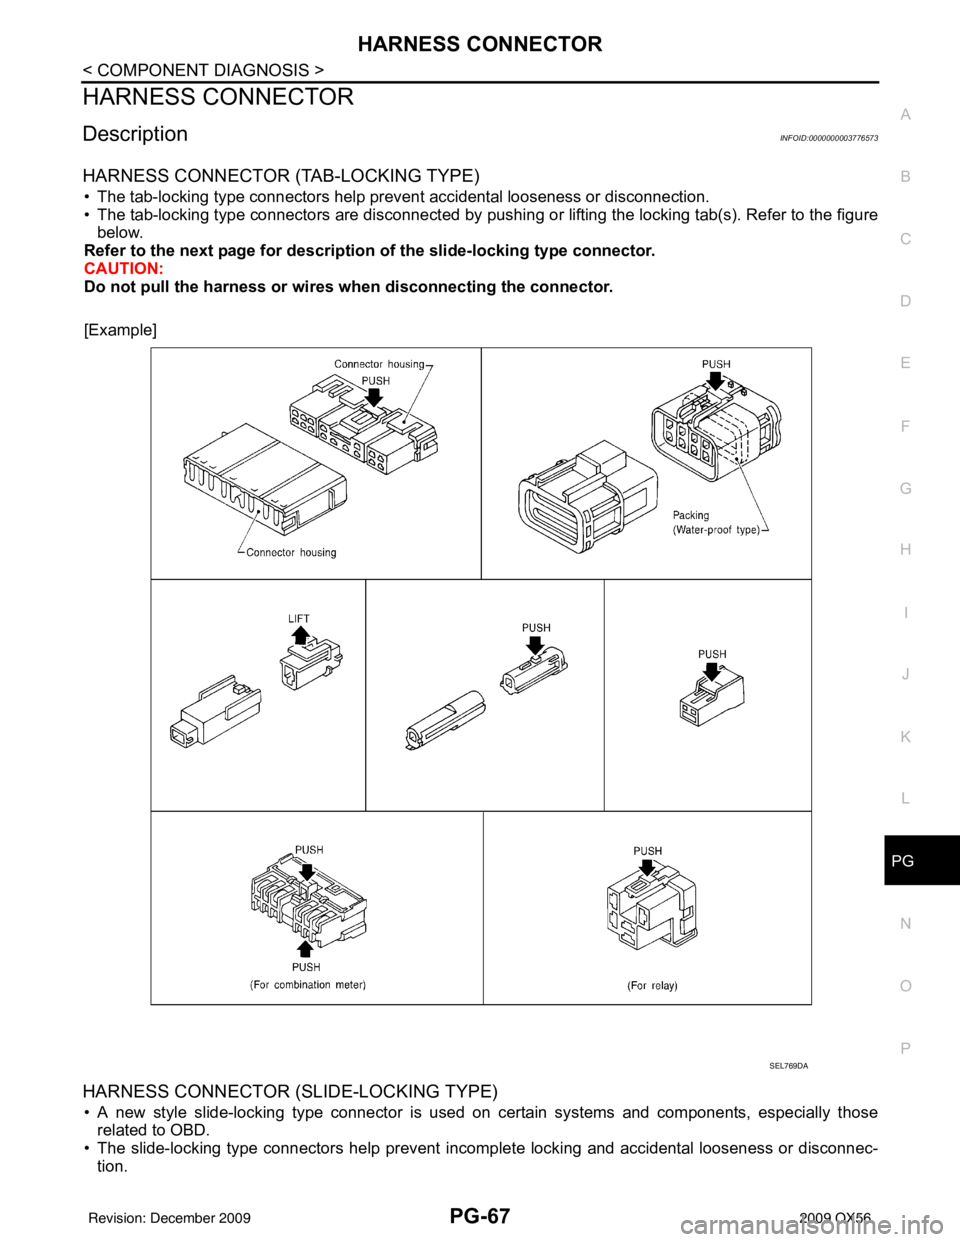
HARNESS CONNECTOR (TAB-LOCKING TYPE)
• The tab-locking type connectors help prevent accidental looseness or disconnection.
• The tab-locking type connectors are disconnected by pushi
ng or lifting the locking tab(s). Refer to the figure
below.
Refer to the next page for description of the slide-locking type connector.
CAUTION:
Do not pull the harness or wires when disconnecting the connector.
[Example]
HARNESS CONNECTOR (SLIDE-LOCKING TYPE)
• A new style slide-locking type connector is used on certain systems and components, especially those related to OBD.
• The slide-locking type connectors help prevent incomplete locking and accidental looseness or disconnec- tion.
SEL769DA
Revision: December 20092009 QX56
Page 2954 of 4171

PWC-6
< FUNCTION DIAGNOSIS >
POWER WINDOW SYSTEM
REAR POWER WINDOW CONTROL
INPUT/OUTPUT SIGNAL CHART
POWER WINDOW OPERATION
Power window system is operable during the retained power operation timer after turning ignition switch ON
and OFF.
Main power window and door lock/unlock switch can open/close all windows.
Power window and door lock unlock switch RH & rear power window switches LH and RH can open/close the corresponding windows.
REAR POWER VENT WINDOW OPERATION
Rear power vent window system is operable during the retained power operation timer after turning ignition
switch ON and OFF.
Rear power vent window switch can open/close the rear power vent window LH and RH.
POWER WINDOW AUTO-OPERATION
AUTO UP/DOWN operation can be performed when main power window and door lock/unlock switch or
power window and door lock/unlock switch RH turns to AUTO.
Main power window and door lock/unlock switch controls rear power window LH/RH auto-operation.
Encoder continues detecting the movement of power window motor and transmits to front power window
switch LH/RH or rear power window control unit LH/RH as the encoder pulse signal while power window
motor is operating.
Front power window switch LH/RH or rear power window control unit LH/RH reads the changes of encoder
signal and stops AUTO operation when door glass is at fully opened/closed position.
Power window motor is operable in case encoder is malfunctioning.
RETAINED POWER OPERATION
Retained power operation is an additional power supply function that enables power window system to oper-
ate during the 45 seconds even when ignition switch is turned OFF
Retained power function cancel conditions
Front door CLOSE (door switch OFF) →OPEN (door switch ON).
When ignition switch is ON.
When timer time passes. (45 seconds)
POWER WINDOW LOCK
The power window lock is designed to lock operation of all windows except for front door window LH.
When in the lock position, the power window lock si gnal is transmitted to power window and door lock/unlock
switch RH and rear power window control unit LH/RH by power window serial link. This prevents the power
window motor from operating.
Item Input signal to front power window
switch Front power window switch
function Actuator
Power window and
door lock/unlock
switch RH Front power window motor RH UP/
DOWN signal
Power window control Front power window motor RH
Encoder Encoder pulse signal
BCM RAP signal
Item Input signal to front power window
switch Front power window switch
function Actuator
Main power window
and door lock/un-
lock switch Rear power window motor LH/RH UP/
DOWN signal
Power window control Rear power window motor LH/RH
Rear power window
switch LH/RH
Rear power window motor LH/RH UP/
DOWN signal
Rear power window
control unit LH/RH Rear power window
motor control LH
RH UP/DOWN signal
Encoder Encoder pulse signal
BCM Power window serial link signal
Revision: December 20092009 QX56
Page 2960 of 4171
PWC-12
< COMPONENT DIAGNOSIS >
POWER SUPPLY AND GROUND CIRCUIT
COMPONENT DIAGNOSIS
POWER SUPPLY AND GROUND CIRCUIT
POWER WINDOW MAIN SWITCH
POWER WINDOW MAIN SWITCH : DescriptionINFOID:0000000003775966
BCM supplies power.
It operates each power window motor via corresponding power window switch and makes window move up/down when main power window and door lock/unlock switch is operated.
POWER WINDOW MAIN SWITCH : Component Function CheckINFOID:0000000003775967
Main Power Window And Door Lock/Unlock Switch
1. CHECK MAIN POWER WINDOW AND DO OR LOCK/UNLOCK SWITCH FUNCTION
Does power window motor operate with main power window and door lock/unlock switch operation?
Is the inspection result normal?
YES >> Main power window and door lock/unlock switch power supply and ground circuit are OK.
NO >> Refer to PWC-12, "POWER WI NDOW MAIN SWITCH : Diagnosis Procedure"
.
POWER WINDOW MAIN SWITCH : Diagnosis ProcedureINFOID:0000000003775968
Main Power Window And Door Lock/Unlo ck Switch Power Supply Circuit Check
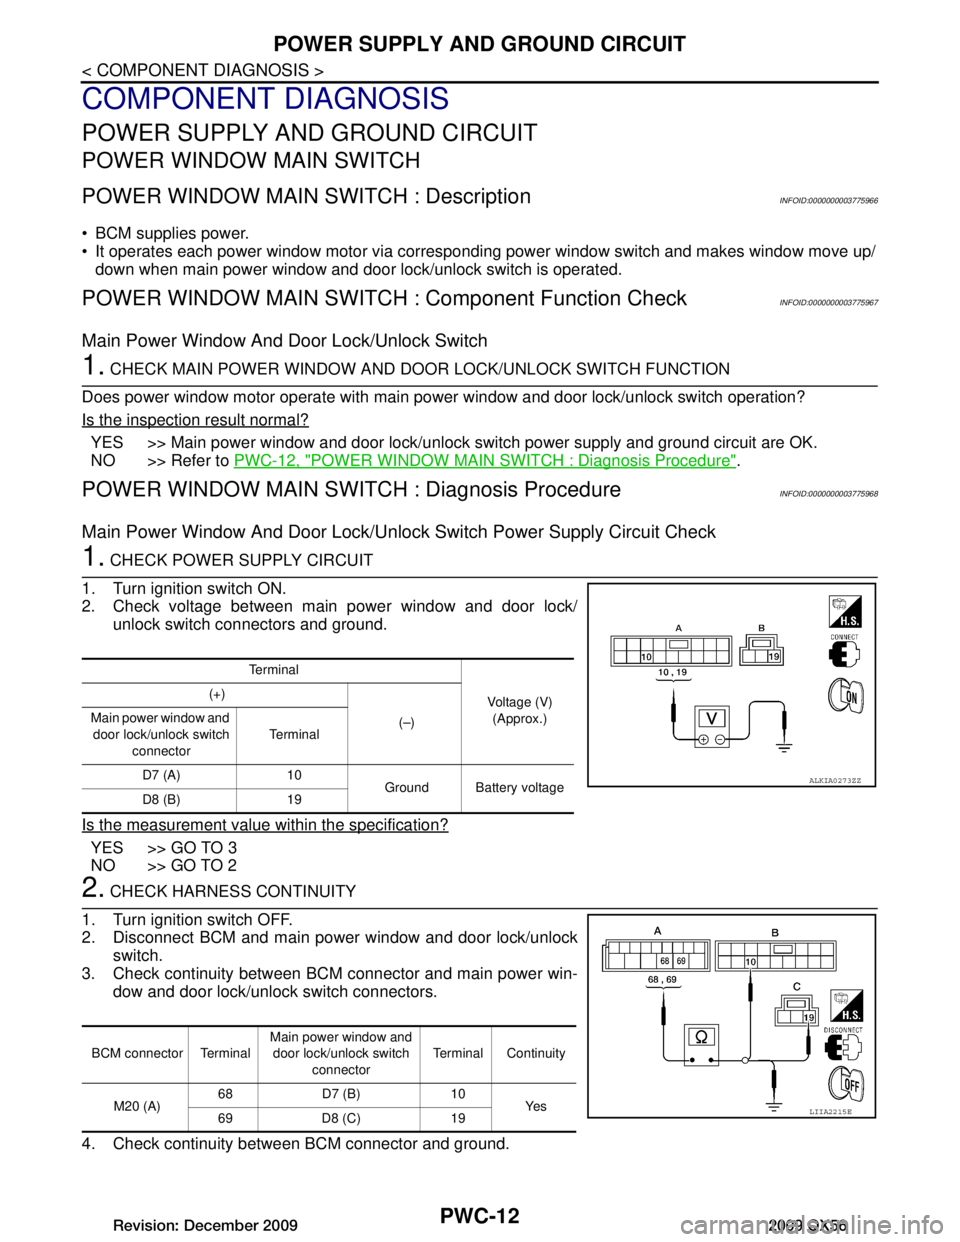
1. CHECK POWER SUPPLY CIRCUIT
1. Turn ignition switch ON.
2. Check voltage between main power window and door lock/ unlock switch connectors and ground.
Is the measurement value within the specification?
YES >> GO TO 3
NO >> GO TO 2
2. CHECK HARNESS CONTINUITY
1. Turn ignition switch OFF.
2. Disconnect BCM and main power window and door lock/unlock switch.
3. Check continuity between BCM connector and main power win- dow and door lock/unlock switch connectors.
4. Check continuity between BCM connector and ground.
Te r m i n a l Voltage (V)(Approx.)
(+)
(–)
Main power window and
door lock/unlock switch connector Te r m i n a l
D7 (A) 10 Ground Battery voltage
D8 (B) 19
ALKIA0273ZZ
BCM connector Terminal Main power window and
door lock/unlock switch
connector Terminal Continuity
M20 (A) 68 D7 (B) 10
Ye s
69 D8 (C) 19
LIIA2215E
Revision: December 20092009 QX56
Page 3133 of 4171
RF-42
< SYMPTOM DIAGNOSIS >
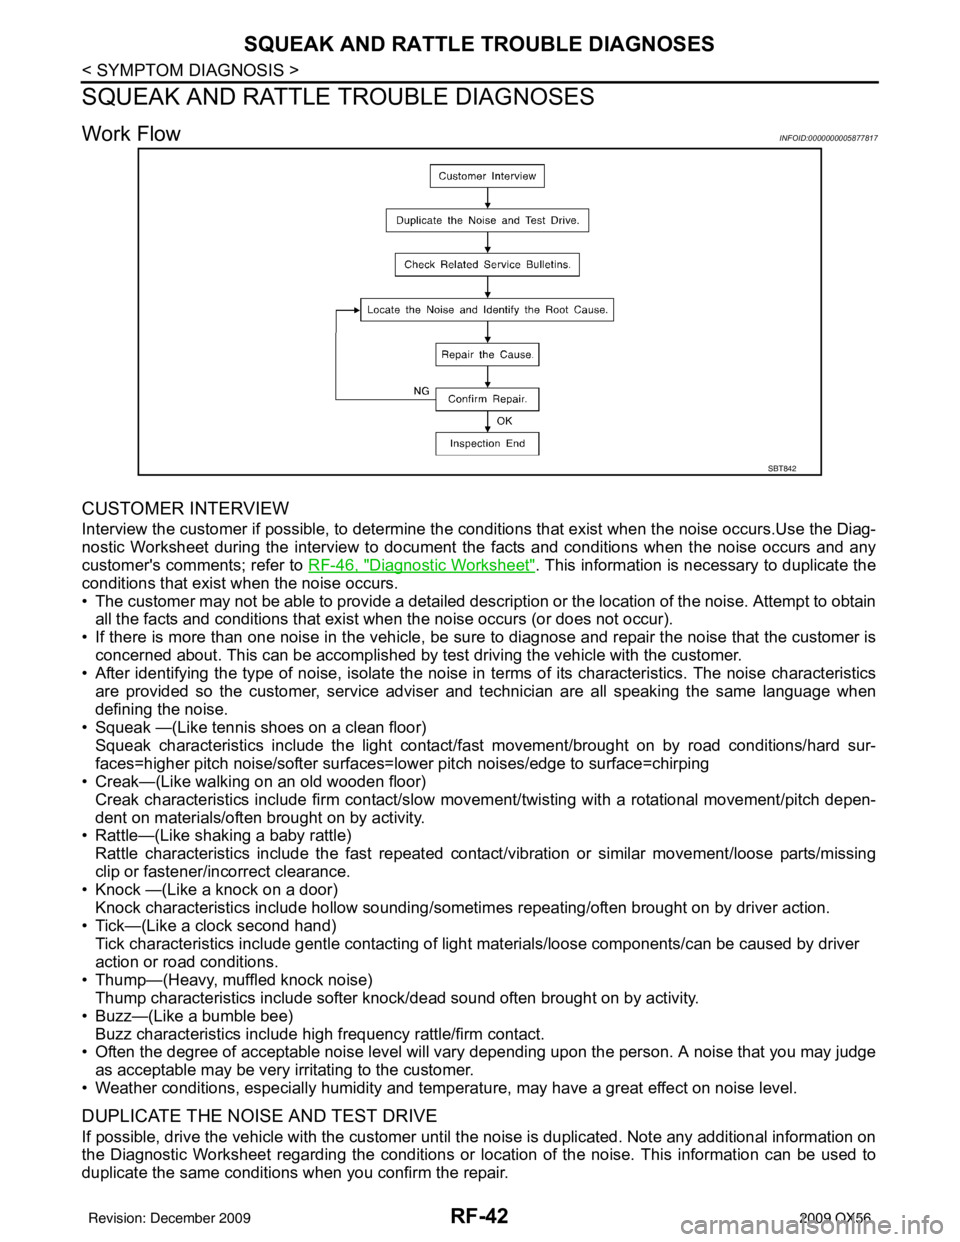
SQUEAK AND RATTLE TROUBLE DIAGNOSES
SQUEAK AND RATTLE TROUBLE DIAGNOSES
Work FlowINFOID:0000000005877817
CUSTOMER INTERVIEW
Interview the customer if possible, to determine the conditions that exist when the noise occurs.Use the Diag-
nostic Worksheet during the interview to document the facts and conditions when the noise occurs and any
customer's comments; refer to RF-46, "
Diagnostic Worksheet". This information is necessary to duplicate the
conditions that exist when the noise occurs.
• The customer may not be able to provide a detailed description or the location of the noise. Attempt to obtain all the facts and conditions that exist w hen the noise occurs (or does not occur).
• If there is more than one noise in the vehicle, be sure to diagnose and repair the noise that the customer is
concerned about. This can be accomplished by test driving the vehicle with the customer.
• After identifying the type of noise, isolate the noise in terms of its characteristics. The noise characteristics
are provided so the customer, service adviser and technician are all speaking the same language when
defining the noise.
• Squeak —(Like tennis shoes on a clean floor)
Squeak characteristics include the light contact/fa st movement/brought on by road conditions/hard sur-
faces=higher pitch noise/softer surfaces=l ower pitch noises/edge to surface=chirping
• Creak—(Like walking on an old wooden floor)
Creak characteristics include firm contact/slow mo vement/twisting with a rotational movement/pitch depen-
dent on materials/often brought on by activity.
• Rattle—(Like shaking a baby rattle)
Rattle characteristics include the fast repeated contac t/vibration or similar movement/loose parts/missing
clip or fastener/incorrect clearance.
• Knock —(Like a knock on a door)
Knock characteristics include hollow sounding/someti mes repeating/often brought on by driver action.
• Tick—(Like a clock second hand) Tick characteristics include gentle contacting of light materials/loose components/can be caused by driver
action or road conditions.
• Thump—(Heavy, muffled knock noise) Thump characteristics include softer k nock/dead sound often brought on by activity.
• Buzz—(Like a bumble bee)
Buzz characteristics include hi gh frequency rattle/firm contact.
• Often the degree of acceptable noise level will vary depending upon the person. A noise that you may judge as acceptable may be very irritating to the customer.
• Weather conditions, especially humidity and temperat ure, may have a great effect on noise level.
DUPLICATE THE NOISE AND TEST DRIVE
If possible, drive the vehicle with the customer until the noise is duplicated. Note any additional information on
the Diagnostic Worksheet regarding the conditions or lo cation of the noise. This information can be used to
duplicate the same conditions when you confirm the repair.
SBT842
Revision: December 20092009 QX56
Page 3215 of 4171
SCS-22
< COMPONENT DIAGNOSIS >
HEIGHT SENSOR SIGNAL CIRCUIT
HEIGHT SENSOR SIGNAL CIRCUIT
DescriptionINFOID:0000000003772342
Supplies vehicle height input to the suspension control unit.
Component Function CheckINFOID:0000000003772343
1.CHECK HEIGHT SENSOR OPERATION
CONSULT-III
1. Select "HEIGT SEN" of AIR LEVELIZER data monitor test item.
2. While monitoring test item, add or take away weight from the rear of the vehi cle. Check that the voltage
value changes with vehicle height.
Is the HEIGHT SEN data monitor responding normally?
YES >> Height sensor is operating normally.
NO >> Refer to SCS-22, "
Diagnosis Procedure".
Diagnosis ProcedureINFOID:0000000003772344
1.CHECK HEIGHT SENSOR POWER AND GROUND SUPPLY
Check height sensor power and ground supply. Refer to SCS-18, "
HEIGHT SENSOR : Diagnosis Procedure".
Are the inspection results normal?
YES >> GO TO 2.
NO >> Repair harness or connector.
2.CHECK HEIGHT SENSOR SIGNAL CIRCUIT
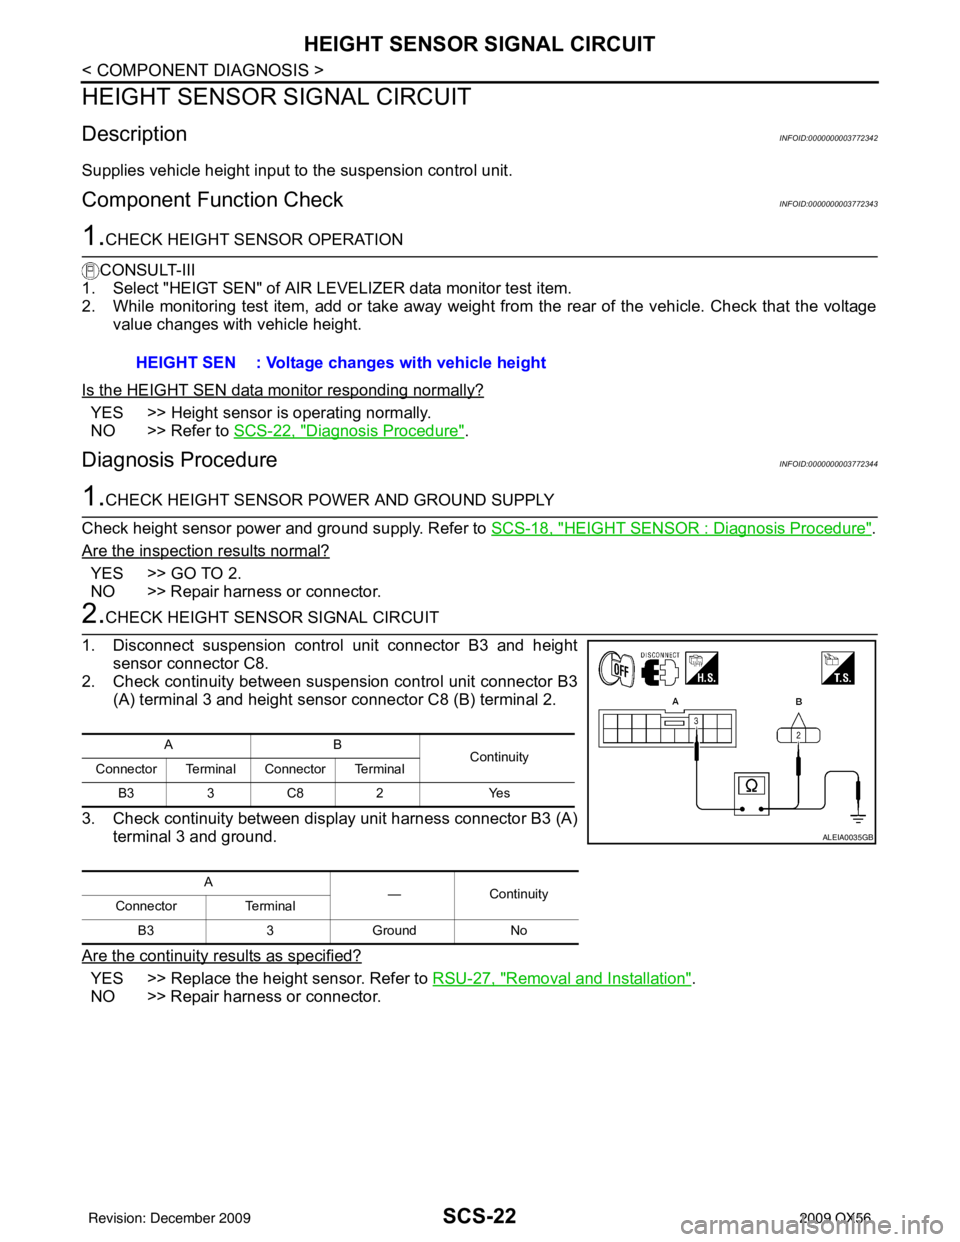
1. Disconnect suspension control unit connector B3 and height sensor connector C8.
2. Check continuity between suspension control unit connector B3 (A) terminal 3 and height sensor connector C8 (B) terminal 2.
3. Check continuity between display unit harness connector B3 (A) terminal 3 and ground.
Are the continuity results as specified?
YES >> Replace the height sensor. Refer to RSU-27, "Removal and Installation".
NO >> Repair harness or connector. HEIGHT SEN : Voltage changes with vehicle height
AB
Continuity
Connector Terminal Connector Terminal
B33C82 Yes
A —Continuity
Connector Terminal
B3 3Ground No
ALEIA0035GB
Revision: December 20092009 QX56
Page 3229 of 4171
SCS-36
< SYMPTOM DIAGNOSIS >
SUSPENSION CONTROL SYSTEM INOPERATIVE
SUSPENSION CONTROL SYSTEM INOPERATIVE
DescriptionINFOID:0000000003772355
The suspension control system does not activate. It does not raise or lower the vehicle in response to ride
height changes.
Diagnosis ProcedureINFOID:0000000003772356
1.SUSPENSION CONTROL UNIT PO WER AND GROUND INSPECTION
Check the suspension control unit power and ground supply. Refer to SCS-17, "
SUSPENSION CONTROL
UNIT : Diagnosis Procedure".
Does the suspension control unit power and ground pass inspection?
YES >> GO TO 2.
NO >> Repair or replace the malfunctioning part.
2.CHECK HEIGHT SENSOR SIGNAL INPUT
CONSULT-III DATA MONITOR
1. Turn ignition switch ON.
2. Select "HEIGT SEN" of AI R LEVELIZER data monitor item.
3. Check the monitor status.
Is the height sensor voltage normal?
YES >> GO TO 3.
NO >> Check height sensor signal circuit. Refer to SCS-22, "
Diagnosis Procedure" .
3.CHECK GENERATOR "L" CIRCUIT SIGNAL
CONSULT-III DATA MONITOR
1. Start the engine.
2. Select "ACG L" of AIR LE VELIZER data monitor item.
3. Check the monitor status.
Is the generator "L" signal operating normally?
YES >> GO TO 4.
NO >> Check generator L circuit. Refer to CHG-12, "
Diagnosis Procedure".
4.SUSPENSION AIR COMPRESSOR POWER AND GROUND INSPECTION
Check the suspension air compressor power and ground supply. Refer to SCS-17, "
SUSPENSION AIR COM-
PRESSOR : Diagnosis Procedure".
Does the suspension air compressor power and ground pass inspection?
YES >> System is operating normally.
NO >> Repair or replace the malfunctioning part. HEIGT SEN
: 0.2V - 4.8V
ACG L: OFF with charge light OFF
: ON with charge light ON
Revision: December 20092009 QX56
Page 3270 of 4171
SE-38
< SYMPTOM DIAGNOSIS >
SQUEAK AND RATTLE TROUBLE DIAGNOSES
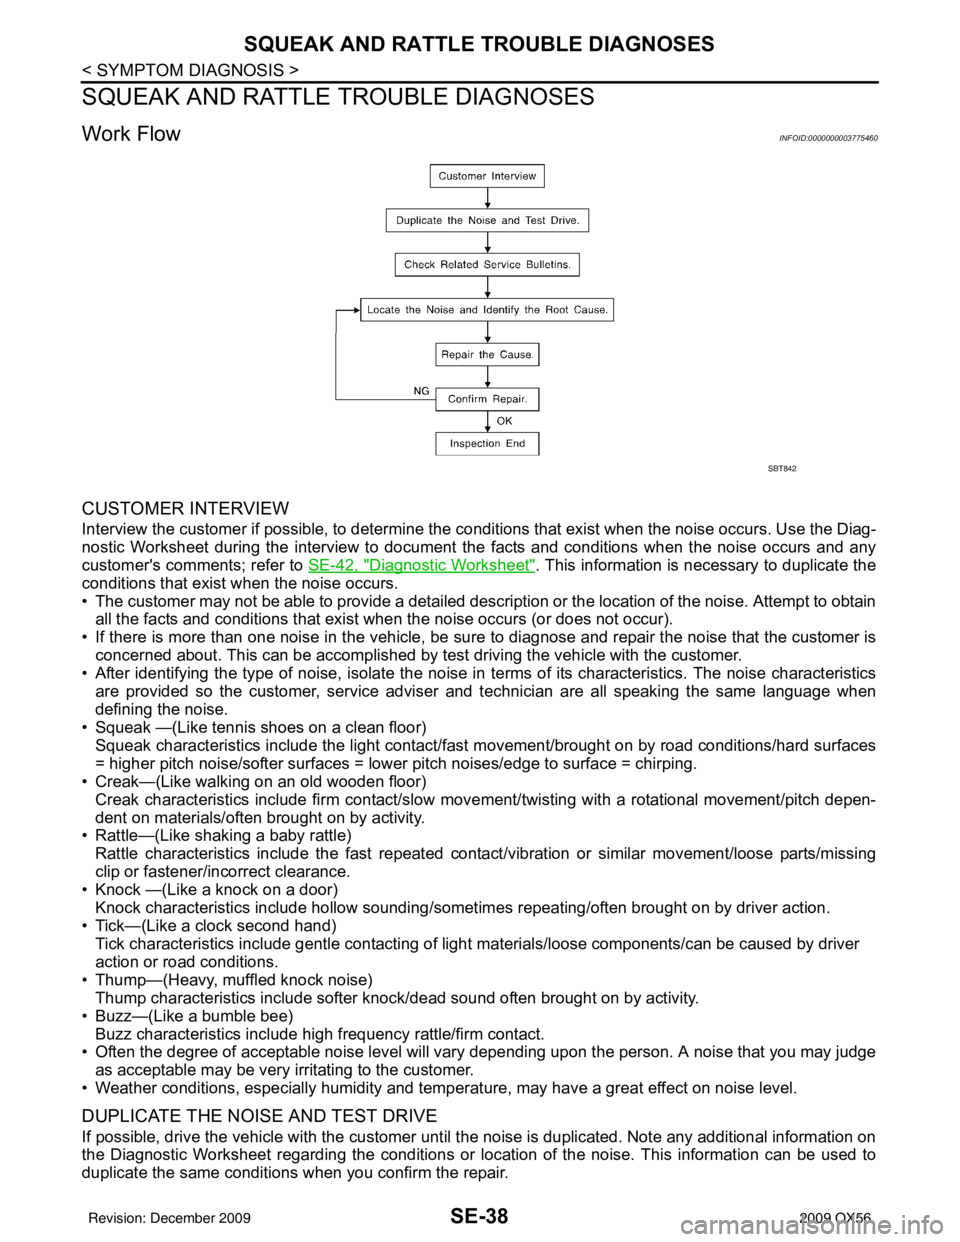
SQUEAK AND RATTLE TROUBLE DIAGNOSES
Work FlowINFOID:0000000003775460
CUSTOMER INTERVIEW
Interview the customer if possible, to determine the conditions that exist when the noise occurs. Use the Diag-
nostic Worksheet during the interview to document the facts and conditions when the noise occurs and any
customer's comments; refer to SE-42, "
Diagnostic Worksheet". This information is necessary to duplicate the
conditions that exist when the noise occurs.
• The customer may not be able to provide a detailed description or the location of the noise. Attempt to obtain all the facts and conditions that exist w hen the noise occurs (or does not occur).
• If there is more than one noise in the vehicle, be sure to diagnose and repair the noise that the customer is
concerned about. This can be accomplished by test driving the vehicle with the customer.
• After identifying the type of noise, isolate the noise in terms of its characteristics. The noise characteristics
are provided so the customer, service adviser and technician are all speaking the same language when
defining the noise.
• Squeak —(Like tennis shoes on a clean floor)
Squeak characteristics include the light contact/fast movement/brought on by road conditions/hard surfaces
= higher pitch noise/softer surfaces = lower pitch noises/edge to surface = chirping.
• Creak—(Like walking on an old wooden floor)
Creak characteristics include firm contact/slow mo vement/twisting with a rotational movement/pitch depen-
dent on materials/often brought on by activity.
• Rattle—(Like shaking a baby rattle)
Rattle characteristics include the fast repeated contac t/vibration or similar movement/loose parts/missing
clip or fastener/incorrect clearance.
• Knock —(Like a knock on a door)
Knock characteristics include hollow sounding/someti mes repeating/often brought on by driver action.
• Tick—(Like a clock second hand) Tick characteristics include gentle contacting of light materials/loose components/can be caused by driver
action or road conditions.
• Thump—(Heavy, muffled knock noise) Thump characteristics include softer k nock/dead sound often brought on by activity.
• Buzz—(Like a bumble bee)
Buzz characteristics include hi gh frequency rattle/firm contact.
• Often the degree of acceptable noise level will vary depending upon the person. A noise that you may judge as acceptable may be very irritating to the customer.
• Weather conditions, especially humidity and temperat ure, may have a great effect on noise level.
DUPLICATE THE NOISE AND TEST DRIVE
If possible, drive the vehicle with the customer until the noise is duplicated. Note any additional information on
the Diagnostic Worksheet regarding the conditions or lo cation of the noise. This information can be used to
duplicate the same conditions when you confirm the repair.
SBT842
Revision: December 20092009 QX56
Page 3653 of 4171
DIAGNOSIS AND REPAIR WORKFLOWTM-5
< BASIC INSPECTION >
CEF
G H
I
J
K L
M A
B
TM
N
O P
BASIC INSPECTION
DIAGNOSIS AND REPAIR WORKFLOW
Work FlowINFOID:0000000003771803
INTRODUCTION
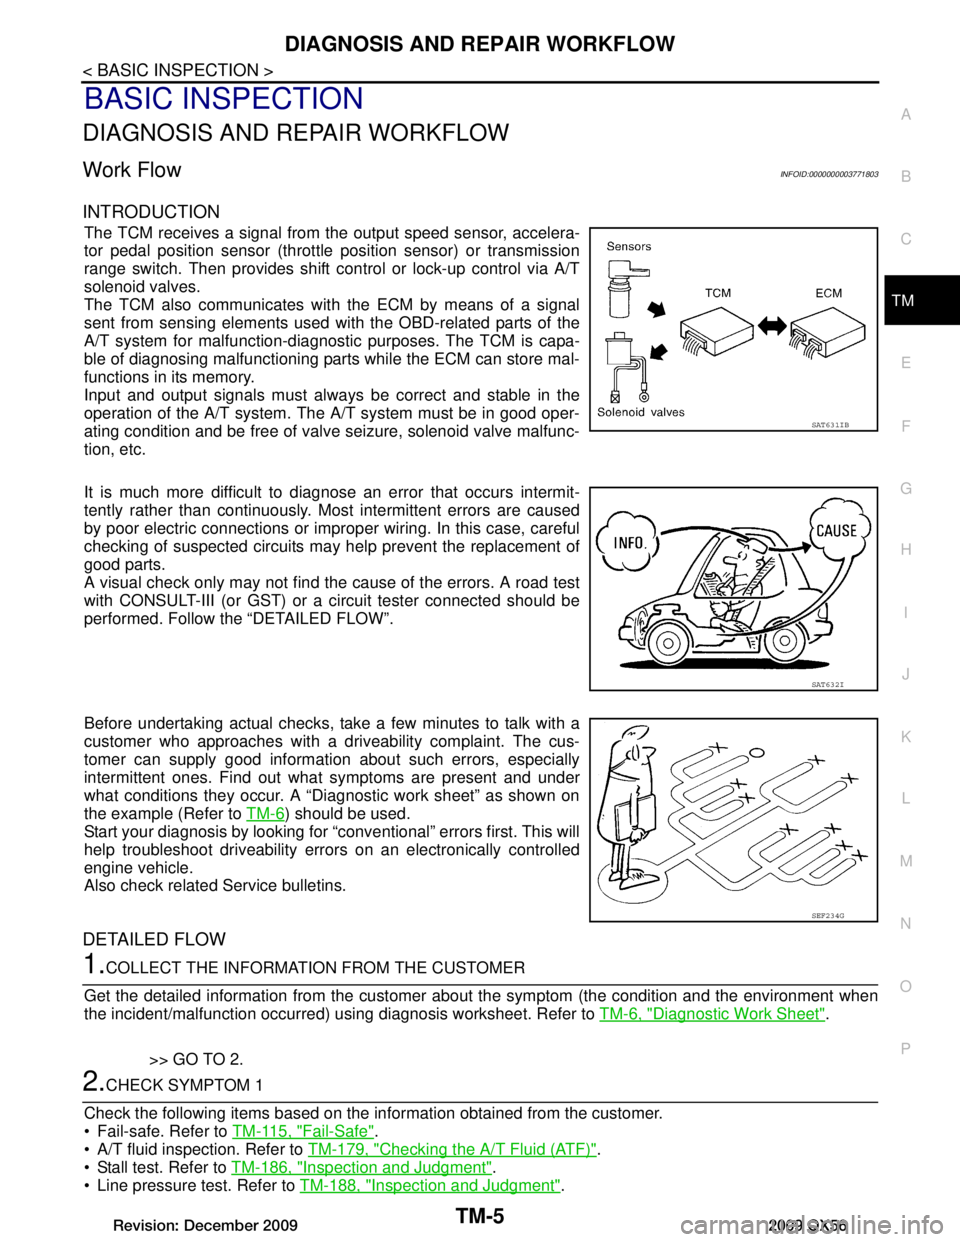
The TCM receives a signal from the output speed sensor, accelera-
tor pedal position sensor (throttle position sensor) or transmission
range switch. Then provides shift c ontrol or lock-up control via A/T
solenoid valves.
The TCM also communicates with the ECM by means of a signal
sent from sensing elements used wit h the OBD-related parts of the
A/T system for malfunction-diagnostic purposes. The TCM is capa-
ble of diagnosing malfunctioning parts while the ECM can store mal-
functions in its memory.
Input and output signals must always be correct and stable in the
operation of the A/T system. T he A/T system must be in good oper-
ating condition and be free of valve seizure, solenoid valve malfunc-
tion, etc.
It is much more difficult to diagnose an error that occurs intermit-
tently rather than continuously. Most intermittent errors are caused
by poor electric connections or impr oper wiring. In this case, careful
checking of suspected circuits may help prevent the replacement of
good parts.
A visual check only may not find t he cause of the errors. A road test
with CONSULT-III (or GST) or a circuit tester connected should be
performed. Follow the “DETAILED FLOW”.
Before undertaking actual checks, take a few minutes to talk with a
customer who approaches with a driveability complaint. The cus-
tomer can supply good information about such errors, especially
intermittent ones. Find out what symptoms are present and under
what conditions they occur. A “Diagnostic work sheet” as shown on
the example (Refer to TM-6
) should be used.
Start your diagnosis by looking for “conventional” errors first. This will
help troubleshoot driveability errors on an electronically controlled
engine vehicle.
Also check related Service bulletins.
DETAILED FLOW
1.COLLECT THE INFORMATION FROM THE CUSTOMER
Get the detailed information from the customer about the symptom (the condition and the environment when
the incident/malfunction occurred) using diagnosis worksheet. Refer to TM-6, "Diagnostic Work Sheet"
.
>> GO TO 2.
2.CHECK SYMPTOM 1
Check the following items based on the in formation obtained from the customer.
Fail-safe. Refer to TM-115, "Fail-Safe"
.
A/T fluid inspection. Refer to TM-179, "Checking the A/T Fluid (ATF)"
.
Stall test. Refer to TM-186, "Inspection and Judgment"
.
Line pressure test. Refer to TM-188, "Inspection and Judgment"
.
SAT631IB
SAT632I
SEF234G
Revision: December 20092009 QX56