heater INFINITI QX56 2010 Factory Repair Manual
[x] Cancel search | Manufacturer: INFINITI, Model Year: 2010, Model line: QX56, Model: INFINITI QX56 2010Pages: 4210, PDF Size: 81.91 MB
Page 2962 of 4210

PG-52
< COMPONENT DIAGNOSIS >
HARNESS
G3 B3 W/16 : Suspension control unitC5 B69 SMJ : To M40
E4 B6 W/18 : To D201 G2 B70 GR/3 : Rear combination lamp LH
C5 B7 — : Body ground D5 B72 BR/6 : Subwoofer
D4 B8 W/3 : Front door switch LH F3 B73 W/16 : Rear view camera control unit
C4 B9 Y/12 : Air bag diagnosis sensor unit C4 B74 Y/4 : Seat belt buckle pre-tensioner assembly LH
E5 B10 Y/2 : Front LH side air bag module F2 B75 W/10 : To B400
F3 B13 W/24 : ICC unit F2 B76 GR/2 : Luggage area antenna
E5 B14 Y/2 : Front LH seat belt pre-tensioner C3 B78 W/3 : Rear seat heater RH
E5 B15 Y/2 : LH side air bag (satellite) sensor E3 B79 W/3 : Rear seat heater LH
G3 B17 GR/24 : ICC unit Front seat LH harness
E3 B18 W/3 : Rear door switch LH D3 B200 W/16 : To B37
G1 B19 — : Body ground D5 B202 W/32 : Driver seat control unit
G2 B24 W/16 : Sonar control unit D5 B203 W/16 : Driver seat control unit
B4 B32 W/6 : To B124 C5 B204 GR/5 : Sliding motor LH
G2 B35 B/3 : Rear combination lamp LH D3 B205 W/4 : Reclining motor LH
D3 B37 W/16 : To B200 C4 B206 GR/5 : Lifting motor (front)
C5 B38 Y/2 : LH side front curtain air bag module D4 B207 GR/5 : Lifting motor (rear)
C5 B40 W/24 : To E34 D4 B208 W/10 : Power seat switch LH
C5 B41 W/12 : To E35 D4 B209 W/3 : Front seat heater LH
C5 B42 W/2 : To E36 D5 B210 W/4 : Lumbar support switch
B4 B43 W/16 : To B111 E5 B211 B/2 : Lumbar support motor
F1 B48 W/18 : To D401 Third row power folding seat sub-harness
F1 B49 W/2 : To D402 F2 B400 W/10 : To B75
F2 B52 W/2 : Rear power vent window motor LH E3 B401 GR/12 : Third row power folding seat control unit
F2 B54 Y/2 : LH side rear curtain air bag module E3 B402 W/10 : Third row power folding seat control unit
G3 B55 W/26 : Back door control unit F3 B403 GR/4 : Third row power folding seat motor LH
F2 B56 GR/16 : Sonar control unit (with front and rear
sonar system) E2 B404 W/4 : To B425
G2 B57 GR/10 : Sonar control unit (with front and rear
sonar system) E3 B425 W/4 : To B404
G1 B63 W/6 : Back door close switch E2 B426 GR/4 : Third row power folding seat motor RH
Revision: April 20092010 QX56
Page 2964 of 4210

PG-54
< COMPONENT DIAGNOSIS >
HARNESS
ROOM LAMP HARNESS
F4 B111 W/16 : To B43B2 B153 W/2 : Cargo lamp
E3 B113 Y/12 : Air bag diagnosis sensor unit E5 B154 W/2 : To B303
D5 B114 Y/2 : RH side air bag (satellite) sensor B3 B155 B/6 : Air mix door motor (rear)
C3 B116 W/3 : Rear door switch RH B3 B156 B/6 : Mode door motor (rear)
F5 B117 — : Body ground E5 B157 Y/4 : Seat belt buckle pre-tensioner assembly RH
E5 B118 W/3 : Front seat heater RH C3 B162 BR/6: Third row power folding seat switch
passenger side (front)
A2 B119 W/2 : Condenser-3 A3 B163 W/6: Third row power folding seat switch
passenger side (rear)
A2 B120 W/2 : Condenser-4 C3 B164 W/6: Third row power folding seat switch
driver side (front)
F4 B124 W/6 : To B32 A3 B165 BR/6: Third row power folding seat switch
driver side (rear)
E4 B126 Y/2 : Front RH side air bag module B2 B166 B/2 : Rear sonar buzzer
D4 B127 Y/2 : Front RH seat belt pre-tensioner Front seat RH harness
C3 B128 Y/2 : RH side rear curtain air bag module E5 B303 W/2 : To B154
F3 B129 Y/2 : RH side front curtain air bag module E4 B308 W/10 : Power seat switch RH
A3 B130 GR/3 : Rear combination lamp RH E4 B309 GR/2 : Sliding motor RH
A3 B132 — : Body ground E5 B310 GR/2 : Lifting motor RH (rear)
A3 B133 W/4 : Variable blower control (re ar)E4 B311 GR/2 : Lifting motor RH (front)
B3 B134 W/2 : Rear blower motor E4 B350 W/8 : To B136
E3 B136 W/8 : To B350 E4 B351 B/18 : Occupant classification system control unit
D5 B137 W/3 : Belt tension sensor E4 B352 B/3 : Occupant classification system sensor
B2 B138 B/3 : Rear cargo power sock etE4 B372 W/2 : Reclining motor RH
A1 B139 W/16 : To D602
Revision: April 20092010 QX56
Page 3963 of 4210

VTL-1
VENTILATION, HEATER & AIR CONDITIONER
C
DE
F
G H
J
K L
M
SECTION VTL
A
B
VTL
N
O P
CONTENTS
VENTILATION SYSTEM
PRECAUTION ....... ........................................2
PRECAUTIONS .............................................. .....2
Precaution for Supplemental Restraint System
(SRS) "AIR BAG" and "SEAT BELT PRE-TEN-
SIONER" ............................................................. ......
2
Precaution Necessary for Steering Wheel Rota-
tion After Battery Disconnect ............................... ......
2
Precaution for Working with HFC-134a (R-134a) ......3
Precaution for Procedure without Cowl Top Cover ......3
PREPARATION ............................................4
PREPARATION .............................................. .....4
Commercial Service Tool .................................... ......4
FUNCTION DIAGNOSIS ...............................5
IN-CABIN MICROFILTER .............................. .....5
Description .......................................................... ......5
ON-VEHICLE MAINTENANCE .....................6
IN-CABIN MICROFILTER .............................. .....6
Removal and Installation ...........................................6
ON-VEHICLE REPAIR .... ..............................7
CONTROL UNIT ..................................................7
Removal and Installation ...........................................7
IN-VEHICLE SENSOR ................................... .....9
Removal and Installation ...........................................9
OPTICAL SENSOR ........................................ ....10
Removal and Installation .........................................10
INTAKE SENSOR ..............................................11
Removal and Installation .........................................11
BLOWER MOTOR .......................................... ....12
Component .......................................................... ....12
Removal and Installation .........................................12
VARIABLE BLOWER CONTROL .....................14
Components ............................................................14
Removal and Installation .........................................15
HEATER & COOLING UNIT ASSEMBLY ........16
Component ..............................................................16
Removal and Installation .........................................17
EVAPORATOR .................................................19
Removal and Installation for Front Evaporator ........19
Removal and Installation for Rear Evaporator .........20
EXPANSION VALVE .........................................22
Removal and Installation for Rear Expansion
Valve .................................................................... ....
22
HEATER CORE .................................................23
Component ..............................................................23
Removal and Installation .........................................24
DEFROSTER DOOR MOTOR ..........................26
Removal and Installation .........................................26
INTAKE DOOR MOTOR ...................................27
Removal and Installation .........................................27
MODE DOOR MOTOR ......................................28
Components ............................................................28
Removal and Installation .........................................29
AIR MIX DOOR MOTOR ...................................30
Component ..............................................................30
Removal and Installation .........................................31
DUCTS AND GRILLES .....................................33
Component ..............................................................33
Removal and Installation .........................................36
Revision: April 20092010 QX56
Page 3967 of 4210

IN-CABIN MICROFILTERVTL-5
< FUNCTION DIAGNOSIS >
C
DE
F
G H
J
K L
M A
B
VTL
N
O P
FUNCTION DIAGNOSIS
IN-CABIN MICROFILTER
DescriptionINFOID:0000000005147603
FUNCTION
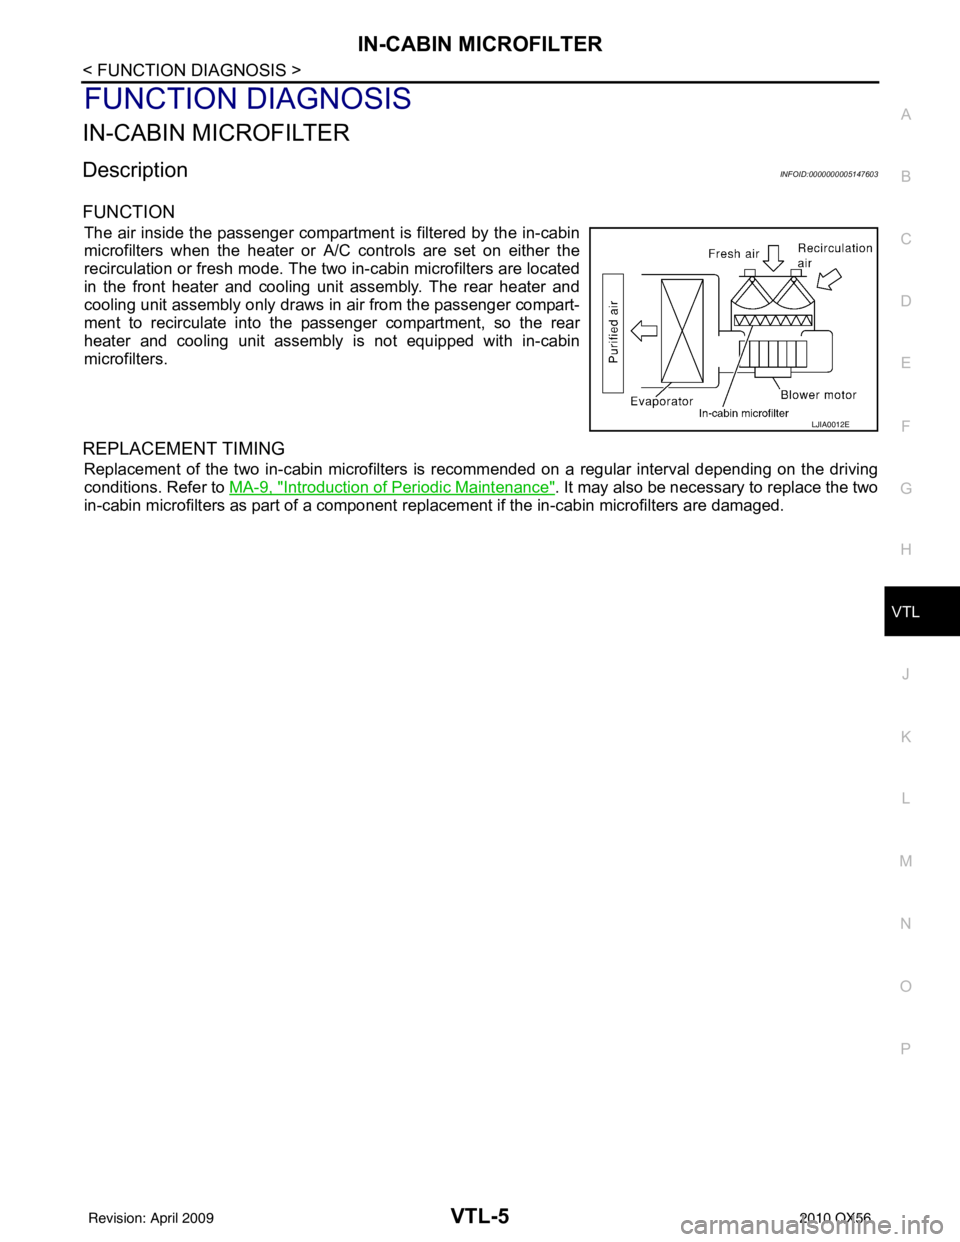
The air inside the passenger compartment is filtered by the in-cabin
microfilters when the heater or A/C controls are set on either the
recirculation or fresh mode. The two in-cabin microfilters are located
in the front heater and cooling unit assembly. The rear heater and
cooling unit assembly only draws in air from the passenger compart-
ment to recirculate into the passenger compartment, so the rear
heater and cooling unit assembly is not equipped with in-cabin
microfilters.
REPLACEMENT TIMING
Replacement of the two in-cabin microfilters is recommended on a regular interval depending on the driving
conditions. Refer to MA-9, "
Introduction of Periodic Maintenance". It may also be necessary to replace the two
in-cabin microfilters as part of a component r eplacement if the in-cabin microfilters are damaged.
LJIA0012E
Revision: April 20092010 QX56
Page 3968 of 4210

VTL-6
< ON-VEHICLE MAINTENANCE >
IN-CABIN MICROFILTER
ON-VEHICLE MAINTENANCE
IN-CABIN MICROFILTER
Removal and InstallationINFOID:0000000005147604
REPLACEMENT PROCEDURE
1. Remove the glove box assembly from the instrument panel. Refer to IP-17, "Removal and Installation".
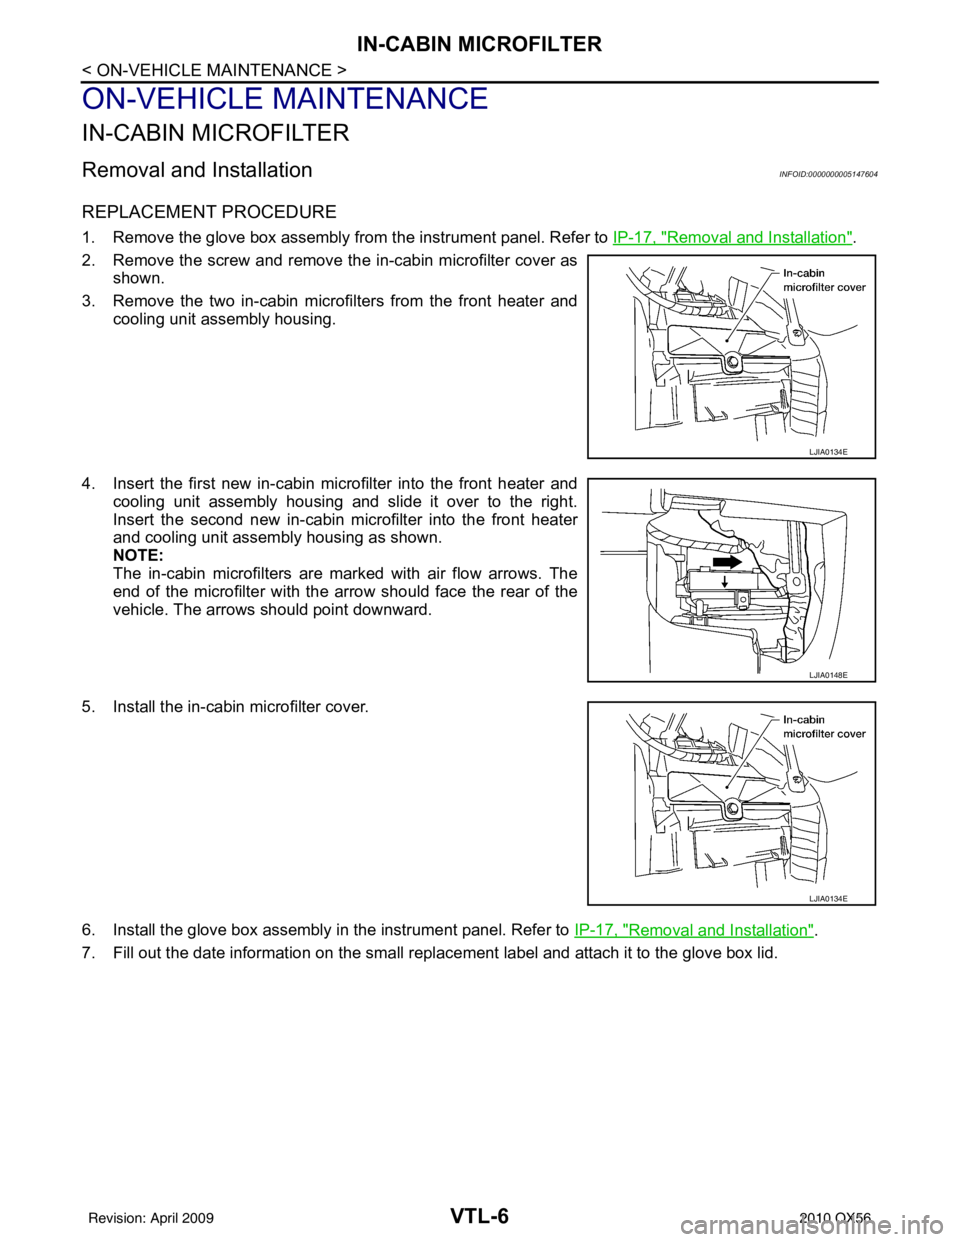
2. Remove the screw and remove the in-cabin microfilter cover as shown.
3. Remove the two in-cabin microf ilters from the front heater and
cooling unit assembly housing.
4. Insert the first new in-cabin micr ofilter into the front heater and
cooling unit assembly housing and slide it over to the right.
Insert the second new in-cabin mi crofilter into the front heater
and cooling unit assembly housing as shown.
NOTE:
The in-cabin microfilters are marked with air flow arrows. The
end of the microfilter with the arro w should face the rear of the
vehicle. The arrows should point downward.
5. Install the in-cabin microfilter cover.
6. Install the glove box assembly in the instrument panel. Refer to IP-17, "
Removal and Installation".
7. Fill out the date information on the small replac ement label and attach it to the glove box lid.
LJIA0134E
LJIA0148E
LJIA0134E
Revision: April 20092010 QX56
Page 3973 of 4210

INTAKE SENSORVTL-11
< ON-VEHICLE REPAIR >
C
DE
F
G H
J
K L
M A
B
VTL
N
O P
INTAKE SENSOR
Removal and InstallationINFOID:0000000005147608
REMOVAL
1. Remove the instrument lower panel RH and glove box. Refer to IP-17, "Removal and Installation".
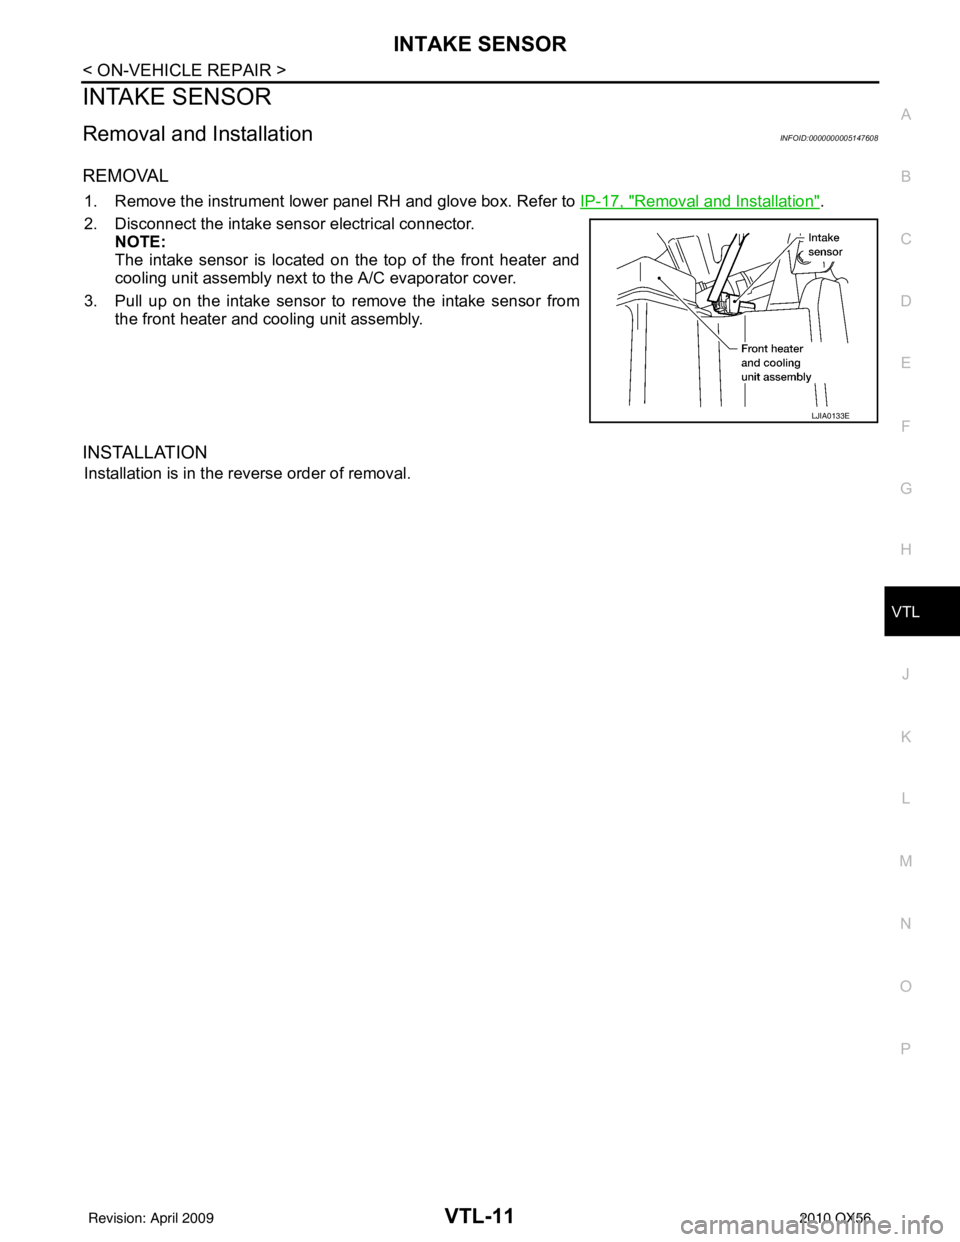
2. Disconnect the intake sensor electrical connector. NOTE:
The intake sensor is located on the top of the front heater and
cooling unit assembly next to the A/C evaporator cover.
3. Pull up on the intake sensor to remove the intake sensor from the front heater and cooling unit assembly.
INSTALLATION
Installation is in the reverse order of removal.
LJIA0133E
Revision: April 20092010 QX56
Page 3974 of 4210

VTL-12
< ON-VEHICLE REPAIR >
BLOWER MOTOR
BLOWER MOTOR
ComponentINFOID:0000000005147609
Front Blower MotorRear Blower Motor
Removal and InstallationINFOID:0000000005147610
FRONT BLOWER MOTOR
Removal
1. Remove the glove box assembly. Refer to IP-17, "Removal and Installation".
2. Disconnect the front blower motor electrical connector.
3. Remove the three screws and remove the front blower motor.
4. Remove the blower motor wheel as necessary to transfer to the new blower motor.
Installation
Installation is in the reverse order of removal.
LJIA0136E
1. Front heater and cooling unit assembly 2. Front blower motor 3. Front variable blower control
AWIIA0085ZZ
1. Rear blower motor2. Rear heater and cooling unit assembly 3. Rear variable blower control
Revision: April 20092010 QX56
Page 3975 of 4210

BLOWER MOTORVTL-13
< ON-VEHICLE REPAIR >
C
DE
F
G H
J
K L
M A
B
VTL
N
O P
REAR BLOWER MOTOR
Removal
1. Remove the rear heater and cooling unit assembly. Refer to VTL-17, "Removal and Installation".
2. Disconnect the rear blower motor electrical connector.
3. Remove the three screws and remove the rear blower motor.
4. Remove the blower motor wheel as necessary to transfer to the new blower motor.
Installation
Installation is in the reverse order of removal.
Revision: April 20092010 QX56
Page 3976 of 4210

VTL-14
< ON-VEHICLE REPAIR >
VARIABLE BLOWER CONTROL
VARIABLE BLOWER CONTROL
ComponentsINFOID:0000000005147622
Front Variable Blower Control - Front Heater and Cooling Unit Assembly
LJIA0139E
1. Front heater and cooling unit assembly 2. Intake door motor3. Air mix door motor (driver)
4. Variable blower control 5. Air mix door motor (passenger) 6. Mode door motor
7. Defroster door motor
Revision: April 20092010 QX56
Page 3977 of 4210

VARIABLE BLOWER CONTROLVTL-15
< ON-VEHICLE REPAIR >
C
DE
F
G H
J
K L
M A
B
VTL
N
O P
Rear Variable Blower Control - Rear Heater and Cooling Unit Assembly
Removal and InstallationINFOID:0000000005147623
FRONT VARIABLE BLOWER CONTROL
Removal
1. Remove the glove box assembly. Refer to IP-17, "Removal and Installation".
2. Disconnect the variable blower control electrical connector.
3. Remove the two screws and remove the variable blower control.
Installation
Installation is in the reverse order of removal.
REAR VARIABLE BLOWER CONTROL
Removal
1. Remove the luggage side finisher lower RH. Refer to INT-19, "Removal and Installation".
2. Disconnect the rear blower motor resistor electrical connector.
3. Remove the two screws and remove the rear blower motor resistor.
Installation
Installation is in the reverse order of removal.
ALIIA0066ZZ
1. Air mix door motor 2. Heater core 3. Blower motor
4. Variable blower control 5. Rear heater and cooling unit assembly Front
Revision: April 20092010 QX56