display INFINITI QX56 2011 Factory Workshop Manual
[x] Cancel search | Manufacturer: INFINITI, Model Year: 2011, Model line: QX56, Model: INFINITI QX56 2011Pages: 5598, PDF Size: 94.53 MB
Page 192 of 5598

AV-44
< SYSTEM DESCRIPTION >
DIAGNOSIS SYSTEM (AROUND VIEW MONITOR CONTROL UNIT)
DIAGNOSIS SYSTEM (AROUND VIEW MONITOR CONTROL UNIT)
On Board Diagnosis FunctionINFOID:0000000006216221
The diagnosis function of around view monitor control unit is displayed when selecting “Camera Cont.” of Con-
firmation/Adjustment mode in the multi AV system.
Around view monitor control unit diagnosis item
CAUTION:
*: Never perform other operations for approxim ately 10 seconds after performing "Initialize Camera
Image Calibration".
Connection Confirmation
The status of signals inputted to around view monitor control unit can
be checked.
Connection Confirmation item list
AV control unit Confirmation/Adjustment mode Function
Camera Cont. Connection Confirmation
The status of signals input to around view monitor control unit
can be checked.
Calibrating Cam-
era Image Rear Camera Performs the calibration of rear camera.
Pass-Side Camera Performs the calibration of side camera RH.
Front Camera Performs the calibration of front camera.
Dr-Side Camera Performs the calibration of side camera LH.
Initialize Camera Image
Calibration
*The calibration can be initialized to NISSAN factory shipment
condition.
Fine Tuning of Bird’s-Eye View The confirmation and adjustment of the difference between
each camera can be performed.
The system changes to the ZOOM function by the operation of shift and the ZOOM ratio of each camera can be changed.
Correct Draw Line
of Wide View Rear-Wide View The position of rear wide view guideline can be changed.
JSNIA2277ZZ
Diagnosis item Display Description
Steer. Angle Sensor ON/OFF Input status of steering angle sensor is displayed by ON/OFF.
Reverse Sensor ON/OFF Input status of reverse signal inputted to around view monitor control unit is dis-
played by ON/OFF in real time.
Vehicle Speed Sensor ON/OFF Input status of vehicle speed signal inputted to around view monitor control
unit is displayed by ON/OFF.
When the vehicle speed signal is input, it is turned ON. It remains ON until con- nection confirmation mode is stopped.
Camera Switch ON/OFF The status of camera switch signal received via AV communication from AV
control unit is displayed by ON/OFF.
When the camera switch signal is received once, it is turned ON. It remains ON until connection confirmation mode is stopped.
IGN ON/OFF Input status of ignition signal inputted to around view monitor control unit is dis-
played by ON/OFF in real time.
ILL ON/OFF Input status of illumination signal inputted to around view monitor control unit is
displayed by ON/OFF in real time.
Revision: 2010 May2011 QX56
Page 193 of 5598

AV
DIAGNOSIS SYSTEM (AROUND VIEW MONITOR CONTROL UNIT)
AV-45
< SYSTEM DESCRIPTION >
C
D E
F
G H
I
J
K L
M B A
O P
Calibrating Camera Image
Perform the calibration of camera image caused by the incorrect mounting position of each camera, etc. Always perform calibration
after performing the following work.
- When each camera or each camera mount (door mirror, front grille,
etc.) is removed
- When replacing around view monitor control unit
When performing the calibration initialization, it can be set to the
NISSAN factory shipment condition.
Refer to AV-112, "
Work Procedure" for the calibration procedure.
Calibrating Camera Image item
CAUTION:
Type of Steer. Angle Sensor Abslt. The input type of steering angle sensor is displayed. (“Abslt.” is displayed on this
model.)
Type of Steer. Gear ratio 1 The type of steering gear ratio is displayed. (“1” is displayed on this model.)
Left or Right Steer. Right/Left The steering position is displayed.
Rear Camera Image Output signal OK/NG The input status of rear camera image signal is displayed by OK/NG in real time.
Rear Camera COMM Status OK/NG The communication status with rear camera is displayed by OK/NG in real time.
Rear Camera COMM Line OK/NG The status of communication line with rear camera is displayed by OK/NG in real
time.
Front Camera Image Output signal OK/NG The input status of front camera image signal is displayed by OK/NG in real time.
Front Camera COMM Status OK/NG The communication status with front camera is displayed by OK/NG in real time.
Front Camera COMM Line OK/NG The status of communication line with front camera is displayed by OK/NG in real
time.
Pass-Side Camera Image Output sig-
nal OK/NGThe input status of side camera RH image signal is displayed by OK/NG in real
time.
Pass-Side Camera COMM Status OK/NG The communication status with side camera RH is displayed by OK/NG in real
time.
Pass-Side Camera COMM Line OK/NG The status of communication line with side camera RH is displayed by OK/NG in
real time.
Dr-Side Camera Image Output signal OK/NG The input status of side camera LH image signal is displayed by OK/NG in real
time.
Dr-Side Camera COMM Status OK/NG The communication status with side camera LH is displayed by OK/NG in real
time.
Dr-Side Camera COMM Line OK/NG The status of communication line with side camera LH is displayed by OK/NG in
real time.
Diagnosis item Display Description
JSNIA2379ZZ
Adjustment range
Rotating direction : 31 patterns (16 on the center)
Upper/lower direction : (
−99) – (+99)
Left/right direction : ( −99) – (+99)
Items Description
Rear Camera Performs the ca libration of rear camera.
Pass-Side Camera Performs the ca libration of side camera RH.
Front Camera Performs the ca libration of front camera.
Dr-Side Camera Performs the calib ration of side camera LH.
Initialize Camera Image Calibration
*The calibration can be initialized to the factory shipment setting.
Revision: 2010 May2011 QX56
Page 194 of 5598

AV-46
< SYSTEM DESCRIPTION >
DIAGNOSIS SYSTEM (AROUND VIEW MONITOR CONTROL UNIT)
*: Never perform other operations for approxim ately 10 seconds after performing "Initialize Camera
Image Calibration".
Fine Tuning of Birds-Eye View
The fine adjustment function of camera calibration can check and adjust the difference between each camera.
Fine adjustments can be performed for each camera. Move the
“+”-mark to select the camera by pressing the “CAMERA” switch.
Perform the adjustment with the center dial and upper/lower/left/
right switches.
CAUTION:
Operate the center dial slowly because the changing of the
screen takes approximately 1 second.
NOTE:
It can be initialized to the NISSAN factory shipment setting with “Initialize Camera Image Calibration” of “Calibrating Camera
Image”.
The adjustment value is cancelled in this mode by performing “Initialize Camera Image Calibration”.
ZOOM function
The ZOOM ratio of camera can be changed when calibrating the
camera.
It shifts to ZOOM function mode by shifting the selector lever to a
position other than the “R” position → “R” position → other than “R”
position in the “Fine Tuning of Birds-Eye View” mode.
The changing of ZOOM ratio can be performed for each camera.
Move the “+”-mark to select the camera by pressing “CAMERA”
switch and press the left/right s witch to change the ZOOM ratio.
NOTE:
When the position is not correct in “Fine Tuning of Birds-Eye View”
mode, use this "ZOOM" function to adjust it.
If this function is used, always adjust the upper/lower/left/right posi-
tion again on the “Fine Tuning of Birds-Eye View” screen.
Correct Draw Line of Wide View
The display position of guiding lines when displayed on the rear-wide
view can be changed.
Correct Draw Line of Camera Image item
Adjustment range
Rotating direction : 31 patterns (16 on the center)
Upper/lower direction : ( −99) – (+99)
Left/right direction : ( −99) − (+99)
JSNIA2280ZZ
JSNIA2279ZZ
Adjustment range
Rotating direction : 7 patterns
JSNIA2380ZZ
Items Description
Rear-Wide View The position of rear wide view guideline can be changed.
Revision: 2010 May2011 QX56
Page 195 of 5598
![INFINITI QX56 2011 Factory Workshop Manual
AV
DIAGNOSIS SYSTEM [SONAR CONTROL UNIT (WITH AROUND VIEW MONI-
TOR)]
AV-47
< SYSTEM DESCRIPTION >
C
D E
F
G H
I
J
K L
M B A
O P
DIAGNOSIS SYSTEM [SONAR CONT ROL UNIT (WITH AROUND VIEW
MONITOR)]
CONS INFINITI QX56 2011 Factory Workshop Manual
AV
DIAGNOSIS SYSTEM [SONAR CONTROL UNIT (WITH AROUND VIEW MONI-
TOR)]
AV-47
< SYSTEM DESCRIPTION >
C
D E
F
G H
I
J
K L
M B A
O P
DIAGNOSIS SYSTEM [SONAR CONT ROL UNIT (WITH AROUND VIEW
MONITOR)]
CONS](/img/42/57033/w960_57033-194.png)
AV
DIAGNOSIS SYSTEM [SONAR CONTROL UNIT (WITH AROUND VIEW MONI-
TOR)]
AV-47
< SYSTEM DESCRIPTION >
C
D E
F
G H
I
J
K L
M B A
O P
DIAGNOSIS SYSTEM [SONAR CONT ROL UNIT (WITH AROUND VIEW
MONITOR)]
CONSULT-III FunctionINFOID:0000000006216222
APPLICATION ITEMS
CONSULT-III can display each diagnostic item using the diagnostic test modes shown as follows:
ECU IDENTIFICATION
Displays the part number of sonar control unit.
SELF-DIAGNOSTIC RESULTS
For details, refer to AV-77, "DTC Index".
DATA MONITOR
*: Even when a buzzer (backward) is output c ondition, this item is indicated as OFF.
ACTIVE TEST
WORK SUPPORT
CORNER SEN DISTANCE SET
Corner sensor warning buzzer distance can be set to 4 phases as follows.
Test mode Function
Ecu Identification Sonar control unit part number can be read.
Self Diagnostic Result Sonar control unit checks the conditions and displays memorized error.
Data Monitor Sonar control unit input/output data in real time.
Active Test Gives a drive signal to a load to check the operation.
Work support Changes setting of each function.
Monitor Item Display Description
SONAR OPE On Around view monitor is ON. (sonar system is ON)
Off Around view monitor is OFF. (sonar system is OFF)
BUZZER OUTPUT
*On Buzzer (forward) is output condition. Off Buzzer (forward) is non-output condition.
CR SEN [FL]
CR SEN [FR]
CR SEN [RL]
CR SEN [RR] ERROR When a sensor is abnormal.
LV.0 When a sensor is not detection.
LV. 2 The distance between the corner sensor and an obstacle is 50 cm (19.6 in) or more and
less then 60 cm (23.6 in).
LV. 3 The distance between the corner sensor and an obstacle is 30 cm (11.8 in) or more and
less then 50 cm (19.6 in).
LV.4 The distance between corner sensor and an obstacle less than 30 cm (11.8 in).
Active test item Function
BUZZER This test is able to check buzzer operation.
SONAR SENSOR This test is able to check each sonar sensor operation.
Work support item Function
CORNER SEN DISTANCE SET Corner sensor warning buzzer distance is adjustable to 4 phases.
Revision: 2010 May2011 QX56
Page 197 of 5598

AV
DIAGNOSIS SYSTEM (HEADREST DISPLAY UNIT)AV-49
< SYSTEM DESCRIPTION >
C
DE
F
G H
I
J
K L
M B A
O P
DIAGNOSIS SYSTEM (HEA DREST DISPLAY UNIT)
DescriptionINFOID:0000000006216223
Self-diagnosis of headrest display unit can be perform ed by operating rear seat remote controller.
On Board Diagnosis FunctionINFOID:0000000006216224
Self-diagnosis mode can check the following items.
METHOD OF STARTING
1. Turn ignition switch to the ON position.
2. Turn the headrest display unit OFF.
3. Press each switch of rear seat remote controller in the order shown below.
“AUX(L)” →“VOL DOWN” →“DISP(R)” →“VOL UP” →“DVD” →“L”
NOTE:
Operation must be done within 20 seconds.
Perform the operation of rear seat remote controller for head- rest display unit of each side.
4. When the rear seat remote operation is performed as shown on procedure 3, self-diagnosis screen is displayed.
Diagnosis item Display Description
Display Location Left/Right/Un-
known Installation location of headrest display unit is displayed.
NOTE:
If displayed location is different from the actual location or shown as “unknown”,
check location recognition signal circuit.
Software Ver. ***** Software version of headrest display unit is displayed.
Hardware Ver. ***** Hardware version of headrest display unit is displayed.
Seat Position OK Not used for this vehicle.
JSNIA3003ZZ
JSNIA3005ZZ
Revision: 2010 May2011 QX56
Page 198 of 5598

AV-50
< SYSTEM DESCRIPTION >
DIAGNOSIS SYSTEM (HEADREST DISPLAY UNIT)
Finishing Self-diagnosis Mode
Self-diagnosis mode is canceled when pressing the enter switch of
rear seat remote controller.
JSNIA3004ZZ
Revision: 2010 May2011 QX56
Page 199 of 5598

AV
AV CONTROL UNITAV-51
< ECU DIAGNOSIS INFORMATION >
C
DE
F
G H
I
J
K L
M B A
O P
ECU DIAGNOSIS INFORMATION
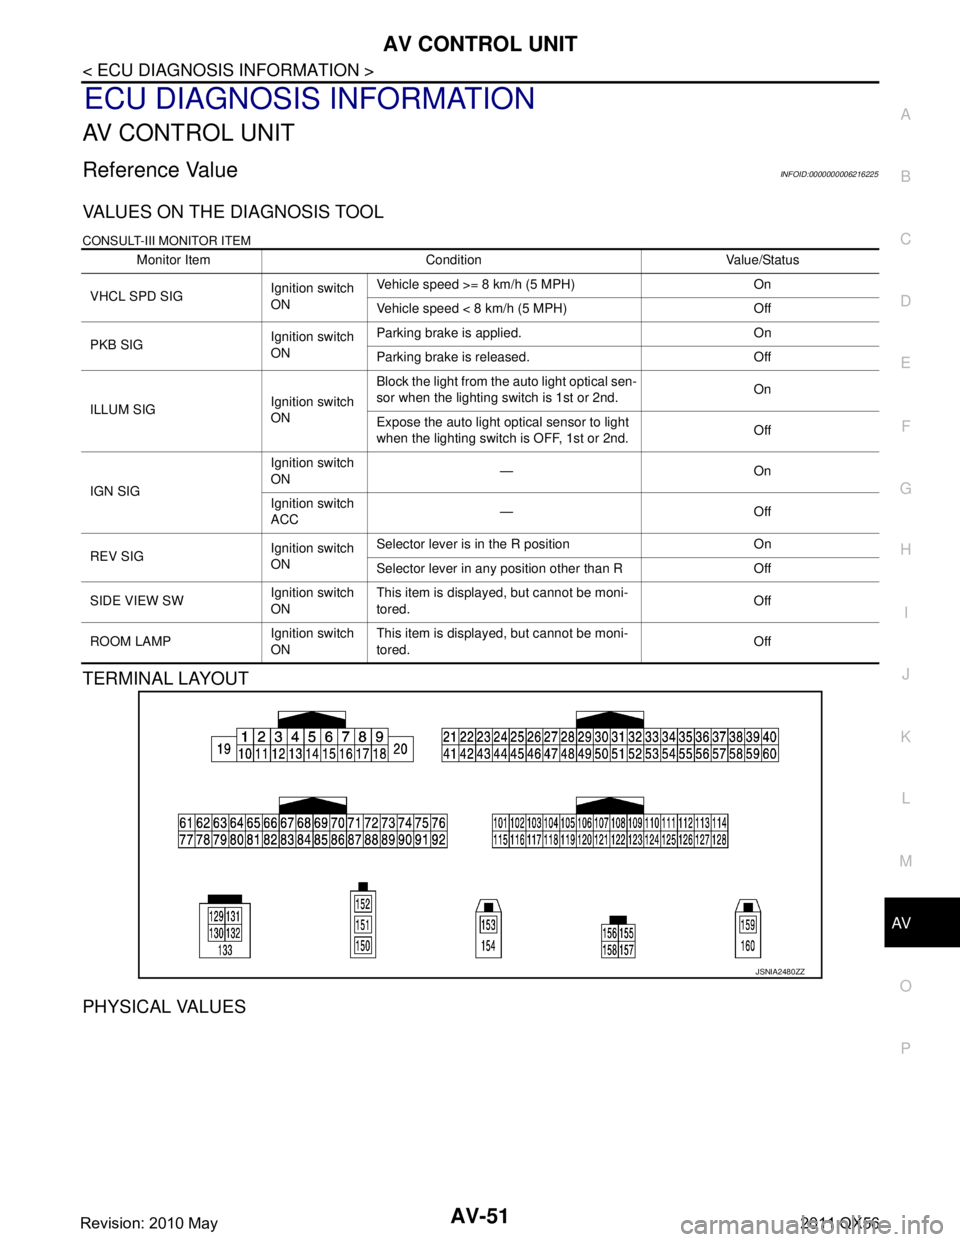
AV CONTROL UNIT
Reference ValueINFOID:0000000006216225
VALUES ON THE DIAGNOSIS TOOL
CONSULT-III MONITOR ITEM
TERMINAL LAYOUT
PHYSICAL VALUES
Monitor Item Condition Value/Status
VHCL SPD SIG Ignition switch
ONVehicle speed >= 8 km/h (5 MPH) On
Vehicle speed < 8 km/h (5 MPH) Off
PKB SIG Ignition switch
ONParking brake is applied. On
Parking brake is released. Off
ILLUM SIG Ignition switch
ONBlock the light from the auto light optical sen-
sor when the lighting switch is 1st or 2nd.
On
Expose the auto light optical sensor to light
when the lighting switch is OFF, 1st or 2nd. Off
IGN SIG Ignition switch
ON
—On
Ignition switch
ACC —Off
REV SIG Ignition switch
ONSelector lever is in the R position On
Selector lever in any position other than R Off
SIDE VIEW SW Ignition switch
ONThis item is displayed, but cannot be moni-
tored.
Off
ROOM LAMP Ignition switch
ONThis item is displayed, but cannot be moni-
tored.
Off
JSNIA2480ZZ
Revision: 2010 May2011 QX56
Page 201 of 5598

AV
AV CONTROL UNITAV-53
< ECU DIAGNOSIS INFORMATION >
C
DE
F
G H
I
J
K L
M B A
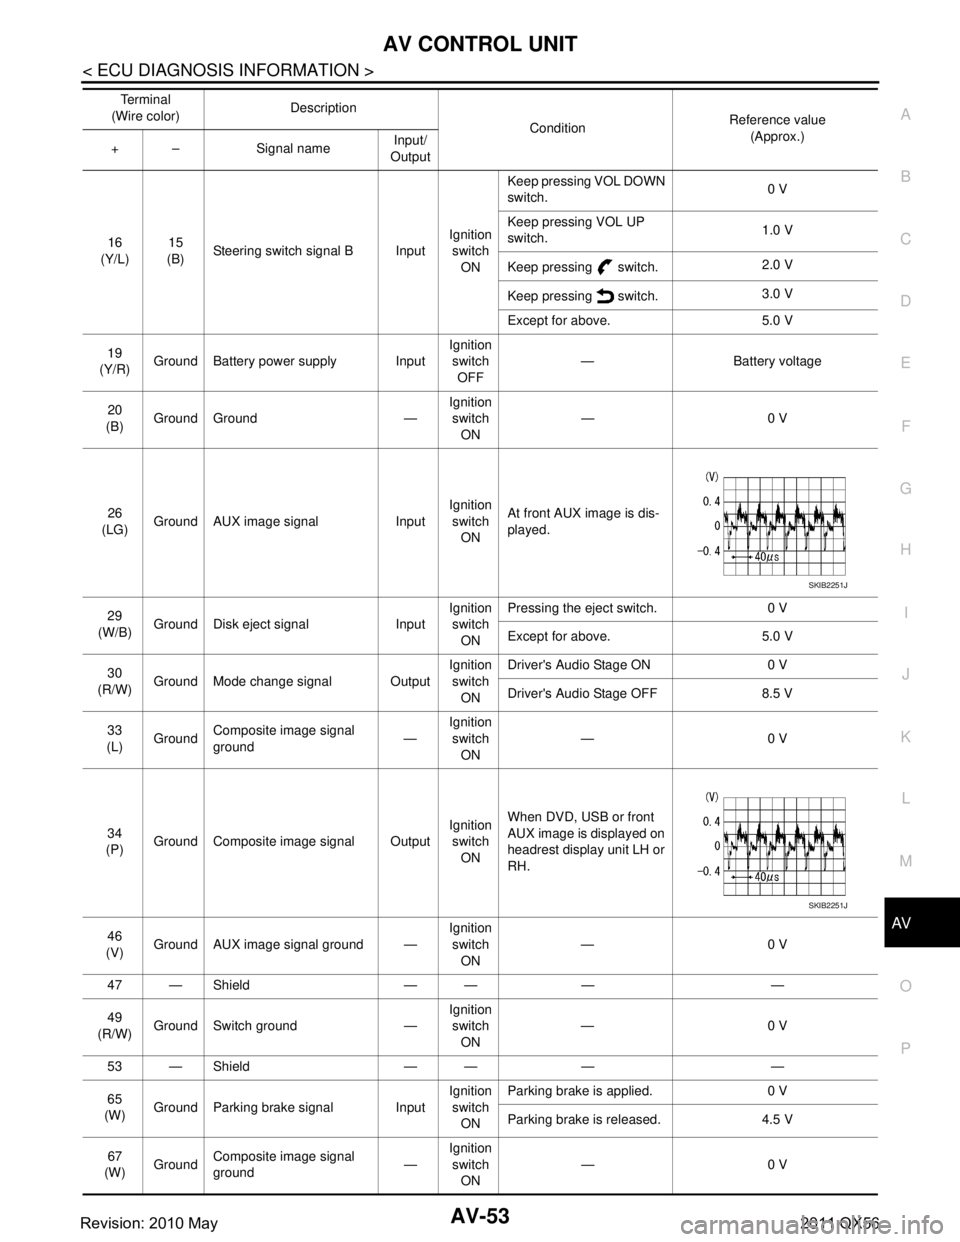
O P16
(Y/L) 15
(B) Steering switch signal B Input Ignition
switch
ON Keep pressing VOL DOWN
switch.
0 V
Keep pressing VOL UP
switch. 1.0 V
Keep pressing switch. 2.0 V
Keep pressing switch. 3.0 V
Except for above. 5.0 V
19
(Y/R) Ground Battery power supply Input Ignition
switch
OFF — Battery voltage
20
(B) Ground Ground — Ignition
switch ON —0 V
26
(LG) Ground AUX image signal Input Ignition
switch ON At front AUX image is dis-
played.
29
(W/B) Ground Disk eject signal Input Ignition
switch
ON Pressing the eject switch. 0 V
Except for above. 5.0 V
30
(R/W) Ground Mode change signal Output Ignition
switch ON Driver's Audio Stage ON 0 V
Driver's Audio Stage OFF 8.5 V
33
(L) Ground
Composite image signal
ground —Ignition
switch ON —0 V
34
(P) Ground Composite image signal Output Ignition
switch ON When DVD, USB or front
AUX image is displayed on
headrest display unit LH or
RH.
46
(V) Ground AUX image signal ground — Ignition
switch ON —0 V
47 — Shield — — — —
49
(R/W) Ground Switch ground — Ignition
switch
ON —0 V
53 — Shield — — — —
65
(W) Ground Parking brake signal Input Ignition
switch ON Parking brake is applied. 0 V
Parking brake is released. 4.5 V
67
(W) Ground Composite image signal
ground —Ignition
switch ON —0 V
Te r m i n a l
(Wire color) Description
ConditionReference value
(Approx.)
+ – Signal name Input/
Output
SKIB2251J
SKIB2251J
Revision: 2010 May2011 QX56
Page 202 of 5598

AV-54
< ECU DIAGNOSIS INFORMATION >
AV CONTROL UNIT
68
(R) Ground Composite image signal Output Ignition
switch ON At DVD image is displayed.
72
(Y/G) Ground Microphone VCC Output Ignition
switch ON —5.0 V
73
(Y/G) Ground Communication signal
(CONT
→DISP) OutputIgnition
switch ON When adjusting display
brightness.
74
(P) —CAN–L Input/
Output —— —
75
(LG) —
AV communication signal
(L) Input/
Output —— —
76
(LG) —AV communication signal
(L) Input/
Output —— —
79
(L/O) Ground Dimmer signal Input Ignition
switch ON Either of the following con-
ditions
Lighting switch is OFF
Lighting switch is 1st or
2nd, and the area around
the vehicle is bright
(shine a light on the opti-
cal sensor) 0 V
Lighting switch is 1st or
2nd, and the area around
the vehicle is dark (block
the light from the optical
sensor) 12.0 V
80
(GR/L) Ground Ignition signal Input Ignition
switch
ON — Battery voltage
81
(R/Y) Ground Reverse signal Input Ignition
switch ON Selector lever is in R posi-
tion.
12.0 V
Selector lever is in other
than R position. 0 V
Te r m i n a l
(Wire color) Description
ConditionReference value
(Approx.)
+ – Signal name Input/
Output
SKIB2251J
PKIB5039J
Revision: 2010 May2011 QX56
Page 203 of 5598

AV
AV CONTROL UNITAV-55
< ECU DIAGNOSIS INFORMATION >
C
DE
F
G H
I
J
K L
M B A
O P
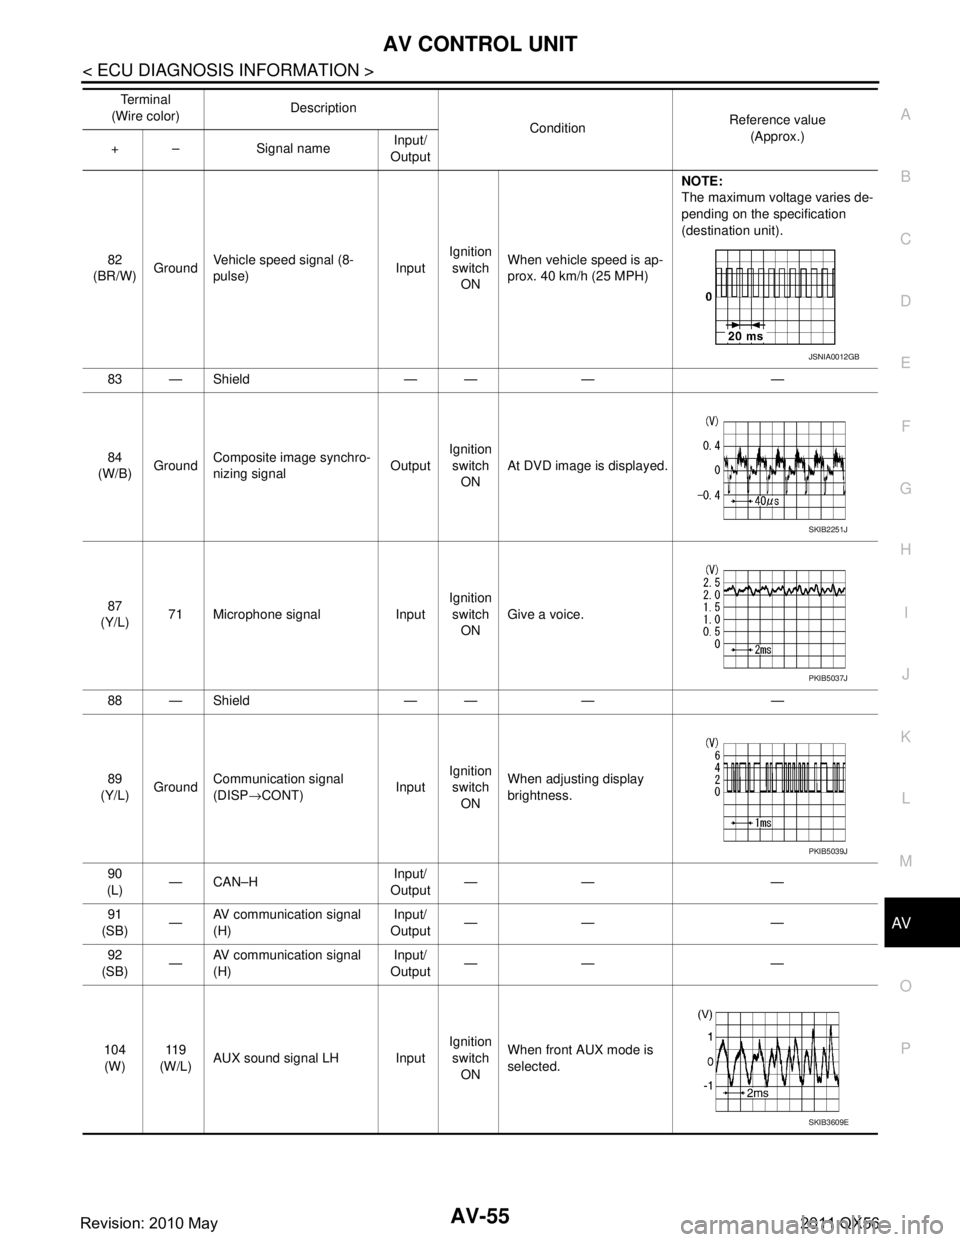
82
(BR/W) GroundVehicle speed signal (8-
pulse) InputIgnition
switch ON When vehicle speed is ap-
prox. 40 km/h (25 MPH) NOTE:
The maximum voltage varies de-
pending on the specification
(destination unit).
83 — Shield — — — —
84
(W/B) Ground Composite image synchro-
nizing signal
OutputIgnition
switch ON At DVD image is displayed.
87
(Y/L) 71 Microphone signal Input Ignition
switch ON Give a voice.
88 — Shield — — — —
89
(Y/L) Ground Communication signal
(DISP
→CONT) InputIgnition
switch ON When adjusting display
brightness.
90
(L) —CAN–H Input/
Output —— —
91
(SB) —AV communication signal
(H) Input/
Output —— —
92
(SB) —
AV communication signal
(H) Input/
Output —— —
104 (W) 11 9
(W/L) AUX sound signal LH Input Ignition
switch ON When front AUX mode is
selected.
Te r m i n a l
(Wire color) Description
ConditionReference value
(Approx.)
+ – Signal name Input/
Output
JSNIA0012GB
SKIB2251J
PKIB5037J
PKIB5039J
SKIB3609E
Revision: 2010 May2011 QX56