seats INFINITI QX56 2011 Factory Service Manual
[x] Cancel search | Manufacturer: INFINITI, Model Year: 2011, Model line: QX56, Model: INFINITI QX56 2011Pages: 5598, PDF Size: 94.53 MB
Page 1748 of 5598

DLK-212
< SYMPTOM DIAGNOSIS >
SQUEAK AND RATTLE TROUBLE DIAGNOSES
Most of these incidents can be repaired by adjusting, securing or insulating the item(s) or component(s) caus-
ing the noise.
SUNROOF/HEADLINING
Noises in the sunroof/headlining area c an often be traced to one of the following:
1. Sunroof lid, rail, linkage or seals making a rattle or light knocking noise
2. Sunvisor shaft shaking in the holder
3. Front or rear windshield touching headlining and squeaking
Again, pressing on the components to stop the noise while duplicating the conditions can isolate most of these
incidents. Repairs usually consist of insulating with felt cloth tape.
SEATS
When isolating seat noise it is important to note t he position the seat is in and the load placed on the seat
when the noise is present. These conditions should be duplicated when verifying and isolating the cause of
the noise.
Cause of seat noise include:
1. Headrest rods and holder
2. A squeak between the seat pad cushion and frame
3. Rear seatback lock and bracket
These noises can be isolated by moving or pressing on the suspected components while duplicating the con-
ditions under which the noise occurs. Most of thes e incidents can be repaired by repositioning the component
or applying urethane tape to the contact area.
UNDERHOOD
Some interior noise may be caused by components under the hood or on the engine wall. The noise is then
transmitted into the passenger compartment.
Causes of transmitted underhood noise include:
1. Any component mounted to the engine wall
2. Components that pass through the engine wall
3. Engine wall mounts and connectors
4. Loose radiator mounting pins
5. Hood bumpers out of adjustment
6. Hood striker out of adjustment
These noises can be difficult to isolate since they cannot be reached from the interior of the vehicle. The best
method is to secure, move or insulate one component at a time and test drive the \
vehicle. Also, engine RPM
or load can be changed to isolate the noise. Repairs can usually be made by moving, adjusting, securing, or
insulating the component causing the noise.
Revision: 2010 May2011 QX56
Page 2318 of 5598
![INFINITI QX56 2011 Factory Service Manual
EC-294
< DTC/CIRCUIT DIAGNOSIS >[VK56VD]
P0300, P0301, P0302, P
0303, P0304, P0305, P0306, P0307, P0308 MISFIRE
When the gap is less than 13 mm (0.52 in), a spark might be generated even if the coi INFINITI QX56 2011 Factory Service Manual
EC-294
< DTC/CIRCUIT DIAGNOSIS >[VK56VD]
P0300, P0301, P0302, P
0303, P0304, P0305, P0306, P0307, P0308 MISFIRE
When the gap is less than 13 mm (0.52 in), a spark might be generated even if the coi](/img/42/57033/w960_57033-2317.png)
EC-294
< DTC/CIRCUIT DIAGNOSIS >[VK56VD]
P0300, P0301, P0302, P
0303, P0304, P0305, P0306, P0307, P0308 MISFIRE
When the gap is less than 13 mm (0.52 in), a spark might be generated even if the coil is malfunc-
tioning.
Is the inspection result normal?
YES >> GO TO 9.
NO >> GO TO 6.
6.CHECK FUNCTION OF IGNITION COIL-II
1. Turn ignition switch OFF.
2. Disconnect spark plug and connect a non-malfunctioning spark plug.
3. Crank engine for approximately 3 seconds, and rec heck whether spark is generated between the spark
plug and the grounded metal portion.
Is the inspection result normal?
YES >> GO TO 7.
NO >> Check ignition coil, power transistor and their circuits. Refer to EC-506, "
Diagnosis Procedure".
7.CHECK SPARK PLUG
Check the initial spark plug for fouling, etc.
Is the inspection result normal?
YES >> Replace spark plug(s) with standard type one(s). For spark plug type, refer to EM-132, "
Spark Plug".
NO >> Repair or clean spark plug. Then GO TO 8.
8.CHECK FUNCTION OF IGNITION COIL-III
1. Reconnect the initial spark plugs.
2. Crank engine for approximately 3 seconds, and rec heck whether spark is generated between the spark
plug and the grounded portion.
Is the inspection result normal?
YES >> INSPECTION END
NO >> Replace spark plug(s) with standard type one(s). For spark plug type, refer to EM-132, "
Spark
Plug".
9.CHECK COMPRESSION PRESSURE
Check compression pressure. Refer to EM-16, "
Inspection".
Is the inspection result normal?
YES >> GO TO 10.
NO >> Check pistons, piston rings, valves, valve seats and cylinder head gaskets.
10.CHECK FUEL PRESSURE
1. Install all removed parts.
2. Check fuel pressure. Refer to EC-153, "
Work Procedure".
Is the inspection result normal?
YES >> GO TO 12.
NO >> GO TO 11.
11 .DETECT MALFUNCTIONING PART
Check fuel hoses and fuel tubes for clogging.
Is the inspection result normal?
Spark should be generated.
SEF156I
Spark should be generated.
Revision: 2010 May2011 QX56
Page 2630 of 5598

EM-68
< REMOVAL AND INSTALLATION >
TIMING CHAIN
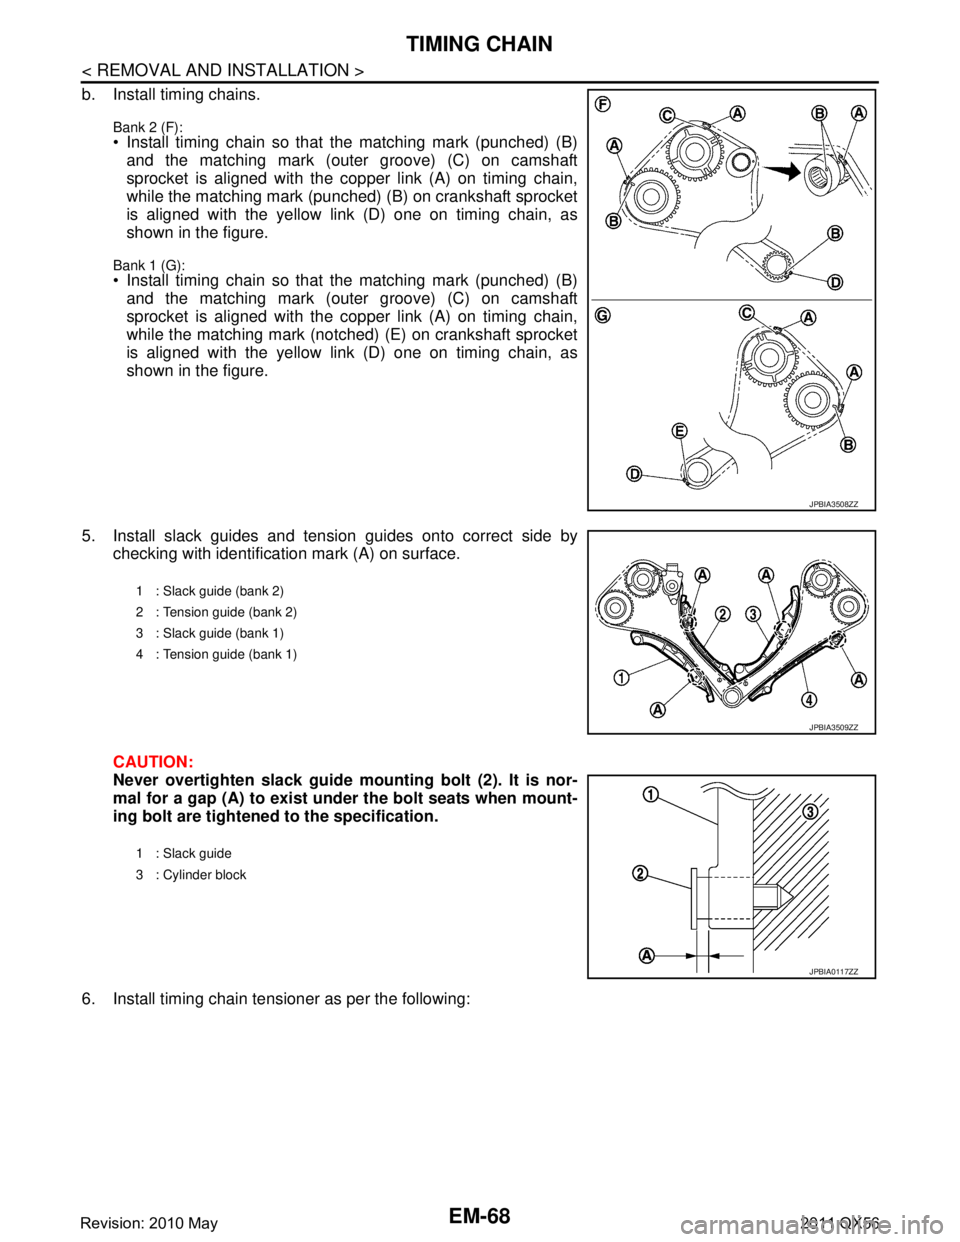
b. Install timing chains.
Bank 2 (F): Install timing chain so that the matching mark (punched) (B)and the matching mark (outer groove) (C) on camshaft
sprocket is aligned with the copper link (A) on timing chain,
while the matching mark (punched) (B) on crankshaft sprocket
is aligned with the yellow link (D) one on timing chain, as
shown in the figure.
Bank 1 (G): Install timing chain so that the matching mark (punched) (B)and the matching mark (outer groove) (C) on camshaft
sprocket is aligned with the copper link (A) on timing chain,
while the matching mark (notched) (E) on crankshaft sprocket
is aligned with the yellow link (D) one on timing chain, as
shown in the figure.
5. Install slack guides and tension guides onto correct side by checking with identification mark (A) on surface.
CAUTION:
Never overtighten slack guide mounting bolt (2). It is nor-
mal for a gap (A) to exist und er the bolt seats when mount-
ing bolt are tightened to the specification.
6. Install timing chain tensioner as per the following:
JPBIA3508ZZ
1 : Slack guide (bank 2)
2 : Tension guide (bank 2)
3 : Slack guide (bank 1)
4 : Tension guide (bank 1)
JPBIA3509ZZ
1 : Slack guide
3 : Cylinder block
JPBIA0117ZZ
Revision: 2010 May2011 QX56
Page 2653 of 5598

CYLINDER HEADEM-91
< REMOVAL AND INSTALLATION >
C
DE
F
G H
I
J
K L
M A
EM
NP
O
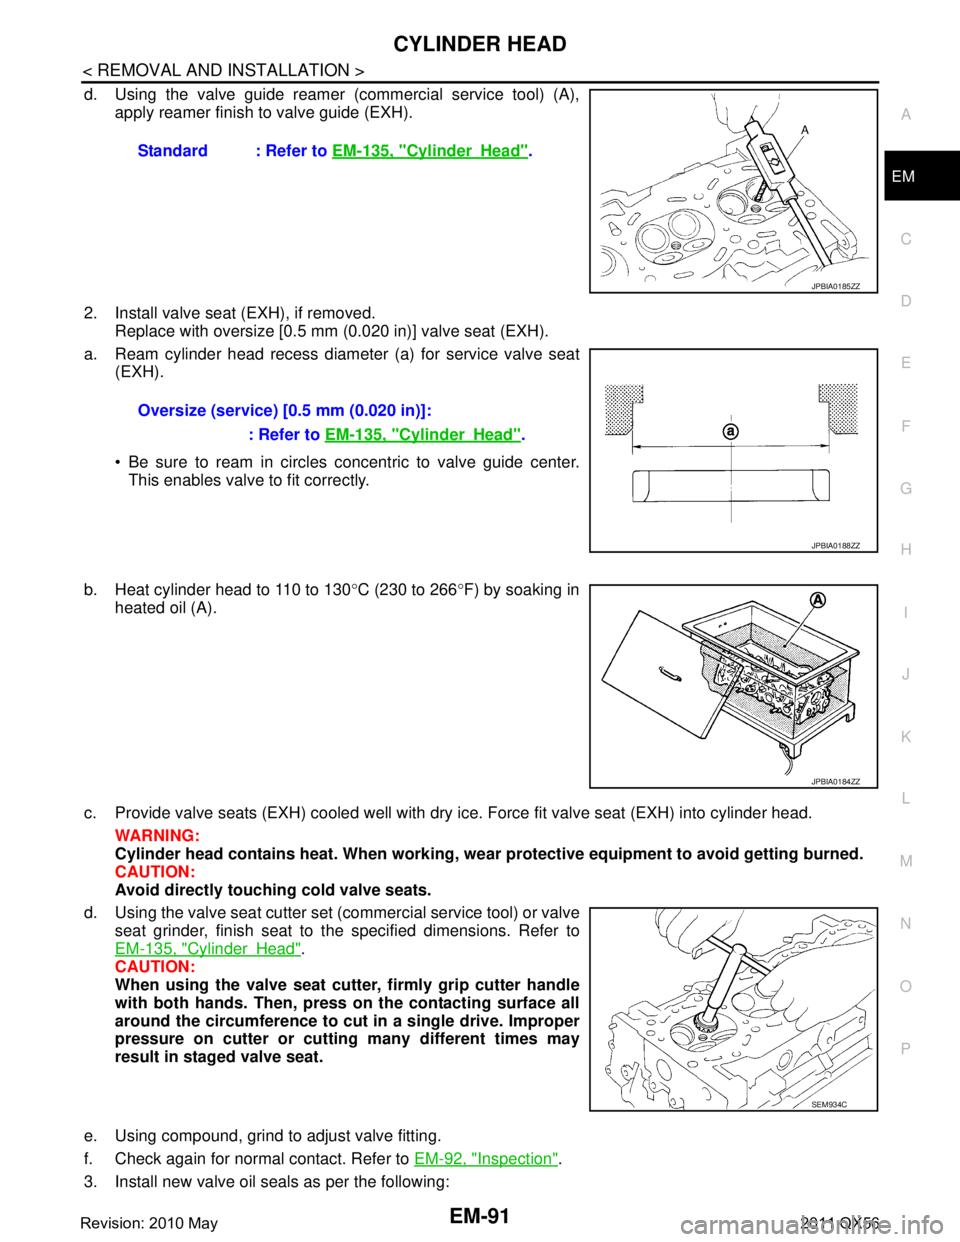
d. Using the valve guide reamer (commercial service tool) (A),
apply reamer finish to valve guide (EXH).
2. Install valve seat (EXH), if removed. Replace with oversize [0.5 mm (0.020 in)] valve seat (EXH).
a. Ream cylinder head recess diameter (a) for service valve seat (EXH).
Be sure to ream in circles concentric to valve guide center.
This enables valve to fit correctly.
b. Heat cylinder head to 110 to 130 °C (230 to 266 °F) by soaking in
heated oil (A).
c. Provide valve seats (EXH) cooled well with dry ice. Force fit valve seat (EXH) into cylinder head. WARNING:
Cylinder head contains heat. When working, w ear protective equipment to avoid getting burned.
CAUTION:
Avoid directly touching cold valve seats.
d. Using the valve seat cutter set (commercial service tool) or valve seat grinder, finish seat to the specified dimensions. Refer to
EM-135, "
CylinderHead".
CAUTION:
When using the valve seat cutt er, firmly grip cutter handle
with both hands. Then, press on the contacting surface all
around the circumference to cu t in a single drive. Improper
pressure on cutter or cutting many different times may
result in staged valve seat.
e. Using compound, grind to adjust valve fitting.
f. Check again for normal contact. Refer to EM-92, "
Inspection".
3. Install new valve oil seals as per the following: Standard : Refer to
EM-135, "
CylinderHead".
JPBIA0185ZZ
Oversize (service) [0.5 mm (0.020 in)]:
: Refer to EM-135, "
CylinderHead".
JPBIA0188ZZ
JPBIA0184ZZ
SEM934C
Revision: 2010 May2011 QX56
Page 2676 of 5598

EM-114
< UNIT DISASSEMBLY AND ASSEMBLY >
CYLINDER BLOCK
Before installing connecting rod bearings, apply engine oil to the bearing surface (inside). Do not applyengine oil to the back surface, but thoroughly clean it.
When installing, align connecting rod bearing stopper protru-
sion (B) with cutout (A) of connecting rods and connecting rod
bearing caps to install.
Ensure the oil hole (C) on connecting rod and that on the cor-
responding bearing are aligned.
13. Install piston and connecting rod assembly to crankshaft. Position crankshaft pin corresponding to connecting rod to be installed onto the bottom dead center.
Apply engine oil sufficiently to the cylinder bore, piston and crankshaft pin journal.
Match the cylinder position with the cyli nder number on connecting rod to install.
Be sure that front mark on piston cr own is facing the front of the engine.
Using a piston ring compressor [SST: EM03470000 (J-8037)]
(A) or suitable tool, install piston with the front mark on the pis-
ton crown facing the front of the engine.
CAUTION:
Be careful not to damage the cylinder wall and crankshaft
pin, resulting from an interf erence of the connecting rod big
end.
14. Install connecting rod bearing cap. Match the stamped cylinder number marks on connecting rodwith those on connecting rod bearing cap to install.
Be sure that front mark (H) on connecting rod bearing cap is facing the front of the engine.
15. Tighten connecting rod bolts as per the following:
a. Inspect the outer diameter of connecting rod bolt. Refer to EM-115, "
Inspection".
b. Apply engine oil to the threads and seats of connecting rod bolts.
c. Tighten connecting rod bolts.
d. Completely loosen connecting rod bolts.
e. Tighten connecting rod bolts.
JPBIA2272ZZ
PBIC3244J
A: Sample codes
B : Bearing stopper groove
C : Small-end diameter grade
D : Big-end diameter grade
E : Weight grade
F : Cylinder No.
G : Management code
: 29.4 N·m (3.0 kg-m, 21.7 ft-lb)
: 0 N·m (0 kg-m, 0 ft-lb)
JPBIA2273ZZ
Revision: 2010 May2011 QX56
Page 2864 of 5598

SQUEAK AND RATTLE TROUBLE DIAGNOSESEXT-9
< SYMPTOM DIAGNOSIS >
C
DE
F
G H
I
J
L
M A
B
EXT
N
O P
1. Trunk lid dumpers out of adjustment
2. Trunk lid striker out of adjustment
3. Trunk lid torsion bars knocking together
4. A loose license plate or bracket
Most of these incidents can be repaired by adjusting, se curing, or insulating the item(s) or component(s) caus-
ing the noise.
SUNROOF/HEADLINING
Noises in the sunroof / headlining area can of ten be traced to one of the following items:
1. Sunroof lid, rail, linkage, or seals making a rattle or light knocking noise
2. Sunvisor shaft shaking in the holder
3. Front or rear windshield touching headlining and squeaking
Again, pressing on the components to stop the noise while duplicating the conditions can isolate most of these
incidents. Repairs usually consist of insulating with felt cloth tape.
SEATS
When isolating seat noise it is important to note the position the seat is in and the load placed on the seat
when the noise occurs. These conditions should be duplic ated when verifying and isolating the cause of the
noise.
Causes of seat noise include:
1. Headrest rods and holder
2. A squeak between the seat pad cushion and frame
3. The rear seatback lock and bracket
These noises can be isolated by moving or pressing on the suspected components while duplicating the con-
ditions under which the noise occurs. Most of thes e incidents can be repaired by repositioning the component
or applying urethane tape to the contact area.
UNDERHOOD
Some interior noise may be caused by components under the hood or on the engine wall. The noise is then
transmitted into the passenger compartment.
Causes of transmitted underhood noise include:
1. Any component mounted to the engine wall
2. Components that pass through the engine wall
3. Engine wall mounts and connectors
4. Loose radiator mounting pins
5. Hood bumpers out of adjustment
6. Hood striker out of adjustment
These noises can be difficult to isolate since they cannot be reached from the interior of the vehicle. The best
method is to secure, move, or insulate one component at a time and test drive the vehicle. Also, engine RPM
or load can be changed to isolate the noise. Repairs c an usually be made by moving, adjusting, securing, or
insulating the component causing the noise.
Revision: 2010 May2011 QX56
Page 3037 of 5598

GW-8
< SYMPTOM DIAGNOSIS >
SQUEAK AND RATTLE TROUBLE DIAGNOSES
3. The trunk lid torsion bars knocking together
4. A loose license plate or bracket
Most of these incidents can be repaired by adjusting, securing or insulatingthe item(s) or component(s) caus-
ing the noise.
SUNROOF/HEADLINING
Noises in the sunroof/headlining area c an often be traced to one of the following:
1. Sunroof lid, rail, linkage or seals making a rattle or light knockingnoise
2. Sunvisor shaft shaking in the holder
3. Front or rear windshield touching headlining and squeaking
Again, pressing on the components to stop the noise while duplicatingthe conditions can isolate most of these
incidents. Repairs usually consistof insulating with felt cloth tape.
SEATS
When isolating seat noise it's important to note the pos ition the seatis in and the load placed on the seat when
the noise is present. These conditionsshould be duplic ated when verifying and isolating the cause of the
noise.
Cause of seat noise include:
1. Headrest rods and holder
2. A squeak between the seat pad cushion and frame
3. The rear seatback lock and bracket
These noises can be isolated by moving or pressing on the suspectedcomponents while duplicating the condi-
tions under which the noise occurs. Most of these incidents can be repaired by repositioning the component
orapplying urethane tape to the contact area.
UNDERHOOD
Some interior noise may be caused by components under the hood or onthe engine wall. The noise is then
transmitted into the passenger compartment.
Causes of transmitted underhood noise include:
1. Any component mounted to the engine wall
2. Components that pass through the engine wall
3. Engine wall mounts and connectors
4. Loose radiator mounting pins
5. Hood bumpers out of adjustment
6. Hood striker out of adjustment
These noises can be difficult to isolate since they cannot be reached from the interior of the vehicle. The best
method is to secure, move or insulate one component at a time and test drive the \
vehicle. Also, engine RPM
or load can be changed to isolate the noise. Repairs can usually be made by moving, adjusting, securing, or
insulating the component causing the noise.
Revision: 2010 May2011 QX56
Page 3359 of 5598

INT-10
< SYMPTOM DIAGNOSIS >
SQUEAK AND RATTLE TROUBLE DIAGNOSES
1. Trunk lid dumpers out of adjustment
2. Trunk lid striker out of adjustment
3. Trunk lid torsion bars knocking together
4. A loose license plate or bracket
Most of these incidents can be repaired by adjusting, securing, or insulating the item(s) or component(s) caus-
ing the noise.
SUNROOF/HEADLINING
Noises in the sunroof / headlining area can often be traced to one of the following items:
1. Sunroof lid, rail, linkage, or seals making a rattle or light knocking noise
2. Sunvisor shaft shaking in the holder
3. Front or rear windshield touching headlining and squeaking
Again, pressing on the components to stop the noise while duplicating the conditions can isolate most of these
incidents. Repairs usually consist of insulating with felt cloth tape.
SEATS
When isolating seat noise it is important to note t he position the seat is in and the load placed on the seat
when the noise occurs. These conditions should be duplic ated when verifying and isolating the cause of the
noise.
Causes of seat noise include:
1. Headrest rods and holder
2. A squeak between the seat pad cushion and frame
3. The rear seatback lock and bracket
These noises can be isolated by moving or pressing on the suspected components while duplicating the con-
ditions under which the noise occurs. Most of thes e incidents can be repaired by repositioning the component
or applying urethane tape to the contact area.
UNDERHOOD
Some interior noise may be caused by components under the hood or on the engine wall. The noise is then
transmitted into the passenger compartment.
Causes of transmitted underhood noise include:
1. Any component mounted to the engine wall
2. Components that pass through the engine wall
3. Engine wall mounts and connectors
4. Loose radiator mounting pins
5. Hood bumpers out of adjustment
6. Hood striker out of adjustment
These noises can be difficult to isolate since they cannot be reached from the interior of the vehicle. The best
method is to secure, move, or insulate one component at a time and test drive the vehicle. Also, engine RPM
or load can be changed to isolate the noise. Repairs can usually be made by moving, adjusting, securing, or
insulating the component causing the noise.
Revision: 2010 May2011 QX56
Page 3400 of 5598

IP-10
< SYMPTOM DIAGNOSIS >
SQUEAK AND RATTLE TROUBLE DIAGNOSES
1. Trunk lid dumpers out of adjustment
2. Trunk lid striker out of adjustment
3. Trunk lid torsion bars knocking together
4. A loose license plate or bracket
Most of these incidents can be repaired by adjusting, securing, or insulating the item(s) or component(s) caus-
ing the noise.
SUNROOF/HEADLINING
Noises in the sunroof / headlining area can often be traced to one of the following items:
1. Sunroof lid, rail, linkage, or seals making a rattle or light knocking noise
2. Sunvisor shaft shaking in the holder
3. Front or rear windshield touching headlining and squeaking
Again, pressing on the components to stop the noise while duplicating the conditions can isolate most of these
incidents. Repairs usually consist of insulating with felt cloth tape.
SEATS
When isolating seat noise it is important to note t he position the seat is in and the load placed on the seat
when the noise occurs. These conditions should be duplic ated when verifying and isolating the cause of the
noise.
Causes of seat noise include:
1. Headrest rods and holder
2. A squeak between the seat pad cushion and frame
3. The rear seatback lock and bracket
These noises can be isolated by moving or pressing on the suspected components while duplicating the con-
ditions under which the noise occurs. Most of thes e incidents can be repaired by repositioning the component
or applying urethane tape to the contact area.
UNDERHOOD
Some interior noise may be caused by components under the hood or on the engine wall. The noise is then
transmitted into the passenger compartment.
Causes of transmitted underhood noise include:
1. Any component mounted to the engine wall
2. Components that pass through the engine wall
3. Engine wall mounts and connectors
4. Loose radiator mounting pins
5. Hood bumpers out of adjustment
6. Hood striker out of adjustment
These noises can be difficult to isolate since they cannot be reached from the interior of the vehicle. The best
method is to secure, move, or insulate one component at a time and test drive the vehicle. Also, engine RPM
or load can be changed to isolate the noise. Repairs can usually be made by moving, adjusting, securing, or
insulating the component causing the noise.
Revision: 2010 May2011 QX56
Page 3419 of 5598

REAR CONSOLE ASSEMBLYIP-29
< REMOVAL AND INSTALLATION >
C
DE
F
G H
I
K L
M A
B
IP
N
O P
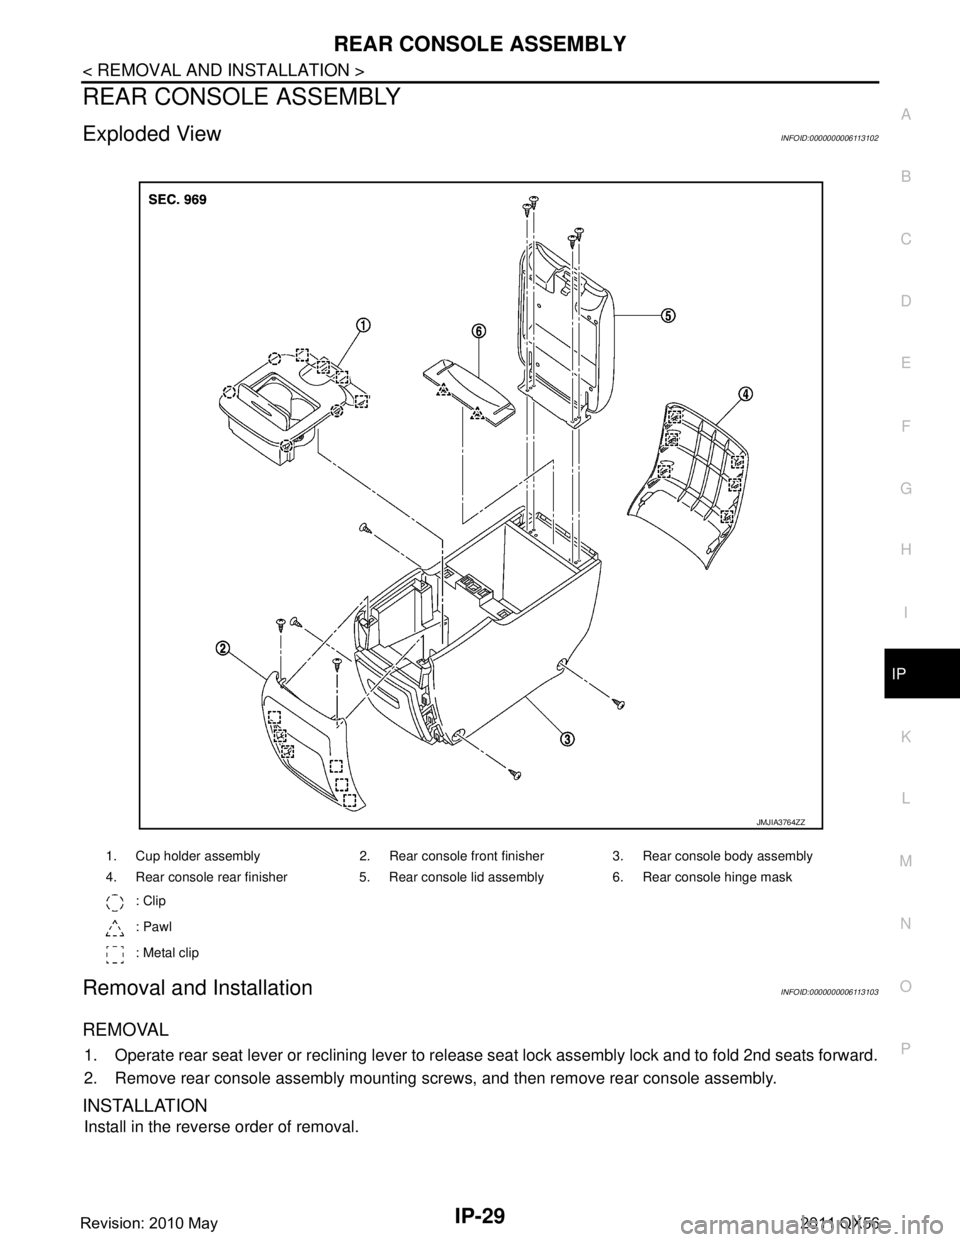
REAR CONSOLE ASSEMBLY
Exploded ViewINFOID:0000000006113102
Removal and InstallationINFOID:0000000006113103
REMOVAL
1. Operate rear seat lever or reclining lever to release seat lock assembly lock and to fold 2nd seats forward.
2. Remove rear console assembly mounting screws, and then remove rear console assembly.
INSTALLATION
Install in the reverse order of removal.
1. Cup holder assembly 2. Rear console front finisher 3. Rear console body assembly
4. Rear console rear finisher 5. Rear console lid assembly 6. Rear console hinge mask : Clip
: Pawl
: Metal clip
JMJIA3764ZZ
Revision: 2010 May2011 QX56