ESP INFINITI QX60 2020 Infiniti Connection
[x] Cancel search | Manufacturer: INFINITI, Model Year: 2020, Model line: QX60, Model: INFINITI QX60 2020Pages: 276, PDF Size: 1.17 MB
Page 53 of 276
.An iPod nano® (1st generation) may
remain in fast-forward or rewind mode
if it is connected during a seek operation.
In this case, please manually reset the
iPod®.
. An iPod nano® (2nd generation) will
continue to fast-forward or rewind if it
is disconnected during a seek operation.
. An incorrect song title may appear when
the Play Mode is changed while using an
iPod nano® (2nd generation).
. Audiobooks may not play in the same
order as they appear on an iPod®.
. Large video files cause slow responses in
an iPod®. The in-vehicle display may
momentarily black out, but will soon
recover.
. If an iPod® automatically selects large
video files while in the shuffle mode, the
in-vehicle display may momentarily black
out, but will soon recover.COMPRESSED AUDIO FILES
(MP3/WMA/AAC)
Explanation of terms
.MP3 — MP3 is short for Moving Pictures
Experts Group Audio Layer 3. MP3 is the
most well known compressed digital
audio file format. This format allows for
near “CD quality” sound, but at a fraction
of the size of normal audio files. MP3
conversion of an audio track can reduce
the file size by approximately a 10:1 ratio
(Sampling: 44.1 kHz, Bit rate: 128 kbps)
with virtually no perceptible loss in
quality. The compression reduces certain
parts of sound that seem inaudible to
most people.
. WMA — Windows Media Audio (WMA)
is a compressed audio format created by
Microsoft as an alternative to MP3. The
WMA codec offers greater file compres-
sion than the MP3 codec, enabling
storage of more digital audio tracks in
the same amount of space when com-
pared to MP3s at the same level of
quality.
This product is protected by certain
intellectual property rights of Microsoft
Corporation and third parties. Use or distribution of such technology outside
of this product is prohibited without a
license from Microsoft or an authorized
Microsoft subsidiary and third parties.
. AAC — Advanced Audio Coding (AAC) is
a compressed audio format. AAC offers
greater file compression than MP3 and
enables music file creation and storage
at the same quality as MP3.
. Bit rate — Bit rate denotes the number of
bits per second used by a digital music
file. The size and quality of a compressed
digital audio file is determined by the bit
rate used when encoding the file.
. Sampling frequency — Sampling fre-
quency is the rate at which the samples
of a signal are converted from analog to
digital (A/D conversion) per second.
. Multisession — Multisession is one of the
methods for writing data to media.
Writing data once to the media is called
a single session, and writing more than
once is called a multisession.
. ID3/WMA Tag — The ID3/WMA tag is
the part of the encoded MP3 or WMA
file that contains information about the
digital music file such as song title, artist,
album title, encoding bit rate, track time
3. Audio system
3-9
Page 64 of 276
3. Audio system
Manual tuning:
To tune to the preferred station manually,
turn
station is selected.
Scan tuning:
To scan tune the stations/channels, touch
[Control] on the display and then touch
[Scan]. The stations/channels will be tuned
from low to high frequencies and stop at
each broadcasting station/channel for 5
seconds. Touching [Scan] again during this
5 seconds period will stop scan tuning and
the radio will remain tuned to that station/
channel.
For models with
button can also scan tune the stations/
channels.
Presetting:
Up to 36 stations/channels can be regis-
tered for AM, FM and SXM® in the preset
list.
1. Select a radio band (AM, FM or SXM®).
2. Tune to the station/channel you wish to
store in the preset list. 3. Touch and hold one of the preset
numbers in the preset list or push and
hold the desired radio memory buttons.
4. The information such as frequency (AM/ FM), channel number (SXM®), etc. will
be displayed on the preset list.
INFO:
. To change the preset stations/channels,
touch and hold one of the preset num-
bers. You can select whether to change
the station/channel or to delete the
preset setting.
. Tilting
so equipped) will scroll up/down the
preset stations/channels.
Alert Notification (SXM® only):
Favorite artists and songs can be registered
to receive an alert notice when a song of the
registered conditions is on the radio. To tune
to the respective channel, touch [Listen to be
consistent]. The alert can be ignored by
touching [Cancel].
“Radio controls” (page 3-21)
INFO:
Satellite Radio: . The satellite mode requires an active
SiriusXM® Satellite Radio subscription.
The Satellite service is available only to
those at least 18 and older in the 48
contiguous United States and DC.
. It may take some time to receive the
activation signal after the initiation of
the SiriusXM® Satellite Radio subscrip-
tion. After receiving the activation signal,
an available channel list will automati-
cally be updated in the radio. Change the
ignition switch position from LOCK to
ACC to update the SiriusXM® channel
list.
3-20
Page 75 of 276
iPod® PLAYER
Connecting iPod®
WARNING
Do not connect, disconnect or operate the
iPod® while driving. Doing so can be a
distraction. If distracted, you could lose
control of your vehicle and cause an
accident or serious injury.
CAUTION
.Do not force the iPod® device into the
USB connection port. Inserting the
iPod® cable tilted or upside down into
the port may damage the port. Make
sure that the iPod® cable is connected
correctly to the USB connection port.
. Do not grab the USB connection port
cover (if so equipped) when pulling
the iPod® cable out of the port. This
could damage the port and the cover.
. Do not leave the iPod® cable in a
place where it can be pulled uninten-
tionally. Pulling the cable may da-
mage the port. Refer to your device manufacturer’s owner
information regarding the proper use and
care of the device.
The battery of the iPod® will be charged
while the device is connected to the vehicle if
the iPod® supports USB connection char-
ging.
Depending on the model and firmware
version of the iPod®, the display on the
iPod® shows an INFINITI or Accessory
Attached screen when the connection is
completed. When the iPod® is connected
to the vehicle, the iPod® music library can
only be operated using the vehicle audio
controls.
USB connection port location:
“Audio accessories” (page 2-8)
Compatibility:
Made for . iPod touch® (5th generation)
. iPod touch® (4th generation)
. iPod touch® (3rd generation)
. iPod touch® (2nd generation)
. iPod touch® (1st generation) .
iPod with video
. iPod classic®
. iPod nano® (7th generation)
. iPod nano® (6th generation)
. iPod nano® (5th generation)
. iPod nano® (4th generation)
. iPod nano® (3rd generation)
. iPod nano® (2nd generation)
. iPod nano® (1st generation)
. iPhone® 5s
. iPhone® 5
. iPhone® 4S
. iPhone® 4
. iPhone® 3GS
. iPhone® 3G
. iPhone®
INFO:
. The iPod touch® may not respond
quickly with the system in some cases.
. Make sure that the iPod® firmware is
updated.
3. Audio system
3-31
Page 94 of 276
3. Audio system
Apple support
When an iPhone®, iPad®, or iPod® is
connected, the Mobile Entertainment Sys-
tem will play music with the iPod® technol-
ogy and initiate quick charging (up to 2.1 A).
The following Apple products are supported:. iPhone® 5s (iOS 7.0.4)
. iPhone® 5c (iOS 7.1)
. iPhone® 5 (iOS 6.1.4)
. iPhone® 4S (iOS 5.1.1)
. iPhone® 4 (iOS 7.1)
. iPhone® 3GS (iOS 6.1.6)
. iPhone® 3G (iOS 4.2.1)
. iPad® (4th generation) (iOS 7.0.4)
. iPad® (3rd generation) (iOS 6.0)
. iPad® (2nd generation) (iOS 6.0)
. iPad® (1st generation) (iOS 5.1.1)
. iPad Air® (iOS 7.0.4)
. iPad mini
TM(2nd generation) (iOS 7.0.4)
. iPad mini
TM(1st generation) (iOS 7.0.4)
. iPod touch® (5th generation) (iOS 6.1.3) .
iPod touch® (4th generation) (iOS 6.1.3)
. iPod touch® (3rd generation) (iOS 5.1.1)
. iPod touch® (2nd generation) (iOS 4.2.1)
. iPod touch® (1st generation) (iOS 3.1.3)
. iPod nano® (7th generation) (Firmware
version 1.0.2)
. iPod nano® (6th generation) (Firmware
version 1.2)
. iPod nano® (5th generation) (Firmware
version 1.0.2)
. iPod nano® (4th generation) (Firmware
version 1.0.3)
. iPod nano® (3rd generation) (Firmware
version 1.1.2)
. iPod nano® (2nd generation) (Firmware
version 1.1.3)
. iPod nano® (1st generation) (Firmware
version 1.3.1)
. iPod classic® (160 GB) (End 2009)
(Firmware version 2.0.4)
. iPod classic® (120 GB) (Firmware ver-
sion 2.0.1)
. iPod classic® (Firmware version 1.1.2)
“Made for iPod®”, “Made for iPhone®”, and
“Made for iPad®” mean that an electronic
accessory has been designed to connect
specifically to iPod®, iPhone®, or iPad®,
respectively, and has been certified by the
developer to meet Apple performance stan-
dards. Apple is not responsible for the
operation of this device or its compliance
with safety and regulatory standards. Please
note that the use of this accessory with
iPod®, iPhone®, or iPad® may affect wire-
less performance.
iPad®, iPhone®, iPod®, iPod classic®, iPod
nano®, iPod touch®, and Retina are trade-
marks of Apple Inc., registered in the U.S.
and other countries. iPad Air® and iPad
mini
TMare trademarks of Apple Inc.
Licenses
Dolby:
Manufactured under license from Dolby
Laboratories. Dolby and the double-D sym-
bol are trademarks of Dolby Laboratories.
3-50
Page 97 of 276
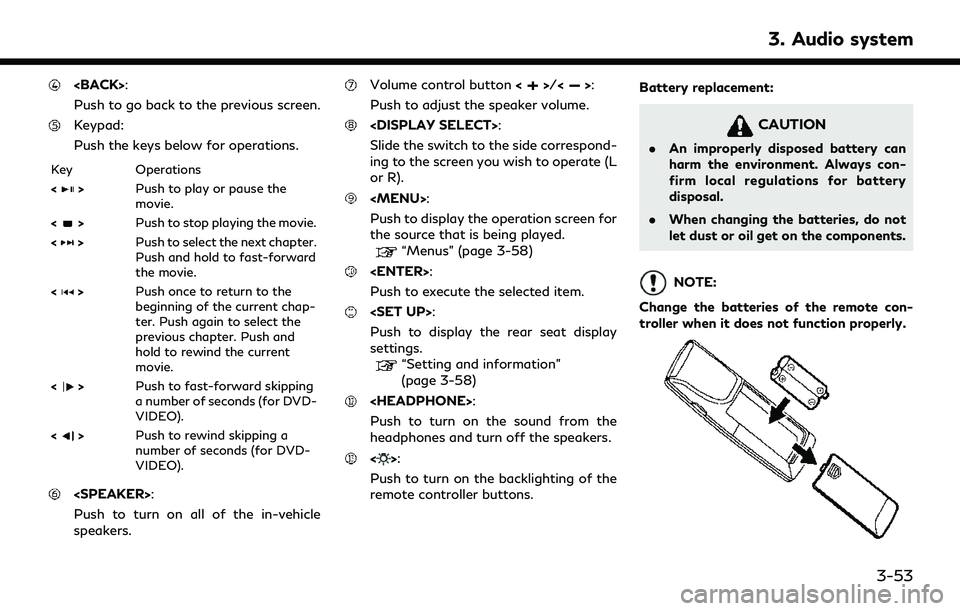
Push to go back to the previous screen.
Keypad:
Push the keys below for operations.
Key Operations
<
>Push to play or pause the
movie.
<
> Push to stop playing the movie.
<
> Push to select the next chapter.
Push and hold to fast-forward
the movie.
<
> Push once to return to the
beginning of the current chap-
ter. Push again to select the
previous chapter. Push and
hold to rewind the current
movie.
<
> Push to fast-forward skipping
a number of seconds (for DVD-
VIDEO).
<
> Push to rewind skipping a
number of seconds (for DVD-
VIDEO).
Push to turn on all of the in-vehicle
speakers.
Volume control button <>/<>:
Push to adjust the speaker volume.
Slide the switch to the side correspond-
ing to the screen you wish to operate (L
or R).
Page 100 of 276
3. Audio system
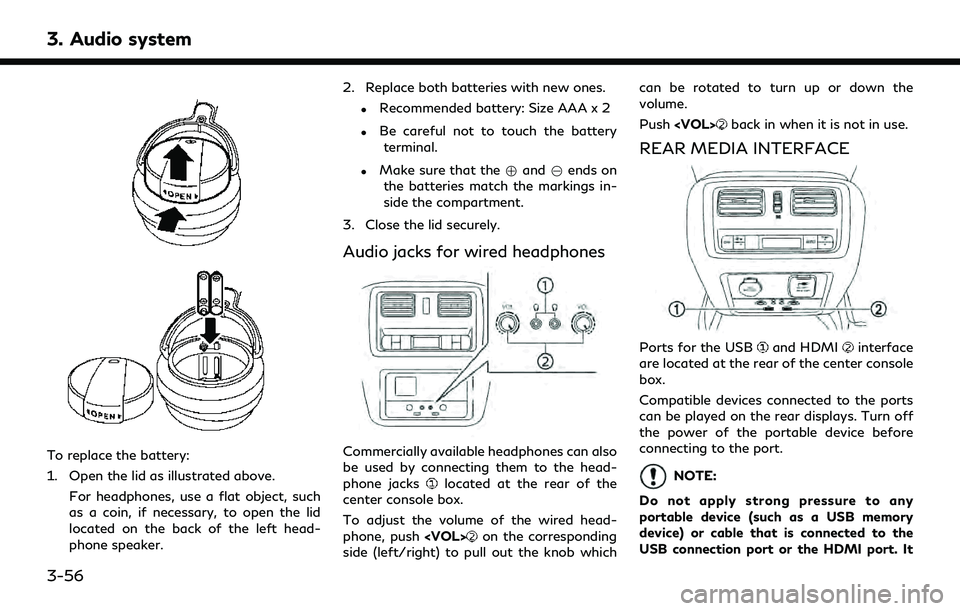
To replace the battery:
1. Open the lid as illustrated above.For headphones, use a flat object, such
as a coin, if necessary, to open the lid
located on the back of the left head-
phone speaker. 2. Replace both batteries with new ones.
.Recommended battery: Size AAA x 2
.Be careful not to touch the battery
terminal.
.Make sure that the +and 7ends on
the batteries match the markings in-
side the compartment.
3. Close the lid securely.
Audio jacks for wired headphones
Commercially available headphones can also
be used by connecting them to the head-
phone jacks
located at the rear of the
center console box.
To adjust the volume of the wired head-
phone, push
on the corresponding
side (left/right) to pull out the knob which can be rotated to turn up or down the
volume.
Push
back in when it is not in use.
REAR MEDIA INTERFACE
Ports for the USBand HDMIinterface
are located at the rear of the center console
box.
Compatible devices connected to the ports
can be played on the rear displays. Turn off
the power of the portable device before
connecting to the port.
NOTE:
Do not apply strong pressure to any
portable device (such as a USB memory
device) or cable that is connected to the
USB connection port or the HDMI port. It
3-56
Page 101 of 276
could damage the device and the ports.
ACTIVATING REAR DISPLAYS
CAUTION
.The glass screen on the display screen
may break if hit with a hard or sharp
object. If the glass breaks, do not
touch the liquid crystalline material. In
case of contact with skin, wash im-
mediately with soap and water.
. Applying pressure to a display screen
may damage it.
“Care and maintenance”
(page 3-63)
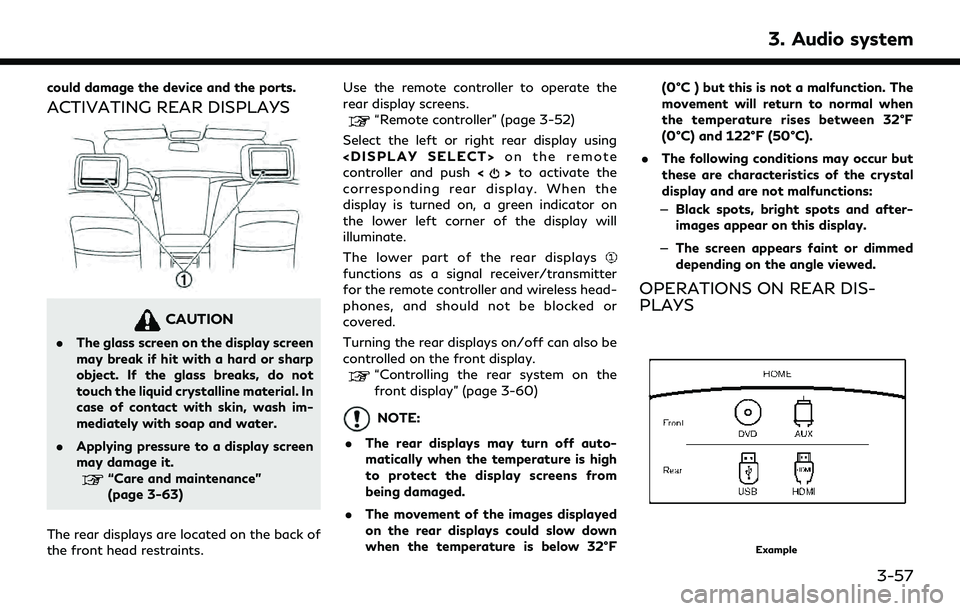
The rear displays are located on the back of
the front head restraints. Use the remote controller to operate the
rear display screens.
“Remote controller” (page 3-52)
Select the left or right rear display using
controller and push <
>to activate the
corresponding rear display. When the
display is turned on, a green indicator on
the lower left corner of the display will
illuminate.
The lower part of the rear displays
functions as a signal receiver/transmitter
for the remote controller and wireless head-
phones, and should not be blocked or
covered.
Turning the rear displays on/off can also be
controlled on the front display.
“Controlling the rear system on the
front display” (page 3-60)
NOTE:
. The rear displays may turn off auto-
matically when the temperature is high
to protect the display screens from
being damaged.
. The movement of the images displayed
on the rear displays could slow down
when the temperature is below 32°F (0°C ) but this is not a malfunction. The
movement will return to normal when
the temperature rises between 32°F
(0°C) and 122°F (50°C).
. The following conditions may occur but
these are characteristics of the crystal
display and are not malfunctions:
— Black spots, bright spots and after-
images appear on this display.
— The screen appears faint or dimmed
depending on the angle viewed.
OPERATIONS ON REAR DIS-
PLAYS
Example
3. Audio system
3-57
Page 102 of 276
3. Audio system
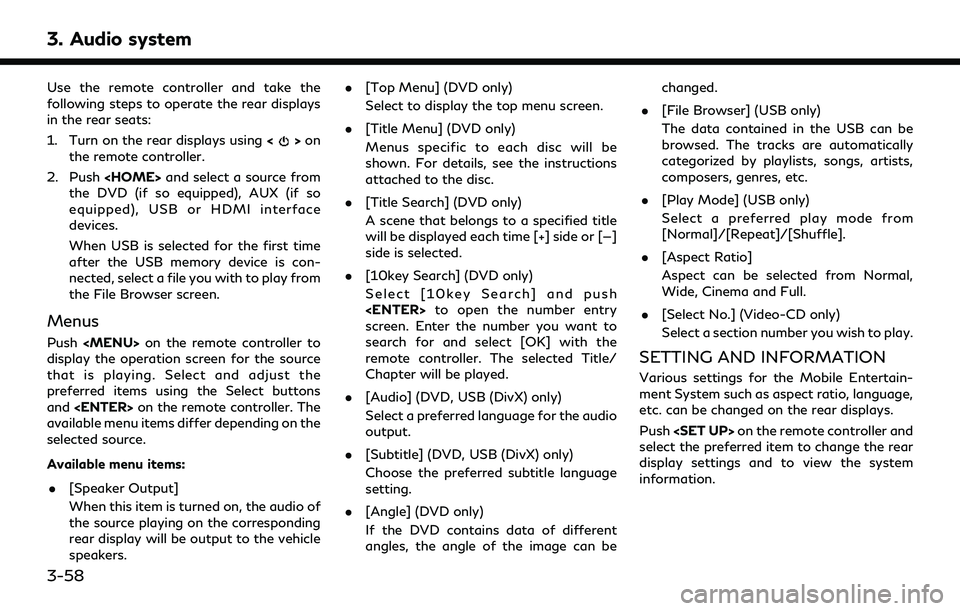
Use the remote controller and take the
following steps to operate the rear displays
in the rear seats:
1. Turn on the rear displays using<
>on
the remote controller.
2. Push
the DVD (if so equipped), AUX (if so
equipped), USB or HDMI interface
devices.
When USB is selected for the first time
after the USB memory device is con-
nected, select a file you with to play from
the File Browser screen.
Menus
Push
Page 104 of 276
![INFINITI QX60 2020 Infiniti Connection 3. Audio system
.[Noise Reduction]
With the noise reduction function, block
noise that accompanies images can be
reduced. Select the level of the function
from High, Medium or Low.
Software informatio INFINITI QX60 2020 Infiniti Connection 3. Audio system
.[Noise Reduction]
With the noise reduction function, block
noise that accompanies images can be
reduced. Select the level of the function
from High, Medium or Low.
Software informatio](/img/42/35140/w960_35140-103.png)
3. Audio system
.[Noise Reduction]
With the noise reduction function, block
noise that accompanies images can be
reduced. Select the level of the function
from High, Medium or Low.
Software information
To display the software information of the
Mobile Entertainment System, push
[Information].
CONTROLLING THE REAR SYS-
TEM ON THE FRONT DISPLAY
To control the rear displays and the rear
speakers on the front display, push
Page 136 of 276
5. Information
Notes on SiriusXM TrafficTMinfor-
mation
. The SiriusXM TrafficTMinformation ser-
vice is not provided for some cities. In
addition, the cities for which the traffic
information service is provided may be
changed.
. In some cases, infrastructure problems
may prevent the complete display of the
traffic information. This is not a mal-
function.
. Due to infrastructure problems, or due to
the time when the traffic information
service broadcast is received, the dis-
played information may differ from the
actual traffic conditions.
. Depending on the traffic information, a
detour route may be slower than the
original route.
. SiriusXM Traffic
TMis a service of Sir-
iusXM® Radio. SiriusXM TrafficTMis
only available in select markets and is
subject to data availability. Reception of
the SXM® signal may vary depending on
location. It requires a monthly premium
subscription. The service provider is
solely responsible for the quality and accuracy of the information provided.
All fees and programming are subject to
change. For more details on the SiriusXM
Traffic
TMservice, terms and conditions,
please visit
www.siriusxm.com.
You can also contact SiriusXM® at
1-866-635-2349.
. SiriusXM Traffic
TMis available in over
130 metropolitan markets. For the most
current list of markets covered, please
refer to
www.siriusxm.com/siriusxmtraffic, or
call SiriusXM Listener Care at 1-866-
635-2349.
. Due to road maintenance, infrastructure
problems (e.g. malfunction of road sen-
sors, outage of central computer of
infrastructure) or natural disasters, there
are times when some or all traffic
information may not be available.
. Incident information is based on human
collection. Not all incidents that have
happened are collected and provided.
. Due to infrastructure problems, or trans-
mission delay, there are times when the
information may differ from the actual condition. Always observe safe driving
practices and follow all traffic regula-
tions.
. Due to the coverage and quality of traffic
information and road conditions, it is not
always possible for the system to pro-
vide the shortest time route even when
traffic information is considered.
. Traffic information that is displayed may
differ from information from other media
(e.g., radio), as other media may use
different information sources.
5-14