USB INFINITI QX60 2020 Infiniti Connection
[x] Cancel search | Manufacturer: INFINITI, Model Year: 2020, Model line: QX60, Model: INFINITI QX60 2020Pages: 276, PDF Size: 1.17 MB
Page 75 of 276
iPod® PLAYER
Connecting iPod®
WARNING
Do not connect, disconnect or operate the
iPod® while driving. Doing so can be a
distraction. If distracted, you could lose
control of your vehicle and cause an
accident or serious injury.
CAUTION
.Do not force the iPod® device into the
USB connection port. Inserting the
iPod® cable tilted or upside down into
the port may damage the port. Make
sure that the iPod® cable is connected
correctly to the USB connection port.
. Do not grab the USB connection port
cover (if so equipped) when pulling
the iPod® cable out of the port. This
could damage the port and the cover.
. Do not leave the iPod® cable in a
place where it can be pulled uninten-
tionally. Pulling the cable may da-
mage the port. Refer to your device manufacturer’s owner
information regarding the proper use and
care of the device.
The battery of the iPod® will be charged
while the device is connected to the vehicle if
the iPod® supports USB connection char-
ging.
Depending on the model and firmware
version of the iPod®, the display on the
iPod® shows an INFINITI or Accessory
Attached screen when the connection is
completed. When the iPod® is connected
to the vehicle, the iPod® music library can
only be operated using the vehicle audio
controls.
USB connection port location:
“Audio accessories” (page 2-8)
Compatibility:
Made for . iPod touch® (5th generation)
. iPod touch® (4th generation)
. iPod touch® (3rd generation)
. iPod touch® (2nd generation)
. iPod touch® (1st generation) .
iPod with video
. iPod classic®
. iPod nano® (7th generation)
. iPod nano® (6th generation)
. iPod nano® (5th generation)
. iPod nano® (4th generation)
. iPod nano® (3rd generation)
. iPod nano® (2nd generation)
. iPod nano® (1st generation)
. iPhone® 5s
. iPhone® 5
. iPhone® 4S
. iPhone® 4
. iPhone® 3GS
. iPhone® 3G
. iPhone®
INFO:
. The iPod touch® may not respond
quickly with the system in some cases.
. Make sure that the iPod® firmware is
updated.
3. Audio system
3-31
Page 76 of 276
3. Audio system
.The LightningTMconnector works with
iPhone® 5, iPhone® 5s, iPod touch®
(5th generation) and iPod nano® (7th
generation).
. The 30–pin connector works with
iPhone® 4S, iPhone® 4, iPhone® 3GS,
iPhone® 3G, iPhone®, iPod touch® (1st
through 4th generation), iPod classic®
and iPod nano® (1st through 6th gen-
eration).
. USB works with iPhone® 5, iPhone® 4S,
iPhone® 4, iPhone® 3GS, iPhone® 3G,
iPhone®, iPod touch® (1st through 5th
generation), iPod classic® and iPod
nano® (1st through 7th generation).How to view iPod® operation screen
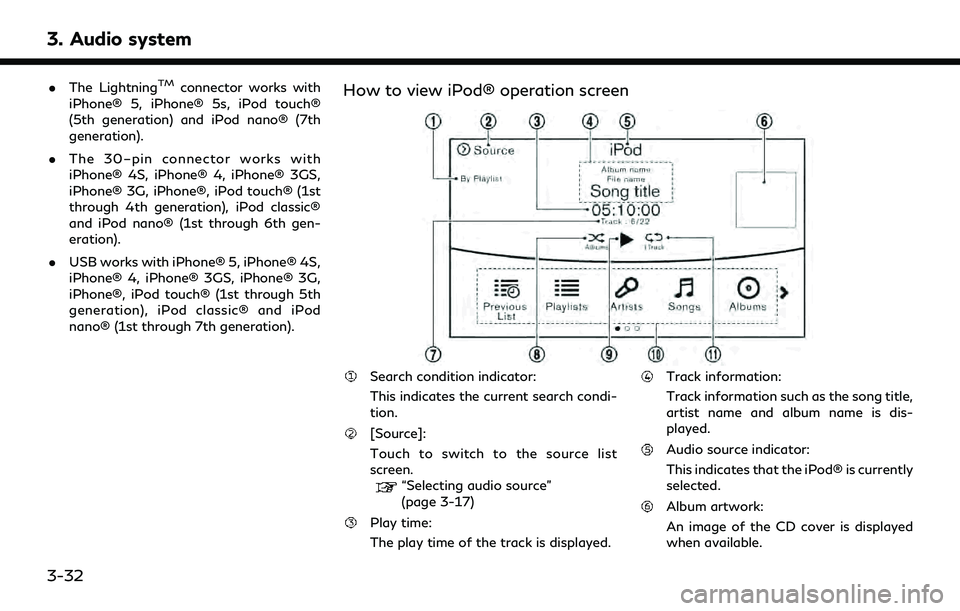
Search condition indicator:
This indicates the current search condi-
tion.
[Source]:
Touch to switch to the source list
screen.
“Selecting audio source”
(page 3-17)
Play time:
The play time of the track is displayed.
Track information:
Track information such as the song title,
artist name and album name is dis-
played.
Audio source indicator:
This indicates that the iPod® is currently
selected.
Album artwork:
An image of the CD cover is displayed
when available.
3-32
Page 77 of 276
![INFINITI QX60 2020 Infiniti Connection Track number:
This indicates the current track number
and the total number of tracks.
Shuffle mode indicator:
Touch to change the shuffle mode.
ModeScreen display
[Shuffle albums]
Albums
[All songs]
S INFINITI QX60 2020 Infiniti Connection Track number:
This indicates the current track number
and the total number of tracks.
Shuffle mode indicator:
Touch to change the shuffle mode.
ModeScreen display
[Shuffle albums]
Albums
[All songs]
S](/img/42/35140/w960_35140-76.png)
Track number:
This indicates the current track number
and the total number of tracks.
Shuffle mode indicator:
Touch to change the shuffle mode.
ModeScreen display
[Shuffle albums]
Albums
[All songs]
Songs
[Shuffle Off]
Off
[]/[]:
Touch to play or pause the track.
iPod® menu:
- [Previous List]
- [Playlists]
- [Artists]
- [Songs]
- [Albums]
- [Genres]
- [Composers]
- [Podcasts]
- [Audiobooks]
- [Shuffle]
- [Repeat]
Repeat mode indicator:
Touch to change the repeat mode.
Mode Screen display
[All Track Repeat]
All
[1 Track Repeat]
1 Track
[Repeat Off]
Off
iPod® player operation
Activation and playing:
Inserting the iPod® cable into the connec-
tion port will activate the iPod® mode.
iPod® can also be selected from the audio
sources list and the source bar by touch
panel operation or by pushing
“Names and functions of audio control
buttons” (page 3-14)
“Selecting audio source” (page 3-17)
To play and pause the iPod®, touch
[
]/[] in the iPod® menu.
Selecting search method:
A list of search methods is displayed in the
iPod® menu. Touch and select an item to
play the iPod® in your preferred settings. Fast-forwarding or rewinding:
Push and hold
forward or rewind the song. Release to play
the song at normal speed.
Changing play mode:
Touch [Shuffle], [Repeat], [
]or[]to
select the play mode.
For models with
button can also change the play mode.
Skipping songs:
Push
next or previous song.
Tilting up/down the
steering wheel (if so equipped) can also
skip the songs.
Even when iPod® and/or iPhone® are
inserted into both of the two USB connec-
tion ports, the system recognizes only one of
the connected iPod® and/or iPhone® at a
time.
3. Audio system
3-33
Page 85 of 276
DISC/USB MEMORY DEVICE
CARE AND CLEANING
DISCS
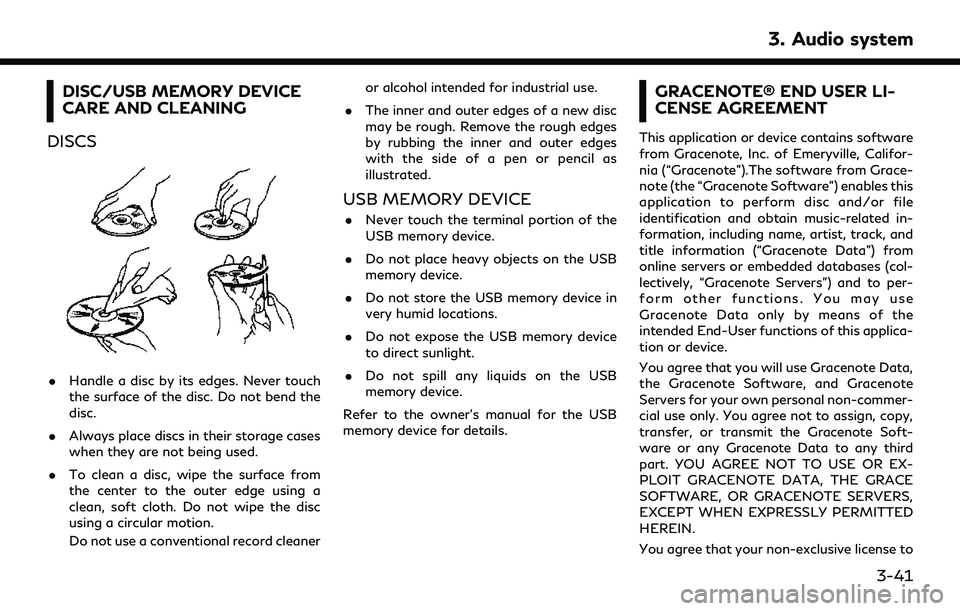
. Handle a disc by its edges. Never touch
the surface of the disc. Do not bend the
disc.
. Always place discs in their storage cases
when they are not being used.
. To clean a disc, wipe the surface from
the center to the outer edge using a
clean, soft cloth. Do not wipe the disc
using a circular motion.
Do not use a conventional record cleaner or alcohol intended for industrial use.
. The inner and outer edges of a new disc
may be rough. Remove the rough edges
by rubbing the inner and outer edges
with the side of a pen or pencil as
illustrated.
USB MEMORY DEVICE
.Never touch the terminal portion of the
USB memory device.
. Do not place heavy objects on the USB
memory device.
. Do not store the USB memory device in
very humid locations.
. Do not expose the USB memory device
to direct sunlight.
. Do not spill any liquids on the USB
memory device.
Refer to the owner’s manual for the USB
memory device for details.
GRACENOTE® END USER LI-
CENSE AGREEMENT
This application or device contains software
from Gracenote, Inc. of Emeryville, Califor-
nia (“Gracenote”).The software from Grace-
note (the “Gracenote Software”) enables this
application to perform disc and/or file
identification and obtain music-related in-
formation, including name, artist, track, and
title information (“Gracenote Data”) from
online servers or embedded databases (col-
lectively, “Gracenote Servers”) and to per-
form other functions. You may use
Gracenote Data only by means of the
intended End-User functions of this applica-
tion or device.
You agree that you will use Gracenote Data,
the Gracenote Software, and Gracenote
Servers for your own personal non-commer-
cial use only. You agree not to assign, copy,
transfer, or transmit the Gracenote Soft-
ware or any Gracenote Data to any third
part. YOU AGREE NOT TO USE OR EX-
PLOIT GRACENOTE DATA, THE GRACE
SOFTWARE, OR GRACENOTE SERVERS,
EXCEPT WHEN EXPRESSLY PERMITTED
HEREIN.
You agree that your non-exclusive license to
3. Audio system
3-41
Page 86 of 276
3. Audio system
use the Gracenote Data, the Gracenote
Software, and Gracenote Servers will termi-
nate if you violate these restrictions. If your
license terminates, you agree to cease any
and all use of the Gracenote Data, the
Gracenote Software, and Gracenote Ser-
vers. Gracenote reserves all rights in Grace-
note Data, the Gracenote Software, and the
Gracenote Servers, including all ownership
rights. Under no circumstances will Grace-
note become liable for any payment to you
for any information that you provide. You
agree that Gracenote, Inc. may enforce its
rights under this Agreement against you
directly in its own name.
The Gracenote service uses a unique identi-
fier to track queries for statistical purposes.
The purpose of a randomly assigned numeric
identifier is to allow the Gracenote service to
count queries without knowing anything
about who you are. For more information,
see the web page for the Gracenote Privacy
Policy for the Gracenote service.
The Gracenote Software and each item of
Gracenote Data is licensed to you “AS IS”.
Gracenote makes no representations or
warranties, express or implied, regarding
the accuracy of any Gracenote Data from
the Gracenote Servers. Gracenote reservesthe right to delete data from the Gracenote
Servers or to change data categories for any
cause that Gracenote seems sufficient. No
warranty is made that the Gracenote Soft-
ware or Gracenote Servers are error-free or
that functioning of Gracenote Software or
Gracenote Servers will be uninterrupted.
Gracenote is not obligated to provide you
with new enhanced or additional data types
or categories that Gracenote may provide in
the future and is free to discontinue its
services at any time.
GRACENOTE DISCLAIMS ALL WARRAN-
TIES EXPRESS OR IMPLIED, INCLUDING,
BUT NOT LIMITED TO, IMPLIED WAR-
RANTIES OF MERCHANTABILITY, FIT-
NESS FOR A PARTICULAR PURPOSE,
TITLE, AND NON-INFRINGEMENT.
GRACENOTE DOES NOTWARRANT THE
RESULTS THAT WILL BE OBTAINED BY
YOUR USE OF THE GRACENOTE SOFT-
WARE OR ANY GRACENOTE SERVER. IN
NO CASE WILL GRACENOTE BE LIABLE
FOR ANY CONSEQUENTIAL OR INCI-
DENTAL DAMAGES OR FOR ANY LOST
PROFITS OR LOST REVENUES.
© Gracenote, Inc. 2009MOBILE ENTERTAINMENT
SYSTEM (MES) (if so equipped)
If your vehicle is equipped with the Mobile
Entertainment System (MES), you can enjoy
playing audio and movie files on the rear
displays with images and sound.
Playable source:
. DVD (if so equipped)
. AUX device (if so equipped)
. USB memory device (connected to the
rear USB connection port)
. HDMI device
The front and left/right rear displays can
show different sources individually.
CD/DVD (if so equipped) slot location:
“Names and functions of audio control
buttons” (page 3-14)
Auxiliary input jack location (if so equipped):
“Audio accessories” (page 2-8)
Rear media interface (USB and HDMI con-
nection ports) location:
“Rear media interface” (page 3-56)
3-42
Page 87 of 276
WARNING
The driver must not attempt to operate
the Mobile Entertainment System while
driving so full attention may be given to
vehicle operation.
CAUTION
.Do not attempt to use the system in
extremely high or low temperature
conditions [below -4°F (-20°C) or
above 158°F (70°C)].
. To avoid draining the vehicle battery
(12V battery), do not operate the
system for more that 15 minutes
without starting the engine or the
hybrid system.
The front display is designed not to show
images during driving, as the driver’s atten-
tion must be given to vehicle operation for
safety. Sounds are still audible. To show
images on the front display, stop the vehicle
in a safe location, move the shift lever to the
"P" (Park) position and apply the parking
brake.
PRECAUTIONS
Start the engine or the hybrid system when
using the Mobile Entertainment System.
WARNING
The driver must not attempt to operate
the Mobile Entertainment System or
wear the headphones while the vehicle is
in motion so that full attention may be
given to vehicle operation.
Park the vehicle in a safe location and
apply the parking break to view the
images on the front center display with
the Mobile Entertainment System.
CAUTION
. Only operate the Mobile Entertain-
ment System while the engine or the
hybrid system is running. Operating
the Mobile Entertainment System for
extended periods of time with the
engine or the hybrid system turned
off can discharge the vehicle battery
(12V battery).
. Do not allow the system to get wet.
Excessive moisture such as spilled
liquids may cause the system to mal- function.
. While playing VIDEO-CD media, this
DVD player does not guarantee com-
plete functionality of all VIDEO-CD
formats.
TECHNICAL INFORMATION
USB media support
Supported USB media:
USB 1.1 Low Speed (1.5 Mbps), Full
Speed (12 Mbps)
USB 2.0 Low Speed (1.5 Mbps), Full Speed (12 Mbps), High Speed
(480 Mbps)
Mass Storage Support:
The Mobile Entertainment System recog-
nizes the connected USB media as a mass
storage device.
Supported file systems and partition:
The first partition of the following file
systems are supported.
. NTFS
3. Audio system
3-43
Page 96 of 276
3. Audio system
Sorenson Spark Video decoder:
This product contains an officially licensed
Sorenson Spark optimized video decoder
licensed from Sorenson Media, Inc.
Natune surround sound:
Natune surround sound is a
general term for the family
of the latest acoustic signal
processing technology pro-
duced by DiMAGIC Co., Ltd.
REMOTE CONTROLLER AND
HEADPHONES
Remote controller
A remote controller is provided with the
Mobile Entertainment System.
The remote controller is for the rear display
operation and cannot be used to control
portable devices.
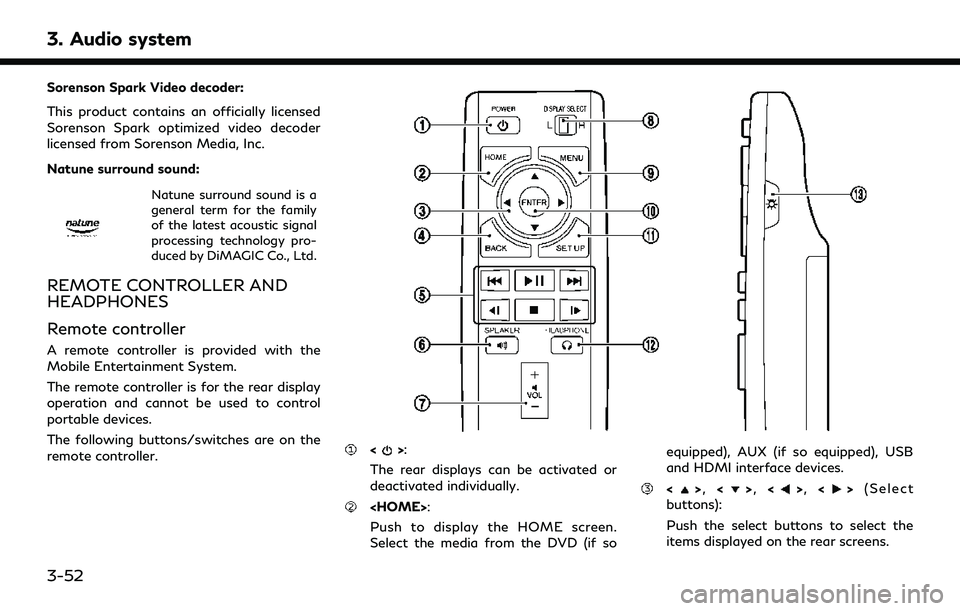
The following buttons/switches are on the
remote controller.
<>:
The rear displays can be activated or
deactivated individually.
Push to display the HOME screen.
Select the media from the DVD (if so equipped), AUX (if so equipped), USB
and HDMI interface devices.
<>
, <>, <>, <> (Select
buttons):
Push the select buttons to select the
items displayed on the rear screens.
3-52
Page 100 of 276
3. Audio system
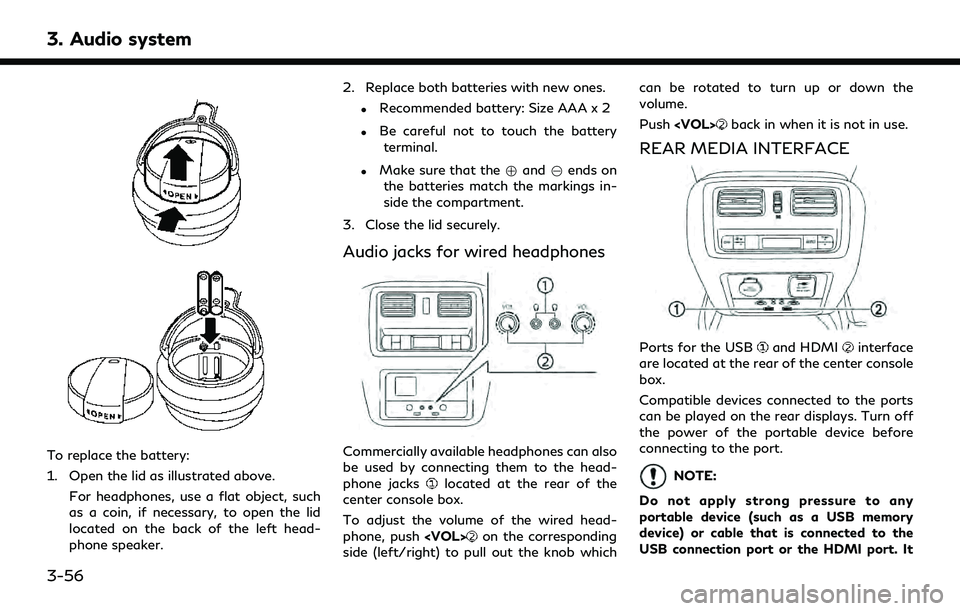
To replace the battery:
1. Open the lid as illustrated above.For headphones, use a flat object, such
as a coin, if necessary, to open the lid
located on the back of the left head-
phone speaker. 2. Replace both batteries with new ones.
.Recommended battery: Size AAA x 2
.Be careful not to touch the battery
terminal.
.Make sure that the +and 7ends on
the batteries match the markings in-
side the compartment.
3. Close the lid securely.
Audio jacks for wired headphones
Commercially available headphones can also
be used by connecting them to the head-
phone jacks
located at the rear of the
center console box.
To adjust the volume of the wired head-
phone, push
on the corresponding
side (left/right) to pull out the knob which can be rotated to turn up or down the
volume.
Push
back in when it is not in use.
REAR MEDIA INTERFACE
Ports for the USBand HDMIinterface
are located at the rear of the center console
box.
Compatible devices connected to the ports
can be played on the rear displays. Turn off
the power of the portable device before
connecting to the port.
NOTE:
Do not apply strong pressure to any
portable device (such as a USB memory
device) or cable that is connected to the
USB connection port or the HDMI port. It
3-56
Page 102 of 276
3. Audio system
Use the remote controller and take the
following steps to operate the rear displays
in the rear seats:
1. Turn on the rear displays using<
>on
the remote controller.
2. Push
the DVD (if so equipped), AUX (if so
equipped), USB or HDMI interface
devices.
When USB is selected for the first time
after the USB memory device is con-
nected, select a file you with to play from
the File Browser screen.
Menus
Push
Page 105 of 276
![INFINITI QX60 2020 Infiniti Connection which of the rear displays you wish to
operate.
. [Remote Controller Lock]
Touch to lock or unlock the remote
controller operation.
When the ignition switch is placed in the
OFF or LOCK position, the INFINITI QX60 2020 Infiniti Connection which of the rear displays you wish to
operate.
. [Remote Controller Lock]
Touch to lock or unlock the remote
controller operation.
When the ignition switch is placed in the
OFF or LOCK position, the](/img/42/35140/w960_35140-104.png)
which of the rear displays you wish to
operate.
. [Remote Controller Lock]
Touch to lock or unlock the remote
controller operation.
When the ignition switch is placed in the
OFF or LOCK position, the remote
controller will be unlocked.
. [Rr Speaker Mute]
Touch to mute or unmute the rear
speakers.
. [Auto Display Power ON]
Touch to turn on or off the setting for
automatic power on setting. When this
item is turned on, both the left and right
rear displays will turn on automatically
when the DVD (if so equipped) is inserted
into the front unit and the movie will
start to play.OPERATING TIPS
.The rear USB and the rear HDMI (rear
media interface) cannot be played on the
front screen.
. Devices connected to the USB connec-
tion port for the front display cannot be
played on the rear displays.
. When connecting a device to the USB
connection port for the first time, the
system structures the file list and this
could slow down the operation speed.
This is not a malfunction.
. The operation speed of the system could
slow down when the left and right
displays play different files from the
same device connected to the USB
connection port. This is not a malfunc-
tion.
. Images from DVDs (if so equipped) or
devices connected to the USB connec-
tion port may not be displayed in ade-
quate ratio depending on the resolution.
To correct the ratio, adjust the aspect
using the remote controller.
“System settings” (page 3-59)
. If a computer with an HDMI output
terminal is connected to the HDMI input terminal, the computer may not auto-
matically shift to the output mode. To
view images on the rear displays, operate
the computer and change the mode to
the output mode according to the com-
puter Owner’s Manual.
. Depending on the USB memory device,
the image may not start playing upon
activation or connection of the device to
the USB connection port. In that case,
remove and reinsert the USB memory
device into the port.
Multiple source display
It is possible to play different sources on
each display.
Refer to the following table of example
combinations.
Playback combinations by media:
Rear Dis-
play (L) Rear Dis-
play (R) Availability of play-
back on the left and
right displays
DVD*1 DVD*1 Simultaneous play- back
DVD*1 USB Individual playback
DVD*1 HDMI Individual playback
3. Audio system
3-61