light INFINITI QX60 HYBRID 2014 Navigation Manual
[x] Cancel search | Manufacturer: INFINITI, Model Year: 2014, Model line: QX60 HYBRID, Model: INFINITI QX60 HYBRID 2014Pages: 267, PDF Size: 3.09 MB
Page 25 of 267
![INFINITI QX60 HYBRID 2014 Navigation Manual 4. After finishing the entry, highlight [List]and push <ENTER>.
INFO:
.
Push <BACK> on the control panel to return
to the previous screen, but only after
deleting all the characters entered.
.Touch [B INFINITI QX60 HYBRID 2014 Navigation Manual 4. After finishing the entry, highlight [List]and push <ENTER>.
INFO:
.
Push <BACK> on the control panel to return
to the previous screen, but only after
deleting all the characters entered.
.Touch [B](/img/42/35043/w960_35043-24.png)
4. After finishing the entry, highlight [List]and push
INFO:
.
Push
to the previous screen, but only after
deleting all the characters entered.
.Touch [BACK] on the screen to return to the
previous screen even when characters have
been entered.
.The list screen appears automatically when
text has been entered and the matching list
items have been narrowed down to a
number that will fit on the screen.
Symbol input screen
.Symbol keys are displayed by highlighting
[Symbols] and pushing
keys are displayed by highlighting [A-Z] and
pushing
NUMBER INPUT SCREEN
A phone number or a street number can
also be entered as a search method to look
for a destination. Perform the following
procedure to enter a number.
INFO:
Only the locations included in the map data
database can be searched for by a phone
number.
1. Use the INFINITI controller to highlight a
number on the displayed keyboard.
2. Push
is entered.
INFO:
Inputting numbers can also be done with
the touch panel operation.
3. Push
push
entered.
Push and hold
numbers entered.
2. Getting started
2-17
Page 26 of 267
![INFINITI QX60 HYBRID 2014 Navigation Manual 2. Getting started
2-18
4. After finishing the entry, highlight [List]and push <ENTER>.
INFO:
.
Push <BACK> on the control panel to return
to the previous screen, but only after
deleting all the numbe INFINITI QX60 HYBRID 2014 Navigation Manual 2. Getting started
2-18
4. After finishing the entry, highlight [List]and push <ENTER>.
INFO:
.
Push <BACK> on the control panel to return
to the previous screen, but only after
deleting all the numbe](/img/42/35043/w960_35043-25.png)
2. Getting started
2-18
4. After finishing the entry, highlight [List]and push
INFO:
.
Push
to the previous screen, but only after
deleting all the numbers entered.
.Touch [BACK] on the screen to return to the
previous screen even when numbers have
been entered.
MAP MENU SCREEN
Push
map screen or a scrolled map screen is
displayed to display the menu correspond-
ing to that screen.
This menu can be used to access helpful
functions quickly, such as setting a desti-
nation and searching for points of interest
nearby.
There are various methods used to select a
menu item. Use a method described earlier
in this manual.
“Menu screen and operation method”
(page 2-11)
INFO:
With the touch panel operation, the same
screen can be displayed by touching [Map
Menu] located on the map screen.
CURRENT LOCATION MAP SCREEN
If
location map screen is displayed, the
following options are available.
. [Store Location]:
Stores the current vehicle location in
the Address Book. The stored location
can be retrieved as necessary to set it
as a destination (waypoint).
“Storing location” (page 6-2)
. [Nearby Places]:
Searches for points of interest near the
current vehicle location, such as res-
taurants and gas stations, etc.
“Finding nearby place” (page 4-6)
. [Map View]:
Performs map operations such as the
switching of map type and the setting
of map orientation and scale.
Page 28 of 267

2. Getting started
2-20
STORING HOME LOCATION/ADDRESS
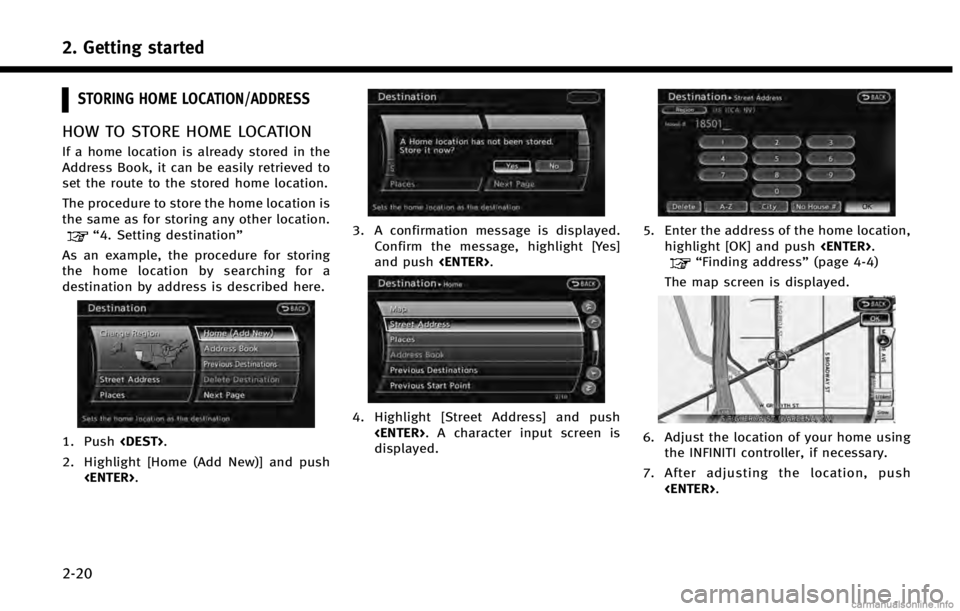
HOW TO STORE HOME LOCATION
If a home location is already stored in the
Address Book, it can be easily retrieved to
set the route to the stored home location.
The procedure to store the home location is
the same as for storing any other location.
“4. Setting destination”
As an example, the procedure for storing
the home location by searching for a
destination by address is described here.
1. Push
2. Highlight [Home (Add New)] and push
3. A confirmation message is displayed.Confirm the message, highlight [Yes]
and push
4. Highlight [Street Address] and push
displayed.
5. Enter the address of the home location,highlight [OK] and push
“Finding address”(page 4-4)
The map screen is displayed.
6. Adjust the location of your home using the INFINITI controller, if necessary.
7. After adjusting the location, push
Page 29 of 267
![INFINITI QX60 HYBRID 2014 Navigation Manual INFO:
It is recommended to move the home
location for security reasons.
8. A message is displayed and the homelocation is stored.
9. Highlight [OK] and push <ENTER>.
10. Push <MAP>to return to the cur INFINITI QX60 HYBRID 2014 Navigation Manual INFO:
It is recommended to move the home
location for security reasons.
8. A message is displayed and the homelocation is stored.
9. Highlight [OK] and push <ENTER>.
10. Push <MAP>to return to the cur](/img/42/35043/w960_35043-28.png)
INFO:
It is recommended to move the home
location for security reasons.
8. A message is displayed and the homelocation is stored.
9. Highlight [OK] and push
10. Push
Page 30 of 267
![INFINITI QX60 HYBRID 2014 Navigation Manual 2. Getting started
2-22
INFO:
The search can also be narrowed down by
selecting [All Categories or Name] or [ZAGAT]
on this screen. By selecting [All Categories
or Name], the area, name of facility, e INFINITI QX60 HYBRID 2014 Navigation Manual 2. Getting started
2-22
INFO:
The search can also be narrowed down by
selecting [All Categories or Name] or [ZAGAT]
on this screen. By selecting [All Categories
or Name], the area, name of facility, e](/img/42/35043/w960_35043-29.png)
2. Getting started
2-22
INFO:
The search can also be narrowed down by
selecting [All Categories or Name] or [ZAGAT]
on this screen. By selecting [All Categories
or Name], the area, name of facility, etc. can
be specified. By selecting [ZAGAT], restau-
rants registered in the ZAGAT database can
be searched and sorted by their rating
regarding food, decor, cost, service, etc.
The Zagat Content displayed may not reflect
the most up-to-date Zagat Content available
to the public.
4. Highlight the preferred restaurant fromthe list and push
INFO:
.The position of the selected location is
displayed in the preview on the right
side of the screen.
.If there is a route already in progress,only places along the current route will
be listed. Turn off [Show Along Route] at
the top of list to display all nearby
places.
5. The entire route is shown on the map. Highlight [Start] after confirming the
location of the displayed destination,
and push
The system sets the destination to the
selected location and starts calculating
a route.
INFO:
Even after setting a destination, the location
of the destination can be adjusted and the
route can be stored, etc., if necessary.
“Procedures after setting destination”
(page 5-2)
STARTING ROUTE GUIDANCE
After the destination is set and route
calculation is performed, the suggested
route is displayed.
1. Highlight [Start] and push
2. Once route guidance is started, the
system navigates you through the
guide points using visual and voice
guidance.
Page 31 of 267

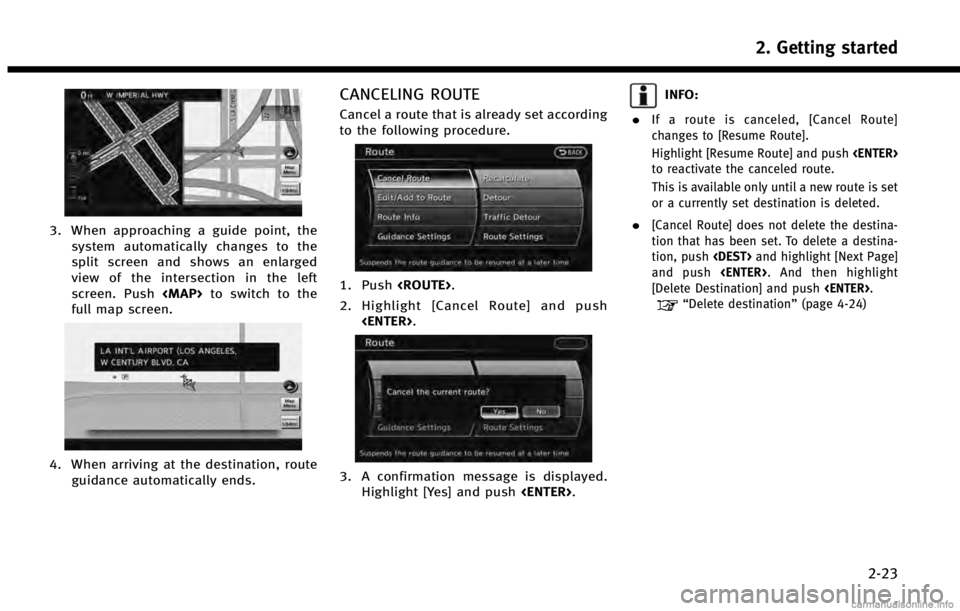
3. When approaching a guide point, thesystem automatically changes to the
split screen and shows an enlarged
view of the intersection in the left
screen. Push
Page 33 of 267

“Setting map orientation”
(page 3-14)
*9Scale indicator:
Indicates the scale of the map.
Touch the icon to display the scale bar.
The map scale can be adjusted using
the scale bar.
“Operating with touch panel op-
eration” (page 3-5)
*10Street name:
Displays the name of the street that
the vehicle is currently driving on.
*11IVR soft button (if so equipped):
Touch the icon to connect to the Infiniti
Connection
TMInteractive Voice Menu.“Connecting to Interactive Voice
Menu”(page 7-10)
INFO:
Infiniti Connection Interactive Voice Menu is a
feature of Infiniti Connection. Use of this feature
is dependent upon a valid subscription and the
telematics device being in operative condition,
as well as cellular connectivity, navigation map
data and GPS satellite signal reception being
available.
SETTING VOICE GUIDANCE
TURNING VOICE GUIDANCE ON/OFF
Voice guidance can be activated or deac-
tivated.
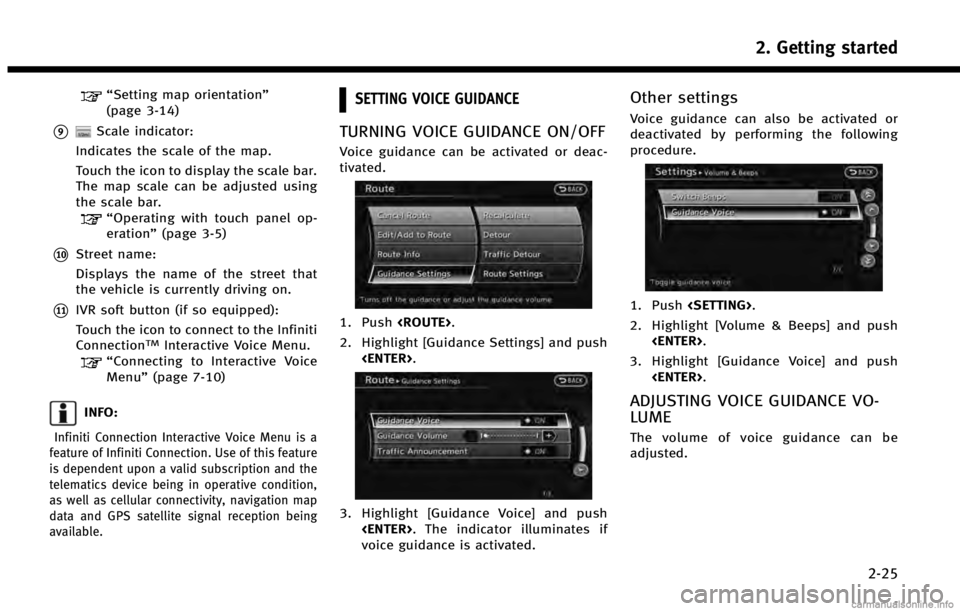
1. Push
2. Highlight [Guidance Settings] and push
3. Highlight [Guidance Voice] and push
voice guidance is activated.
Other settings
Voice guidance can also be activated or
deactivated by performing the following
procedure.
1. Push
2. Highlight [Volume & Beeps] and push
3. Highlight [Guidance Voice] and push
ADJUSTING VOICE GUIDANCE VO-
LUME
The volume of voice guidance can be
adjusted.
2. Getting started
2-25
Page 34 of 267
![INFINITI QX60 HYBRID 2014 Navigation Manual 2. Getting started
2-26
1. Push<ROUTE>.
2. Highlight [Guidance Settings] and push <ENTER>.
3. Highlight [Guidance Volume] and push<ENTER>.
4. Adjust the volume of voice guidance byusing the INFINITI c INFINITI QX60 HYBRID 2014 Navigation Manual 2. Getting started
2-26
1. Push<ROUTE>.
2. Highlight [Guidance Settings] and push <ENTER>.
3. Highlight [Guidance Volume] and push<ENTER>.
4. Adjust the volume of voice guidance byusing the INFINITI c](/img/42/35043/w960_35043-33.png)
2. Getting started
2-26
1. Push
2. Highlight [Guidance Settings] and push
3. Highlight [Guidance Volume] and push
4. Adjust the volume of voice guidance byusing the INFINITI controller.
Other settings
The volume of voice guidance can also be
adjusted by performing the following
procedure.
1. Push
2. Highlight [Volume & Beeps] and push
4. Adjust the volume of voice guidance by using the INFINITI controller.
INFO:
The guidance volume can also be adjusted by
turning the audio system volume control knob
or pushing <+>/<−> on the steering wheel while
voice guidance is being announced.
“Steering wheel switches” (page 2-7)
Page 55 of 267

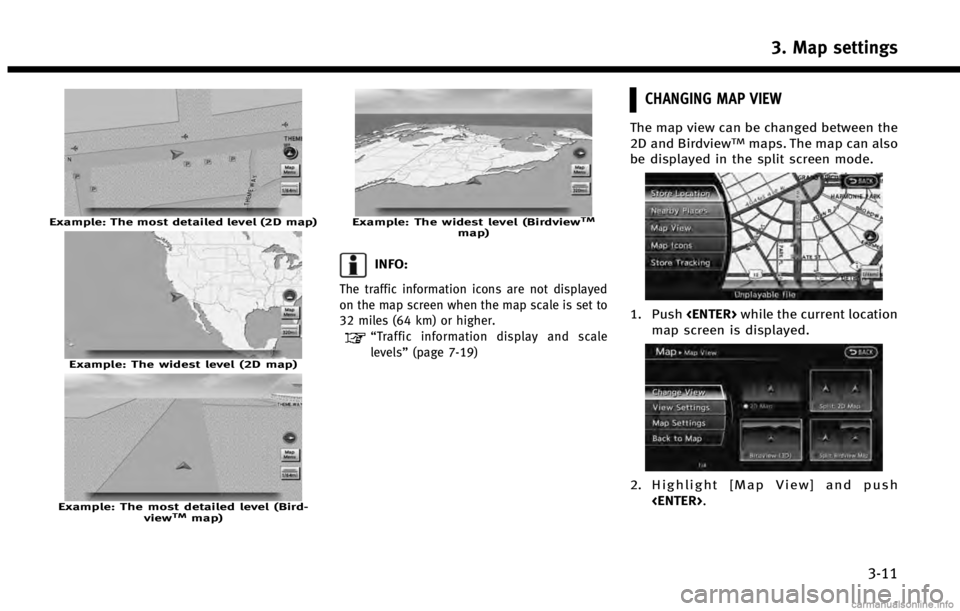
Example: The most detailed level (2D map)
Example: The widest level (2D map)
Example: The most detailed level (Bird-viewTMmap)
Example: The widest level (BirdviewTMmap)
INFO:
The traffic information icons are not displayed
on the map screen when the map scale is set to
32 miles (64 km) or higher.
“Traffic information display and scale
levels” (page 7-19)
CHANGING MAP VIEW
The map view can be changed between the
2D and BirdviewTMmaps. The map can also
be displayed in the split screen mode.
1. Push
map screen is displayed.
2. Highlight [Map View] and push
3. Map settings
3-11
Page 56 of 267
![INFINITI QX60 HYBRID 2014 Navigation Manual 3. Map settings
3-12
3. Highlight [Change View] and push theright button of the directional buttons
or push the slide switch to the right.
4. Highlight the preferred map view and push <ENTER>. The ind INFINITI QX60 HYBRID 2014 Navigation Manual 3. Map settings
3-12
3. Highlight [Change View] and push theright button of the directional buttons
or push the slide switch to the right.
4. Highlight the preferred map view and push <ENTER>. The ind](/img/42/35043/w960_35043-55.png)
3. Map settings
3-12
3. Highlight [Change View] and push theright button of the directional buttons
or push the slide switch to the right.
4. Highlight the preferred map view and push
selected map view illuminates.
5. The display automatically returns to the map screen.
Available views . [2D Map]:
Switches to the 2D map.
. [Birdview (3D)]:
Switches to the Birdview
TMmap.
. [Split: 2D Map]:
Changes to the split screen mode and
both halves display maps in 2D.
. [Split: Birdview Map]:
Changes to the split screen mode and the left half displays the map in 2D and
the right half displays the map in
Birdview
TM.
INFO:
.
When the split screen mode is selected, the
map settings for the left screen can be
changed independently.
“Setting left screen display”
(page 3-17)
.If the split screen mode is selected, the
normal map scrolling and scale adjustment
are set in the right screen.
.The map direction or scale for each screen
can be adjusted independently by touching
an icon on the map.
Split: 2D Map
Split: BirdviewTMMap
OTHER SETTINGS
The map view can also be set by perform-
ing the following procedure.
1. Push
2. Highlight [Navigation] and push
3. Highlight [Map View] and push
4. Highlight [Change View] and push