INFINITI QX60 HYBRID 2015 Quick Reference Guide
Manufacturer: INFINITI, Model Year: 2015, Model line: QX60 HYBRID, Model: INFINITI QX60 HYBRID 2015Pages: 36, PDF Size: 1.83 MB
Page 21 of 36
19
21
356
4
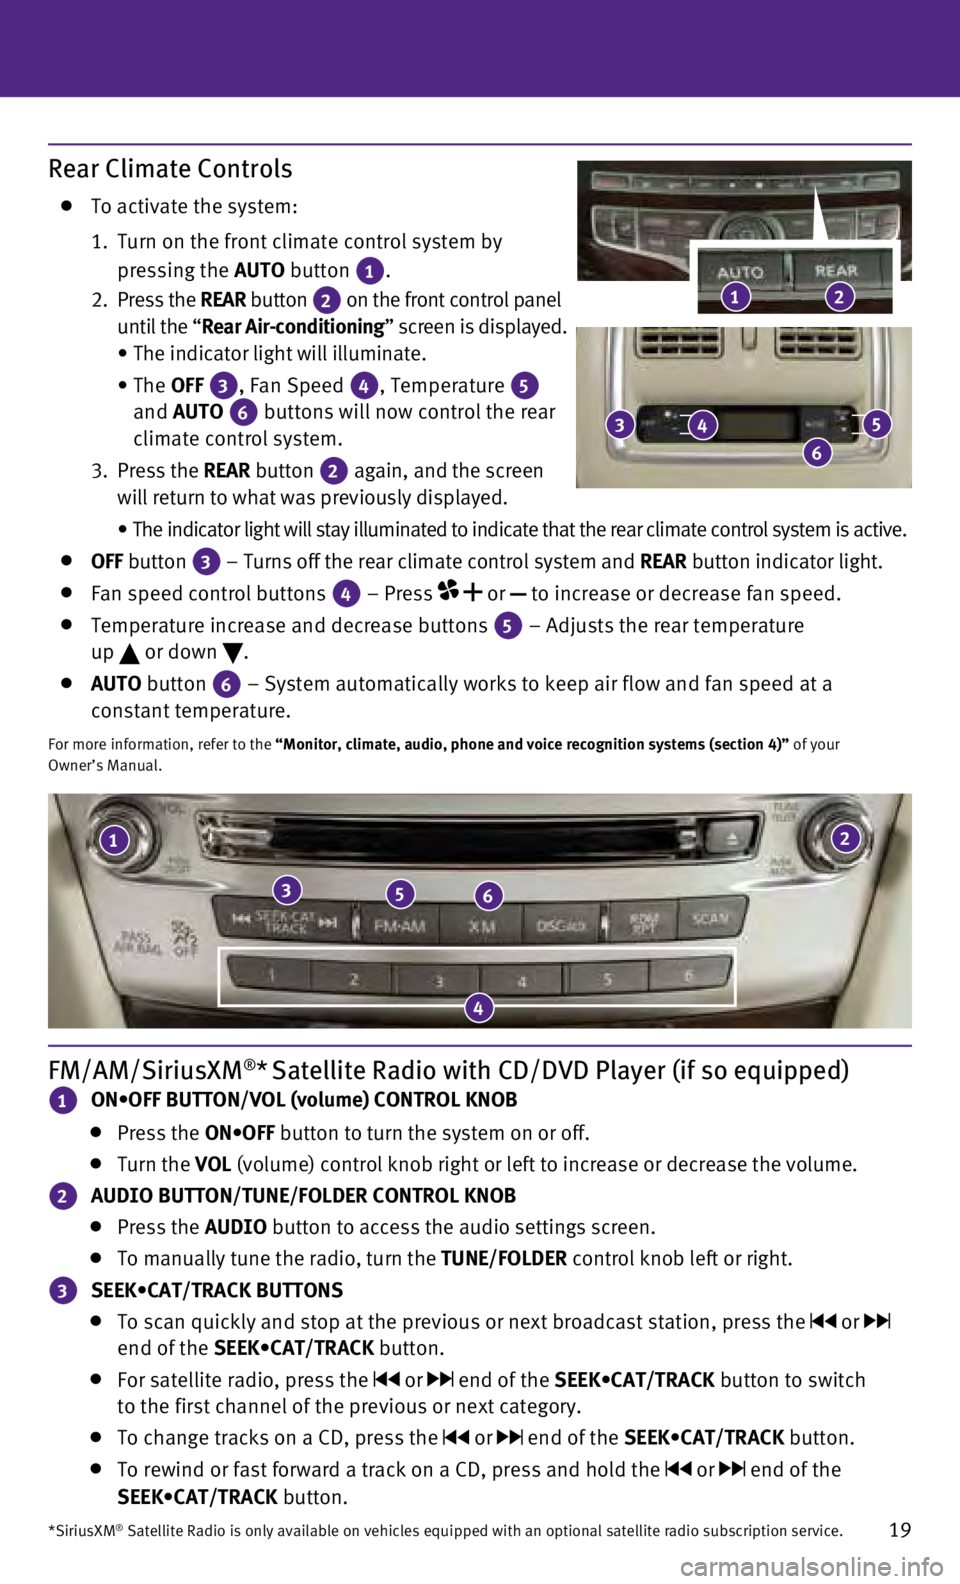
FM/AM/SiriusXM®* Satellite Radio with CD/DVD Player (if so equipped)
1 ON•OFF BUTTON/VOL (volume) CONTROL KNOB
Press the ON•OFF button to turn the system on or off.
Turn the VOL (volume) control knob right or left to increase or decrease the volume\
.
2 AUDIO BUTTON/TUNE/FOLDER CONTROL KNOB
Press the
AUDIO button to access the audio settings screen.
To manually tune the radio, turn the TUNE/FOLDER control knob left or right.
3 SEEK•CAT/TRACK BUTTONS
To scan quickly and stop at the previous or next broadcast station, pres\
s the or
end of the SEEK•CAT/TRACK button.
For satellite radio, press the or end of the SEEK•CAT/TRACK button to switch
to the first channel of the previous or next category.
To change tracks on a CD, press the or end of the SEEK•CAT/TRACK button.
To rewind or fast forward a track on a CD, press and hold the or end of the
SEEK•CAT/TRACK button.
*SiriusXM® Satellite Radio is only available on vehicles equipped with an optional\
satellite radio subscription service.
Rear Climate Controls
To activate the system:
1.
Turn on the front climate control system by
pressing the AUTO button
1.
2
.
Press the REAR button
2 on the front control panel
until the “Rear Air-conditioning” screen is displayed.
•
The indicator light will illuminate.
•
The OFF
3, Fan Speed 4, Temperature 5
and AUTO
6 buttons will now control the rear
climate control system.
3.
Press the REAR button
2 again, and the screen
will return to what was previously displayed.
•
The indicator light will stay illuminated to indicate that the rear clim\
ate control system is active.
OFF button
3 – Turns off the rear climate control system and REAR button indicator light. Fan speed control buttons
4 – Press
or
to increase or decrease fan speed.
Temperature increase and decrease buttons 5 – Adjusts the rear temperature
up or down
.
AUTO button
6 – System automatically works to keep air flow and fan speed at a
constant temperature.
For more information, refer to the “Monitor, climate, audio, phone and voice recognition systems (secti\
on 4)” of your
Owner’s Manual.
2
3
6
45
1
Page 22 of 36
20
USB (Universal Serial Bus) Connection
Port/iPod® Interface
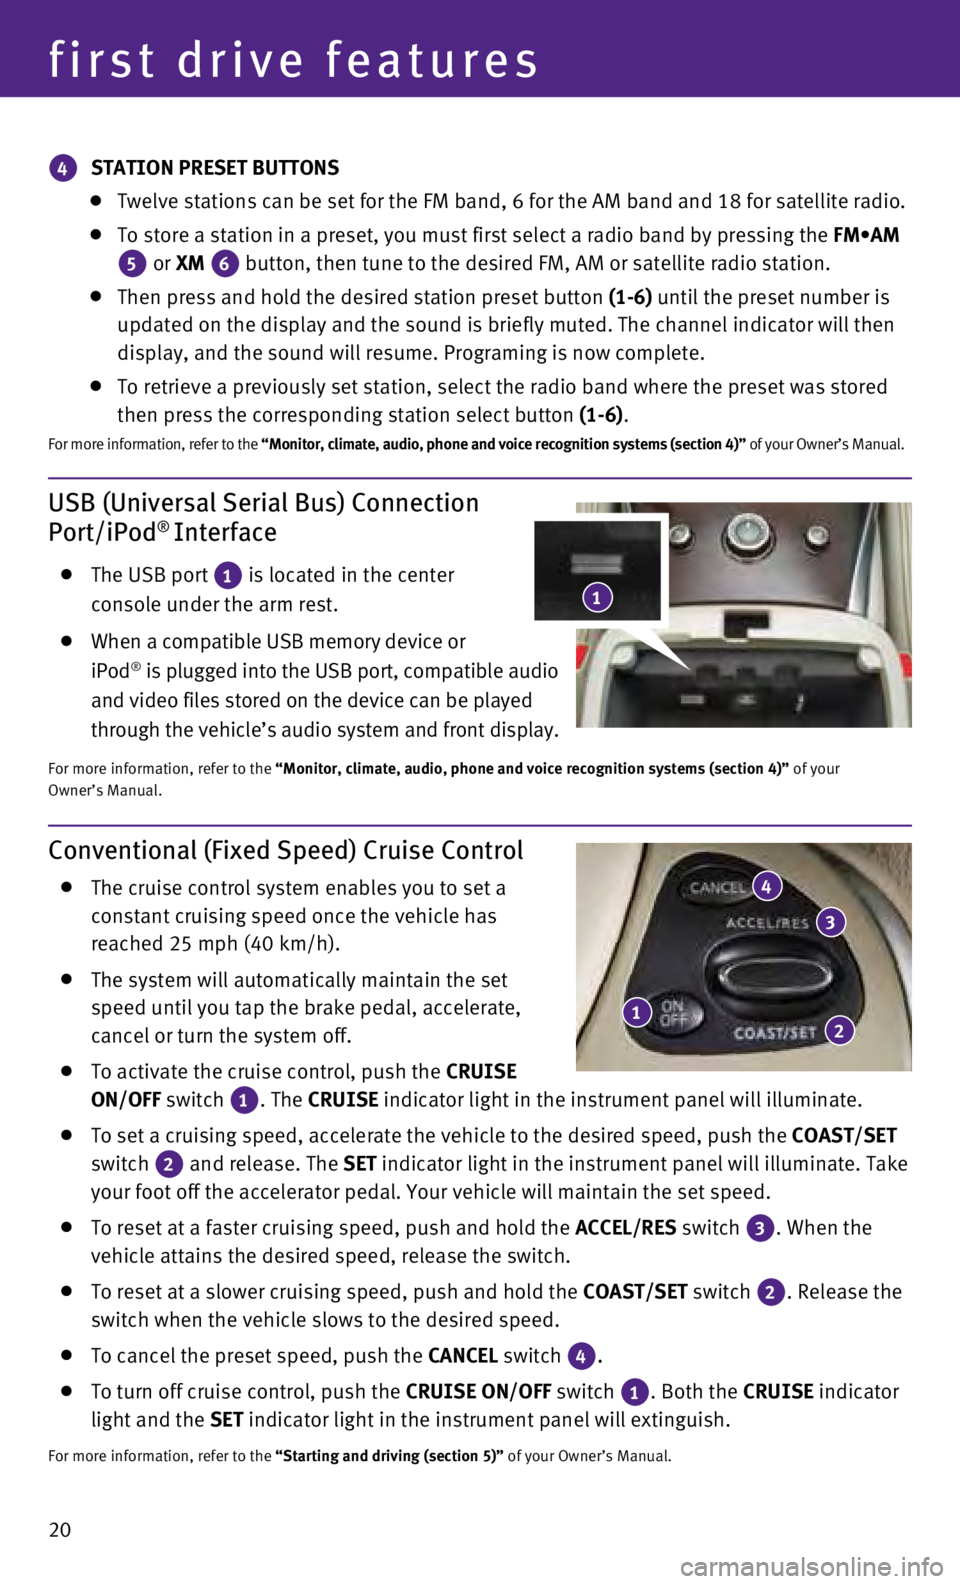
The USB port 1 is located in the center
console under the arm rest.
When a compatible USB memory device or
iPod® is plugged into the USB port, compatible audio
and video files stored on the device can be played
through the vehicle’s audio system and front display.
For more information, refer to the “Monitor, climate, audio, phone and voice recognition systems (secti\
on 4)” of your
Owner’s Manual.
first drive features
Conventional (Fixed Speed) Cruise Control
The cruise control system enables you to set a
constant cruising speed once the vehicle has
reached 25 mph (40 km/h).
The system will automatically maintain the set
speed until you tap the brake pedal, accelerate,
cancel or turn the system off.
To activate the cruise control, push the CRUISE
ON/OFF switch
1. The
CRUISE
indicator light in the instrument panel will illuminate.
To set a cruising speed, accelerate the vehicle to the desired speed, pu\
sh the
COAST/SET
switch
2 and release. The
SET indicator light
in the instrument panel will illuminate. Take
your foot off the accelerator pedal. Your vehicle will maintain the set \
speed.
To reset at a faster cruising speed, push and hold the ACCEL/RES switch 3. When the
vehicle attains the desired speed, release the switch.
To reset at a slower cruising speed, push and hold the COAST/SET switch 2. Release the
switch when the vehicle slows to the desired speed.
To cancel the preset speed, push the CANCEL switch
4.
To turn off cruise control, push the CRUISE
ON/OFF switch
1. Both the
CRUISE indicator
light and the SET indicator light in the instrument panel will extinguish.
For more information, refer to the “Starting and driving (section 5)” of your Owner’s Manual.
12
3
4
4 STATION PRESET BUTTONS
Twelve stations can be set for the FM band, 6 for the AM band and 18 for\
sa
tellite radio.
To store a station in a preset, you must first select a radio band by pr\
essing the FM•AM
5 or XM
6 button, then tune to the desired FM, AM or satellite radio station. Then press and hold the desired station preset button
(1-6) until the preset number is
updated on the display and the sound is briefly muted. The channel indic\
ator will then
display, and the sound will resume. Programing is now complete.
To retrieve a previously set station, select the radio band where the pr\
eset w as stored
then press the corresponding station select button (1-6).
F or more information, refer to the “Monitor, climate, audio, phone and voice recognition systems (secti\
on 4)” of your Owner’s Manual.
1
Page 23 of 36
21
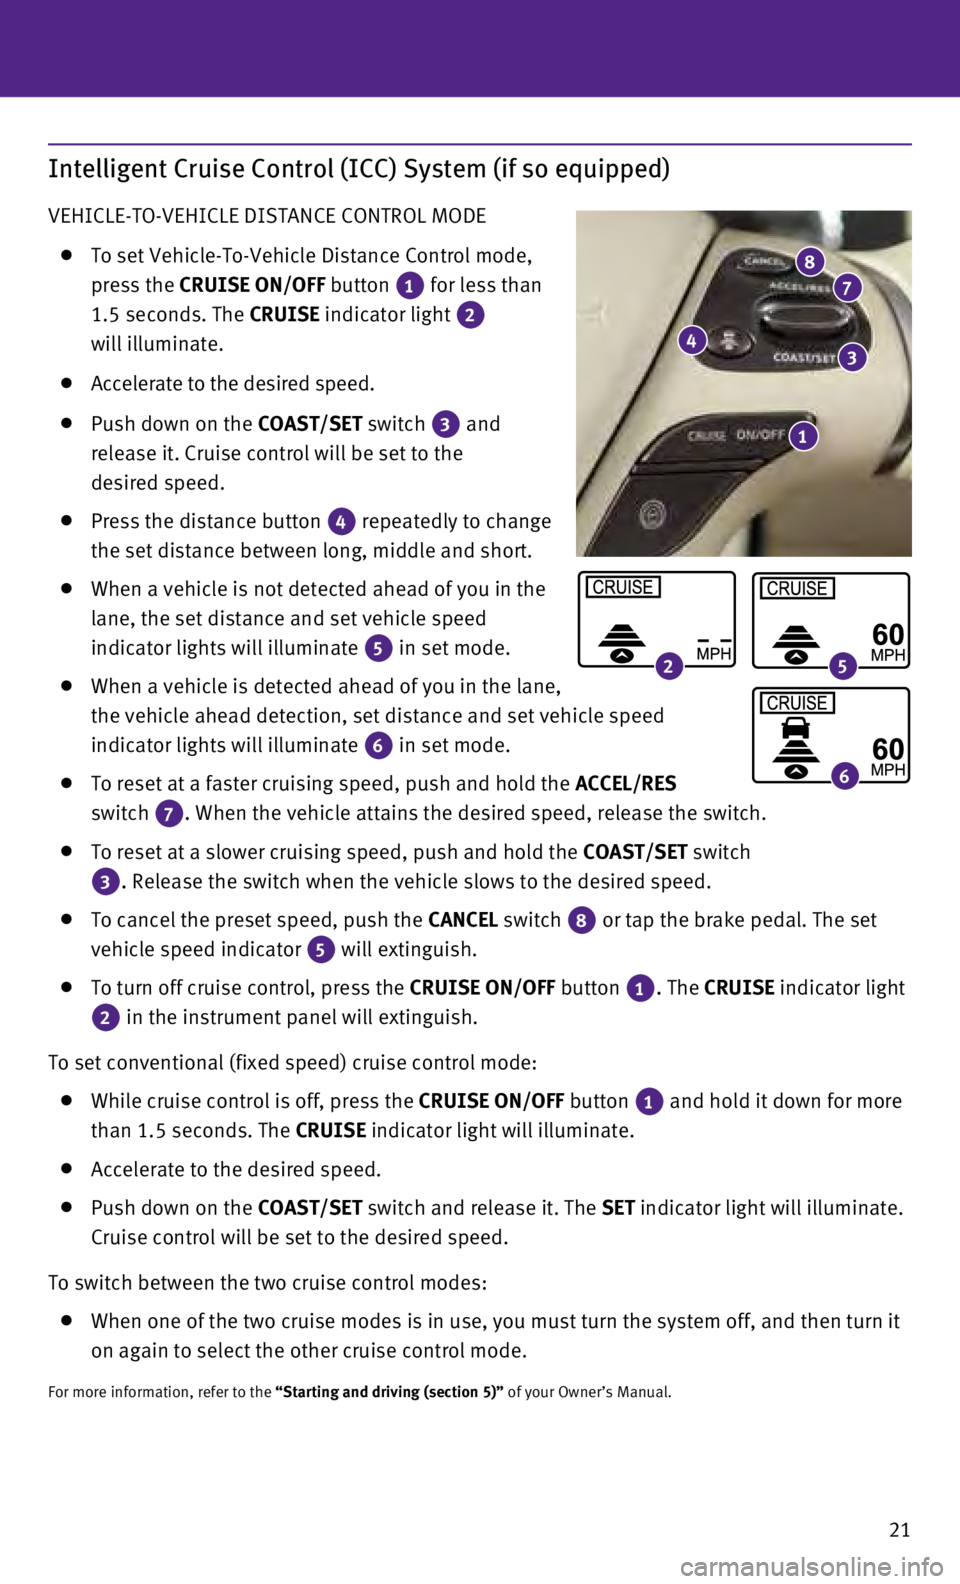
Intelligent Cruise Control (ICC) System (if so equipped)
VEHICLE-TO-VEHICLE DISTANCE CONTROL MODE
To set Vehicle-To-Vehicle Distance Control mode,
press the CRUISE ON/OFF button
1 for less than
1.5 seconds. The CRUISE indicator light 2
will illuminate.
Accelerate to the desired speed.
Push down on the COAST/SET switch
3 and
release it. Cruise control will be set to the
desired speed.
Press the distance button 4 repeatedly to change
the set distance between long, middle and short.
When a vehicle is not detected ahead of you in the
lane, the set distance and set vehicle speed
indicator lights will illuminate
5 in set mode.
When a vehicle is detected ahead of you in the lane,
the vehicle ahead detection, set distance and set vehicle speed
indicator lights will illuminate
6 in set mode.
To reset at a faster cruising speed, push and hold the
ACCEL/RES
switch
7. When the vehicle attains the desired speed, release the switch.
To reset at a slower cruising speed, push and hold the COAST/SET switch
3. Release the switch when the vehicle slows to the desired speed.
To cancel the preset speed, push the CANCEL switch
8 or tap the brake pedal. The set
vehicle speed indicator 5 will extinguish.
To turn off cruise control, press the
CRUISE ON/OFF button
1. The CRUISE indicator light
2 in the instrument panel will extinguish.
To set conventional (fixed speed) cruise control mode:
While cruise control is off, press the CRUISE ON/OFF
button 1
and hold it down for more
than 1.5 seconds. The
CRUISE indicator light will illuminate.
Accelerate to the desired speed.
Push down on the COAST/SET switch and release it. The SET indicator light will illuminate.
Cruise control will be set to the desired speed.
To switch between the two cruise control modes:
W hen one of the two cruise modes is in use, you must turn the system off,\
and then turn it
on again to select the other cruise control mode.
For more information, refer to the “Starting and driving (section 5)” of your Owner’s Manual.
1
43
78
25
6
Page 24 of 36
22
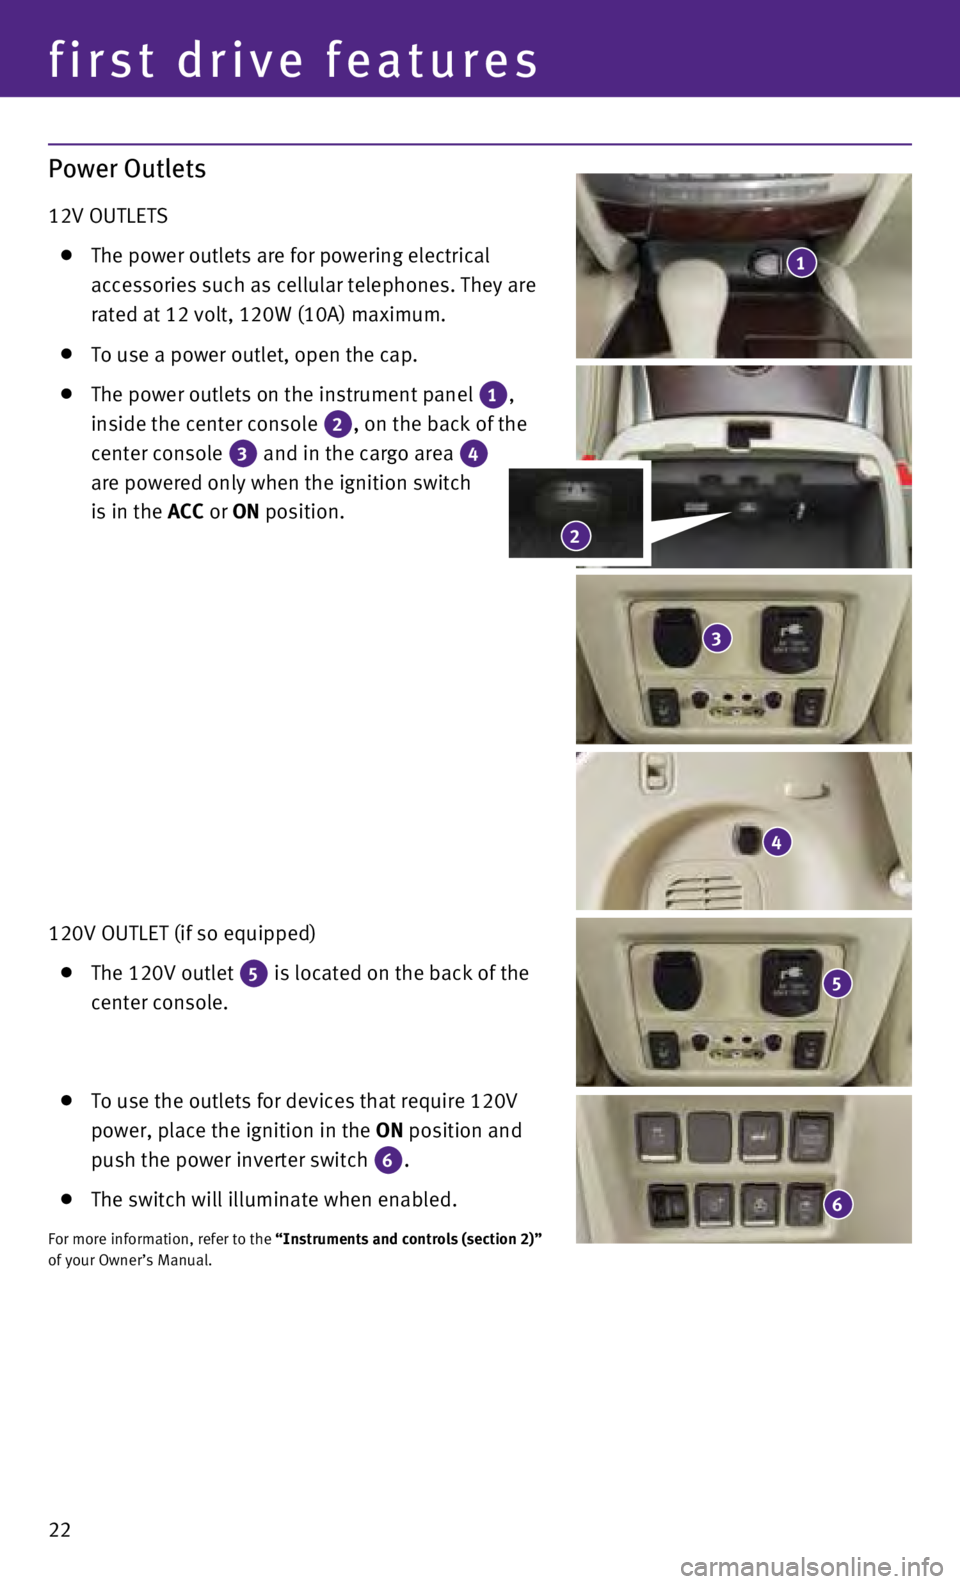
Power Outlets
12V OUTLETS
The power outlets are for powering electrical
accessories such as cellular telephones. They are
rated at 12 volt, 120W (10A) maximum.
To use a power outlet, open the cap.
The power outlets on the instrument panel 1,
inside the center console 2, on the back of the
center console 3 and in the cargo area 4
are powered only when the ignition switch
is in the ACC or ON position.
120V OUTLET (if so equipped)
The 120V outlet 5 is located on the back of the
center console.
To use the outlets for devices that require 120V
power, place the ignition in the ON position and
push the power inverter switch
6.
The switch will illuminate when enabled.
For more information, refer to the “Instruments and controls (section 2)”
of your Owner’s Manual.
1
4
5
3
6
2
first drive features
Page 25 of 36
23
Vehicle Information Display
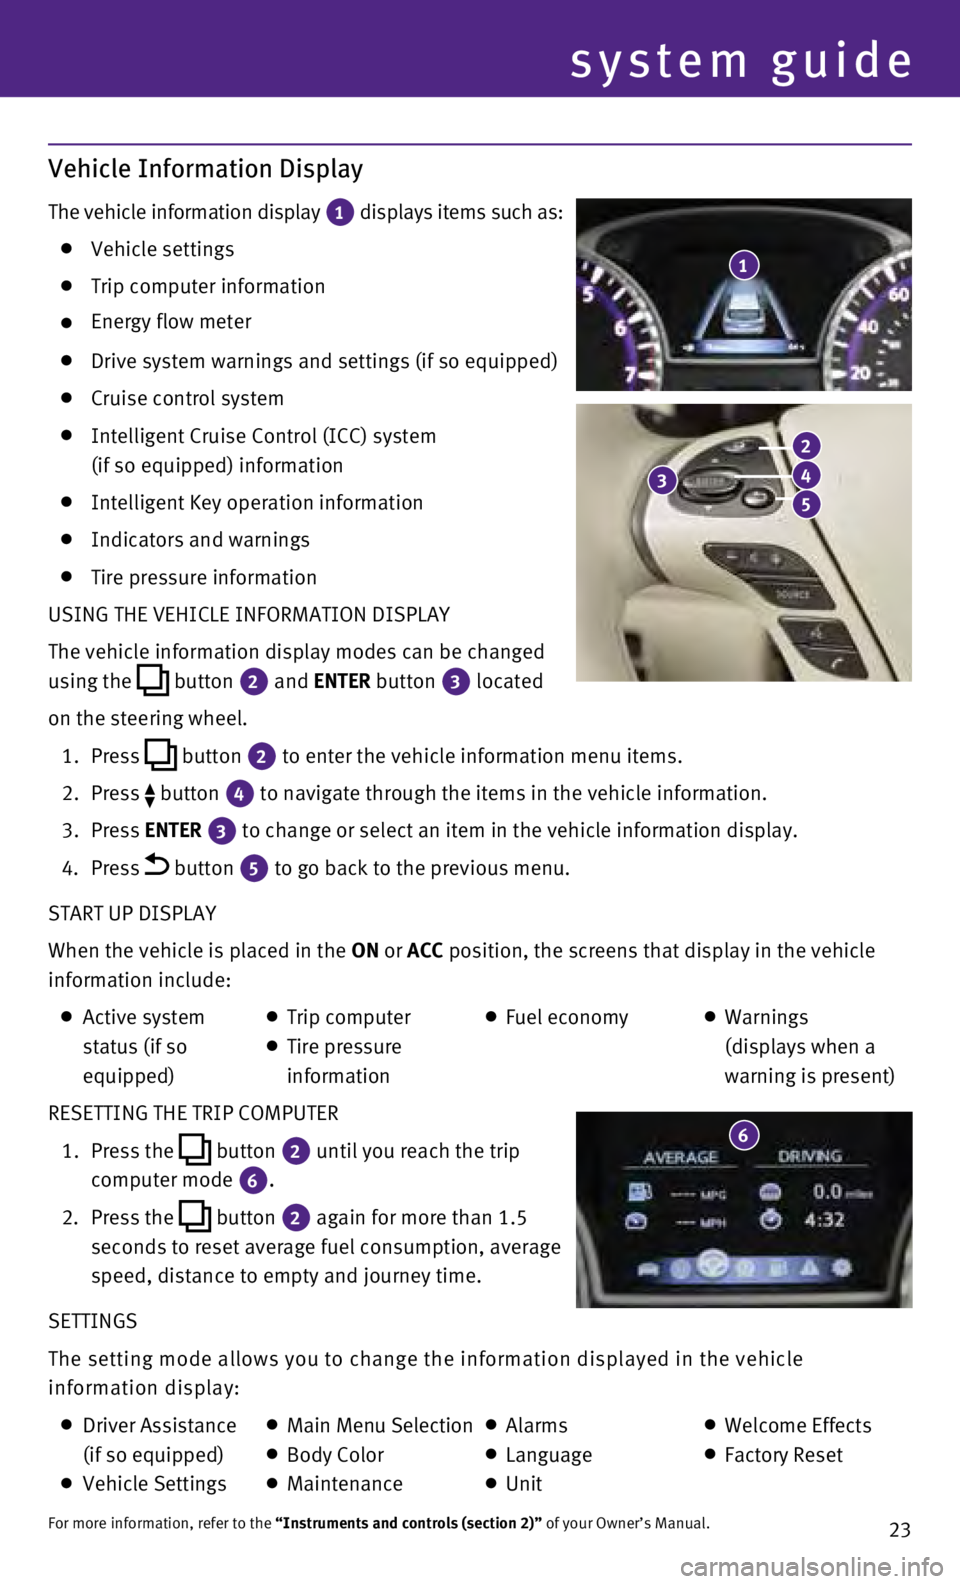
The vehicle information display 1 displays items such as: Vehicle settings
Trip computer information
Energy flow meter
Drive system warnings and settings (if so equipped)
Cruise control system
Intelligent Cruise Control (ICC) system
(if so equipped) information
Intelligent Key operation information
Indicators and warnings
Tire pressure information
USING THE VEHICLE INFORMATION DISPLAY
The vehicle information display modes can be changed
using the
button
2 and ENTER button 3
located
on the steering wheel.
1.
Press
button
2 to enter the vehicle information menu items.
2.
Press button
4 to navigate through the items in the vehicle information.
3.
Press
ENTER
3 to change or select an item in the vehicle information display.
4.
Press button 5 to go back to the previous menu.
START UP DISPLAY
When the vehicle is placed in the ON or ACC position, the screens that display in the vehicle
information include:
Active system
status (if so
equipped) Trip computer
Tire pressure
information
Fuel economy
Warnings
(displays when a
warning is present)
RESETTING THE TRIP COMPUTER
1.
Press the
button
2 until you reach the trip
computer mode 6.
2.
Press the button 2 again for more than 1.5
seconds to reset average fuel consumption, average
speed, distance to empty and journey time.
SETTINGS
The setting mode allows you to change the information displayed in the v\
ehicle
information display:
Driver Assistance
(if so equipped)
Vehicle Settings
Main Menu Selection Body Color
Maintenance
Alarms
Language
Unit
Welcome Effects
Factory Reset
For more information, refer to the “Instruments and controls (section 2)” of your Owner’s Manual.
1
system guide
3
2
4
5
6
Page 26 of 36
24
system guide
Bluetooth® Hands-free Phone System
A cellular telephone should not be used while
driving so full attention may be given to
vehicle operation.*
SYSTEM OPERATING TIPS
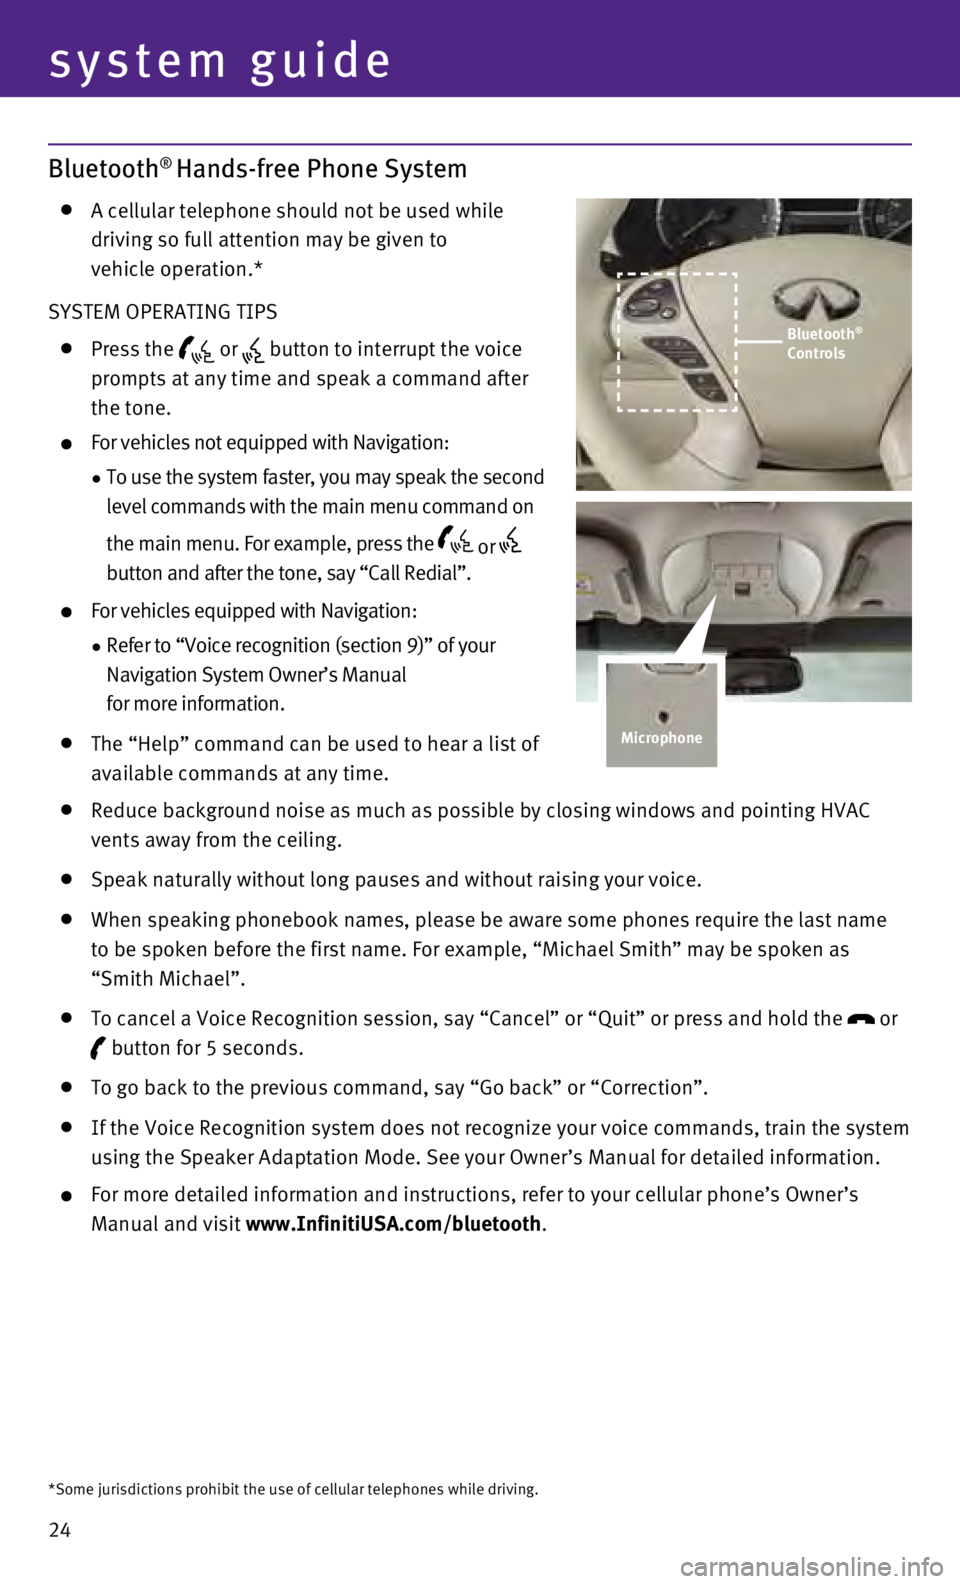
Press the or button to interrupt the voice
prompts at any time and speak a command after
the tone.
For vehicles not equipped with Navigation:
•
To use the system faster, you may speak the second
level commands with the main menu command on
the main menu. For example, press the
or
button and after the tone, say “Call Redial”.
For vehicles equipped with Navigation:
•
Refer to “Voice recognition (section 9)” of your
Navigation System Owner’s Manual
for more information.
The “Help” command can be used to hear a list of
available commands at any time.
Reduce background noise as much as possible by closing windows and pointing HVAC
vents away from the ceiling.
Speak naturally without long pauses and without raising your voice.
When speaking phonebook names, please be aware some phones require the last name
to be spoken before the first name. For example, “Michael Smith” m\
ay be spoken as
“Smith Michael”.
To cancel a Voice Recognition session, say “Cancel” or “Quit”\
or press and hold the
or
button for 5 seconds.
To go back to the previous command, say “Go back” or “Correctio\
n”.
If the Voice Recognition system does not recognize your voice commands, \
train the system
using the Speaker Adaptation Mode. See your Owner’s Manual for detail\
ed information.
For more detailed information and instructions, refer to your cellular p\
hone ’s Owner’s
Manual and visit www.InfinitiUSA.com/bluetooth.
*Some jurisdictions prohibit the use of cellular telephones while drivin\
g.
Bluetooth®
Controls
Microphone
Page 27 of 36
25
Bluetooth® System without Navigation (if so equipped)
CONNECTING PROCEDURE
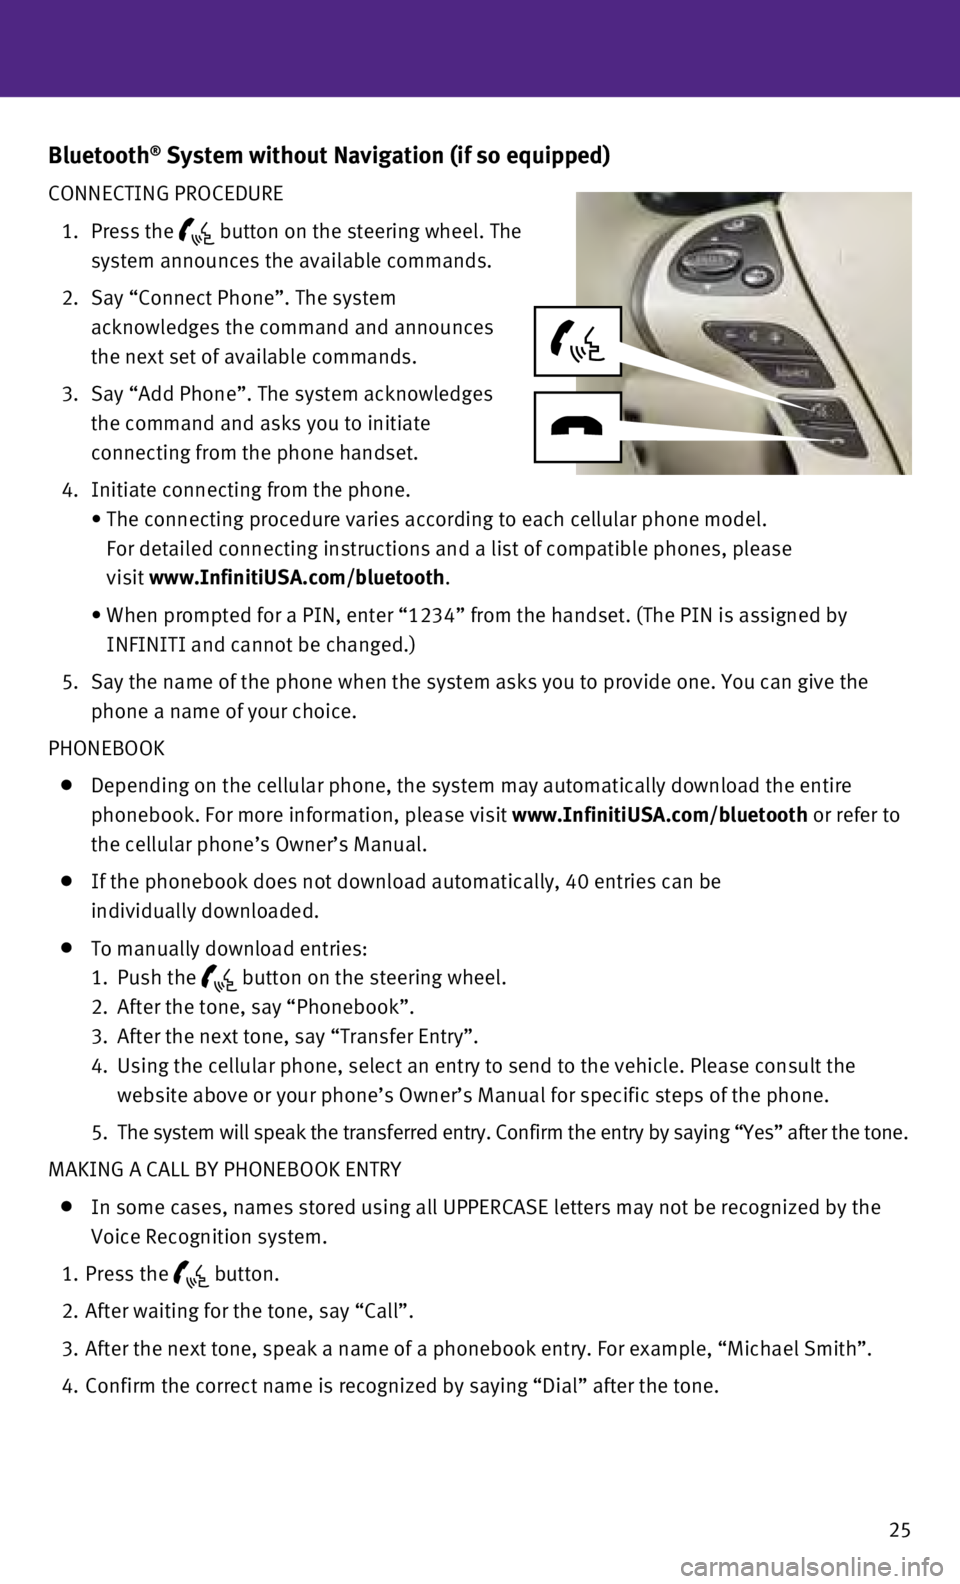
1.
Press the button on the steering wheel. The
system announces the available commands.
2.
Say “Connect Phone”. The system
acknowledges the command and announces
the next set of available commands.
3.
Say “Add Phone”. The system acknowledges
the command and asks you to initiate
connecting from the phone handset.
4.
Initiate connecting from the phone.
•
The connecting procedure varies according to each cellular phone model. \
For detailed connecting instructions and a list of compatible phones, pl\
ease
visit
www.InfinitiUSA.com/bluetooth.
•
When prompted for a PIN, enter “1234” from the handset. (The PIN \
is assigned by
INFINITI and cannot be changed.)
5
.
Say the name of the phone when the system asks you to provide one. You c\
an give the
phone a name of your choice.
PHONEBOOK
Depending on the cellular phone, the system may automatically download t\
he entire
phonebook. For more information, please visit
www.InfinitiUSA.com/bluetooth or refer to
the cellular phone’s Owner’s Manual.
If the phonebook does not download automatically, 40 entries can be
individually downloaded.
To manually download entries:
1.
Push the button on the steering wheel.
2.
After the tone, say “Phonebook”.
3.
After the next tone, say “Transfer Entry”.
4.
Using the cellular phone, select an entry to send to the vehicle. Please\
consult the
website above or your phone’s Owner’s Manual for specific steps of\
the phone.
5.
The system will speak the transferred entry. Confirm the entry by saying\
“Yes” after the tone.
MAKING A CALL BY PHONEBOOK ENTRY
In some cases, names stored using all UPPERCASE letters may not be recog\
nized by the
Voice Recognition system.
1.
Press the button.
2.
After waiting for the tone, say “Call”.
3.
After the next tone, speak a name of a phonebook entry. For example, “\
Michael Smith”.
4.
Confirm the correct name is recognized by saying “Dial” after the \
tone.
Page 28 of 36
26
system guide
MAKING A CALL BY PHONE NUMBER
1.
Press the button.
2.
After waiting for the tone, say “Call”.
3.
After the next tone, say “Phone Number”.
4.
After the next tone, say “123-456-7890”.
You may also say the digits in groups of 3, 3 and 4, respectively. To us\
e this group
dialing method, say only the first 3 digits of the phone number instead \
of all 10 digits.
After the system recognizes the digits, it will request the next 3 digit\
s and finally the last
4 digits.
5.
After the system speaks the correct number and sounds the tone, say “\
Dial”.
RECEIVING/ENDING A CALL
To accept the call, press the button on the steering wheel.
To reject the call, press the
button.
To hang-up, press the
button.
Bluetooth® System with Navigation (if so equipped)
CONNECTING PROCEDURE
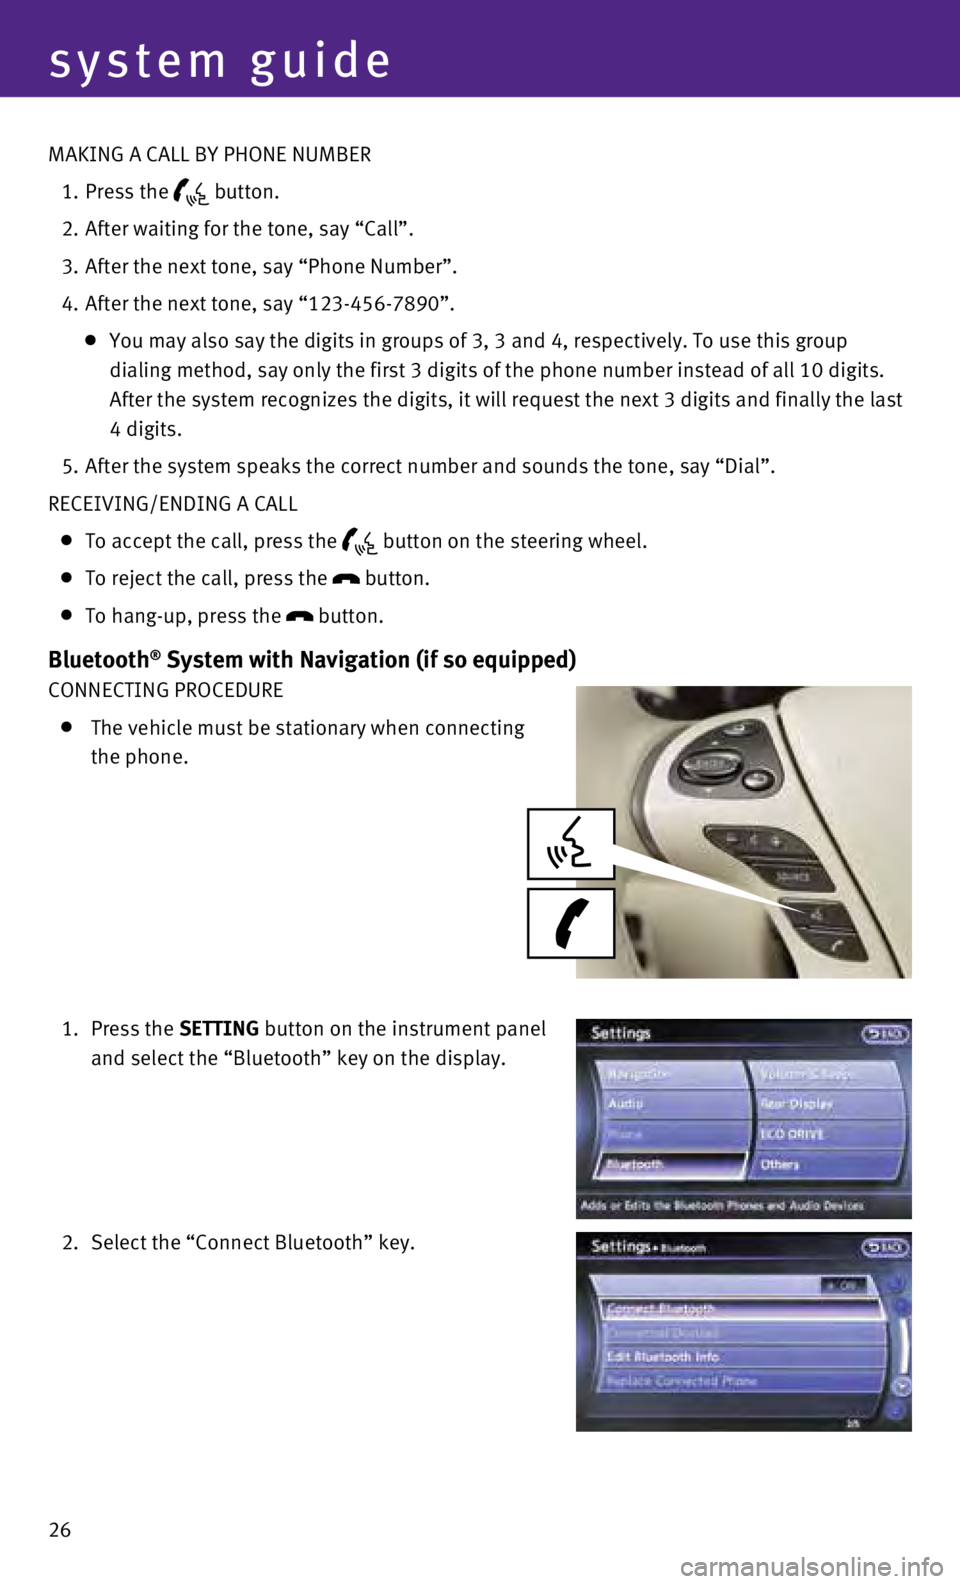
The vehicle must be stationary when connecting
the phone.
1.
Press the SETTING button on the instrument panel
and select the “Bluetooth” key on the display.
2.
Select the “Connect Bluetooth” key.
Page 29 of 36
27
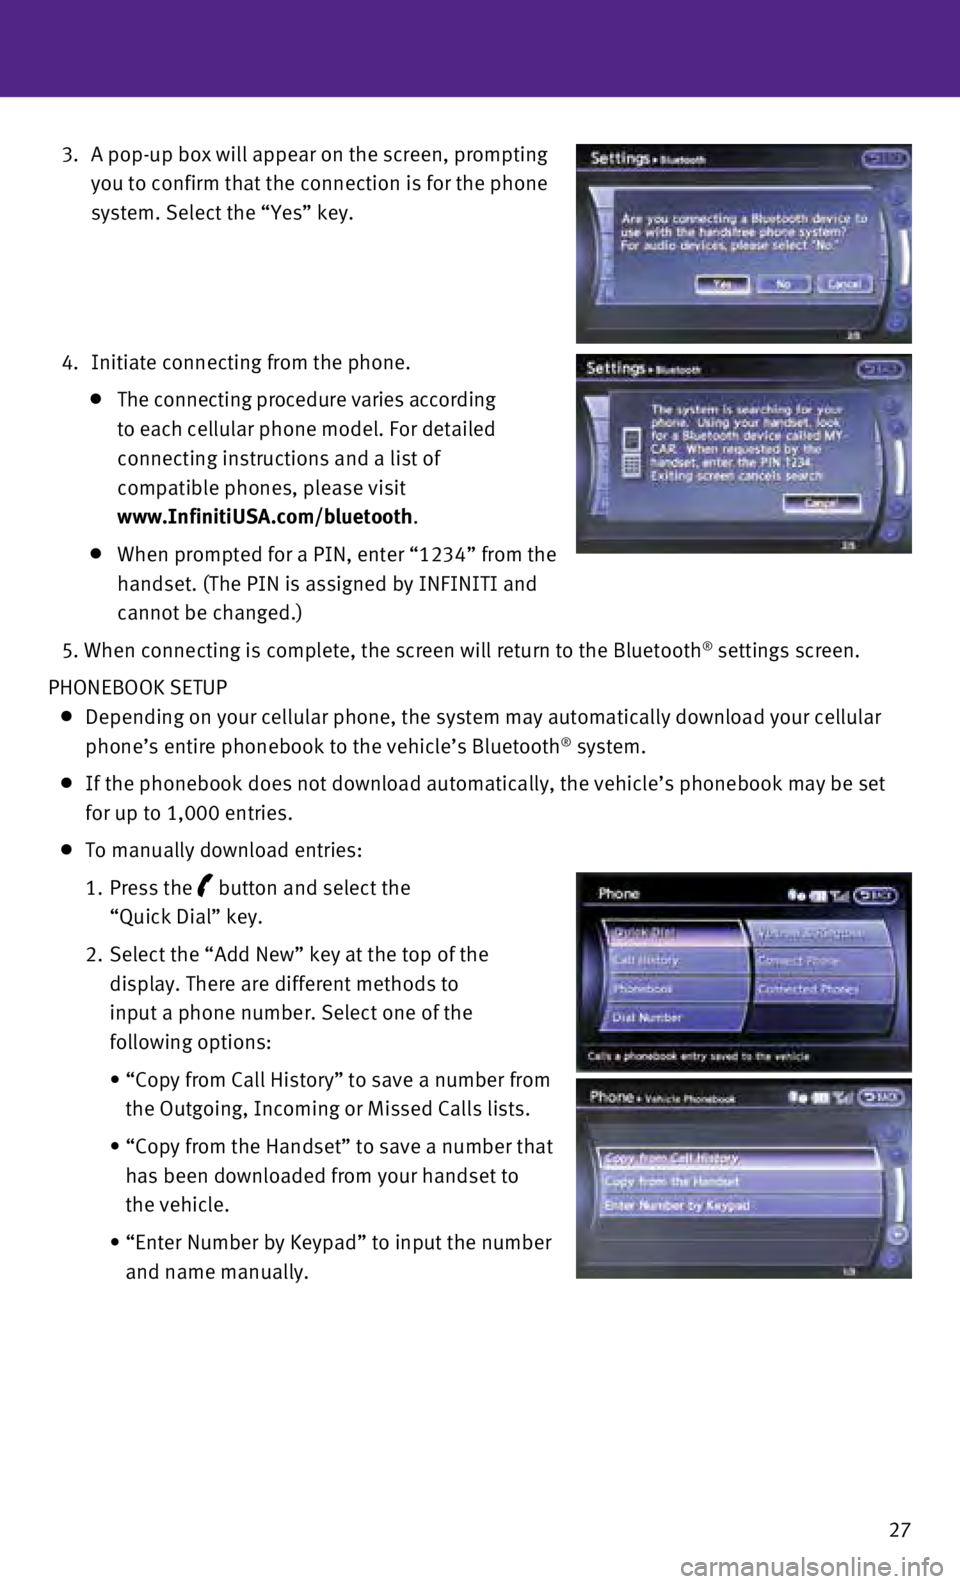
3.
A pop-up box will appear on the screen, prompting
you to confirm that the connection is for the phone
system. Select the “Yes” key.
4.
Initiate connecting from the phone.
The connecting procedure varies according
to each cellular phone model. For detailed
connecting instructions and a list of
compatible phones, please visit
www.InfinitiUSA.com/bluetooth.
When prompted for a PIN, enter “1234” from the
handset. (The PIN is assigned by INFINITI and
cannot be changed.)
5.
When connecting is complete, the screen will return to the Bluetooth® settings screen.
PHONEBOOK SETUP
Depending on your cellular phone, the system may automatically download \
your cellular
phone’s entire phonebook to the vehicle’s Bluetooth® system.
If the phonebook does not download automatically, the vehicle’s phone\
book may be set
for up to 1,000 entries.
To manually download entries:
1.
Press the
button and select the
“Quick Dial” key.
2.
Select the “Add New” key at the top of the
display. There are different methods to
input a phone number. Select one of the
following options:
•
“Copy from Call History” to save a number from
the Outgoing, Incoming or Missed Calls lists.
•
“Copy from the Handset” to save a number that
has been downloaded from your handset to
the vehicle.
•
“Enter Number by Keypad” to input the number
and name manually.
Page 30 of 36
28
system guide
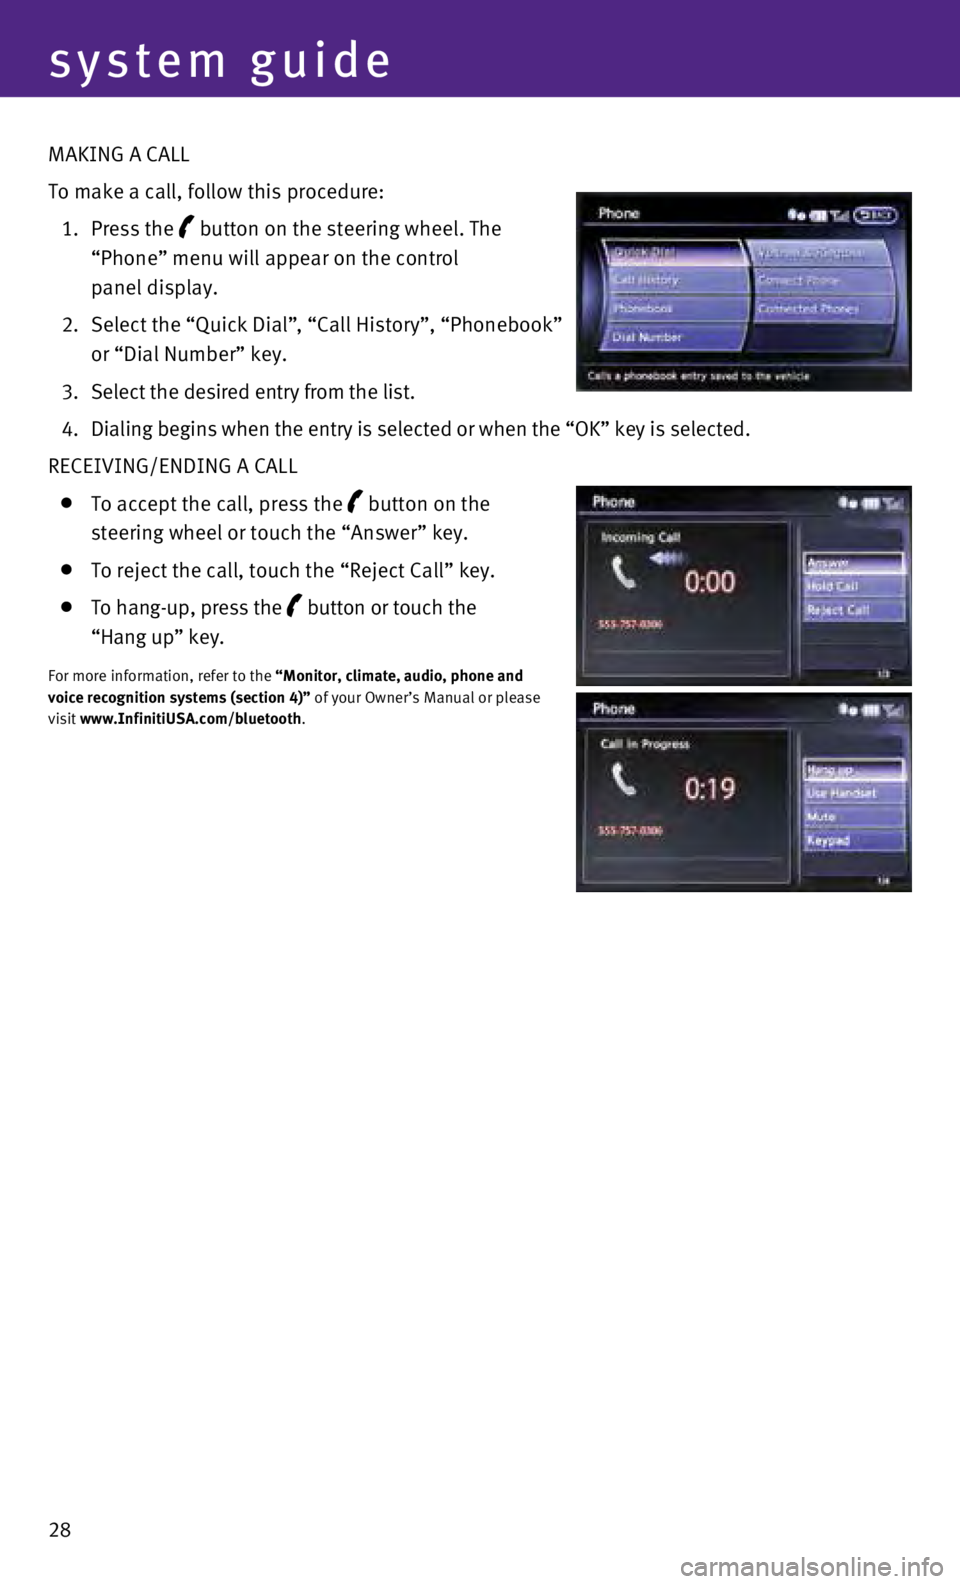
MAKING A CALL
To make a call, follow this procedure:
1.
Press the
button on the steering wheel. The
“Phone” menu will appear on the control
panel display.
2.
Select the “Quick Dial”
, “Call History”, “Phonebook”
or “Dial Number” key.
3.
Select the desired entry from the list.
4.
Dialing begins when the entry is selected or when the “OK” key is \
selected.
RECEIVING/ENDING A CALL
To accept the call, press the button on the
steering wheel or touch the “Answer” key.
To reject the call, touch the “Reject Call” key.
To hang-up, press the button or touch the
“Hang up” key.
For more information, refer to the “Monitor, climate, audio, phone and
voice recognition systems (section 4)” of your Owner’s Manual or please
visit www.InfinitiUSA.com/bluetooth.