change time INFINITI QX80 2019 Infiniti Connection
[x] Cancel search | Manufacturer: INFINITI, Model Year: 2019, Model line: QX80, Model: INFINITI QX80 2019Pages: 283, PDF Size: 1.59 MB
Page 3 of 283

FOREWORD
Thank you for purchasing an INFINITI
vehicle.
This user’s manual is for Infiniti InTouch
TM
and the systems linked to Infiniti InTouchTM
offered in your INFINITI vehicle.
Operation instructions for the following
systems are included in this manual.. Audio
. Hands-Free Phone
. Infiniti InTouch
TMApps
. Infiniti InTouch
TMServices
. Navigation
. Voice recognition
. Information and settings viewable on
Infiniti InTouch
TM
Please read this manual carefully to ensure
safe operation of Infiniti InTouchTM.
. Because of possible specification
changes and optional equipment, some
sections of this manual may not apply to
your vehicle.
. All information, specifications and illus-
trations in this manual are those in effect at the time of printing. INFINITI reserves
the right to change specifications or
design at any time without notice.
. Do not remove this manual from the
vehicle when selling this vehicle. The next
user of this Infiniti InTouch
TMmay need
the manual.
Page 35 of 283

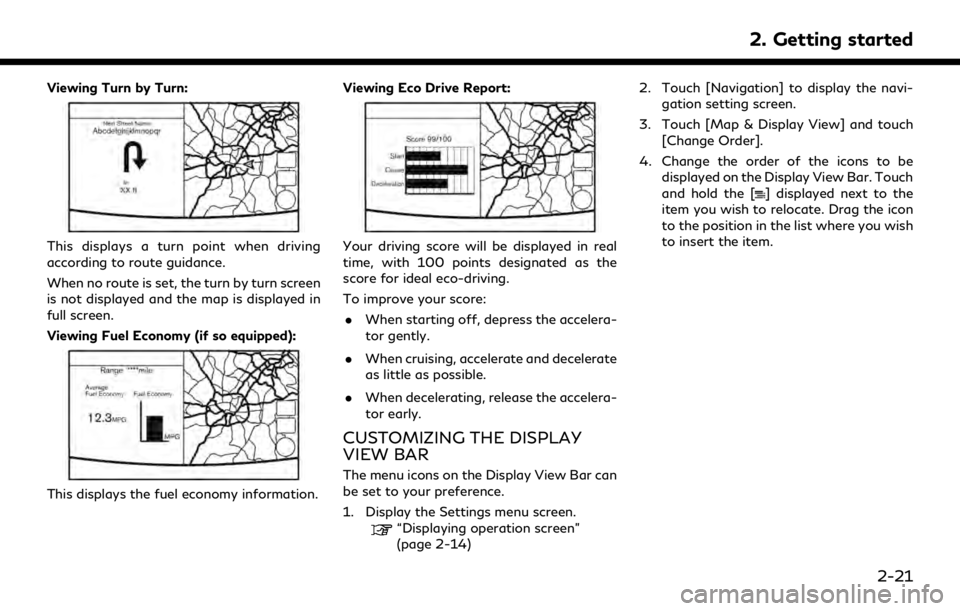
Viewing Turn by Turn:
This displays a turn point when driving
according to route guidance.
When no route is set, the turn by turn screen
is not displayed and the map is displayed in
full screen.
Viewing Fuel Economy (if so equipped):
This displays the fuel economy information.Viewing Eco Drive Report:
Your driving score will be displayed in real
time, with 100 points designated as the
score for ideal eco-driving.
To improve your score:
. When starting off, depress the accelera-
tor gently.
. When cruising, accelerate and decelerate
as little as possible.
. When decelerating, release the accelera-
tor early.
CUSTOMIZING THE DISPLAY
VIEW BAR
The menu icons on the Display View Bar can
be set to your preference.
1. Display the Settings menu screen.
“Displaying operation screen”
(page 2-14) 2. Touch [Navigation] to display the navi-
gation setting screen.
3. Touch [Map & Display View] and touch [Change Order].
4. Change the order of the icons to be displayed on the Display View Bar. Touch
and hold the [
] displayed next to the
item you wish to relocate. Drag the icon
to the position in the list where you wish
to insert the item.
2. Getting started
2-21
Page 40 of 283

2. Getting started
Screen settings
This menu turns on/off the display and adjusts the image quality of the screen.
Available setting items may vary depending on models and specifications.
1. Display the Settings menu screen.
“Displaying operation screen” (page 2-14)
2. Touch [Screen].
Setting item Action
[Display Settings] [Brightness] Adjust the brightness.
[Contrast] Adjust the contrast.
[Black Level] Adjust the black level.
[Display OFF] Turn the screen on or off.
Push and hold
the display on.
[Day/Night] Adjust the display brightness. Toggle between the daytime screen and nighttime screen.
[Change Map Color] Toggle the map color between the daytime screen and nighttime screen.
[Reset Settings] This restores the display settings to the default settings.
2-26
Page 44 of 283

2. Getting started
Clock settings
This changes the clock settings.
Available setting items may vary depending on models and specifications.
1. Display the Settings menu screen.
“Displaying operation screen” (page 2-14)
2. Touch [Clock].
Menu item Action
[On-Screen Clock] Sets the clock display on/off. When this item is on, the clock display appears.
[Daylight Savings Time] Select the setting for the daylight saving time from ON or OFF. Each time by touching this item
changes the setting.
[Clock Format (24h)] Select the clock format between 12-hour and 24-hour times. When the indicator light illuminates, the
clock is set to the 24-hour format.
[Time Zone] Select an appropriate time zone from the list. When selecting [AUTO], the system selects the time
zone automatically.
Offset Adjustment Adjust the offset value (hour and minutes).
[>] [Time Adjustment] Adjusts the time by increasing or decreasing the value.
[Calendar Adjustment] Adjusts the year, month and day.
2-30
Page 50 of 283

3. Audio system
AUDIO OPERATION PRECAU-
TIONS
WARNING
.The driver must not attempt to oper-
ate the audio system while the vehicle
is in motion, so that full attention may
be given to the vehicle operation.
. Park the vehicle in a safe location and
apply the parking brake before oper-
ating the audio system and playing
movies (if so equipped).
CAUTION
.Operate the audio system only when
the engine or the hybrid system is
running. Operating the audio system
for extended periods of time with the
engine or the hybrid system turned
off can discharge the vehicle battery
(12V battery).
. Do not allow these systems to get
wet. Excessive moisture such as
spilled liquids may cause the system
to malfunction.
RADIO
Place the ignition switch in the ACC or ON
position before turning on the radio. If you
listen to the radio with the engine or the
hybrid system not running, the ignition
switch should be placed in the ACC position.
Radio reception is affected by station signal
strength, distance from radio transmitter,
buildings, bridges, mountains and other
external influences. Intermittent changes in
reception quality normally are caused by
these external influences.
Using a cellular phone in or near the vehicle
may influence radio reception quality.
Radio reception
Your radio system is equipped with state-of-
the-art electronic circuits to enhance radio
reception. These circuits are designed to
extend reception range, and to enhance the
quality of that reception.
However there are some general character-
istics of both FM and AM radio signals that
can affect radio reception quality in a
moving vehicle, even when the finest equip-
ment is used. These characteristics are
completely normal in a given reception area,
and do not indicate any malfunction in your
radio system. Reception conditions will constantly change
because of vehicle movement. Buildings,
terrain, signal distance and interference
from other vehicles can work against ideal
reception. Described below are some of the
factors that can affect your radio reception.
Some cellular phones or other devices may
cause interference or a buzzing noise to
come from the audio system speakers.
Storing the device in a different location
may reduce or eliminate the noise.
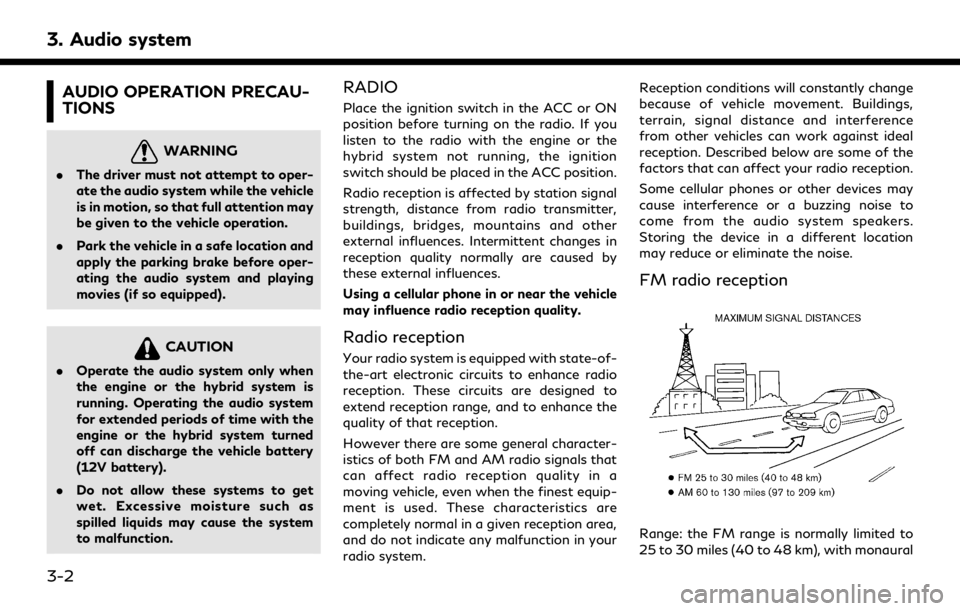
FM radio reception
Range: the FM range is normally limited to
25 to 30 miles (40 to 48 km), with monaural
3-2
Page 57 of 283

.An iPod nano® (1st generation) may
remain in fast-forward or rewind mode
if it is connected during a seek operation.
In this case, please manually reset the
iPod®.
. An iPod nano® (2nd generation) will
continue to fast-forward or rewind if it
is disconnected during a seek operation.
. An incorrect song title may appear when
the Play Mode is changed while using an
iPod nano® (2nd generation).
. Audiobooks may not play in the same
order as they appear on an iPod®.
. Large video files cause slow responses in
an iPod®. The in-vehicle display may
momentarily black out, but will soon
recover.
. If an iPod® automatically selects large
video files while in the shuffle mode, the
in-vehicle display may momentarily black
out, but will soon recover.COMPRESSED AUDIO FILES
(MP3/WMA/AAC)
Explanation of terms
.MP3 — MP3 is short for Moving Pictures
Experts Group Audio Layer 3. MP3 is the
most well known compressed digital
audio file format. This format allows for
near “CD quality” sound, but at a fraction
of the size of normal audio files. MP3
conversion of an audio track can reduce
the file size by approximately a 10:1 ratio
(Sampling: 44.1 kHz, Bit rate: 128 kbps)
with virtually no perceptible loss in
quality. The compression reduces certain
parts of sound that seem inaudible to
most people.
. WMA — Windows Media Audio (WMA)
is a compressed audio format created by
Microsoft as an alternative to MP3. The
WMA codec offers greater file compres-
sion than the MP3 codec, enabling
storage of more digital audio tracks in
the same amount of space when com-
pared to MP3s at the same level of
quality.
This product is protected by certain
intellectual property rights of Microsoft
Corporation and third parties. Use or distribution of such technology outside
of this product is prohibited without a
license from Microsoft or an authorized
Microsoft subsidiary and third parties.
. AAC — Advanced Audio Coding (AAC) is
a compressed audio format. AAC offers
greater file compression than MP3 and
enables music file creation and storage
at the same quality as MP3.
. Bit rate — Bit rate denotes the number of
bits per second used by a digital music
file. The size and quality of a compressed
digital audio file is determined by the bit
rate used when encoding the file.
. Sampling frequency — Sampling fre-
quency is the rate at which the samples
of a signal are converted from analog to
digital (A/D conversion) per second.
. Multisession — Multisession is one of the
methods for writing data to media.
Writing data once to the media is called
a single session, and writing more than
once is called a multisession.
. ID3/WMA Tag — The ID3/WMA tag is
the part of the encoded MP3 or WMA
file that contains information about the
digital music file such as song title, artist,
album title, encoding bit rate, track time
3. Audio system
3-9
Page 62 of 283

3. Audio system
NAMES AND FUNCTIONS OF AUDIO CONTROL BUTTONS
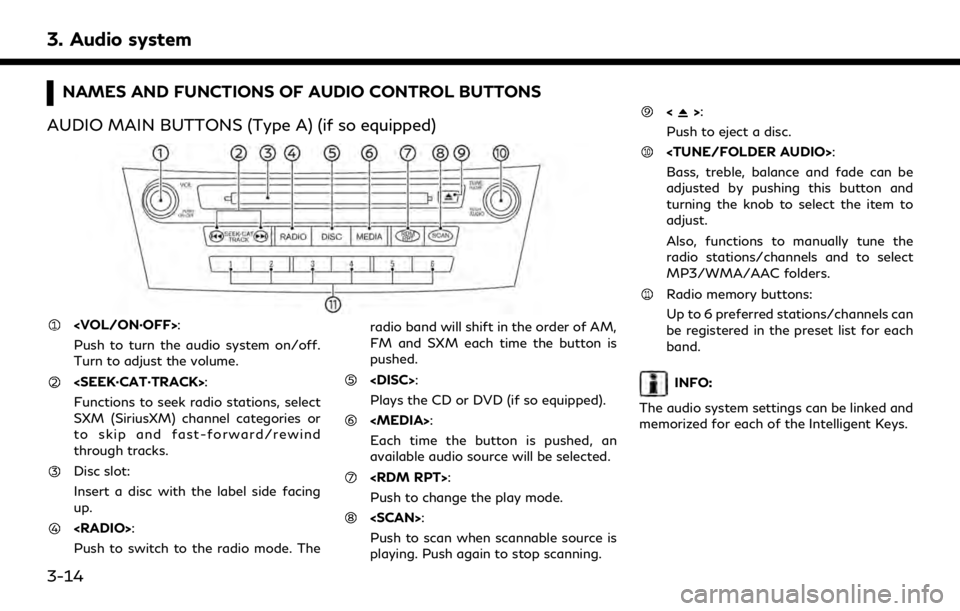
AUDIO MAIN BUTTONS (Type A) (if so equipped)
Push to turn the audio system on/off.
Turn to adjust the volume.
Functions to seek radio stations, select
SXM (SiriusXM) channel categories or
to skip and fast-forward/rewind
through tracks.
Disc slot:
Insert a disc with the label side facing
up.
Push to switch to the radio mode. The radio band will shift in the order of AM,
FM and SXM each time the button is
pushed.
Plays the CD or DVD (if so equipped).
Each time the button is pushed, an
available audio source will be selected.
Push to change the play mode.
Push to scan when scannable source is
playing. Push again to stop scanning.
<>:
Push to eject a disc.
Bass, treble, balance and fade can be
adjusted by pushing this button and
turning the knob to select the item to
adjust.
Also, functions to manually tune the
radio stations/channels and to select
MP3/WMA/AAC folders.
Radio memory buttons:
Up to 6 preferred stations/channels can
be registered in the preset list for each
band.
INFO:
The audio system settings can be linked and
memorized for each of the Intelligent Keys.
3-14
Page 63 of 283

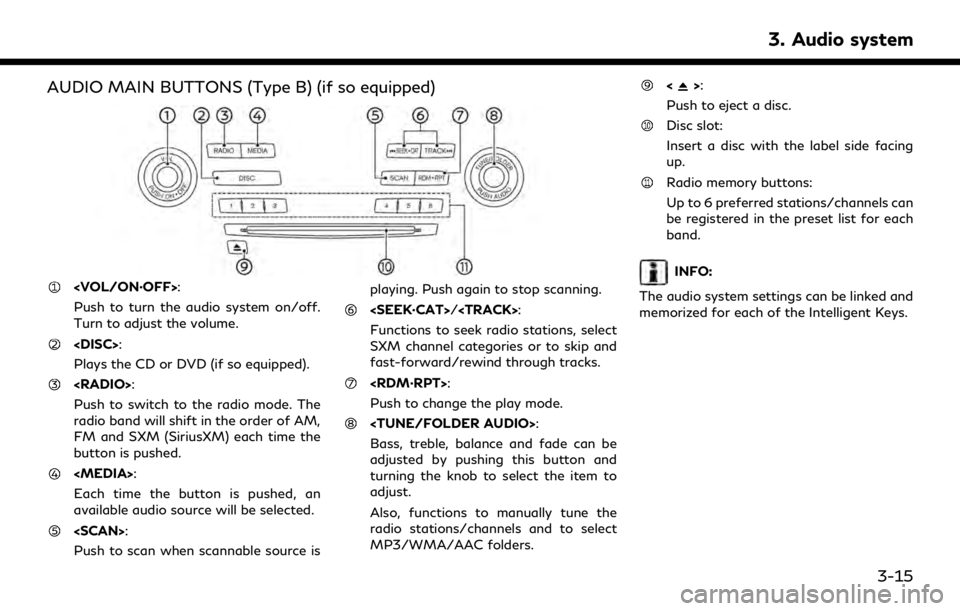
AUDIO MAIN BUTTONS (Type B) (if so equipped)
Push to turn the audio system on/off.
Turn to adjust the volume.
Plays the CD or DVD (if so equipped).
Push to switch to the radio mode. The
radio band will shift in the order of AM,
FM and SXM (SiriusXM) each time the
button is pushed.
Each time the button is pushed, an
available audio source will be selected.
Push to scan when scannable source isplaying. Push again to stop scanning.
Page 69 of 283

digital signal but the sound output is not
yet in the HD Radio mode.
Preset list:
36 stations/channels (FM/AM/SXM)
can be registered in the preset list.
“Radio operation” (page 3-21)
INFO:
HD Radio (if so equipped) reception needs to
be activated to receive HD Radio broad-
casts. This enables you to receive radio
broadcasts digitally (where available), pro-
viding a better quality sound with clear
reception. When this feature is not activated
or HD Radio broadcasts are not available,
you will receive analog radio (AM/FM)
broadcasts.
Radio operation
Available functions and items displayed on
the screen may vary depending on models
and specifications.
Radio activation and band selection:
Push
band (AM, FM or SXM) from the audio
source list to turn on the radio. Each time
“Names and functions of audio control
buttons” (page 3-14)
“Selecting audio source” (page 3-19)
INFO:
When the stereo broadcast signal is weak,
the radio will automatically change from
stereo to monaural reception.
Seeking stations/channels:
AM and FM radio
Push
Page 70 of 283

3. Audio system
3. Touch and hold one of the presetnumbers in the preset list or push and
hold the desired radio memory buttons.
4. The information such as frequency (AM/ FM), channel number (SXM), etc. will be
displayed on the preset list.
INFO:
. To change the preset stations/channels,
touch and hold one of the preset num-
bers. You can select whether to change
the station/channel or to delete the
preset setting.
. Tilting
so equipped) will scroll up/down the
preset stations/channels.
Alert Notification (SXM only):
Favorite artists and songs can be registered
to receive an alert notice when a song of the
registered conditions is on the radio. To tune
to the respective channel, touch [Listen to be
consistent]. The alert can be ignored by
touching [Cancel].
“Radio controls” (page 3-23)
INFO:
Satellite Radio: . The satellite mode requires an active
SiriusXM Satellite Radio subscription.
The Satellite service is available only to
those at least 18 and older in the 48
contiguous United States and DC.
. It may take some time to receive the
activation signal after the initiation of
the SiriusXM Satellite Radio subscrip-
tion. After receiving the activation signal,
an available channel list will automati-
cally be updated in the radio. Change the
ignition switch position from LOCK to
ACC to update the SiriusXM channel list.
3-22