USB port INFINITI QX80 2021 Infiniti Connection
[x] Cancel search | Manufacturer: INFINITI, Model Year: 2021, Model line: QX80, Model: INFINITI QX80 2021Pages: 268, PDF Size: 1.13 MB
Page 82 of 268
![INFINITI QX80 2021 Infiniti Connection 3. Audio system
.Control panel
— Push and hold <SEEK·TRACK>
. Steering wheel
— Tilt and hold <
/OK>
. Touch screen
— Touch and hold [
]/[]
Changing play mode:
Repeat mode
Touch [
] on the scree INFINITI QX80 2021 Infiniti Connection 3. Audio system
.Control panel
— Push and hold <SEEK·TRACK>
. Steering wheel
— Tilt and hold <
/OK>
. Touch screen
— Touch and hold [
]/[]
Changing play mode:
Repeat mode
Touch [
] on the scree](/img/42/35007/w960_35007-81.png)
3. Audio system
.Control panel
— Push and hold
. Steering wheel
— Tilt and hold <
/OK>
. Touch screen
— Touch and hold [
]/[]
Changing play mode:
Repeat mode
Touch [
] on the screen to change the
repeat mode.
Random mode
Touch [
] on the screen to change the
random mode.
INFO:
Available repeat/random modes change
depending on the connected device.
Bluetooth® menu
Touch [Menu] on the Bluetooth® audio
screen to display the Bluetooth® audio menu
screen.
The following items are available.
[Now Play-
ing] Touch to display the Blue-
tooth® audio screen.
[Current
List] A list of tracks in the currently
selected folder is displayed.
[Connec-
tions] Touch to display the Connec-
tions screen.
“Connections settings”
(page 2-28)
Folder list* The track list for the selected folder is displayed. The name
of sub folder is displayed on
the top of the list if the sub
holder is included in the se-
lected folder. Touch an item on
the list to select the folder or
track. Touch [
] and go back
to the previous screen.
*: Displayed only when available.
INFO:
Depending on the connected device, [Menu]
may not be displayed.
AUXILIARY (AUX) DEVICES (if so
equipped)
Connecting auxiliary devices
Connect an AUX device to the AUX input
jack.
AUX input jack location:
“USB (Universal Serial Bus) connection
ports and AUX (auxiliary) input jack”
(page 2-8)
The AUX input jack accepts any standard
analog audio input such as from a portable
cassette player, CD player or MP3 player.
INFO:
Insert a 1/8 in (3.5 mm) stereo mini plug in
the audio input jack. If a cable with a mono
plug is used, the audio output may not
function normally.
AUX operation
Activation and playing:
Turn on an AUX device.
Connect an AUX cable to the AUX device
and the AUX input jack. Select AUX mode
from the audio source menu screen or by
pushing
3-34
Page 83 of 268
![INFINITI QX80 2021 Infiniti Connection “Selecting audio source” (page 3-13)“Audio main buttons” (page 3-11)
How to view AUX screen
[Source]:
Touch to switch to the source menu
screen.
“Selecting audio source”
(page 3-13)
Audio INFINITI QX80 2021 Infiniti Connection “Selecting audio source” (page 3-13)“Audio main buttons” (page 3-11)
How to view AUX screen
[Source]:
Touch to switch to the source menu
screen.
“Selecting audio source”
(page 3-13)
Audio](/img/42/35007/w960_35007-82.png)
“Selecting audio source” (page 3-13)“Audio main buttons” (page 3-11)
How to view AUX screen
[Source]:
Touch to switch to the source menu
screen.
“Selecting audio source”
(page 3-13)
Audio source indicator:
Indicates that the AUX source is cur-
rently playing.
Volume Setting keys:
Touch one of the keys to select the
sound output gain from [Low], [Med-
ium] and [High].
SMARTPHONE AUDIO
You can also listen to music from your
compatible smartphone using Apple Car-
Play® or Android Auto.
“Apple CarPlay®” (page 5-18)“Android AutoTM” (page 5-22)
Connecting smartphone
Connect the iPhone® or Android phone to
the USB connection port.
“USB (Universal Serial Bus) connection
ports and AUX (auxiliary) input jack”
(page 2-8)
“USB connection ports” (page 2-9)
Smartphone audio operation
1. Connect the iPhone® or Android phoneto the USB connection port and activate
Apple CarPlay® or Android Auto.
2. Push
Page 84 of 268

3. Audio system
MOBILE ENTERTAINMENT
SYSTEM (MES) (if so equipped)
If your vehicle is equipped with the Mobile
Entertainment System (MES), rear seat
passengers can enjoy playing audio and
movie files on the rear displays with images
and sound.
Playable source:. USB device
. HDMI device
Only the compatible devices connected to
the rear media interface can be played on the
rear displays.
Rear media interface (USB connection port
and HDMI port) location:
“Rear media interface” (page 3-50)
The left/right rear displays can show differ-
ent sources individually.
WARNING
The driver must not attempt to operate
the Mobile Entertainment System while
driving so full attention may be given to
vehicle operation.
CAUTION
. Do not attempt to use the system in
extremely high or low temperature
conditions [below -4°F (-20°C) or
above 158°F (70°C)].
. To avoid draining the vehicle battery,
do not operate the system for more
than 15 minutes without starting the
engine.
PRECAUTIONS
Start the engine when using the Mobile
Entertainment System.
WARNING
The driver must not attempt to operate
the Mobile Entertainment System or
wear the headphones while the vehicle is
in motion so that full attention may be
given to vehicle operation.
Park the vehicle in a safe location and
apply the parking brake to view the
images on the front touch screen display
with the Mobile Entertainment System.
CAUTION
.Only operate the Mobile Entertain-
ment System while the engine is
running. Operating the Mobile Enter-
tainment System for extended peri-
ods of time with the engine turned off
can discharge the vehicle battery.
. Do not allow the system to get wet.
Excessive moisture, such as spilled
liquids, may cause the system to
malfunction.
3-36
Page 85 of 268

TECHNICAL INFORMATION
USB media support
Only the USB device connected to the rear
media interface can be played on the rear
displays.
“Rear media interface” (page 3-50)
Supported USB media:
USB 1.1 Low Speed (1.5 Mbps), Full Speed (12 Mbps)
USB 2.0 Low Speed (1.5 Mbps), Full Speed (12 Mbps), High Speed
(480 Mbps)
Mass Storage Support:
The Mobile Entertainment System recog-
nizes the connected USB media as a mass
storage device.
Supported file systems and partition:
The first partition of the following file
systems is supported.
. NTFS
. FAT32
. FAT16 .
HFS+
Supported folder structure:
Folders 1,000 folders maximum
Files 10,000 files maximum
Pass length 3,072 characters maximum
Full name
length 232 characters maximum
Folder levels 11 levels maximum (when root is regarded as level 0)
3. Audio system
3-37
Page 98 of 268

3. Audio system
2. Replace both batteries with new ones.
.Recommended battery: Size AAA x 2
.Be careful not to touch the batteryterminal.
.Make sure that the +and 7ends on
the batteries match the markings in-
side the compartment.
3. Close the lid securely.
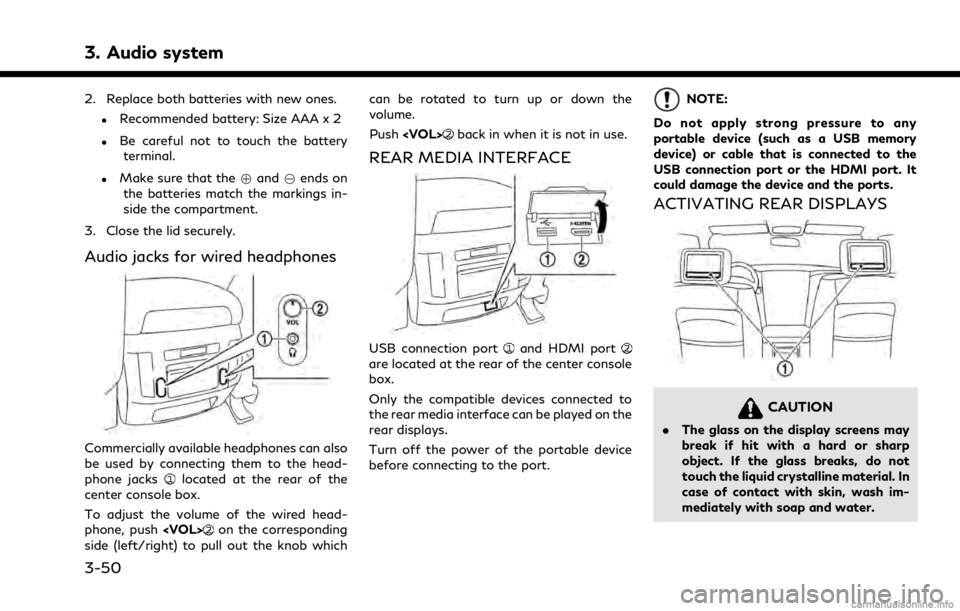
Audio jacks for wired headphones
Commercially available headphones can also
be used by connecting them to the head-
phone jacks
located at the rear of the
center console box.
To adjust the volume of the wired head-
phone, push
on the corresponding
side (left/right) to pull out the knob which can be rotated to turn up or down the
volume.
Push
back in when it is not in use.
REAR MEDIA INTERFACE
USB connection portand HDMI portare located at the rear of the center console
box.
Only the compatible devices connected to
the rear media interface can be played on the
rear displays.
Turn off the power of the portable device
before connecting to the port.
NOTE:
Do not apply strong pressure to any
portable device (such as a USB memory
device) or cable that is connected to the
USB connection port or the HDMI port. It
could damage the device and the ports.
ACTIVATING REAR DISPLAYS
CAUTION
. The glass on the display screens may
break if hit with a hard or sharp
object. If the glass breaks, do not
touch the liquid crystalline material. In
case of contact with skin, wash im-
mediately with soap and water.
3-50
Page 103 of 268
![INFINITI QX80 2021 Infiniti Connection [] Touch to stop playing.
[
] Touch to skip the next file. Touch and hold to fast-forward the file.
OPERATING TIPS
.The rear USB and the rear HDMI (rear
media interface) cannot be played on the
front INFINITI QX80 2021 Infiniti Connection [] Touch to stop playing.
[
] Touch to skip the next file. Touch and hold to fast-forward the file.
OPERATING TIPS
.The rear USB and the rear HDMI (rear
media interface) cannot be played on the
front](/img/42/35007/w960_35007-102.png)
[] Touch to stop playing.
[
] Touch to skip the next file. Touch and hold to fast-forward the file.
OPERATING TIPS
.The rear USB and the rear HDMI (rear
media interface) cannot be played on the
front screen.
. Devices connected to the USB connec-
tion port for the front display cannot be
played on the rear displays.
. When connecting a device to the USB
connection port for the first time, the
system structures the file list and this
could slow down the operation speed.
This is not a malfunction.
. The operation speed of the system could
slow down when the left and right
displays play different files from the
same device connected to the USB
connection port. This is not a malfunc-
tion.
. Images from devices connected to the
USB connection port may not be dis-
played in an adequate ratio depending on
the resolution. To correct the ratio,
adjust the aspect using the remote controller.
“System settings” (page 3-52)
. If a computer with an HDMI output
terminal is connected to the HDMI input
terminal, the computer may not auto-
matically shift to the output mode. To
view images on the rear displays, operate
the computer and change the mode to
the output mode according to the com-
puter owner’s manual.
. Depending on the USB memory device,
the image may not start playing upon
activation or connection of the device to
the USB connection port. In that case,
remove and reinsert the USB memory
device into the port.
Multiple source display
It is possible to play different sources on
each display.
Refer to the following table of example
combinations. Playback combinations by media:
Rear Dis-
play (L)
Rear Dis-
play (R) Availability of play-
back on the left and
right displays
HDMI HDMI Simultaneous play- back
USB HDMI Individual playback
HDMI USB Individual playback
USB USB Individual playback*
* When playing a USB memory device simultaneously on the left and right
displays, playback may be limited by
the image quality (resolution) of the
data. Refer to the following examples
of combinations. However, when the
system is under a heavy load, there are
some combinations that cannot be
played.
Combinations according to USB memory
device image quality:
Rear Dis-
play (L) Rear Dis-
play (R) Availability of in-
dividual playback
on the left and
right displays
3. Audio system
3-55
Page 106 of 268

3. Audio system
CD/USB MEMORY DEVICE
CARE AND CLEANING
CD (if so equipped)
. Handle a CD by its edges. Never touch
the surface of the disc. Do not bend the
disc.
. Always place the discs in the storage
case when they are not being used.
. To clean a disc, wipe the surface from
the center to the outer edge using a
clean, soft cloth. Do not wipe the disc
using a circular motion.
Do not use a conventional record cleaner or alcohol intended for industrial use.
. A new disc may be rough on the inner
and outer edges. Remove the rough
edges by rubbing the inner and outer
edges with the side of a pen or pencil as
illustrated.
USB MEMORY DEVICE
.Never touch the terminal portion of the
USB memory device.
. Do not place heavy objects on the USB
memory device.
. Do not store the USB memory device in
highly humid locations.
. Do not expose the USB memory device
to direct sunlight.
. Do not spill any liquids on the USB
memory device.
Refer to the USB memory device Owner’s
Manual for the details.
3-58
Page 138 of 268

5. Information and vehicle settings
Apple CarPlay®
WARNING
.Stop your vehicle in a safe location
and apply the parking brake before
connecting your iPhone® to the ve-
hicle or operating your connected
iPhone® for setup.
. If you are unable to devote full
attention to vehicle operation while
using Apple CarPlay®, pull off the
road to a safe location and stop your
vehicle.
You can use Apple CarPlay® by connecting a
compatible iPhone® to your vehicle using a
USB cable.
With Apple CarPlay®, your in-vehicle sys-
tem can be used as a display and a controller
for some of the iPhone® functions. Apple
CarPlay® features Siri® which enables op-
erations via voice controls. Visit Apple.com
for information about the functions that are
available and details about Apple’s privacy
policy.
Certain vehicle information (e.g. location and
speed) may be shared with your device while Apple CarPlay® is in use. Carrier charges
may apply to use Apple CarPlay®.
COMPATIBILITY
The following iPhone® models support
Apple CarPlay®.
Model
Firmware version
iPhone® 5 or la-
ter iOS 8.4 or later
Refer to the Apple website for more infor-
mation.
INFO:
. For best results, always update your
device to the latest software version.
. Apple CarPlay® will take the place of
your Bluetooth® audio and Bluetooth®
Hands-Free Phone functionality.
. Phone menu and access to the con-
nected phone through Voice Recognition
System will be disabled while Apple
CarPlay® is connected. To access your
phone, use the Siri® function or select
the phone icon in the Apple CarPlay® top
menu screen. .
When setting a route on the navigation
system (if so equipped), if you set a
destination with Apple CarPlay®, the
route setting of the navigation system
will be cancelled.
CONNECTING iPhone®
INFO:
To connect your iPhone® with the in-vehicle
system, it is recommended to use the Apple
Lightning
TMcable (Mfi certified) that was
provided with your iPhone®.
1. Connect the iPhone® to the USB con- nection port.
“USB (Universal Serial Bus) connec-
tion ports and AUX (auxiliary) input
jack” (page 2-8)
“USB connection ports” (page 2-9)
2. Depending on the setting, a Startup Information screen will appear on the
upper display. Touch [Yes] to use Apple
CarPlay®.
3. Apple CarPlay® starts and the Apple CarPlay® screen appear on the upper
display.
5-18
Page 143 of 268

setting of the navigation system will be
cancelled.
. The Phone menu and access to the
connected phone through the Voice
Recognition System will be disabled
while Android Auto is connected. To
access your phone, talk to your Google
Assistant or select the phone icon in the
Android Auto top menu screen.
INITIAL Android Auto SETTINGS
Before using Android Auto, download the
Android Auto app from the Google Play
store on your Android phone.
It may be necessary to operate the Android
phone when connecting first.
Depending on the selection on the connect-
ing Android phone, such as approval, some
of the features of Android Auto are not
available.
Android Auto OPERATION
Unlock your phone’s screen before connect-
ing your Android phone.
1. Connect your Android phone to the USB
connection port.
“USB (Universal Serial Bus) connec-
tion ports and AUX (auxiliary) input
jack” (page 2-8)
“USB connection ports” (page 2-9)
2. Depending on the setting, a Startup Information screen will appear on the
upper display. Touch [Yes] to use An-
droid Auto.
INFO:
.If you are using Android Auto or AppleCarPlay®, you can not start Android
Auto with the other Android phone.
To use the Android Auto with the
other Android phone, disconnect the
current device, or deactivate Android
Auto or Apple CarPlay® on the Con-
nections settings.
“Connections settings”
(page 2-28)
.If you do not wish to display the
Startup Information screen each time
you activate Android Auto, turn on [Don’t Ask Anymore] on the Startup
Information screen. The Startup In-
formation screen will not be displayed
from the next Android Auto activa-
tion. The Startup Information screen
can be set to appear again in the
Android Auto setting menu.
“Android Auto settings”
(page 5-25)
.The Bluetooth® setting of your An-
droid phone will be turned on and
connected to in-vehicle system auto-
matically when Android Auto is acti-
vated. Keep the Bluetooth® turned
on to use the phone functions.
.Some functions of Android Auto arenot available if the Bluetooth® is not
connected.
3. The Android Auto top menu screen will appear on the upper display. The Android
phone functions displayed on the screen
should now be operable using the in-
vehicle system.
4. To exit the Android Auto screen, touch [
] and then touch the key to return to
INFINITI InTouchTM.
5. Information and vehicle settings
5-23
Page 216 of 268

6. Navigation (if so equipped)
— Even if the ferry preference is set toOFF, a route that uses a ferry line
may be suggested.
HOW TO UPDATE MAP DATA
WARNING
TO AVOID RISK OF DEATH OR SER-
IOUS PERSONAL INJURY WHEN UP-
DATING THE MAP SOFTWARE:
If you choose to park the vehicle within
range of a TCU (Telematics Control Unit)
or a Wi-Fi connection (if so equipped),
park the vehicle in a secure, safe well-
ventilated location that is open to the air.
During the update process, if you choose
to park your vehicle, it should be kept in a
well ventilated area to avoid exposure to
carbon monoxide. Do not breathe ex-
haust gases; they contain colorless and
odorless carbon monoxide. Carbon mon-
oxide is dangerous. It can cause uncon-
sciousness or death.
1.Apply the parking brake.
2. Remain with the vehicle while the
update is in process.
3. Do not allow children, pets or people
who may need assistance to remain in the vehicle while the software is
updating.
NOTE:
The vehicle is not required to be parked
during the map update process. If the
vehicle disconnects from the Wi-Fi connec-
tion (if so equipped), it will resume when the
vehicle reconnects to a known Wi-Fi con-
nection.
Navigation map data can be updated via
USB memory device, Wi-Fi (if so equipped)
or TCU (Telematics Control Unit).
Updating with USB memory
The navigation map data can be updated
with the latest information by downloading
a new map database to a USB memory
device and installing it in the vehicle.
For map update, use the USB memory with
the following specifications:
Supported media: USB2.0
Supported file system: FAT32
1. Push