ISUZU AXIOM 2002 Service Repair Manual
Manufacturer: ISUZU, Model Year: 2002,
Model line: AXIOM,
Model: ISUZU AXIOM 2002
Pages: 2100, PDF Size: 19.35 MB
ISUZU AXIOM 2002 Service Repair Manual
AXIOM 2002
ISUZU
ISUZU
https://www.carmanualsonline.info/img/61/57174/w960_57174-0.png
ISUZU AXIOM 2002 Service Repair Manual
Trending: flat tire, seats, overheating, jump start, security, front axle shaft, manual radio set
Page 551 of 2100
4C±54
DRIVE SHAFT SYSTEM
Disassembly
NOTE: For the left side, follow the same steps as right
side.
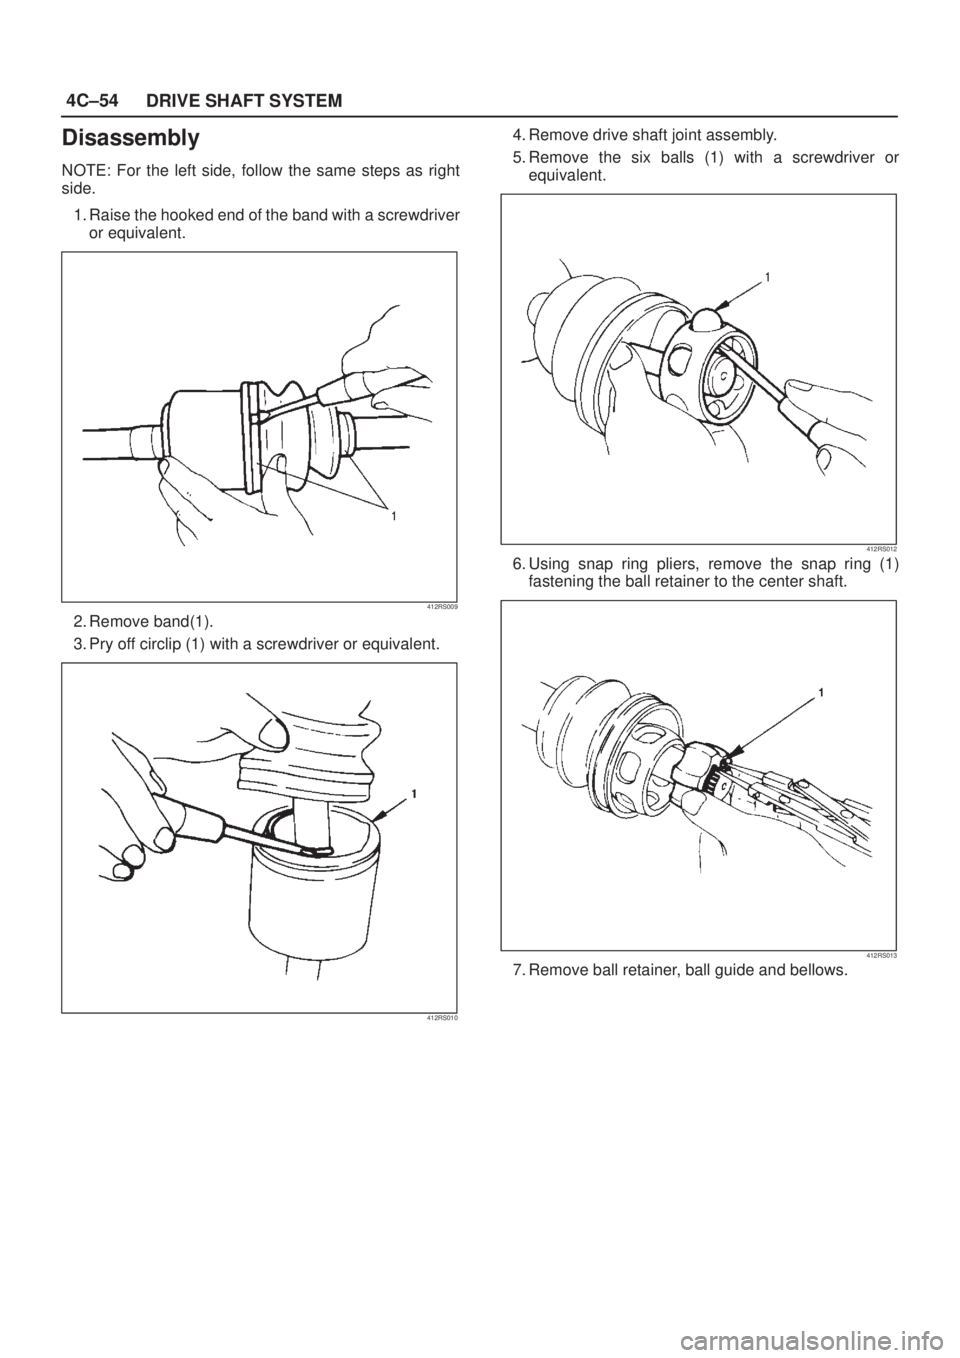
1. Raise the hooked end of the band with a screwdriver
or equivalent.
412RS009
2. Remove band(1).
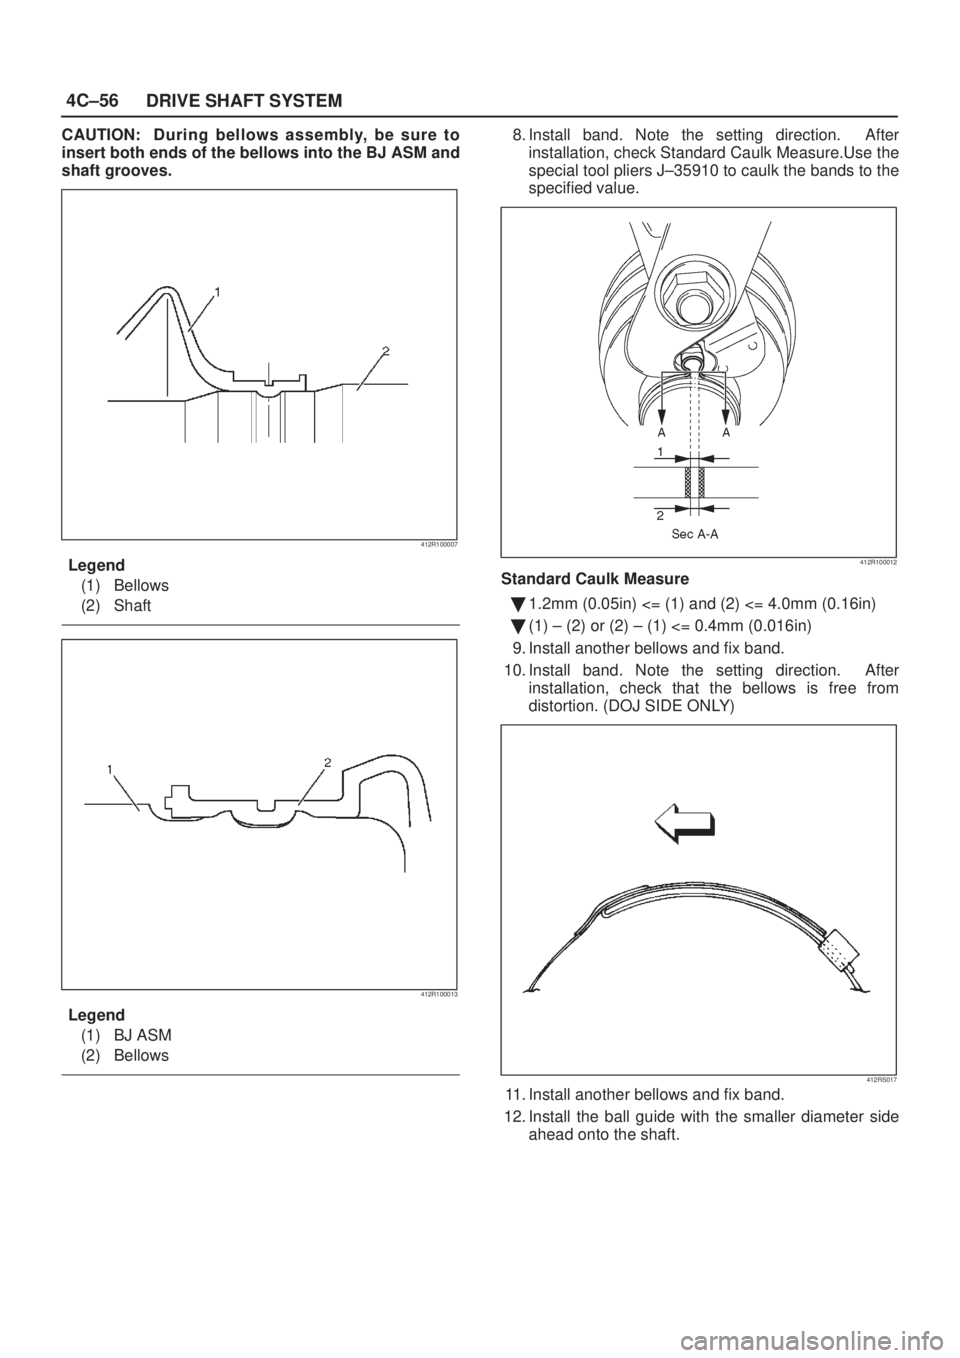
3. Pry off circlip (1) with a screwdriver or equivalent.
412RS010
4. Remove drive shaft joint assembly.
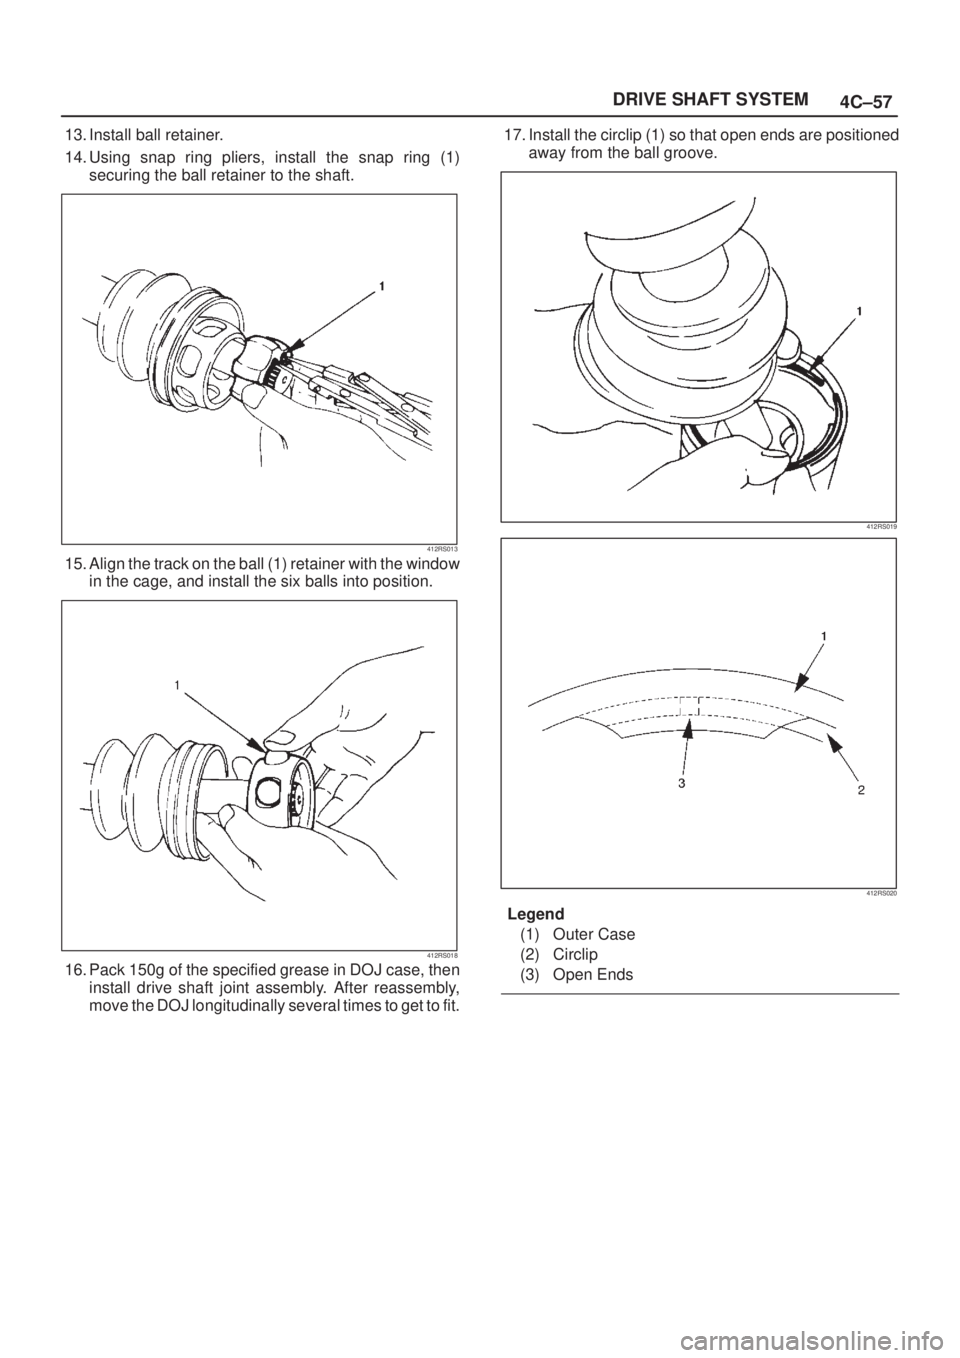
5. Remove the six balls (1) with a screwdriver or
equivalent.
412RS012
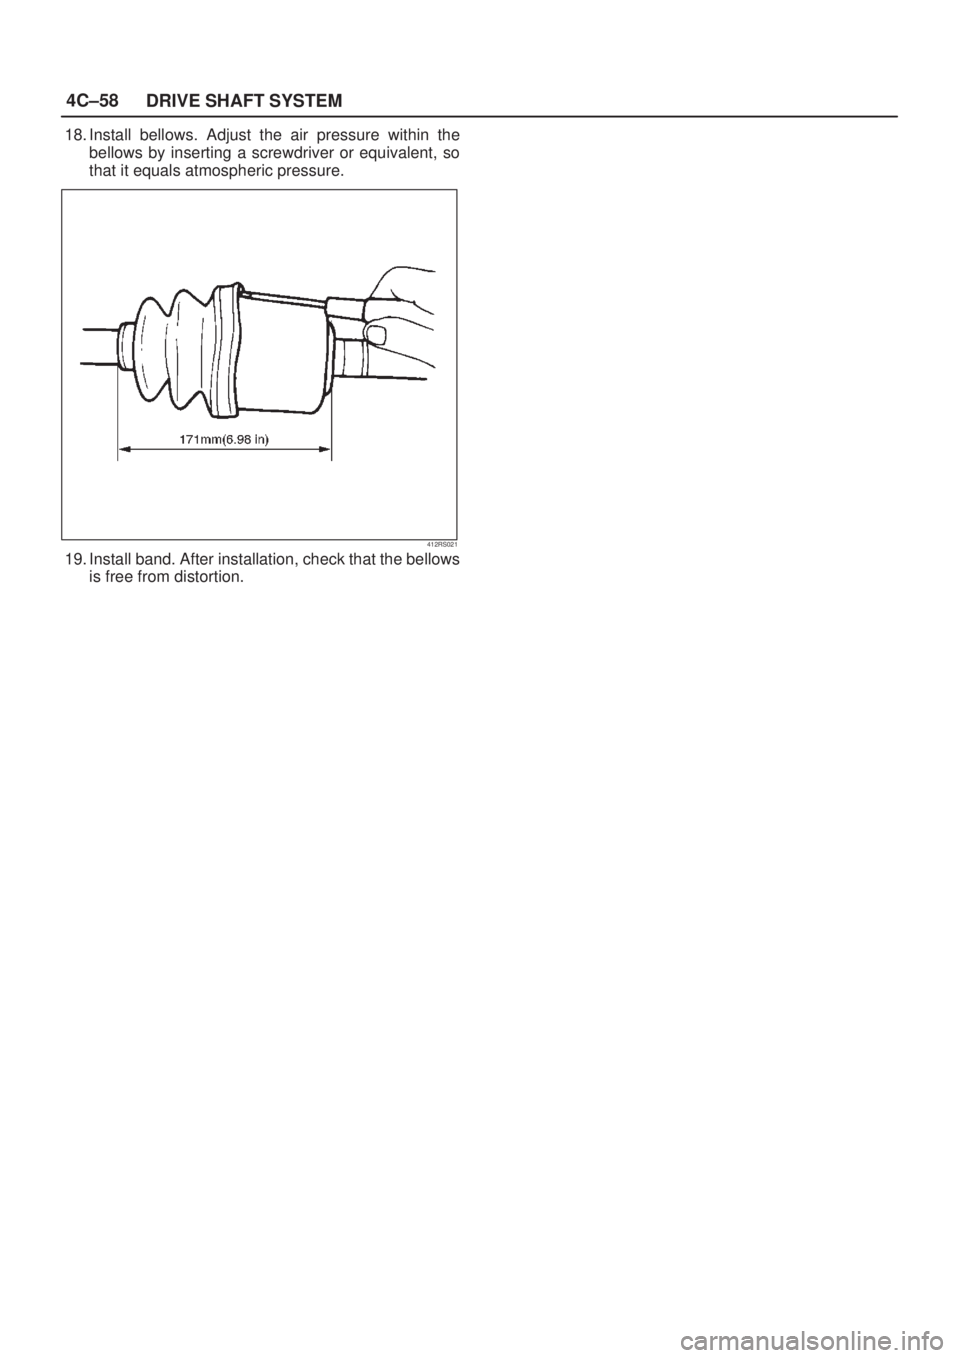
6. Using snap ring pliers, remove the snap ring (1)
fastening the ball retainer to the center shaft.
412RS013
7. Remove ball retainer, ball guide and bellows.
Page 552 of 2100
4C±55 DRIVE SHAFT SYSTEM
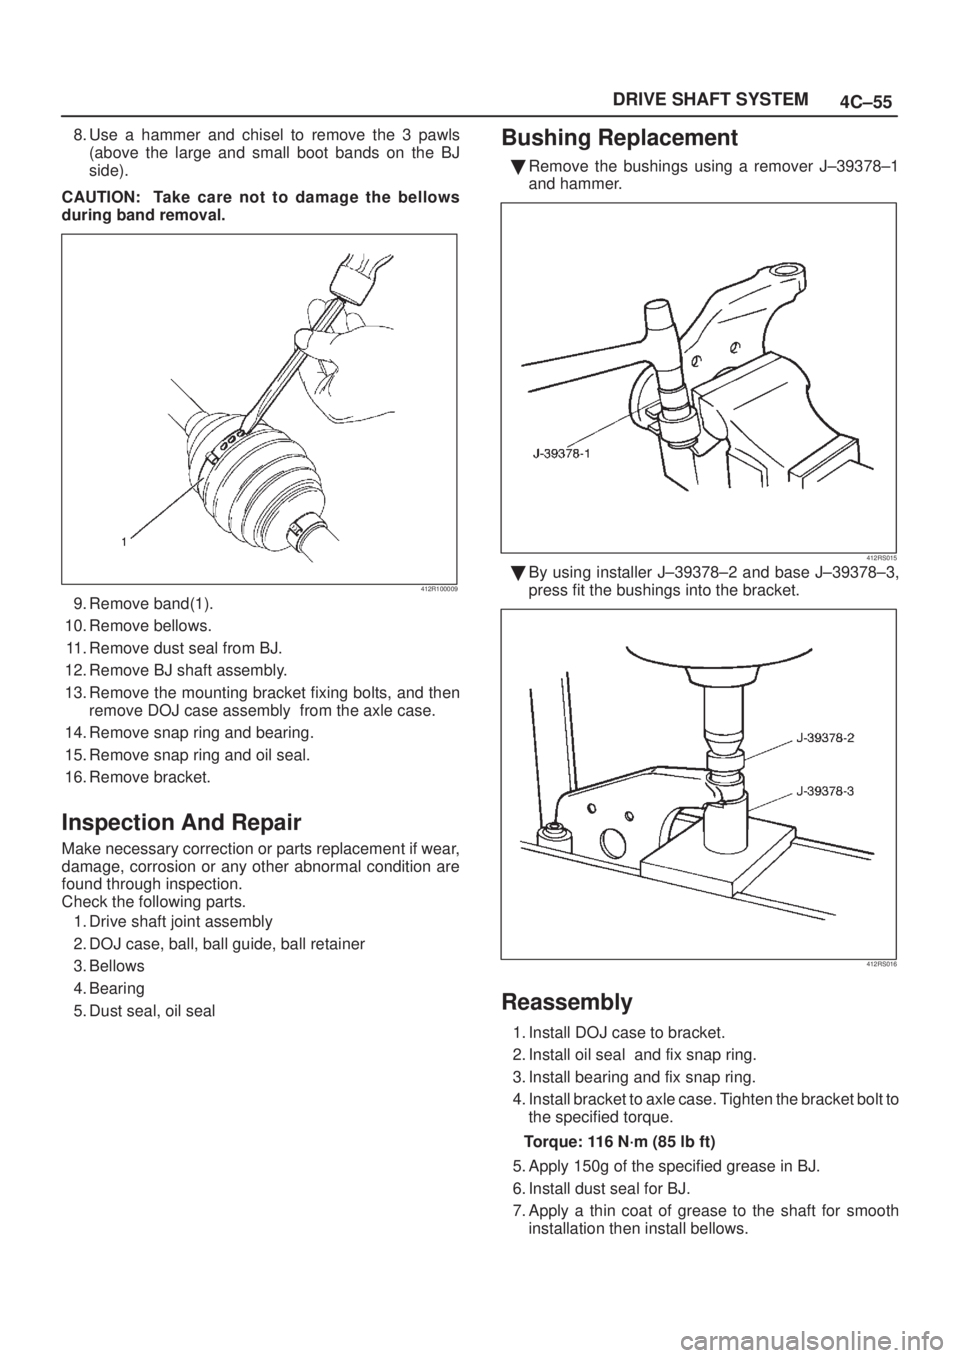
8. Use a hammer and chisel to remove the 3 pawls
(above the large and small boot bands on the BJ
side).
CAUTION: Take care not to damage the bellows
during band removal.
412R100009
9. Remove band(1).
10. Remove bellows.
11. Remove dust seal from BJ.
12. Remove BJ shaft assembly.
13. Remove the mounting bracket fixing bolts, and then
remove DOJ case assembly from the axle case.
14. Remove snap ring and bearing.
15. Remove snap ring and oil seal.
16. Remove bracket.
Inspection And Repair
Make necessary correction or parts replacement if wear,
damage, corrosion or any other abnormal condition are
found through inspection.
Check the following parts.
1. Drive shaft joint assembly
2. DOJ case, ball, ball guide, ball retainer
3. Bellows
4. Bearing
5. Dust seal, oil seal
Bushing Replacement
�Remove the bushings using a remover J±39378±1
and hammer.
412RS015
�By using installer J±39378±2 and base J±39378±3,
press fit the bushings into the bracket.
412RS016
Reassembly
1. Install DOJ case to bracket.
2. Install oil seal and fix snap ring.
3. Install bearing and fix snap ring.
4. Install bracket to axle case. Tighten the bracket bolt to
the specified torque.
Torque: 116 N´m (85 lb ft)
5. Apply 150g of the specified grease in BJ.
6. Install dust seal for BJ.
7. Apply a thin coat of grease to the shaft for smooth
installation then install bellows.
Page 553 of 2100
4C±56
DRIVE SHAFT SYSTEM
CAUTION: During bellows assembly, be sure to
insert both ends of the bellows into the BJ ASM and
shaft grooves.
412R100007
Legend
(1) Bellows
(2) Shaft
412R100013
Legend
(1) BJ ASM
(2) Bellows
8. Install band. Note the setting direction. After
installation, check Standard Caulk Measure.Use the
special tool pliers J±35910 to caulk the bands to the
specified value.
412R100012
Standard Caulk Measure
�1.2mm (0.05in) <= (1) and (2) <= 4.0mm (0.16in)
�(1) ± (2) or (2) ± (1) <= 0.4mm (0.016in)
9. Install another bellows and fix band.
10. Install band. Note the setting direction. After
installation, check that the bellows is free from
distortion. (DOJ SIDE ONLY)
412RS017
11. Install another bellows and fix band.
12. Install the ball guide with the smaller diameter side
ahead onto the shaft.
Page 554 of 2100
4C±57 DRIVE SHAFT SYSTEM
13. Install ball retainer.
14. Using snap ring pliers, install the snap ring (1)
securing the ball retainer to the shaft.
412RS013
15. Align the track on the ball (1) retainer with the window
in the cage, and install the six balls into position.
412RS018
16. Pack 150g of the specified grease in DOJ case, then
install drive shaft joint assembly. After reassembly,
move the DOJ longitudinally several times to get to fit.17. Install the circlip (1) so that open ends are positioned
away from the ball groove.
412RS019
412RS020
Legend
(1) Outer Case
(2) Circlip
(3) Open Ends
Page 555 of 2100
4C±58
DRIVE SHAFT SYSTEM
18. Install bellows. Adjust the air pressure within the
bellows by inserting a screwdriver or equivalent, so
that it equals atmospheric pressure.
412RS021
19. Install band. After installation, check that the bellows
is free from distortion.
Page 556 of 2100
4C±59 DRIVE SHAFT SYSTEM
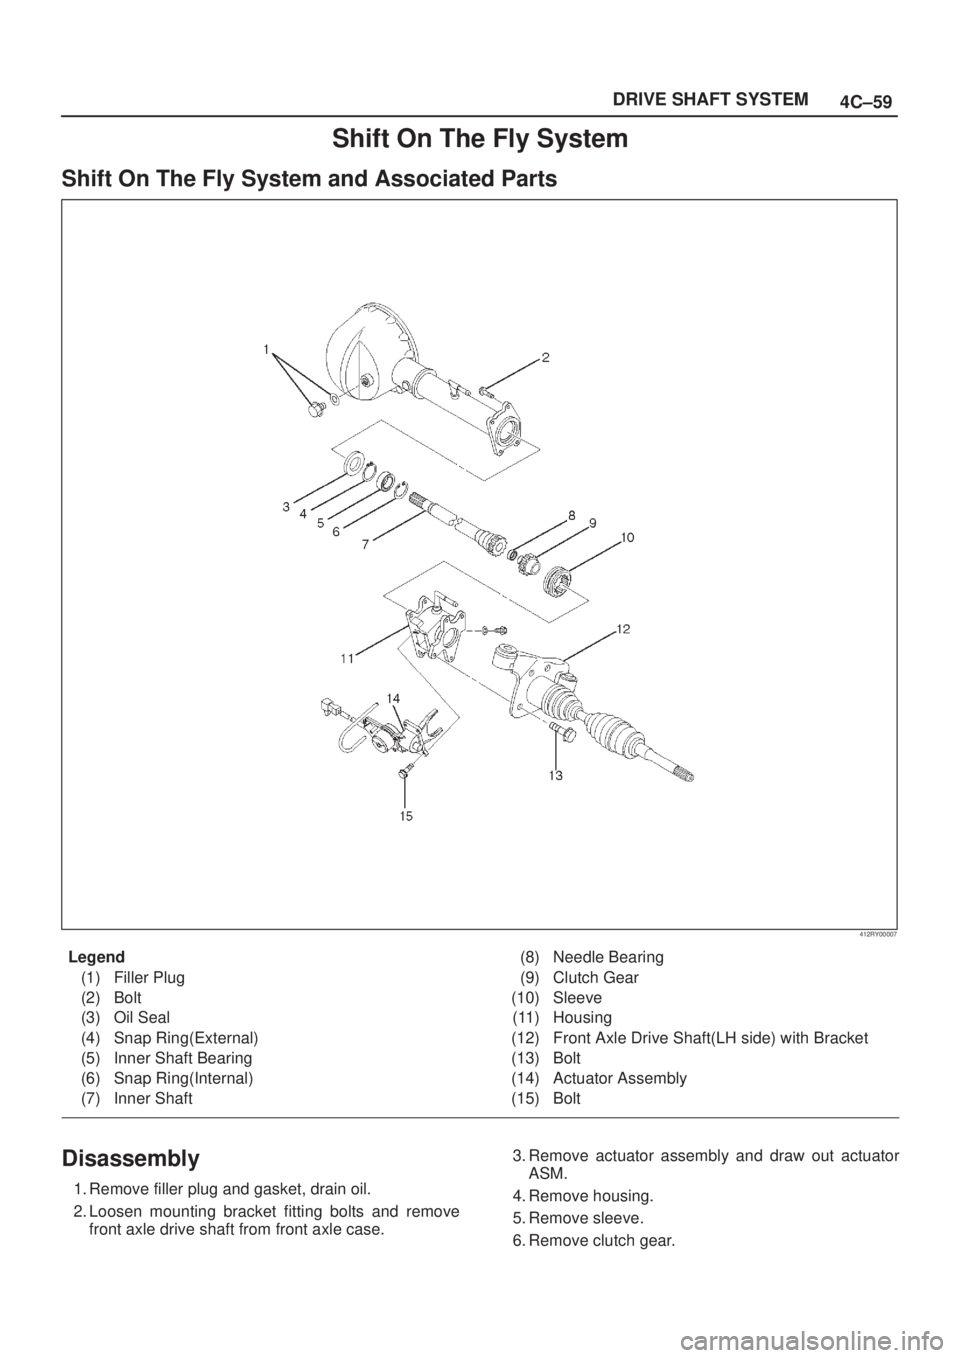
Shift On The Fly System
Shift On The Fly System and Associated Parts
412RY00007
Legend
(1) Filler Plug
(2) Bolt
(3) Oil Seal
(4) Snap Ring(External)
(5) Inner Shaft Bearing
(6) Snap Ring(Internal)
(7) Inner Shaft(8) Needle Bearing
(9) Clutch Gear
(10) Sleeve
(11) Housing
(12) Front Axle Drive Shaft(LH side) with Bracket
(13) Bolt
(14) Actuator Assembly
(15) Bolt
Disassembly
1. Remove filler plug and gasket, drain oil.
2. Loosen mounting bracket fitting bolts and remove
front axle drive shaft from front axle case.3. Remove actuator assembly and draw out actuator
ASM.
4. Remove housing.
5. Remove sleeve.
6. Remove clutch gear.
Page 557 of 2100
4C±60
DRIVE SHAFT SYSTEM
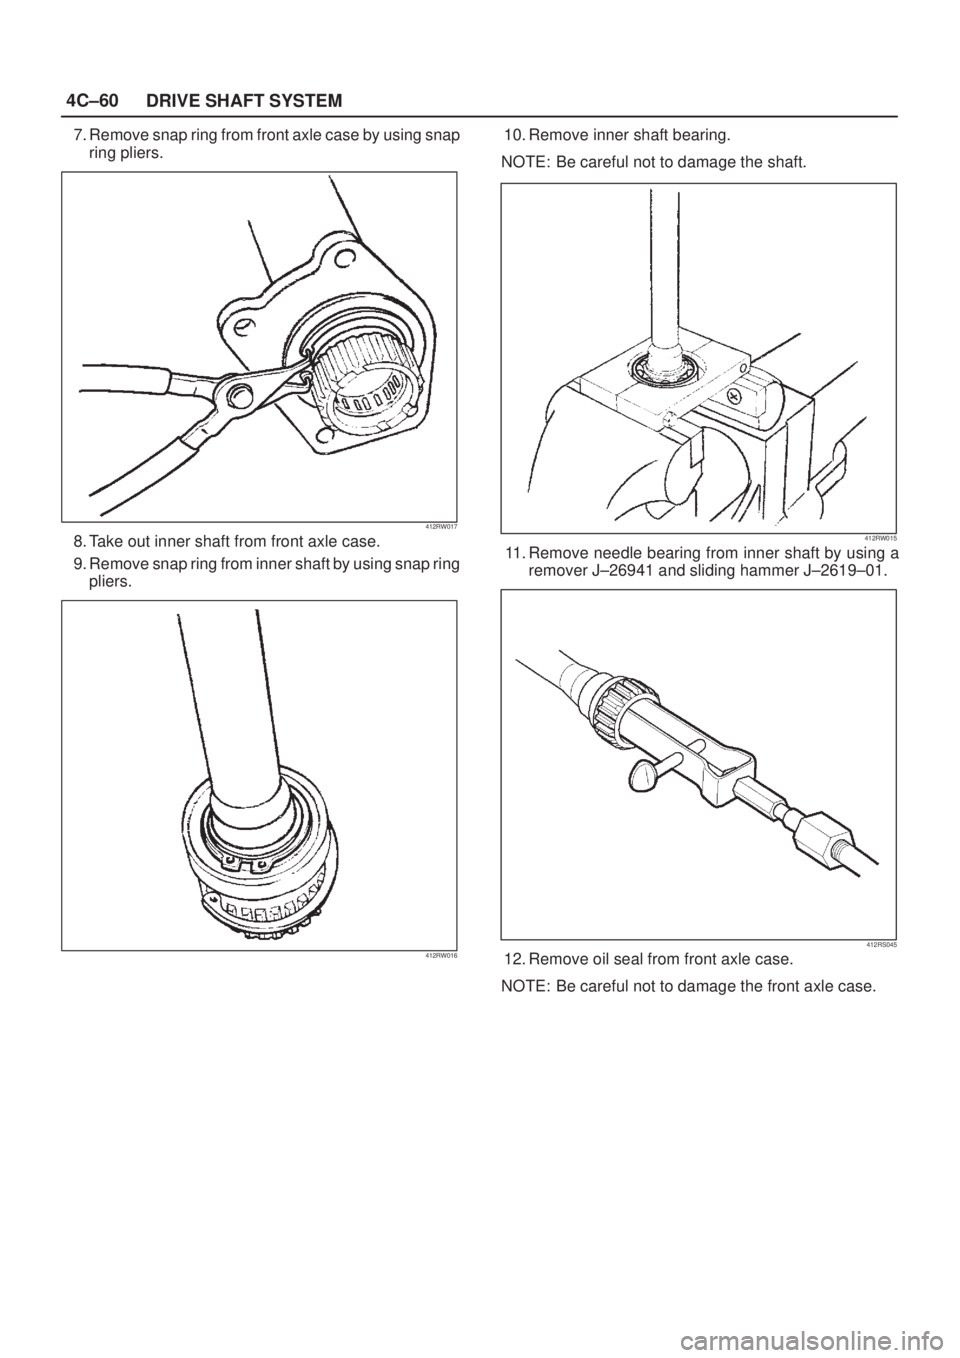
7. Remove snap ring from front axle case by using snap
ring pliers.
412RW017
8. Take out inner shaft from front axle case.
9. Remove snap ring from inner shaft by using snap ring
pliers.
412RW016
10. Remove inner shaft bearing.
NOTE: Be careful not to damage the shaft.
412RW015
11. Remove needle bearing from inner shaft by using a
remover J±26941 and sliding hammer J±2619±01.
412RS045
12. Remove oil seal from front axle case.
NOTE: Be careful not to damage the front axle case.
Page 558 of 2100
4C±61 DRIVE SHAFT SYSTEM
Inspection And Repair
Inspect the removed parts. If there are abnormalities
such as wear and damage, take corrective action or
replace.
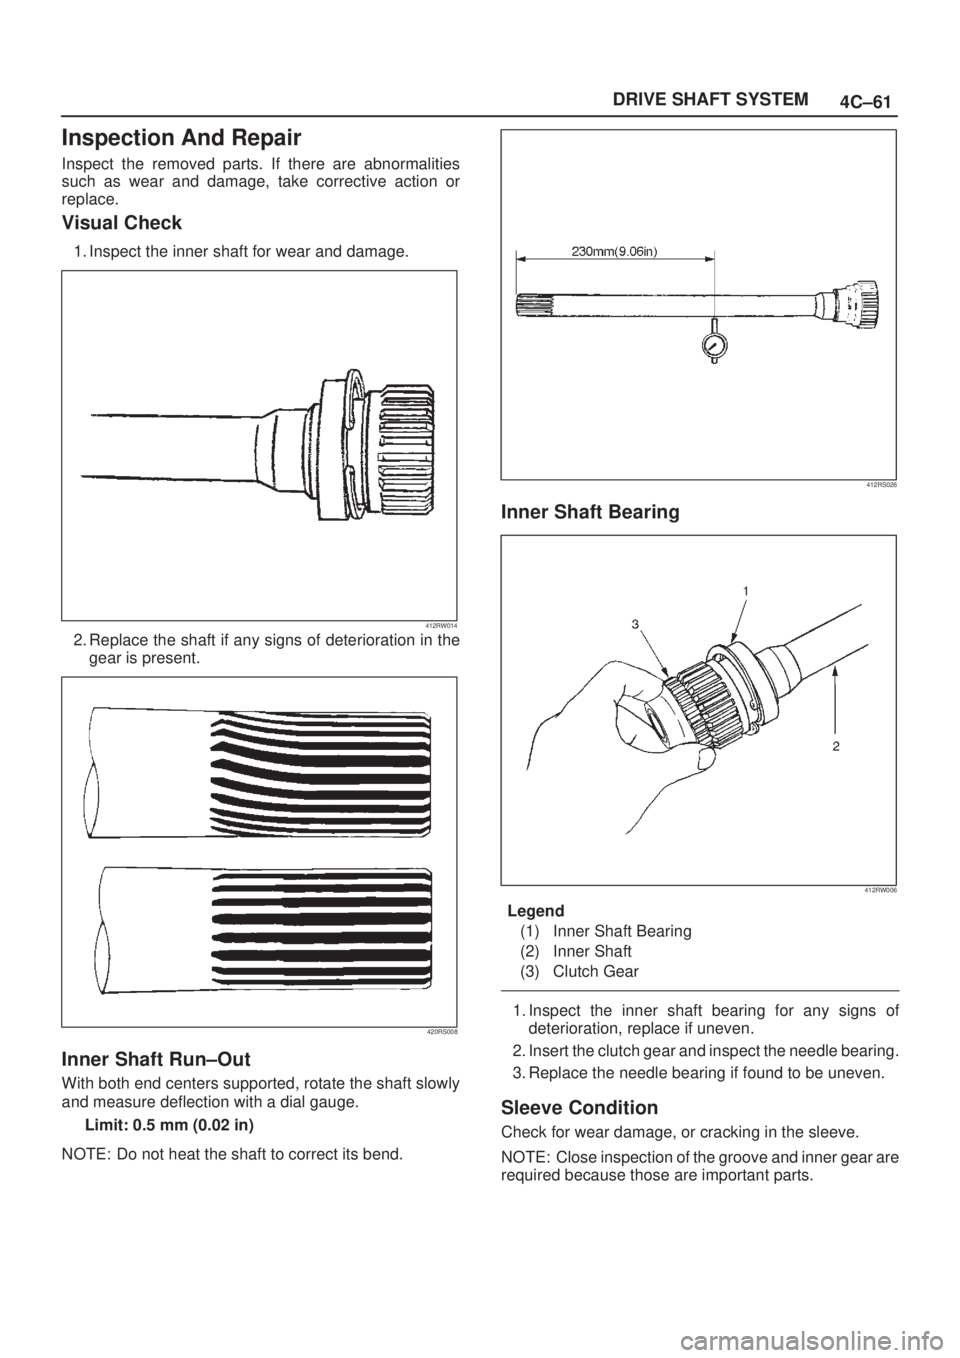
Visual Check
1. Inspect the inner shaft for wear and damage.
412RW014
2. Replace the shaft if any signs of deterioration in the
gear is present.
420RS008
Inner Shaft Run±Out
With both end centers supported, rotate the shaft slowly
and measure deflection with a dial gauge.
Limit: 0.5 mm (0.02 in)
NOTE: Do not heat the shaft to correct its bend.
412RS026
Inner Shaft Bearing
412RW006
Legend
(1) Inner Shaft Bearing
(2) Inner Shaft
(3) Clutch Gear
1. Inspect the inner shaft bearing for any signs of
deterioration, replace if uneven.
2. Insert the clutch gear and inspect the needle bearing.
3. Replace the needle bearing if found to be uneven.
Sleeve Condition
Check for wear damage, or cracking in the sleeve.
NOTE: Close inspection of the groove and inner gear are
required because those are important parts.
Page 559 of 2100
4C±62
DRIVE SHAFT SYSTEM
Sleeve Function
412RY00039Test the sleeve for smoothness by sliding it between the
inner shaft and the clutch gear, replace the sleeve if its
difficult to slide.
NOTE: Gear oil should be applied to the contact surface
of gear.
Check the width of sleeve center groove.
Limit: 7.1 mm (0.28 in)
412RW022
Clutch Gear Condition
Check for wear, damage, crack or any other deterioration
in the clutch gear.
Clutch Gear Function
412RY00038Test the sleeve for smoothness by sliding it across the
clutch gear, replace the clutch gear if its difficult to slide.
NOTE: When inspecting, gear oil should be applied to the
contact surface of gear.
Clutch Gear Journal Diameter
Make sure of the size illustrated.
Limit: 36.98 mm (1.456 in)
412RY00037
Actuator
Check for damage, cracking, or other abnormality.
Page 560 of 2100
4C±63 DRIVE SHAFT SYSTEM
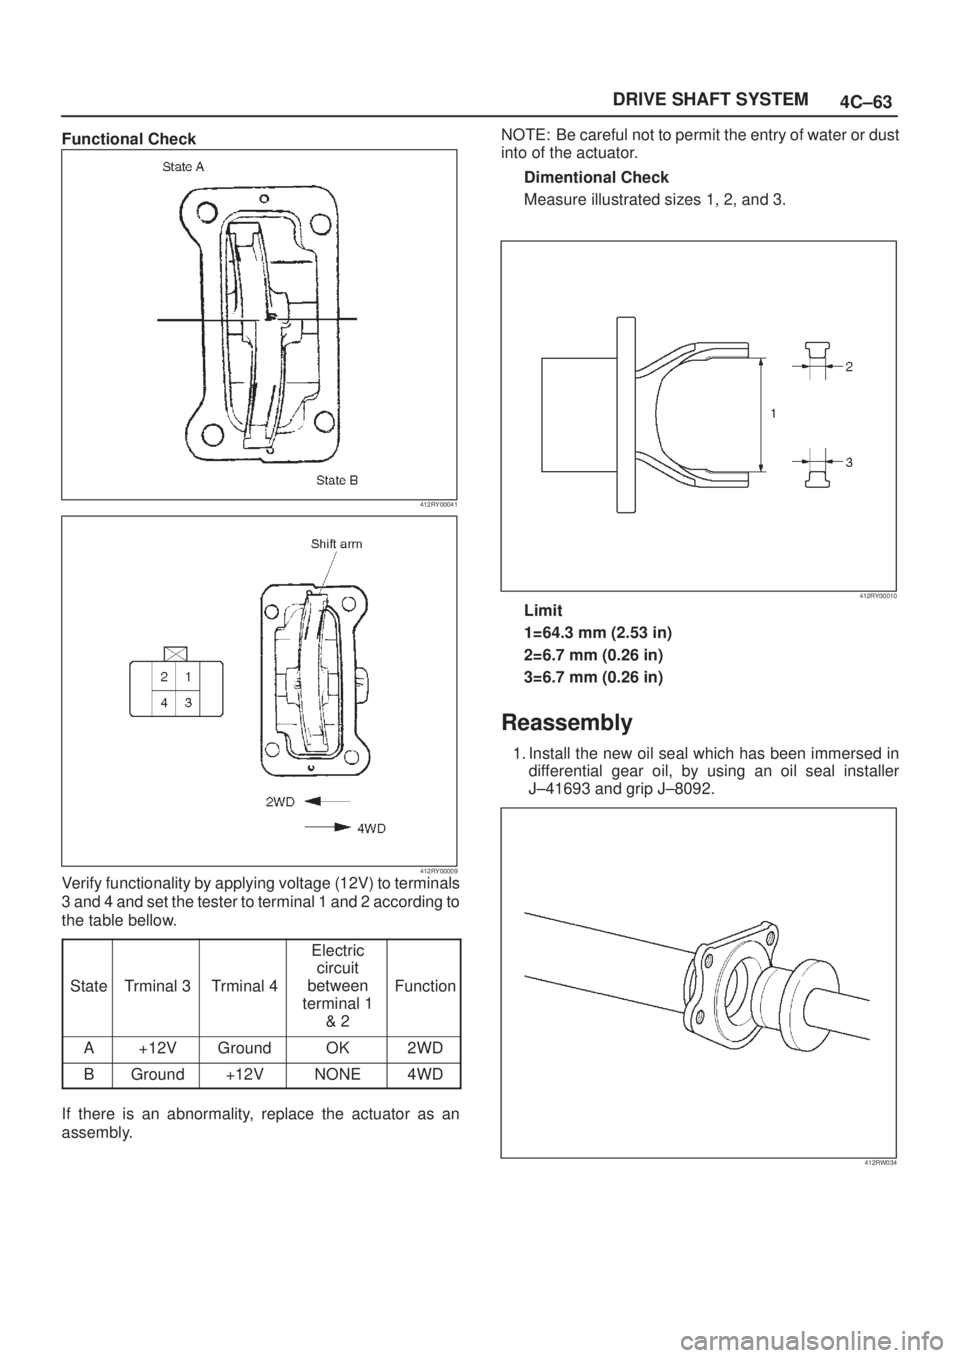
Functional Check
412RY00041
412RY00009Verify functionality by applying voltage (12V) to terminals
3 and 4 and set the tester to terminal 1 and 2 according to
the table bellow.
State
Trminal 3Trminal 4
Electric
circuit
between
terminal 1
& 2
Function
A+12VGroundOK2WD
BGround+12VNONE4WD
If there is an abnormality, replace the actuator as an
assembly.NOTE: Be careful not to permit the entry of water or dust
into of the actuator.
Dimentional Check
Measure illustrated sizes 1, 2, and 3.
412RY00010
Limit
1=64.3 mm (2.53 in)
2=6.7 mm (0.26 in)
3=6.7 mm (0.26 in)
Reassembly
1. Install the new oil seal which has been immersed in
differential gear oil, by using an oil seal installer
J±41693 and grip J±8092.
412RW034
Trending: service indicator, dimensions, charging, clock setting, jump start, automatic transmission fluid, battery replacement
