engine mount ISUZU KB P190 2007 Workshop User Guide
[x] Cancel search | Manufacturer: ISUZU, Model Year: 2007, Model line: KB P190, Model: ISUZU KB P190 2007Pages: 6020, PDF Size: 70.23 MB
Page 510 of 6020
4C1-6 FRONT WHEEL DRIVE
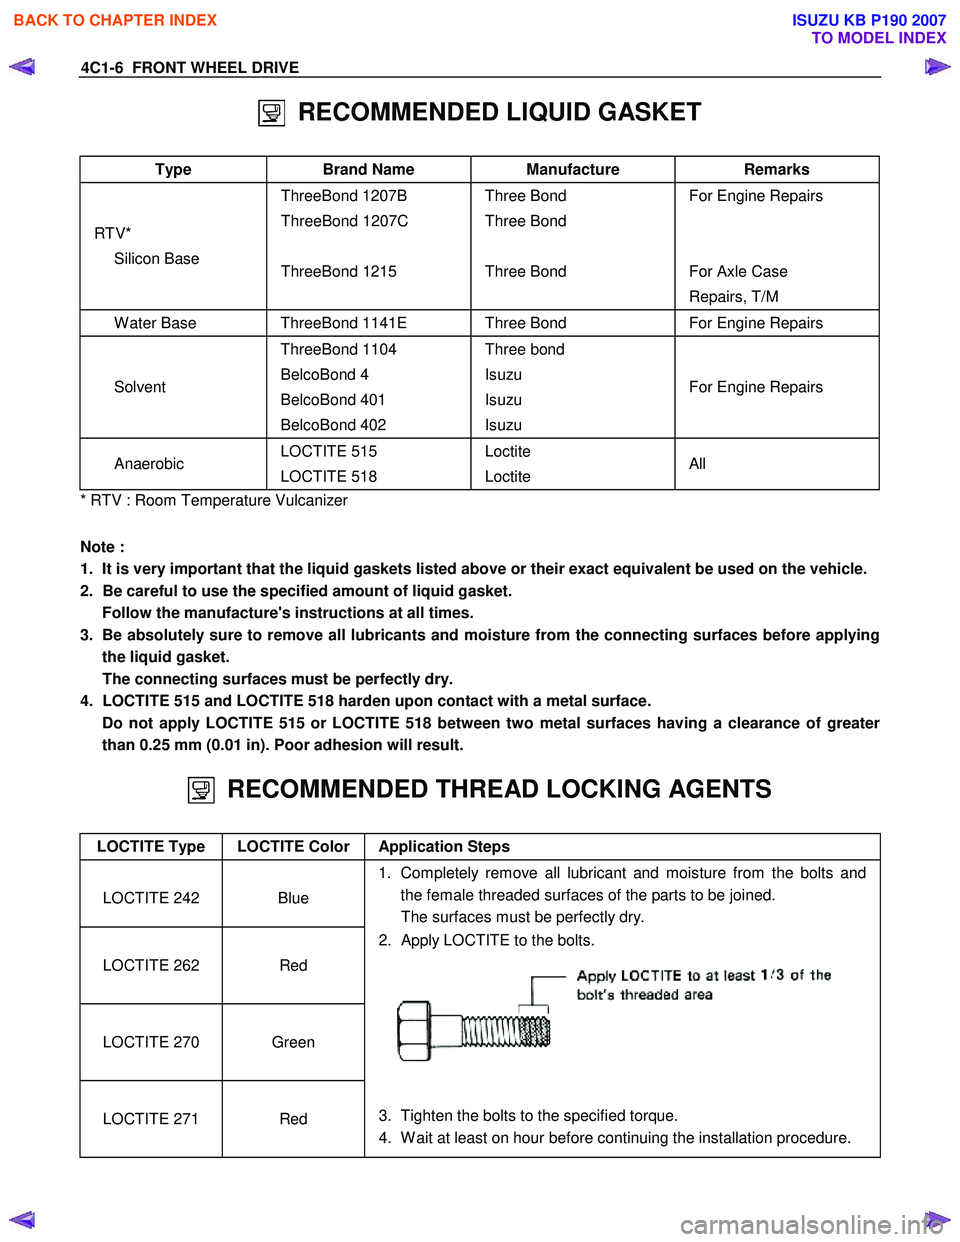
RECOMMENDED LIQUID GASKET
Type Brand Name Manufacture Remarks
RTV* Silicon Base ThreeBond 1207B
ThreeBond 1207C
ThreeBond 1215
Three Bond
Three Bond
Three Bond
For Engine Repairs
For Axle Case
Repairs, T/M
W ater Base ThreeBond 1141E Three Bond For Engine Repairs
Solvent ThreeBond 1104
BelcoBond 4
BelcoBond 401
BelcoBond 402 Three bond
Isuzu
Isuzu
Isuzu
For Engine Repairs
Anaerobic LOCTITE 515
LOCTITE 518 Loctite
Loctite All
* RTV : Room Temperature Vulcanizer
Note :
1. It is very important that the liquid gaskets listed above or their exact equivalent be used on the vehicle.
2. Be careful to use the specified amount of liquid gasket. Follow the manufacture's instructions at all times.
3. Be absolutely sure to remove all lubricants and moisture from the connecting surfaces before applying the liquid gasket.
The connecting surfaces must be perfectly dry.
4. LOCTITE 515 and LOCTITE 518 harden upon contact with a metal surface.
Do not apply LOCTITE 515 or LOCTITE 518 between two metal surfaces having a clearance of greater than 0.25 mm (0.01 in). Poor adhesion will result.
RECOMMENDED THREAD LOCKING AGENTS
LOCTITE Type LOCTITE Color Application Steps
LOCTITE 242
Blue 1. Completely remove all lubricant and moisture from the bolts and
the female threaded surfaces of the parts to be joined.
The surfaces must be perfectly dry.
LOCTITE 262
Red 2. Apply LOCTITE to the bolts.
LOCTITE 270
Green
LOCTITE 271
Red
3. Tighten the bolts to the specified torque.
4. W ait at least on hour before continuing the installation procedure.
BACK TO CHAPTER INDEX
TO MODEL INDEX
ISUZU KB P190 2007
Page 615 of 6020
5A-22 BRAKE CONTROL SYSTEM
System Components
Electronic Hydraulic Control Unit (EHCU), four W heel
Speed Sensors, two W arning Lamps, and G sensor.
Electronic Hydraulic Control Unit (EHCU)
The EHCU consists of ABS control circuits, fault
detector, and a fail-safe. It drives the EHCU according
to the signal from each sensor, cancelling ABS to return
to normal braking when a malfunction has occurred in
the ABS.
The EHCU has a self-diagnosing function which can
indicate faulty circuits during diagnosis.
The EHCU is mounted on the engine compartment rear
left side. It consists of a motor, solenoid valves and a
fail safe relay.
Solenoid Valves: Reduces or holds the caliper fluid
pressure for each front brake or both rear brakes
according to the signal sent from the EHCU.
Buffer chamber: Temporarily holds the brake fluid that
returns from the front and rear brake so that pressure of
front brake can be reduced smoothly.
Motor: Drives the pump according to the signal from
EHCU.
Fail safe Relay: W hen failure occurs in ABS.
The power supply to solenoid Valve is cut.
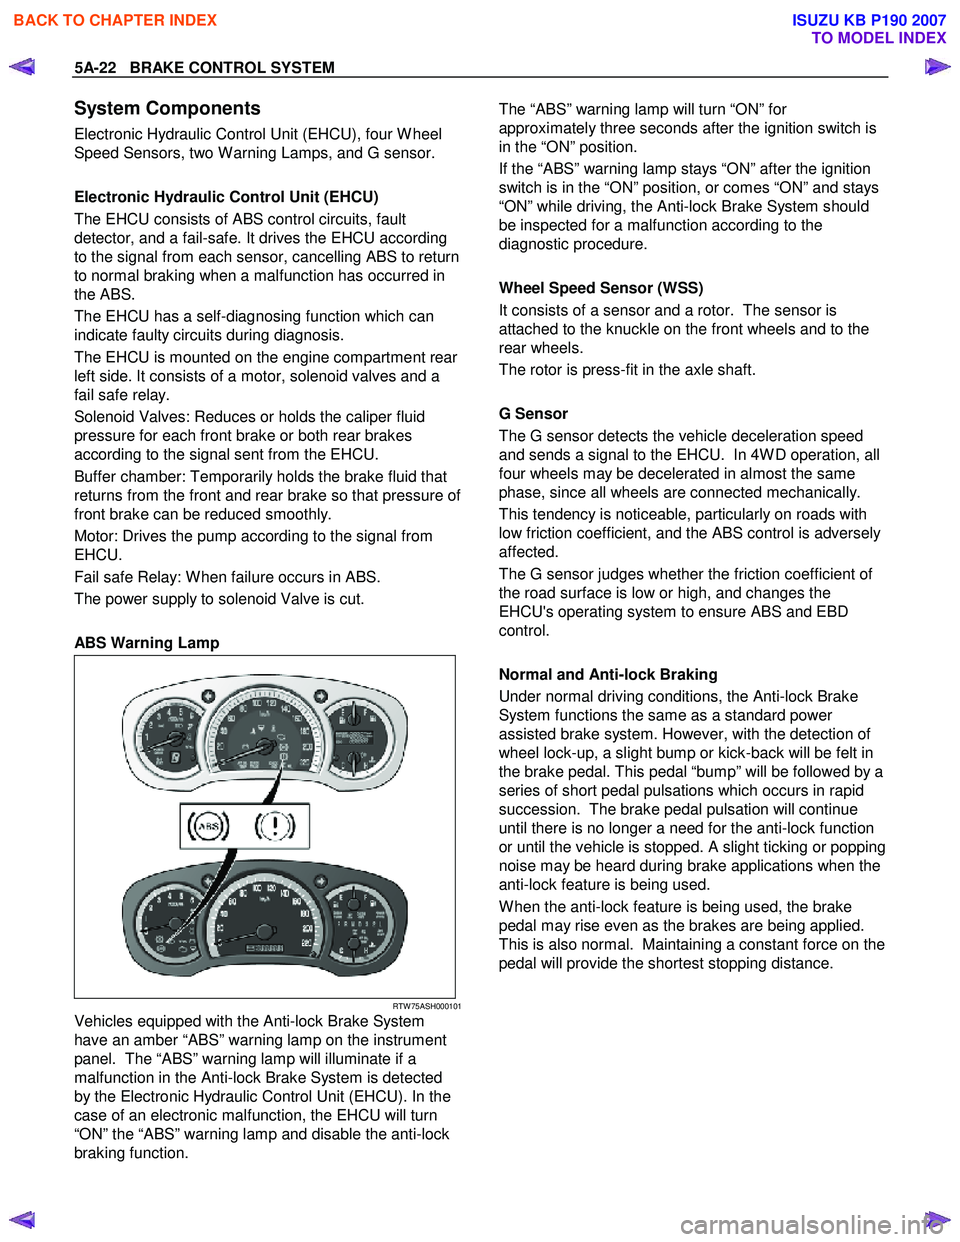
ABS Warning Lamp
RTW 75ASH000101
Vehicles equipped with the Anti-lock Brake System
have an amber “ABS” warning lamp on the instrument
panel. The “ABS” warning lamp will illuminate if a
malfunction in the Anti-lock Brake System is detected
by the Electronic Hydraulic Control Unit (EHCU). In the
case of an electronic malfunction, the EHCU will turn
“ON” the “ABS” warning lamp and disable the anti-lock
braking function.
The “ABS” warning lamp will turn “ON” for
approximately three seconds after the ignition switch is
in the “ON” position.
If the “ABS” warning lamp stays “ON” after the ignition
switch is in the “ON” position, or comes “ON” and stays
“ON” while driving, the Anti-lock Brake System should
be inspected for a malfunction according to the
diagnostic procedure.
Wheel Speed Sensor (WSS)
It consists of a sensor and a rotor. The sensor is
attached to the knuckle on the front wheels and to the
rear wheels.
The rotor is press-fit in the axle shaft.
G Sensor
The G sensor detects the vehicle deceleration speed
and sends a signal to the EHCU. In 4W D operation, all
four wheels may be decelerated in almost the same
phase, since all wheels are connected mechanically.
This tendency is noticeable, particularly on roads with
low friction coefficient, and the ABS control is adversely
affected.
The G sensor judges whether the friction coefficient of
the road surface is low or high, and changes the
EHCU's operating system to ensure ABS and EBD
control.
Normal and Anti-lock Braking
Under normal driving conditions, the Anti-lock Brake
System functions the same as a standard power
assisted brake system. However, with the detection of
wheel lock-up, a slight bump or kick-back will be felt in
the brake pedal. This pedal “bump” will be followed by a
series of short pedal pulsations which occurs in rapid
succession. The brake pedal pulsation will continue
until there is no longer a need for the anti-lock function
or until the vehicle is stopped. A slight ticking or popping
noise may be heard during brake applications when the
anti-lock feature is being used.
W hen the anti-lock feature is being used, the brake
pedal may rise even as the brakes are being applied.
This is also normal. Maintaining a constant force on the
pedal will provide the shortest stopping distance.
BACK TO CHAPTER INDEX
TO MODEL INDEX
ISUZU KB P190 2007
Page 638 of 6020
BRAKE CONTROL SYSTEM 5A-45
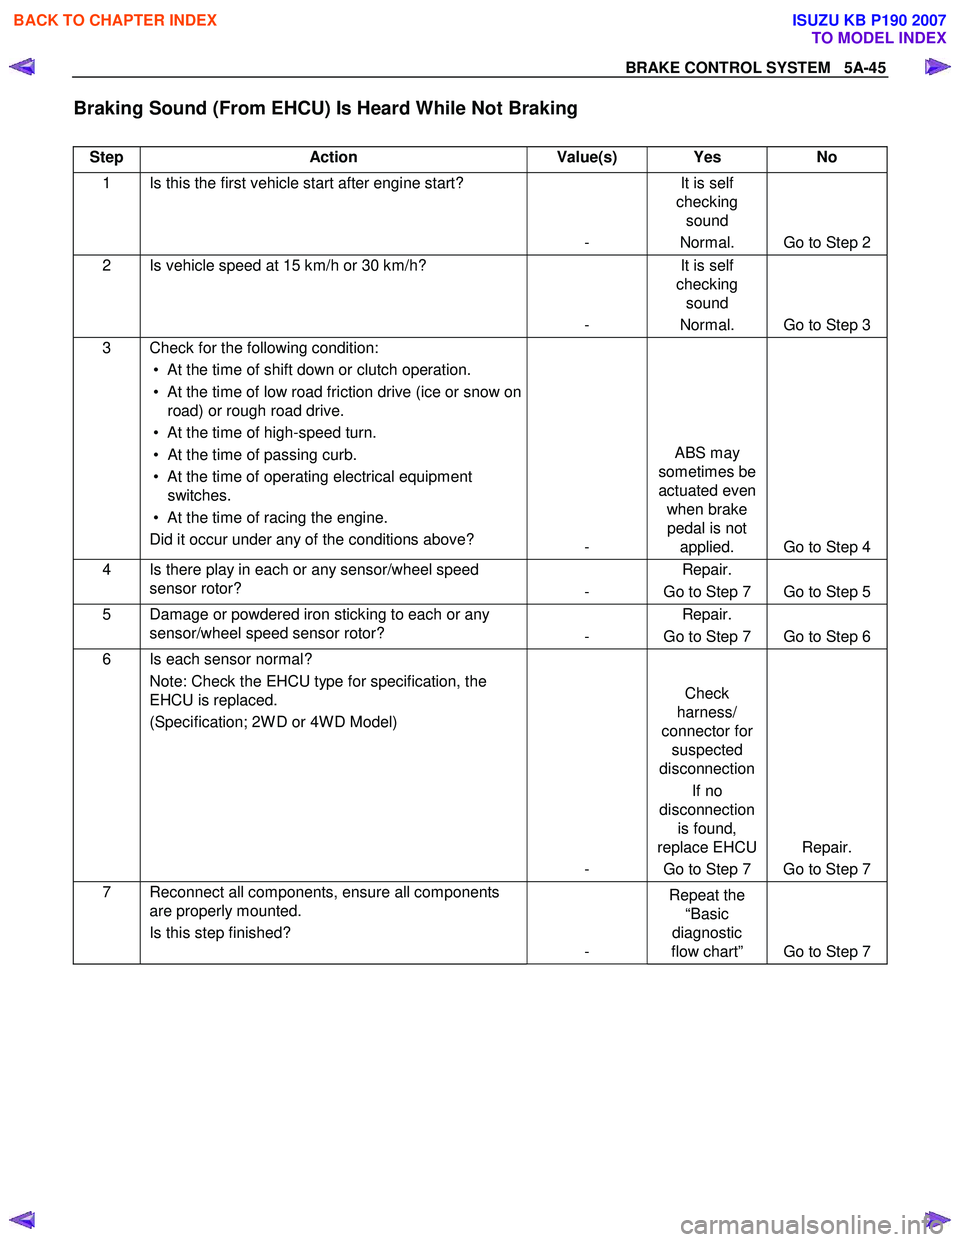
Braking Sound (From EHCU) Is Heard While Not Braking
Step Action Value(s) Yes No
1 Is this the first vehicle start after engine start?
- It is self
checking sound
Normal. Go to Step 2
2 Is vehicle speed at 15 km/h or 30 km/h?
- It is self
checking sound
Normal. Go to Step 3
3 Check for the following condition: • At the time of shift down or clutch operation.
• At the time of low road friction drive (ice or snow on road) or rough road drive.
• At the time of high-speed turn.
• At the time of passing curb.
• At the time of operating electrical equipment switches.
• At the time of racing the engine. Did it occur under any of the conditions above? - ABS may
sometimes be
actuated even when brake pedal is not applied. Go to Step 4
4 Is there play in each or any sensor/wheel speed sensor rotor? - Repair.
Go to Step 7 Go to Step 5
5 Damage or powdered iron sticking to each or any sensor/wheel speed sensor rotor? - Repair.
Go to Step 7 Go to Step 6
6 Is each sensor normal? Note: Check the EHCU type for specification, the
EHCU is replaced.
(Specification; 2W D or 4W D Model)
- Check
harness/
connector for suspected
disconnection
If no
disconnection is found,
replace EHCU
Go to Step 7 Repair.
Go to Step 7
7 Reconnect all components, ensure all components are properly mounted.
Is this step finished? - Repeat the
“Basic
diagnostic
flow chart” Go to Step 7
BACK TO CHAPTER INDEX
TO MODEL INDEX
ISUZU KB P190 2007
Page 730 of 6020
BRAKES 5C-31
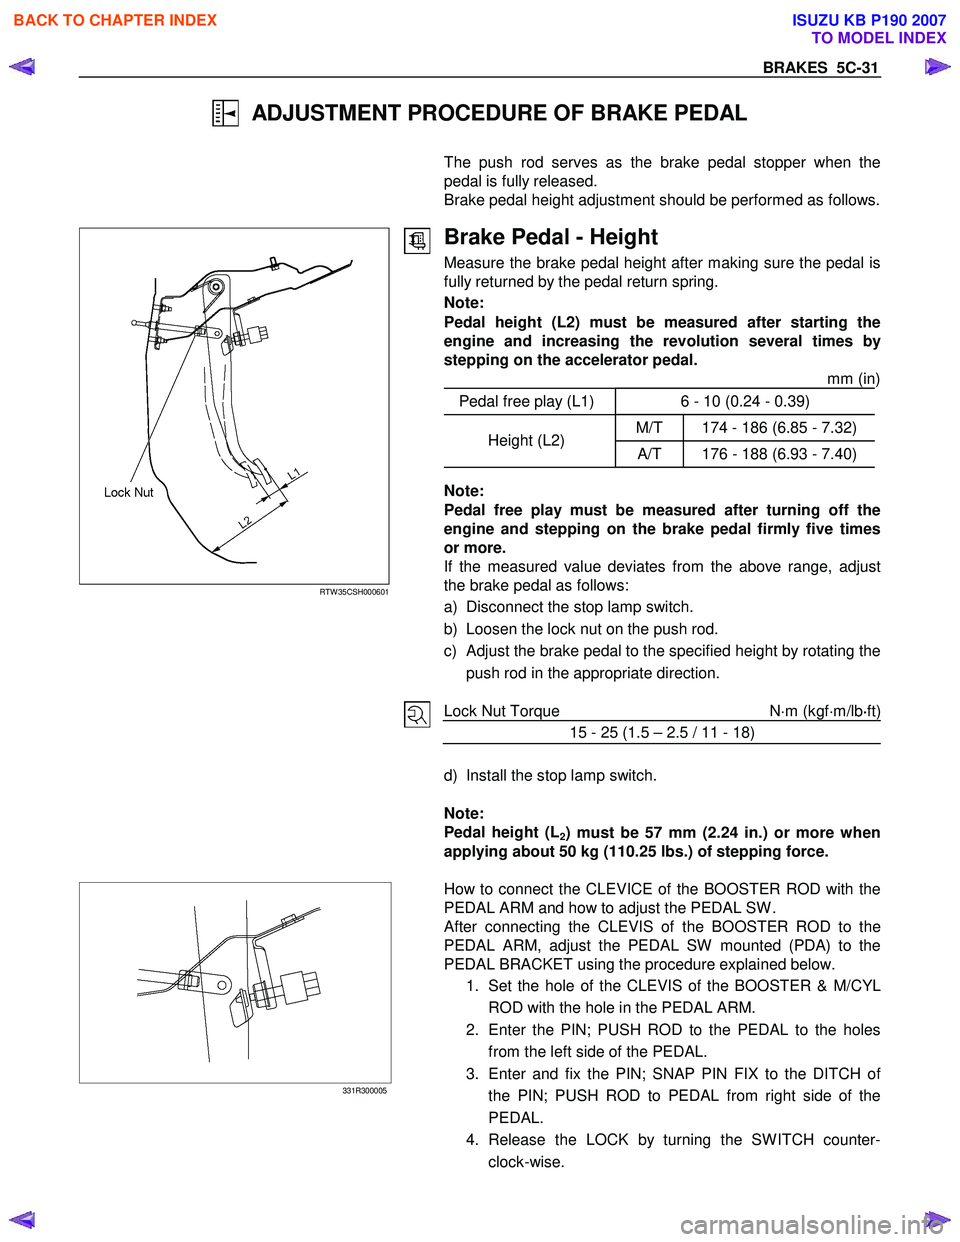
ADJUSTMENT PROCEDURE OF BRAKE PEDAL
The push rod serves as the brake pedal stopper when the
pedal is fully released.
Brake pedal height adjustment should be performed as follows.
RTW 35CSH000601
Brake Pedal - Height
Measure the brake pedal height after making sure the pedal is
fully returned by the pedal return spring.
Note:
Pedal height (L2) must be measured after starting the
engine and increasing the revolution several times by
stepping on the accelerator pedal. mm (in)
Pedal free play (L1) 6 - 10 (0.24 - 0.39)
M/T 174 - 186 (6.85 - 7.32) Height (L2)
A/T 176 - 188 (6.93 - 7.40)
Note:
Pedal free play must be measured after turning off the
engine and stepping on the brake pedal firmly five times
or more.
If the measured value deviates from the above range, adjust
the brake pedal as follows:
a) Disconnect the stop lamp switch.
b) Loosen the lock nut on the push rod.
c)
Adjust the brake pedal to the specified height by rotating the
push rod in the appropriate direction.
Lock Nut Torque
N⋅m (kgf ⋅m/lb ⋅
⋅⋅
⋅
ft)
15 - 25 (1.5 – 2.5 / 11 - 18)
d) Install the stop lamp switch.
Note:
Pedal height (L
2) must be 57 mm (2.24 in.) or more when
applying about 50 kg (110.25 lbs.) of stepping force.
331R300005
How to connect the CLEVICE of the BOOSTER ROD with the
PEDAL ARM and how to adjust the PEDAL SW .
After connecting the CLEVIS of the BOOSTER ROD to the
PEDAL ARM, adjust the PEDAL SW mounted (PDA) to the
PEDAL BRACKET using the procedure explained below.
1. Set the hole of the CLEVIS of the BOOSTER & M/CYL
ROD with the hole in the PEDAL ARM.
2. Enter the PIN; PUSH ROD to the PEDAL to the holes from the left side of the PEDAL.
3. Enter and fix the PIN; SNAP PIN FIX to the DITCH o
f
the PIN; PUSH ROD to PEDAL from right side of the
PEDAL.
4. Release the LOCK by turning the SW ITCH counter- clock-wise.
BACK TO CHAPTER INDEX
TO MODEL INDEX
ISUZU KB P190 2007
Page 760 of 6020

BRAKES 5C-61
RTW 75CSH002701
Important Operation-Removal
1. Brake pipe
W hen hurdling, be careful not to spill brake fluid over the
painted surfaces, as damage to the paint finish will result.
2. Master Cylinder Fixing Nut
3. Bracket
4. Master Cylinder Assembly
NOTE:
W hen removing the master cylinder from the vacuum booster,
be sure to get rid of the internal negative pressure of the
vacuum booster (by, for instance, disconnecting the vacuum
hose) in advance.
If any negative pressure remains in the vacuum booster, the
piston may possibly come out when the master cylinder is
being removed, letting the brake fluid run out.
W hile removing the master cylinder, do not hold the piston as it
can be easily pulled out.
Inspection and Repair
Vacuum Hose (The built in check valve)
360R300002
1) Inspect the check valve, which is installed inside the
vacuum hose.
2) Blow air into the hose from the booster side as shown in the illustration. The air should pass freely through the
hose.
3) Blow air into the hose from the engine side. The check valve should close to block the passage of air.
The vacuum hose and built-in check valve must be
replaced as a set if either is found to be defective.
Important Operation-Installation
10. Vacuum Booster Assembly
Note:
•
Adjustment of push rod of vacuum booster is not carried
out. W hen vacuum booster is damaged it exchanges for a
new article. (Push rod is adjusted)
• Measurement of primary piston position by the side o
f
master cylinder is unnecessary.
9. Spacer
8. Gasket
7. Vacuum Booster Fixing Nut
6. Snap Pin
Install the vacuum booster assembly to the dash panel and
pedal mounting bracket.
BACK TO CHAPTER INDEX
TO MODEL INDEX
ISUZU KB P190 2007
Page 826 of 6020
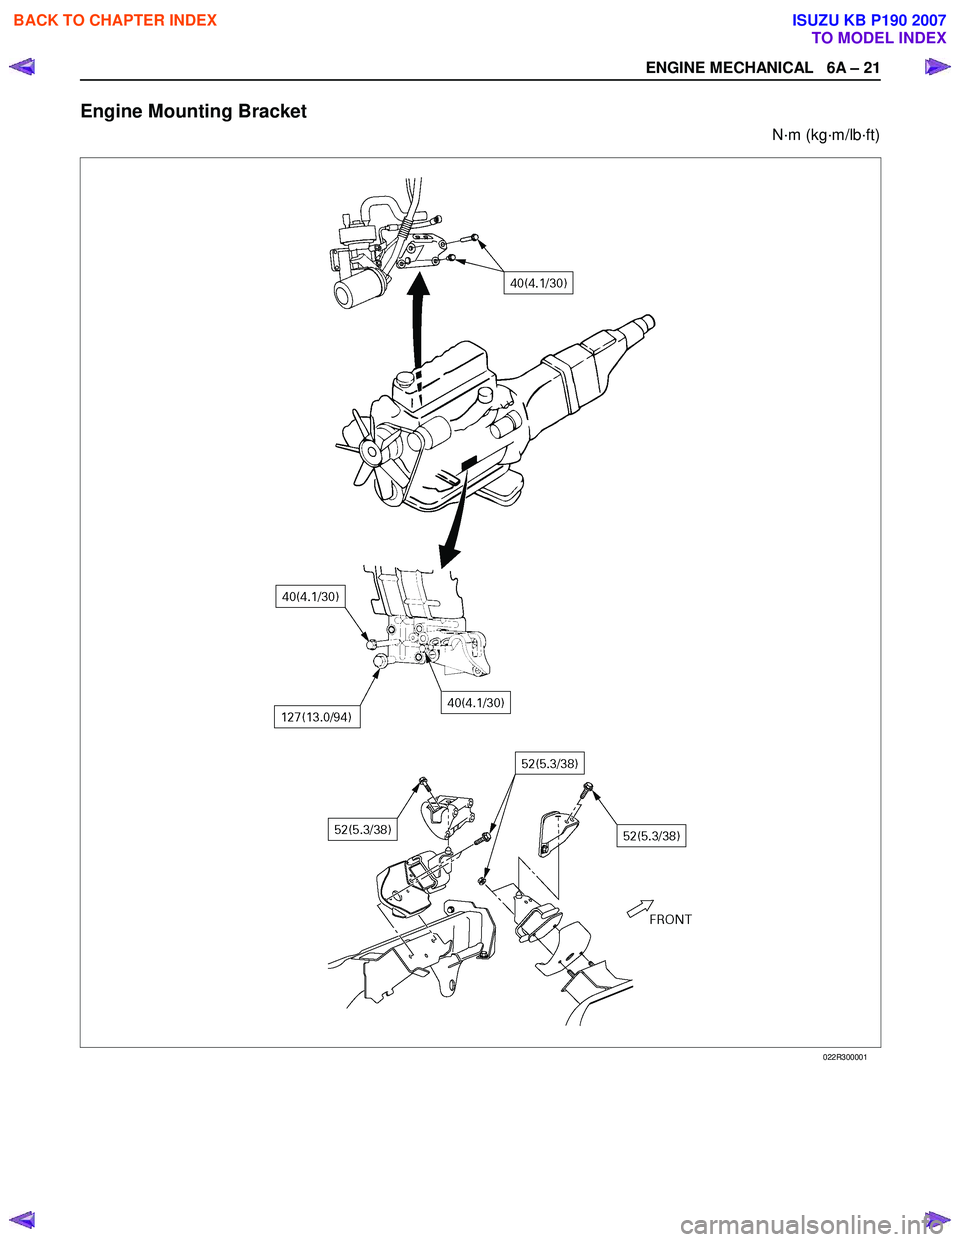
ENGINE MECHANICAL 6A – 21
Engine Mounting Bracket
N·m (kg·m/lb·ft)
022R300001
BACK TO CHAPTER INDEX
TO MODEL INDEX
ISUZU KB P190 2007
Page 827 of 6020

6A – 22 ENGINE MECHANICAL
RECOMMENDED LIQUID GASKET
Type Brand Name Manufacturer Remarks
RTV*
Silicon Base ThreeBond 1207B
ThreeBond 1207C Three Bond
Three Bond
W ater Base
ThreeBond 1141E
ThreeBond 1215 Three Bond
Three Bond
Solvent
ThreeBond 1104
Belco Bond 4
Belco Bond 401
Belco Bond 402 Three Bond
Isuzu
Isuzu
Isuzu
Anaerobic
LOCTITE 515
LOCTITE 518
LOCTITE 262 Loctite
Loctite
Loctite Recommended for
transaxle repairs
* RTV : Room Temperature Vulcanizer
Note:
1. It is very important that the liquid gaskets listed above or their exact equivalent be used on the vehicle.
2. Be careful to use the specified amount of liquid gasket. Follow the manufacturer’s instructions at all times.
3. Be absolutely sure to remove all lubricants and moisture from the connecting surfaces before applying the liquid gasket.
The connecting surfaces must be perfectly dry.
4. LOCTITE 515 and LOCTITE 518 harden upon contact with a metal surface. Do not apply LOCTITE 515 or LOCTITE 518 between two metal surfaces having a clearance of
greater than 0.25 mm (0.01 in). Poor adhesion will result.
BACK TO CHAPTER INDEX
TO MODEL INDEX
ISUZU KB P190 2007
Page 843 of 6020
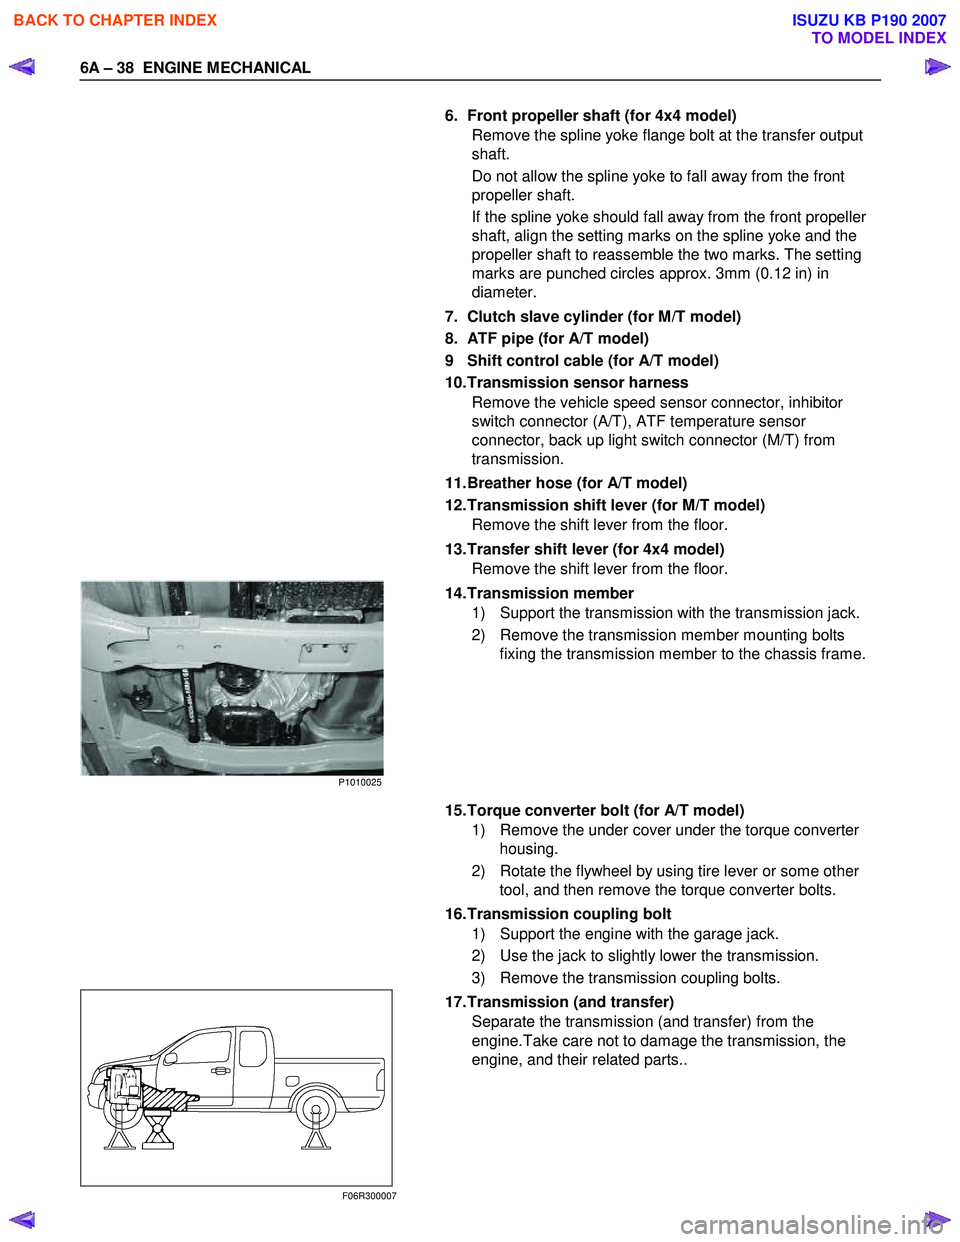
6A – 38 ENGINE MECHANICAL
6. Front propeller shaft (for 4x4 model)
Remove the spline yoke flange bolt at the transfer output
shaft.
Do not allow the spline yoke to fall away from the front
propeller shaft.
If the spline yoke should fall away from the front propeller
shaft, align the setting marks on the spline yoke and the
propeller shaft to reassemble the two marks. The setting
marks are punched circles approx. 3mm (0.12 in) in
diameter.
7. Clutch slave cylinder (for M/T model)
8. ATF pipe (for A/T model)
9 Shift control cable (for A/T model)
10. Transmission sensor harness Remove the vehicle speed sensor connector, inhibitor
switch connector (A/T), ATF temperature sensor
connector, back up light switch connector (M/T) from
transmission.
11. Breather hose (for A/T model)
12. Transmission shift lever (for M/T model) Remove the shift lever from the floor.
13. Transfer shift lever (for 4x4 model) Remove the shift lever from the floor.
14. Transmission member 1) Support the transmission with the transmission jack.
2) Remove the transmission member mounting bolts fixing the transmission member to the chassis frame.
15. Torque converter bolt (for A/T model) 1) Remove the under cover under the torque converter housing.
2) Rotate the flywheel by using tire lever or some other tool, and then remove the torque converter bolts.
16. Transmission coupling bolt 1) Support the engine with the garage jack.
2) Use the jack to slightly lower the transmission.
3) Remove the transmission coupling bolts.
17. Transmission (and transfer) Separate the transmission (and transfer) from the
engine.Take care not to damage the transmission, the
engine, and their related parts..
F06R300007
P1010025
BACK TO CHAPTER INDEX
TO MODEL INDEX
ISUZU KB P190 2007
Page 845 of 6020
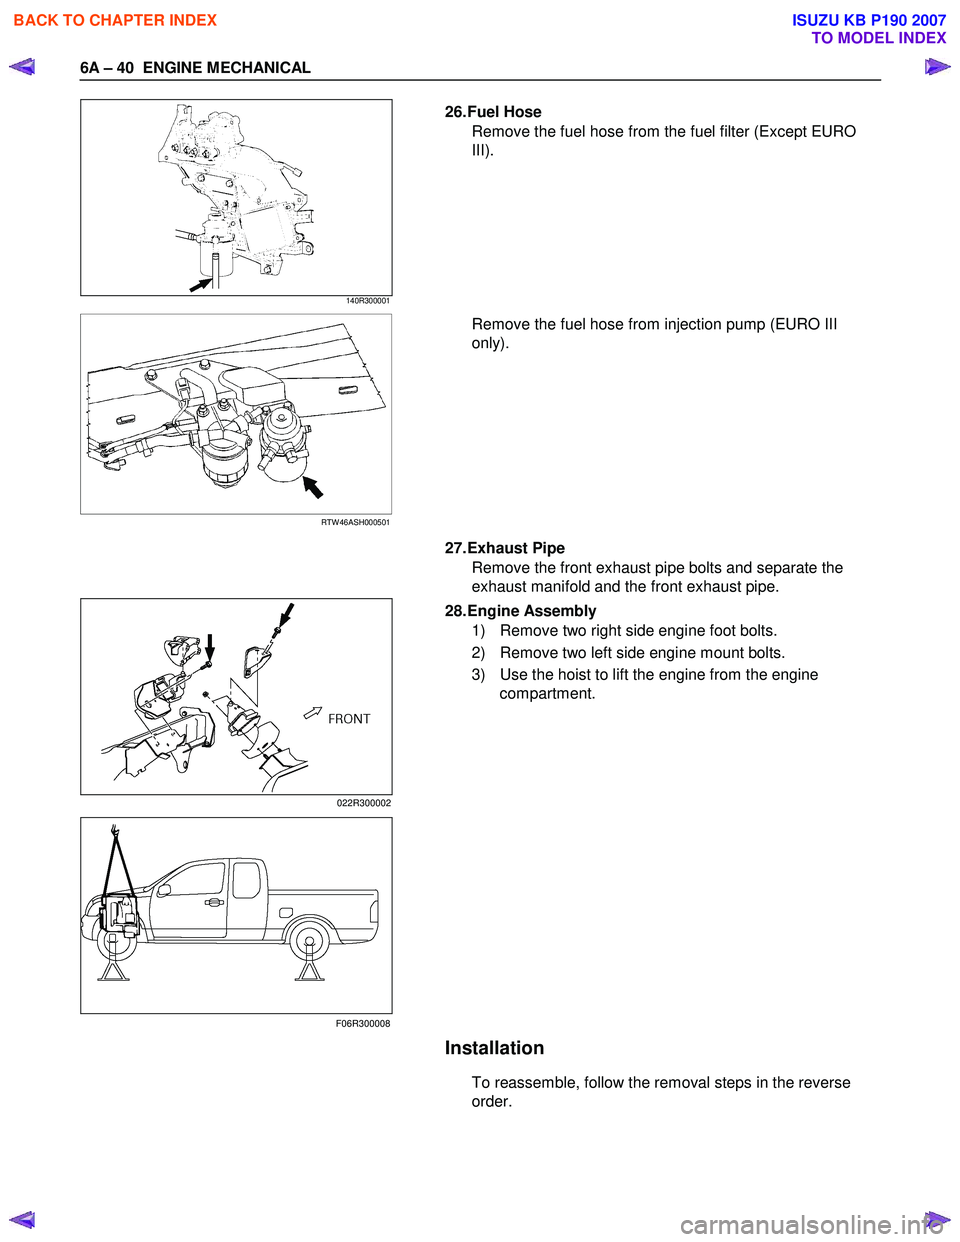
6A – 40 ENGINE MECHANICAL
140R300001
26. Fuel Hose
Remove the fuel hose from the fuel filter (Except EURO
III).
RTW 46ASH000501
Remove the fuel hose from injection pump (EURO III
only).
27. Exhaust Pipe Remove the front exhaust pipe bolts and separate the
exhaust manifold and the front exhaust pipe.
28. Engine Assembly
1) Remove two right side engine foot bolts.
2) Remove two left side engine mount bolts.
3) Use the hoist to lift the engine from the engine compartment.
Installation
To reassemble, follow the removal steps in the reverse
order.
022R300002
F06R300008
BACK TO CHAPTER INDEX
TO MODEL INDEX
ISUZU KB P190 2007
Page 848 of 6020
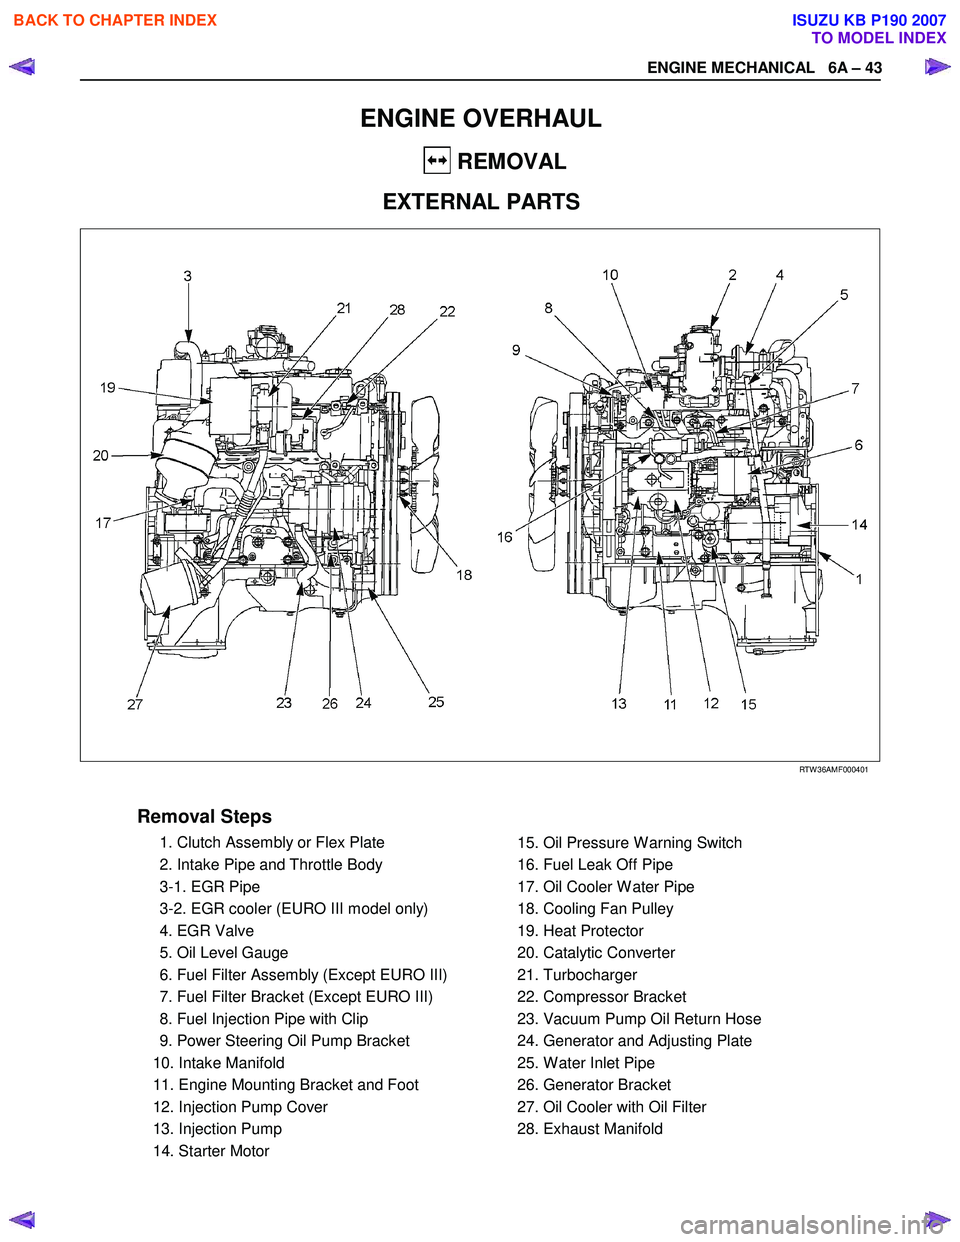
ENGINE MECHANICAL 6A – 43
ENGINE OVERHAUL
REMOVAL
EXTERNAL PARTS
RTW 36AMF000401
Removal Steps
1. Clutch Assembly or Flex Plate
2. Intake Pipe and Throttle Body
3-1. EGR Pipe
3-2. EGR cooler (EURO III model only)
4. EGR Valve
5. Oil Level Gauge
6. Fuel Filter Assembly (Except EURO III)
7. Fuel Filter Bracket (Except EURO III)
8. Fuel Injection Pipe with Clip
9. Power Steering Oil Pump Bracket
10. Intake Manifold
11. Engine Mounting Bracket and Foot
12. Injection Pump Cover
13. Injection Pump
14. Starter Motor
15. Oil Pressure W arning Switch
16. Fuel Leak Off Pipe
17. Oil Cooler W ater Pipe
18. Cooling Fan Pulley
19. Heat Protector
20. Catalytic Converter
21. Turbocharger
22. Compressor Bracket
23. Vacuum Pump Oil Return Hose
24. Generator and Adjusting Plate
25. W ater Inlet Pipe
26. Generator Bracket
27. Oil Cooler with Oil Filter
28. Exhaust Manifold
BACK TO CHAPTER INDEX
TO MODEL INDEX
ISUZU KB P190 2007