service ISUZU TF SERIES 2004 Workshop Manual
[x] Cancel search | Manufacturer: ISUZU, Model Year: 2004, Model line: TF SERIES, Model: ISUZU TF SERIES 2004Pages: 4264, PDF Size: 72.63 MB
Page 2831 of 4264
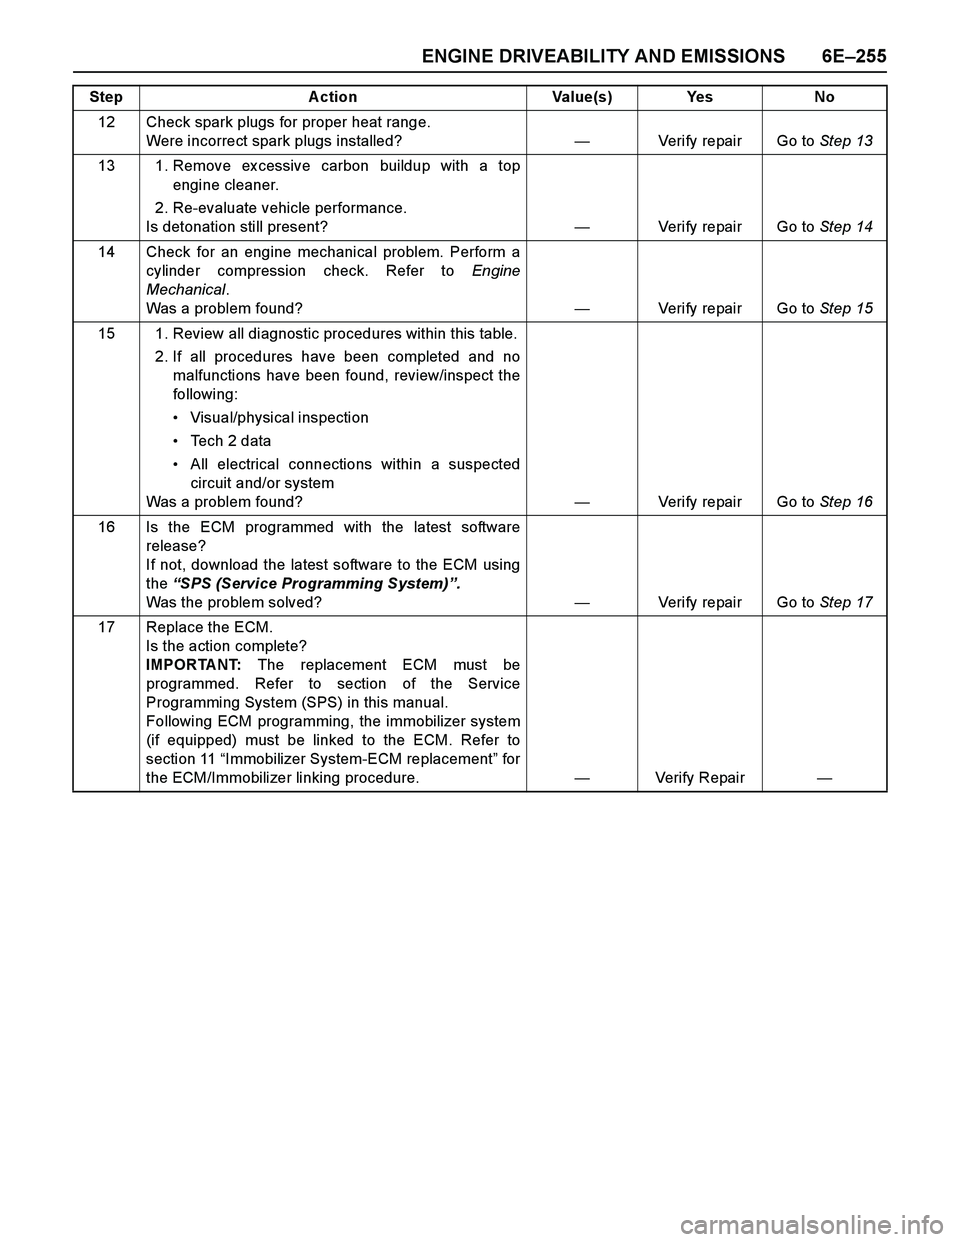
ENGINE DRIVEABILITY AND EMISSIONS 6E–255
12 Check spark plugs for proper heat range.
Were incorrect spark plugs installed?—Verify repair Go to Step 13
13 1. Remove ex cessive carbon buildup with a top
engine cleaner.
2. Re-evaluate vehicle performance.
Is detonation still present?—Verify repair Go to Step 14
14 Check for an engine mechanical problem. Perform a
cylinder compression check. Refer to Engine
Mechanical.
Was a problem found?—Verify repair Go to Step 15
15 1. Review all diagnostic procedures within this table.
2. If all procedures have been completed and no
malfunctions have been found, review/inspect the
followi ng:
Visual/physical inspection
Te c h 2 d a t a
All electrical connections within a suspected
circuit and/or system
Was a problem found?—Verify repair Go to Step 16
16 Is the ECM programmed with the latest software
release?
If not, download the latest software to the ECM using
the “SPS (Service Programming System)”.
Was the problem solved?—Verify repair Go to Step 17
17 Replace the ECM.
Is the action complete?
IMPORTANT: The replacement ECM must be
programmed. Refer to section of the Service
Programming System (SPS) in this manual.
Following ECM programming, the immobilizer system
(if equipped) must be linked to the ECM. Refer to
section 11 “Immobilizer System-ECM replacement” for
the ECM/Immobilizer linking procedure.—Verify Repair— Step Action Value(s) Yes No
Page 2833 of 4264
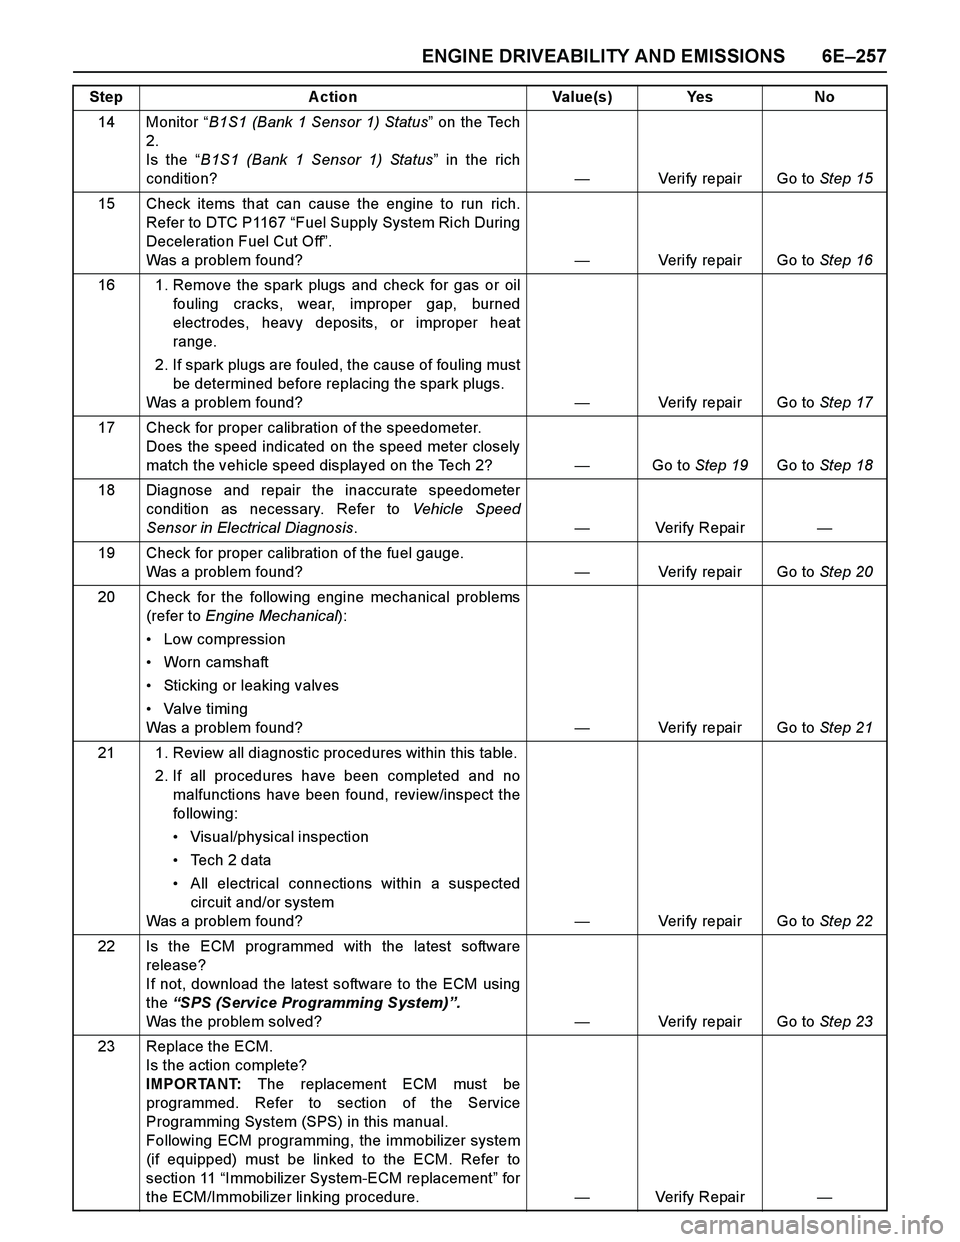
ENGINE DRIVEABILITY AND EMISSIONS 6E–257
14 Monitor “B1S1 (Bank 1 Sensor 1) Status” on the Tech
2.
Is the “B1S1 (Bank 1 Sensor 1) Status” in the rich
condition?—Verify repair Go to Step 15
15 Check items that can cause the engine to run rich.
Refer to DTC P1167 “Fuel Supply System Rich During
Deceleration Fuel Cut Off”.
Was a problem found?—Verify repair Go to Step 16
16 1. Remove the spark plugs and check for gas or oil
fouling cracks, wear, improper gap, burned
electrodes, heavy deposits, or improper heat
range.
2. If spark plugs are fouled, the cause of fouling must
be determined before replacing the spark plugs.
Was a problem found?—Verify repair Go to Step 17
17 Check for proper calibration of the speedometer.
Does the speed indicated on the speed meter closely
match the vehicle speed displayed on the Tech 2?—Go to Step 19Go to Step 18
18 Diagnose and repair the inaccurate speedometer
condition as necessary. Refer to Vehicle Speed
Sensor in Electrical Diagnosis.—Verify Repair—
19 Check for proper calibration of the fuel gauge.
Was a problem found?—Verify repair Go to Step 20
20 Check for the following engine mechanical problems
(refer to Engine Mechanical):
Low compression
Worn camshaft
Sticking or leaking valves
Valve timing
Was a problem found?—Verify repair Go to Step 21
21 1. Review all diagnostic procedures within this table.
2. If all procedures have been completed and no
malfunctions have been found, review/inspect the
followi ng:
Visual/physical inspection
Te c h 2 d a t a
All electrical connections within a suspected
circuit and/or system
Was a problem found?—Verify repair Go to Step 22
22 Is the ECM programmed with the latest software
release?
If not, download the latest software to the ECM using
the “SPS (Service Programming System)”.
Was the problem solved?—Verify repair Go to Step 23
23 Replace the ECM.
Is the action complete?
IMPORTANT: The replacement ECM must be
programmed. Refer to section of the Service
Programming System (SPS) in this manual.
Following ECM programming, the immobilizer system
(if equipped) must be linked to the ECM. Refer to
section 11 “Immobilizer System-ECM replacement” for
the ECM/Immobilizer linking procedure.—Verify Repair— Step Action Value(s) Yes No
Page 2836 of 4264
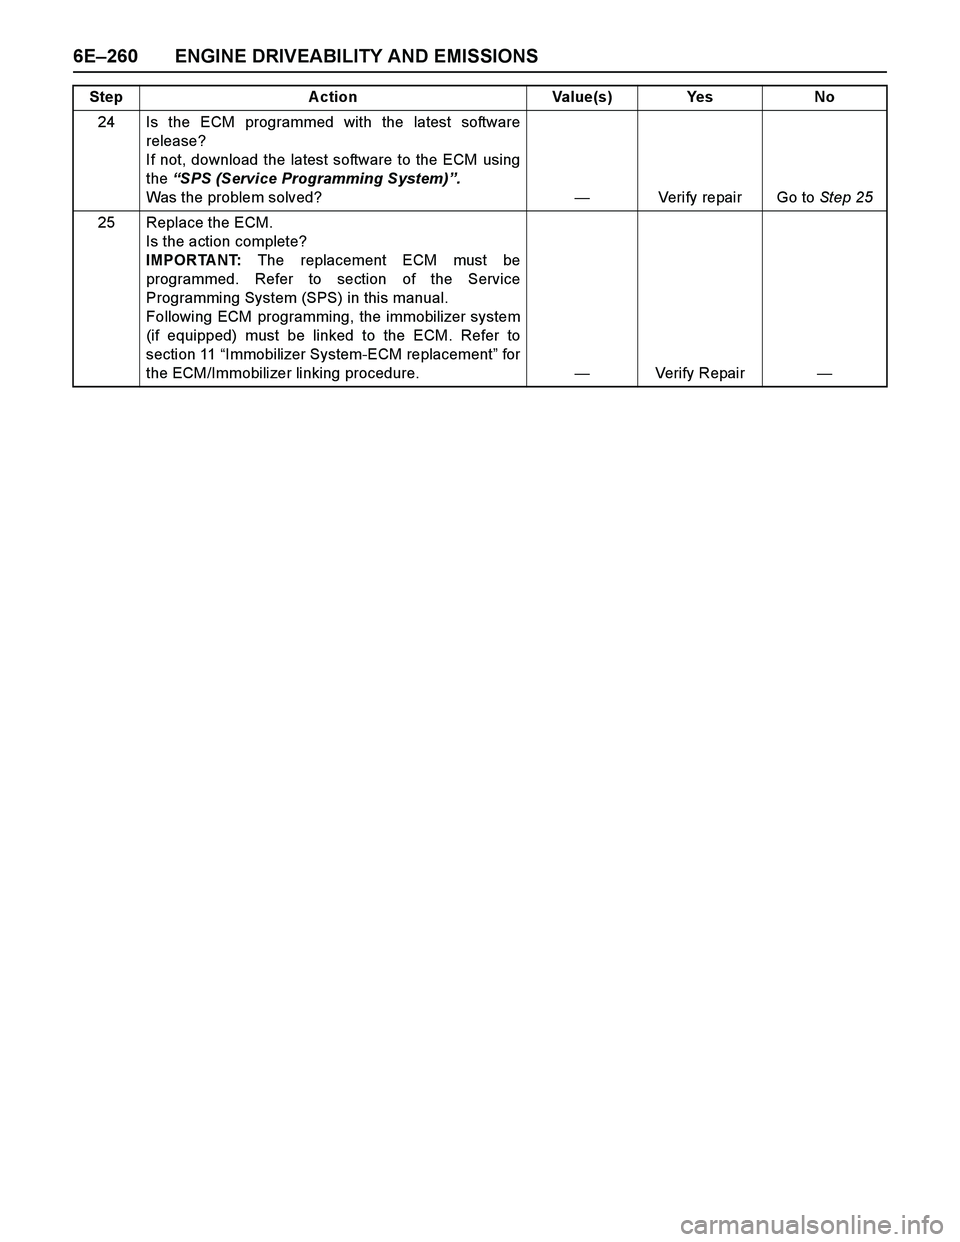
6E–260 ENGINE DRIVEABILITY AND EMISSIONS
24 Is the ECM programmed with the latest software
release?
If not, download the latest software to the ECM using
the “SPS (Service Programming System)”.
Was the problem solved?—Verify repair Go to Step 25
25 Replace the ECM.
Is the action complete?
IMPORTANT: The replacement ECM must be
programmed. Refer to section of the Service
Programming System (SPS) in this manual.
Following ECM programming, the immobilizer system
(if equipped) must be linked to the ECM. Refer to
section 11 “Immobilizer System-ECM replacement” for
the ECM/Immobilizer linking procedure.—Verify Repair— Step Action Value(s) Yes No
Page 2837 of 4264
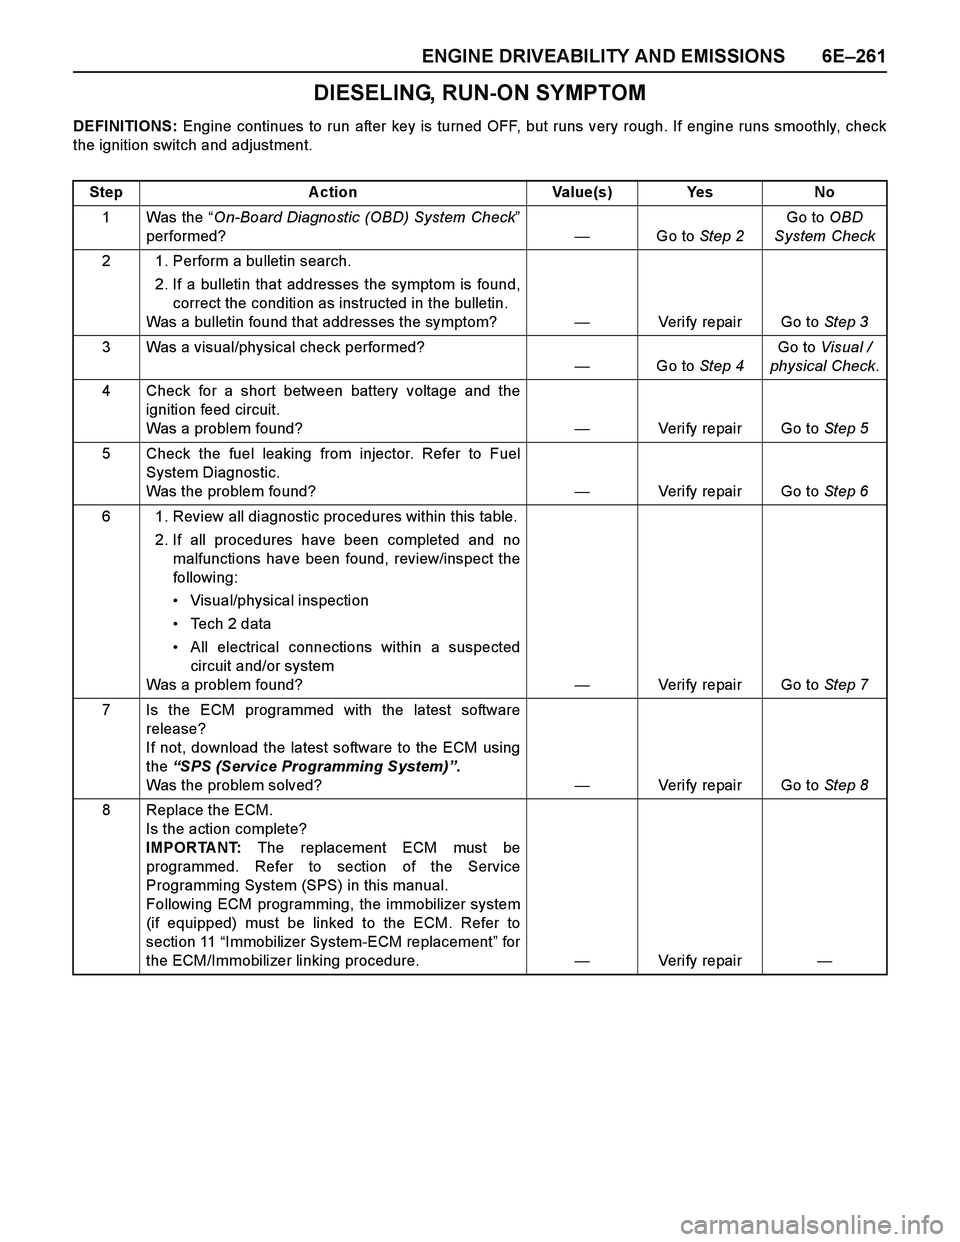
ENGINE DRIVEABILITY AND EMISSIONS 6E–261
DIESELING, RUN-ON SYMPTOM
DEFINITIONS: Engine continues to run after key is turned OFF, but runs very rough. If engine runs smoothly, check
the ignition switch and adjustment.
Step Action Value(s) Yes No
1Was the “On-Board Diagnostic (OBD) System Check”
performed?—Go to Step 2Go to OBD
System Check
2 1. Perform a bulletin search.
2. If a bulletin that addresses the symptom is found,
correct the condition as instructed in the bulletin.
Was a bulletin found that addresses the symptom?—Verify repair Go to Step 3
3 Was a visual/physical check performed?
—Go to Step 4Go to Visual /
physical Check.
4 Check for a short between battery voltage and the
ignition feed circuit.
Was a problem found?—Verify repair Go to Step 5
5 Check the fuel leaking from injector. Refer to Fuel
System Diagnostic.
Was the problem found?—Verify repair Go to Step 6
6 1. Review all diagnostic procedures within this table.
2. If all procedures have been completed and no
malfunctions have been found, review/inspect the
followi ng:
Visual/physical inspection
Te c h 2 d a t a
All electrical connections within a suspected
circuit and/or system
Was a problem found?—Verify repair Go to Step 7
7 Is the ECM programmed with the latest software
release?
If not, download the latest software to the ECM using
the “SPS (Service Programming System)”.
Was the problem solved?—Verify repair Go to Step 8
8 Replace the ECM.
Is the action complete?
IMPORTANT: The replacement ECM must be
programmed. Refer to section of the Service
Programming System (SPS) in this manual.
Following ECM programming, the immobilizer system
(if equipped) must be linked to the ECM. Refer to
section 11 “Immobilizer System-ECM replacement” for
the ECM/Immobilizer linking procedure.—Veri fy repai r—
Page 2839 of 4264
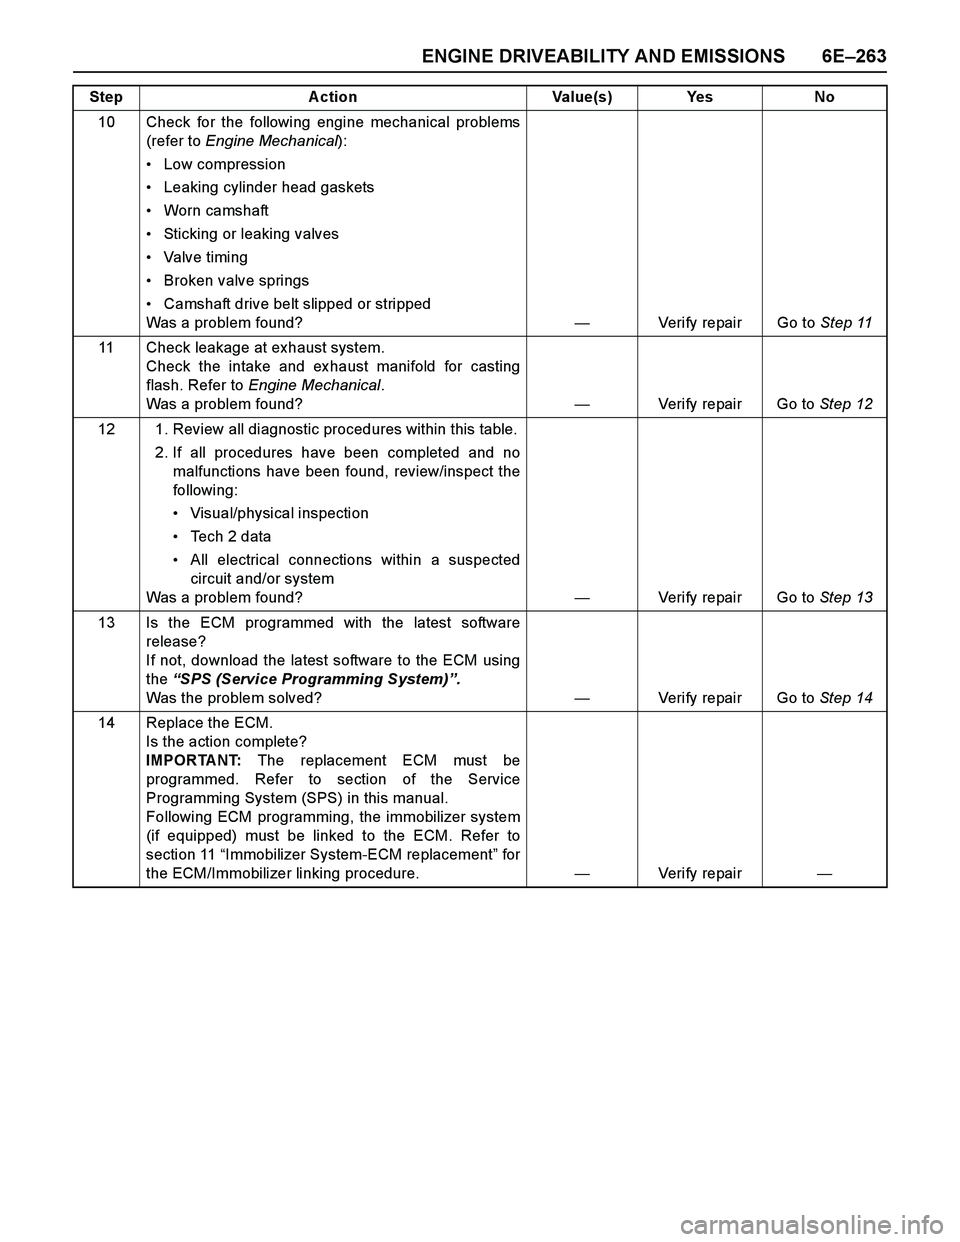
ENGINE DRIVEABILITY AND EMISSIONS 6E–263
10 Check for the following engine mechanical problems
(refer to Engine Mechanical):
Low compression
Leaking cylinder head gaskets
Worn camshaft
Sticking or leaking valves
Valve timing
Broken valve springs
Camshaft drive belt slipped or stripped
Was a problem found?—Verify repair Go to Step 11
11 Check leakage at exhaust system.
Check the intake and ex haust manifold for casting
flash. Refer to Engine Mechanical.
Was a problem found?—Verify repair Go to Step 12
12 1. Review all diagnostic procedures within this table.
2. If all procedures have been completed and no
malfunctions have been found, review/inspect the
followi ng:
Visual/physical inspection
Te c h 2 d a t a
All electrical connections within a suspected
circuit and/or system
Was a problem found?—Verify repair Go to Step 13
13 Is the ECM programmed with the latest software
release?
If not, download the latest software to the ECM using
the “SPS (Service Programming System)”.
Was the problem solved?—Verify repair Go to Step 14
14 Replace the ECM.
Is the action complete?
IMPORTANT: The replacement ECM must be
programmed. Refer to section of the Service
Programming System (SPS) in this manual.
Following ECM programming, the immobilizer system
(if equipped) must be linked to the ECM. Refer to
section 11 “Immobilizer System-ECM replacement” for
the ECM/Immobilizer linking procedure.—Veri fy repai r— Step Action Value(s) Yes No
Page 2840 of 4264
6E–264 ENGINE DRIVEABILITY AND EMISSIONS
ON-VEHICLE SERVICE PROCEDURE
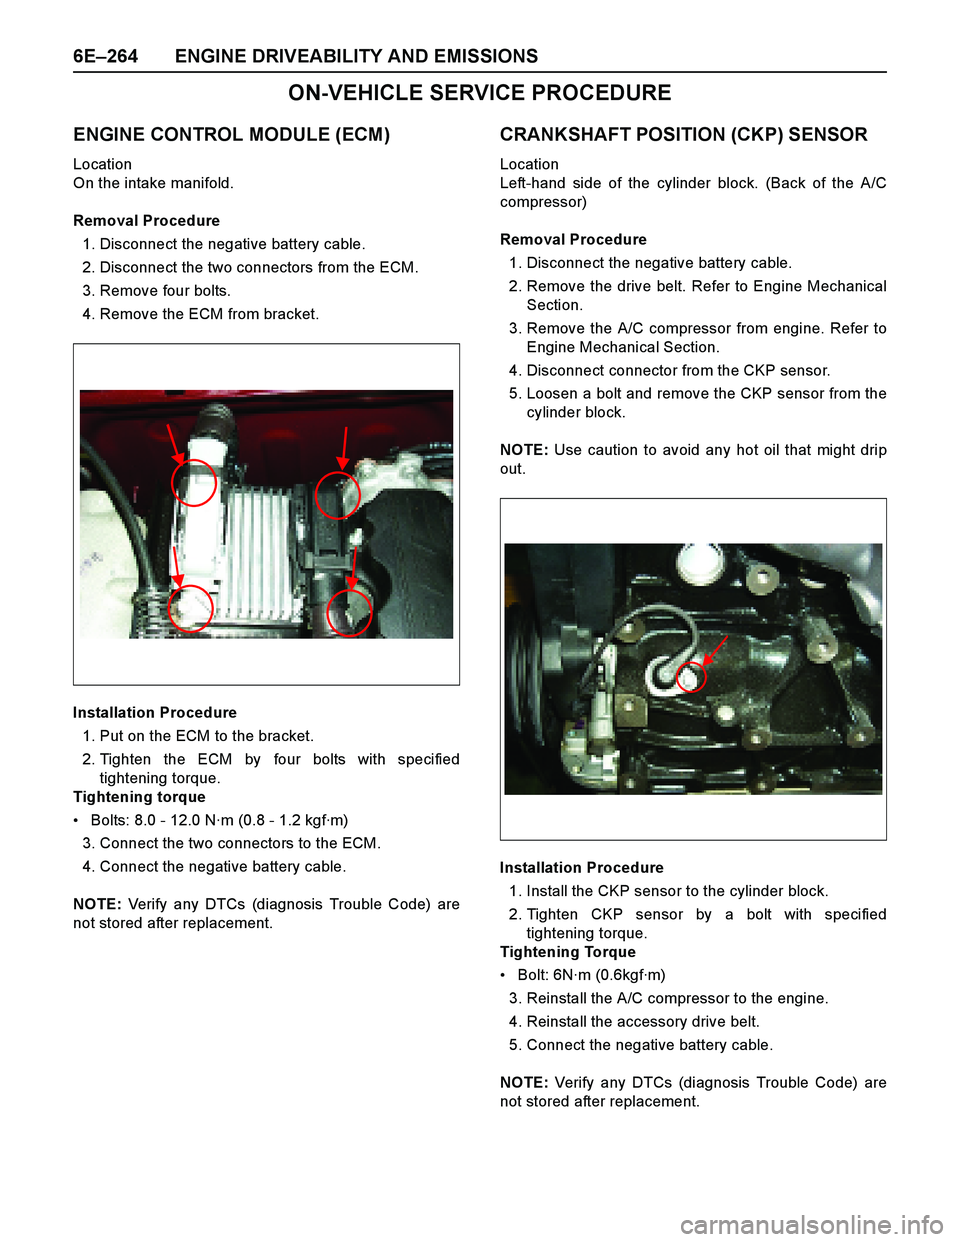
ENGINE CONTROL MODULE (ECM)
Location
On the intake manifold.
Removal Procedure
1. Disconnect the negative battery cable.
2. Disconnect the two connectors from the ECM.
3. Remove four bolts.
4. Remove the ECM from bracket.
Installation Procedure
1. Put on the ECM to the bracket.
2. Tighten the ECM by four bolts with specified
tightening torque.
Tightening torque
Bolts: 8.0 - 12.0 N·m (0.8 - 1.2 kgf·m)
3. Connect the two connectors to the ECM.
4. Connect the negative battery cable.
NOTE: Verify any DTCs (diagnosis Trouble Code) are
not stored after replacement.
CRANKSHAFT POSITION (CKP) SENSOR
Location
Left-hand side of the cylinder block. (Back of the A/C
compressor)
Removal Procedure
1. Disconnect the negative battery cable.
2. Remove the drive belt. Refer to Engine Mechanical
Section.
3. Remove the A/C compressor from engine. Refer to
Engine Mechanical Section.
4. Disconnect connector from the CKP sensor.
5. Loosen a bolt and remove the CKP sensor from the
cylinder block.
NOTE: Use caution to avoid any hot oil that might drip
out.
Installation Procedure
1. Install the CKP sensor to the cylinder block.
2. Tighten CKP sensor by a bolt with specified
tightening torque.
Tightening Torque
Bolt: 6N·m (0.6kgf·m)
3. Reinstall the A/C compressor to the engine.
4. Reinstall the accessory drive belt.
5. Connect the negative battery cable.
NOTE: Verify any DTCs (diagnosis Trouble Code) are
not stored after replacement.
Page 2846 of 4264
6E–270 ENGINE DRIVEABILITY AND EMISSIONS
FUEL PRESSURE RELIEF
Caution: To reduce the risk of fire and personal
injury, it is necessary to relieve the fuel system
pressure before servicing the fuel system
components.
Caution: After relieving the fuel system pressure, a
small amount of fuel may be released when
servicing fuel lines or connections. Reduce the
chance of personal injury by covering the fuel line
fitting with a short towel before disconnecting the
fittings. The towel will absorb any fuel that may leak
out. When the disconnect is completed, place the
towel in an approved container.
1. Remove the fuel filler cap.
2. Remove the fuel pump relay from the underhood
relay box .
3. Start the engine and allow it to stall.
4. Crank the engine for about 30 seconds.
5. Disconnect the negative battery cable.
FUEL RAIL ASSEMBLY
Removal Procedure
NOTE:
Use care when removing the fuel rail assembly in
order to prevent damage to the injector al connector
terminal and the injector spray tips.
Fitting should be capped and holes plugged during
servicing to prevent dirt and other contaminants from
entering open lines and passage.
Important: An eight-digit identification number is
stamped on side of the fuel injector. Refer to this
number when you service the fuel rail or when a
replacement part is required.
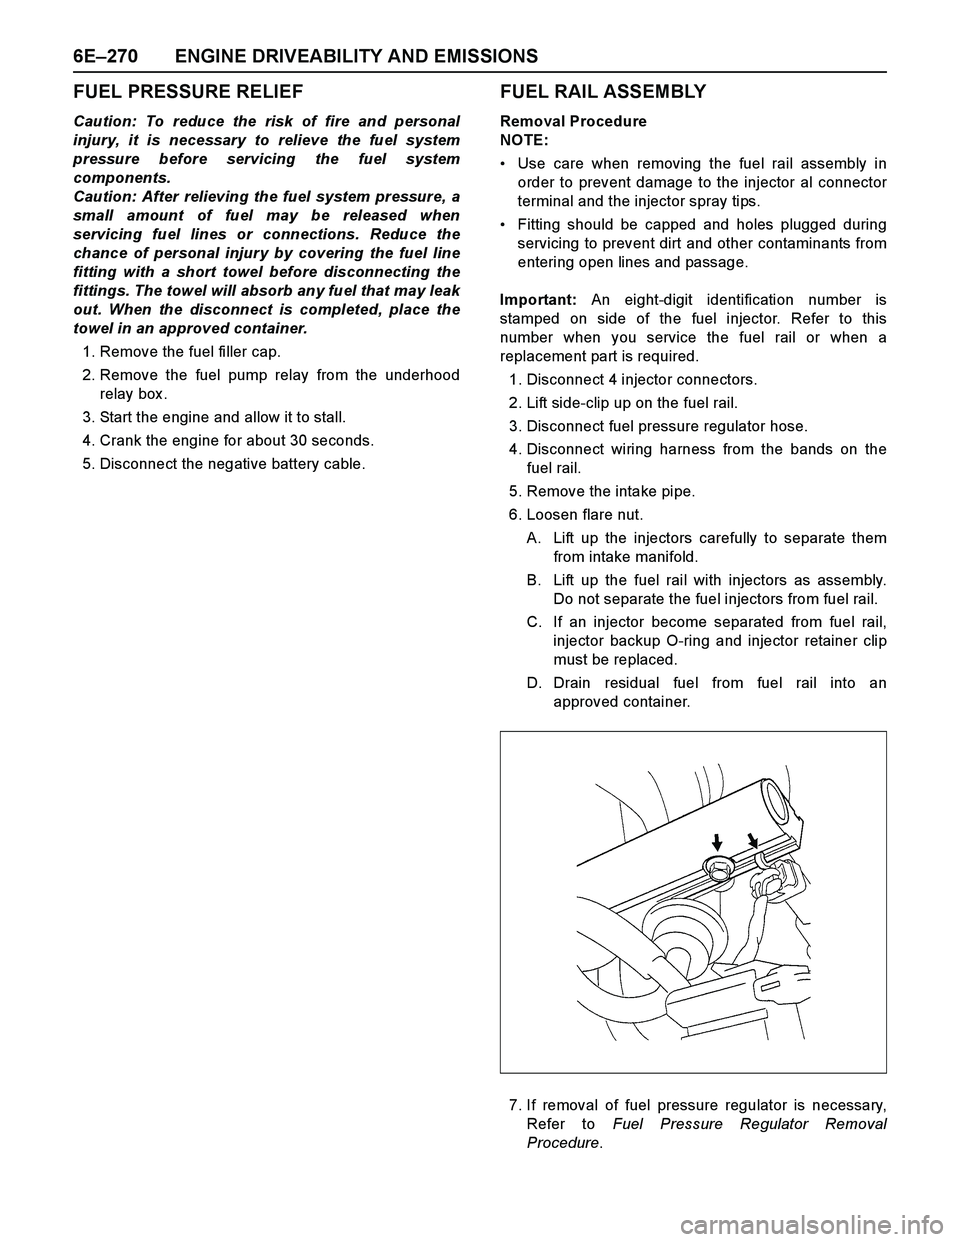
1. Disconnect 4 injector connectors.
2. Lift side-clip up on the fuel rail.
3. Disconnect fuel pressure regulator hose.
4. Disconnect wiring harness from the bands on the
fuel rail.
5. Remove the intake pipe.
6. Loosen flare nut.
A. Lift up the injectors carefully to separate them
from intake manifold.
B. Lift up the fuel rail with injectors as assembly.
Do not separate the fuel injectors from fuel rail.
C. If an injector become separated from fuel rail,
injector backup O-ring and injector retainer clip
must be replaced.
D. Drain residual fuel from fuel rail into an
approved container.
7. If removal of fuel pressure regulator is necessary,
Refer to Fuel Pressure Regulator Removal
Procedure.
Page 2848 of 4264
6E–272 ENGINE DRIVEABILITY AND EMISSIONS
FUEL INJECTOR
Removal Procedure
NOTE: If the fuel injectors are leaking, the engine oil
may be contaminated with fuel. Check the oil for signs
of contamination and change the oil and filter if
necessary.
NOTE: Use care in removing the fuel injector in order to
prevent damage to the fuel injector al connector pins or
fuel injector nozzles. The fuel injector is an al
component and should not be immersed in any type of
cleaner as this may damage the fuel injector.
Important: Fuel injectors are serviced as complete
assembly only.
1. Disconnect the negative battery cable.
2. Disconnect al connector from fuel injector.
3. Remove the fuel rail. Refer to Fuel Rail Removal
Procedure.
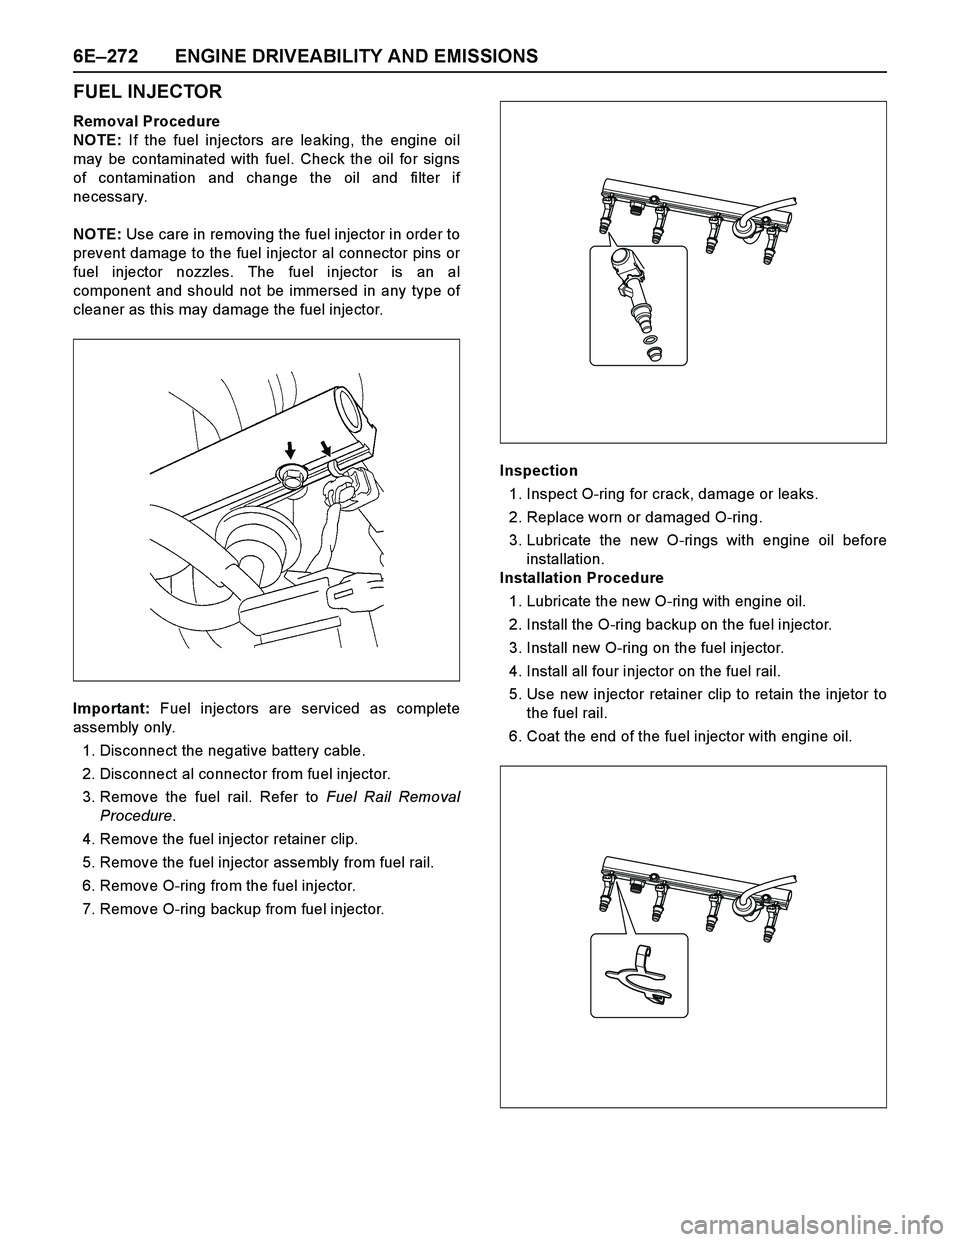
4. Remove the fuel injector retainer clip.
5. Remove the fuel injector assembly from fuel rail.
6. Remove O-ring from the fuel injector.
7. Remove O-ring backup from fuel injector.Inspection
1. Inspect O-ring for crack, damage or leaks.
2. Replace worn or damaged O-ring.
3. Lubricate the new O-rings with engine oil before
installation.
Installation Procedure
1. Lubricate the new O-ring with engine oil.
2. Install the O-ring backup on the fuel injector.
3. Install new O-ring on the fuel injector.
4. Install all four injector on the fuel rail.
5. Use new injector retainer clip to retain the injetor to
the fuel rail.
6. Coat the end of the fuel injector with engine oil.
Page 2855 of 4264
ENGINE DRIVEABILITY AND EMISSIONS 6E–279
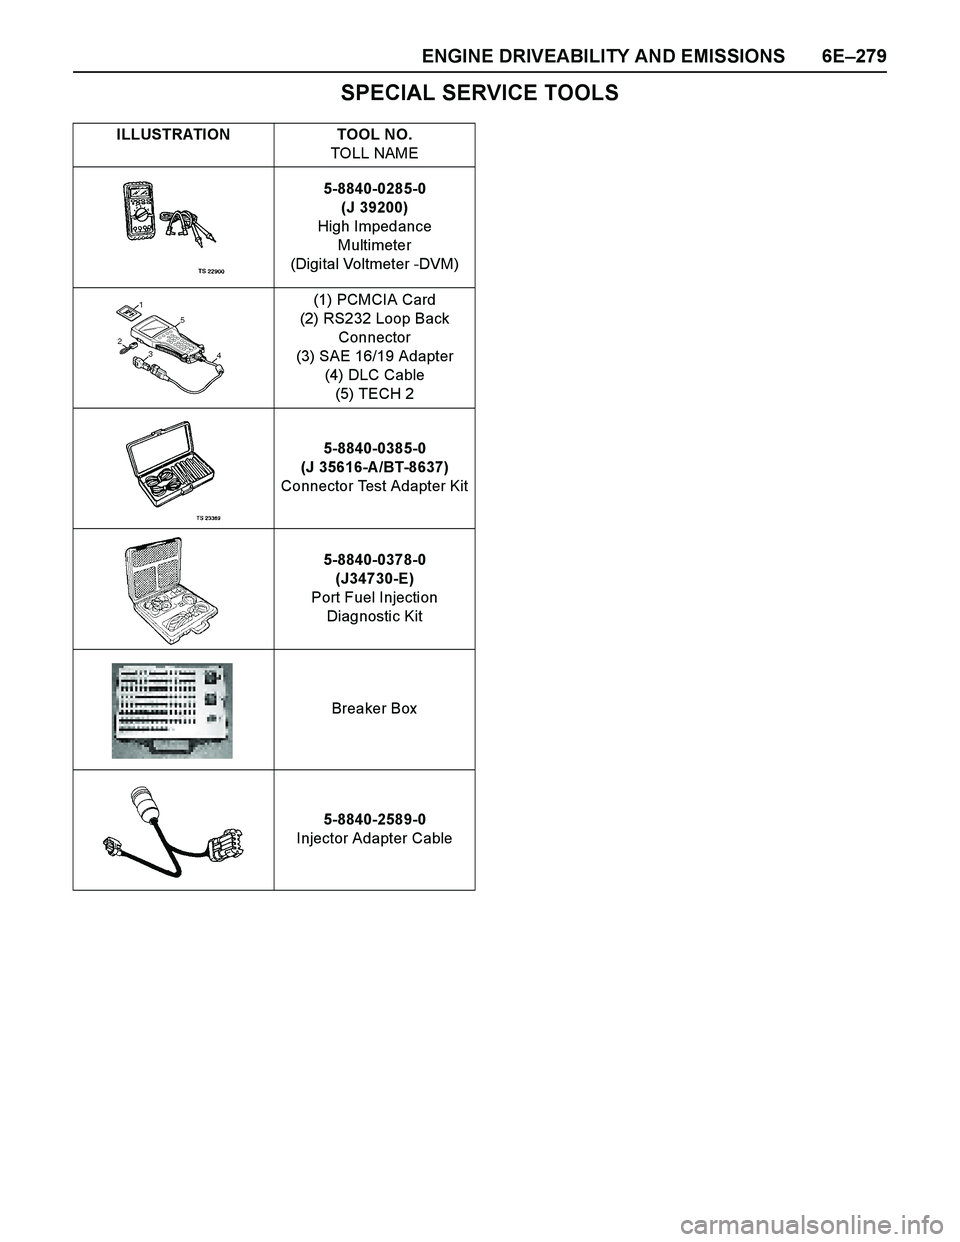
SPECIAL SERVICE TOOLS
ILLUSTRATION TOOL NO.
TOLL NAME
5-8840-0285-0
(J 39200)
High Impedance
Multimeter
(Digital Voltmeter -DVM)
(1) PCMCIA Card
(2) RS232 Loop Back
Connector
(3) SAE 16/19 Adapter
(4) DLC Cable
(5) TECH 2
5-8840-0385-0
(J 35616-A /BT-8637)
Connector Test Adapter Kit
5-8840-0378-0
(J34730-E)
Port Fuel Injection
Diagnostic Kit
Breaker Box
5-8840-2589-0
Injector Adapter Cable
Page 2857 of 4264
ENGINE EXHAUST 6F-1
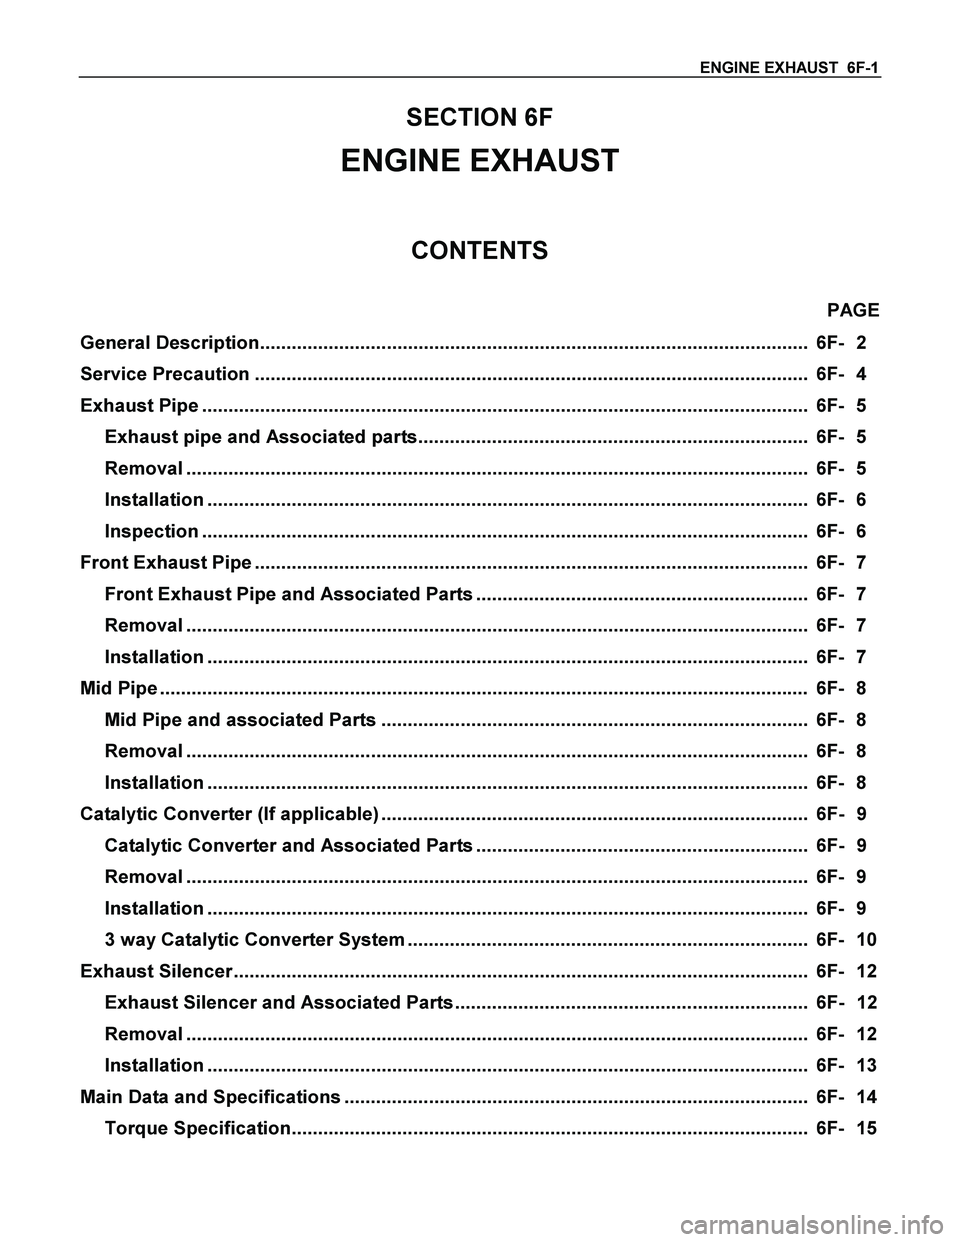
SECTION 6F
ENGINE EXHAUST
CONTENTS
PAGE
General Description........................................................................................................ 6F- 2
Service Precaution ......................................................................................................... 6F- 4
Exhaust Pipe ................................................................................................................... 6F- 5
Exhaust pipe and Associated parts.......................................................................... 6F- 5
Removal ...................................................................................................................... 6F- 5
Installation .................................................................................................................. 6F- 6
Inspection ................................................................................................................... 6F- 6
Front Exhaust Pipe ......................................................................................................... 6F- 7
Front Exhaust Pipe and Associated Parts ............................................................... 6F- 7
Removal ...................................................................................................................... 6F- 7
Installation .................................................................................................................. 6F- 7
Mid Pipe ........................................................................................................................... 6F- 8
Mid Pipe and associated Parts ................................................................................. 6F- 8
Removal ...................................................................................................................... 6F- 8
Installation .................................................................................................................. 6F- 8
Catalytic Converter (If applicable) ................................................................................. 6F- 9
Catalytic Converter and Associated Parts ............................................................... 6F- 9
Removal ...................................................................................................................... 6F- 9
Installation .................................................................................................................. 6F- 9
3 way Catalytic Converter System ............................................................................ 6F- 10
Exhaust Silencer ............................................................................................................. 6F- 12
Exhaust Silencer and Associated Parts ................................................................... 6F- 12
Removal ...................................................................................................................... 6F- 12
Installation .................................................................................................................. 6F- 13
Main Data and Specifications ........................................................................................ 6F- 14
Torque Specification.................................................................................................. 6F- 15