window ISUZU TFS SERIES 1997 User Guide
[x] Cancel search | Manufacturer: ISUZU, Model Year: 1997, Model line: TFS SERIES, Model: ISUZU TFS SERIES 1997Pages: 1600, PDF Size: 40.98 MB
Page 471 of 1600

CAB 10-17
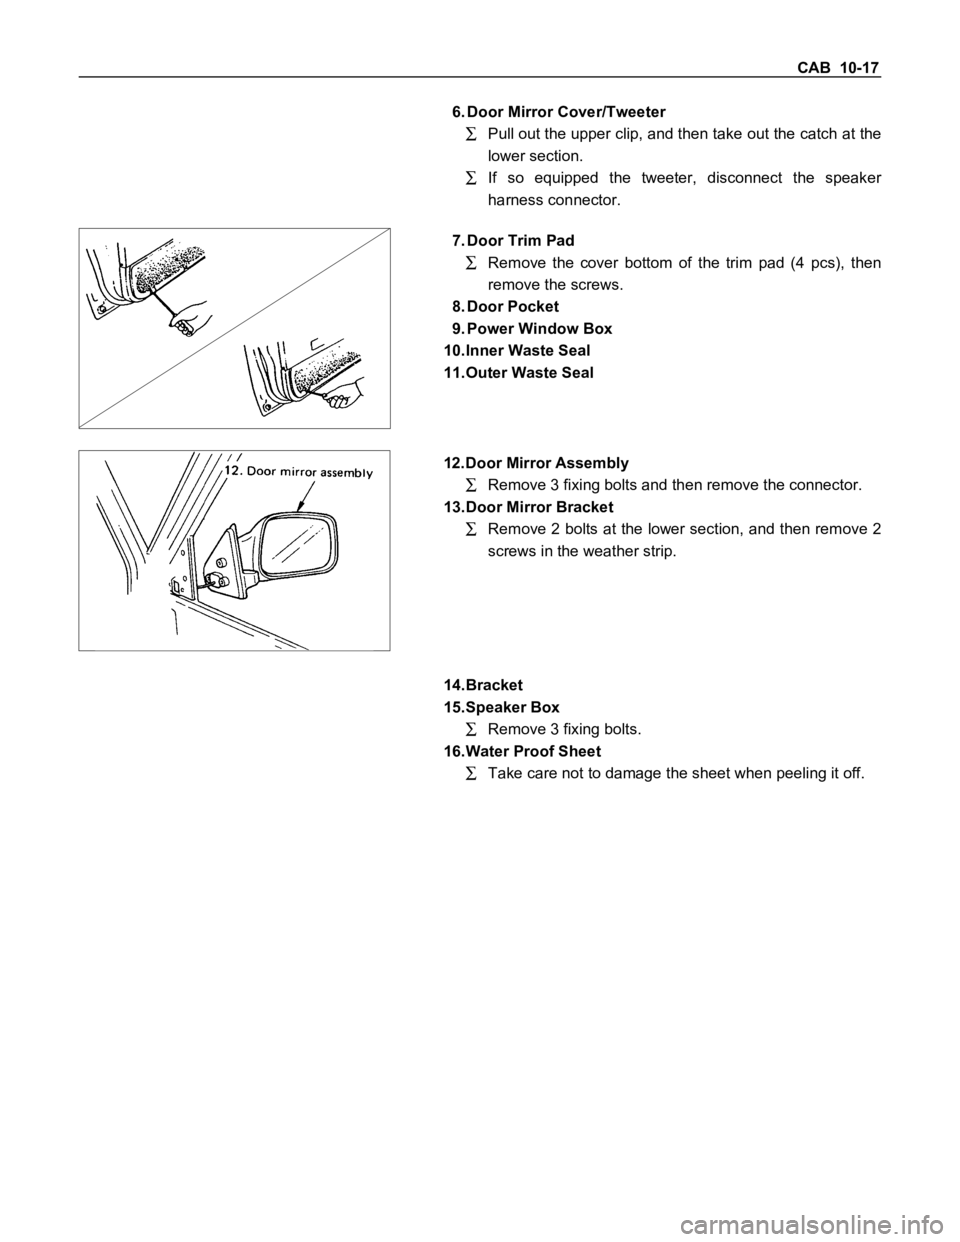
6. Door Mirror Cover/Tweeter
Pull out the upper clip, and then take out the catch at the
lower section.
If so equipped the tweeter, disconnect the speaker
harness connector.
7. Door Trim Pad
Remove the cover bottom of the trim pad (4 pcs), then
remove the screws.
8. Door Pocket
9. Power Window Box
10.Inner Waste Seal
11.Outer Waste Seal
12.Door Mirror Assembly
Remove 3 fixing bolts and then remove the connector.
13.Door Mirror Bracket
Remove 2 bolts at the lower section, and then remove 2
screws in the weather strip.
14.Bracket
15.Speaker Box
Remove 3 fixing bolts.
16.Water Proof Sheet
Take care not to damage the sheet when peeling it off.
Page 472 of 1600

10-18 CAB
17.Window Glass
Remove 2 screws through the access hole and pull out
the window glass upward.
18.Window Regulator/Power Window Motor
Disconnect the power window motor connector.
19.Glass Run
Pull it out of the door piller of the channel. (front/rear)
20.Glass Run Rear Channel
Remove 2 screws.
21.Inside Lever
22.Door Lock Assembly/Door Lock Actuator
Disconnect the linkage with the outside handle, the
inside lever and the lock cylinder.
23.Glass Run Front Channel
24.Door Lock Cylinder
Remove the door lock cylinder by applying finger
pressure from inside while depressing the retaining clip.
25.Outside Handle
Page 473 of 1600

CAB 10-19
DISASSEMBLY AND REASSEMBLY
(Rear Door)
3
2
910 181219 13
1716
15 14
6
5 4 1611
7
68
Disassembly Steps
1.Power window switch/Window regurator
handle
2. Speaker grill
3. Speaker
4. Bezel
5. Inside pull handole
6. Door trim pad
7. Arm rest sm
8. Bracket
9. Water proof sheet
10. Glass guide
11. Upper cover
12. Window regurator/Power window motor
13. Window glass
14. Bracket15. Inside lever
16. Outside handle
17. Door lock cylinder
18. Outer waste seal
19. Glass run
Reassembly Steps
To reassemble, follow the disassembly steps
in the reverse order.
Page 474 of 1600

10-20 CAB
Important Operations
1. Window Regulator Handle
To remove the regulator handle, remove the clip at the
root of the handle by using wire.
4. Bezel
Remove the screw while pulling the inside lever toward
you.
6. Door Trim Pad
Remove the cover bottom of the trim pad (4 pcs), then
remove the screws.
12.Window Regulator
Remove the 4 screws holding the regulator.
Page 475 of 1600

CAB 10-21
13.Window Glass
First, align the height of regulator to the access hole.
Remove 2 screws attaching bottom channel and
regulator, then remove the glass.
Remove the window glass by tilting it as necessary.
17.Door Lock Assembly
Disconnect the linkage from the door outside handle,
inside lever and lock cylinder.
Remove the 2 bolts holding the outside handle from
inner side.
Remove the 3 bolts holding the door lock assembly.
Page 477 of 1600

CAB 10-23
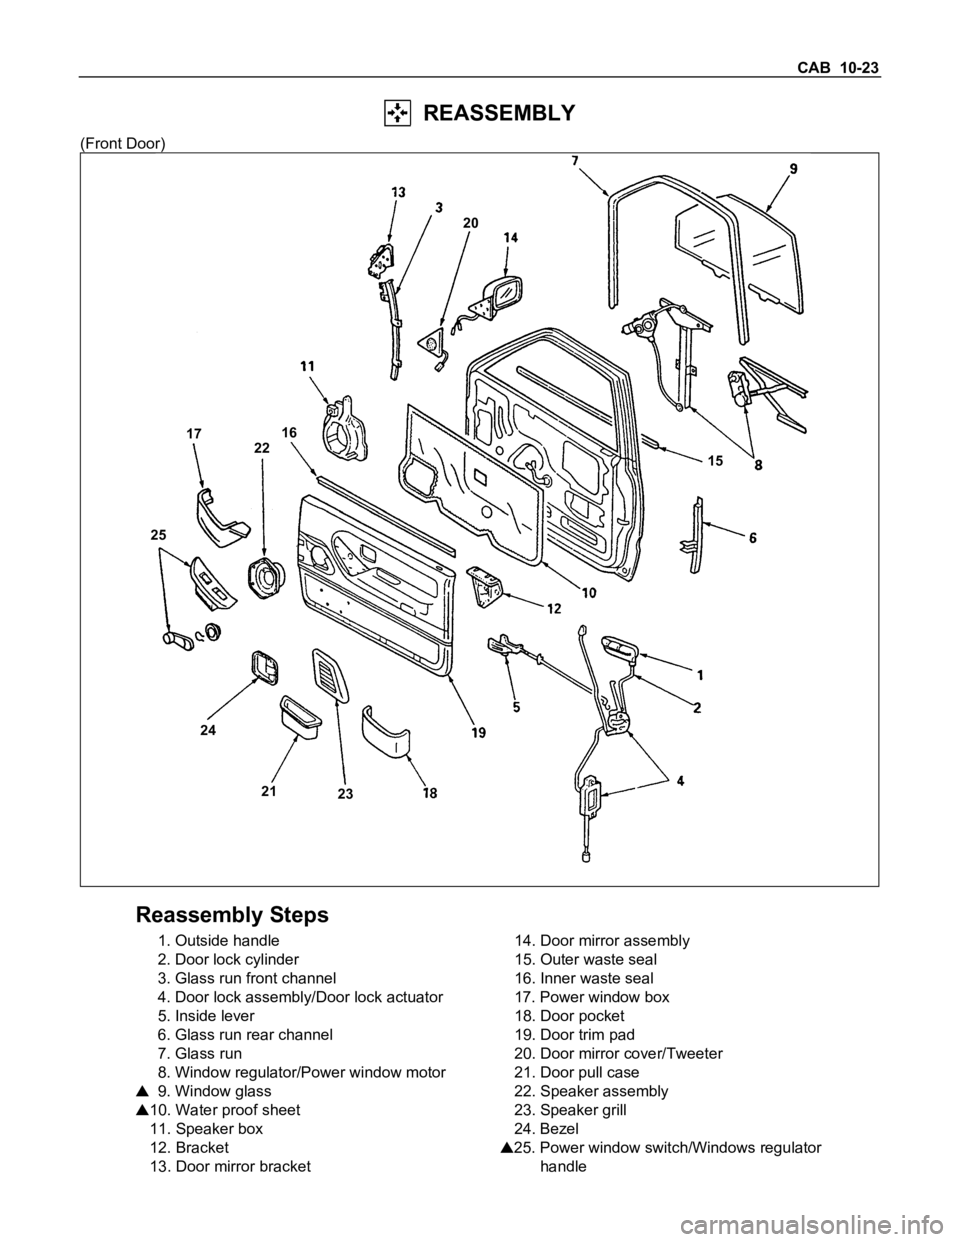
REASSEMBLY
(Front Door)
15
23 21 24 2522 171620
Reassembly Steps
1. Outside handle
2. Door lock cylinder
3. Glass run front channel
4. Door lock assembly/Door lock actuator
5. Inside lever
6. Glass run rear channel
7. Glass run
8. Window regulator/Power window motor
9. Window glass
10. Water proof sheet
11. Speaker box
12. Bracket
13. Door mirror bracket14. Door mirror assembly
15. Outer waste seal
16. Inner waste seal
17. Power window box
18. Door pocket
19. Door trim pad
20. Door mirror cover/Tweeter
21. Door pull case
22. Speaker assembly
23. Speaker grill
24. Bezel
25. Power window switch/Windows regulator
handle
Page 478 of 1600

10-24 CAB
Important Operations
9.Window Glass
Insert the window glass into position by tilting it as
necessary, then set it against the channel of the window
regulator.
Attach the window glass to the window regulator with the
two screws.
10.Water Proof Sheet
Place the butyl type on the door panel so as not to cover
the drain hole.
25.Regulator Handle
Install the regulator handle as illustrated when closing
the window glass.
Page 498 of 1600

CAB 10-1
SECTION 10
CAB
TABLE OF CONTENTS
PAGE
Servicing<0011001100110011001100110011001100110011001100110011001100110011001100110011001100110011001100110011001100110011001100110011001100110011001100110011001100110011001100110011001100110011001100110011001100
11001100110011[<0011001100110011001100110011001100110011001100110011001100110011001100110011001100110011001100110011001100110011001100110011001100110011001100110011001100110011001100110011001100110011001100110011001100
11001100110011001100110011001100110011001100110011[........ 10- 2
Windshield and Back Light Glasses ................................................................................ 10- 3
Sliding Rear Window Assembly ....................................................................................... 10- 8
Doors .................................................................................................................................. 10- 12
Instrument Panel...............................................<0011001100110011001100110011001100110011001100110011001100110011001100110011001100110011001100110011001100110011001100110011001100110011001100110011001100110011001100110011001100110011001100110011001100
11001100110011001100110011001100110011001100110011[.. 10- 26
Console Box ....................................................................................................................... 10- 31
Head Lining ........................................................................................................................ 10- 33
Quarter Glass (Space Cab) ............................................................................................... 10- 36
Front Seat ........................................................................................................................... 10- 37
Front and Rear Seat Belt ................................................................................................... 10-39
<002d005800500053000300360048004400570011001100110011001100110011001100110011001100110011001100110011001100110011001100110011001100110011001100110011001100110011001100110011001100110011001100110011001100
11001100110011001100110011001100110011001100110011[<0011001100110011001100110011001100110011001100110011001100110011001100110011001100110011001100110011001100110011001100110011001100110011001100110011001100110011001100110011001100110011001100110011001100
11001100110011001100110011001100110011001100110011[...... 10- 40
Jump Seat Belt .................................................<0011001100110011001100110011001100110011001100110011001100110011001100110011001100110011001100110011001100110011001100110011001100110011001100110011001100110011001100110011001100110011001100110011001100
11001100110011001100110011001100110011001100110011[... 10- 41
INDEX
Page 502 of 1600

CAB 10-5
Important Operation - Removal
6. Windshield Glass
Remove the windshield glass, carefully following the steps
listed below :
1) Use a knife to cut through part of the adhesive caulking
material.
2) Secure one end of a piece of steel piano wire (0.02 inches
in diameter) to a piece of wood that can serve as a handle.
3) Use a pair of needle nose pliers to insert the other end of
the piano wire through the adhesive caulking material at the
edge of the windshield glass.
4) Secure the other end of the piano wire to another piece of
wood.
5) W ith the aid of an assistant, carefully move the piano wire
with a sawing motion to cut through the adhesive caulking
material around the entire circumferance of the windshield
glass.
6) Lift the windshield from the body.
7) Clean any remaining adhesive caulking material from the
area of the body which holds the windshield.
8) Use a soft rag and unleaded gasoline to wipe off any
adhesive remaining on the windshield glass.
Important Operations - Installation
7. Engine Hood Rear Seal
Install the engine hood rear seal as shown in the illustration.
1 : Seal
2 : Clip
3 : Rear (windshield glass side)
4 : Front
6. Windshield Glass
1) Clean the windshield glass bonding surface.
2) Use a soft rag and unleaded gasoline to wipe off any
adhesive remaining on the body.
3) Mount the body window glass as shown in the illustration.
Attach spacers at seven (7) locations.
Page 503 of 1600

10-6 CAB
4) Apply primer 1 #435-95 or equivalent to the body side
bonding surface. The primer should extend 25 mm (1 in.).
Apply primer #435-40 or equivalent to the windshield glass
side bonding surface.
The primer should extend 15 mm (0.6 in.) from end of the
glass.
Apply the window glass sealing adhesive 2.
If you are using an air gun, air pressure should be maintained
at 147 - 294 kpa.
Note :
Open time (1 min. or more) should be set after application
of the primer.
Bonding shall be done within 5 minutes after the sealer
has been applied.
Adjust the setting of the windshield glass with suction discs.
The center of the windshield glass should be in alignment with
the center of the windshield glass opening.
The clearance between body and upper moulding should be
within 0.5 mm (A).
Both of the clearance for RH and LH should be same. (6 mm
2 mm)
Note:
It is a good idea to perform the windshield installation
procedure from beginning to end without pausing. If you
allow time to elapse between steps, excessive amounts of
adhesive may be extruded from around the windshield.