ABS ISUZU TROOPER 1995 Workshop Manual
[x] Cancel search | Manufacturer: ISUZU, Model Year: 1995, Model line: TROOPER, Model: ISUZU TROOPER 1995Pages: 1928
Page 1531 of 1928
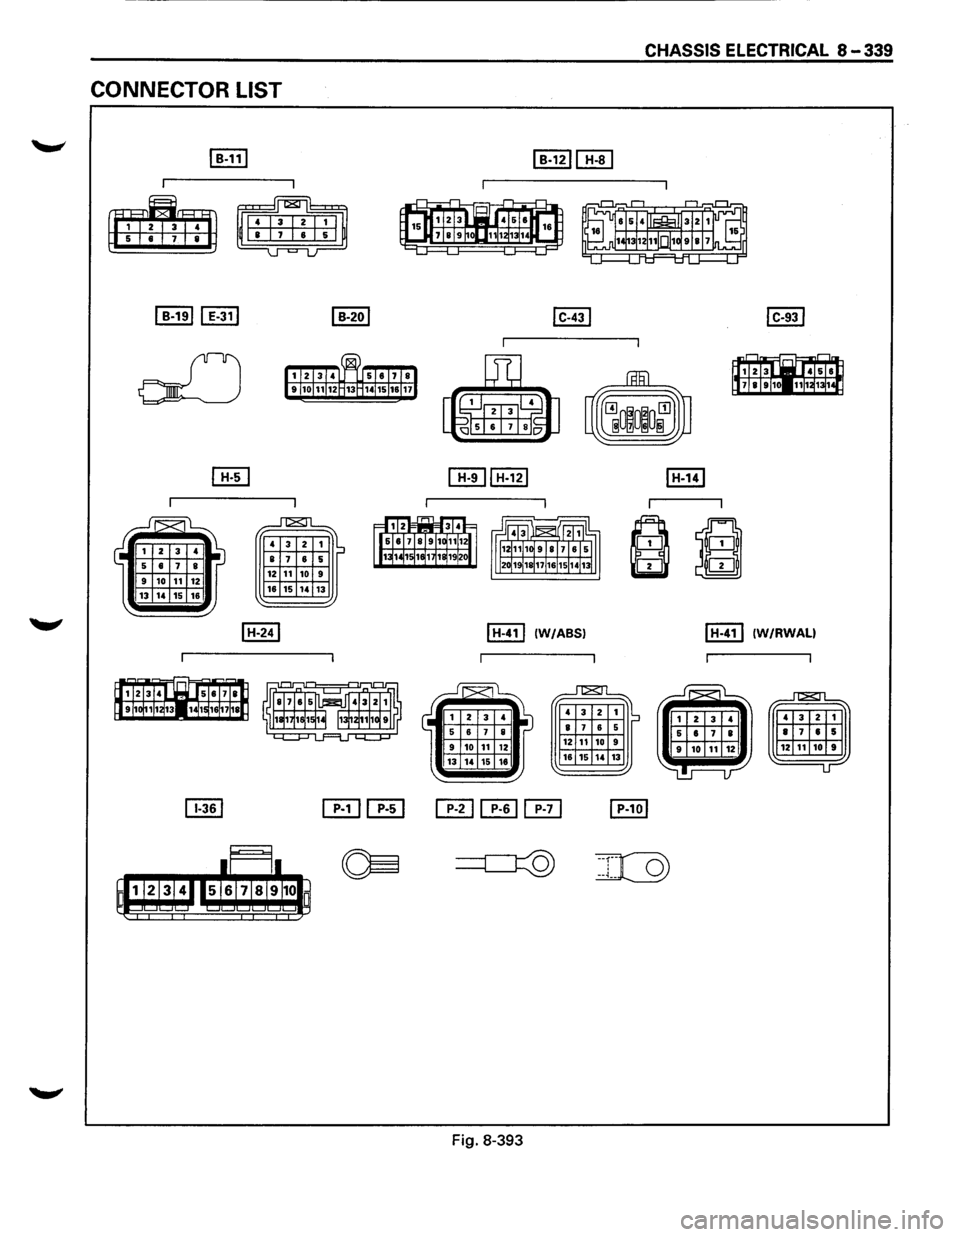
CONNECTOR LIST
12 11 10 16 15 ,. 13
I H-411 (W/ABSI
Fig. 8-393
12 11 10 9 16 15 ,, 13
CHASSIS ELECTRICAL 8-339
I H-411 (W/RWALI
Page 1627 of 1928
Supplemental Restraint System 9J-3
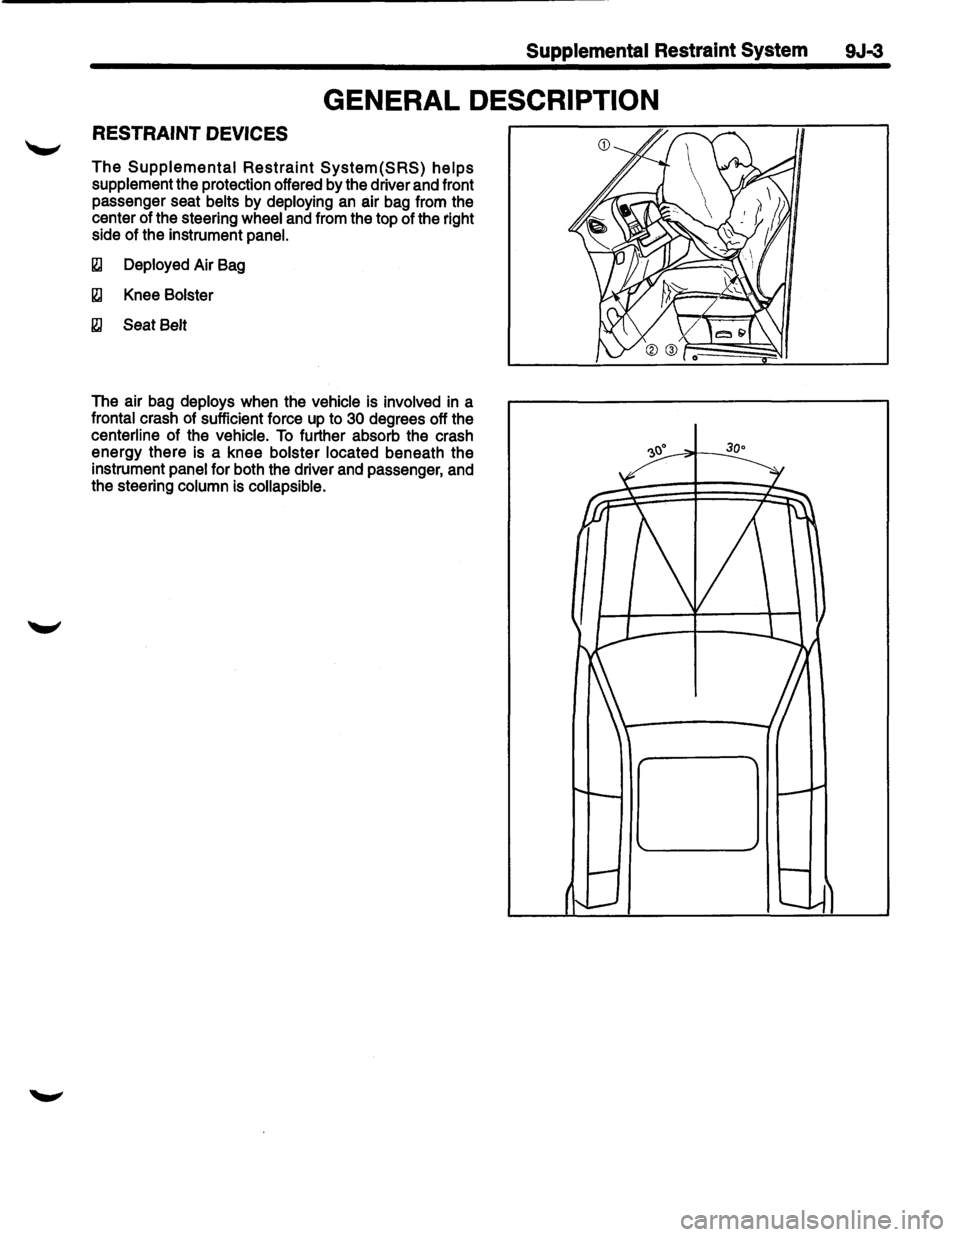
GENERAL DESCRIPTION
RESTRAINT DEVICES
The Supplemental Restraint System(SRS) helps
supplement the protection offered by the driver and front
passenger seat
belts by deploying an air bag from the
center of the steering
wheel and from the top of the right
side of the instrument
panel.
~ Deployed Air Bag
~ Knee Bolster
~ Seat Belt
The air bag deploys when the vehicle is involved in a
frontal crash of sufficient force up to 30 degrees off the
centerline of the vehicle. To further absorb the crash
energy there is a knee
bolster located beneath the
instrument
panel for both the driver and passenger, and
the steering
column is collapsible.
Page 1631 of 1928
SRS COIL ASSEMBLY
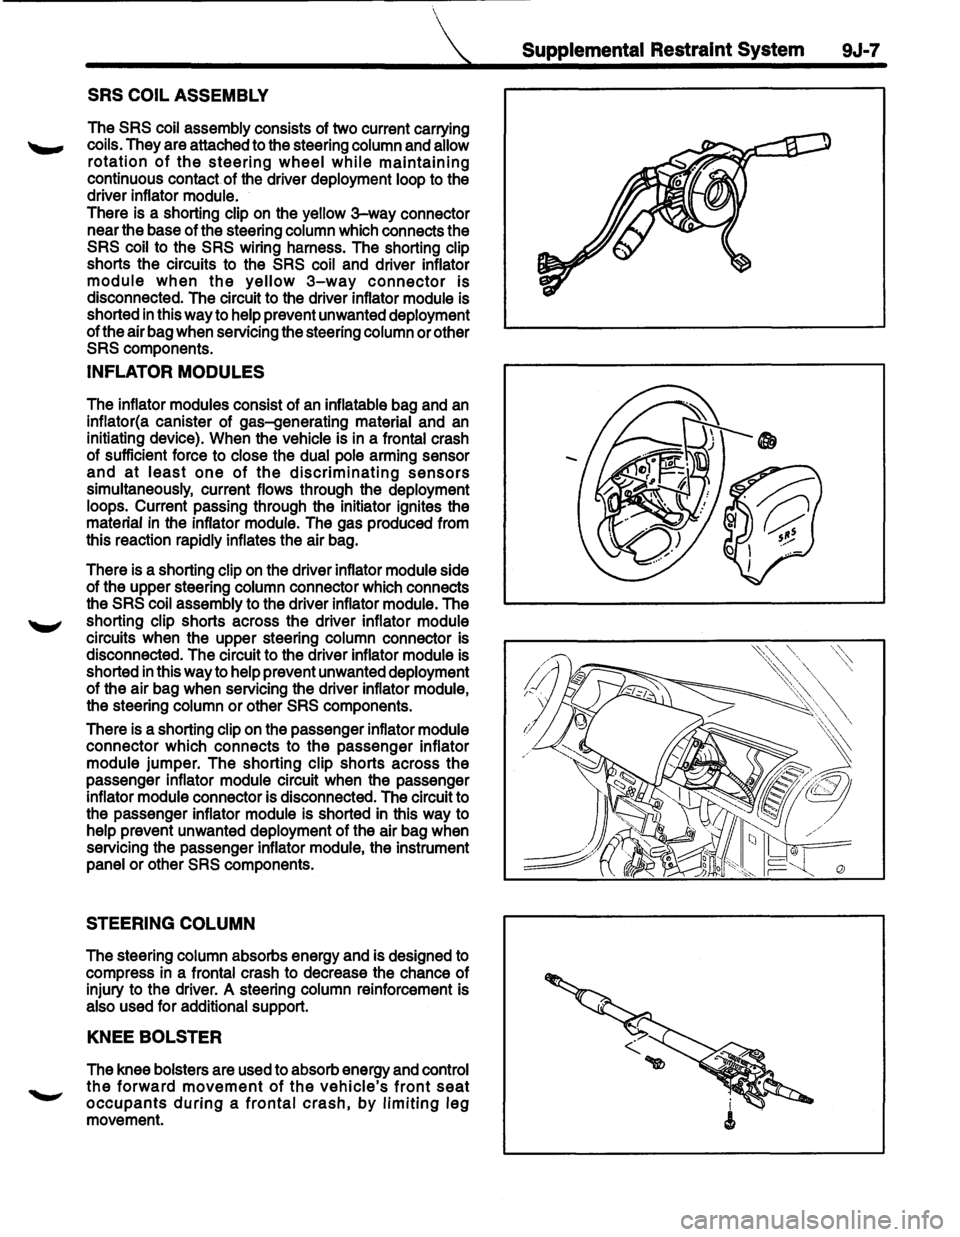
The SRS coil assembly consists of two current carrying
coils. They are attached to the steering column and allow
rotation of the steering wheel while maintaining
continuous contact of the driver deployment loop to the
driver inflator module.
There is a shorting clip on the yellow
3-way connector
near the base of the steering column which connects the
SRS coil to the SRS wiring harness. The shorting clip
shorts the circuits to the
SRS coil and driver inflator
module when the yellow 3-way connector is
disconnected. The circuit to the driver inflator module is
shorted
in this way to help prevent unwanted deployment
of the air bag when servicing the steering column or other
SRS components.
INFLATOR MODULES
The inflator modules consist of an inflatable bag and an
inflator(a canister of gas-generating material and an
initiating device). When the vehicle is in a frontal crash
of sufficient force to close the dual pole arming sensor
and at least one of the discriminating sensors
simultaneously, current flows through the deployment
loops. Current passing through the initiator ignites the
material
in the inflator module. The gas produced from
this reaction rapidly inflates the air bag.
There is a shorting clip
on the driver inflator module side
of the upper steering column connector which connects
the
SRS coil assembly to the driver inflator module. The
shorting clip shorts across the driver inflator module
circuits when the upper steering column connector is
disconnected. The circuit to the driver inflator module is
shorted
in this way to help prevent unwanted deployment
of the air bag when servicing the driver inflator module,
the steering column
or other SRS components.
There is a shorting clip on the passenger inflator module
connector which connects to the passenger inflator
module jumper. The shorting clip shorts across the
passenger inflator module circuit when the passenger
inflator module connector is disconnected. The circuit to
the passenger inflator module is shorted in this way to
help prevent unwanted deployment of the air bag when
servicing the passenger inflator module, the instrument
panel or other
SRS components.
STEERING COLUMN
The steering column absorbs energy and is designed to
compress in a frontal crash to decrease the chance of
injury to the driver. A steering column reinforcement is
also used for additional support.
KNEE BOLSTER
The knee bolsters are used to absorb energy and control
the forward movement of the vehicle's front seat
occupants during a frontal crash, by limiting leg
movement.
Supplemental Restraint System 9J-7
Page 1749 of 1928
Supplemental Restraint System 9J-125
STEERING WHEEL
WARNING: SAFETY PRECAUTIONS MUST BE FOLLOWED WHEN HANDLING A DEPLOYED INFLATOR
MODULE(AIR BAG). AFTER DEPLOYMENT, THE INFLATOR MODULE(AIR BAG) SURFACE MAY CONTAIN A
SMALL AMOUNT OF SODIUM HYDROXIDE, A BY-PRODUCT OF THE DEPLOYMENT REACTION, THAT IS
IRRITATING TO
THE SKIN AND EYES. MOST OF THE POWDER ON THE INFLATOR MODULE (AIR BAG )IS
HARMLESS.
AS A PRECAUTION, WEAR GLOVES AND SAFETY GLASSES WHEN HANDLING A DEPLOYED
INFLATOR MODULE (AIR BAG ), AND WASH YOUR HANDS WITH MILD SOAP AND WATER AFTERWARDS.
WARNING: WHEN CARRYING A LIVE INFLATOR MODULE (AIR BAG ), MAKE SURE THE BAG AND TRIM
COVER
ARE POINTED AWAY FROM YOU. NEVER CARRY INFLATOR MODULE (AIR BAG )BY THE WIRES OR
CONNECTOR ON
THE UNDERSIDE OF MODULE. IN THE CASE OF AN ACCIDENTAL DEPLOYMENT, THE BAG
WILL THEN DEPLOY WITH MINIMAL CHANCE OF INJURY. WHEN PLACING A LIVE INFLATOR MODULE (AIR
BAG ) ON A BENCH OR OTHER SURFACE, ALWAYS FACE BAG AND TRIM COVER UP, AWAY FROM THE
SURFACE.NEVER
REST A STEERING COLUMN ASSEMBLY ON THE STEERING WHEEL WITH THE INFLATOR
MODULE (AIR BAG ) FACE DOWN AND COLUMN VERTICAL. THIS IS NECESSARY SO THAT A FREE SPACE
IS PROVIDED
TO ALLOW THE INFLATOR MODULE (AIR BAG) TO EXPAND IN THE UNLIKELY EVENT OF
ACCIDENTAL DEPLOYMENT. OTHERWISE, PERSONAL INJURY COULD RESULT.
NOTE: In
the event deployment has occurred, inspect coil assembly wire for any signs of scorching, melting or any
other damage due to excessive heat.
If the coil has been damaged, replace it.
REMOVAL ~-----------------------------,
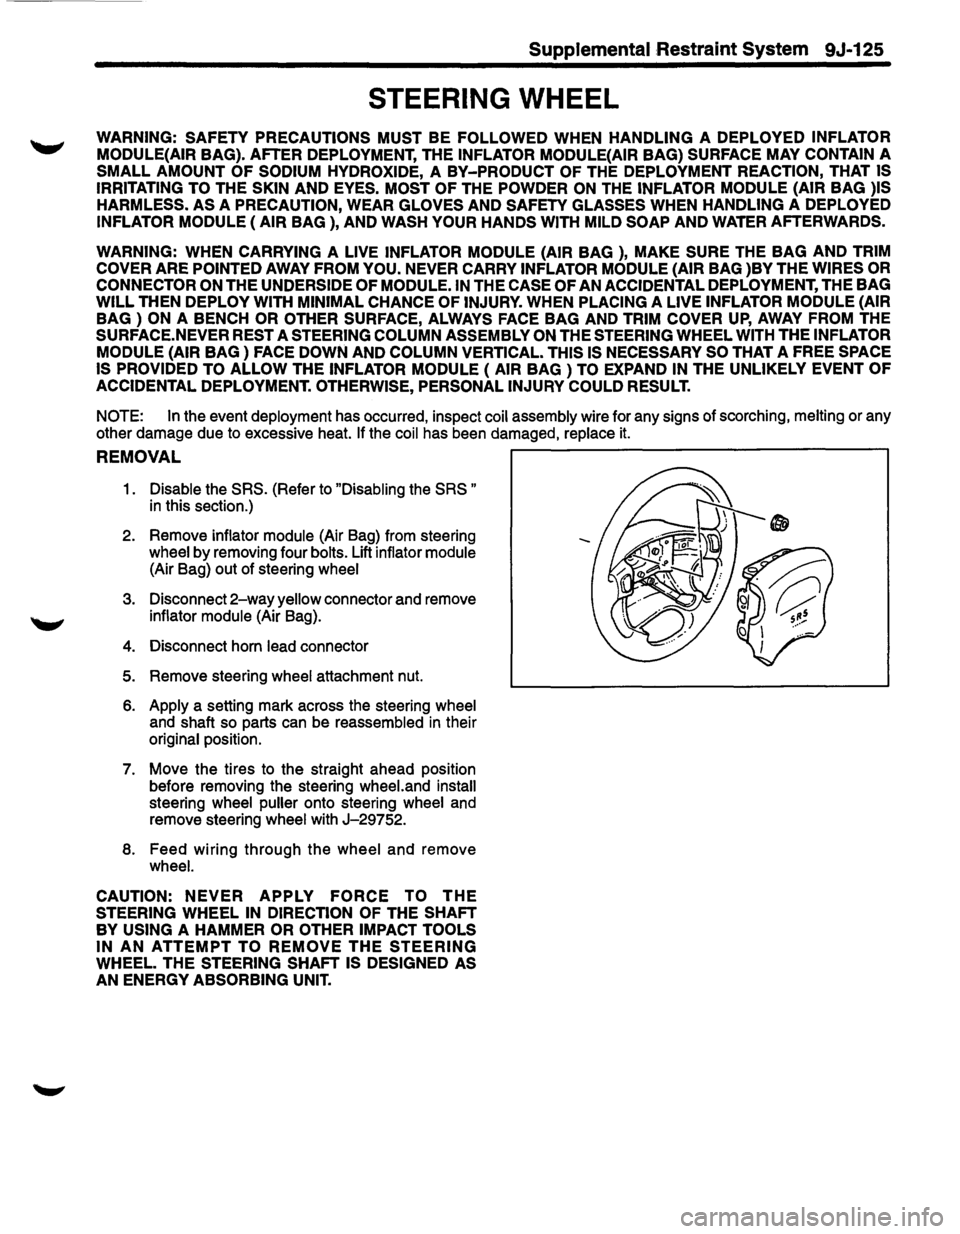
1. Disable the SRS. (Refer to "Disabling the SRS "
in this section.)
2. Remove
inflator module (Air Bag) from steering
wheel by removing four bolts. Lift inflator module
(Air Bag) out of steering wheel
3. Disconnect 2-way yellow connector and remove
inflator module (Air Bag).
4. Disconnect horn lead connector
5. Remove steering wheel attachment nut.
6. Apply a setting mark across the steering wheel
and shaft so parts can be reassembled in their
original position.
7.
Move the tires to the straight ahead position
before removing the steering
wheel.and install
steering wheel puller onto steering wheel and
remove steering
wheel with J-29752.
8. Feed wiring through the wheel and remove
wheel.
CAUTION:
NEVER APPLY FORCE TO THE
STEERING WHEEL IN DIRECTION OF THE SHAFT
BY USING A HAMMER OR OTHER IMPACT TOOLS
IN AN ATTEMPT TO REMOVE THE STEERING
WHEEL. THE STEERING SHAFT IS DESIGNED AS
AN ENERGY ABSORBING UNIT.
-
Page 1751 of 1928
Supplemental Restraint System 9J-127
SRS COIL ASSEMBLY
WARNING: SAFETY PRECAUTIONS MUST BE FOLLOWED WHEN HANDLING A DEPLOYED INFLATOR
MODULE{AIR
BAG). AFTER DEPLOYMENT, THE INFLATOR MODULE{AIR BAG) SURFACE MAY CONTAIN A
SMALL AMOUNT OF SODIUM HYDROXIDE, A BY-PRODUCT OF THE DEPLOYMENT REACTION, THAT IS
IRRITATING TO
THE SKIN AND EYES. MOST OF THE POWDER ON THE INFLATOR MODULE (AIR BAG )IS
HARMLESS.
AS A PRECAUTION, WEAR GLOVES AND SAFETY GLASSES WHEN HANDLING A DEPLOYED
INFLATOR MODULE {AIR BAG ), AND WASH YOUR HANDS WITH MILD SOAP AND WATER AFTERWARDS.
WARNING: WHEN CARRYING A LIVE INFLATOR MODULE {AIR BAG ), MAKE SURE THE BAG AND TRIM
COVER
ARE POINTED AWAY FROM YOU. NEVER CARRY INFLATOR MODULE {AIR BAG )BY THE WIRES OR
CONNECTOR ON
THE UNDERSIDE OF MODULE. IN THE CASE OF AN ACCIDENTAL DEPLOYMENT, THE BAG
WILL THEN DEPLOY WITH MINIMAL CHANCE OF INJURY. WHEN PLACING A LIVE INFLATOR MODULE (AIR
BAG ) ON A BENCH OR OTHER SURFACE, ALWAYS FACE BAG AND TRIM COVER UP, AWAY FROM THE
SURFACE. NEVER REST A STEERING COLUMN ASSEMBLY ON THE STEERING WHEEL WITH THE INFLATOR
MODULE (AIR BAG) FACE DOWN AND COLUMN VERTICAL. THIS IS NECESSARY SO THAT A FREE SPACE
IS PROVIDED TO
ALLOW THE INFLATOR MODULE { AIR BAG ) TO EXPAND IN THE UNLIKELY EVENT OF
ACCIDENTAL
DEPLOYMENT. OTHERWISE, PERSONAL INJURY COULD RESULT.
NOTE:
In the event deployment has occurred, inspect coil assembly wire for any signs of scorching, melting or any
other damage due to excessive heat.
If the coil has been damaged, replace it.
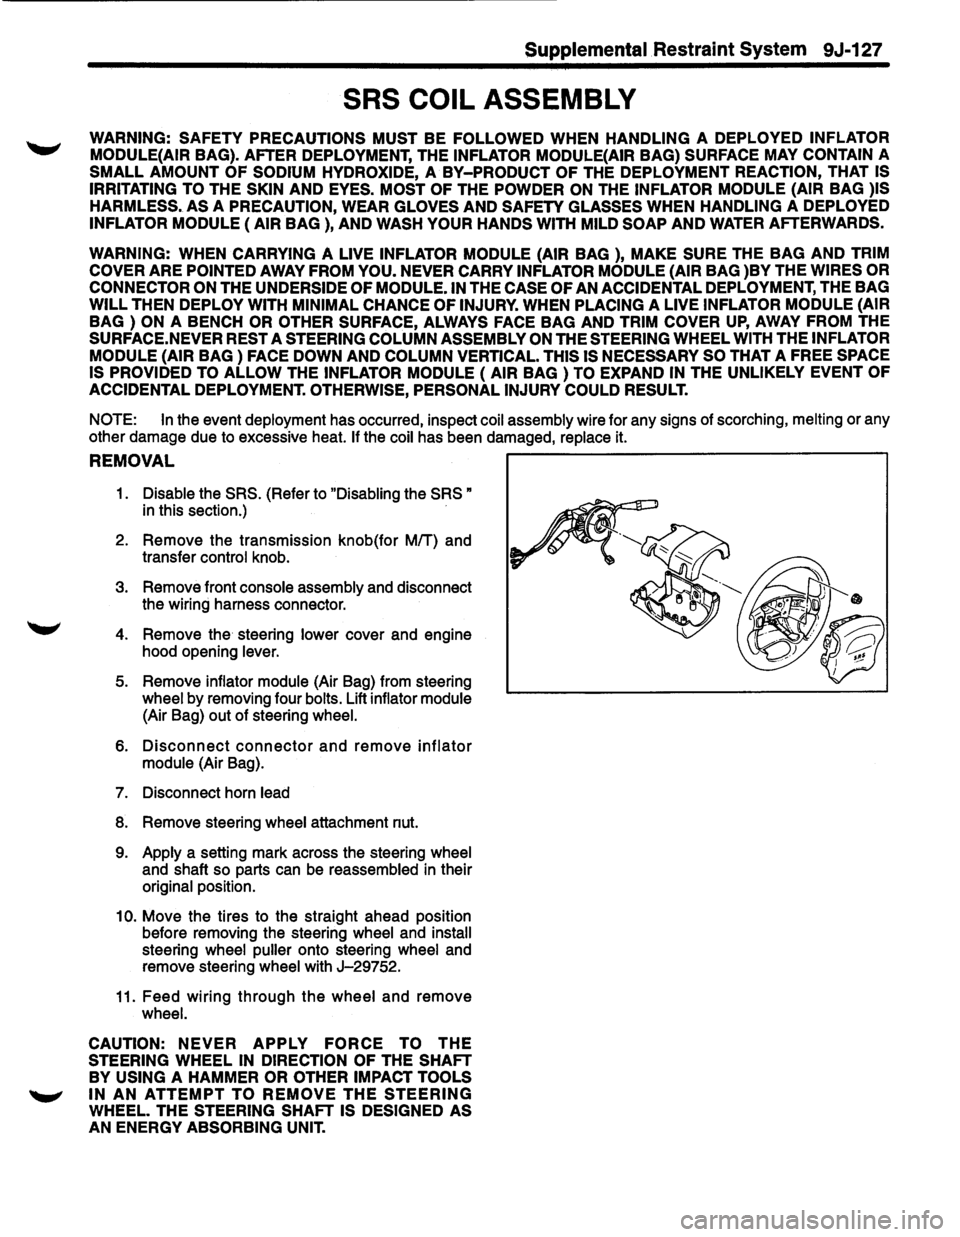
REMOVAL ~------------------------------------------,
1. Disable the SRS. (Refer to "Disabling the SRS"
in this section.)
2. Remove the transmission knob(for
MIT) and
transfer
control knob.
3. Remove front console assembly and disconnect
the wiring harness connector.
4. Remove the steering lower cover and engine
hood opening
lever.
5. Remove inflator module (Air Bag) from steering
wheel by removing four bolts. Lift inflator module
(Air Bag) out of steering wheel.
6. Disconnect connector and remove inflator
module (Air Bag).
7. Disconnect horn lead
8. Remove steering wheel attachment nut.
9. Apply a setting mark across the steering wheel
and shaft so parts can be reassembled in their
original position.
10. Move the tires to the straight ahead position
before removing the steering
wheel and install
steering wheel puller onto steering wheel and
remove steering
wheel with J-29752.
11. Feed wiring through the wheel and remove
wheel.
CAUTION:
NEVER APPLY FORCE TO THE
STEERING WHEEL IN DIRECTION OF THE SHAFT
BY USING A HAMMER OR OTHER IMPACT TOOLS
~ IN AN ATTEMPT TO REMOVE THE STEERING
WHEEL. THE STEERING SHAFT IS DESIGNED AS
AN ENERGY ABSORBING UNIT.
Page 1754 of 1928
9J .. 130 Supplemental Restraint System
CAUTION: NEVER APPLY FORCE TO THE
STEERING WHEEL IN DIRECTION OF THE SHAFT
BY USING A HAMMER OR OTHER I~PACT TOOLS
IN AN ATTEMPT TO REMOVE THE STEERING
WHEEL. THE STEERING SHAFT IS DESIGNED AS
AN ENERGY ABSORBING UNIT.
12. Remove steering column cover.
13.
Disconne~t the wiring harness connectors
located base of steering column.
14. Remove the combination switch assembly with
SRScoil.
NOTE: SRS
coil is a part of combination switch
assembly,
which cannot be replaced individually.
Therefore, be sure not to remove the SRS coil from the
combination switch assembly.
15. Remove snap ring.
16. Remove cushion rubber.
17. Disconnect shift
lock cable(For AfT)
18. Disconnect the starter switch harness connector.
Located base of steering column.
19. Remove steering
lock cylinder assembly.
20. Apply a setting mark across the universal joint
and steering shaft to reassemble the parts
in ~
their original position. ~
21. Remove steering column assembly.
NOTE: A setting mark can be easily made if the shaft
is with draw a little by loosening the steering shaft
universal joint.
INSTALLATION
1. Install steering column assembly and align the
setting marks on the universal joint and steering
shaft made during removal.
2. Tighten the steering column fixing bolts( dash
panel side) to the specified torque.
Torque:
19N·m(14 lb·ft.).
3. Tighten the steering column fixing bolts( Pedal
bracket) to the specified torque.
Torque:
17N·m(13 lb·ft.).
4. Tighten the universal joint to the specified
torque.
Torque:
25N·m(181b·ft.).
5. Install steering lock cylinder assembly.
6. Connect shift lock cable(For AfT)
7. Install cushion rubber.
8. Install snap ring.
9. Install the combination switch assembly with
SRScoil.
Page 1886 of 1928
10-128 BODY
6. Windshield upper moulding
• Taking notice of the adhesive tape, peel the
moulding off the windshield upper portion.
7. Moulding clip
8. Spacer
I••! INSTALLATION
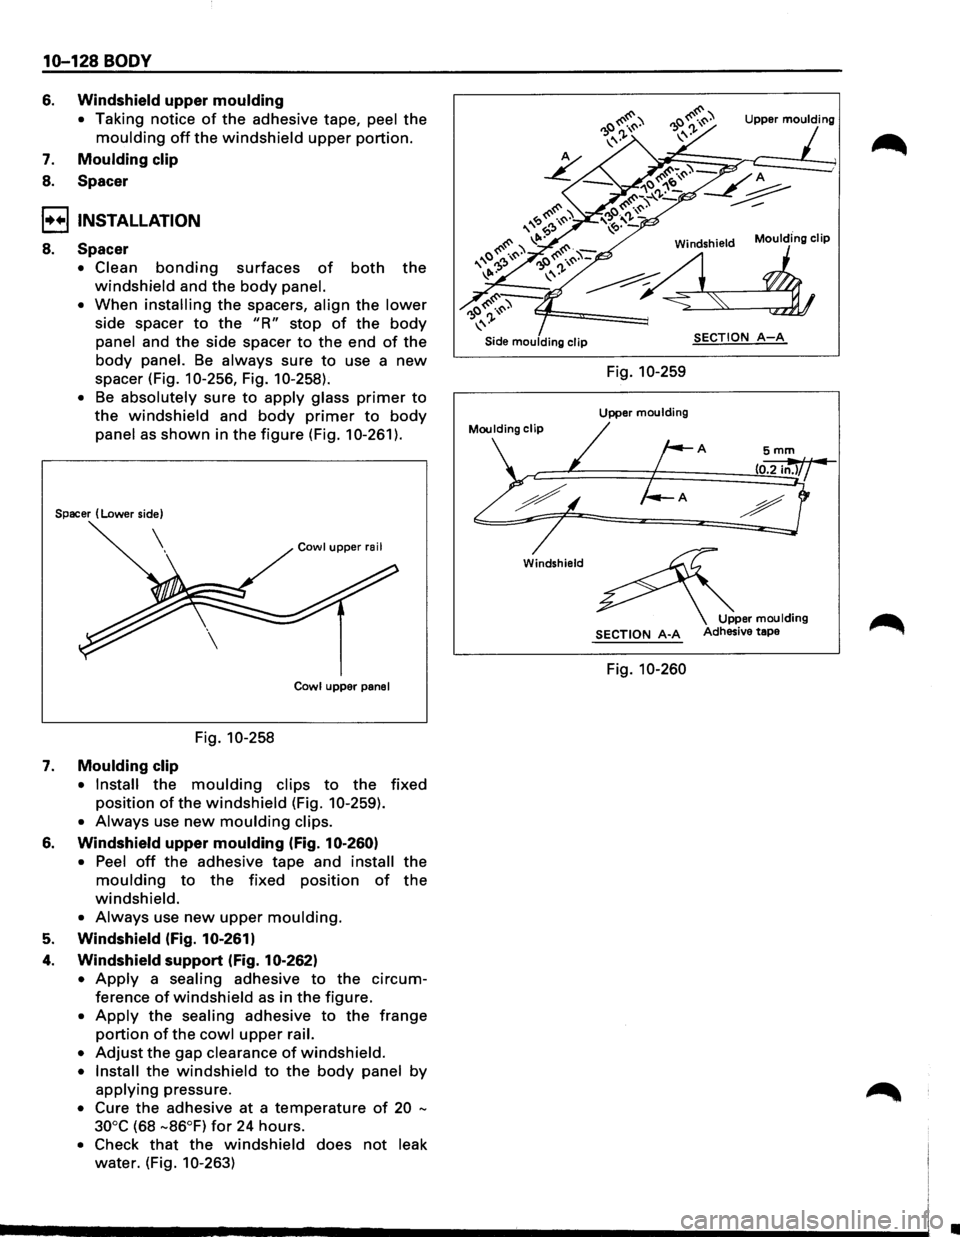
8. Spacer
• Clean bonding surfaces of both the
windshield and the body panel.
•
When installing the spacers, align the lower
side spacer to the "R" stop of the body
panel and the side spacer to the end of the
body panel. Be always sure to use a new
spacer (Fig. 10-256, Fig. 1 0-258).
• Be absolutely sure to apply glass primer to
the windshield and body primer to body
panel as shown in the figure (Fig. 10-261).
Spacer (Lower side)
Cowl upper rail
Cowl
upper panel
Fig. 10-258
7. Moulding clip
• Install the moulding clips to the fixed
position of the windshield (Fig. 10-259).
• Always use new moulding clips.
6. Windshield upper moulding (Fig. 10-260)
• Peel off the adhesive tape and install the
moulding to the fixed position of the
windshield.
• Always use new upper moulding.
5. Windshield (Fig. 10-261)
4. Windshield support (Fig. 10-262)
• Apply a sealing adhesive to the circum
ference of windshield as in the figure.
• Apply the sealing adhesive to the frange
portion of the cowl upper rail.
•
Adjust the gap clearance of windshield.
• Install the windshield to the body panel by
applying pressure.
• Cure the adhesive at a temperature of 20 -
30°C
(68 -86°F) for 24 hours.
• Check that the windshield does not leak
water. (Fig. 10-263)
Upper moulding
Moulding clip
Side moulding clip SECTION A-A
Fig. 10-259
Upper moulding
Moulding clip
A
Windshield
Upper moulding SECTION A-A Adhesive tape
Fig. 10-260
•
Page 1888 of 1928
10-130 BODY
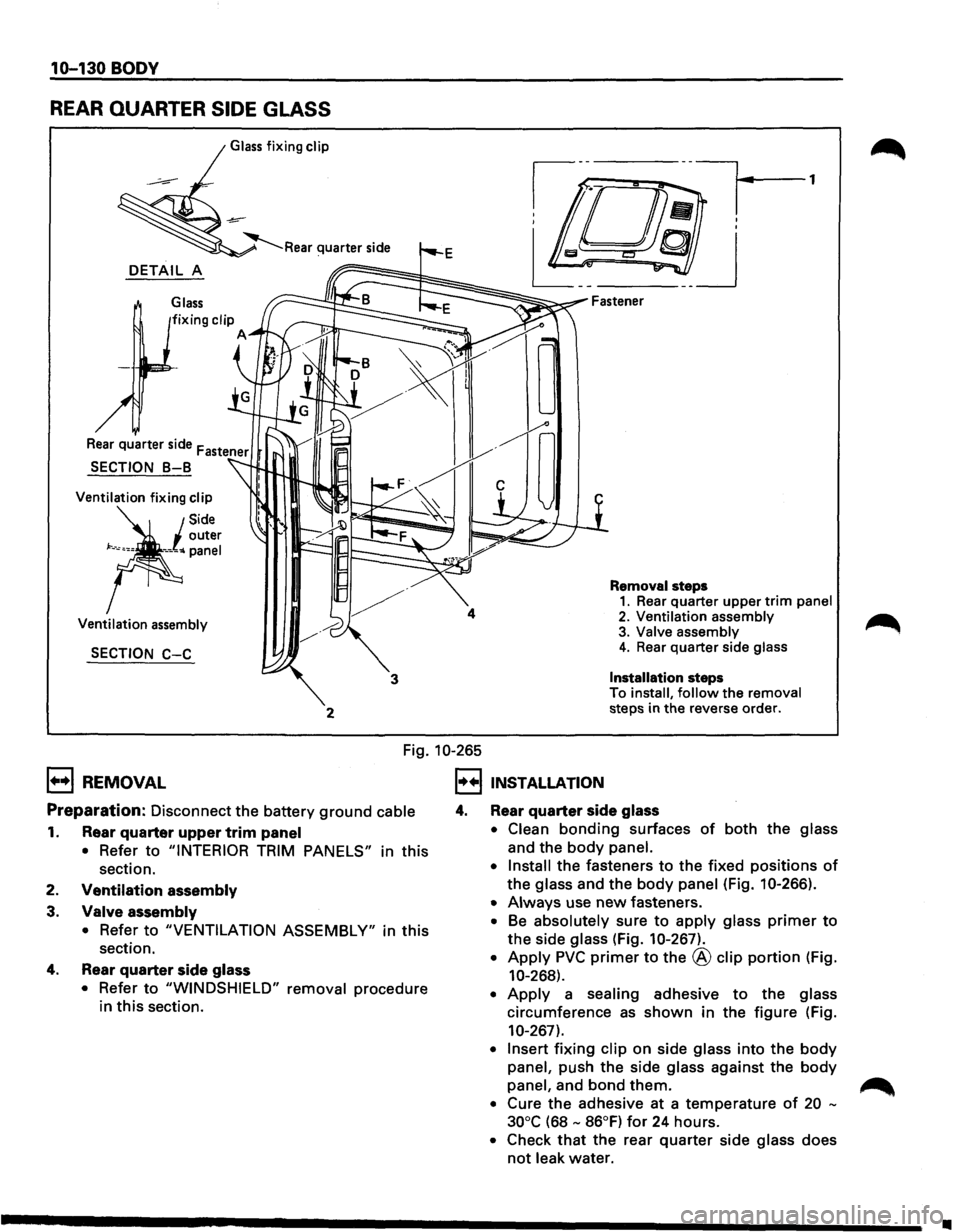
REAR QUARTER SIDE GLASS
Glass fixing clip
DETAIL A
Glass
Ventilation fixing clip
Ventilation assembly
SECTION C-C
2
4
3
Removal steps 1. Rear quarter upper trim panel
2. Ventilation assembly 3. Valve assembly 4. Rear quarter side glass
Installation
steps
To install, follow the removal steps in the reverse order.
Fig. 10-265
1+•1 REMOVAL
Preparation: Disconnect the battery ground cable
1. Rear quarter upper trim panel
• Refer to "INTERIOR TRIM PANELS" in this
section.
2.
Ventilation assembly
3.
Valve assembly
• Refer to "VENTILATION ASSEMBLY" in this
section.
4. Rear quarter side glass
• Refer to "WINDSHIELD" removal procedure
in this section.
I•+! INSTALLATION
4. Rear quarter side glass
• Clean bonding surfaces of both the glass
and the
body panel.
• Install
the fasteners to the fixed positions of
the glass and the body panel (Fig. 10-266).
• Always use new fasteners.
• Be absolutely sure to apply glass primer to
the side glass (Fig. 10-267).
• Apply PVC primer to the @ clip portion (Fig.
10-268).
• Apply a sealing adhesive to the glass
circumference
as shown in the figure (Fig.
10-267).
• Insert fixing clip on side glass into the body
panel, push the side glass against the body
panel, and bond them. ~
• Cure the adhesive at a temperature of 20 -
30°C
(68 - 86°F) for 24 hours.
• Check that the rear quarter side glass does
not leak water.
•
Page 1891 of 1928
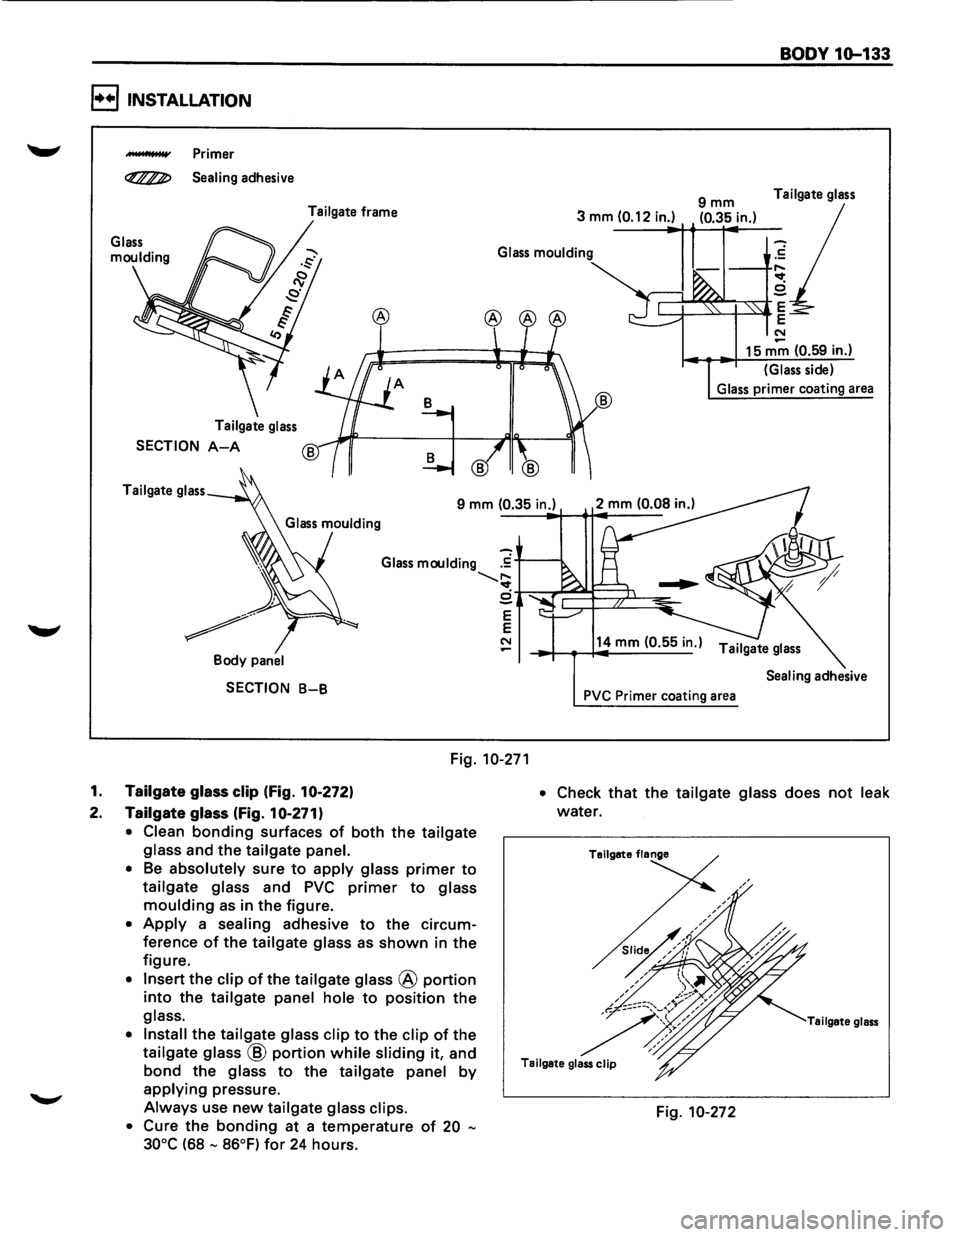
I••! INSTALLATION
"-" ___. Primer
~ Sealing adhesive Tailgate frame
3 mm
(0.12 in.) 9mm (0.35 in.)
BODY 10-133
Tailgate glass
-Glass moulding .~
Tailgate glass
SECTION A-A
Tailgate glass
®
.....
"" 8 y;=::J..r«~~ '----+--~>---+---"-'• E .____ ---E N
15m~ (0.59 in.)
(Glass side)
Glass primer coating area
9 mm (0.35 in.)
SECTION B-B
Fig. 10-271
1. Tailgate glass clip (Fig. 10-2721
2. Tailgate glass (Fig. 10-2711
• Clean bonding surfaces of both the tailgate
glass
and the tailgate panel.
•
Be absolutely sure to apply glass primer to
tailgate glass and PVC primer to glass
moulding as in the figure.
• Apply a sealing adhesive to the circum
ference of the tailgate glass as shown in the
figure.
• Insert the clip of the tailgate glass @ portion
into the tailgate panel hole to position the
glass.
• Install
the tailgate glass clip to the clip of the
tailgate glass @ portion while sliding it, and
bond the glass to the tailgate panel by
applying pressure.
Always use new tailgate glass clips.
• Cure
the bonding at a temperature of 20 -
30°C
(68 - 86°F) for 24 hours.
14 mm (0.5 5 in.)
Tailgate glass
Sealing adhesive
PVC Primer coating area
• Check that the tailgate glass does not leak
water.
Tailgate flange
Tailgate glass
Fig. 10-272