ISUZU TROOPER 1995 Workshop Manual
Manufacturer: ISUZU, Model Year: 1995, Model line: TROOPER, Model: ISUZU TROOPER 1995Pages: 1928
Page 331 of 1928
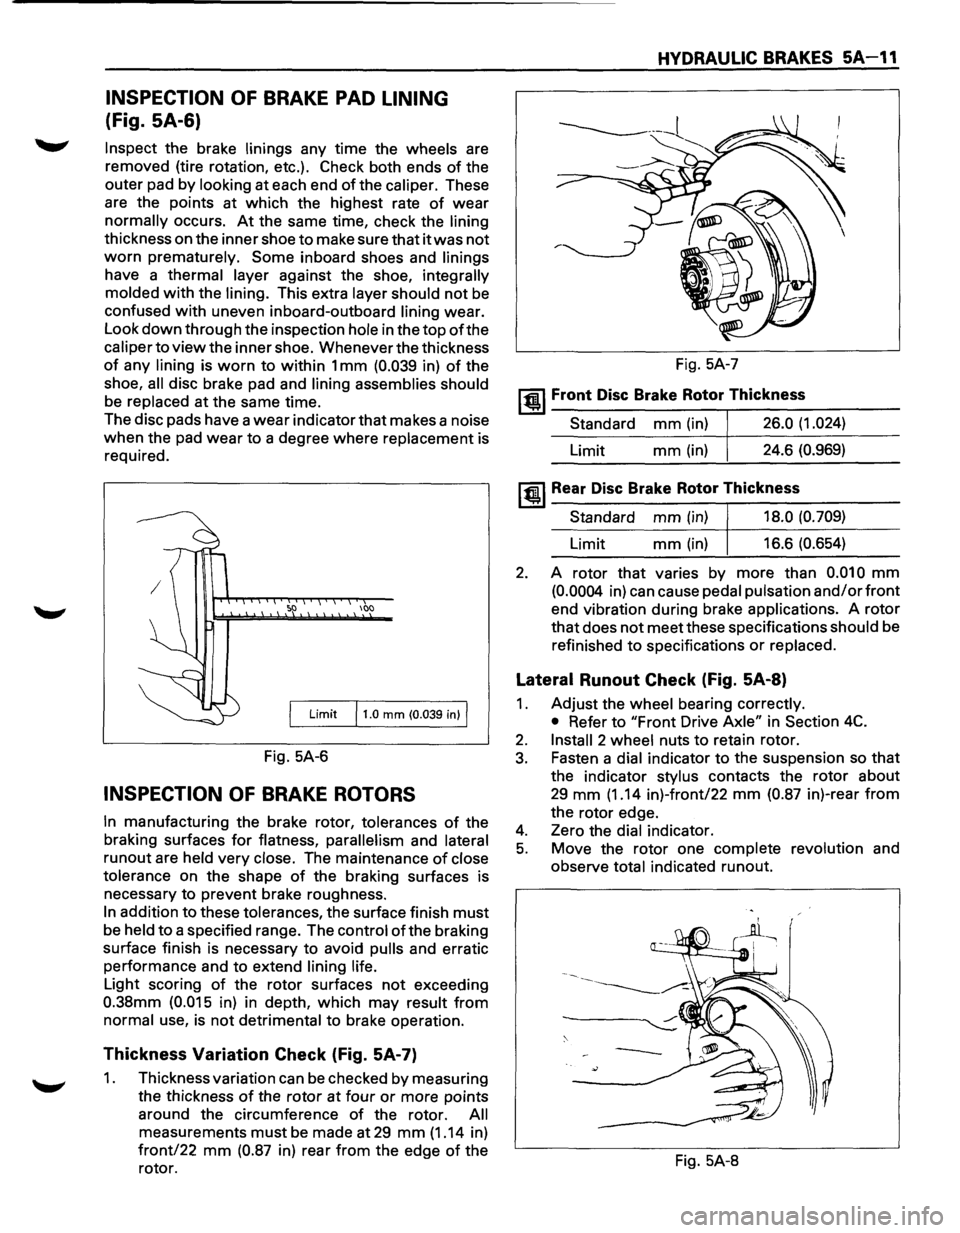
INSPECTION OF BRAKE PAD LINING
(Fig. SA-6)
Inspect the brake linings any time the wheels are
removed (tire rotation, etc.). Check both ends
of the
outer pad by
looking at each end of the caliper. These
are the points at which the highest rate
of wear
normally occurs. At the same time, check the lining
thickness on the inner shoe to make sure that it was not
worn prematurely. Some inboard shoes and linings
have a thermal layer against the shoe, integrally
molded
with the lining. This extra layer should not be
confused with uneven inboard-outboard lining wear.
Look
down through the inspection hole in the top of the
caliper to view the inner shoe. Whenever the thickness
of any lining is worn to within 1 mm (0.039 in) of the
shoe,
all disc brake pad and lining assemblies should
be replaced at the same time.
The disc pads have a
wear indicator that makes a noise
when the pad wear to a degree where replacement is
required.
100
Limit 11.0 mm (0.039 in) I
Fig. 5A-6
INSPECTION OF BRAKE ROTORS
In manufacturing the brake rotor, tolerances of the
braking surfaces
for flatness, parallelism and lateral
runout are held very close. The maintenance of close
tolerance
on the shape of the braking surfaces is
necessary to prevent brake roughness.
In addition to these tolerances, the surface finish must
be held to a specified range. The control ofthe braking
surface finish is necessary to avoid
pulls and erratic
performance and to extend
lining life.
Light scoring of the rotor surfaces not exceeding
0.38mm (0.015 in) in depth, which may result from
normal use, is not detrimental to brake operation.
Thickness Variation Check (Fig. 5A-7)
1. Thickness variation can be checked by measuring
the thickness
of the rotor at four or more points
around the circumference
of the rotor. All
measurements must be made at 29 mm (1.14 in)
front/22 mm (0.87 in) rear from the edge of the
rotor.
HYDRAULIC BRAKES 5A-11
Fig. 5A-7
~~~ Front Disc Brake Rotor Thickness
Standard mm (in) 26.0 (1.024)
Limit mm(in) 24.6 (0.969)
~~~Rear Disc Brake Rotor Thickness
Standard mm (in) 18.0 (0.709)
Limit mm (in) 16.6 (0.654)
2. A rotor that varies by more than 0.010 mm
(0.0004 in) can cause pedal pulsation and/or front
end vibration during brake applications. A rotor
that does not meet these specifications should be
refinished
to specifications or replaced.
Lateral Runout Check (Fig. 5A-8)
1. Adjust the wheel bearing correctly.
• Refer to "Front Drive Axle" in Section 4C.
2. Install 2 wheel nuts to retain rotor.
3. Fasten a dial indicator to the suspension so that
the indicator stylus contacts the rotor about
29 mm (1.14 in)-front/22 mm (0.87 in)-rear from
the rotor edge.
4. Zero the dial indicator.
5. Move the rotor one complete revolution and
observe
total indicated runout.
Fig. 5A-8
Page 332 of 1928
SA-12 HYDRAULIC BRAKES
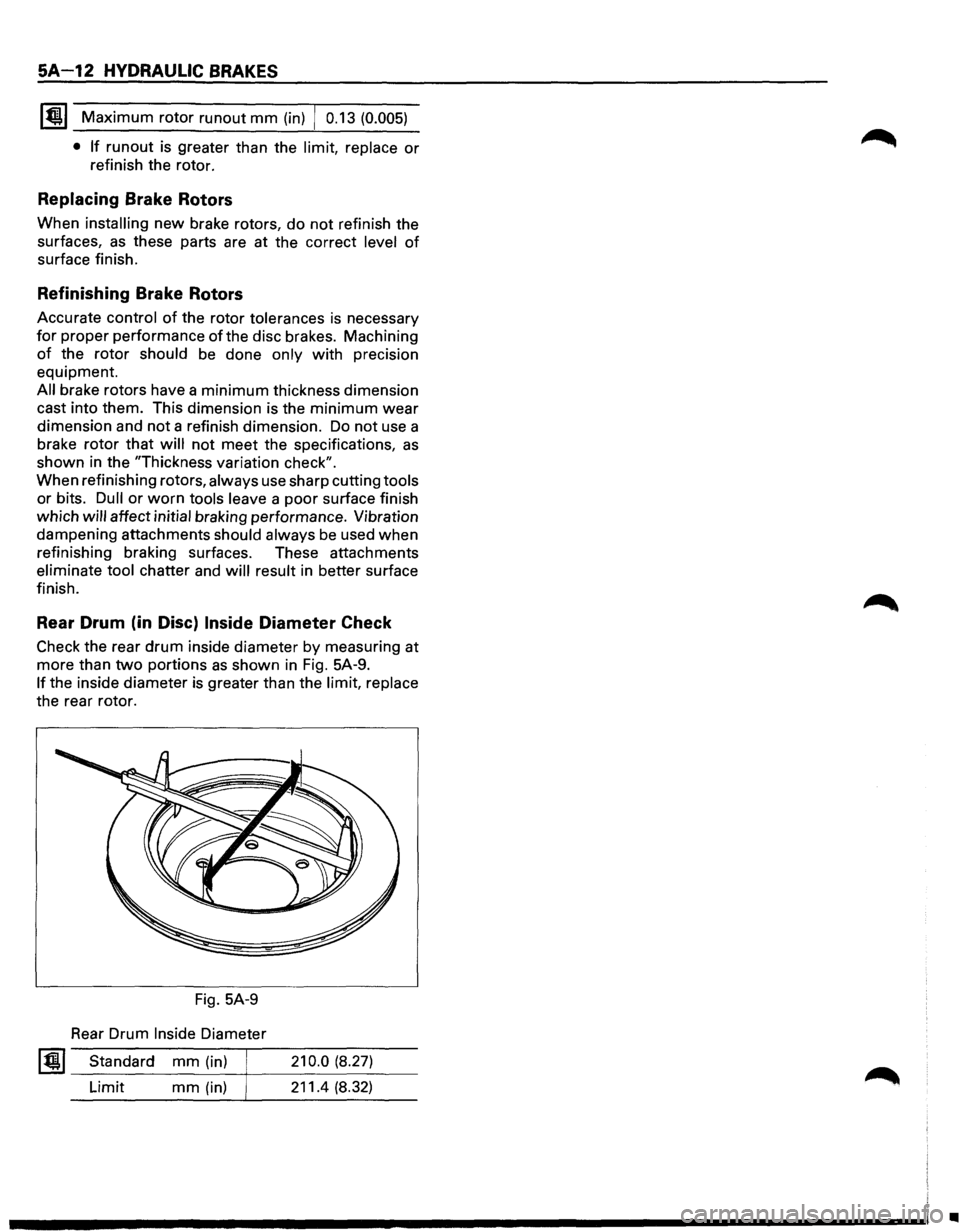
ltilU Maximum rotor runout mm (in) 0.13 (0.005)
• If
runout is greater than the limit, replace or
refinish the rotor.
Replacing Brake Rotors
When installing new brake rotors, do not refinish the
surfaces,
as these parts are at the correct level of
surface finish.
Refinishing Brake Rotors
Accurate control of the rotor tolerances is necessary
for proper performance of the disc brakes. Machining
of the rotor should be done only with precision
equipment.
All brake rotors have a minimum thickness dimension
cast into them. This dimension is the
minimum wear
dimension and
not a refinish dimension. Do not use a
brake rotor
that will not meet the specifications, as
shown in the "Thickness variation check".
When refinishing rotors,
always use sharp cutting tools
or bits. Dull or worn tools leave a poor surface finish
which
will affect initial braking performance. Vibration
dampening attachments
should always be used when
refinishing braking surfaces. These attachments
eliminate tool chatter and will result in better surface
finish.
Rear Drum (in Disc) Inside Diameter Check
Check the rear drum inside diameter by measuring at
more than
two portions as shown in Fig. 5A-9.
If the inside diameter is greater than the limit, replace
the rear rotor.
Fig. 5A-9
Rear Drum
Inside Diameter
ltil!.l Standard mm (in)
Limit
mm (in)
210.0 (8.27)
211.4 (8.32)
•
Page 333 of 1928
HYDRAULIC BRAKES SA-13
BRAKE PEDAL ASSEMBL V
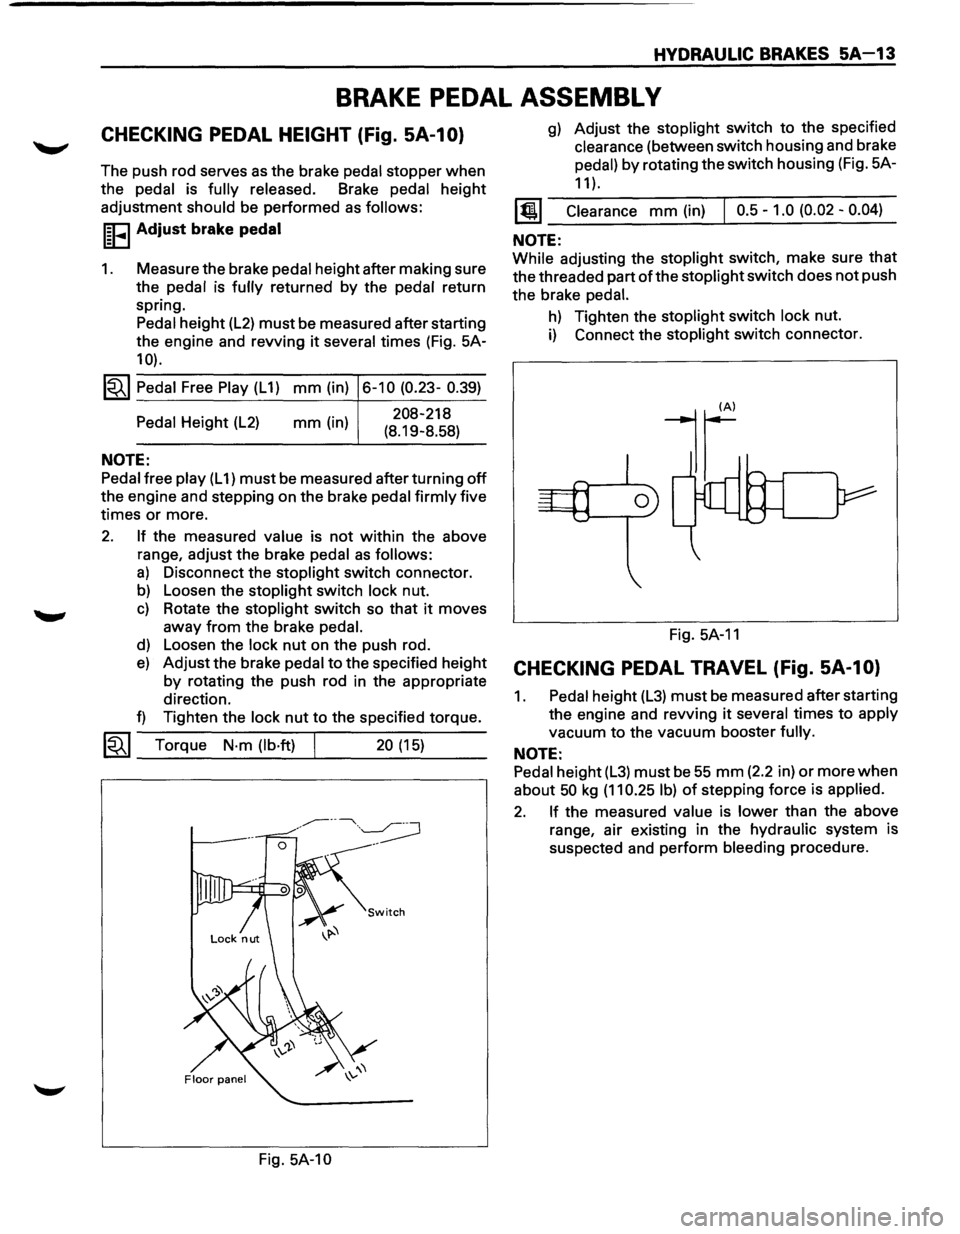
CHECKING PEDAL HEIGHT (Fig. SA-1 0)
The push rod serves as the brake pedal stopper when
the pedal is fully released. Brake pedal height
adjustment
should be performed as follows:
I~FI Adjust brake pedal
1. Measure the brake pedal height after making sure
the pedal is
fully returned by the pedal return
spring. Pedal height
(L2) must be measured after starting
the engine and revving
it several times (Fig. 5A-
10).
1~1 Pedal Free Play (L 1) mm (in) 6-10 (0.23- 0.39)
Pedal Height (L2)
NOTE:
mm (in) 208-218
(8.19-8.58)
Pedal free play (L 1) must be measured after turning off
the engine and stepping on the brake pedal firmly five
times
or more.
2. If the measured value is not within the above
range, adjust the brake
pedal as follows:
a) Disconnect the stoplight switch connector.
b) Loosen the stoplight switch lock nut.
c) Rotate the stoplight switch so that it moves
away
from the brake pedal.
d) Loosen the lock nut on the push rod.
e) Adjust the brake pedal to the specified height
by rotating the push rod in the appropriate
direction.
f) Tighten the lock nut to the specified torque.
~~~ Torque N·m (lb·ft) 20 (15) --------~----~---
Fig. 5A-10
g) Adjust the stoplight switch to the specified
clearance (between switch housing and brake
pedal)
by rotating the switch housing (Fig. 5A-
11 ).
1@1 Clearance mm (in) I 0.5-1.0 (0.02-0.04)
NOTE:
While adjusting the stoplight switch, make sure that
the threaded part of the stoplight switch does not push
the brake
pedal.
h) Tighten the stoplight switch lock nut.
i) Connect the stoplight switch connector.
Fig.
5A-11
CHECKING PEDAL TRAVEL (Fig. SA-1 0)
1. Pedal height (L3) must be measured after starting
the engine and revving
it several times to apply
vacuum
to the vacuum booster fully.
NOTE:
Pedal height (L3) must be 55 mm (2.2 in) or more when
about 50 kg (11 0.25 I b) of stepping force is applied.
2. If the measured value is lower than the above
range, air existing in the hydraulic system is
suspected and perform bleeding procedure.
Page 334 of 1928
5A-14 HYDRAULIC BRAKES
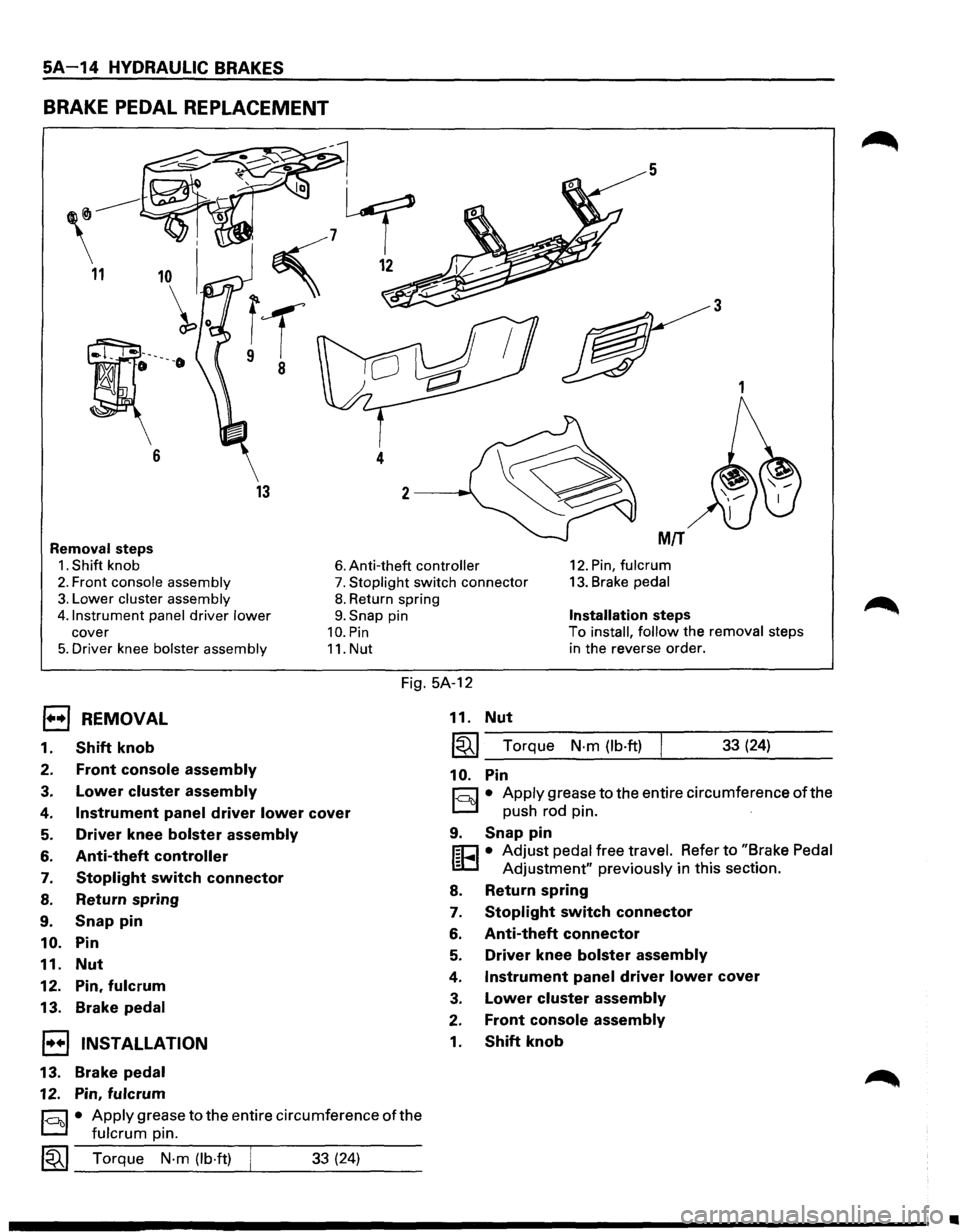
BRAKE PEDAL REPLACEMENT
5
3
1
13
Removal steps MIT
1. Shift knob 6. Anti-theft controller 12. Pin, fulcrum
2. Front console assembly 7. Stoplight switch connector 13. Brake pedal
3. Lower cluster assembly
4.1nstrument panel
driver lower
cover
5. Driver knee bolster assembly
8. Return spring
9. Snap pin
10. Pin
11. Nut
Installation steps
To install, follow the removal steps
in the reverse order.
Fig. 5A-12
EJ REMOVAL
1. Shift knob
2. Front console assembly
3. Lower cluster assembly
4. Instrument panel driver lower cover
5. Driver knee bolster assembly
6. Anti-theft controller
7. Stoplight switch connector
8. Return spring
9. Snap pin
10. Pin
11.
Nut
12. Pin, fulcrum
13. Brake pedal
1•+1 INSTALLATION
13.
Brake pedal
12. Pin, fulcrum
§)• Apply grease to the entire circumference of the
fulcrum pin.
~~~ Torque N·m (lb·ft) ___ __._ ___ _ 33 (24)
11. Nut
~~~--T-o-rq_u_e __ N-.m--(-lb-.ft-)-.-----3-3-(-24_) ____ _
10. Pin
r:::;:] • Apply grease to the entire circumference of the
D push rod pin. ·
9. Snap pin
f;C1 • Adjust pedal free travel. Refer to "Brake Pedal
lED Adjustment" previously in this section.
8. Return spring
7. Stoplight switch connector
6. Anti-theft connector
5. Driver knee bolster assembly
4. Instrument panel driver lower cover
3. Lower cluster assembly
2. Front console assembly
1. Shift knob
•
Page 335 of 1928
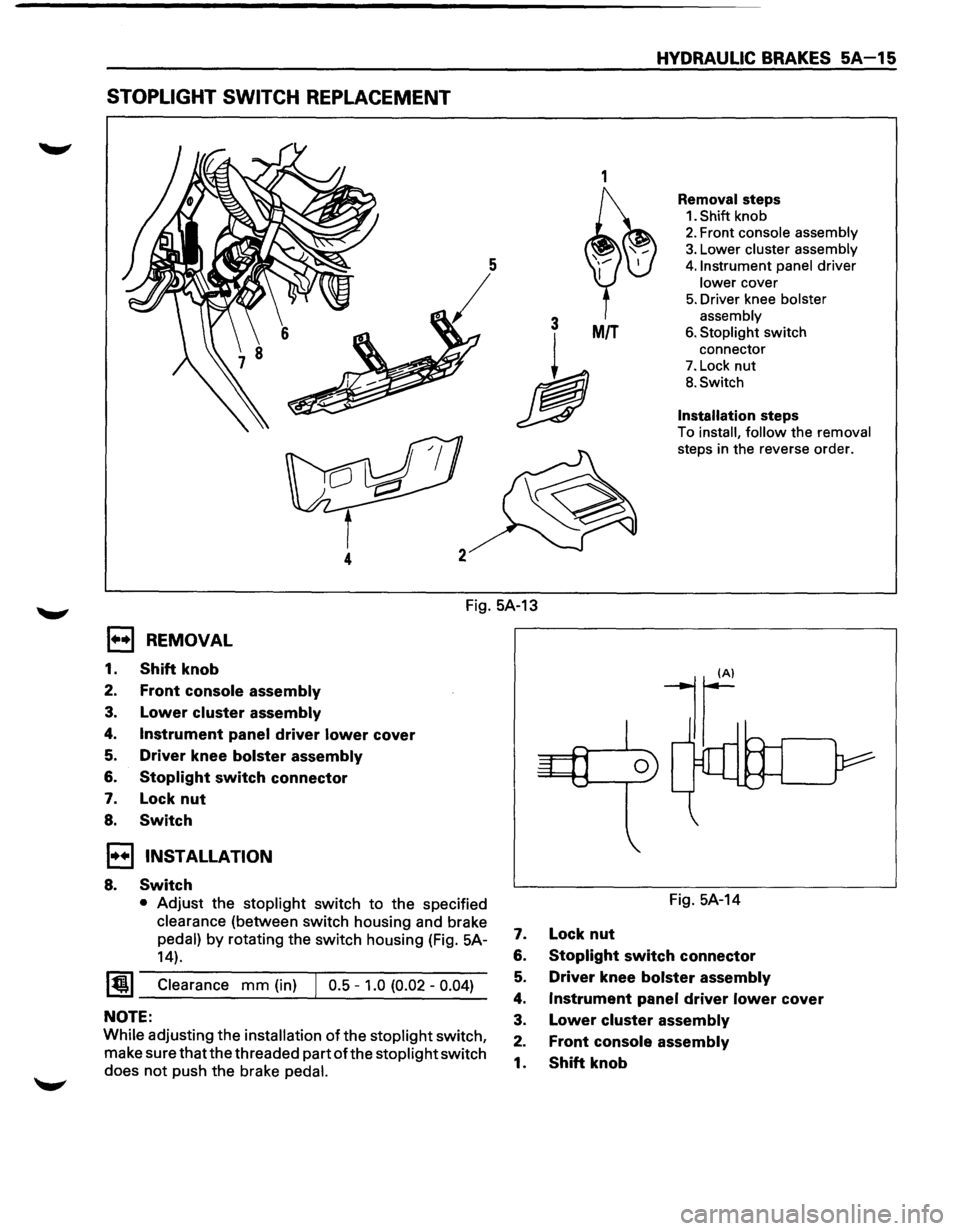
STOPLIGHT SWITCH REPLACEMENT
1
3 MIT
h
4
HYDRAULIC BRAKES SA-15
Removal steps
1. Shift knob
2. Front console assembly
3. Lower cluster assembly
4. Instrument panel driver
lower cover
5. Driver knee bolster
assembly
6. Stoplight switch
connector
7. Lock nut
B. Switch
Installation steps
To install, follow the removal
steps in the reverse order.
Fig. 5A-13
1••1 REMOVAL
1. Shift knob
2. Front console assembly
3. Lower cluster assembly
4. Instrument panel driver lower cover
5. Driver knee bolster assembly
6. Stoplight switch connector
7. Lock nut
8. Switch
1••1 INSTALLATION
8. Switch
• Adjust the stoplight switch to the specified
clearance (between switch housing and brake
pedal) by rotating the switch housing (Fig. 5A-
14).
~~~ Clearance mm (in) J 0.5 -1.0 (0.02 -0.04)
NOTE:
While adjusting the installation of the stoplight switch,
make sure that the threaded part
ofthe stoplight switch
does
not push the brake pedal.
Fig. 5A-14
7. Lock nut
6. Stoplight switch connector
5. Driver knee bolster assembly
4. Instrument panel driver lower cover
3. Lower cluster assembly
2. Front console assembly
1. Shift knob
Page 336 of 1928
SA 16 HYDRAULIC BRAKES
MASTER CYLINDER ASSEMBLY
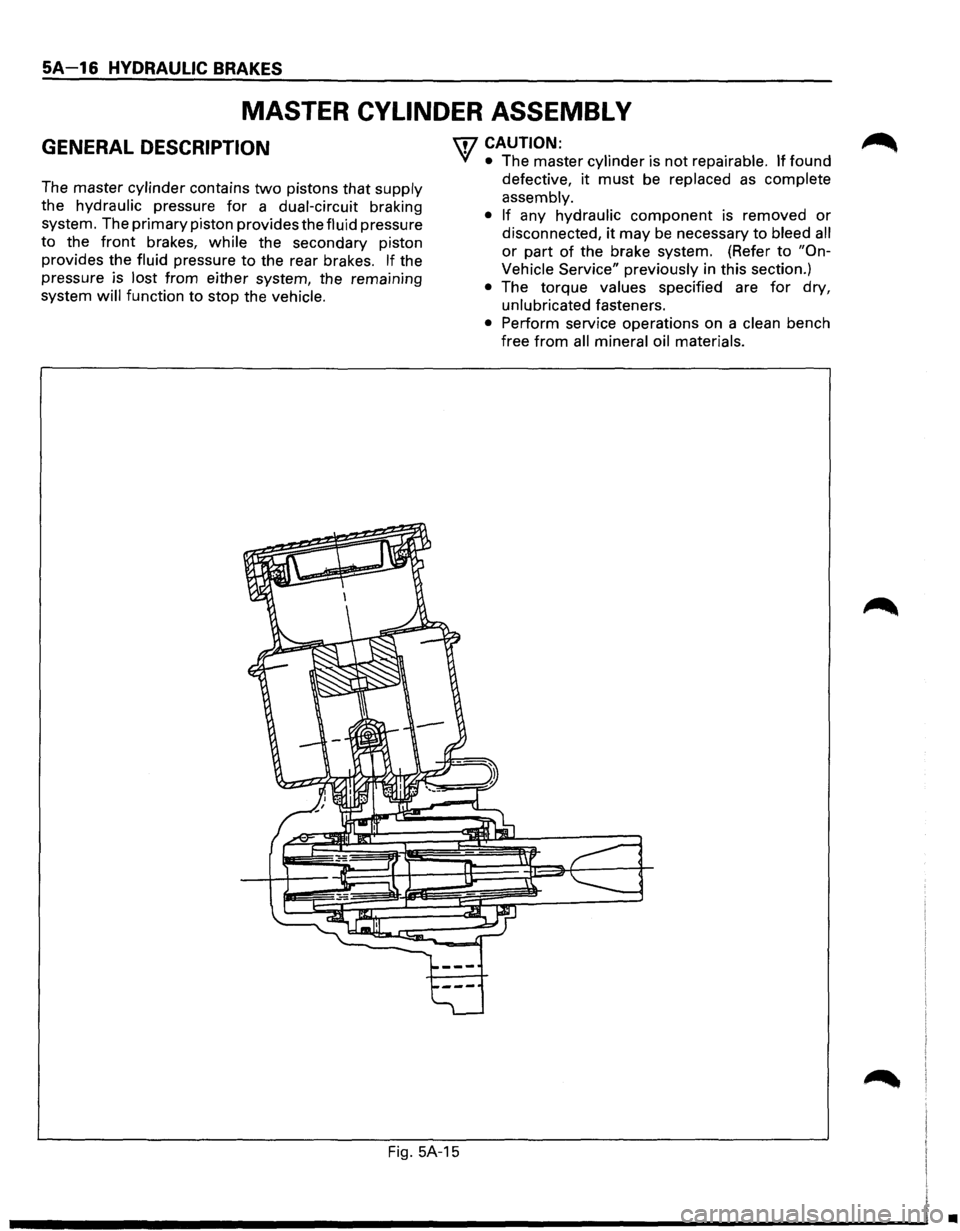
GENERAL DESCRIPTION
The master cylinder contains two pistons that supply
the hydraulic pressure
for a dual-circuit braking
system. The primary piston provides the fluid pressure
to the
front brakes, while the secondary piston
provides the fluid pressure
to the rear brakes. l.f ~he
pressure is lost from either system, the rema1n1ng
system will function to stop the vehicle.
\fl CAUTION:
VI • The master cylinder is not repairable. If found
defective,
it must be replaced as complete
assembly.
• If any hydraulic component is removed or
disconnected, it may be necessary to bleed all
or part of the brake system. (Refer to "On
Vehicle Service" previously in this section.)
• The torque values specified are for dry,
unlubricated fasteners.
• Perform service operations on a clean bench
free
from all mineral oil materials.
Fig.
5A-15
•
Page 337 of 1928
HYDRAULIC BRAKES 5A-17
ON-VEHICLE SERVICE
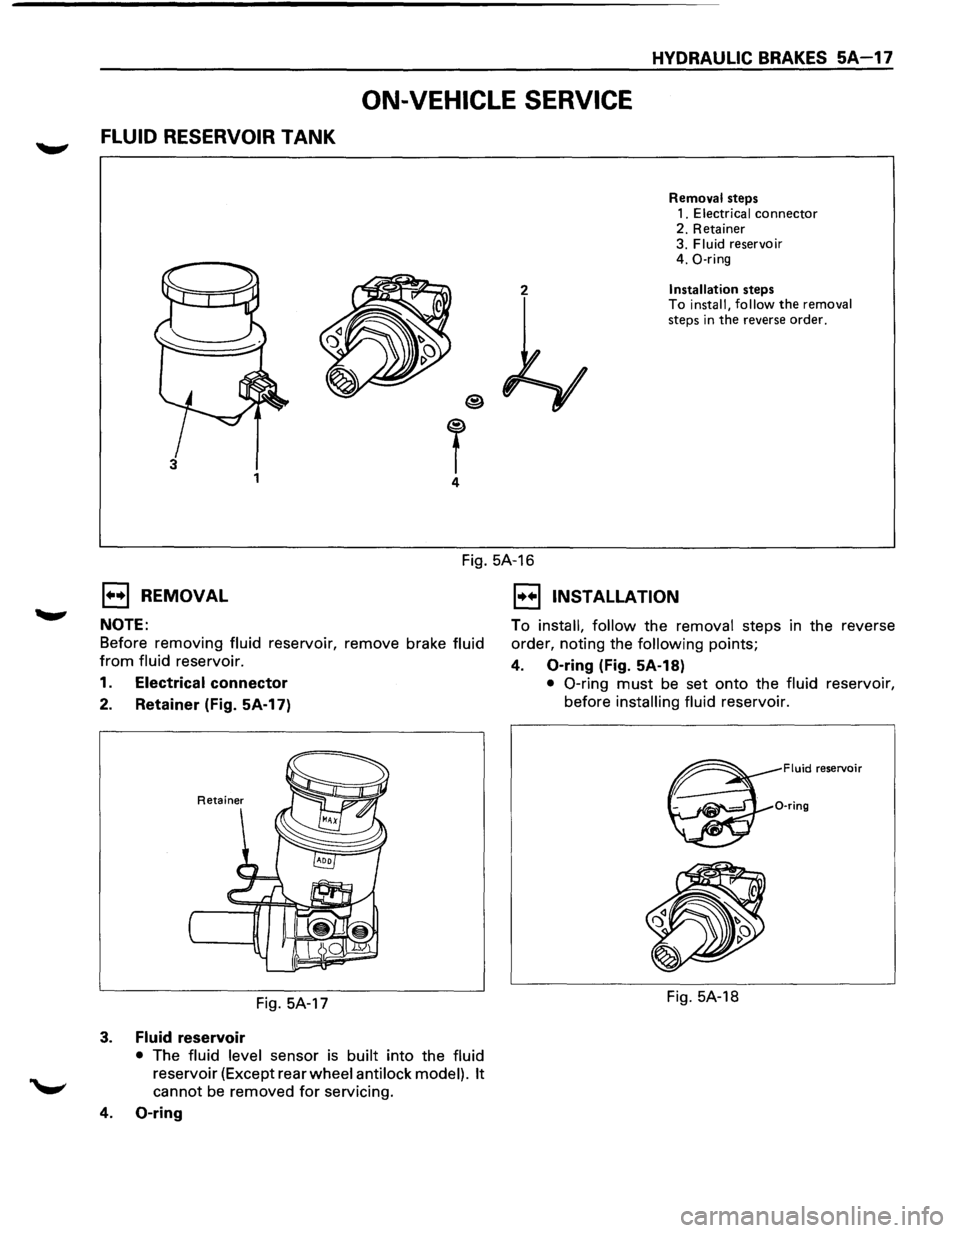
FLUID RESERVOIR TANK
2
T 4
3 1
Removal steps
1. Electrical connector 2. Retainer
3. Fluid reservoir
4. 0-ring
Installation steps
To install, follow the removal steps in the reverse order.
Fig. 5A-16
1••1 REMOVAL
NOTE:
Before removing fluid reservoir, remove brake fluid
from fluid reservoir.
1. Electrical connector
2. Retainer (Fig. 5A-17)
Fig. 5A-17
3. Fluid reservoir
• The fluid level sensor is built into the fluid
reservoir (Except rear wheel anti lock model). It
cannot be removed for servicing.
4. 0-ring
1••1 INSTALLATION
To install, follow the removal steps in the reverse
order, noting the
following points;
4. 0-ring (Fig. 5A-18)
• 0-ring must be set onto the fluid reservoir,
before
installing fluid reservoir.
Fluid reservoir
0-ring
Fig. 5A-18
Page 338 of 1928
SA-18 HYDRAULIC BRAKES
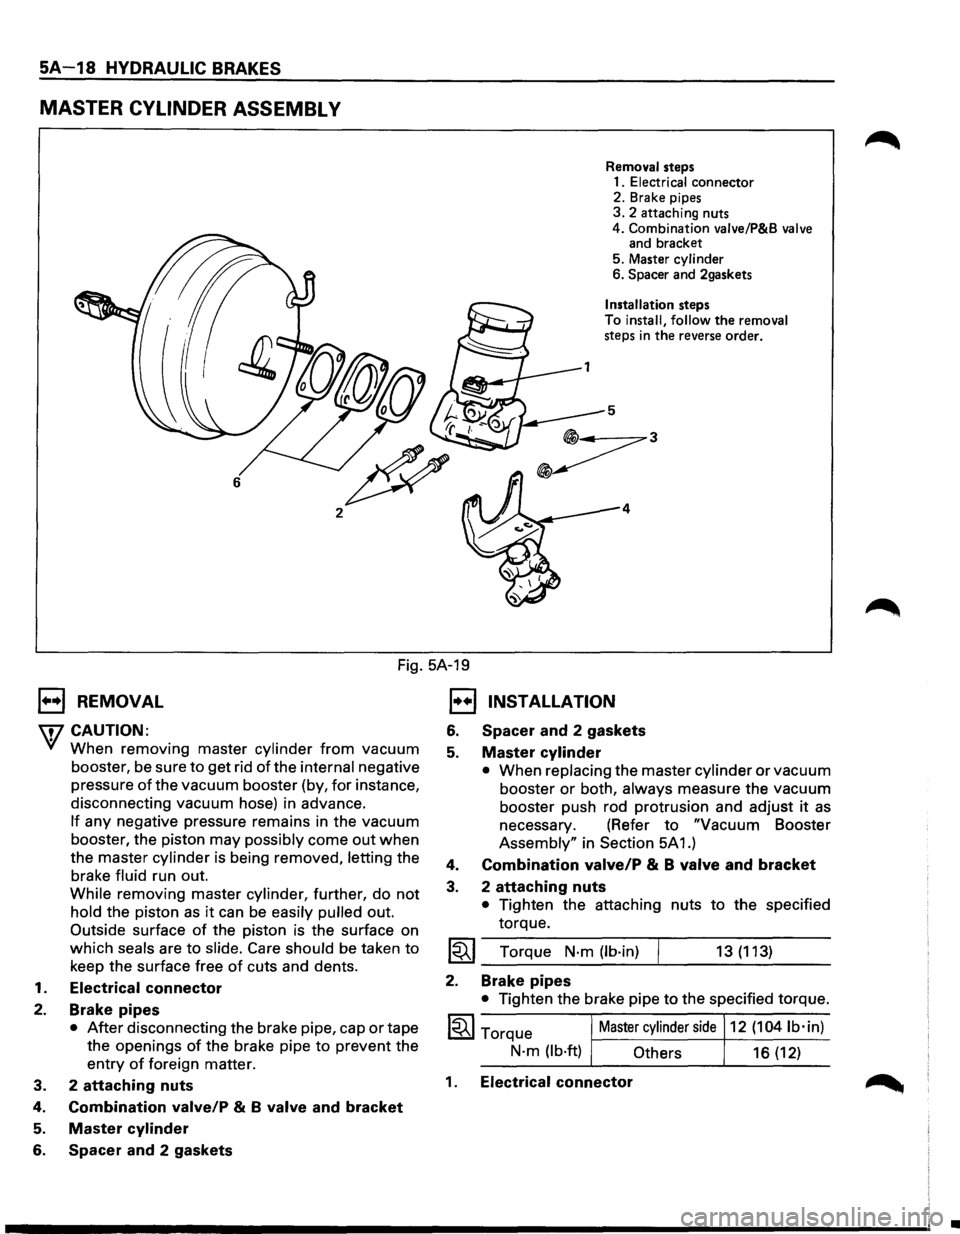
MASTER CYLINDER ASSEMBL V
6
2
Removal steps
1.
Electrical connector
2. Brake pipes
3. 2 attaching nuts
4. Combination valve/P&B
valve and bracket
5. Master cylinder
6.
Spacer and 2gaskets
Installation steps
To
install, follow the removal steps in the reverse order.
5
4
Fig. 5A-19
1••1 REMOVAL
\i7 CAUTION:
'V When removing master cylinder from vacuum
booster, be sure
to get rid of the internal negative
pressure
of the vacuum booster (by, for instance,
disconnecting vacuum hose) in advance.
If any negative pressure remains in the vacuum
booster, the piston
may possibly come out when
the master cylinder is being removed, letting the
brake fluid run out.
While removing master cylinder, further, do
not
hold the piston as it can be easily pulled out.
Outside surface of the piston is the surface on
which seals are to slide. Care should be taken to
keep the surface free of cuts and dents.
1.
Electrical connector
2. Brake pipes
• After disconnecting the brake pipe, cap or tape
the openings
of the brake pipe to prevent the
entry of foreign matter.
3. 2
attaching nuts
4. Combination valve/P & B valve and bracket
5. Master cylinder
6. Spacer and 2 gaskets
1••1 INSTALLATION
6. Spacer and 2 gaskets
5. Master cylinder
• When replacing the master cylinder or vacuum
booster
or both, always measure the vacuum
booster push rod protrusion and adjust
it as
necessary. (Refer to "Vacuum Booster
Assembly" in Section 5A 1.)
4. Combination valve/P & B valve and bracket
3. 2 attaching nuts
• Tighten the attaching nuts to the specified
torque.
~~~ Torque N·m (lb·in) 13 (113)
2. Brake pipes
• Tighten the brake pipe to the specified torque.
1~1 Torque Master cylinder side 12 (1041b·in)
N·m (lb·ft) Others
16 (12)
1. Electrical connector
•
Page 339 of 1928
HYDRAULIC BRAKES SA-19
UNIT REPAIR
MASTER CYLINDER
• The master cylinder is not repairable and must
be replaced as complete assembly if found
defective.
INSPECTION
Excessive brake pedal travel, malfunction or dragging
brake suggests
that the master cylinder is defective. In
such cases perform the following visual check.
IL•I Visual check
Make parts replacement as required if wear, distortion,
nicks, cuts, corrosion,
or other abnormal conditions
are
found through the following parts inspection;
• Master cylinder body
• Fluid reservoir
• 0-ring
rfil FUNCTIONAL INSPECTION OF MASTER
l..!aJ CYLINDER PISTON (Fig. SA-20)
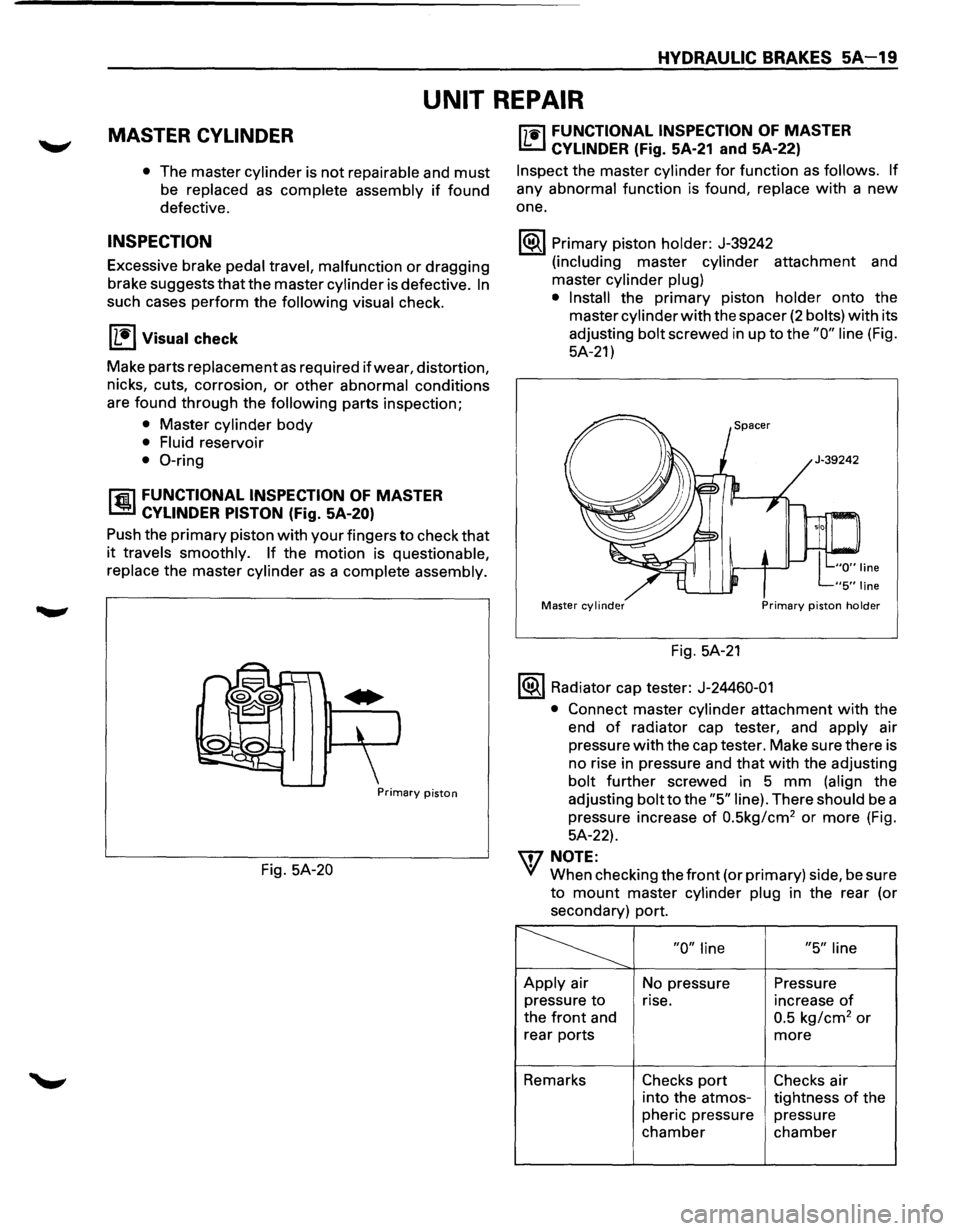
Push the primary piston with your fingers to check that
it travels smoothly. If the motion is questionable,
replace
the master cylinder as a complete assembly.
Primary piston
Fig. 5A-20
["j"1i"l FUNCTIONAL INSPECTION OF MASTER
I..!:::..J CYLINDER (Fig. 5A-21 and 5A-22)
Inspect the master cylinder for function as follows. If
any abnormal function is found, replace with a new
one.
1®.1 Primary piston holder: J-39242
(including master cylinder attachment and
master
cylinder plug)
• Install
the primary piston holder onto the
master
cylinder with the spacer (2 bolts) with its
adjusting
bolt screwed in up to the "0" line (Fig.
5A-21)
Master cylinder Primary piston holder
Fig. 5A-21
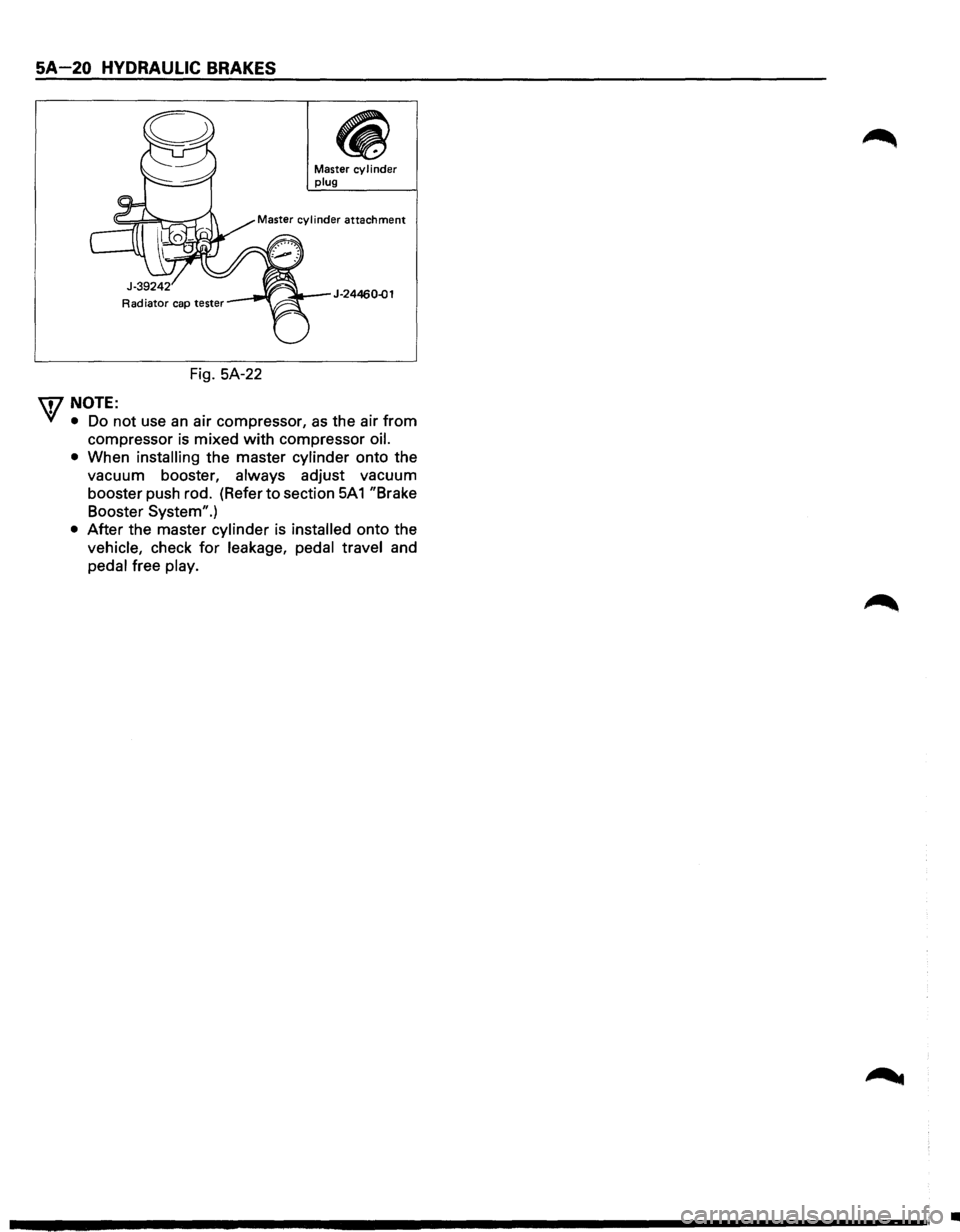
1®.1 Radiator cap tester: J-24460-01
•
Connect master cylinder attachment with the
end
of radiator cap tester, and apply air
pressure
with the cap tester. Make sure there is
no rise in pressure and
that with the adjusting
bolt further screwed in 5 mm (align the
adjusting
bolt to the "5" line). There should be a
pressure increase
of 0.5kg/cm2 or more (Fig.
5A-22).
\f7 NOTE:
VI When checking the front (or primary) side, be sure
to mount master cylinder plug in the rear (or
secondary) port.
~ "0" line "5" line
Apply air
No pressure Pressure
pressure
to rise. increase of
the front and 0.5 kg/cm2 or
rear ports more
Remarks Checks port Checks air
into the atmos-
tightness
of the
pheric pressure pressure
chamber chamber
Page 340 of 1928
SA-20 HYDRAULIC BRAKES
Fig. SA-22
\f/NOTE:
Master cy I i nder plug
J-24460..()1
VI • Do not use an air compressor, as the air from
compressor is mixed with compressor oil.
•
When installing the master cylinder onto the
vacuum booster,
always adjust vacuum
booster push rod. (Refer
to section SA 1 "Brake
Booster System".)
• After the master cylinder is installed onto the
vehicle, check for leakage, pedal travel and
pedal free play.
•