wheel ISUZU TROOPER 1995 Service Manual
[x] Cancel search | Manufacturer: ISUZU, Model Year: 1995, Model line: TROOPER, Model: ISUZU TROOPER 1995Pages: 1928
Page 201 of 1928
WHEELS AND TIRES 3E-1
SECTION 3E
WHEELS AND TIRES
W CAUTION:
When fasteners are removed, always reinstall them at the same location from which they were removed.
If a fastener needs to be replaced, use the correct part number fastener for that application. If the correct
part
number fastener is not available, a fastener of equal size and strength (or stronger) may be used.
Fasteners
that are not reused, and those requiring thread locking compound, will be called out. The correct
torque value must be used when installing fasteners that require it. If the above conditions are not
followed, parts or system damage could result.
CONTENTS
General Description . . . . . . . . . . . . . . . . . . . . . . . . . . . . . . . 3 E -1 Unit Repair .......................................... 3E-7
Diagnosis ........................................... 3E-2 Tires ............................................... 3E-7
Irregular and Premature Wear ................ 3E-2 Wheels ............................................ 3E-7
Inflation of Tires ................................. 3 E- 3 General Balance Procedure ................... 3E-8
Diagnosis List. . . . . . . . . . . . . . . . . . . . . . . . . . . . . . . . . . . . 3 E- 3 Balancing Wheel and Tire ...................... 3E-8
On-Vehicle Service ................................ 3E-6 Main Data and Specifications .................... 3E-9
Wheels ............................................ 3E-6 General Specifications ......................... 3E-9
Torque Specifications .......................... 3E-9
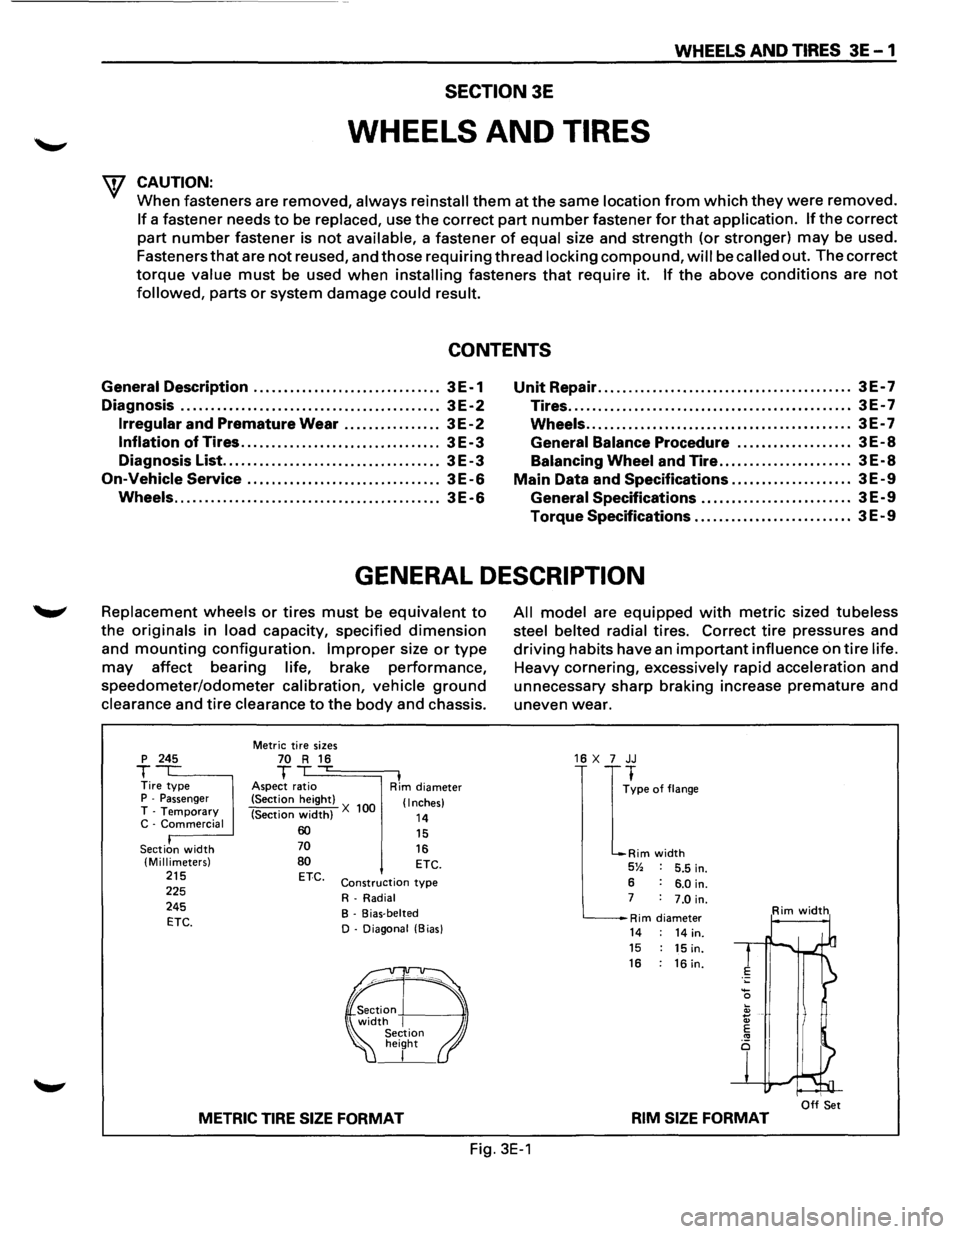
GENERAL DESCRIPTION
Replacement wheels or tires must be equivalent to
the originals in load capacity, specified dimension
and mounting configuration. Improper size or type
may affect bearing life, brake performance,
speedometer/odometer calibration, vehicle ground
clearance and tire clearance to the body and chassis.
p 245
T Tire type P -Passenger T -Temporary C -Commercial
Section
width (Millimeters) 215 225
245
ETC.
Metric tire sizes 70 R 16 T ,...
Aspect ratio I Rim diameter
(Section height)
(Section
width) X 100 (Inches)
14 60 70
80 ETC.
15
16 ETC.
Construction type
R-Radial
B - Bias-belted
D - Diagonal (Bias)
METRIC TIRE SIZE FORMAT
All model are equipped with metric sized tubeless
steel belted radial
tires. Correct tire pressures and
driving habits have an important influence on tire life.
Heavy cornering, excessively rapid acceleration and
unnecessary sharp braking increase
premature and
uneven wear.
16 X 7 JJ
I
~pe of flange
Rim width 5% 5.5 in.
6 6.0 in. 7 7.0 in.
Rim diameter Rim width
14 14 in. 15 15 in. 16 : 16 in.
I Off Set RIM SIZE FORMAT
Fig. 3E-1
Page 202 of 1928
3E-2 WHEELS AND TIRES
DIAGNOSIS
• Hard cornering • Incorrect wheel alignment
• Heavy acceleration from a stop • Under infration • Tire unevenly worn • Lack of rotation • Over inflation
Fig. 3E-2
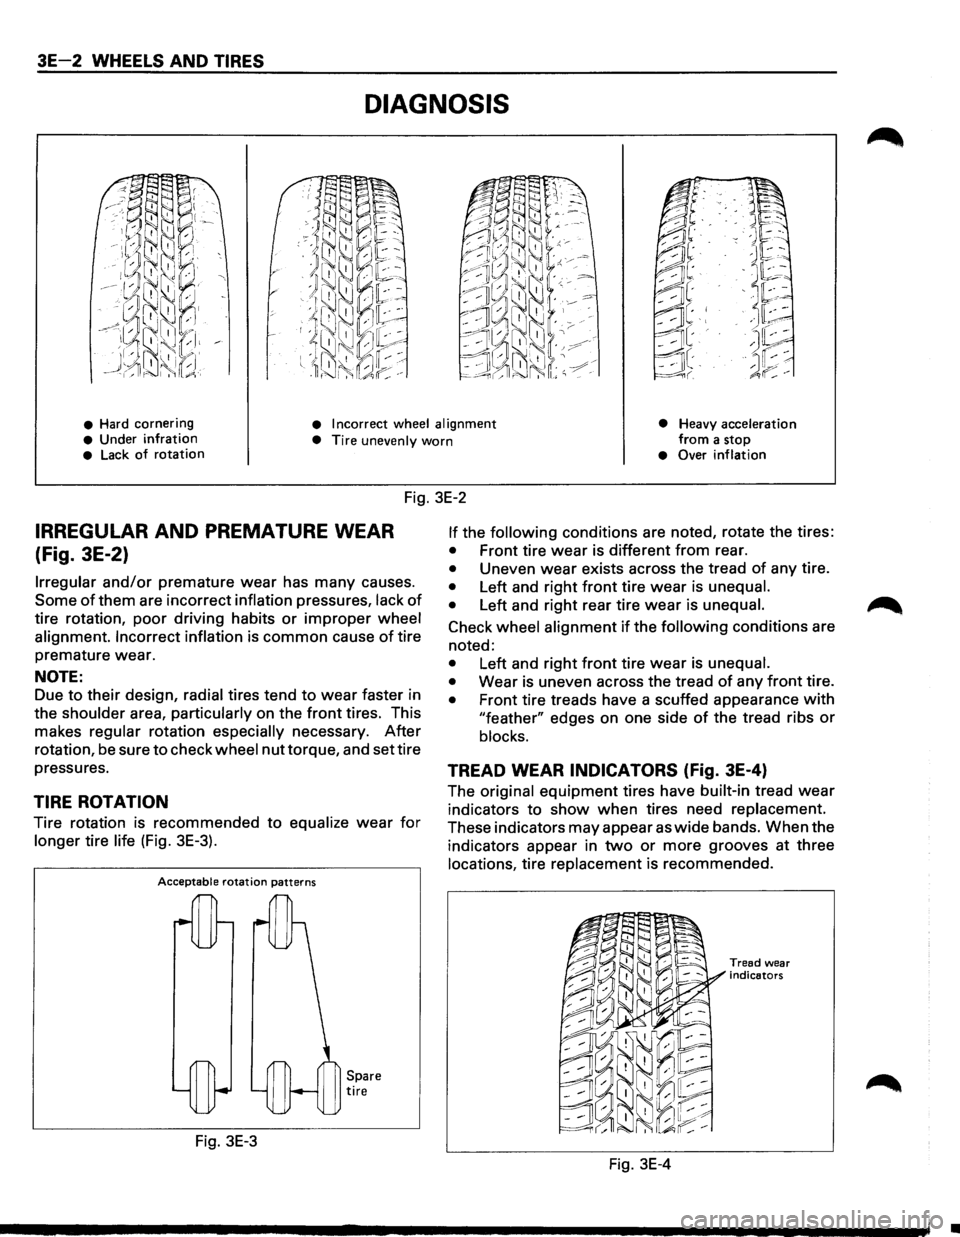
IRREGULAR AND PREMATURE WEAR
(Fig. 3E-2)
Irregular and/or premature wear has many causes.
Some of them are incorrect inflation pressures, lack of
tire rotation, poor driving habits or improper wheel
alignment. Incorrect inflation
is common cause of tire
premature wear.
NOTE:
Due to their design, radial tires tend to wear faster in
the
shoulder area, particularly on the front tires. This
makes
regular rotation especially necessary. After
rotation, be sure to check wheel nut torque, and set tire
pressures.
TIRE ROTATION
Tire rotation is recommended to equalize wear for
longer tire life (Fig. 3E-3).
Acceptable rotation patterns
Fig. 3E-3
Spare tire
If the following conditions are noted, rotate the tires:
• Front tire wear is different from rear.
• Uneven wear exists across the tread of any tire.
• Left and right front tire wear is unequal.
•
Left and right rear tire wear is unequal.
Check wheel alignment if the following conditions are
noted:
• Left and right front tire wear is unequal.
•
Wear is uneven across the tread of any front tire.
• Front tire treads have a scuffed appearance with
"feather" edges on one side of the tread ribs or
blocks.
TREAD WEAR INDICATORS (fig. 3E-4)
The original equipment tires have built-in tread wear
indicators to show when tires need replacement.
These indicators may appear as wide bands. When the
indicators appear in
two or more grooves at three
locations, tire replacement is recommended.
Fig. 3E-4
Tread wear
indicators
•
Page 203 of 1928
INFLATION OF TIRES
Tire pressure, in cold condition (after vehicle has setfor
three hours or more, and driven less than one mile),
should
be checked monthly or before any extended
trip. Tire pressure increases
approximately 15% when
the tires become hot during driving. Tire pressure
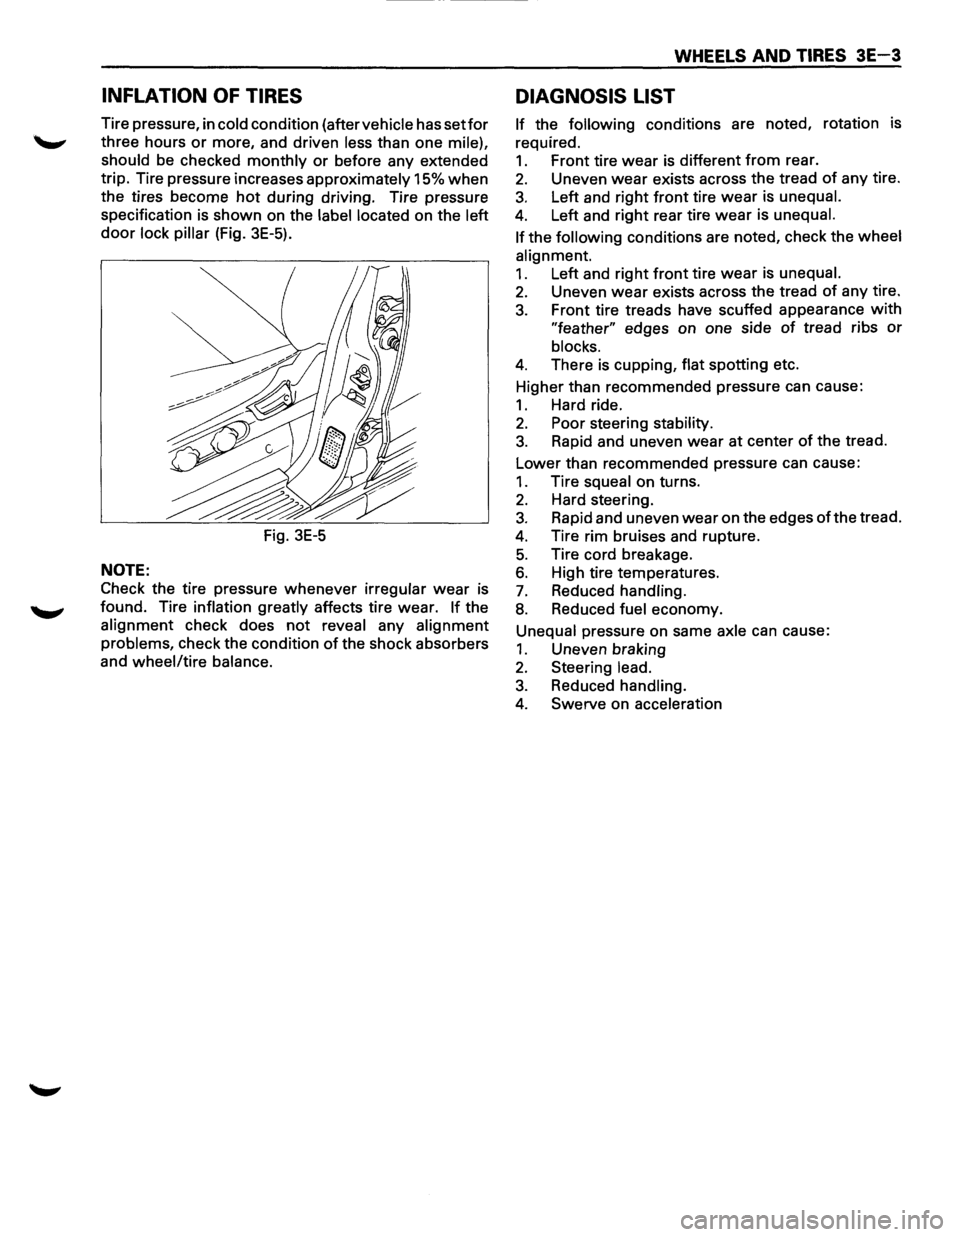
specification is shown on the
label located on the left
door lock pillar (Fig. 3E-5).
Fig.
3E-5
NOTE:
Check the tire pressure whenever irregular wear is
found. Tire
inflation greatly affects tire wear. If the
alignment check does not reveal any alignment
problems,
check the condition of the shock absorbers
and
wheel/tire balance.
WHEELS AND TIRES 3E-3
DIAGNOSIS LIST
If the following conditions are noted, rotation is
required.
1. Front tire wear is different from rear.
2. Uneven wear exists across the tread of any tire.
3. Left and right front tire wear is unequal.
4. Left and right rear tire wear is unequal.
If
the following conditions are noted, check the wheel
alignment.
1. Left and right front tire wear is unequal.
2. Uneven wear exists across the tread of any tire.
3. Front tire treads have scuffed appearance with
"feather" edges on one side of tread ribs or
blocks.
4. There is cupping, flat spotting etc.
Higher than recommended pressure can cause:
1. Hard ride.
2. Poor steering stability.
3. Rapid and uneven wear at center of the tread.
Lower than recommended pressure can cause:
1. Tire squeal on turns.
2. Hard steering.
3. Rapid and uneven wear on the edges of the tread.
4. Tire rim bruises and rupture.
5. Tire cord breakage.
6. High tire temperatures.
7. Reduced handling.
8. Reduced fuel economy.
Unequal pressure on same axle can cause:
1. Uneven braking
2. Steering lead.
3. Reduced handling.
4. Swerve on acceleration
Page 204 of 1928
3E-4 WHEELS AND TIRES
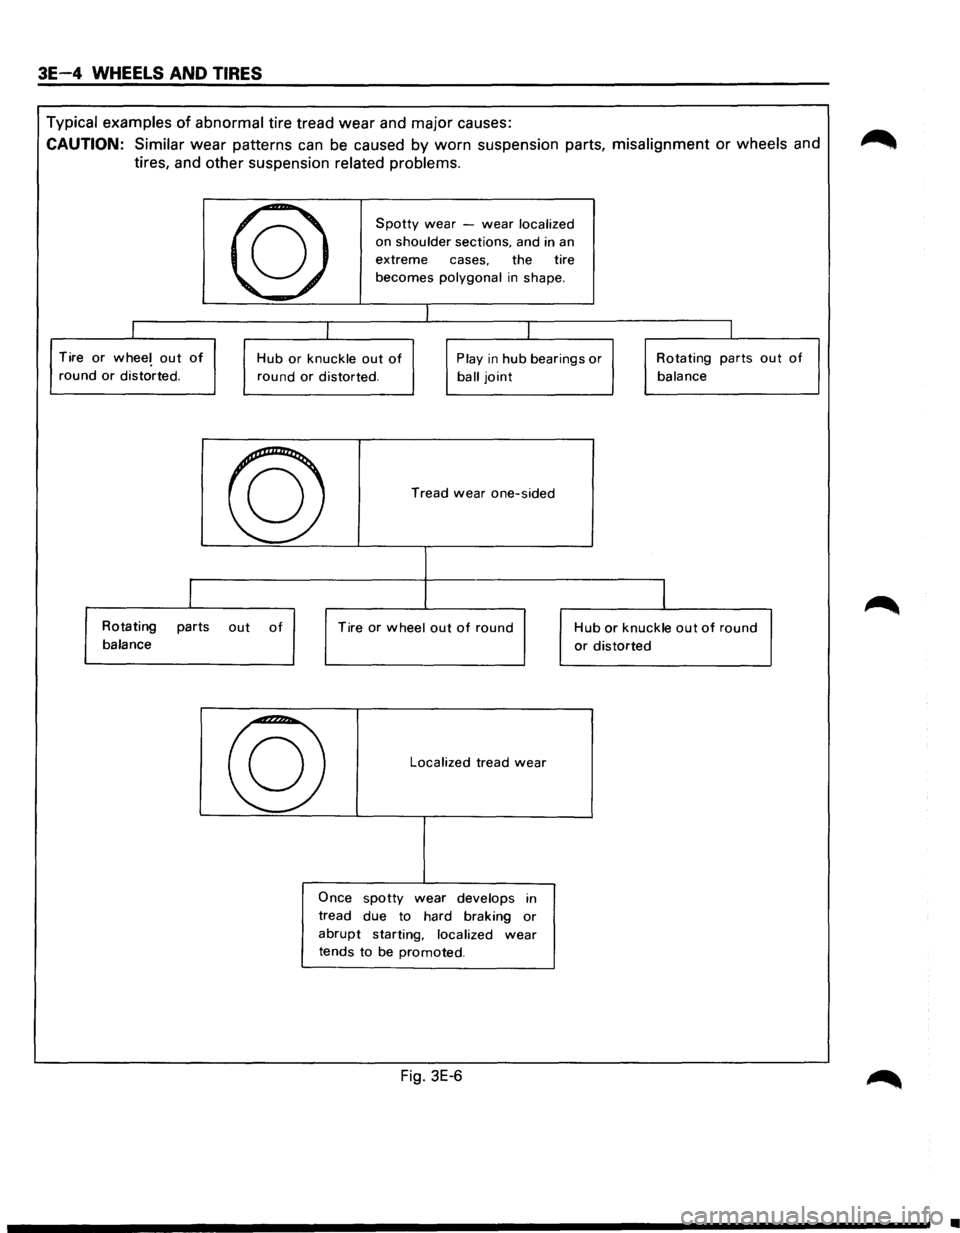
Typical examples of abnormal tire tread wear and major causes:
CAUTION: Similar wear patterns can be caused by worn suspension parts, misalignment or wheels and
tires, and other suspension
related problems.
I
Tire or wheel out of
round or distorted.
I
Rotating parts
balance
-
10
Spotty wear -wear localized
, on shoulder sections, and in an
extreme cases. the tire
'
becomes polygonal in shape.
I
I I
I
Hub or knuckle out of Play in hub bearings or Rotating parts
round or distorted.
ball joint
-
ro
out of
Tread wear one-sided
Tire or wheel out of round
Localized tread wear
Once spotty wear develops in
tread due to hard braking
or
abrupt starting, localized wear
tends to be promoted.
Fig. 3E-6
balance
I
Hub or knuckle out of round
or distorted
out of
•
Page 205 of 1928
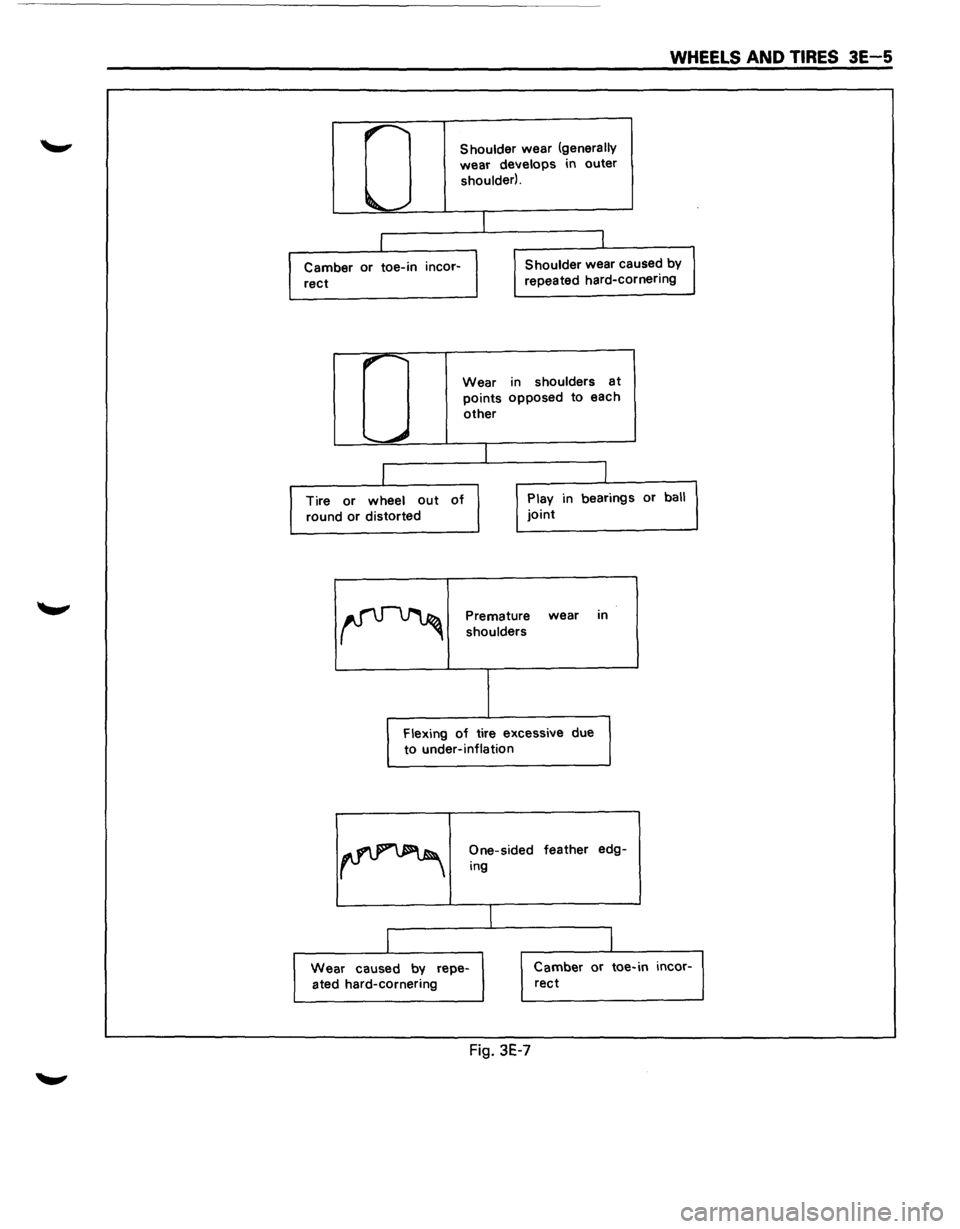
WHEELS AND TIRES 3E-5
0
Shoulder wear (generally
wear develops in outer
shoulder).
I
I I
Camber or toe-in incor- Shoulder
wear caused by
rect repeated hard-cornering
,. .........
Wear in shoulders at
points
opposed to each
other
......
""""" I
I I
Tire or wheel out of Play in bearings or ball
round or distorted joint
~
Premature wear
in
shoulders
Flexing
of tire excessive due
to under-inflation
~
One-sided feather edg-
ing
I
l -I
Wear caused
by
repe- Camber or toe-in incor-
ated hard-cornering
rect
Fig. 3E-7
Page 206 of 1928
3E 6 WHEELS AND TIRES
ON-VEHICLE SERVICE
WHEELS
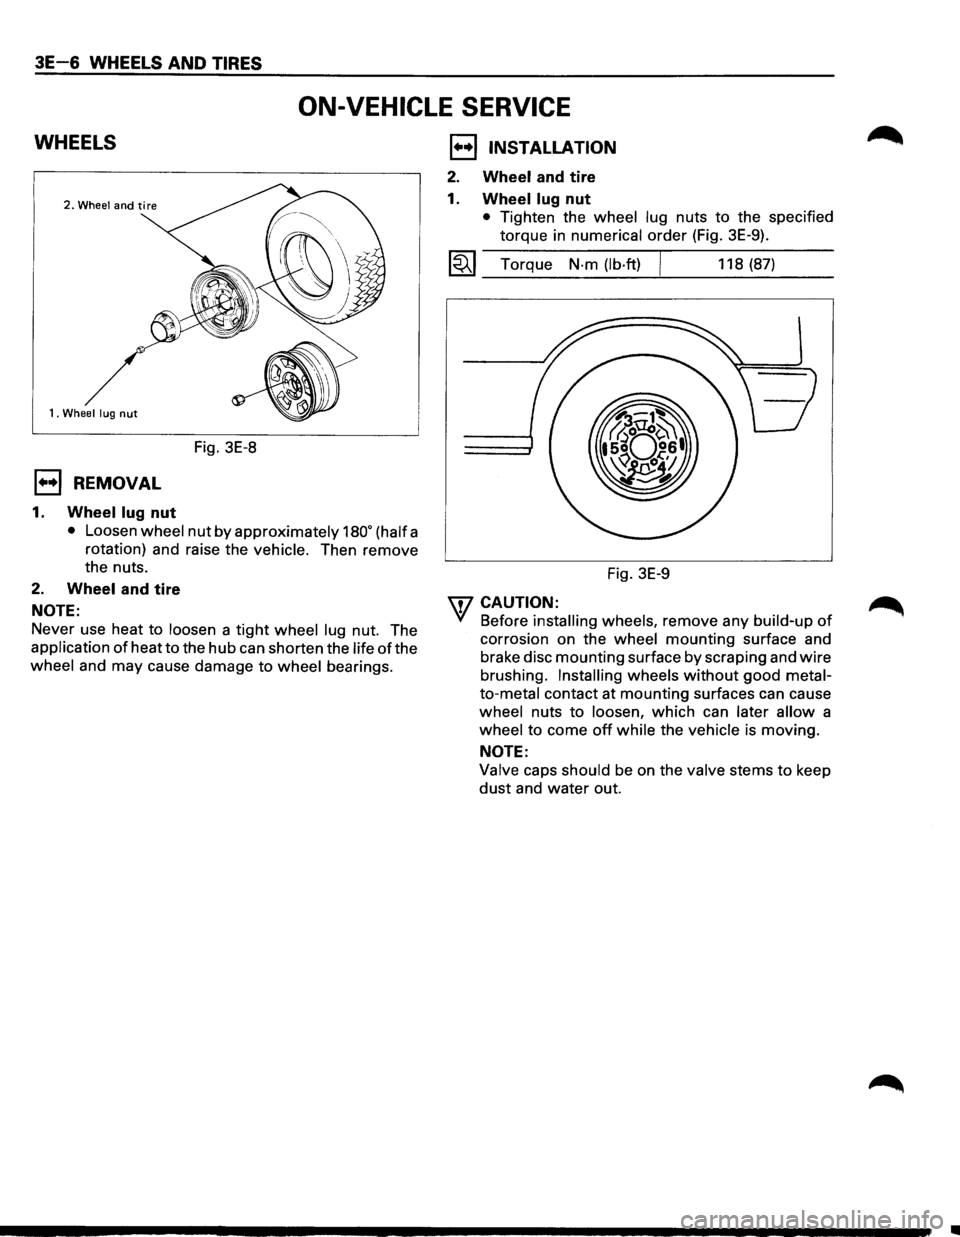
1. Wheel lug nut
Fig. 3E-8
E) REMOVAL
1. Wheel lug nut
• Loosen wheel nut by approximately 180• (half a
rotation) and raise the
vehicle. Then remove
the nuts.
2. Wheel and tire
NOTE:
Never use heat to loosen a tight wheel lug nut. The
application
of heat to the hub can shorten the life of the
wheel and may cause damage to wheel bearings.
1••1 INSTALLATION
2. Wheel and tire
1.
Wheel lug nut
• Tighten the wheel lug nuts to the specified
torque in numerical
order (Fig. 3E-9).
l~l Torque N-m (lb·ft) I 118 (87)
Fig. 3E-9
\fl CAUTION: .
'({ Before installing wheels, remove any build-up of
corrosion on the wheel mounting surface and
brake disc
mounting surface by scraping and wire
brushing. Installing wheels without good metal
to-metal contact at mounting surfaces can cause
wheel nuts to loosen, which can later allow a
wheel to come off while the vehicle is moving.
NOTE:
Valve caps should be on the valve stems to keep
dust and water out.
•
Page 207 of 1928
WHEELS AND TIRES 3E-1
TIRES
REPLACEMENT
UNIT REPAIR
WHEELS
REPLACEMENT
When replacement is necessary, the original metric
the size should be used. Most metric tire sizes do not
have exact corresponding alphanumeric tire sizes. It
is recommended that new tires be installed in pairs on
the same axle. If necessary to replace only one tire, it
should be paired with tire having the most tread, to
equalize braking traction.
w CAUTION:
Do not mix different types of tires such as radial,
bias and bias-belted tires except in emergencies,
because
vehicle handling may be seriously
affected and may result in loss of control.
TIRE DISMOUNTING
Remove valve cap on valve step and deflate the tire.
Then use a
tire changing machine to mount or
dismount tires.
Follow the equipment manufacturer's instruction. Do
not use hand tools or tire lever alone to change tires
as they may damage the tire beads or wheel rim.
TIRE MOUNTING
Rim bead seats should be cleaned with a wire brush
....._., or coarse steel wool to remove lubricants, and light
rust. Before mounting a tire, the bead area should be
well lubricated with an approved tire lubricant.
After mounting, inflate the tire to 196kPa (28 psi) so
that beads are completely seated. Inflate the air to
specified pressure and install valve cap to the stem.
\f WARNING:
Never stand over tire when inflating. Bead may
break when bead snaps over rim's safety hump
and cause serious personal injury.
Never exceed
240 kPa (35 psi) pressure when
inflating. If 240 kPa (35 psi) pressure will not
seat beads, deflate, re-lubricate and re-inflate.
Over
inflation may cause the bead to break and
cause serious
personal injury.
TIRE REPAIR
There are many different materials on the market
used to repair tires.
Manufacturers have published detailed instructions
on how and when to repair tires. These instructions
can be obtained from the tire manufacturer if they are
not included with the repair kit. Damaged
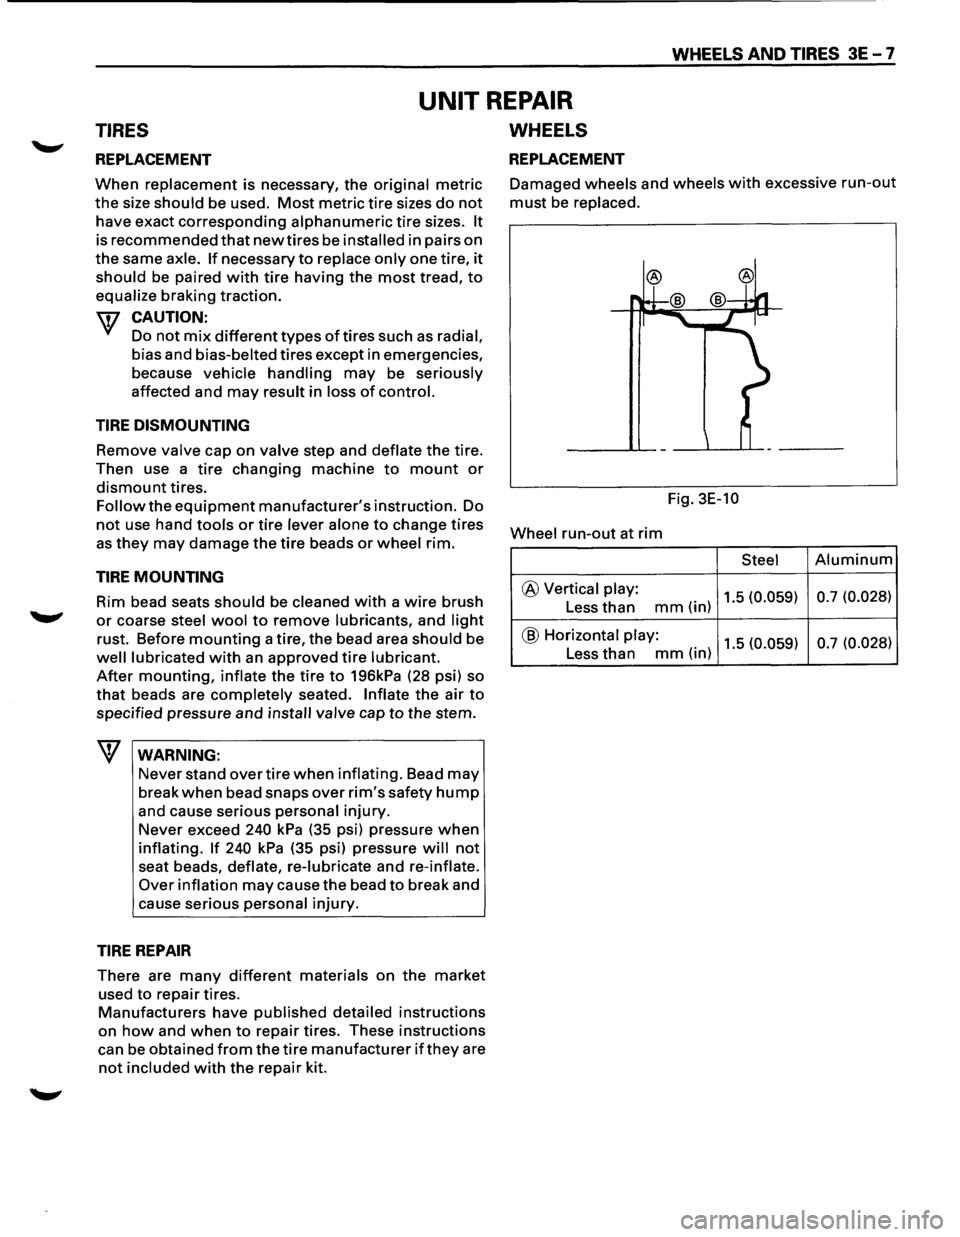
wheels and wheels with excessive run-out
must be replaced.
Fig. 3E-10
Wheel
run-out at rim
Steel Aluminum
@ Vertical play: 1.5 (0.059) 0.7
(0.028) Less than mm(in)
@ Horizontal play: 1.5 (0.059) 0.7
(0.028) Less than mm(in)
Page 208 of 1928
3E-8 WHEELS AND TIRES
GENERAL BALANCE PROCEDURE
Deposits of mud, etc. must be cleaned from the inside
of the rim.
The tire should be inspected
for the following: match
mount paint marks, bent rims, bulges, irregular tire
wear, proper
wheel size and inflation pressure. Then
balance according to the equipment manufacturer's
recommendations.
There are
two types of wheel and tire balance.
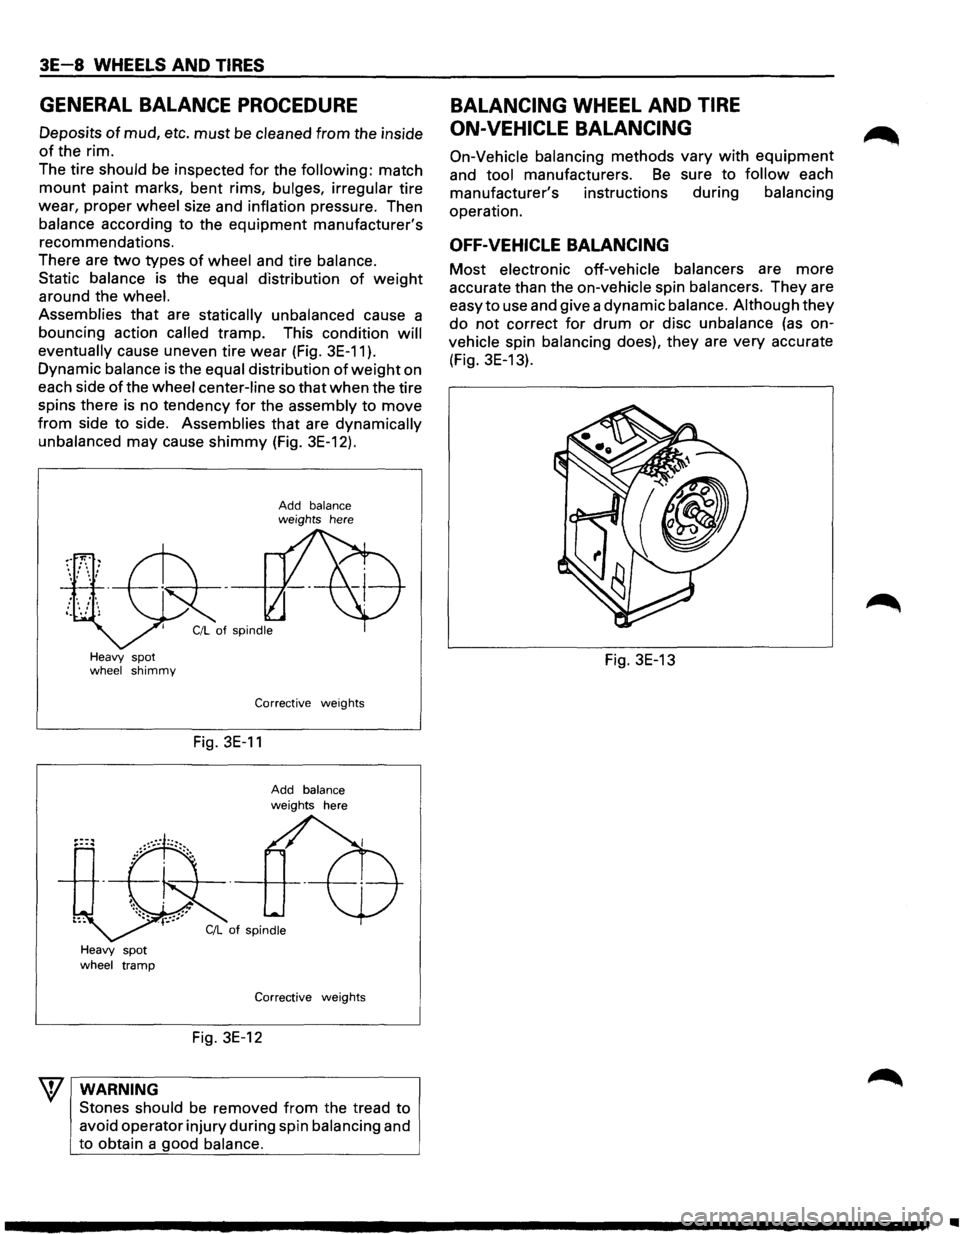
Static balance is the equal distribution
of weight
around the wheel.
Assemblies
that are statically unbalanced cause a
bouncing action
called tramp. This condition will
eventually
cause uneven tire wear (Fig. 3E-11 ).
Dynamic balance is the equal distribution of weight on
each side
of the wheel center-line so that when the tire
spins there
is no tendency for the assembly to move
from side to side. Assemblies that are dynamically
unbalanced may cause shimmy (Fig. 3E-12).
Heavy spot wheel shimmy
Heavy spot wheel tramp
WARNING
Add balance weights here
Corrective weights
Fig. 3E-11
Add balance
weights here
Corrective weights
Fig. 3E-12
Stones should
be removed from the tread to
avoid operator injury during spin balancing and
to obtain a
good balance.
BALANCING WHEEL AND TIRE
ON-VEHICLE
BALANCING
On-Vehicle balancing methods vary with equipment
and tool manufacturers. Be sure to follow each
manufacturer's instructions during balancing
operation.
OFF-VEHICLE BALANCING
Most electronic off-vehicle balancers are more
accurate than the on-vehicle spin balancers. They are
easy to use and give a dynamic balance. Although
they
do not correct for drum or disc unbalance (as on
vehicle
spin balancing does), they are very accurate
(Fig. 3E-13).
Fig. 3E-13
Page 209 of 1928
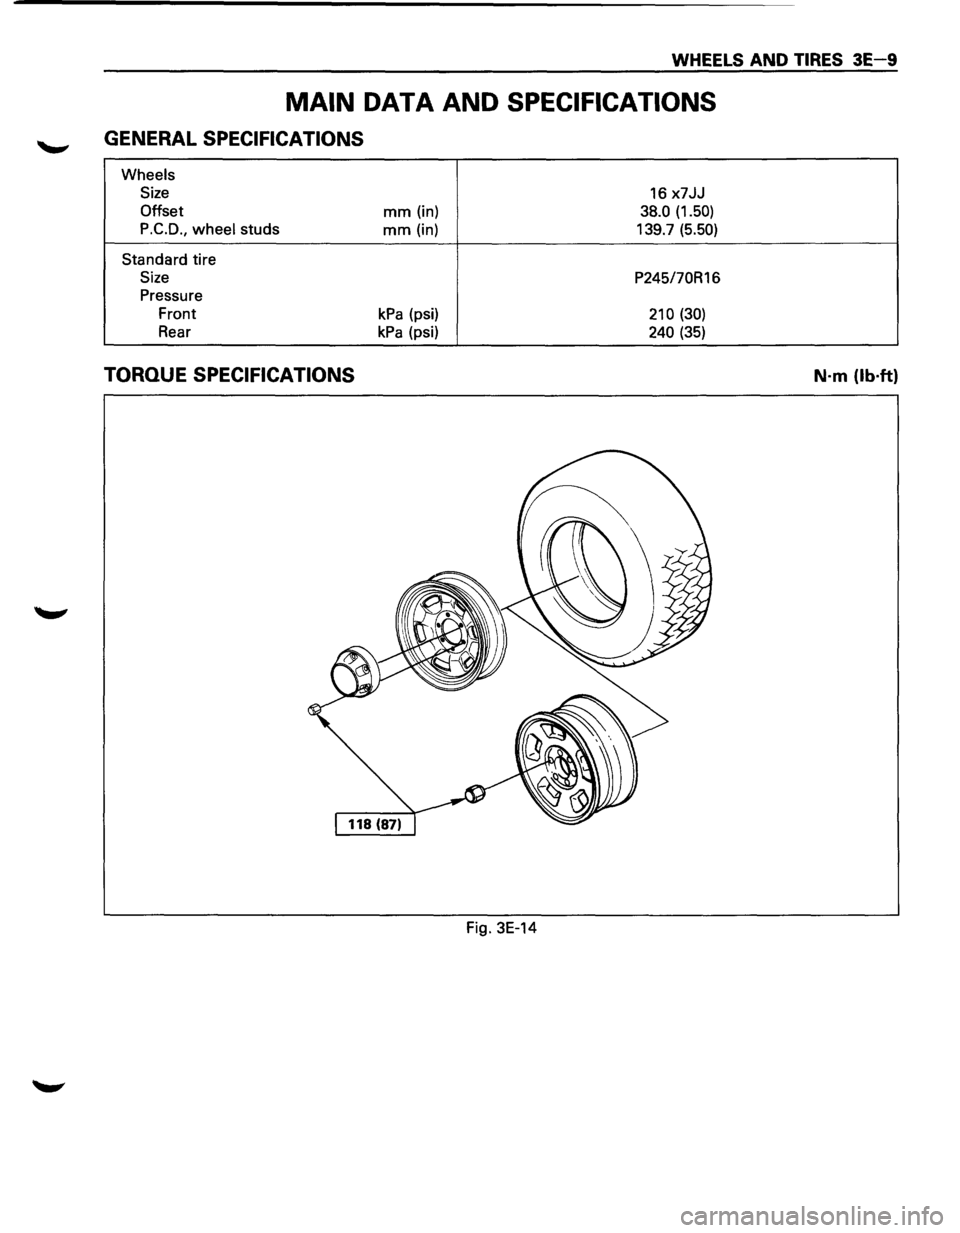
WHEELS AND TIRES 3E-9
MAIN DATA AND SPECIFICATIONS
GENERAL SPECIFICATIONS
Wheels
Size
16 x7JJ
Offset mm (in) 38.0 (1.50)
P.C.D.,
wheel studs mm (in) 139.7 (5.50)
Standard tire
Size P245/70R16
Pressure
Front
kPa (psi) 210 (30)
Rear kPa (psi) 240 (35)
TORQUE SPECIFICATIONS
Fig. 3E-14
N·m (lb·ft)
Page 211 of 1928
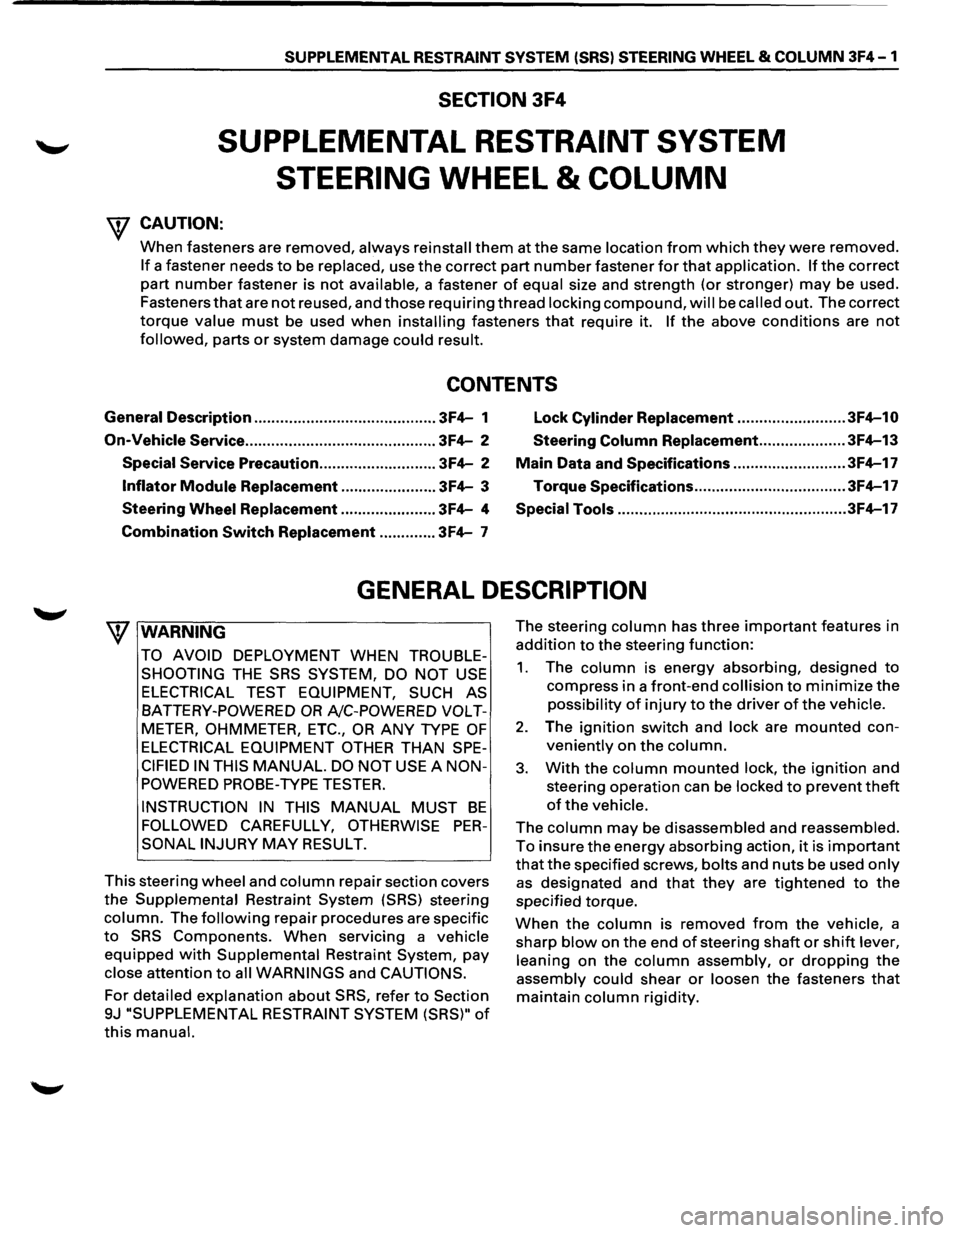
SUPPLEMENTAL RESTRAINT SYSTEM (SRSl STEERING WHEEL & COLUMN 3F4-1
SECTION 3F4
SUPPLEMENTAL RESTRAINT SYSTEM
STEERING
WHEEL & COLUMN
W CAUTION:
When fasteners are removed, always reinstall them at the same location from which they were removed.
If a fastener needs to be replaced, use the correct part number fastener for that application. If the correct
part
number fastener is not available, a fastener of equal size and strength (or stronger) may be used.
Fasteners
that are not reused, and those requiring thread locking compound, will be called out. The correct
torque value must be used when installing fasteners that require it. If the above conditions are not
followed, parts or system damage could result.
CONTENTS
General Description .......................................... 3F4-1
Lock Cylinder Replacement ......................... 3F4-10
On-Vehicle Service
............................................ 3F4-2 Steering Column Replacement .................... 3F4-13
Special Service Precaution ........................... 3F4-2 Main Data and Specifications .......................... 3F4-17
Inflator Module Replacement ...................... 3F4-3 Torque
Specifications ................................... 3F4-17
Steering Wheel Replacement ...................... 3F4-4 Special Tools ..................................................... 3F4-17
Combination
Switch Replacement ............. 3F4-7
GENERAL DESCRIPTION
W WARNING
TO AVOID DEPLOYMENT WHEN TROUBLE
SHOOTING
THE SRS SYSTEM, DO NOT USE
ELECTRICAL TEST EQUIPMENT, SUCH AS
BATTERY-POWERED OR A/C-POWERED VOLT
METER, OHMMETER, ETC., OR ANY TYPE OF
ELECTRICAL EQUIPMENT OTHER THAN SPE
CIFIED IN THIS MANUAL. DO NOT USE A NON
POWERED
PROBE-TYPE TESTER.
INSTRUCTION IN THIS MANUAL MUST BE
FOLLOWED CAREFULLY, OTHERWISE PER
SONAL INJURY MAY RESULT.
This steering
wheel and column repair section covers
the Supplemental Restraint System (SRS) steering
column. The following repair procedures are specific
to SRS Components. When servicing a vehicle
equipped with Supplemental Restraint System, pay
close attention to all WARNINGS and CAUTIONS.
For detailed explanation about SRS, refer to Section
9J "SUPPLEMENTAL
RESTRAINT SYSTEM (SRS)" of
this manual.
The steering column has three important features in
addition to the steering function:
1. The column is energy absorbing, designed to
compress in a front-end collision to minimize the
possibility of injury to the driver of the vehicle.
2. The ignition switch and lock are mounted con
veniently on the column.
3. With the column mounted lock, the ignition and
steering operation can be
locked to prevent theft
of the vehicle.
The column may be disassembled and reassembled.
To insure the energy absorbing action, it is important
that the specified screws, bolts and nuts be used only
as designated and that they are tightened to the
specified torque.
When the column is removed from the vehicle, a
sharp
blow on the end of steering shaft or shift lever,
leaning
on the column assembly, or dropping the
assembly could shear or loosen the fasteners that
maintain column rigidity.