low beam ISUZU TROOPER 1995 Workshop Manual
[x] Cancel search | Manufacturer: ISUZU, Model Year: 1995, Model line: TROOPER, Model: ISUZU TROOPER 1995Pages: 1928
Page 46 of 1928
1A-16 HEATING AND VENTILATION
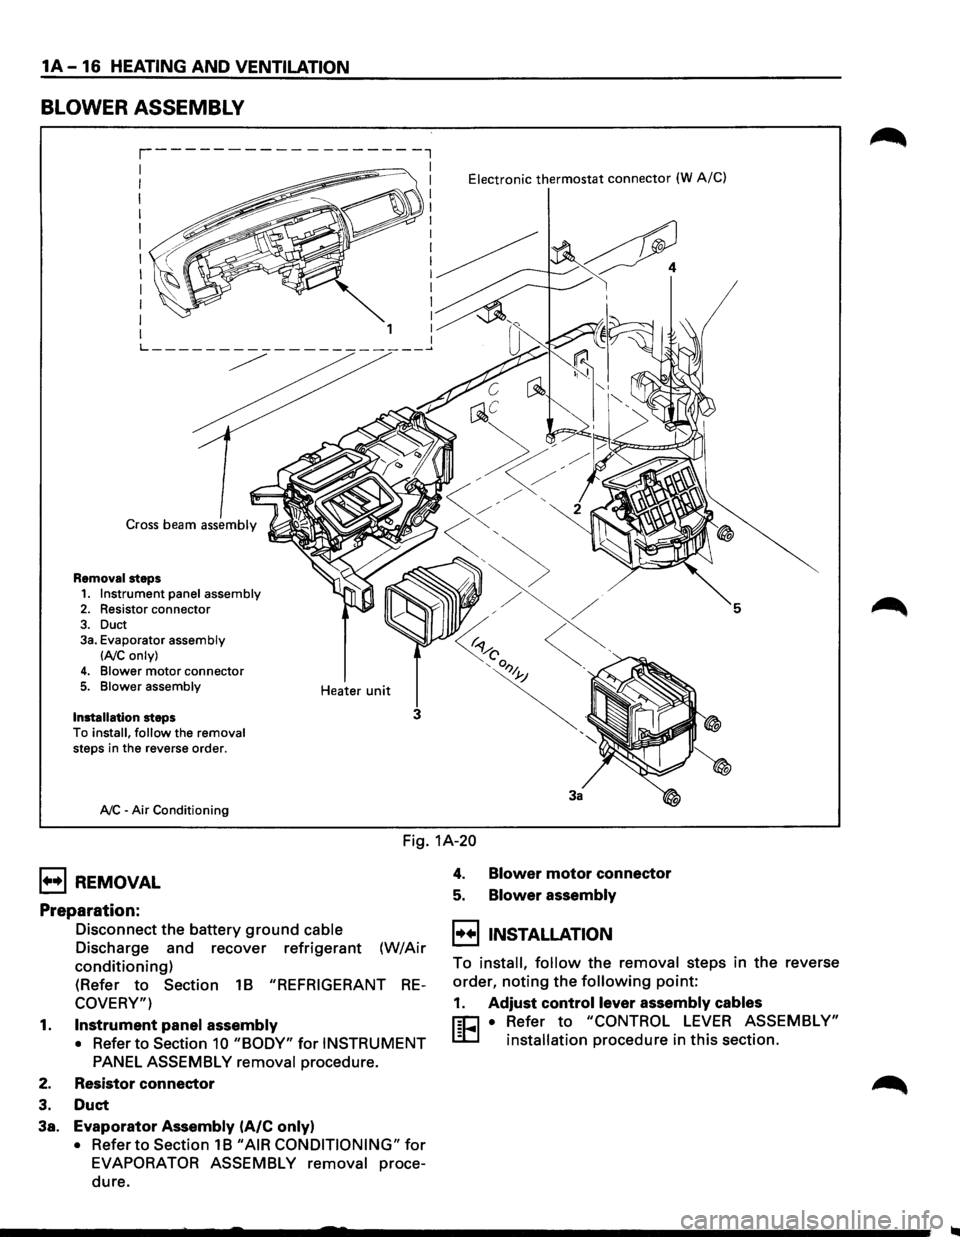
BLOWER ASSEMBLY
Cross beam assembly
Removal steps
1. Instrument panel assembly 2. Resistor connector
3. Duct 3a. Evaporator assembly
lAIC only)
4. Blower motor connector 5. Blower assembly
Installation
steps
To install, follow the removal steps in the reverse order.
A/C -Air Conditioning Heater
unit
Electronic thermostat connector (W A/C)
5
3
3a
Fig.
1A-20
1+•1 REMOVAL
Preparation:
Disconnect the battery ground cable
Discharge and recover refrigerant (W/Air
conditioning)
(Refer to Section 1B "REFRIGERANT RE
COVERY")
1. Instrument panel assembly
• Refer to Section 10 "BODY" for INSTRUMENT
PANEL ASSEMBLY removal
procedure.
2. Resistor connector
3. Duct
3a. Evaporator Assembly (A/C only)
• Refer to Section 1B "AIR CONDITIONING" for
EVAPORATOR ASSEMBLY removal proce
dure.
4. Blower motor connector
5. Blower assembly
I••IINSTALLATION
To install, follow the removal steps in the reverse
order,
noting the following point:
1. Adjust control lever assembly cables
r:C1 • Refer to "CONTROL LEVER ASSEMBLY"
L.:D installation procedure in this section.
Page 49 of 1928
HEATING AND VENTILATION 1A-19
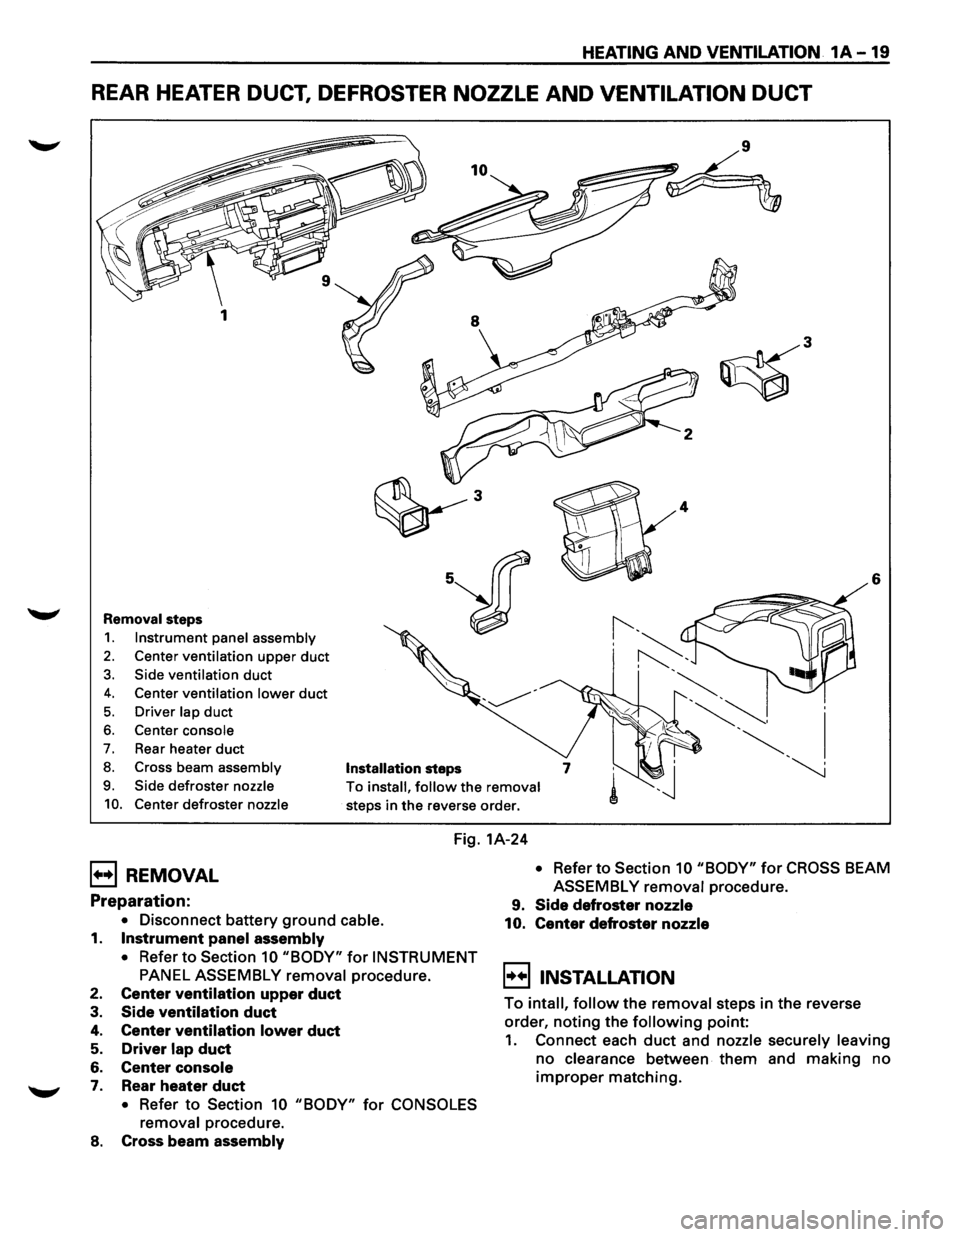
REAR HEATER DUCT, DEFROSTER NOZZLE AND VENTILATION DUCT
6
Removal steps
1. Instrument panel assembly
2. Center ventilation upper duct
3. Side ventilation duct
4. Center ventilation lower duct
5. Driver lap duct
6. Center console
7. Rear heater duct
8. Cross beam assembly Installation steps
9. Side defroster nozzle
10. Center defroster nozzle
To install, follow the removal
steps in the reverse order.
Fig. 1A-24
B REMOVAL
Preparation:
• Disconnect battery ground cable.
1. Instrument panel assembly
• Refer to Section 10 "BODY" for INSTRUMENT
PANEL ASSEMBLY removal procedure.
2. Center ventilation upper duct
3. Side ventilation duct
4. Center ventilation lower duct
5. Driver lap duct
6. Center console
7. Rear heater duct
• Refer to Section 10 "BODY" for CONSOLES
removal
procedure.
8. Cross beam assembly
• Refer to Section 10 "BODY" for CROSS BEAM
ASSEMBLY
removal procedure.
9. Side defroster nozzle
10. Center defroster nozzle
~!!) INSTALLATION
To intall, follow the removal steps in the reverse
order,
noting the following point:
1. Connect each duct and nozzle securely leaving
no clearance between them and making no
improper matching.
Page 1210 of 1928
8-20 CHASSIS ELECTRICAL
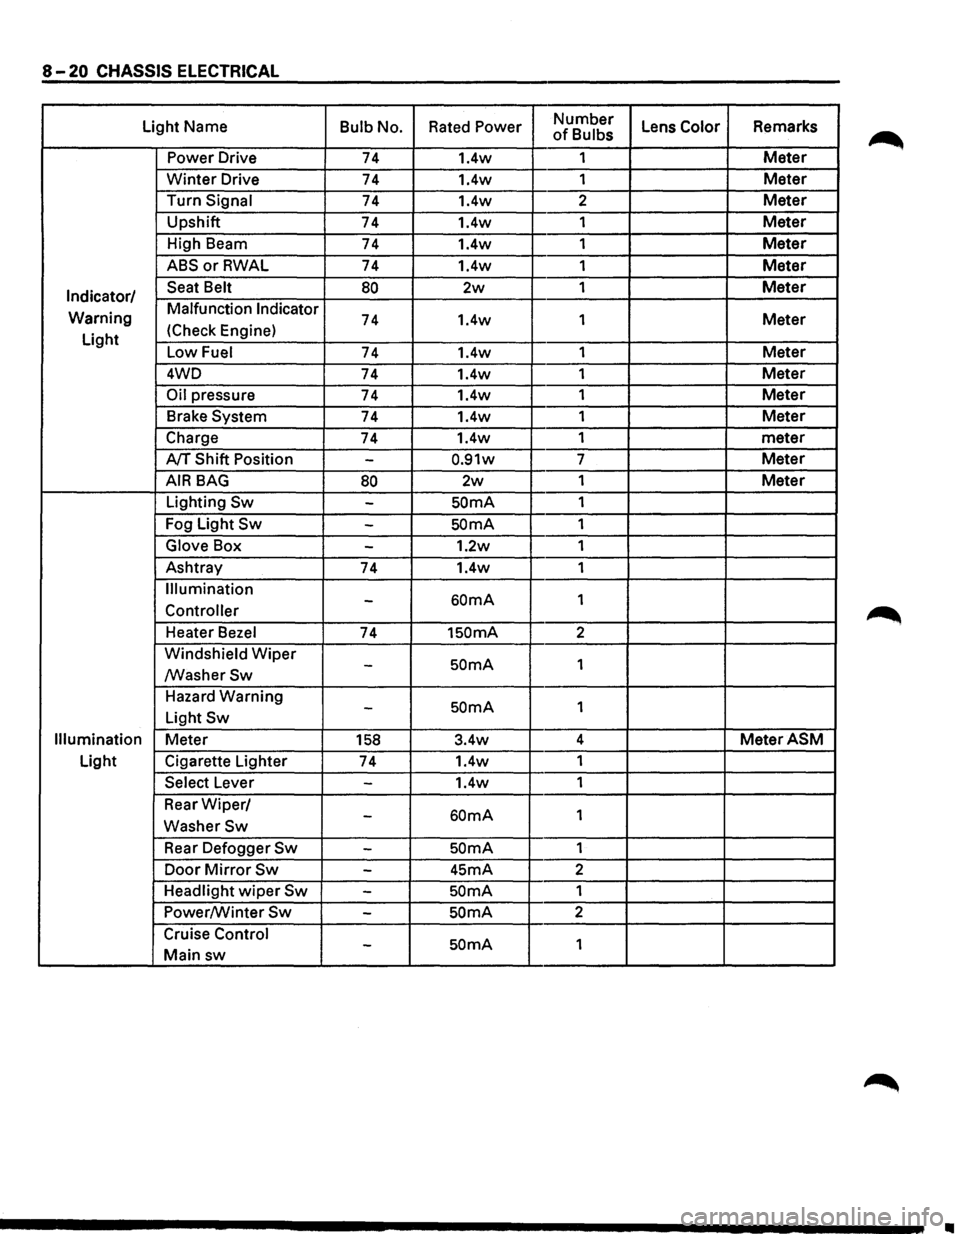
Light Name Bulb No. Rated Power Number Lens Color Remarks of Bulbs
Power Drive 74 1.4w 1
Meter
Winter Drive 74 1.4w
1 Meter
Turn Signal 74 1.4w 2 Meter
Upshift
74 1.4w 1 Meter
High Beam
74 1.4w 1 Meter
ABSorRWAL 74 1.4w 1 Meter
Indicator/ Seat Belt 80 2w 1 Meter
Warning Malfunction Indicator 74 1.4w
1 Meter
Light (Check
Engine)
Low Fuel 74 1.4w 1 Meter
4WD
74 1.4w 1 Meter
Oil pressure 74 1.4w 1 Meter
Brake System 74 1.4w 1 Meter
Charge 74 1.4w 1
meter
A/T Shift Position -0.91w 7 Meter
AIR BAG 80 2w 1 Meter
Lighting Sw -SOmA 1
Fog Light
Sw -SOmA 1
Glove Box -1.2w 1
Ashtray
74 1.4w 1
Illumination
60mA 1 -Controller
Heater Bezel 74 1SOmA 2
Windshield
Wiper SOmA 1 -/WasherSw
Hazard Warning SOmA 1 -Light Sw
Illumination Meter 158 3.4w 4 MeterASM
Light
Cigarette Lighter
74 1.4w
1
Select Lever -1.4w 1
Rear
Wiper/ 60mA 1 -WasherSw
Rear Defogger Sw -SOmA 1
Door
Mirror Sw -45mA 2
Headlight
wiper Sw -SOmA 1
Power/Winter
Sw -SOmA 2
Cruise Control
SOmA 1 -Main sw
II
Page 1248 of 1928
8-58 CHASSIS ELECTRICAL
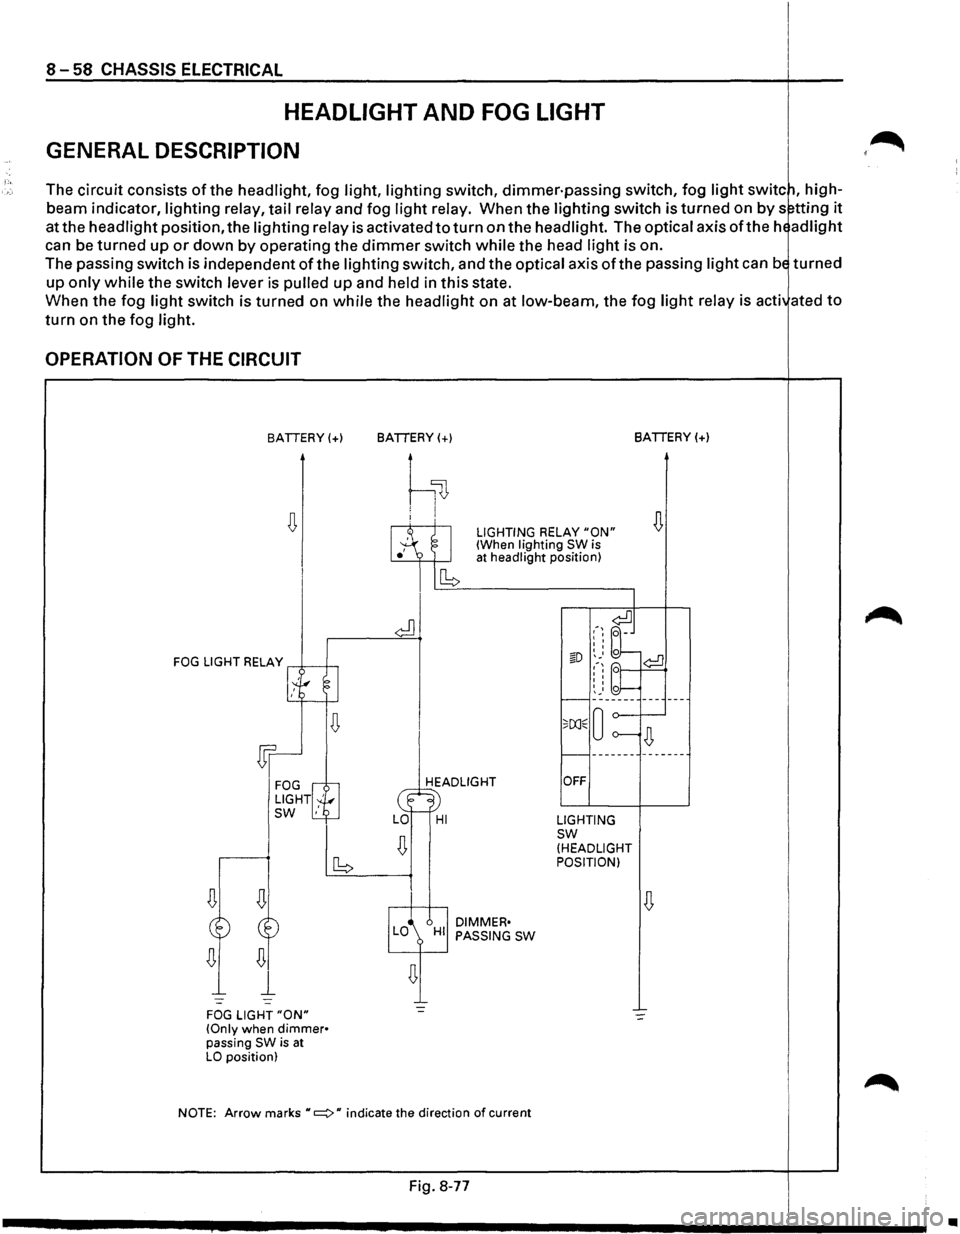
HEADLIGHT AND FOG LIGHT
GENERAL DESCRIPTION
The circuit consists of the headlight, fog light, lighting switch, dimmer·passing switch, fog light switc~, high
beam indicator,
lighting relay, tail relay and fog light relay. When the lighting switch is turned on by s~tting it
at the headlight position, the lighting relay is activated to turn on the headlight. The optical axis oft he hE ad light
can be turned up or down by operating the dimmer switch while the head light is on.
The passing switch is independent
of the lighting switch, and the optical axis ofthe passing light can bE turned
up only while the switch lever is pulled up and held in this state.
When the fog
light switch is turned on while the headlight on at low-beam, the fog light relay is acti ated to
turn on the fog light.
OPERATION OF THE CIRCUIT
BATTERY(+)
FOG LIGHT RELAY .--*-----1--,
1.~---g I
~
Wr
FOG rG LIGHT! '!r_., SW ,
FOG LIGHT "ON" (Only when dimmer• passing SW is at LO position) BATTERY(+)
BATTERY(+)
h~
I.A ~I
LIGHTING RELAY "ON" (When lighting SW is
ICb
at
headlight position)
HEADLIGHT
~· LO-HI
I
DIMMER• LO HI PASSING SW
I
.-~ ~J I I
I I
§D ~_. o ¢:!]
~-~ bt I I I I
I I 0 r--~: _____ ------
o;[X]E 0 o----~
r----------------
OFF
LIGHTING sw (HEADLIGHT
POSITION)
NOTE:
Arrow marks "c::::::>" indicate the direction of current
Fig. 8-77
J •
Page 1252 of 1928
8-62 CHASSIS ELECTRICAL
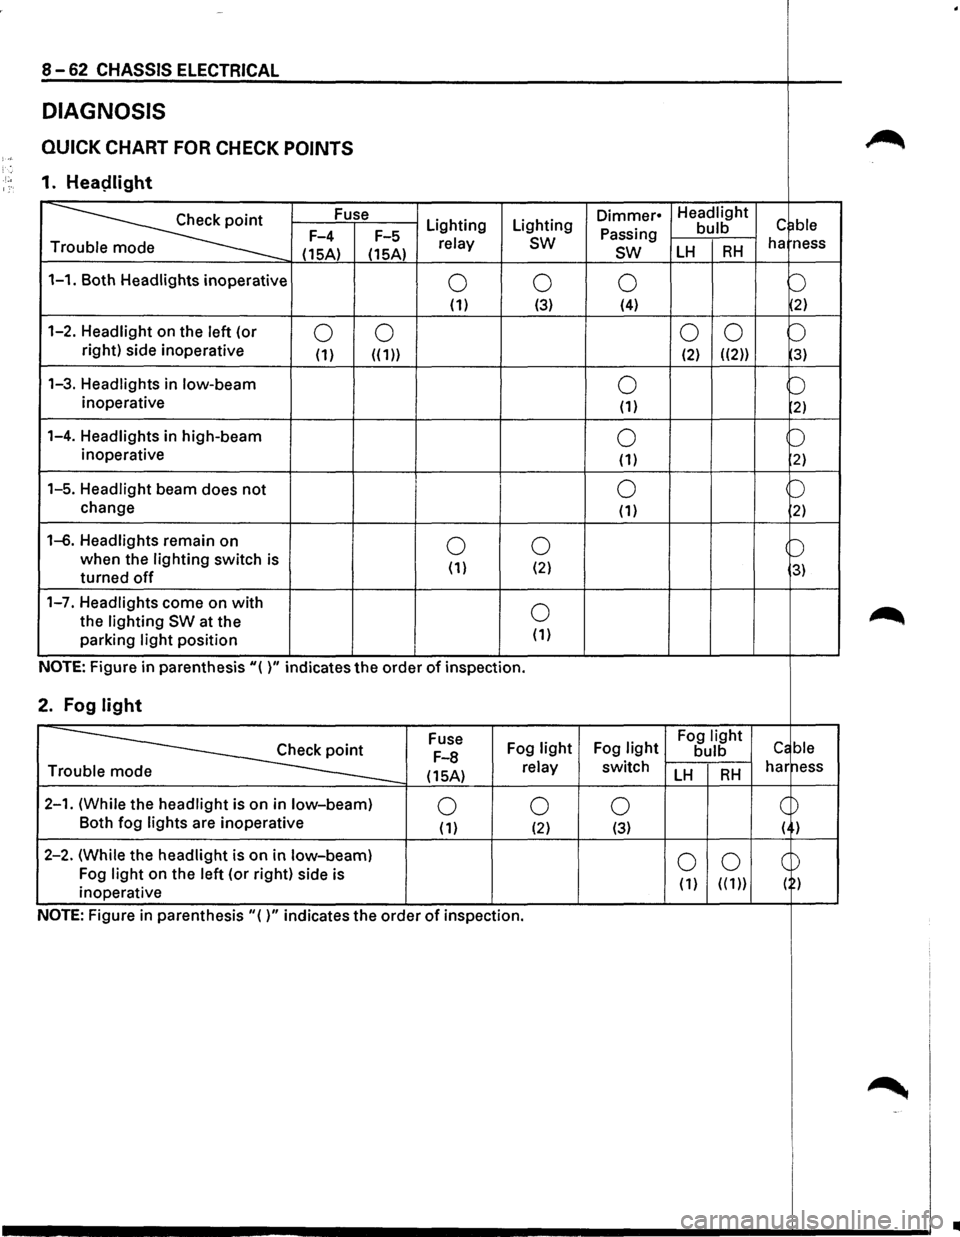
DIAGNOSIS
QUICK CHART FOR CHECK POINTS ~ )-; '. ·'·• 1. Heaplight 1:·
~
Fuse Lighting Lighting Dimmer• Headlight c ~ble Passing bulb F-4
F-5 relay sw ha ness
T
(15A) (15A) sw LH RH
1-1. Both Headlights inoperative 0 0 0 b (1) (3) (4) 2)
1-2. Headlight on
the left (or 0 0 0
0 b right) side inoperative (1) ((1)) (2) ((2)) 3)
1-3. Headlights in low-beam 0 b inoperative (1) 2)
1-4. Headlights in high-beam 0 b inoperative
(1) 2)
1-5. Headlight beam does not 0 p
change (1) 2)
1-6. Headlights remain on 0 0 b when the lighting switch is
( 1) (2) 3) turned off
1-7. Headlights come on with 0 ~ the lighting SW at the
parking light position (1)
NOTE: Figure in parenthesis"( )" indicates the order of inspection.
2. Fog light
~
Fuse
Fog light Fog light Fog light Cc ble F-8 bulb
(15A) relay switch LH RH har ness Tr
2-1. (While the headlight is on in low-beam) 0 0 0 c ~ Both
fog lights are inoperative (1) (2) (3) ( )
2-2. (While the headlight is
on in low-beam) 0 0 CD Fog light on the left (or right) side is
( 1) ( ( 1)) ( ) inoperative
NOTE: Figure
in parenthesis"()" indicates the order of inspection.
~ -'
..
Page 1254 of 1928
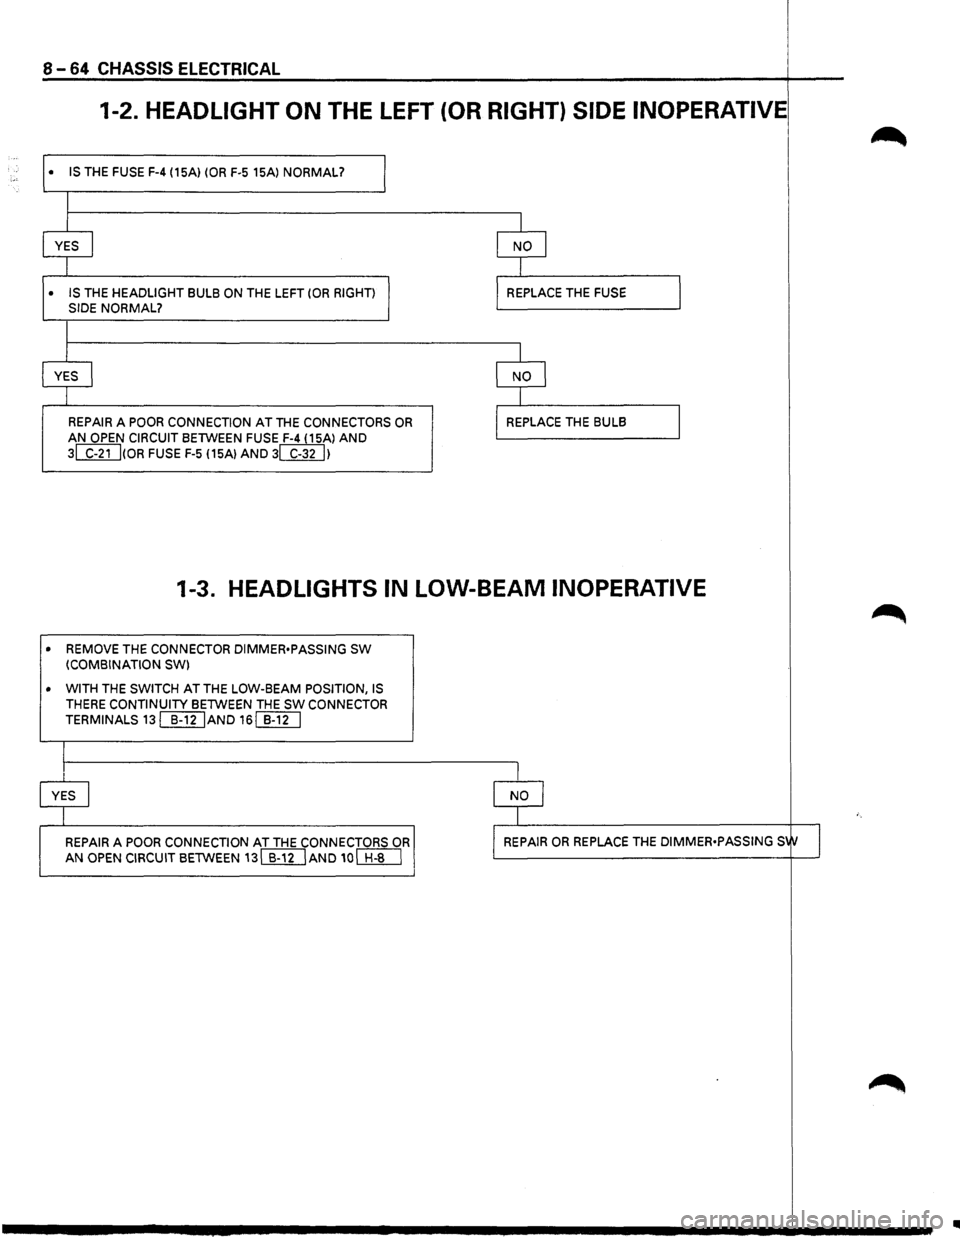
8 -64 CHASSIS ELECTRICAL
1-2. HEADLIGHT ON THE LEFT (OR RIGHT) SIDE INOPERATIVE
• IS THE FUSE F-4 (15A) (OR F-5 15Al NORMAL?
I
I
YES I
I
• IS THE HEADLIGHT BULB ON THE LEFT (OR RIGHT)
SIDE NORMAL?
I
I
YES I
I
I
REPAIR A POOR CONNECTION AT THE CONNECTORS OR
AN OPEN CIRCUIT BETWEEN FUSE F-4 (15Al AND
3~(0R FUSE F-5 115Al AND 3WUI
I
I NO I
I
I REPLACE THE FUSE
I
I NO I
I
I REPLACE THE BULB
I
I
1-3. HEADLIGHTS IN LOW-BEAM INOPERATIVE
• REMOVE THE CONNECTOR DIMMER•PASSING SW (COMBINATION SW)
• WITH
THE SWITCH AT THE LOW-BEAM POSITION, IS THERE CONTINUITY BETWEEN THE SW CONNECTOR
TERMINALS
13[[I[jAND 16[[1[]
I
I
YES I
I
REPAIR A POOR CONNECTION AT THE CONNECTORS OR
AN OPEN CIRCUIT BETWEEN 13[[ll]AND 10~
I
I NO I
I
I REPAIR OR REPLACE THE DIMMER•PASSING S1tJ I
Page 1255 of 1928
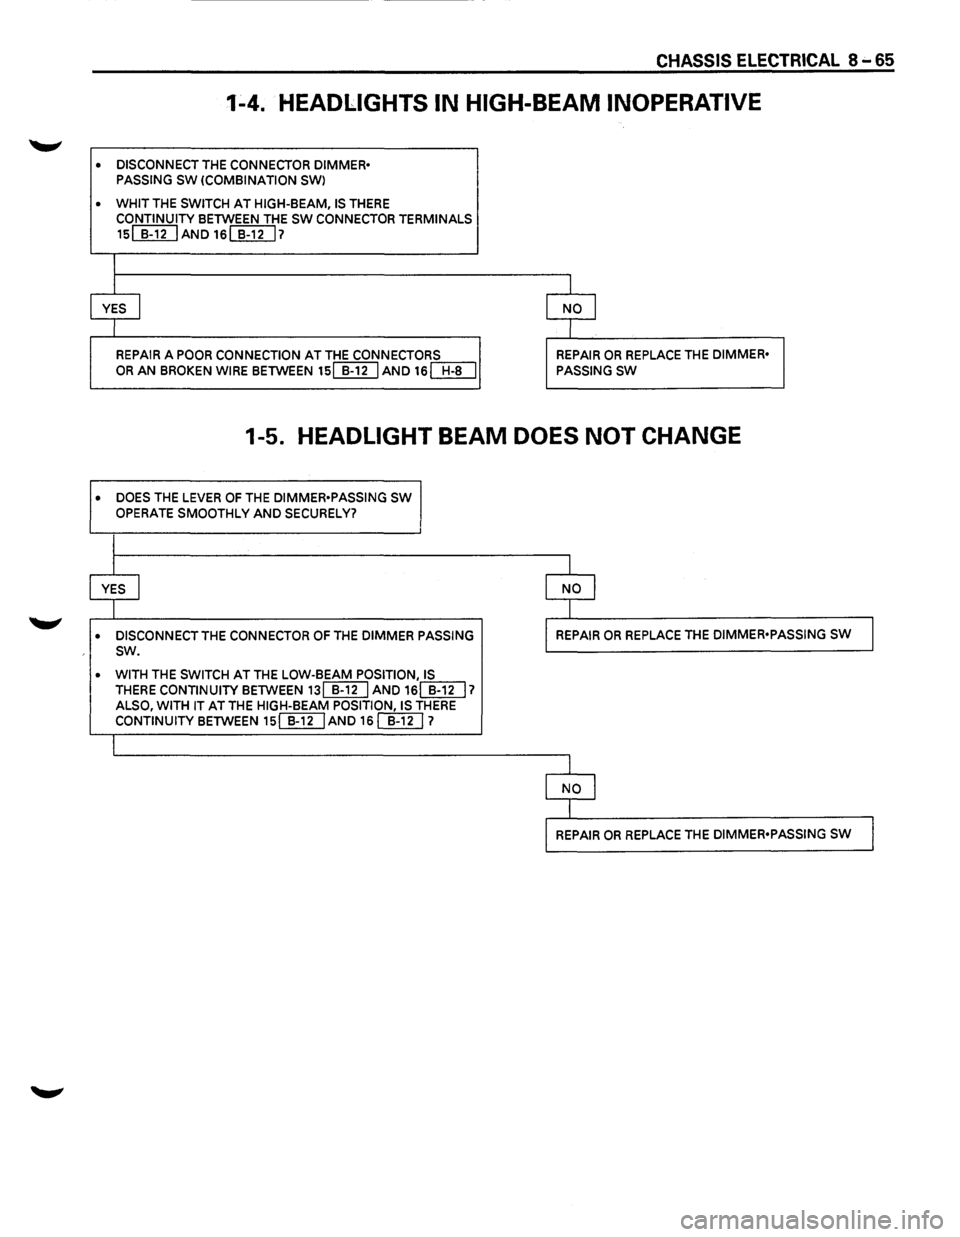
CHASSIS ELECTRICAL 8 .... 65
1-4. HEADLIGHTS IN HIGH-BEAM INOPERATIVE
• DISCONNECT THE CONNECTOR DIMMER•
PASSING SW (COMBINATION SWl
• WHIT THE SWITCH AT HIGH-BEAM, IS THERE
CONTINUITY BETWEEN THE SW CONNECTOR TERMINALS
15~AND16~7
I
I I
YES I NO I
I I
REPAIR A POOR CONNECTION AT THE CONNECTORS REPAIR OR REPLACE THE DIMMER•
OR AN BROKEN WIRE BETWEEN 15[[]IJAND 16[Jf[J PASSING SW
1-5. HEADLIGHT BEAM DOES NOT CHANGE
• DOES THE LEVER OF THE DIMMER•PASSING SW
OPERATE SMOOTHLY AND SECURELY?
I
I I
YES I
I NO I
I I
• DISCONNECT THE CONNECTOR OF THE DIMMER PASSING I REPAIR OR REPLACE THE DIMMER•PASSING sw J sw.
• WITH THE SWITCH AT THE LOW-BEAM POSITION, IS THERE CONTINUITY BETWEEN 13[[g] AND 16(]]U 1 ALSO, WITH IT AT THE HIGH-BEAM POSITION, IS THERE CONTINUITY BETWEEN 15(]]UAND 16 []}[) 1
I
l
I NO I
I
l REPAIR OR REPLACE THE DIMMER•PASSING SW J
Page 1257 of 1928
•
•
•
•
•
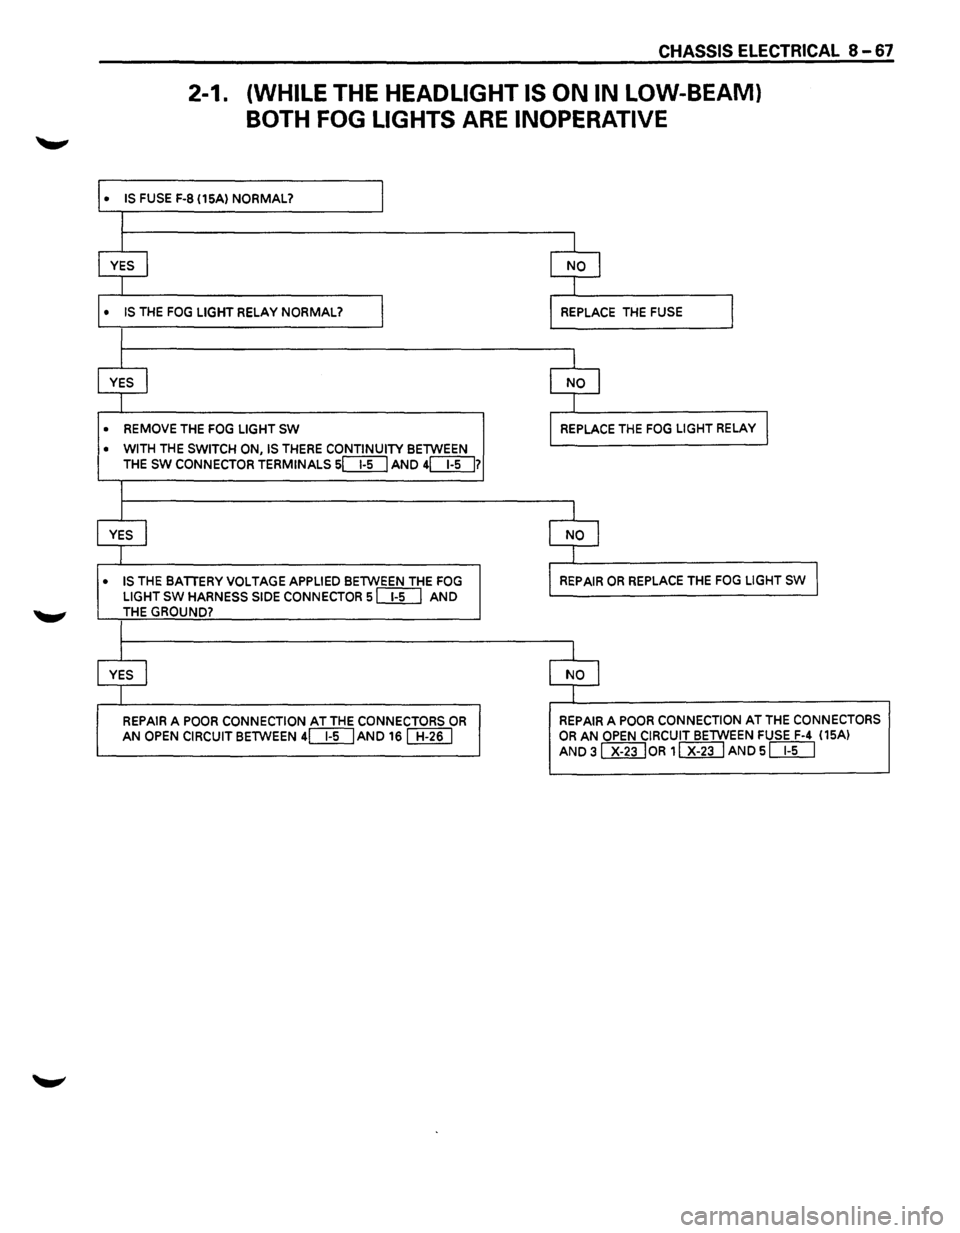
CHASSIS ELECTRICAL 8-67
2-1. (WHILE THE HEADLIGHT IS ON IN LOW-BEAM}
BOTH FOG LIGHTS ARE INOPERATIVE
IS FUSE F-8 (15A) NORMAL? I
I
I I
YES I NO I
I j
IS THE FOG LIGHT RELAY NORMAL? I REPLACE THE FUSE I
I
I j
YES I NO I
I I
REMOVE THE FOG LIGHT SW REPLACE THE FOG LIGHT RELAY I
WITH THE SWITCH ON, IS THERE CONTINUITY BETWEEN
THE SW CONNECTOR TERMINALS sc:::E[J AND 4[}[]7
I
I I
YES I NO j
I J
IS THE BATTERY VOLTAGE APPLIED BETWEEN THE FOG REPAIR OR REPLACE THE FOG LIGHT sw I
LIGHT SW HARNESS SIDE CONNECTOR sill] AND THE GROUND?
I
I I
YES I NO I
I I
REPAIR A POOR CONNECTION AT THE CONNECTORS OR REPAIR A POOR CONNECTION AT THE CONNECTORS
AN OPEN CIRCUIT BETWEEN 4[}[]AND 16 [[ill OR AN OPEN CIRCUIT BETWEEN FUSE F-4 (15AI
AND 31 x-23 loR 1 Wi] AND s DD
Page 1258 of 1928
8-68 CHASSIS ELECTRICAL
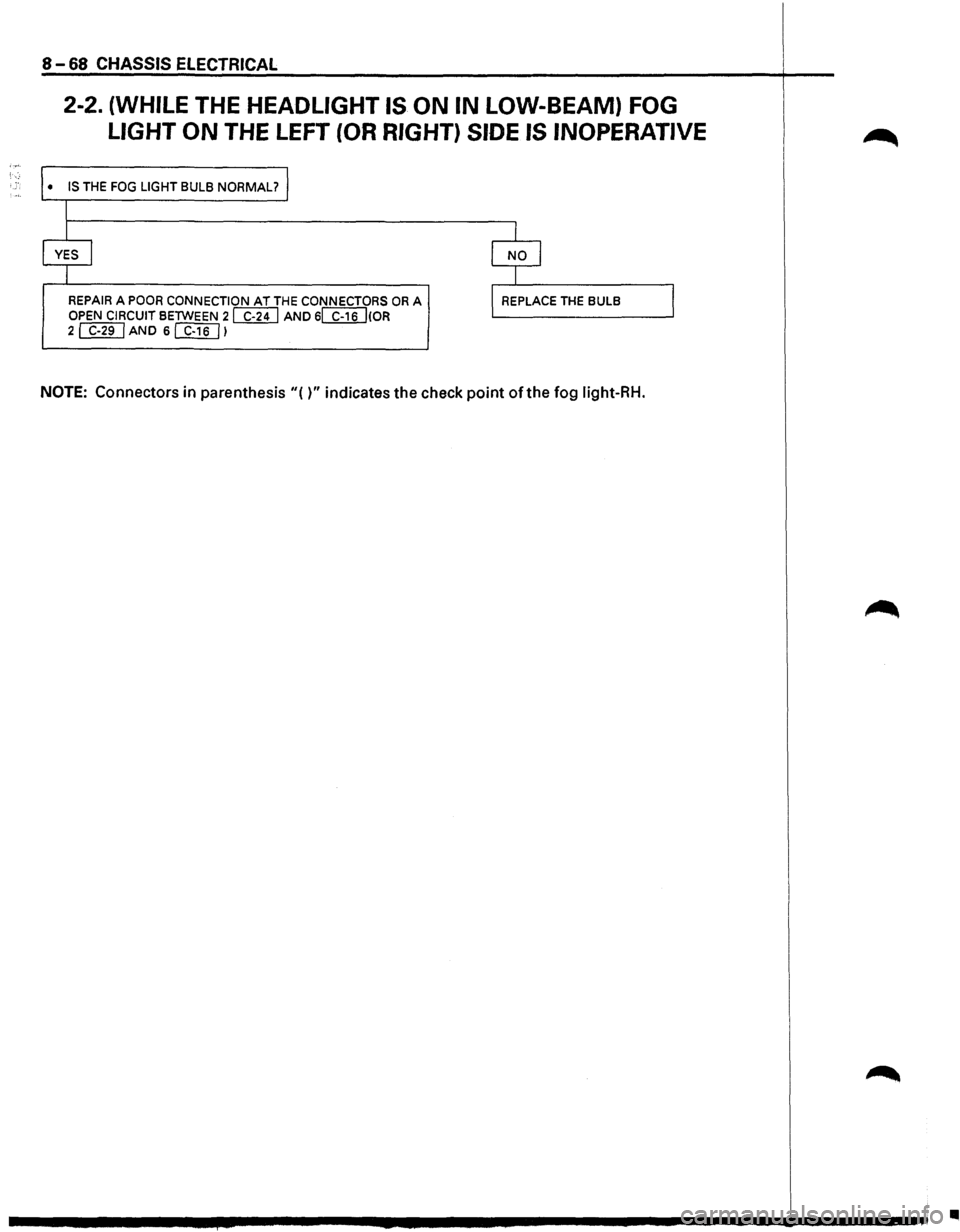
2-2. (WHILE THE HEADLIGHT IS ON IN LOW-BEAM) FOG
LIGHT
ON THE LEFT (OR RIGHT) SIDE IS INOPERATIVE
• IS THE FOG LIGHT BULB NORMAL?
I
I
YES I
I
REPAIR A POOR CONNECTION AT THE CONNECTORS OR A OPEN CIRCUIT BETWEEN 2 WU AND 6~(0R 2~AND 6[f}[]l
I
I NO I
I
l REPLACE THE BULB
NOTE: Connectors in parenthesis"()" indicates the check point of the fog light-RH.
I
•
Page 1261 of 1928
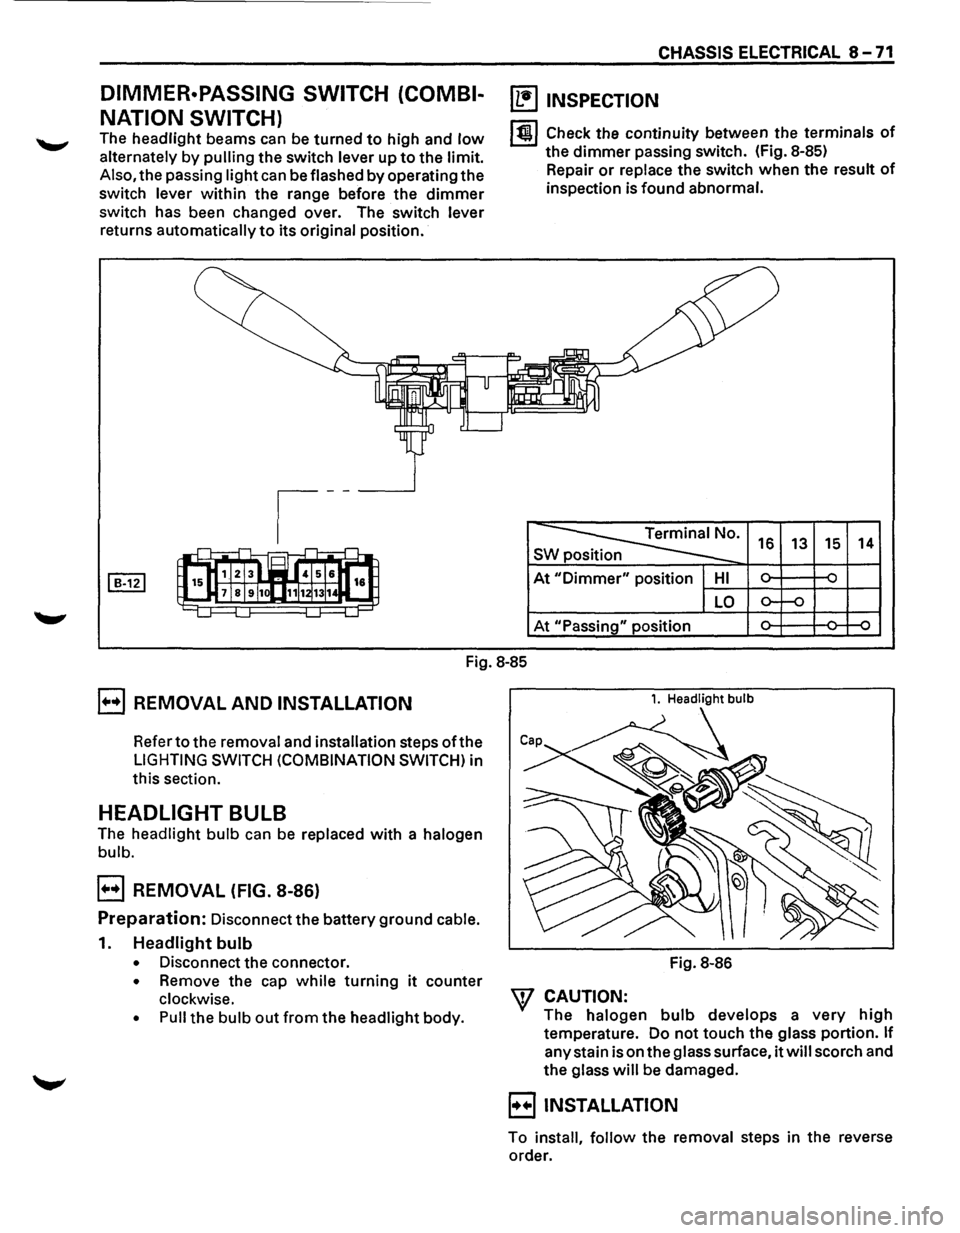
DIMMER·PASSING SWITCH (COMBI
NATION SWITCH)
The headlight beams can be turned to high and low
alternately by pulling the switch lever up to the limit.
Also, the passing light can be flashed by operating the
switch lever within the range before the dimmer
switch has been changed over. The switch lever
returns automatically to its original position.
CHASSIS ELECTRICAL 8 -71
~ INSPECTION
lt!l Check the continuity between the terminals of
the dimmer passing switch. (Fig. 8-85)
Repair
or replace the switch when the result of
inspection is found abnormal.
~· s 16 13 15 14
At "Dimmer" position HI ~ ~ -
LO o-f-o
At "Passing" position ~ ~ ~
Fig.
8-85
E] REMOVAL AND INSTALLATION
Refer to the removal and installation steps oft he
LIGHTING SWITCH (COMBINATION SWITCH) in
this section.
HEADLIGHT BULB
The headlight bulb can be replaced with a halogen
bulb.
E] REMOVAL (FIG. 8-86)
Preparation: Disconnect the battery ground cable.
1. Headlight bulb
• Disconnect the connector.
• Remove the cap while turning it counter
clockwise.
• Pull the bulb out from the headlight body.
1. Headlight bulb
Fig. 8-86
W CAUTION:
The halogen bulb develops a very high
temperature. Do not touch the glass portion. If
any stain is on the glass surface, it will scorch and
the glass will be damaged.
B INSTALLATION
To install, follow the removal steps in the reverse
order.