sensor ISUZU TROOPER 1998 Service Repair Manual
[x] Cancel search | Manufacturer: ISUZU, Model Year: 1998, Model line: TROOPER, Model: ISUZU TROOPER 1998Pages: 3573, PDF Size: 60.36 MB
Page 3024 of 3573
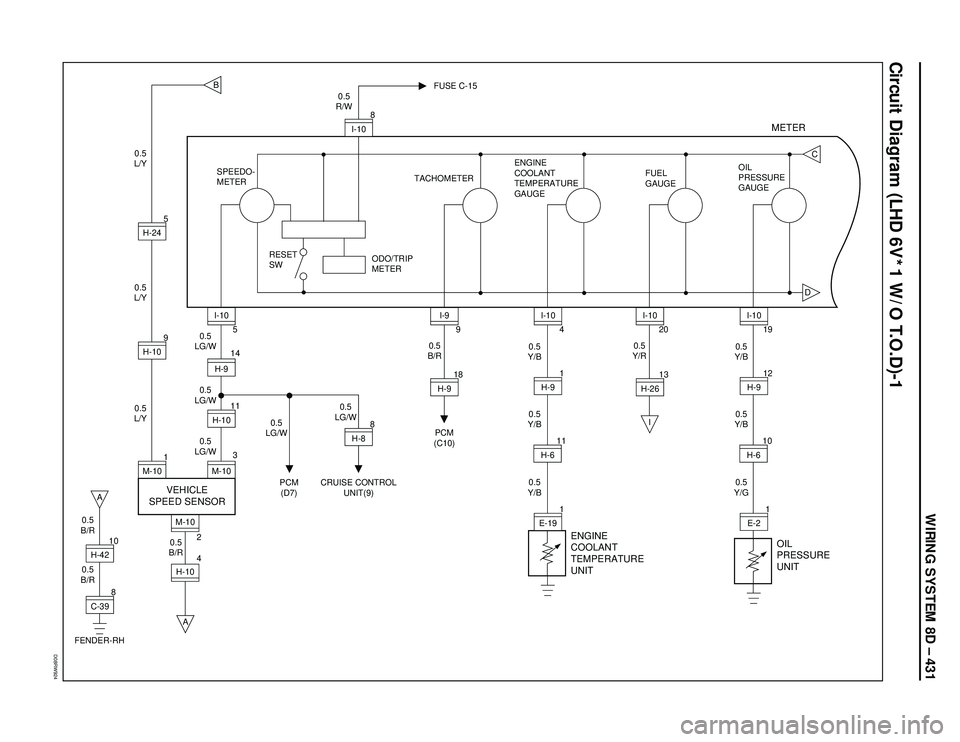
WIRING SYSTEM 8D – 431
D08RW924
Circuit Diagram (LHD 6V*1 W/O T.O.D)-1
8
C-3910H-42
0.5
B/R0.5
B/R 0.5
B/R
B
DC
A
FENDER-RH
H-104M-10
2A
I 0.5
L/Y0.5
L/Y0.5
L/Y
1
M-109H-105H-24
0.5
LG/W0.5
LG/W
0.5
LG/W0.5
LG/W 0.5
LG/W0.5
R/W
SPEEDO-
METER
RESET
SWTACHOMETERENGINE
COOLANT
TEMPERATURE
GAUGEFUEL
GAUGEOIL
PRESSURE
GAUGE FUSE C-15
3
M-10145H-9
11H-10
VEHICLE
SPEED SENSOR
I-10
0.5
Y/B0.5
Y/B0.5
Y/B
1
E-191 4H-9
11H-6I-10
8
H-8
PCM
(D7)CRUISE CONTROL
UNIT(9)0.5
B/R
18
H-9
PCM
(C10)9I-9
0.5
Y/R
13H-2620I-10
ENGINE
COOLANT
TEMPERATURE
UNIT
0.5
Y/G0.5
Y/B0.5
Y/B
1E-212 19H-9
10H-6I-10
OIL
PRESSURE
UNIT
8
I-10
METER
ODO/TRIP
METER
Page 3029 of 3573
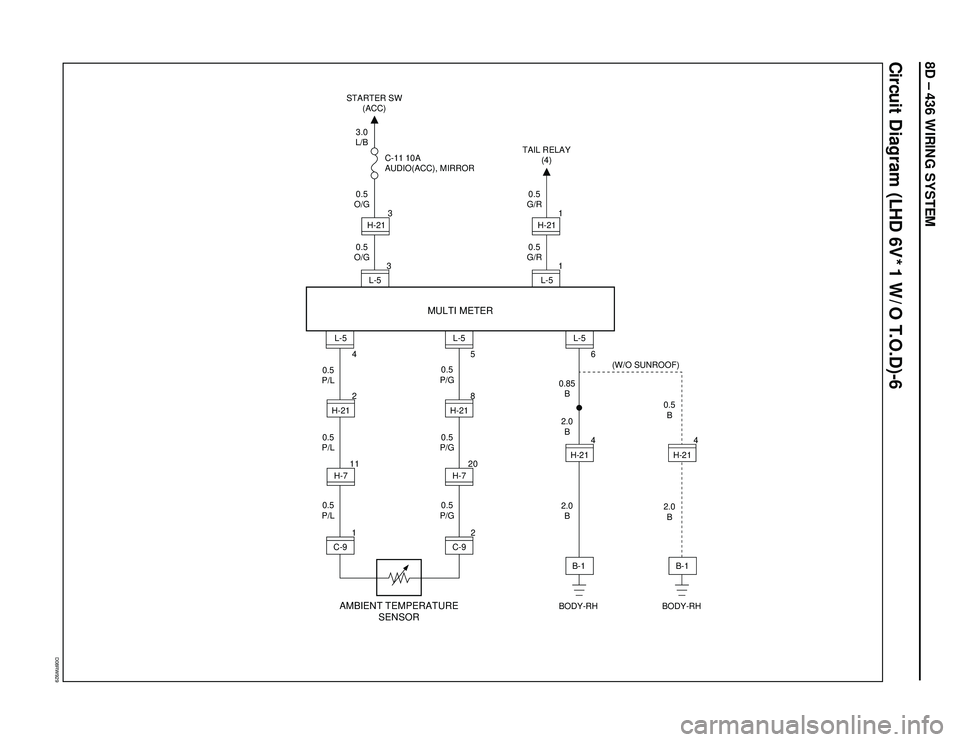
8D – 436 WIRING SYSTEM
Circuit Diagram (LHD 6V*1 W/O T.O.D)-6
D08RW929
BODY-RH BODY-RH TAIL RELAY
(4)
(W/O SUNROOF) STARTER SW
(ACC)
AMBIENT TEMPERATURE
SENSOR
0.5
B
2.0
B 2.0
B 2.0
B 0.5
P/G0.5
G/R0.5
G/R
0.5
O/G0.5
O/G3.0
L/B
0.5
P/G 0.5
P/L0.5
P/L
0.5
P/G 0.5
P/L0.85
B
4
H-21 4 6
H-21 H-21H-21
H-7
C-9L-5
5
8
H-212
20
H-711
2
C-91L-5
4 L-53
L-51 1
H-213
L-5
B-1 B-1
MULTI METER
C-11 10A
AUDIO(ACC), MIRROR
Page 3030 of 3573
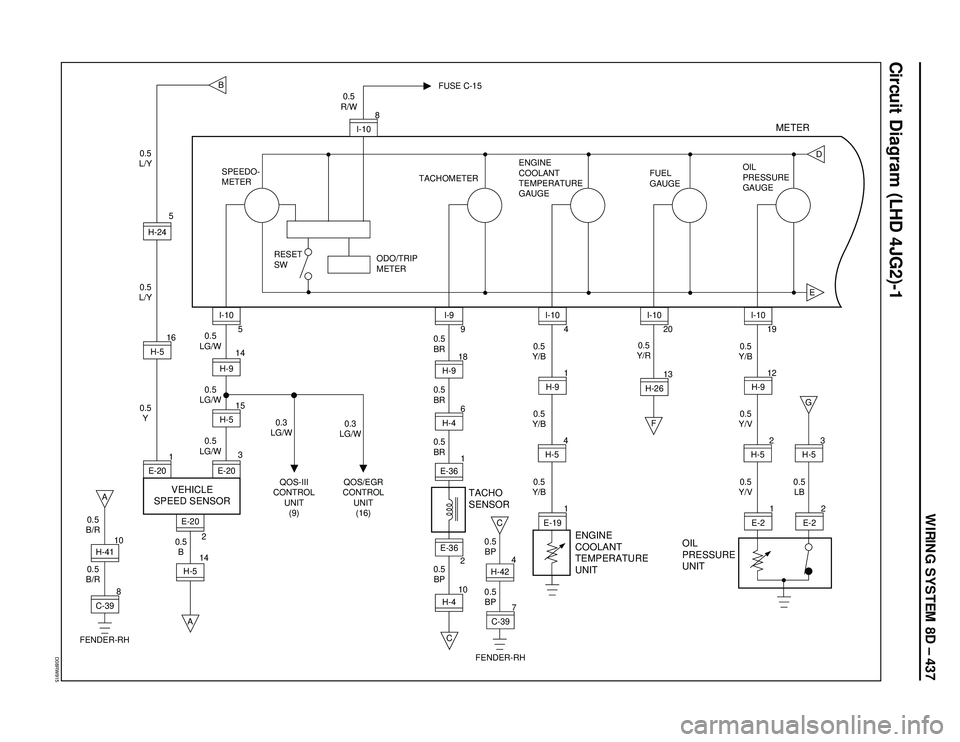
WIRING SYSTEM 8D – 437
D08RW915
Circuit Diagram (LHD 4JG2)-1
8
C-3910H-41
0.5
B/R0.5
B 0.5
B/R
B
EG
F
D
A
FENDER-RH
H-514E-20
2A 0.5
Y 0.5
L/Y0.5
L/Y
1
E-2016H-5H-245
0.5
LG/W0.5
LG/W
0.3
LG/W0.3
LG/W 0.5
LG/W0.5
R/W
SPEEDO-
METER
RESET
SWTACHOMETERENGINE
COOLANT
TEMPERATURE
GAUGEFUEL
GAUGEOIL
PRESSURE
GAUGE FUSE C-15
3
E-20145H-9
15H-5
VEHICLE
SPEED SENSOR
I-10
0.5
Y/B0.5
Y/B0.5
Y/B
1
E-191 4H-9
4H-5I-10
QOS-III
CONTROL
UNIT
(9)QOS/EGR
CONTROL
UNIT
(16)0.5
BR
0.5
BR
0.5
BR
0.5
BP18
H-9
6H-49I-9
1E-36
0.5
Y/R
13H-2620I-10
ENGINE
COOLANT
TEMPERATURE
UNIT TACHO
SENSOR
0.5
Y/V0.5
LB 0.5
Y/V0.5
Y/B
1E-212 19H-9
2H-5
2
E-23H-5
C
0.5
BP 0.5
BP
7
C-39
FENDER-RH4H-42
I-10
OIL
PRESSURE
UNIT
8
I-10
METER
ODO/TRIP
METER
E-36
2
10H-4C
Page 3035 of 3573
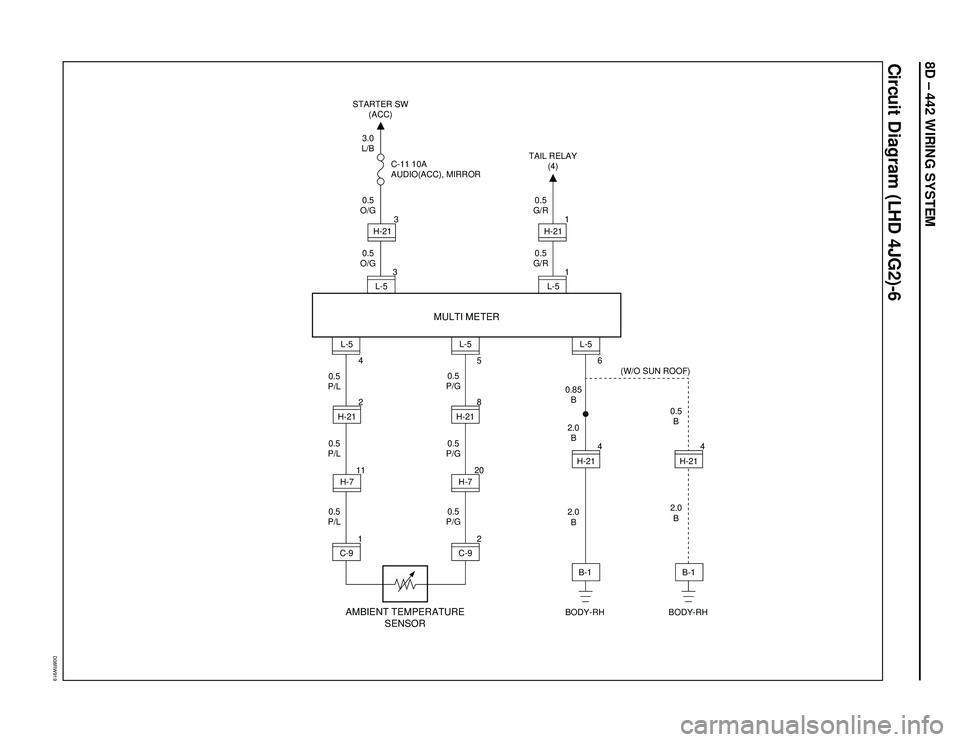
8D – 442 WIRING SYSTEM
D08RW919
Circuit Diagram (LHD 4JG2)-6
BODY-RH BODY-RH TAIL RELAY
(4)
(W/O SUN ROOF) STARTER SW
(ACC)
AMBIENT TEMPERATURE
SENSOR
0.5
B
2.0
B 2.0
B 2.0
B 0.5
P/G0.5
G/R0.5
G/R
0.5
O/G0.5
O/G3.0
L/B
0.5
P/G 0.5
P/L0.5
P/L
0.5
P/G 0.5
P/L0.85
B
4
H-21 4 6
H-21 H-21H-21
H-7
C-9L-5
5
8
H-212
20
H-711
2
C-91L-5
4 L-53
L-51 1
H-213
L-5
B-1 B-1
MULTI METER
C-11 10A
AUDIO(ACC), MIRROR
Page 3038 of 3573
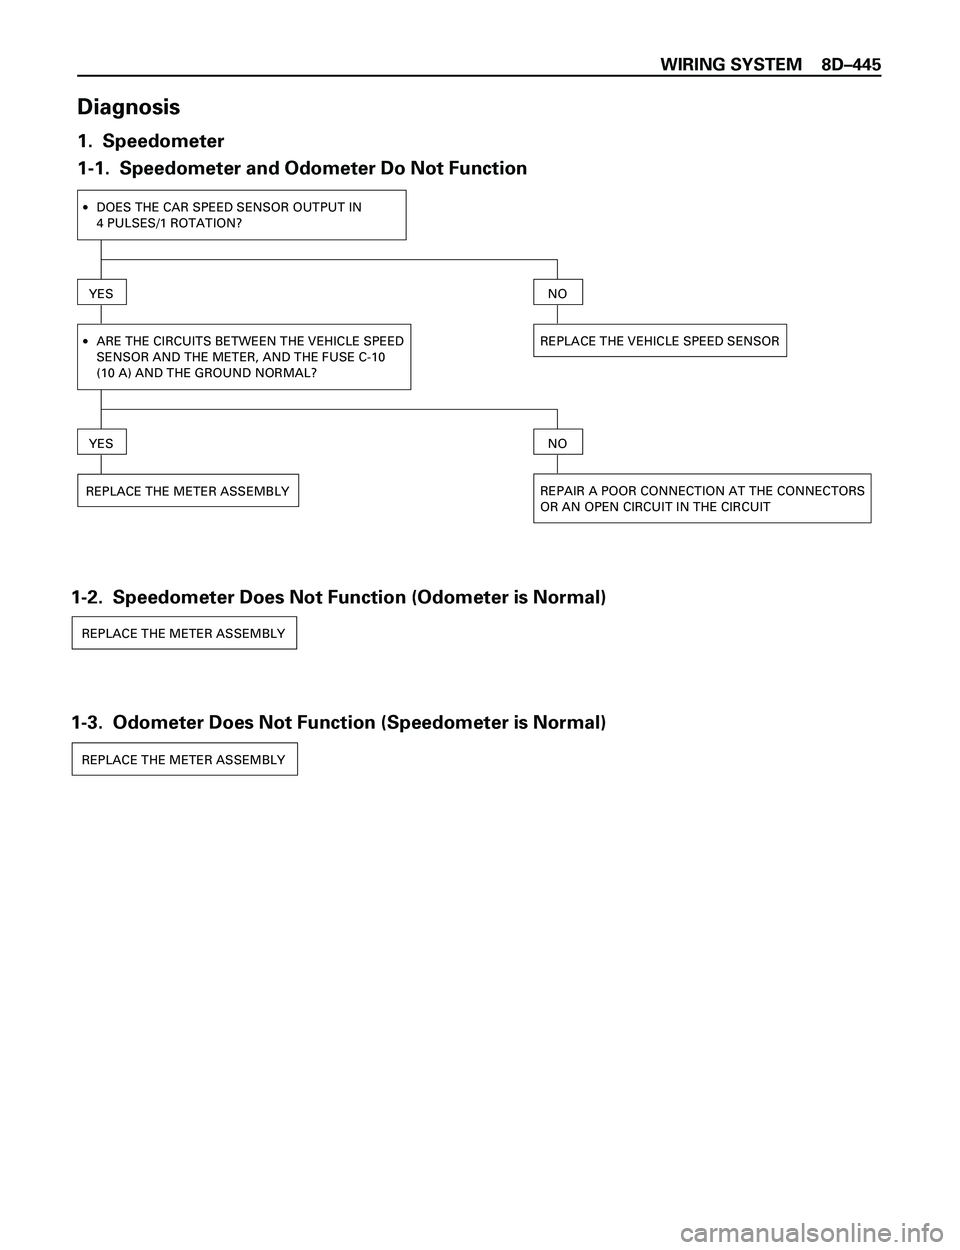
WIRING SYSTEM 8DÐ445
Diagnosis
1. Speedometer
1-1. Speedometer and Odometer Do Not Function
·DOES THE CAR SPEED SENSOR OUTPUT IN
4 PULSES/1 ROTATION?
YES
·ARE THE CIRCUITS BETWEEN THE VEHICLE SPEED
SENSOR AND THE METER, AND THE FUSE C-10
(10 A) AND THE GROUND NORMAL?
YES
REPLACE THE VEHICLE SPEED SENSOR
NO
REPAIR A POOR CONNECTION AT THE CONNECTORS
OR AN OPEN CIRCUIT IN THE CIRCUIT
NO
REPLACE THE METER ASSEMBLY
1-2. Speedometer Does Not Function (Odometer is Normal)
REPLACE THE METER ASSEMBLY
1-3. Odometer Does Not Function (Speedometer is Normal)
REPLACE THE METER ASSEMBLY
Page 3039 of 3573
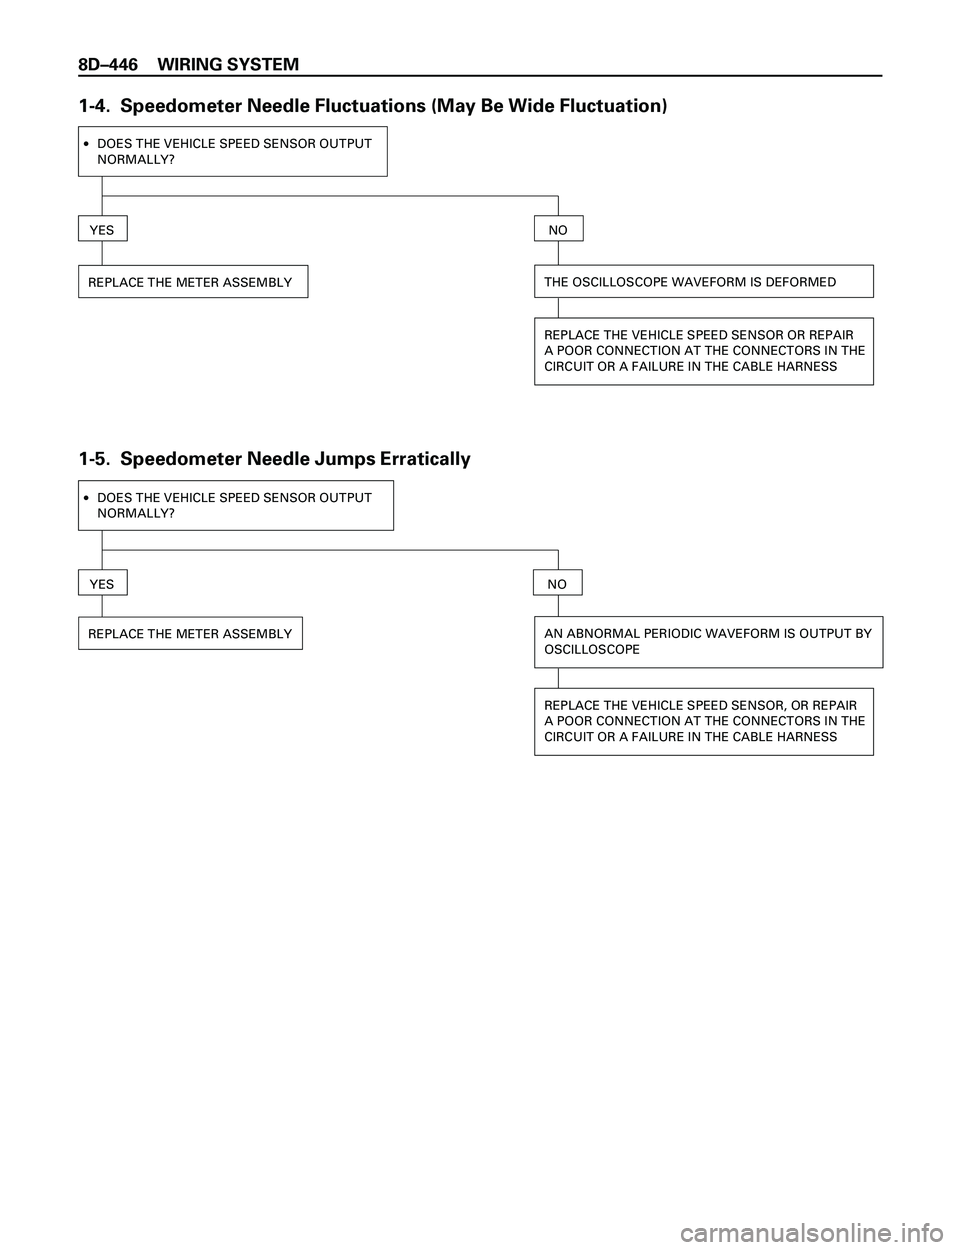
8DÐ446 WIRING SYSTEM
1-4. Speedometer Needle Fluctuations (May Be Wide Fluctuation)
·DOES THE VEHICLE SPEED SENSOR OUTPUT
NORMALLY?
YES
THE OSCILLOSCOPE WAVEFORM IS DEFORMEDREPLACE THE METER ASSEMBLY
REPLACE THE VEHICLE SPEED SENSOR OR REPAIR
A POOR CONNECTION AT THE CONNECTORS IN THE
CIRCUIT OR A FAILURE IN THE CABLE HARNESS
NO
1-5. Speedometer Needle Jumps Erratically
·DOES THE VEHICLE SPEED SENSOR OUTPUT
NORMALLY?
YES
AN ABNORMAL PERIODIC WAVEFORM IS OUTPUT BY
OSCILLOSCOPEREPLACE THE METER ASSEMBLY
REPLACE THE VEHICLE SPEED SENSOR, OR REPAIR
A POOR CONNECTION AT THE CONNECTORS IN THE
CIRCUIT OR A FAILURE IN THE CABLE HARNESS
NO
Page 3133 of 3573
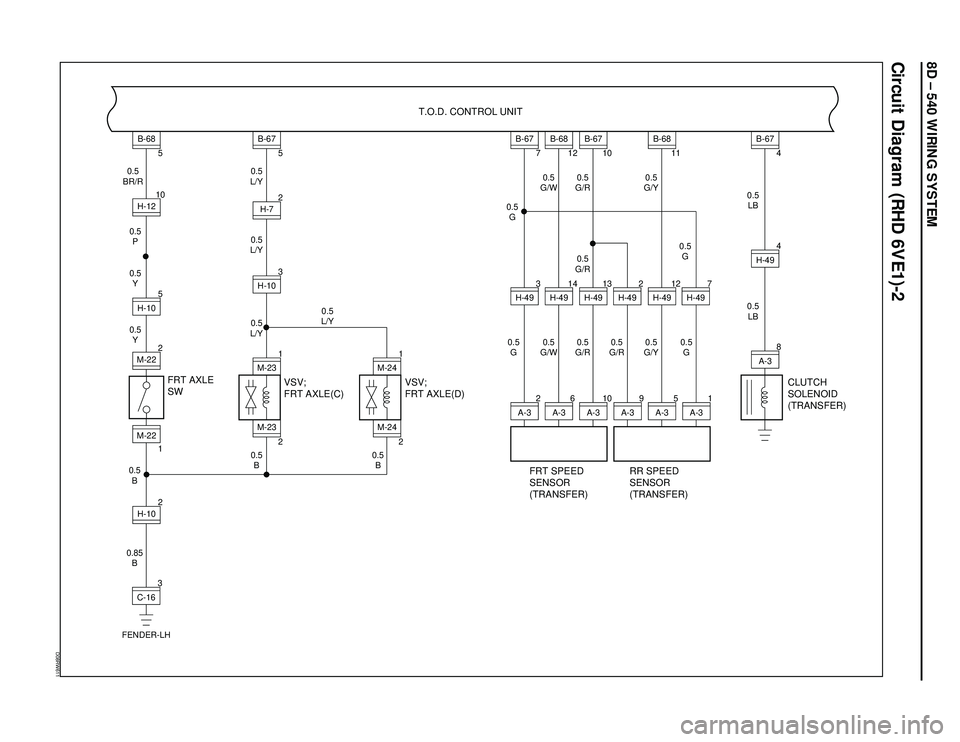
8D – 540 WIRING SYSTEM
Circuit Diagram (RHD 6VE1)-2
D08RW611
FRT AXLE
SWT.O.D. CONTROL UNIT3
C-16
FENDER-LHM-220.5
L/Y
0.5
G0.5
G/W0.5
G/R0.5
G/Y
0.5
LB
0.5
G/R0.5
G
0.5
G0.5
G 0.5
G/W0.5
G/R0.5
G/R0.5
G/Y0.5
LB 0.5
L/Y
0.5
L/Y 0.5
BR/R
0.5
P
0.5
Y
0.5
Y
0.5
B0.5
B
0.5
B
0.85
B0.5
L/Y
2M-225H-10
122B-68
5H-1210H-102
M-231M-233H-10B-67
5H-72
FRT SPEED
SENSOR
(TRANSFER)RR SPEED
SENSOR
(TRANSFER)CLUTCH
SOLENOID
(TRANSFER)
M-241M-24
2
A-33H-49B-67
7
6
A-314H-49B-68
12
10
A-313H-492
H-497
H-49
B-67
10
5
A-3 9
A-31
A-3 12
H-49B-68
11
8
A-3H-49B-67
4
4
VSV;
FRT AXLE(C)VSV;
FRT AXLE(D)
Page 3134 of 3573
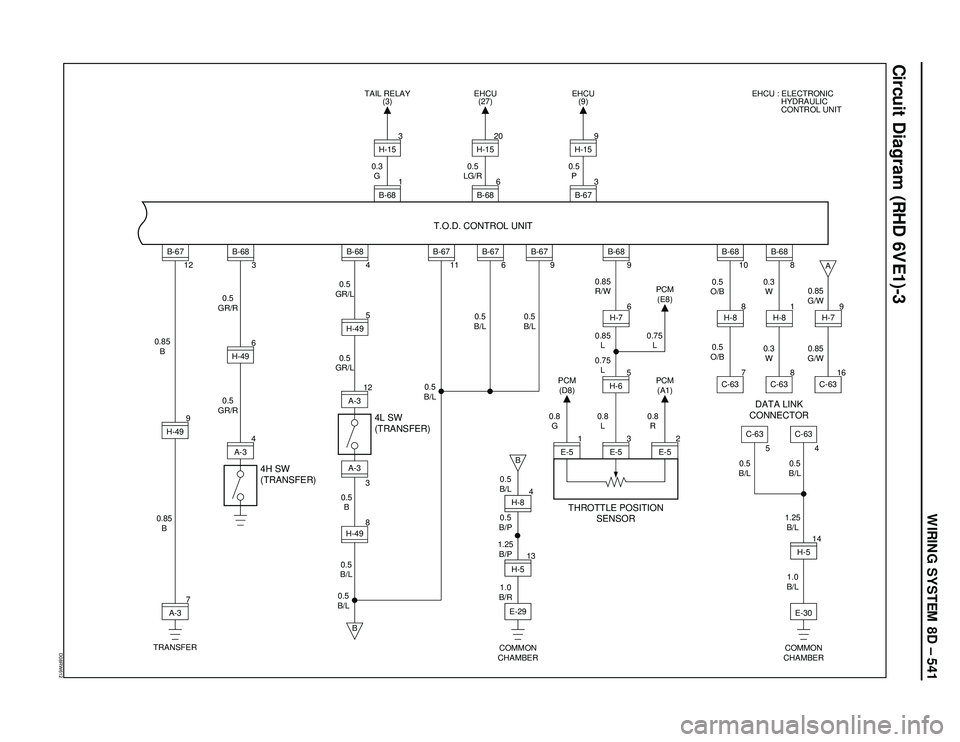
WIRING SYSTEM 8D – 541
Circuit Diagram (RHD 6VE1)-3
D08RW612
4H SW
(TRANSFER)T.O.D. CONTROL UNIT
7
A-3
TRANSFER9H-49
A-3
0.5
B/L 0.85
B4
A-36H-495
H-49
3H-498
B-67
0.85
B0.5
GR/R0.5
GR/L
0.5
GR/L
0.5
B
0.5
B/L 0.5
GR/R 12
B-68
3
B-68
4
B-67
11
B-67
6
4L SW
(TRANSFER)12
A-3
H-84
13H-5
E-30 1.25
B/L
1.0
B/L
E-29
3
E-52
E-5
14
H-5 5
H-6
COMMON
CHAMBER COMMON
CHAMBERB-68
9H-76
C-63
C-63
C-63
B-68
10H-8
7
C-63B-68
8H-8
8
54
C-63H-7
16 819
B
B
A
B-67
9
0.5
B/L0.5
B/L0.5
B/L0.85
R/W
0.85
L
0.75
L
0.8
L0.8
R 0.8
G
0.5
B/L
0.5
B/P0.5
B/L0.5
B/L 0.5
O/B0.3
W
0.3
W0.85
G/W0.85
G/W
0.5
O/B
1.25
B/P
1.0
B/R0.75
LPCM
(E8)
PCM
(A1) PCM
(D8)
6
B-68 EHCU
(27)
1
E-5THROTTLE POSITION
SENSORDATA LINK
CONNECTOR
20
H-15
1
B-68 TAIL RELAY
(3)
3
H-15
0.3
G0.5
LG/R0.5
P
3
B-67 EHCU
(9)EHCU : ELECTRONIC
HYDRAULIC
CONTROL UNIT
9
H-15
Page 3178 of 3573
METER AND GAUGE8E–1
METER AND GAUGE
CONTENTS
Service Precaution 8E–1. . . . . . . . . . . . . . . . . . . . . .
General Description 8E–1. . . . . . . . . . . . . . . . . . . . .
Meter Assembly 8E–2. . . . . . . . . . . . . . . . . . . . . . . . .
General Description 8E–2. . . . . . . . . . . . . . . . . . . . .
Layout for Meters/Gauges, Warning Lights,
Indicator Lights and Illumination Lights 8E–2. . .
Table for Meter/Gauge Connector Terminal
Connections 8E–8. . . . . . . . . . . . . . . . . . . . . . . . . .
Removal 8E–14. . . . . . . . . . . . . . . . . . . . . . . . . . . . .
Installation 8E–14. . . . . . . . . . . . . . . . . . . . . . . . . . . .
Warning Light Bulb, Indicator Light Bulb,
Illumination Light Bulb, A/T Indicator
Light Bulb 8E–14. . . . . . . . . . . . . . . . . . . . . . . . . . . . . .
Removal 8E–14. . . . . . . . . . . . . . . . . . . . . . . . . . . . .
Installation 8E–14. . . . . . . . . . . . . . . . . . . . . . . . . . . . Vehicle Speed Sensor 8E–15. . . . . . . . . . . . . . . . . . .
Removal 8E–15. . . . . . . . . . . . . . . . . . . . . . . . . . . . .
Installation 8E–15. . . . . . . . . . . . . . . . . . . . . . . . . . . .
Fuel Tank Unit 8E–15. . . . . . . . . . . . . . . . . . . . . . . . . .
Removal 8E–15. . . . . . . . . . . . . . . . . . . . . . . . . . . . .
Installation 8E–15. . . . . . . . . . . . . . . . . . . . . . . . . . . .
Multi Meter 8E–16. . . . . . . . . . . . . . . . . . . . . . . . . . . . .
Removal 8E–16. . . . . . . . . . . . . . . . . . . . . . . . . . . . .
Installation 8E–16. . . . . . . . . . . . . . . . . . . . . . . . . . . .
Ambient Sensor 8E–16. . . . . . . . . . . . . . . . . . . . . . . . .
Removal 8E–16. . . . . . . . . . . . . . . . . . . . . . . . . . . . .
Installation 8E–16. . . . . . . . . . . . . . . . . . . . . . . . . . . .
Main Data and Specifications 8E–17. . . . . . . . . . . . .
Service Precaution
WARNING: I F S O E Q U IPPED WITH A
SUPPLEMENTAL RESTRAINT SYSTEM (SRS),
REFER TO THE SRS COMPONENT AND WIRING
LOCATION VIEW IN ORDER TO DETERMINE
WHETHER YOU ARE PERFORMING SERVICE ON OR
NEAR THE SRS COMPONENTS OR THE SRS
WIRING. WHEN YOU ARE PERFORMING SERVICE
ON OR NEAR THE SRS COMPONENTS OR THE SRS
WIRING, REFER TO THE SRS SERVICE
INFORMATION. FAILURE TO FOLLOW WARNINGS
COULD RESULT IN POSSIBLE AIR BAG
DEPLOYMENT, PERSONAL INJURY, OR
OTHERWISE UNNEEDED SRS SYSTEM REPAIRS.
CAUTION: Always use the correct fastener in the
proper location. When you replace a fastener, use
ONLY the exact part number for that application.
ISUZU will call out those fasteners that require a
replacement after removal. ISUZU will also call out
the fasteners that require thread lockers or thread
sealant. UNLESS OTHERWISE SPECIFIED, do not
use supplemental coatings (Paints, greases, or other
corrosion inhibitors) on threaded fasteners or
fastener joint interfaces. Generally, such coatings
adversely affect the fastener torque and the joint
clamping force, and may damage the fastener. When
you install fasteners, use the correct tightening
sequence and specifications. Following these
instructions can help you avoid damage to parts and
systems.
General Description
The circuit consists of the starter switch, meter assembly,
vehicle speed sensor, transmission switch, lighting
switch, turn signal switch, thermo unit, oil pressure unit,
Powertrain Control Module (PCM), fuel tank unit, 4WD
switch, oil pressure switch, parking brake switch, brake
fluid switch, seat belt switch, illumination controller, multi
meter and ambient sensor.
Page 3192 of 3573
METER AND GAUGE8E–15
Vehicle Speed Sensor
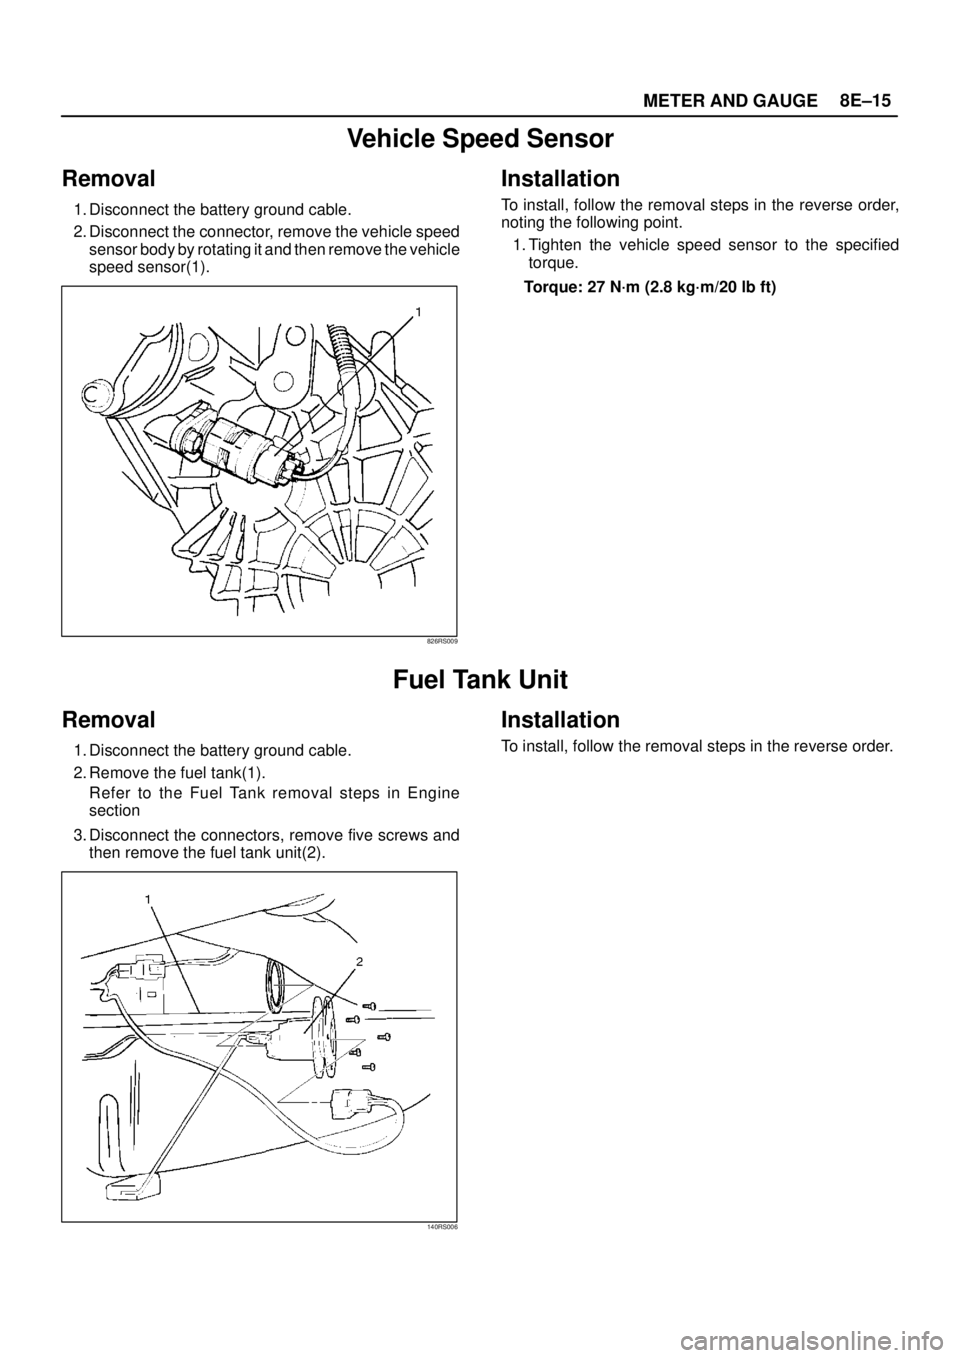
Removal
1. Disconnect the battery ground cable.
2. Disconnect the connector, remove the vehicle speed
sensor body by rotating it and then remove the vehicle
speed sensor(1).
826RS009
Installation
To install, follow the removal steps in the reverse order,
noting the following point.
1. Tighten the vehicle speed sensor to the specified
torque.
Torque: 27 N·m (2.8 kg·m/20 lb ft)
Fuel Tank Unit
Removal
1. Disconnect the battery ground cable.
2. Remove the fuel tank(1).
Refer to the Fuel Tank removal steps in Engine
section
3. Disconnect the connectors, remove five screws and
then remove the fuel tank unit(2).
140RS006
Installation
To install, follow the removal steps in the reverse order.