clock JAGUAR X308 1998 2.G Owners Manual
[x] Cancel search | Manufacturer: JAGUAR, Model Year: 1998, Model line: X308, Model: JAGUAR X308 1998 2.GPages: 2490, PDF Size: 69.81 MB
Page 1930 of 2490

Installation
1. Install bulb in holder.
2. Install bulb and bulb holder in lamp assembly and rotate 1/4
turn clockwise to seat and retain.
3. Position direction lamp at bumper aperture and connect
harness multiplug.
4. Engage front end tang of lamp in bumper aperture.
5. Pivot lamp assembly and firmly seat rear retaining clip in
bumper aperture.
Page 1952 of 2490

Exterior Lighting - Rear Lamp Assembly Bulb
Removal and Installation
Removal
Installation
1. Depress retaining tab and remove rear lamp interior trim
finisher.
2. Disconnect rear lamp harness multiplug.
3. Rotate bulb holder retainin g fastener 1/4 turn counter-
clockwise and withdraw holder from rear lamp lens.
4. Remove bulbs from holder as necessary.
1. Install bulbs in holder as necessary.
Page 1955 of 2490

Exterior Lighting - Rear Side Marker Lamp Bulb
Removal and Installation
Removal
1. Applying firm thumb pressure to front of lens, pivot lamp
assembly for access to rear end.
2. Exercising care to avoid dama ging paintwork, use a small
screwdriver to press and re lease rear retaining clip.
3. Withdraw lamp from bumper for access and disconnect harness connector.
4. Rotate bulb holder 1/4 turn counter-clockwise to release it
from lamp assembly.
5. Withdraw bulb from holder.
Page 1956 of 2490

Installation
1. Install bulb in holder.
2. Install bulb and bulb holder in lamp assembly and rotate 1/4
turn clockwise to seat and retain.
3. Position lamp at bumper ap erture and connect harness
connector.
4. Engage front end tang in bumper aperture.
5. Pivot lamp assembly and firmly seat rear retaining clip in
bumper aperture.
Page 1957 of 2490

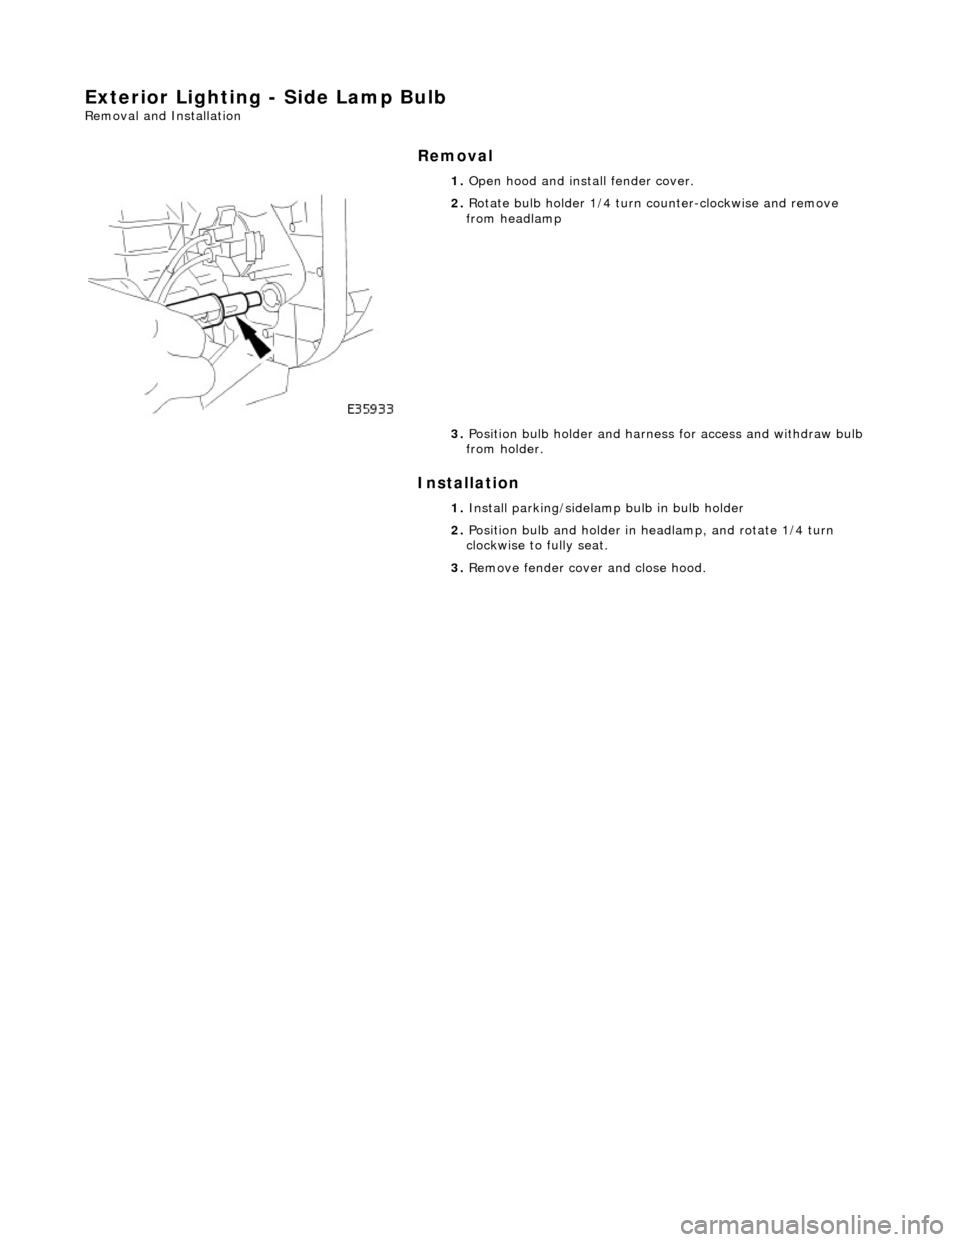
Exterior Lighting - Side Lamp Bulb
Removal and Installation
Removal
Installation
1.
Open hood and install fender cover.
2. Rotate bulb holder 1/4 turn counter-clockwise and remove
from headlamp
3. Position bulb holder and harne ss for access and withdraw bulb
from holder.
1. Install parking/sidelamp bulb in bulb holder
2. Position bulb and holder in headlamp, and rotate 1/4 turn
clockwise to fully seat.
3. Remove fender cover and close hood.
Page 1960 of 2490

Exterior Lighting - Side Turn Signal Lamp Bulb
Removal and Installation
Removal
Installation
1.
Remove indicator repeater lamp assembly. Refer to 86.41.41.
2. Remove lamp. Refer to this section.
Twist bulb holder anti-clockwise and remove.
Remove bulb and replace with new one of correct type.
1. Installation is reverse of removal.
Page 2054 of 2490

Interior Trim and Ornamentation - Interior Trim
Description and Operation
Carpets
The passenger compartment carpet is a one piece moulded constr uction with integral sound deadening material, heel mats
and driver's footrest. The carpet is attach ed to the vehicle floor by plastic clips fitted below the door treadplates. Removal of the carpet necessitates re moval of the front seats, lifting of the centre console rear extens ion and removal of the heelboard
carpet.
Fascia
The full width, slush moulded, soft feel PVC fascia is mounted on an injection moulded armature and is faced with wood
veneer. In addition to the air conditioning and central, outer and demisting vents, it accepts instrument packs dedicated to
market requirements and a centrally mounted analogue clock.
Doors
The one-piece door casings are trimmed in UEV to match the seating, with wood veneer at the waistline and a carpet insert
at the front lower corner. Each casing is secured to the door inner panel by fir tree press fast eners along the lower section,
two armrest fixings at the centre and vene er panel dowels and fixings at the top. The armrests which are common to front
and rear doors, are trimmed in matching leather or UEV according to specification. The door switchpacks, dedicated to
driver and front or rear passenger, are in corporated in the armrests. A speaker is in stalled in the lower section of each door
and a tweeter is incorporated behind each interior door handle escutcheon. Where premium ICE is fitted, the front tweeters
are installed in the upper A posts.
A, B, C and D Posts
On each side,a grained UEV finisher trimmed to match the headlining is secured to the 'A' post and cantrail by fir tree
fasteners locating in BIW apertures. The upper 'D' post finisher is trimmed and secured in the same manner. The single
piece'B/C' post finishers, also finished in grained matching UEV, each have a front se at belt exit aperture and are secured to
the BIW by four spring clips and two fir tree fasteners.
Headlining
The one-piece headlining consists of a 6mm thick polyurethane foam membrane covered with suede effect knitted polyester. The headlining is secured to the BIW roof by body tangs, the roof console, sun visors, combined grab handles and coat
hooks, the cantrail finishers and where fitt ed, the sliding roof finisher and clips.
Trunk
Carpet covered trims line the trunk and are secured by fir tr ee fasteners to the sides and front inner panel. The carpet
covered, two-section, removable trunk fl oor provides access to the spare wheel and wheel changing equipment, the battery
and electrical carrier. The floor board rests on the spare wheel, with the front and rear edges locating in blocks on the fuel
tank backboard and the rear of the body. The support blocks provide for two floor he ight settings to accommodate either a
space saver or full size spare wheel.A moulded finisher covering the rear of the trunk below the sill is secured to the rear
panel by tabs and fir tree fasteners. Finish er panels fitted to the rear lamp units provide trunk interior access to the lamps.
The trunk lid underside is fitted with a removabl e moulded liner and two trunk illumination lights.
Page 2181 of 2490

Glass, Frames and Mechanisms - Door Window Control Switch Bulb
Removal and Installation
Removal
1. Remove casing/armrest asse mbly from door. Refer to
76.34.01.
2. Slacken and remove armres t front securing screw
3. Position armrest for access, slacken and remove two
switchpack securing screws and remove switchpack assembly from armrest.
4. Invert switchpack and using a small flat bladed screwdriver
rotate bulb holder 1/8 turn counterclockwise.
5. Remove bulb from switchpack base.
Page 2182 of 2490

Installation
1.
Fit illumination bulb in switchpa ck base and using a small flat
bladed screwdriver, rotate it 1/ 8 turn clockwise to fully seat.
2. Fit switchpack to armrest. Refer to 86.25.03.
3. Fit casing/armrest assembly to door. Refer to 76.34.01.
Page 2219 of 2490

Instrument Panel and Console - Instrument Panel and Instrument Panel
Console
Description and Operation
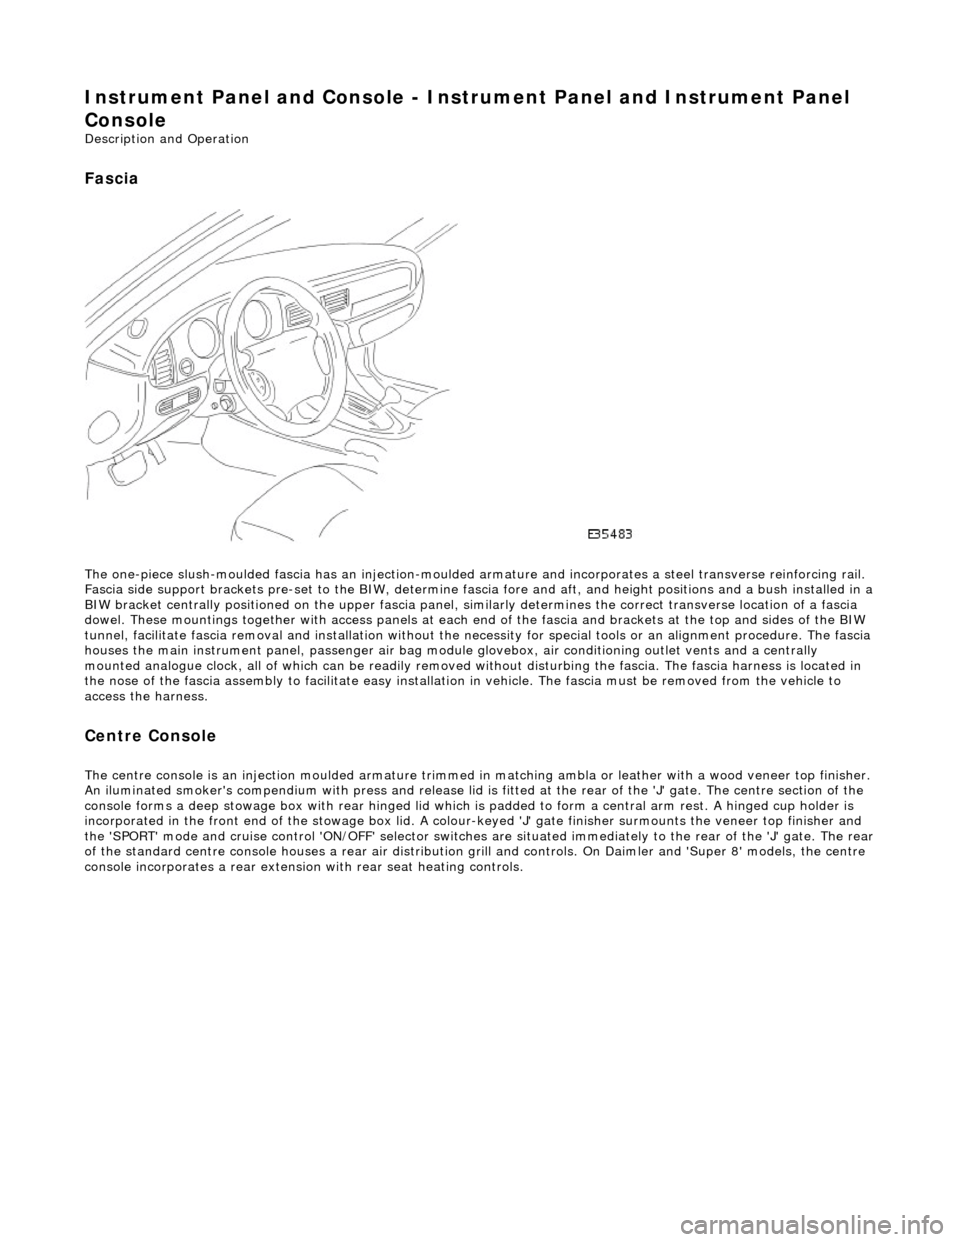
Fascia
The one-piece slush-moulded fascia has an injection-moulded ar mature and incorporates a steel transverse reinforcing rail.
Fascia side support brackets pre-set to th e BIW, determine fascia fore and aft, and height position s and a bush installed in a
BIW bracket centrally positioned on the upper fascia panel, similarly determines the correct transverse location of a fascia
dowel. These mountings together with access panels at each en d of the fascia and brackets at the top and sides of the BIW
tunnel, facilitate fascia removal and instal lation without the necessity for special tools or an alignment procedure. The fasci a
houses the main instrument panel, pass enger air bag module glovebox, air conditioning outlet vents and a centrally
mounted analogue clock, all of which can be readily removed wi thout disturbing the fascia. The fascia harness is located in
the nose of the fascia assembly to facilitate easy installati on in vehicle. The fascia must be removed from the vehicle to
access the harness.
Centre Console
The centre console is an injection moulded armature trimmed in matching ambla or leather with a wood veneer top finisher.
An iluminated smoker's compendium with pr ess and release lid is fitted at the rear of the 'J' gate. The centre section of the
console forms a deep stowage box with rear hinged lid which is padded to form a central arm rest. A hinged cup holder is
incorporated in the front end of the stowage box lid. A colour-keyed 'J' gate finisher surmounts the veneer top finisher and
the 'SPORT' mode and cruise control 'ON/OFF' selector switches are situated immediately to the rear of the 'J' gate. The rear
of the standard centre console houses a re ar air distribution grill and controls. On Daimler and 'Super 8' models, the centre
console incorporates a rear extensio n with rear seat heating controls.