Cooling JAGUAR X308 1998 2.G Service Manual
[x] Cancel search | Manufacturer: JAGUAR, Model Year: 1998, Model line: X308, Model: JAGUAR X308 1998 2.GPages: 2490, PDF Size: 69.81 MB
Page 959 of 2490
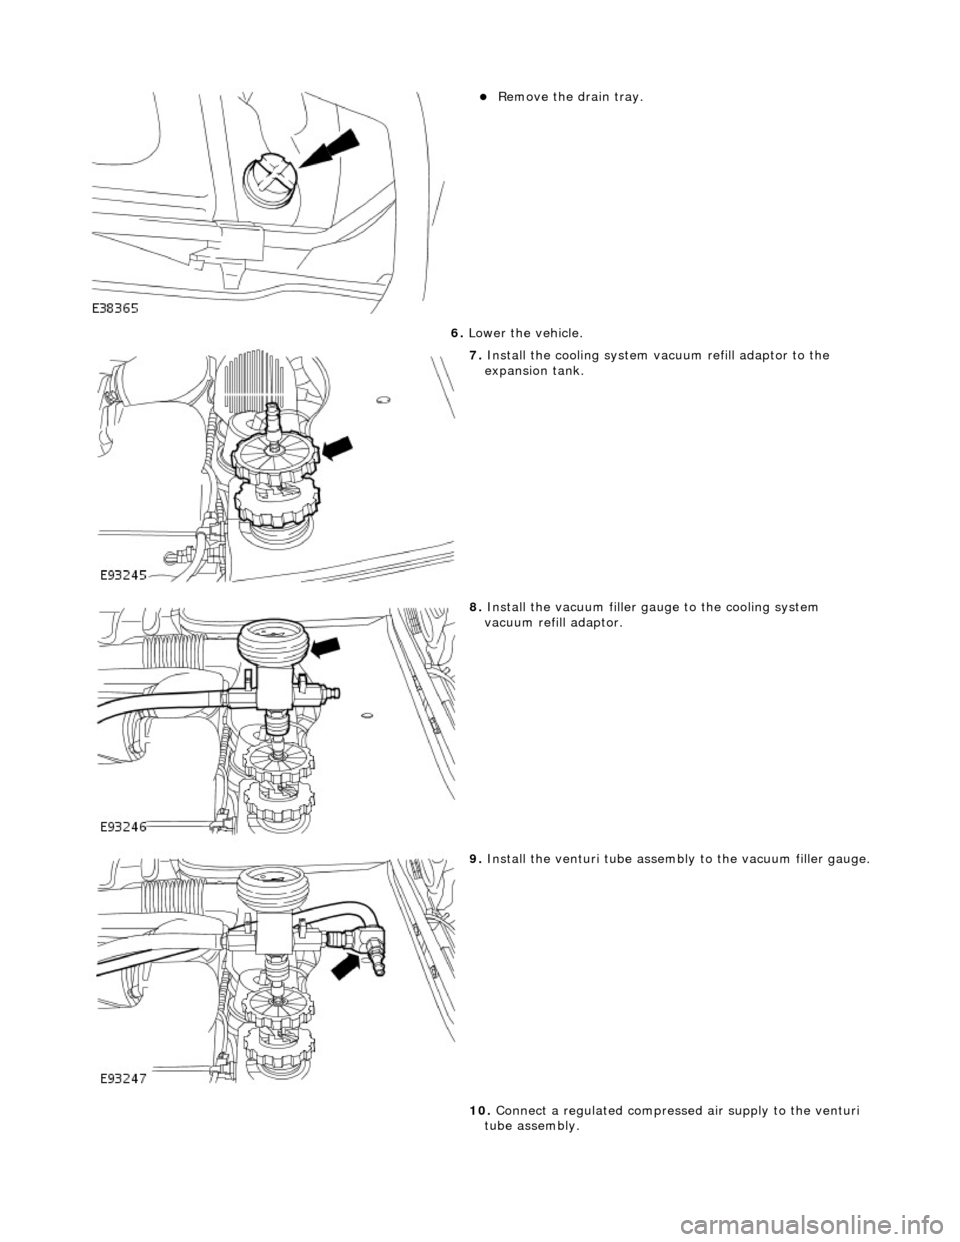
R
emove the drain tray.
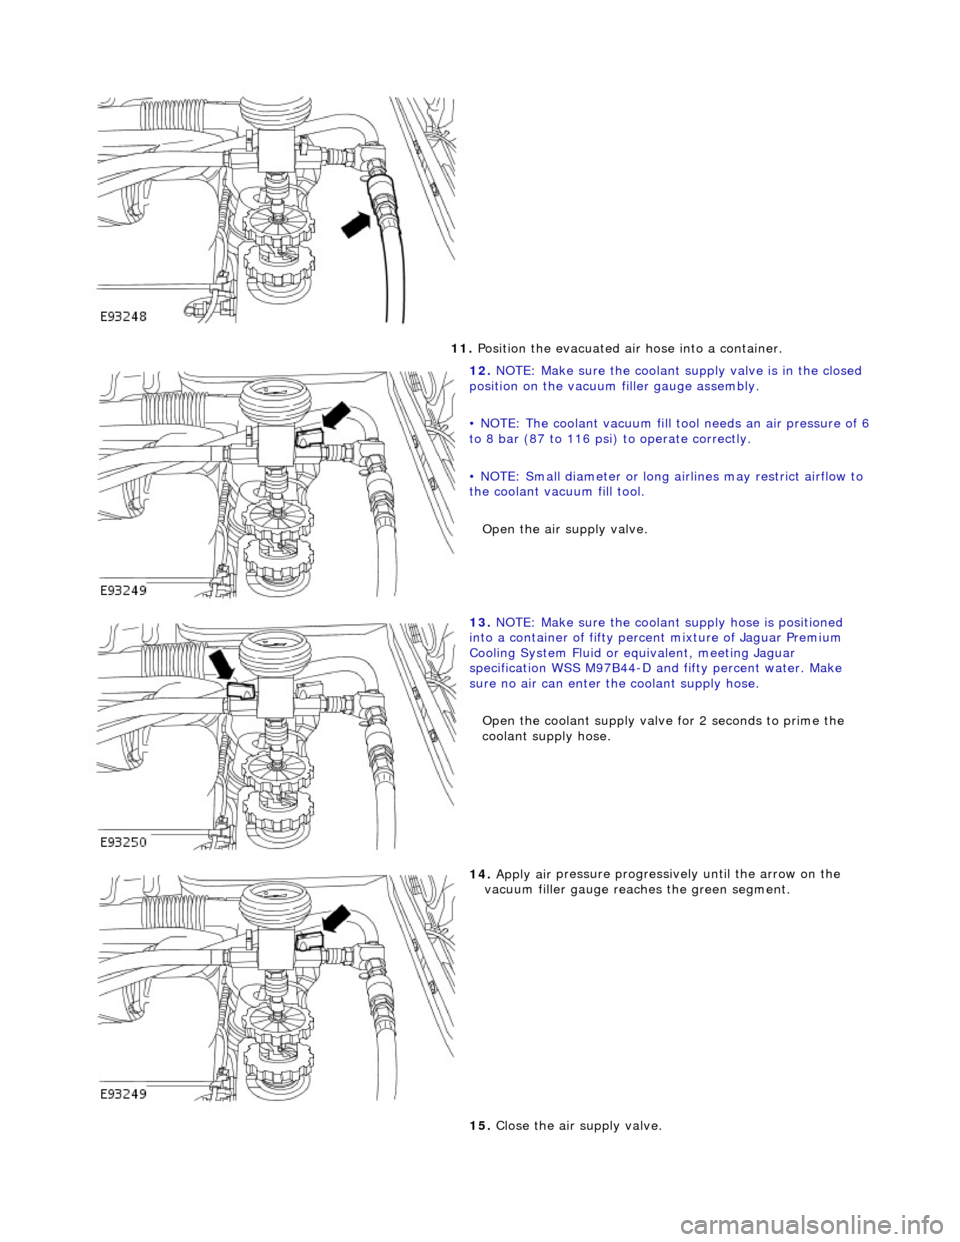
6. Lower the vehicle.
7. Inst
all the cooling system va
cuum refill adaptor to the
expansion tank.
8. Inst
all the vacuum filler gauge to the cooling system
vacuum refill adaptor.
9. Inst
all the venturi tube assembly to the vacuum filler gauge.
10. Connect a regulated compressed air supply to the venturi
tube assembly.
Page 960 of 2490
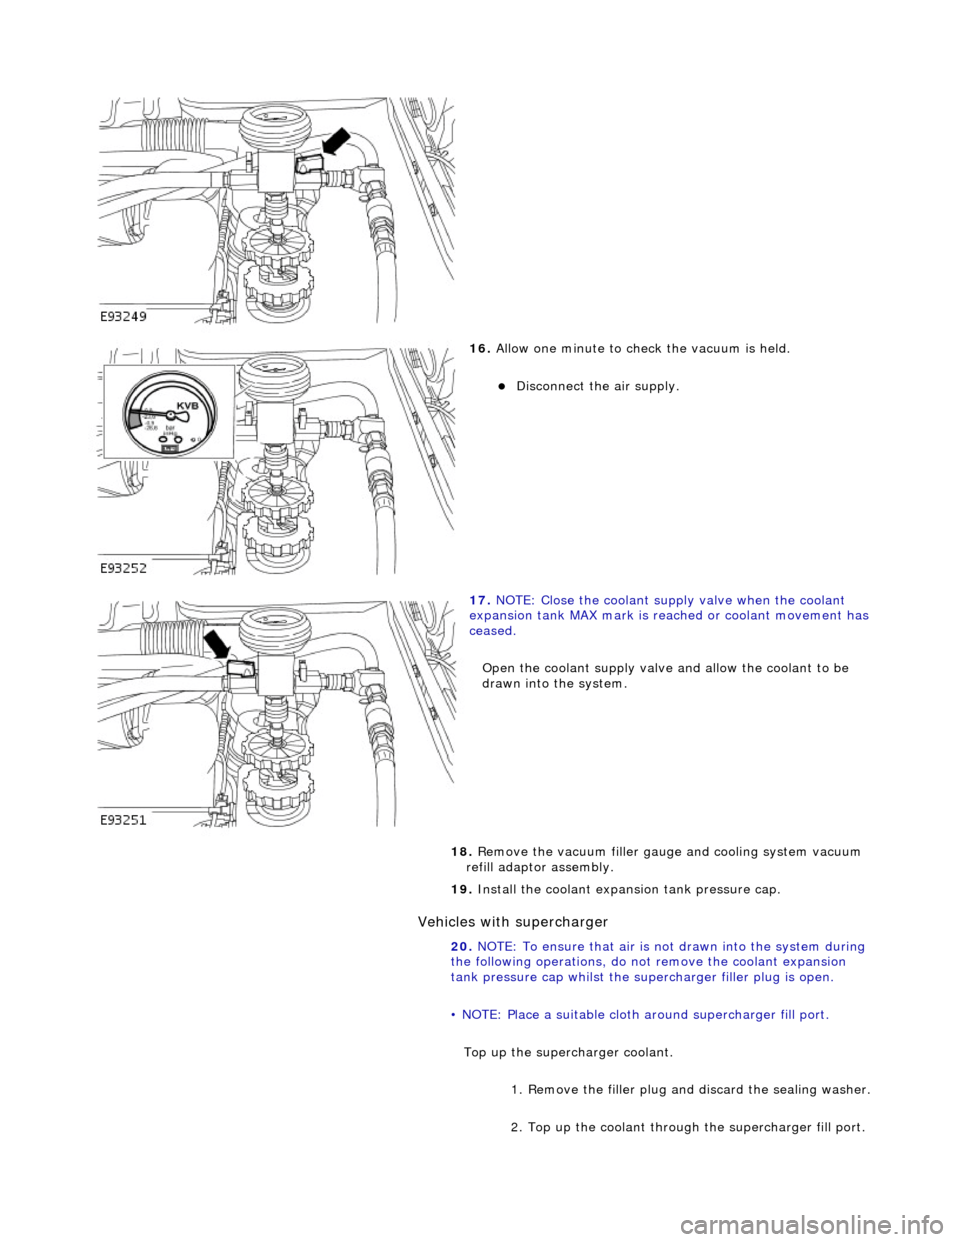
11. P
osition the evacuated air hose into a container.
12 . N
OTE: Make sure the coolant su
pply valve is in the closed
position on the vacuum filler gauge assembly.
• NOTE: The coolant vacuum fill t ool needs an air pressure of 6
to 8 bar (87 to 116 psi) to operate correctly.
• NOTE: Small diameter or long airlines may restrict airflow to
the coolant vacuum fill tool. Open the air supply valve.
13 .
NOTE
: Make sure the coolant supply hose is positioned
into a container of fifty perc ent mixture of Jaguar Premium
Cooling System Fluid or eq uivalent, meeting Jaguar
specification WSS M97B44-D an d fifty percent water. Make
sure no air can enter the coolant supply hose.
Open the coolant supply valve for 2 seconds to prime the
coolant supply hose.
14 . Apply air
pressure
progressively until the arrow on the
vacuum filler gauge reac hes the green segment.
15. Close the air supply valve.
Page 961 of 2490
Vehic
les with supercharger
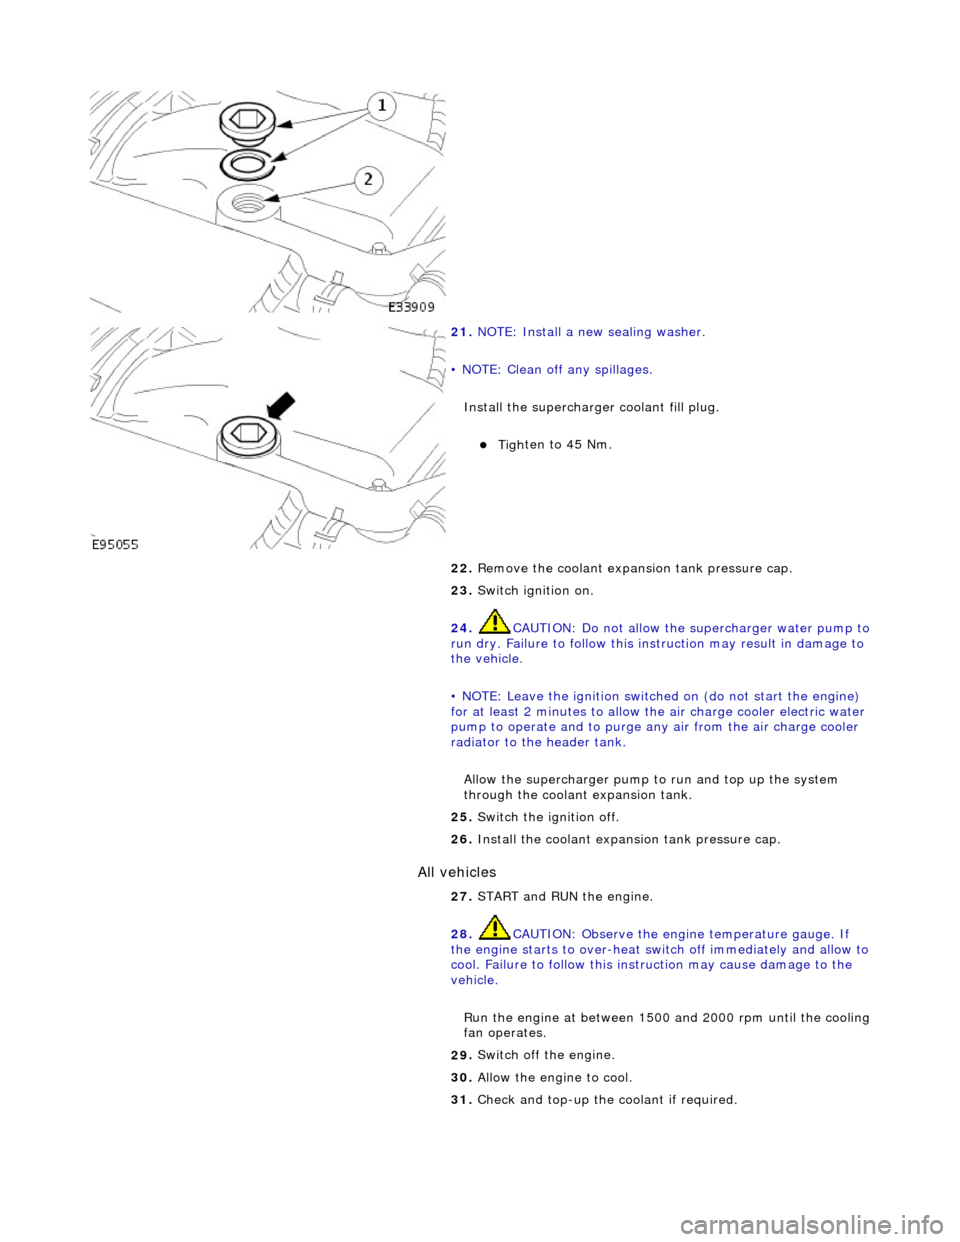
16
.
Allow one minute to check the vacuum is held.
Di
sconnect the air supply.
17
.
NOTE: Close the coolant supply valve when the coolant
expansion tank MAX mark is reached or coolant movement has
ceased.
Open the coolant supply valve and allow the coolant to be
drawn into the system.
18. Remove the vacuum filler gaug e and cooling system vacuum
refill adaptor assembly.
19. Install the coolant expansion tank pressure cap.
20. NOTE: To ensure that air is not drawn into the system during
the following operations, do not remove the coolant expansion
tank pressure cap whilst the supe rcharger filler plug is open.
• NOTE: Place a suitable cloth ar ound supercharger fill port.
Top up the superc harger coolant.
1. Remove the filler plug an d discard the sealing washer.
2. Top up the coolant through the supercharger fill port.
Page 962 of 2490
All vehicles
21.
N
OTE: Install a new sealing washer.
• NOTE: Clean off any spillages.
Install the supercharger coolant fill plug.
Tighte
n to 45 Nm.
22. Remove the coolant expans ion tank pressure cap.
23. Switch ignition on.
24. CAUTION: Do not allow the supercharger water pump to
run dry. Failure to follow this instruction may result in damage to
the vehicle.
• NOTE: Leave the ignition switched on (do not start the engine)
for at least 2 minutes to allow the air charge cooler electric water
pump to operate and to purge an y air from the air charge cooler
radiator to the header tank.
Allow the supercharger pump to run and top up the system
through the coolant expansion tank.
25 . Swit
ch the ignition off.
26. Install the coolant expansion tank pressure cap.
27. START and RUN the engine.
28. CAUTION: Observe the engine temperature gauge. If
the engine starts to over-heat switch off immediately and allow to
cool. Failure to follow this inst ruction may cause damage to the
vehicle.
Run the engine at between 1500 and 2000 rpm until the cooling
fan operates.
29 .
Swi
tch off the engine.
30. Allow the engine to cool.
31. Check and top-up the coolant if required.
Page 963 of 2490

Engine Cooling - Coolant Expansi
on Tank
Re
moval and Installation
Remov
al
1.
O
pen the engine compartment and fit paintwork protection
sheets.
2. R
emove the centre trim panel
from the engine compartment.
1. Remove the left hand side enclosure panel.
2. Remove the centre trim panel.
3. Ensure that the cooling system is cool and very carefully,
remove the pressure cap.
4. Place a cloth under the expansion tank to absorb any spillage
caused by disconnecting the hoses.
5. R
elease the hoses (Quick Fit connections) from the expansion
tank.
1. Release the hose, expansion tank to thermostat housing (coolant outlet pipe on supercharged
engines).
2. Release the hose, expansion tank to recovery tank.
3. Release the hose, expansion tank to radiator..
6. Fit blanking plugs to the pipes and the tank.
7. Re
move the expansion tank from the mounting.
1. Disconnect the coolant level sensor connector.
2. Remove the nuts which secures the tank.
8. Remove the expansion tank from the vehicle.
1. Use a pipe clamp to clam p the bottom hose branch.
2. Release the pipe clip an d move it along the pipe.
3. Disconnect the tank from the bottom hose and
Page 965 of 2490

Engine Cooling - Coolant Outlet Pipe
Re
moval and Installation
Remov
al
Installation
1.
O
pen the engine compartment and fit paintwork protection
sheets.
2. Drain the radiator. Refer to Ge neral Procedures. Retain the
coolant drain tray in position to catch any spillage when
removing the outlet pipe.
3. Di
sconnect the hoses and multi-plug from the coolant outlet
pipe.
1. Release and reposition th e hose clip, and disconnect
the top hose.
2. Release and reposition th e hose clip, and disconnect
the heater hose.
3. Disconnect the multi-plug from the temperature sensor and unscrew the sens or from the outlet pipe.
4. Release and reposition the hose clip along the bypass
hose.
4. R
emove the coolant outlet pipe.
1. Remove the four bolts which secure the outlet pipe.
2. Remove the outlet pipe from the bypass hose and
from the cylinder heads.
5. Remove and discard the sealing rings from the outlet pipe
grooves.
1. Installation is the reverse of the remova l procedure. Use new
sealing rings on the coolant outlet pipe.
2. Tighten the coolant outlet pipe bolts to 10-14 Nm If replacing
the coolant temperature sensor, tighten to 15-19 Nm.
3. Refill the cooling system as de scribed in General Procedures.
Page 966 of 2490

Engine Cooling - Coolant Outlet Pipe
Remo
val and Installation
Remov
a
l
1.
Op
en the engine compartment and fit paintwork protection
sheets.
2. Drain the radiator. Refer to Ge neral Procedures. Retain the
coolant drain tray in position to catch any spillage when
removing the outlet pipe.
3. Disc onne
ct the top hose and br
eather pipe from the coolant
outlet pipe.
1. Release and reposition th e hose clip, and disconnect
the top hose.
2. Release and disconnect the breather pipe quick fit connector.
3. Disconnect the multi-plug from the temperature sensor and unscrew the sens or from the outlet pipe.
4. Release and reposition the hose clip along the bypass
hose.
4. Disc
onnect the bottom hose
from the thermostat housing.
1. Release and reposition th e hose clip along the hose.
2. Disconnect the bottom hose.
5. Disc
onnect the coolant outlet pipe from the cylinder heads.
1. Remove the four bolts which secure the outlet pipe.
2. Remove the outlet pipe from the bypass hose and
from the cylinder heads (still connected to the
heater hose).
6. Release and reposition the clip which secures the heater hose
to the outlet pipe and disconnect the hose. Remove the outlet
pipe.
7. Remove the thermostat from the outlet pipe.
1. Remove the three bolts which secure the thermostat cover to the outlet pipe.
2. Remove the thermostat cover, the thermostat and
the seal from the outlet pipe. Discard the seal.
Page 967 of 2490

I
nstallation
8.
Remove an
d discard the sealing
rings from the outlet pipe
grooves.
1. Installation is th e reverse of the re moval procedure.
Use new
sealing rings on th
e coolant outlet pipe and
thermostat housing.
The t
hermostat ball valve must
locate in the recess in the
cover.
2. Tighten the coolant outlet pipe bolts to 8-12 Nm. If replacing
the coolant temperature sensor, tighten to 15-19 Nm.
3. Refill the cooling system as de scribed in General Procedures.
Page 968 of 2490

Engine Cooling - Cooling Fan Motor
Remo
val and Installation
Remov
a
l
Installation
1.
Re
move the Twin Fan and Motor Assembly (26.25.12)
described in this section.
2. Re
move the fan and motor unit from the twin fan and motor
assembly.
1. Remove the three nuts which secure the fan and motor unit.
2. Remove the fan and motor unit.
3. Re
move the fan rubber mountings.
1. Remove the spacer from each rubber mounting.
2. Remove the three rubber mountings.
1. Installation is th e reverse of the re moval procedure.
Page 969 of 2490
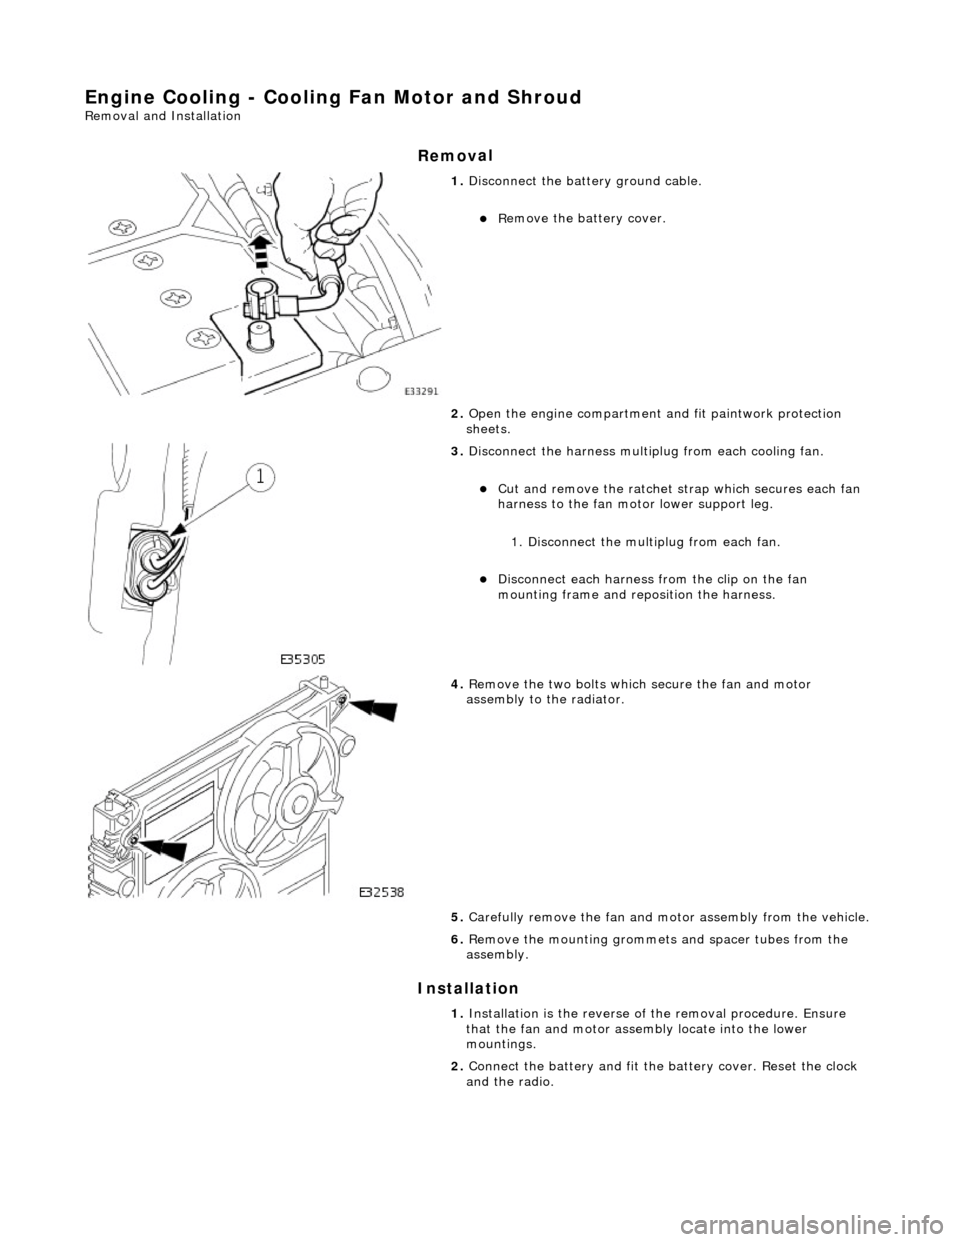
Engine Cooling - Cooling Fan Motor and Shroud
Re
moval and Installation
Remov
al
Installation
1.
Di
sconnect the batt
ery ground cable.
R
emove the battery cover.
2. Open the engine compartment and fit paintwork protection
sheets.
3. Disc
onnect the harness multip
lug from each cooling fan.
Cut an
d remove the ratchet st
rap which secures each fan
harness to the fan moto r lower support leg.
1. Disconnect the mult iplug from each fan.
Di
sconnect each harness
from the clip on the fan
mounting frame and repo sition the harness.
4. R
emove the two bolts which
secure the fan and motor
assembly to the radiator.
5. Carefully remove the fan and mo tor assembly from the vehicle.
6. Re
move the mounting grommets
and spacer tubes from the
assembly.
1. Installation is the reverse of the remova l procedure. Ensure
that the fan and motor assembly locate into the lower
mountings.
2. Connect the battery and fit the battery cover. Reset the clock
and the radio.