ignition JAGUAR X308 1998 2.G Service Manual
[x] Cancel search | Manufacturer: JAGUAR, Model Year: 1998, Model line: X308, Model: JAGUAR X308 1998 2.GPages: 2490, PDF Size: 69.81 MB
Page 859 of 2490
Engine - Valve Cover LH
In-vehicle Repair
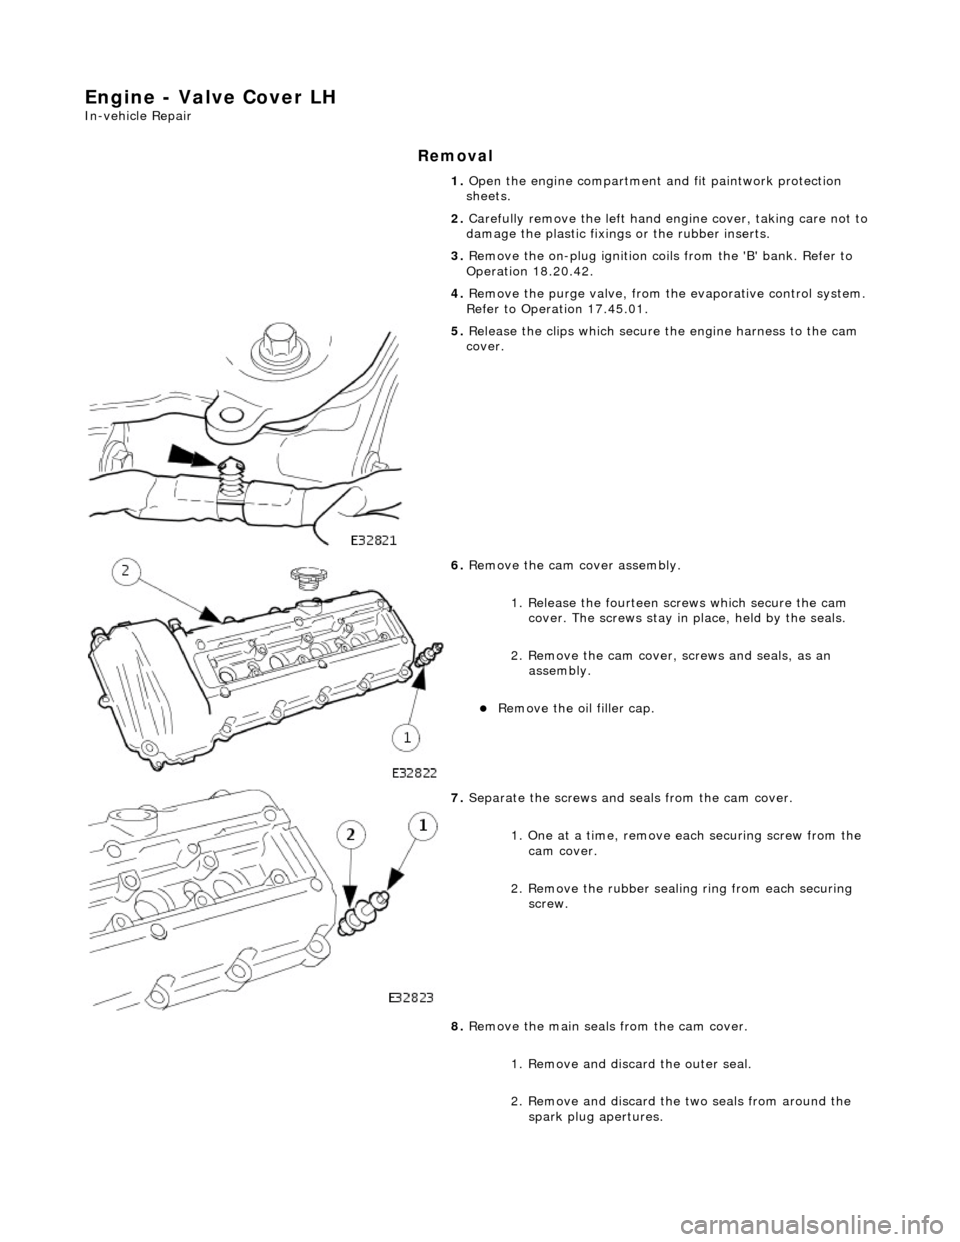
Removal
1. Open the engine compartment and fit paintwork protection
sheets.
2. Carefully remove the le ft hand engine cover, taking care not to
damage the plasti c fixings or the rubber inserts.
3. Remove the on-plug ignition coils from the 'B' bank. Refer to
Operation 18.20.42.
4. Remove the purge valve, from th e evaporative control system.
Refer to Operation 17.45.01.
5. Release the clips which secure the engine harness to the cam
cover.
6. Remove the cam cover assembly.
1. Release the fourteen sc rews which secure the cam
cover. The screws stay in place, held by the seals.
2. Remove the cam cover, screws and seals, as an
assembly.
Remove the oil filler cap.
7. Separate the screws and se als from the cam cover.
1. One at a time, remove ea ch securing screw from the
cam cover.
2. Remove the rubber sealin g ring from each securing
screw.
8. Remove the main seals from the cam cover.
1. Remove and discard the outer seal.
2. Remove and discard the two seals from around the spark plug apertures.
Page 861 of 2490

securing screw.
5. Tighten the securing screws to 9 - 11 Nm. Tighten in the
sequence indicated.
6. Fit the oil filler cap.
7. Reposition the clips which secure the engine harness to the
cam cover.
8. Refit the on-plug ignition coils and the coil cover. Refer to
Operation 18.20.42.
9. Refit the purge valve. Refer to Operation 17.45.01.
10. Reconnect the air flow meter multi-plug.
11. Refit the left hand engine cover.
12. Remove the paintwork protection sheets and close the engine
compartment.
Page 862 of 2490

Engine - Valve Cover RH
In-vehicle Repair
Removal
1. Open the engine compartment and fit paintwork protection
sheets.
2. Disconnect the intake tube from the throttle body.
1. Remove the two bolts which secure the intake tube to the throttle body.
2. Disconnect the intake tube from the throttle body.
3. Disconnect the air cleaner cover.
Release the five clips which se cure the air cleaner cover.
4. Disconnect the air fl ow meter multi-plug.
5. Remove the intake tube / air flow meter / air cleaner cover
assembly.
1. Remove the intake tube / air flow meter / air cleaner
cover assembly.
2. Remove and discard the ru bber seal; air intake tube
to throttle body.
6. Carefully remove the right hand engine cover, taking care not
to damage the plastic fixi ngs or the rubber inserts.
7. Remove the on-plug ignition coils from the 'A' bank. Refer to
Operation 18.20.41.
8. Release the clips which secure the engine harness to the cam
cover.
Page 865 of 2490

6. Reposition the clips which secure the engine harness to the
cam cover.
7. Refit the on-plug ignition coils and the coil cover. Refer to
Operation 18.20.41.
8. Refit the right hand engine cover.
9. Fit the intake tube / air flow meter / air cleaner cover
assembly.
1. Fit a new rubber seal; air in take tube to throttle body.
2. Fit the intake tube / air flow meter / air cleaner cover
assembly.
10. Reconnect the air cleaner cover.
Fit the five clips which secu re the air cleaner cover.
11. Connect the intake tube to the throttle body.
1. Connect the intake tube to the throttle body.
Page 867 of 2490
Engine - Valve Cover Gasket LH
In-vehicle Repair
Removal
1. Open the engine compartment and fit paintwork protection
sheets.
2. Carefully remove the le ft hand engine cover, taking care not to
damage the plasti c fixings or the rubber inserts.
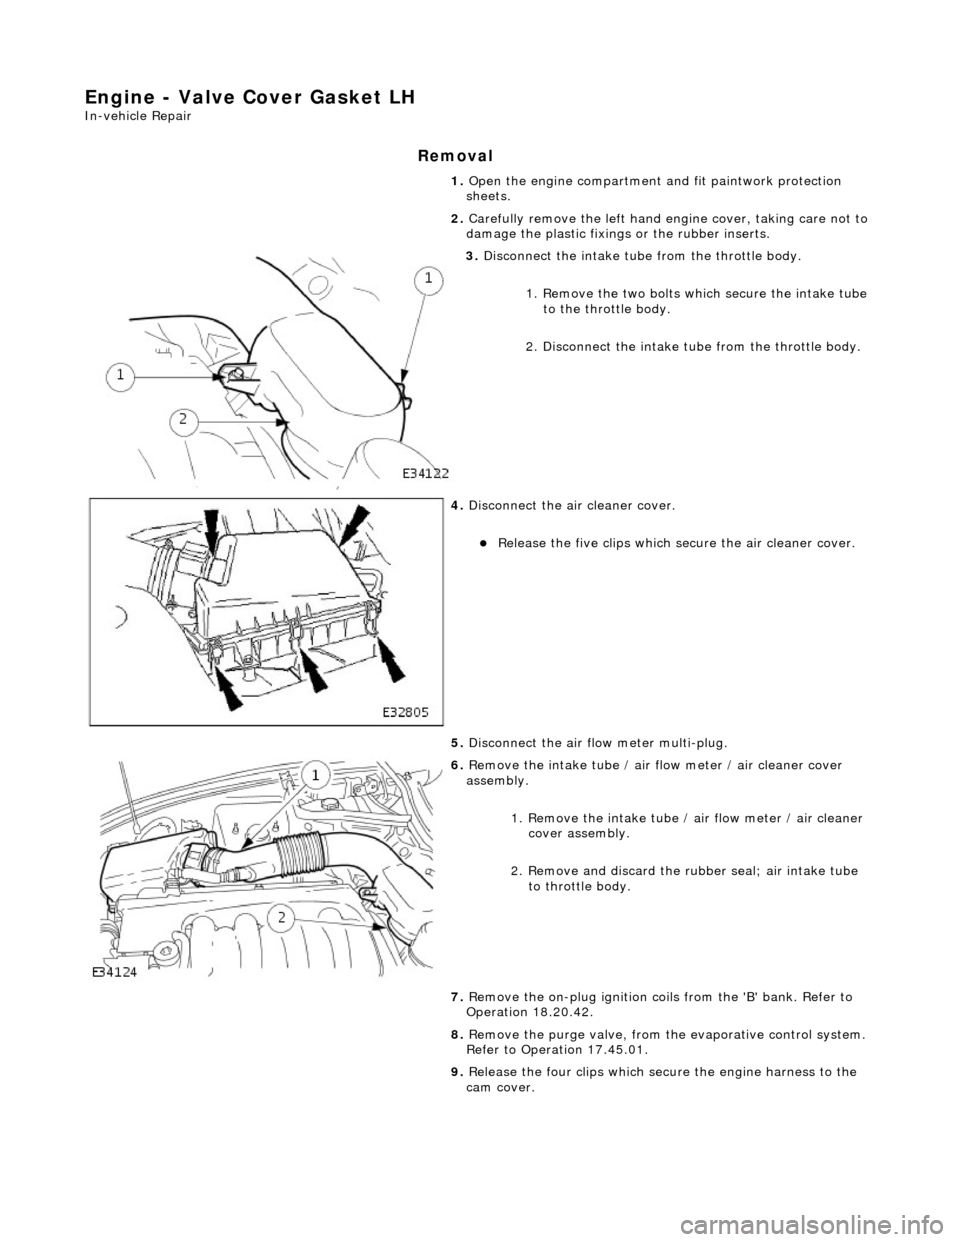
3. Disconnect the intake tube from the throttle body.
1. Remove the two bolts which secure the intake tube to the throttle body.
2. Disconnect the intake tube from the throttle body.
4. Disconnect the air cleaner cover.
Release the five clips which se cure the air cleaner cover.
5. Disconnect the air fl ow meter multi-plug.
6. Remove the intake tube / air flow meter / air cleaner cover
assembly.
1. Remove the intake tube / air flow meter / air cleaner
cover assembly.
2. Remove and discard the ru bber seal; air intake tube
to throttle body.
7. Remove the on-plug ignition coils from the 'B' bank. Refer to
Operation 18.20.42.
8. Remove the purge valve, from th e evaporative control system.
Refer to Operation 17.45.01.
9. Release the four clips which secure the engine harness to the
cam cover.
Page 870 of 2490
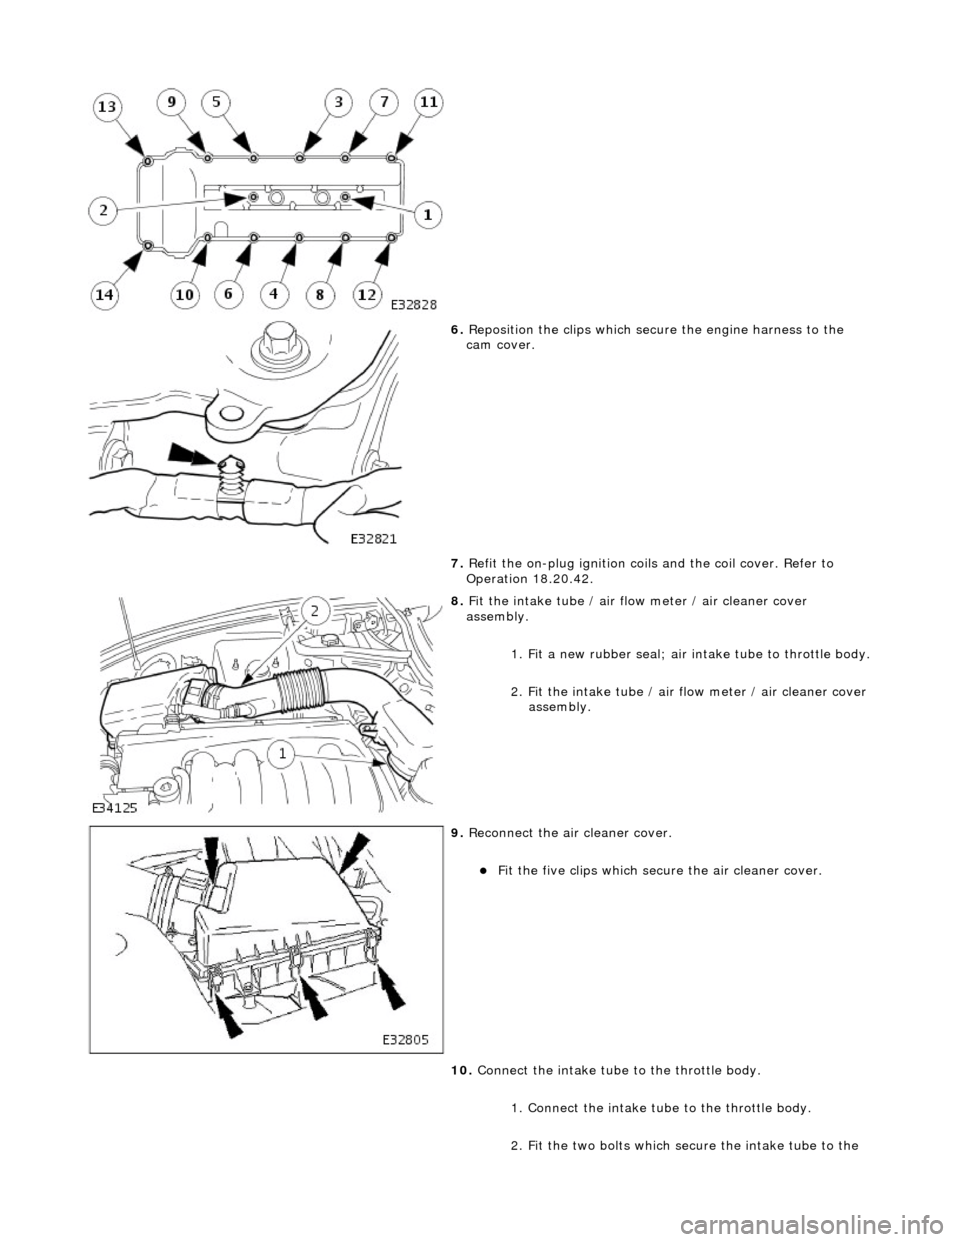
6. Reposition the clips which secure the engine harness to the
cam cover.
7. Refit the on-plug ignition coils and the coil cover. Refer to
Operation 18.20.42.
8. Fit the intake tube / air flow meter / air cleaner cover
assembly.
1. Fit a new rubber seal; air in take tube to throttle body.
2. Fit the intake tube / air flow meter / air cleaner cover
assembly.
9. Reconnect the air cleaner cover.
Fit the five clips which secu re the air cleaner cover.
10. Connect the intake tube to the throttle body.
1. Connect the intake tube to the throttle body.
2. Fit the two bolts which secure the intake tube to the
Page 872 of 2490
Engine - Valve Cover Gasket RH
In-vehicle Repair
Removal
1. Open the engine compartment and fit paintwork protection
sheets.
2. Carefully remove the right hand engine cover, taking care not
to damage the plastic fixi ngs or the rubber inserts.
3. Remove the on-plug ignition coils from the 'A' bank. Refer to
Operation 18.20.41.
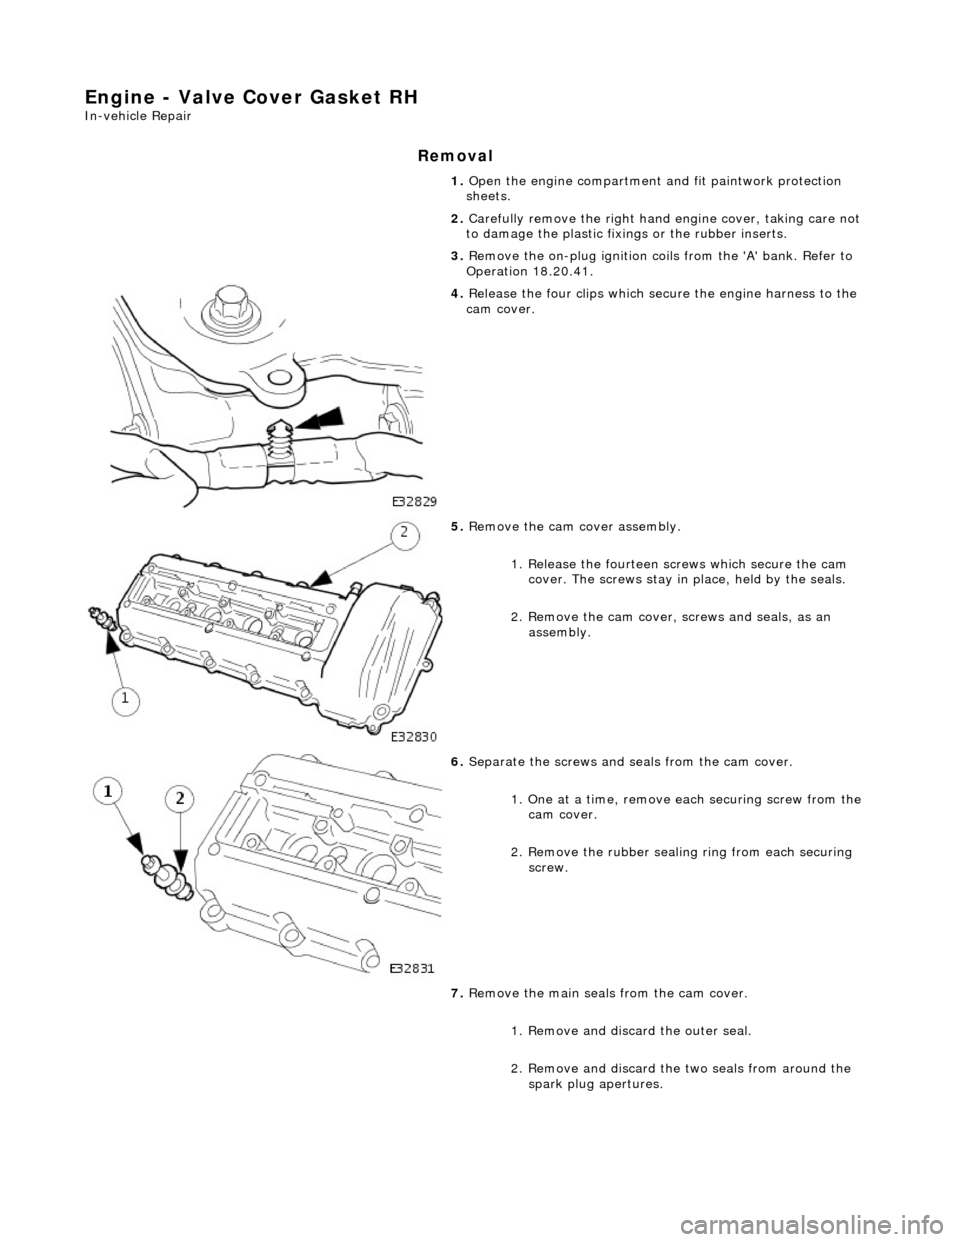
4. Release the four clips which secure the engine harness to the
cam cover.
5. Remove the cam cover assembly.
1. Release the fourteen sc rews which secure the cam
cover. The screws stay in place, held by the seals.
2. Remove the cam cover, screws and seals, as an
assembly.
6. Separate the screws and se als from the cam cover.
1. One at a time, remove ea ch securing screw from the
cam cover.
2. Remove the rubber sealin g ring from each securing
screw.
7. Remove the main seals from the cam cover.
1. Remove and discard the outer seal.
2. Remove and discard the two seals from around the spark plug apertures.
Page 874 of 2490
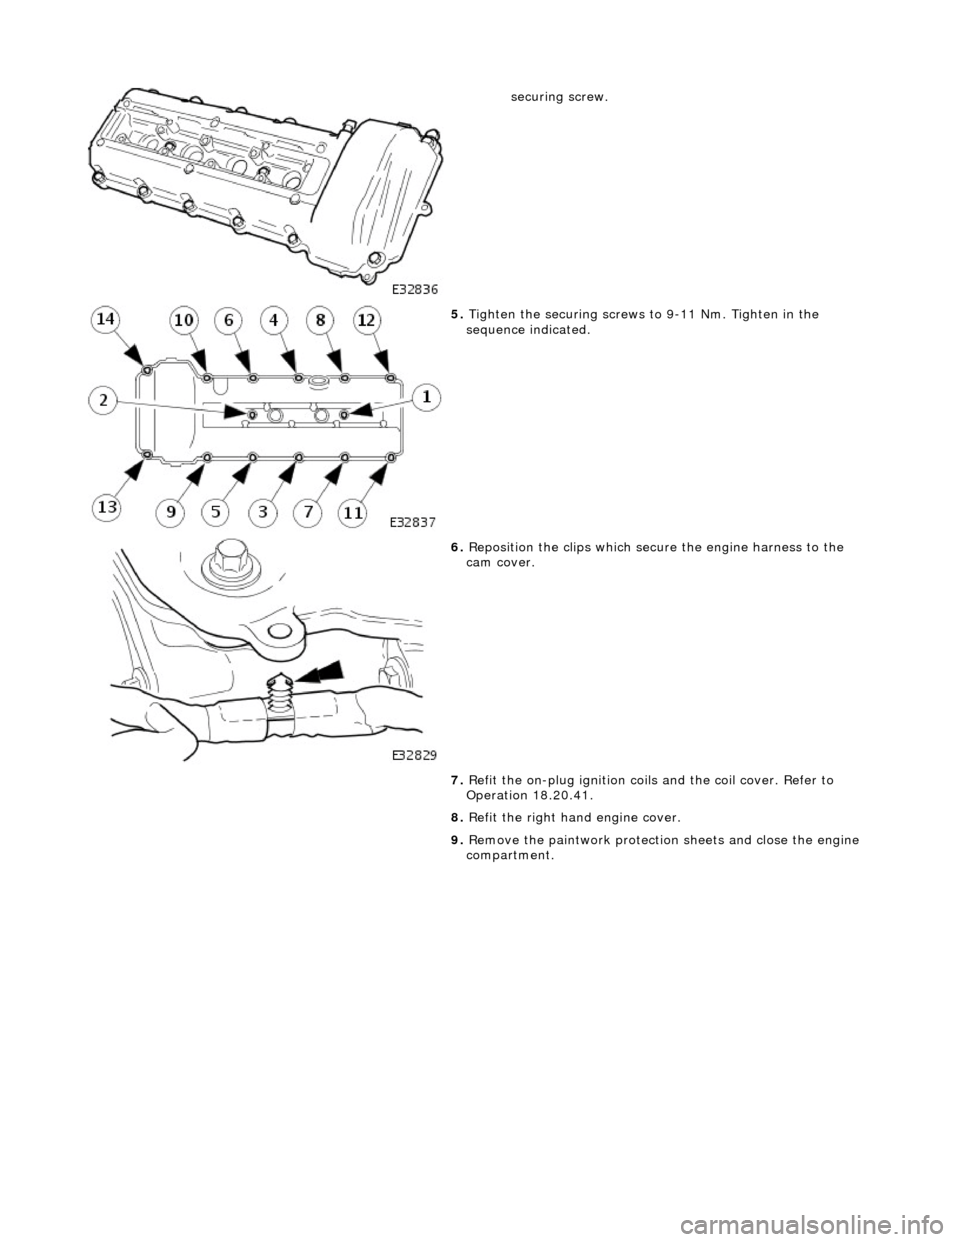
securing screw.
5. Tighten the securing screws to 9-11 Nm. Tighten in the
sequence indicated.
6. Reposition the clips which secure the engine harness to the
cam cover.
7. Refit the on-plug ignition coils and the coil cover. Refer to
Operation 18.20.41.
8. Refit the right hand engine cover.
9. Remove the paintwork protection sheets and close the engine
compartment.
Page 898 of 2490
ENSURE THAT ALL FIRE PREVENTION PROCEDURES ARE ACTIVE.
BEFORE PROCEEDING, IT IS ESSENTIAL THAT THE WARNING NOTES GIVEN IN SECTION 100-00 (UNDER THE
HEADING 'SAFETY PRECAUTIONS') ARE READ AND UNDERSTOOD.
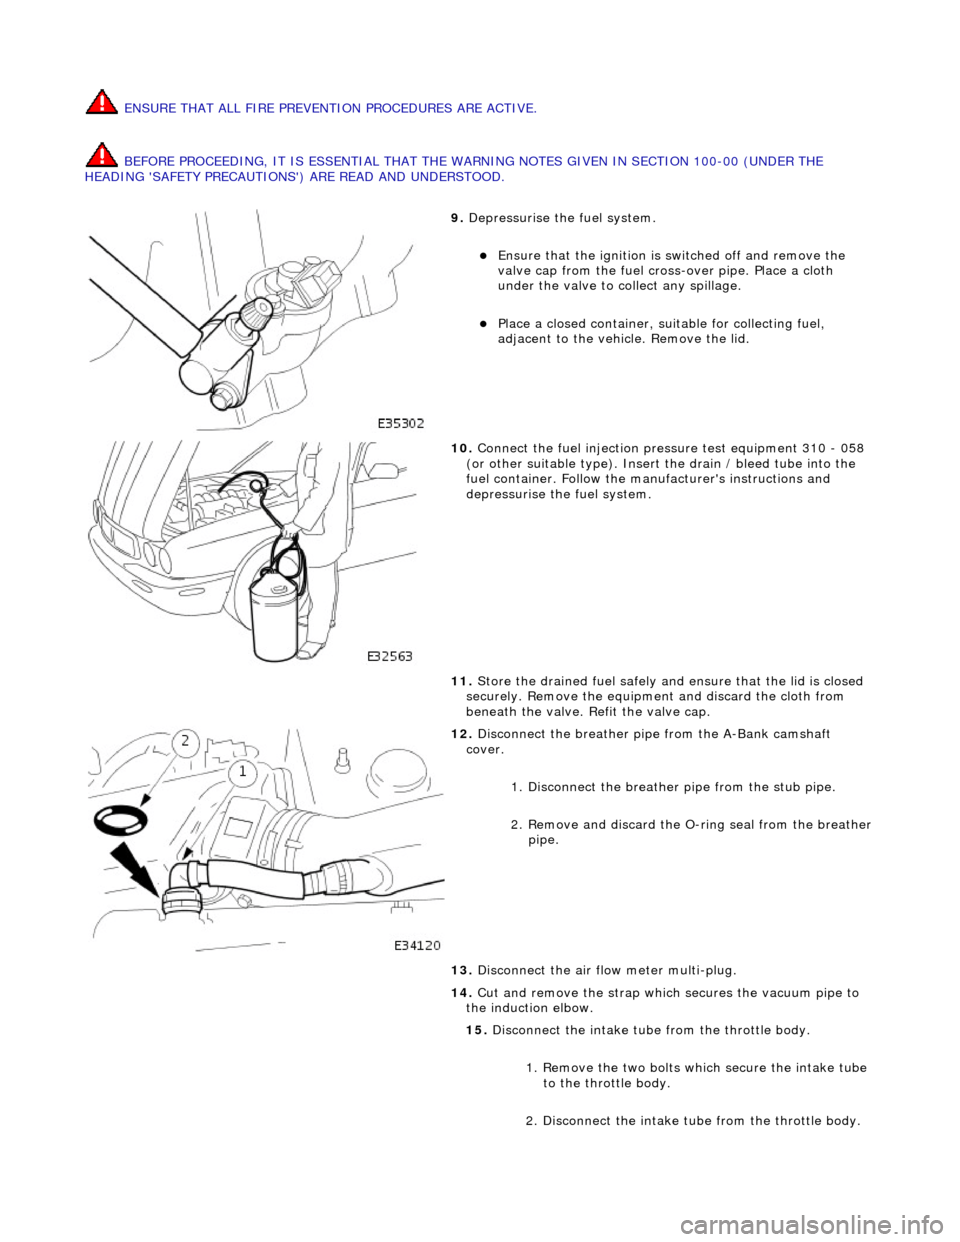
9. Depressurise the fuel system.
Ensure that the ignition is switched off and remove the
valve cap from the fuel cross-over pipe. Place a cloth
under the valve to collect any spillage.
Place a closed container, su itable for collecting fuel,
adjacent to the vehicle. Remove the lid.
10. Connect the fuel injection pressure test equipment 310 - 058
(or other suitable type). Insert the drain / bleed tube into the
fuel container. Follow the ma nufacturer's instructions and
depressurise the fuel system.
11. Store the drained fuel safely and ensure that the lid is closed
securely. Remove the equipmen t and discard the cloth from
beneath the valve. Refit the valve cap.
12. Disconnect the breather pipe from the A-Bank camshaft
cover.
1. Disconnect the breather pipe from the stub pipe.
2. Remove and discard the O-ring seal from the breather
pipe.
13. Disconnect the air flow meter multi-plug.
14. Cut and remove the strap which secures the vacuum pipe to
the induction elbow.
15. Disconnect the intake tube from the throttle body.
1. Remove the two bolts which secure the intake tube to the throttle body.
2. Disconnect the intake tube from the throttle body.
Page 948 of 2490
Ig
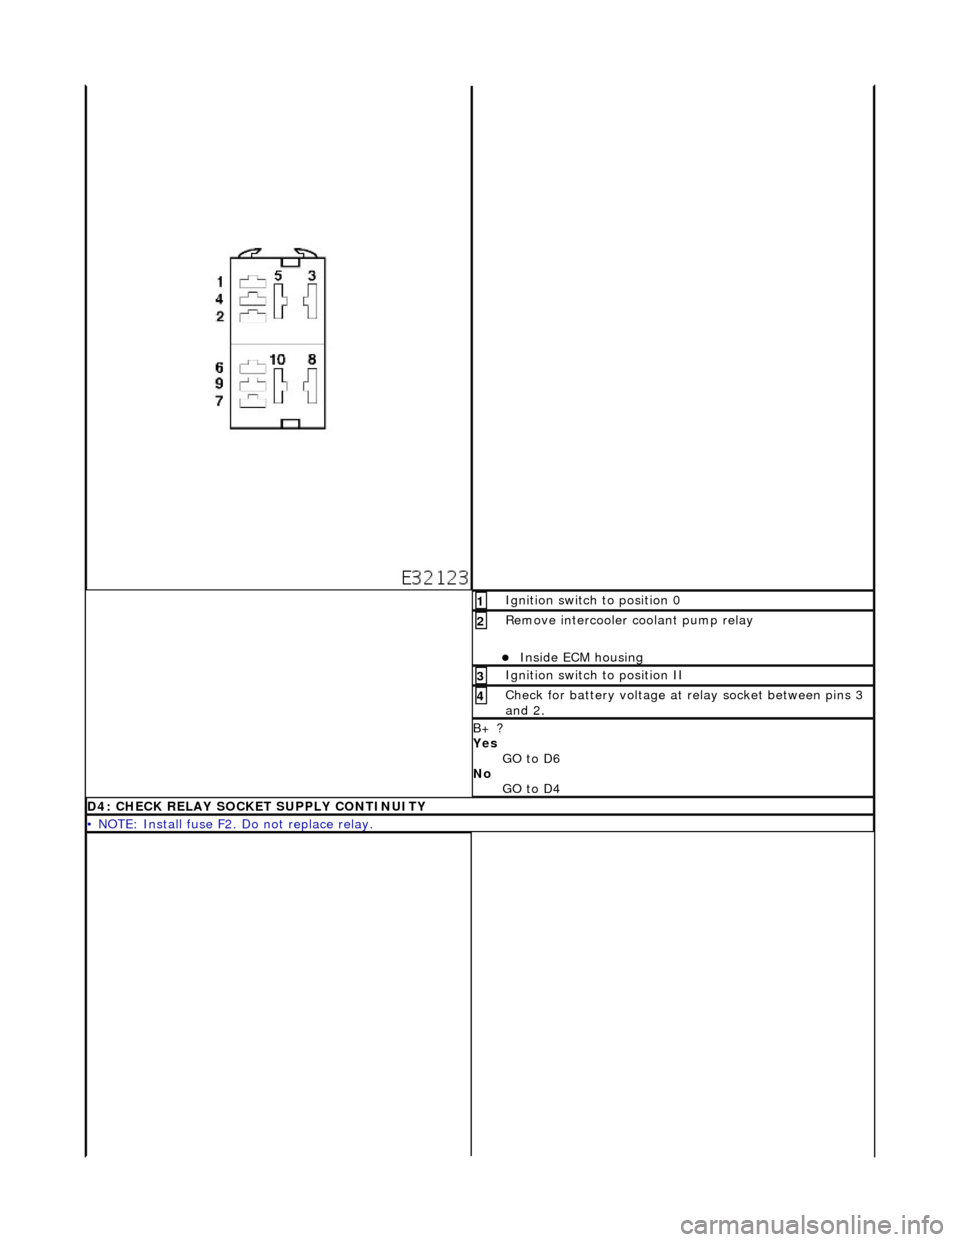
nition switch to position 0
1
R
e
move intercooler
coolant pump relay
Inside EC
M housing
2
Ignition switc
h
to position II
3
Ch
e
ck for battery voltage at relay socket between pins 3
and 2.
4
B+ ?
Yes
GO to D6
No GO to D4
D4: C H
ECK RELAY SOCKET SUPPLY CONTINUITY
•
NOTE: Install fuse F2.
Do not replace relay.