stop start JAGUAR XF 2009 1.G Owner's Manual
[x] Cancel search | Manufacturer: JAGUAR, Model Year: 2009, Model line: XF, Model: JAGUAR XF 2009 1.GPages: 391, PDF Size: 19.32 MB
Page 208 of 391
Maintenance
208
POWER STEERING FLUID CHECK
Checking the fluid level
Check and top-up the fluid with the vehicle on
level ground, with the e ngine switched off and
the system cold. Ensure that the steering wheel
is not turned after stopping the engine.
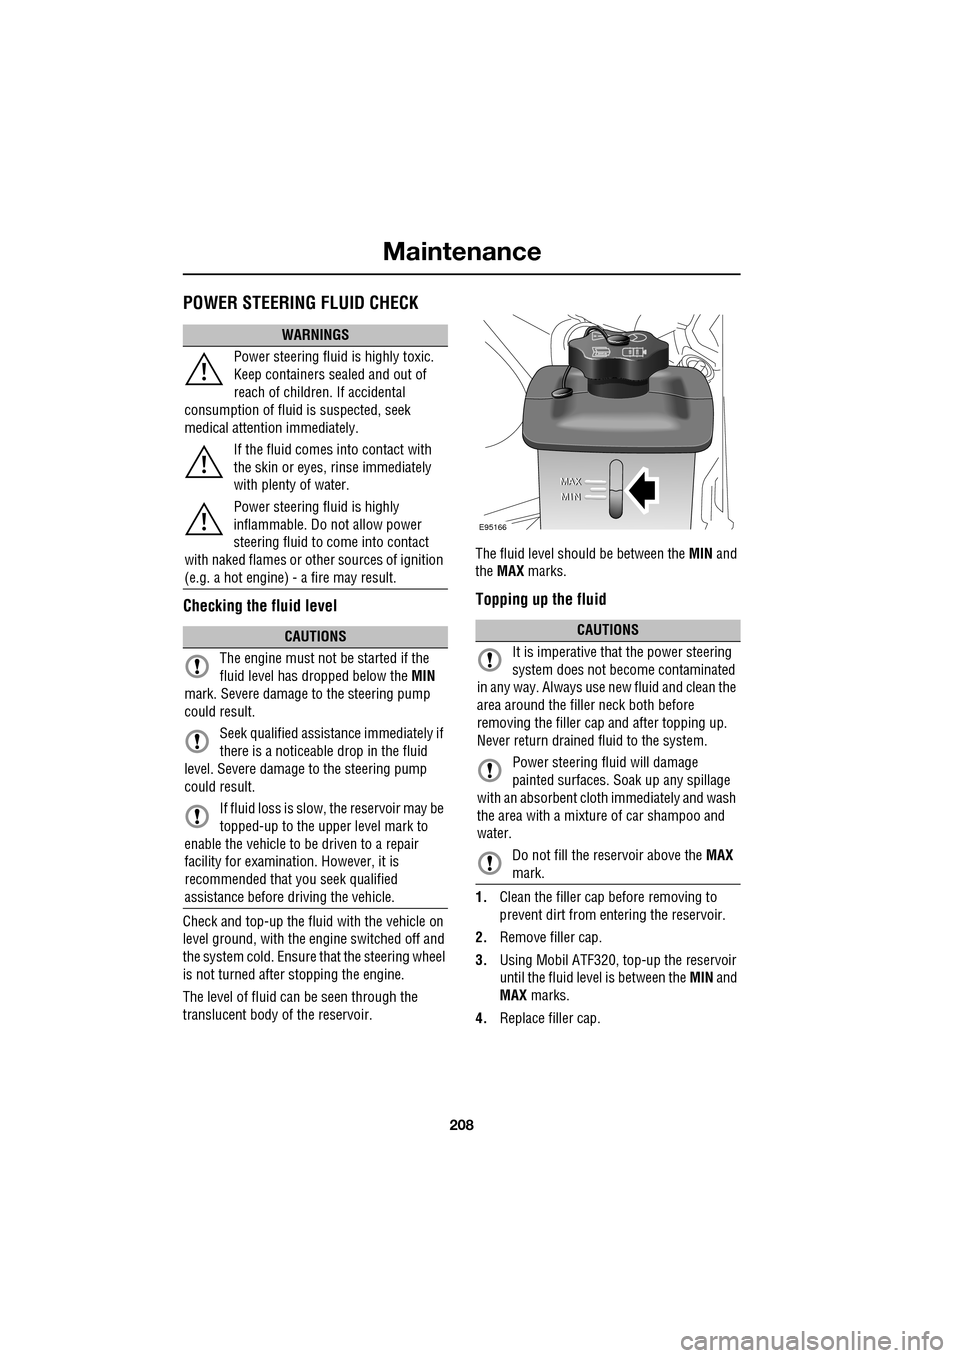
The level of fluid can be seen through the
translucent body of the reservoir. The fluid level shoul
d be between the MIN and
the MAX marks.
Topping up the fluid
1.Clean the filler cap before removing to
prevent dirt from entering the reservoir.
2. Remove filler cap.
3. Using Mobil ATF320, top-up the reservoir
until the fluid level is between the MIN and
MAX marks.
4. Replace filler cap.
WARNINGS
Power steering fluid is highly toxic.
Keep containers sealed and out of
reach of children. If accidental
consumption of fluid is suspected, seek
medical attenti on immediately.
If the fluid comes into contact with
the skin or eyes, rinse immediately
with plenty of water.
Power steering fluid is highly
inflammable. Do not allow power
steering fluid to come into contact
with naked flames or other sources of ignition
(e.g. a hot engine) - a fire may result.
CAUTIONS
The engine must not be started if the
fluid level has dropped below the MIN
mark. Severe damage to the steering pump
could result.
Seek qualified assistance immediately if
there is a noticeable drop in the fluid
level. Severe damage to the steering pump
could result.
If fluid loss is slow, the reservoir may be
topped-up to the upper level mark to
enable the vehicle to be driven to a repair
facility for examination. However, it is
recommended that you seek qualified
assistance before driving the vehicle.CAUTIONS
It is imperative that the power steering
system does not beco me contaminated
in any way. Always use new fluid and clean the
area around the filler neck both before
removing the filler ca p and after topping up.
Never return drained fluid to the system.
Power steering fluid will damage
painted surfaces. So ak up any spillage
with an absorbent cloth immediately and wash
the area with a mixture of car shampoo and
water.
Do not fill the reservoir above the MAX
mark.
E95166
Page 221 of 391
221
Wheels and tyres
Wear indicators
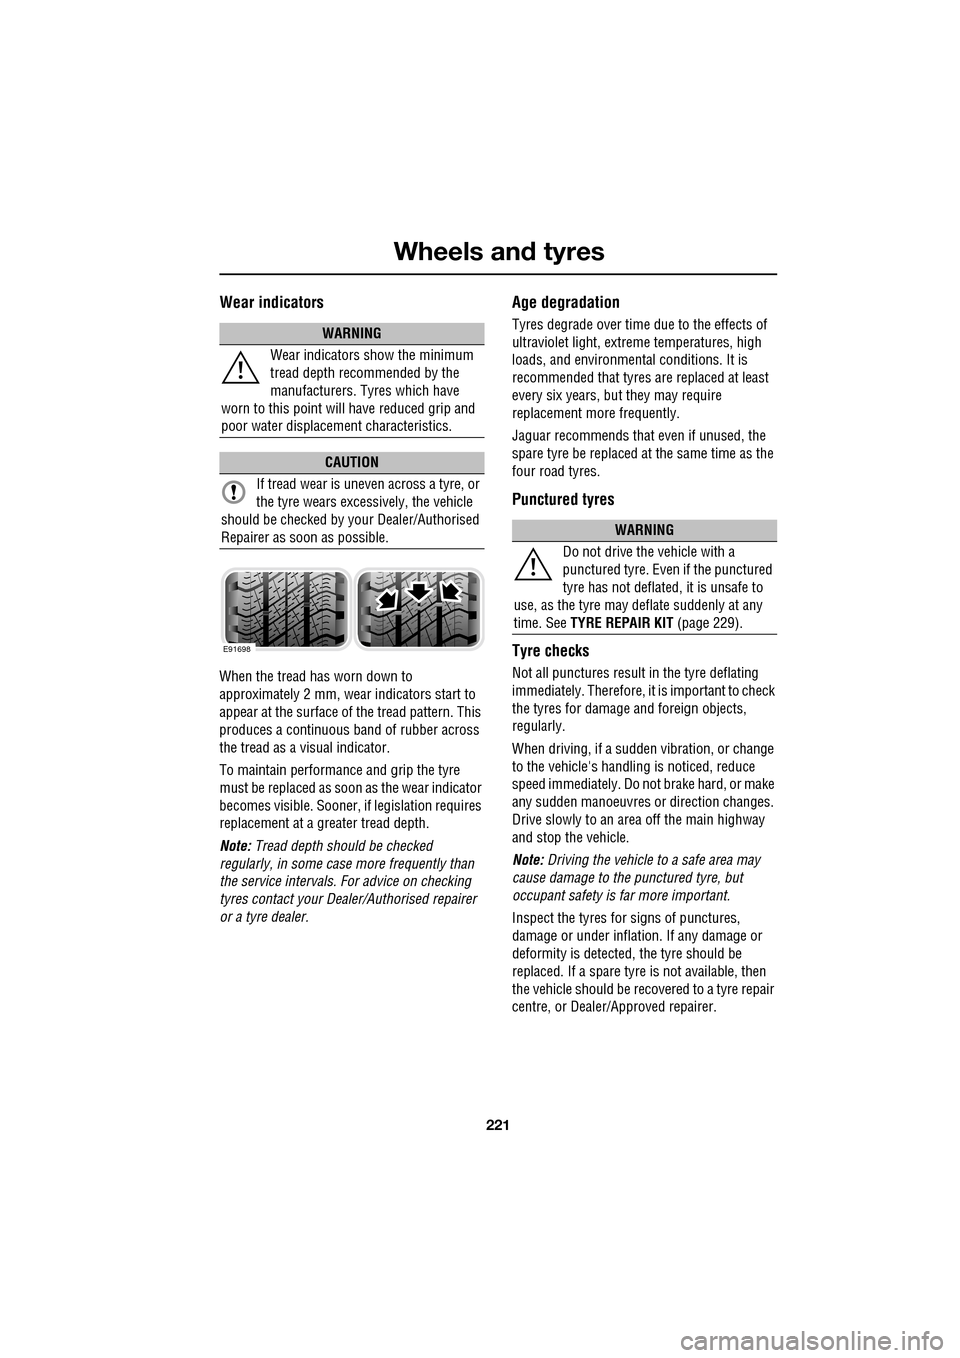
When the tread has worn down to
approximately 2 mm, wear indicators start to
appear at the surface of the tread pattern. This
produces a continuous band of rubber across
the tread as a visual indicator.
To maintain performance and grip the tyre
must be replaced as soon as the wear indicator
becomes visible. Sooner, if legislation requires
replacement at a greater tread depth.
Note: Tread depth should be checked
regularly, in some case more frequently than
the service intervals. For advice on checking
tyres contact your Dealer/Authorised repairer
or a tyre dealer.
Age degradation
Tyres degrade over time due to the effects of
ultraviolet light, extreme temperatures, high
loads, and environmen tal conditions. It is
recommended that tyres are replaced at least
every six years, but they may require
replacement more frequently.
Jaguar recommends that even if unused, the
spare tyre be replaced at the same time as the
four road tyres.
Punctured tyres
Tyre checks
Not all punctures result in the tyre deflating
immediately. Therefore, it is important to check
the tyres for damage and foreign objects,
regularly.
When driving, if a sudden vibration, or change
to the vehicle's hand ling is noticed, reduce
speed immediately. Do not brake hard, or make
any sudden manoeuvres or direction changes.
Drive slowly to an area off the main highway
and stop the vehicle.
Note: Driving the vehicle to a safe area may
cause damage to th e punctured tyre, but
occupant safety is far more important.
Inspect the tyres for signs of punctures,
damage or under inflati on. If any damage or
deformity is detected, the tyre should be
replaced. If a spare tyre is not available, then
the vehicle should be reco vered to a tyre repair
centre, or Dealer/Approved repairer.
WARNING
Wear indicators show the minimum
tread depth recommended by the
manufacturers. Tyres which have
worn to this point will have reduced grip and
poor water displacement characteristics.
CAUTION
If tread wear is uneve n across a tyre, or
the tyre wears excessively, the vehicle
should be checked by your Dealer/Authorised
Repairer as soon as possible.
E91698
WARNING
Do not drive the vehicle with a
punctured tyre. Even if the punctured
tyre has not deflated, it is unsafe to
use, as the tyre may deflate suddenly at any
time. See TYRE REPAIR KIT (page 229).
Page 227 of 391
227
Wheels and tyres
Wheel changing safety
Before raising the vehicle, or changing a wheel
ensure that you read, and comply with the
following warnings.
WARNINGS
Always find a safe place to stop, off
the highway and away from traffic.
Ensure that the vehicle is on firm level
ground.
Disconnect traile r/caravan from
vehicle.
Switch on the hazard warning lamps.
Ensure that all passengers, and
animals, are out of the vehicle and in
a safe place away from the highway.
Place a warning triangle at a suitable
distance behind th e vehicle, facing
towards oncoming traffic.
Ensure that the front wheels are in the
straight ahead position, and engage
the steering lock.
Apply the parking br ake, and engage
Park (P).
Ensure that the jack is on firm level
ground.
Never place anything between the
jack and the ground, or the jack and
the vehicle.
When one rear wheel is lifted off the
ground the selection P (Park) position
will not prevent the vehicle from
moving and possibly slipping off the jack as
the park brake only operates on the rear
wheels.
Do not start or run the engine while
the vehicle is supported only by a
jack.
The jack is designed for use when
changing a wheel only. Never work
beneath the vehicle with the jack as
the only means of s upport - use vehicle
support stands.
Always chock the wheel diagonally
opposite the wheel to be changed,
using the wheel chock supplied in the
tool kit. Chock the front of a front wheel, or the
rear of a rear wheel.
If jacking the vehicle on a slight slope
is unavoidable, place chocks on the
downhill side of the two opposite
wheels. An additional chock will be
needed.
Take care when lifting the spare
wheel, and removing the punctured
wheel. The wheels are heavy, and can
cause injuries if not handled
correctly.
Remove the spare wheel prior to
jacking the vehicle. To avoid
destabilising the vehicle when raised.
Take care when loosening the wheel
nuts. The wheel brace may slip off if
not properly attached, and the wheel
nuts may give way suddenly. Either
unexpected movement ma y cause an injury.
WARNINGS
Page 233 of 391
233
Wheels and tyres
9.Unless the vehicle is in an enclosed area,
start the engine.
10. Set the compressor switch to the on ( I)
position.
11. Inflate the tyre to a minimum of 1.9 bar
(26 lbf/in²) and a maximum of 3.5 bar
(51 lbf/in²).
•When pumping the sealant through the
tyre valve, the pressure may rise up to 6
bar (87 lbf/in²). The pressure will drop
again after approximately 30 seconds.
12. During the inflation, switch the
compressor off briefly, to check the tyre
pressure using the gauge mounted on the
compressor.
• It should not take longer than seven
minutes to inflate the tyre. If, after seven
minutes, the tyre has not yet reached
minimum pressure, the tyre should not
be used.
13. Once the tyre has been inflated, switch off
the compressor. If desired, the engine may
be turned off after the compressor has
been turned off.
14. Remove the power connector from the
auxiliary power socket.
15. Remove the inflation hose from the tyre
valve, by unscrewing it as quickly as
possible (count er-clockwise).
16. Replace the inflation hose protective cap
and the tyre valve cap.
17. Do not remove the sealant bottle from the
receiver.
18. Ensure that the tyre repair kit (including
the bottle and receiver caps) are placed
securely in the vehicle. You will need to
use the kit to check the tyre pressure after
approximately 3 km (2 miles), so ensure
they are easily accessible. 19.
Immediately drive the vehicle for
approximately 3 km (2 miles), to allow the
sealant to coat the inner surface of the tyre
and form a seal at the puncture.
Checking the tyre pressure after a repair
1.Drive the vehicle for 3 km (2 miles) then
stop in a safe place. Carry out a visual
examination of the tyres condition.
2. Make sure that the sealant container
section is in its original position.
3. Screw the inflation hos e connector firmly
onto the tyre valve.
4. Read the tyre pressure from the gauge.
5. If the pressure of the sealant filled tyre is
above 1.3 bar (19 lb/in²) adjust the
pressure to the correct value. See TYRE
CARE (page 217).
6. Ensure that the compressor switch is in
the off (O ) position and insert the power
cable connector into the auxiliary power
socket.
If the vehicle is in a well ventilated area,
start the engine.
WARNINGS
When driving the vehicle, if you
experience vibr ations, abnormal
steering, or noises, reduce speed
immediately. Drive with extreme caution and
reduced speed, to the first safe place to stop
the vehicle. Visually examine the tyre and
check its pressure. If there are any signs of
damage or deformity to the tyre, or the tyre
pressure is below 1.3 bar (19 lb/in²), do not
continue driving.
Consult a tyre repair centre or your
Dealer/Authorised Repairer, for
advice concerning the replacement of
a tyre after using a tyre repair kit.
Page 251 of 391
251
Status after a collision
DRIVING AFTER A COLLISION
Before starting or driving
If the vehicle has been involved in an accident
it should be checked thoroughly before
attempting to start the engine or drive the
vehicle.
Check for:-
• Fuel leaks.
• Fluid leaks.
• Battery damage.
• Damage to wiring.
• Damage to lights.
• Damage to steering, suspension, wheels
or tyres.
• Sharp or protruding bodywork.
• Operation of doors and locks.
• Condition and operation of seat belts and
SRS components.
• Activation of the pe destrian protection
system.
• Condition of chil d seats and their
mounting/attach ment points.
Note: This list is not exhaustive.
Resetting the fuel cut-off
The fuel system cut-off forms part of the Safety
and Restraint System (SRS) fitted to your
vehicle. Following an impact, and depending on
the severity, the fuel pump may be switched
off.
1.Switch the ignition off, and wait for 10
seconds.
2. Without pressing the brake pedal, press
the engine START/STOP button, to switch
the electrical circuits on. Wait for 30
seconds.
3. Check the vehicle thoroughly for fuel leaks.
If a leak is detected switch the ignition off
immediately.
•The vehicle must not be started if a leak
is present. Seek qualified advice, and
have the vehicle recovered.
4. If no leaks are detected, start the engine.
WARNING
If the vehicle is involved in a collision
it should be checked by a Dealer/
Authorised repairer, or suitably
qualified personnel, before starting or driving.
WARNING
The fuel cut-off should never be reset
if you can smell fuel, or a leak can be
seen. Doing so can lead to a fire
which may cause personal injury or death.
Page 286 of 391
Digital audio broadcasting
286
Finding an ensemble
Touch and hold (two seconds) the seek
buttons to find the next or previous ensemble.
SeeAUDIO CONTROLS (page 282).
After a few seconds pause, the first channel in
the ensemble found will start playing.
DAB search
The DAB search menu enables you to view lists
of available ensembles, channels and
subchannels. You can al so perform searches
based on programme type (PTY).
Select DAB search to display the DAB search
menu.
Auto-tune
Select Auto-tune to build a list of available
ensembles and channels for your current
location. See CHANNEL AUTOMATIC TUNING
(page 284).
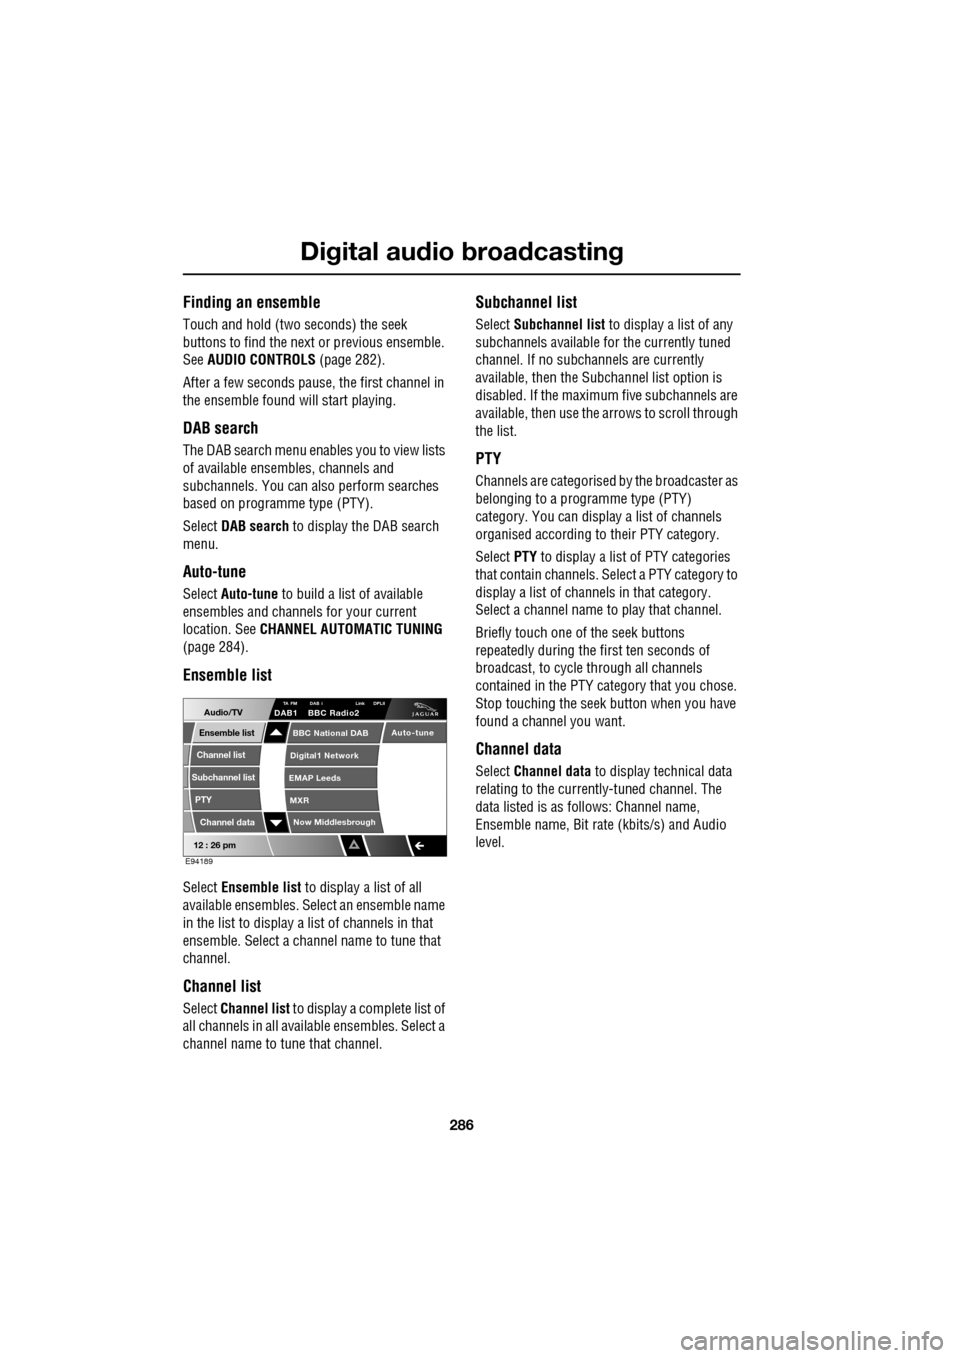
Ensemble list
Select Ensemble list to display a list of all
available ensembles. Select an ensemble name
in the list to display a list of channels in that
ensemble. Select a channe l name to tune that
channel.
Channel list
Select Channel list to display a complete list of
all channels in all availa ble ensembles. Select a
channel name to tune that channel.
Subchannel list
Select Subchannel list to display a list of any
subchannels available for the currently tuned
channel. If no subcha nnels are currently
available, then the Subchannel list option is
disabled. If the maximum five subchannels are
available, then use the arrows to scroll through
the list.
PTY
Channels are categorised by the broadcaster as
belonging to a programme type (PTY)
category. You can display a list of channels
organised according to their PTY category.
Select PTY to display a list of PTY categories
that contain channels. Select a PTY category to
display a list of channels in that category.
Select a channel name to play that channel.
Briefly touch one of the seek buttons
repeatedly during the first ten seconds of
broadcast, to cycle through all channels
contained in the PTY category that you chose.
Stop touching the seek button wh en you have
found a channel you want.
Channel data
Select Channel data to display technical data
relating to the currently-tuned channel. The
data listed is as follows: Channel name,
Ensemble name, Bit rate (kbits/s) and Audio
level.
12 : 26 pm
Now Middlesbrough
BBC National DAB
Digital1 Network
EMAP Leeds
MXR
Audio/TVTA FM DAB i Link DPLIIDAB1 BBC Radio2
Channel list
Subchannel list
Ensemble list
PTY
Channel data
Auto-tune
E94189
Page 294 of 391
Compact disc player
294
Loading several CDs (six CD player)
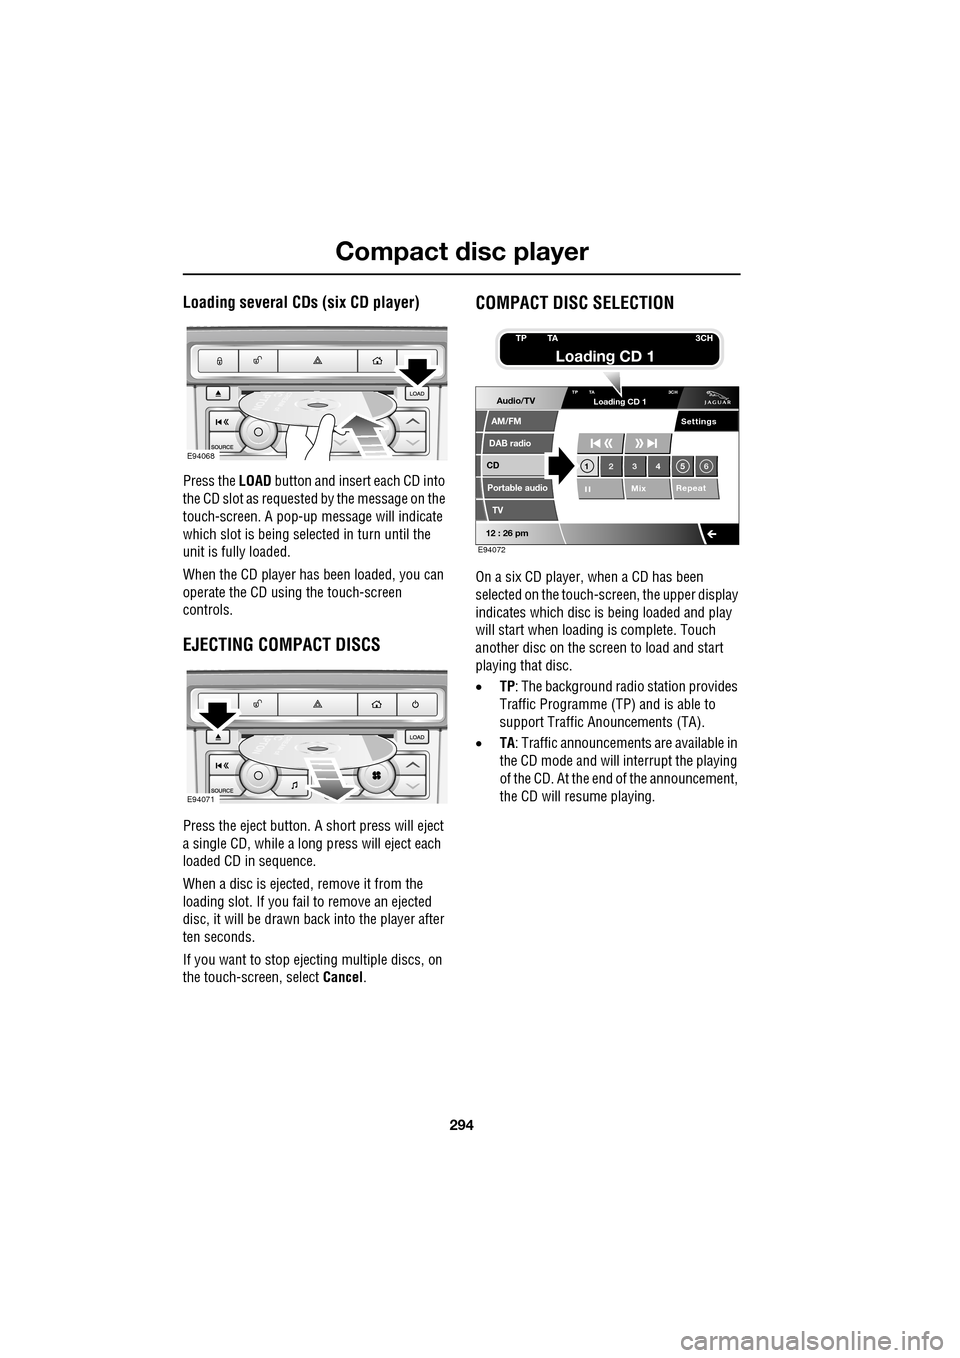
Press the LOAD button and insert each CD into
the CD slot as requested by the message on the
touch-screen. A pop-up me ssage will indicate
which slot is being sele cted in turn until the
unit is fully loaded.
When the CD player has been loaded, you can
operate the CD using the touch-screen
controls.
EJECTING COMPACT DISCS
Press the eject button. A short press will eject
a single CD, while a long press will eject each
loaded CD in sequence.
When a disc is ejected, remove it from the
loading slot. If you fail to remove an ejected
disc, it will be drawn back into the player after
ten seconds.
If you want to stop ejecting multiple discs, on
the touch-screen, select Cancel.
COMPACT DISC SELECTION
On a six CD player, when a CD has been
selected on the touch-screen, the upper display
indicates which disc is being loaded and play
will start when loading is complete. Touch
another disc on the scre en to load and start
playing that disc.
• TP: The background radio station provides
Traffic Programme (TP) and is able to
support Traffic Anouncements (TA).
• TA: Traffic announcements are available in
the CD mode and will interrupt the playing
of the CD. At the end of the announcement,
the CD will resume playing.
E94068
E94071
Audio/TV
DAB radio
CD
AM/FM
12 : 26 pm
Portable audio
TV
Settings
1 23 45 6
MixRepeat
TP TA
3CHLoading CD 1
E94072
TP TA3CH
Loading CD 1
Page 330 of 391
Television
330
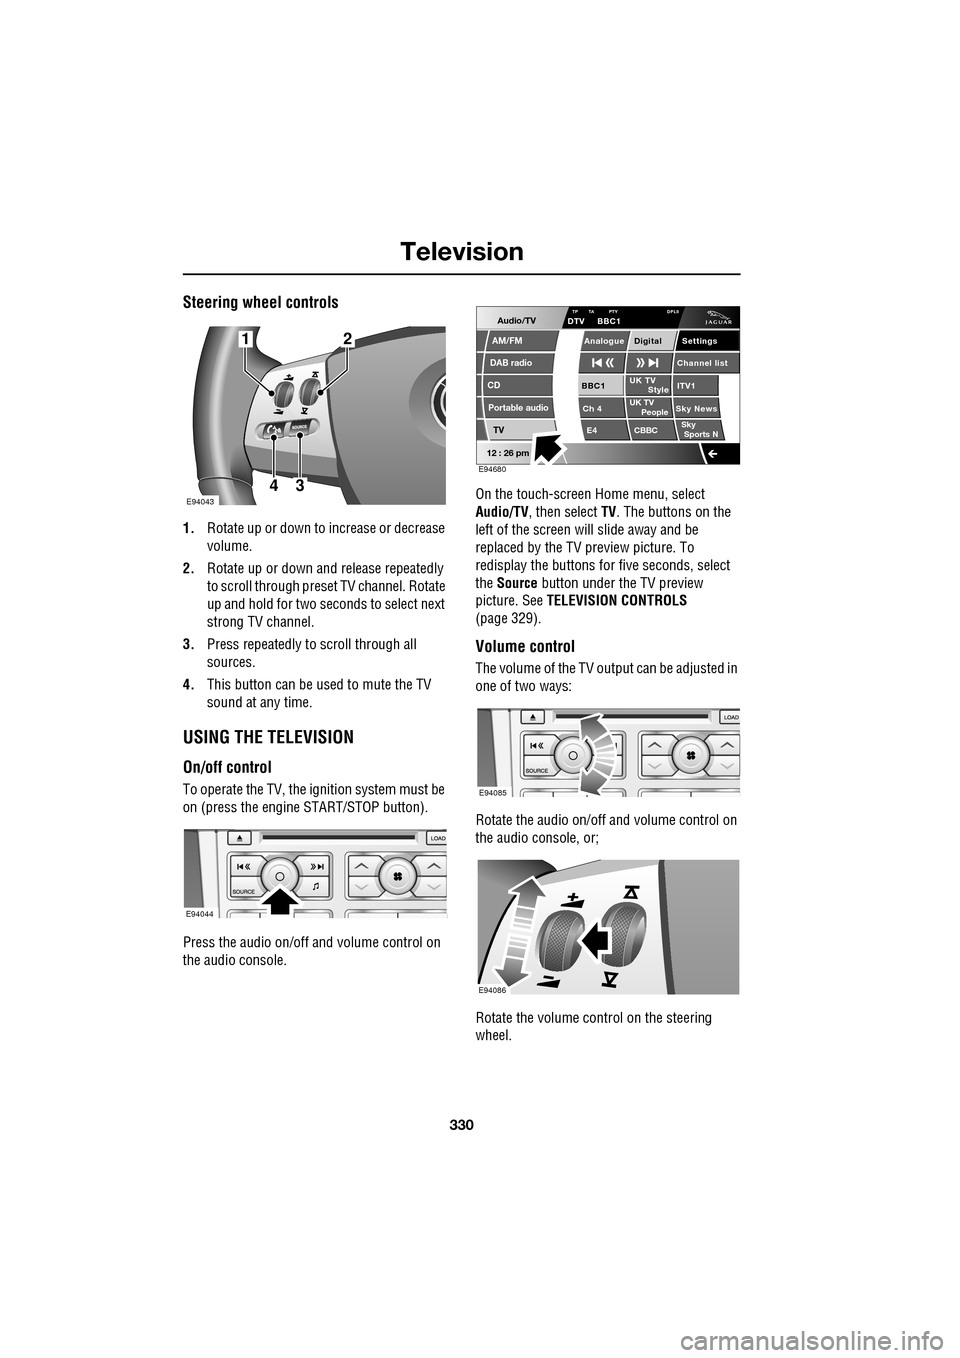
Steering wheel controls
1.Rotate up or down to increase or decrease
volume.
2. Rotate up or down and release repeatedly
to scroll through preset TV channel. Rotate
up and hold for two seconds to select next
strong TV channel.
3. Press repeatedly to scroll through all
sources.
4. This button can be used to mute the TV
sound at any time.
USING THE TELEVISION
On/off control
To operate the TV, the ignition system must be
on (press the engine START/STOP button).
Press the audio on/off and volume control on
the audio console. On the touch-screen
Home menu, select
Audio/TV , then select TV. The buttons on the
left of the screen will slide away and be
replaced by the TV preview picture. To
redisplay the buttons for five sec onds, select
the Source button under the TV preview
picture. See TELEVISION CONTROLS
(page 329).
Volume control
The volume of the TV output can be adjusted in
one of two ways:
Rotate the audio on/off and volume control on
the audio console, or;
Rotate the volume control on the steering
wheel.
E94043
12
43
E94044
Audio/TV
DAB radio
CD
AM/FM
12 : 26 pm
Portable audio
TV
UK TV ITV1
Ch 4 Sky News E4 CBBCBBC1
Settings
Channel list
TA PTY DPLIIDTV BBC1
Style
UK TV People
SkySports NTP
Analogue Digital
E94680
E94085
E94086