rfa JAGUAR XF 2009 1.G Owners Manual
[x] Cancel search | Manufacturer: JAGUAR, Model Year: 2009, Model line: XF, Model: JAGUAR XF 2009 1.GPages: 391, PDF Size: 19.32 MB
Page 4 of 391
Contents
4
SIDE REPEATER LAMP .................................. 85
REAR LAMP BULBS ....................................... 85
BULB SPECIFICATION CHART ........................ 87
Wipers and washers
WINDSCREEN WIPERS .................................. 88
RAIN SENSOR ................................................ 89
WINDSCREEN WASHERS............................... 89
HEADLAMP WASHERS................................... 90
CHECKING THE WIPER BLADES .................... 90
CHANGING THE WIPER BLADES .................... 91
Windows and mirrors
ELECTRIC WINDOWS ..................................... 93
INTERIOR MIRROR ........................................ 94
EXTERIOR MIRRORS ..................................... 95
BLIND SPOT MONITOR .................................. 97
Instruments
INSTRUMENT PANEL OVERVIEW .................. 99
WARNING LAMPS AND INDICATORS .......... 100
AUDIBLE WARNINGS AND INDICATORS ..... 104
Information displays
GENERAL INFORMATION ............................. 105
WARNING AND INFORMATION MESSAGES. 106
TRIP COMPUTER ......................................... 107
TOUCH-SCREEN ........................................... 109
PERSONALISED SETTINGS .......................... 111
Climate control
AIR VENTS ................................................... 115
AUTOMATIC CLIMATE CONTROL ................. 116
ELECTRIC SUNROOF .................................... 121
Convenience features
SUN VISORS ................................................ 123
SUN BLINDS................................................. 123
INSTRUMENT LIGHTING DIMMER ............... 123
CLOCK .......................................................... 124
AUXILIARY POWER SOCKETS ..................... 125
GLOVE BOX .................................................. 125
CUP HOLDERS ............................................. 126
STORAGE COMPARTMENTS ........................ 127
GARAGE DOOR TRANSCEIVER .................... 128
PORTABLE AUDIO INTERFACE..................... 131
Starting the engine
GENERAL INFORMATION.............................. 132
KEYLESS STARTING ..................................... 133
SWITCHING OFF THE ENGINE....................... 134
DIESEL PARTICULATE FILTER (DPF)............ 135
Transmission
AUTOMATIC TRANSMISSION ....................... 137
Brakes
PRINCIPLE OF OPERATION .......................... 144
HINTS ON DRIVING WITH ABS ..................... 144
ELECTRIC PARKING BRAKE (EPB) ............... 146
Parking aid
PRINCIPLE OF OPERATION .......................... 148
USING THE PARKING AID ............................. 148
Rear view camera
PRINCIPLE OF OPERATION .......................... 152
Driving hints
RUNNING-IN ................................................. 154
ECONOMICAL DRIVING ................................ 155
Cruise control
PRINCIPLE OF OPERATION .......................... 156
USING CRUISE CONTROL............................. 156
Adaptive cruise control (ACC)
PRINCIPLE OF OPERATION .......................... 159
USING ACC ................................................... 159
FORWARD ALERT FUNCTION ....................... 164
ADVANCED EMERGENCY BRAKE ASSIST..... 165
Automatic speed limiter (ASL)
PRINCIPLE OF OPERATION .......................... 167
USING THE ASL ............................................ 167
Driving dynamics
GENERAL INFORMATION.............................. 169
WINTER MODE ............................................. 169
DYNAMIC MODE ........................................... 170
STABILITY CONTROL.................................... 170
Fuel and refuelling
SAFETY PRECAUTIONS................................. 174
Page 69 of 391
69
Steering wheel
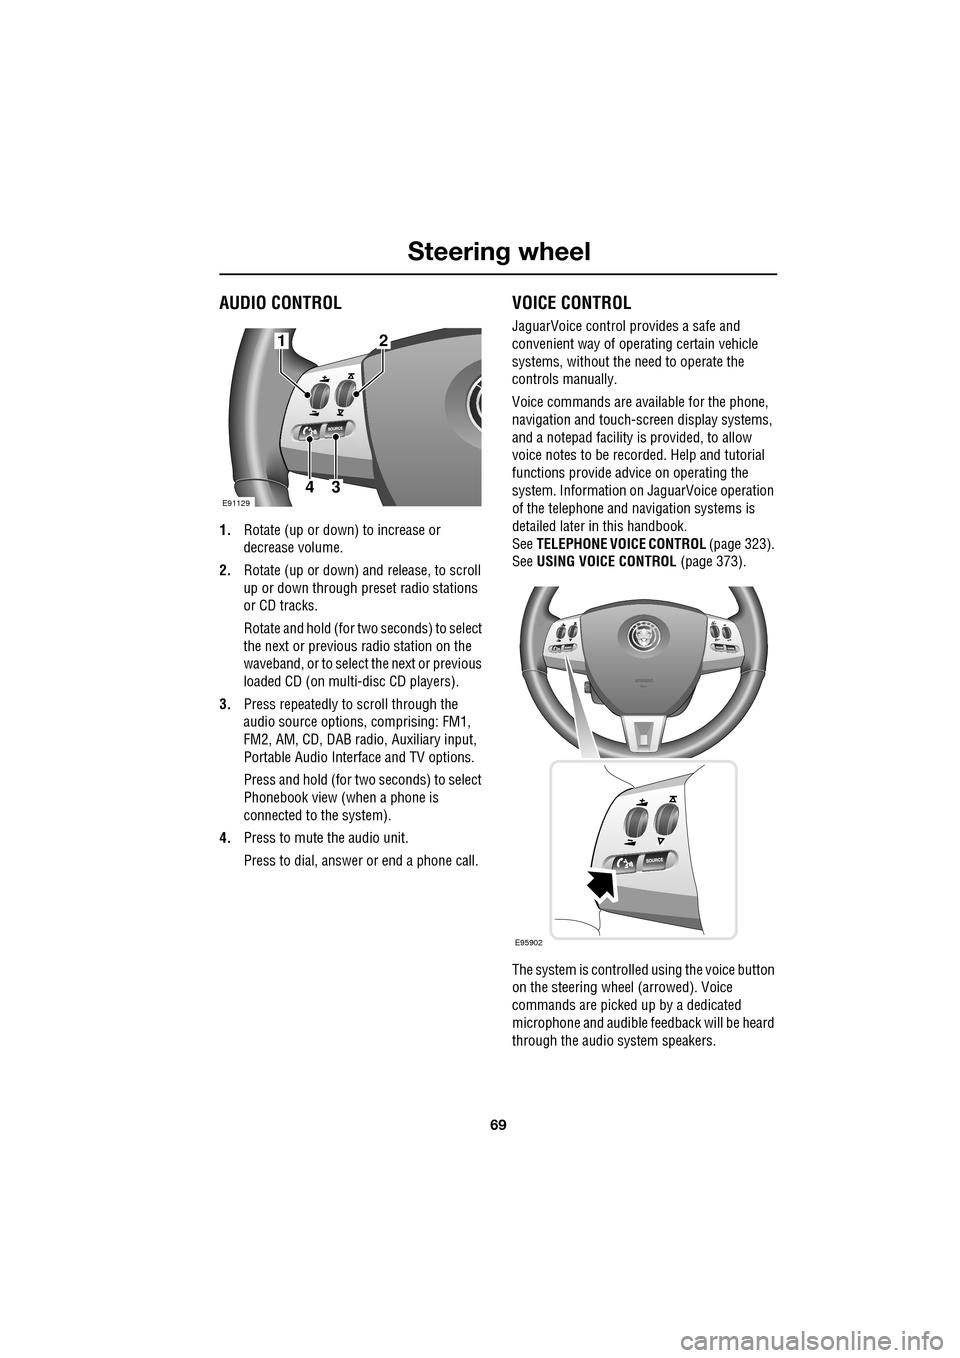
AUDIO CONTROL
1.Rotate (up or down) to increase or
decrease volume.
2. Rotate (up or down) a nd release, to scroll
up or down through preset radio stations
or CD tracks.
Rotate and hold (for two seconds) to select
the next or previous radio station on the
waveband, or to select the next or previous
loaded CD (on multi-disc CD players).
3. Press repeatedly to scroll through the
audio source options, comprising: FM1,
FM2, AM, CD, DAB radi o, Auxiliary input,
Portable Audio Interface and TV options.
Press and hold (for two seconds) to select
Phonebook view (when a phone is
connected to the system).
4. Press to mute the audio unit.
Press to dial, answer or end a phone call.
VOICE CONTROL
JaguarVoice control pr ovides a safe and
convenient way of operating certain vehicle
systems, without the need to operate the
controls manually.
Voice commands are av ailable for the phone,
navigation and touch-scre en display systems,
and a notepad facility is provided, to allow
voice notes to be recorded. Help and tutorial
functions provide advi ce on operating the
system. Information on JaguarVoice operation
of the telephone and navigation systems is
detailed later in this handbook.
See TELEPHONE VOICE CONTROL (page 323).
See USING VOICE CONTROL (page 373).
The system is controlle d using the voice button
on the steering wheel (arrowed). Voice
commands are picked up by a dedicated
microphone and audible fee dback will be heard
through the audio system speakers.12
43E91129
E95902
Page 81 of 391
81
Lighting
Note: For lamps controlled by proximity
sensors, the wearing of gloves may interfere
with operation. If you are wearing gloves, it
may be necessary to touch the proximity
switch to operate the lamps.
Ambience lighting
Ambience lighting. Automatically illuminates
when the headlamps are on. Ambience lighting
creates a blue glow ar ound the centre console
and front door armrests.
Luggage compartment lamp
Automatically illuminates when the luggage
compartment is opened.
APPROACH LAMPS
This feature is activated by pressing
the headlamp icon button on the
Jaguar Smart Key. See USING THE
REMOTE CONTROL (page 17). The headlamps
will remain on for 25 seconds or until the
button is pressed again, or until the engine
START/STOP button is pressed.
REMOVING A HEADLAMP
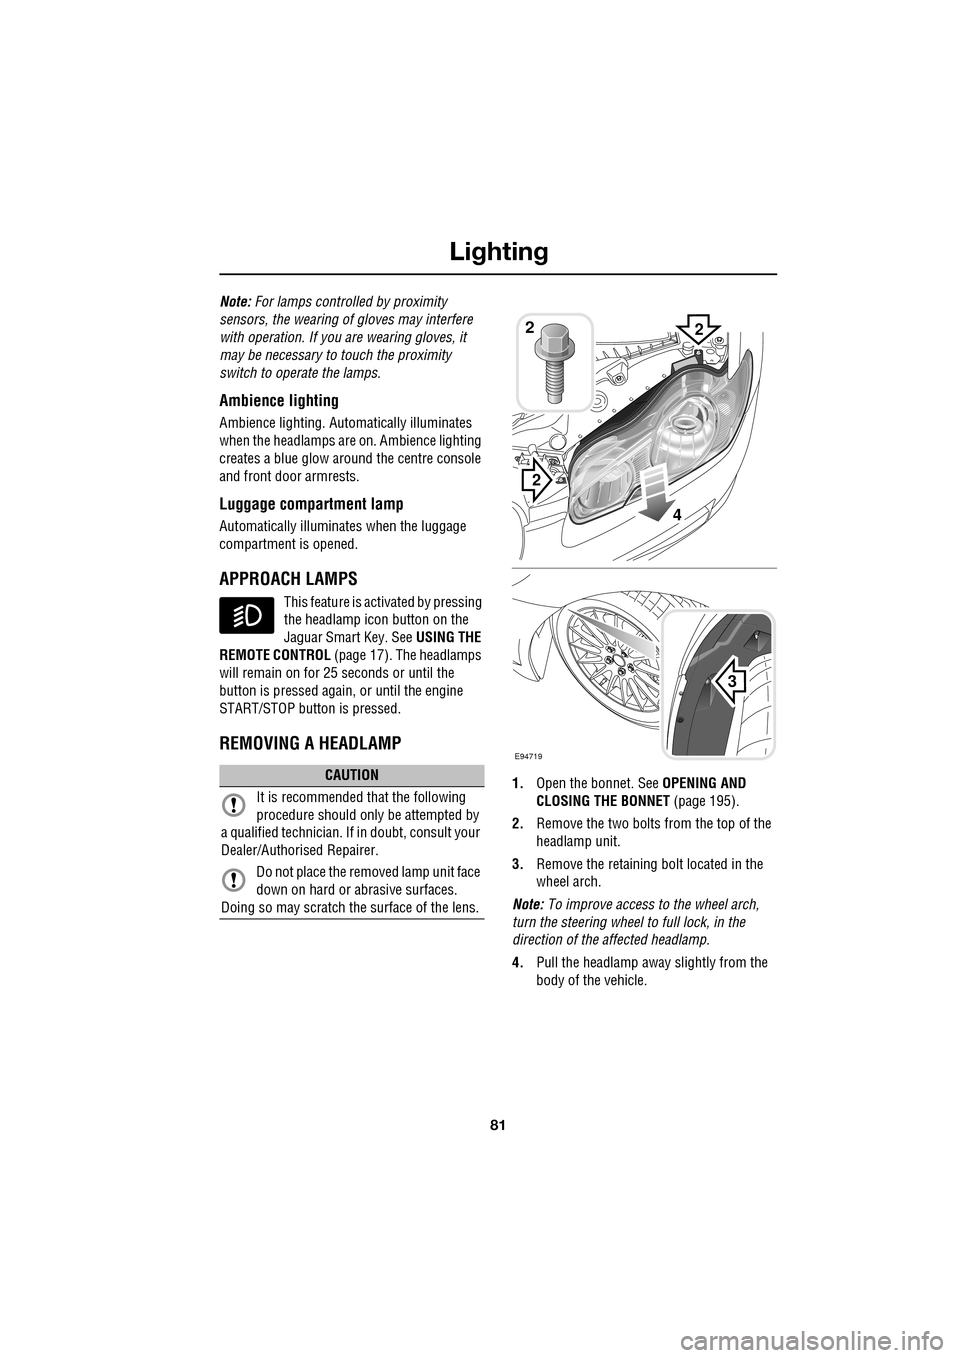
1. Open the bonnet. See OPENING AND
CLOSING THE BONNET (page 195).
2. Remove the two bolts from the top of the
headlamp unit.
3. Remove the retaining bolt located in the
wheel arch.
Note: To improve access to the wheel arch,
turn the steering wheel to full lock, in the
direction of the affected headlamp.
4. Pull the headlamp away slightly from the
body of the vehicle.CAUTION
It is recommended that the following
procedure should only be attempted by
a qualified technician. If in doubt, consult your
Dealer/Authorised Repairer.
Do not place the removed lamp unit face
down on hard or abrasive surfaces.
Doing so may scratch the surface of the lens.
3
2
2
E94719
2
4
Page 82 of 391
Lighting
82
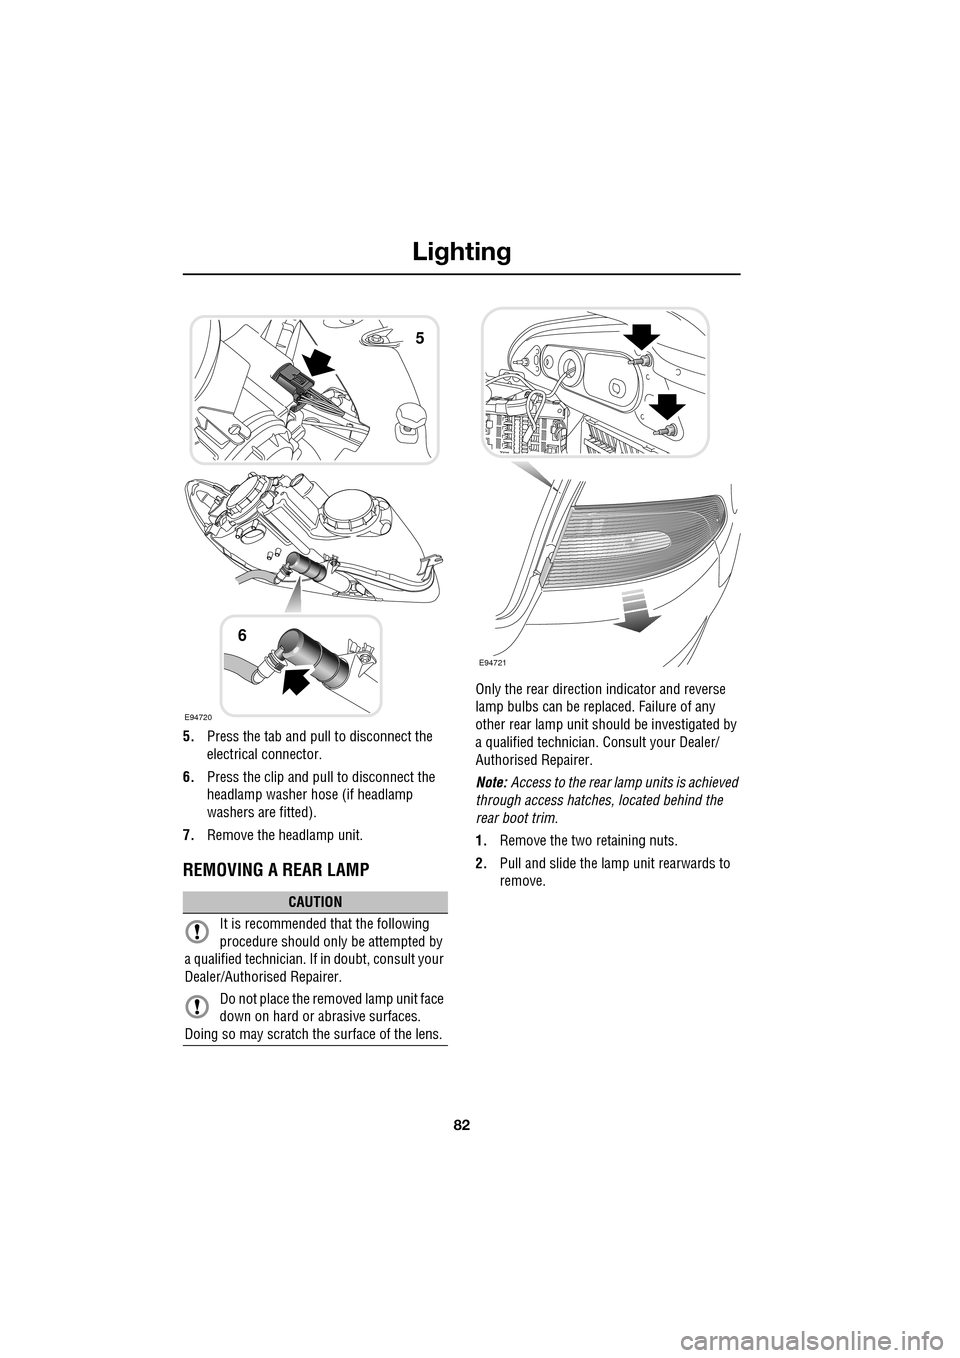
5.Press the tab and pull to disconnect the
electrical connector.
6. Press the clip and pull to disconnect the
headlamp washer hose (if headlamp
washers are fitted).
7. Remove the headlamp unit.
REMOVING A REAR LAMP
Only the rear directio n indicator and reverse
lamp bulbs can be repl aced. Failure of any
other rear lamp unit should be investigated by
a qualified technician. Consult your Dealer/
Authorised Repairer.
Note: Access to the rear lamp units is achieved
through access hatche s, located behind the
rear boot trim.
1. Remove the two retaining nuts.
2. Pull and slide the lamp unit rearwards to
remove.
CAUTION
It is recommended that the following
procedure should only be attempted by
a qualified technician. If in doubt, consult your
Dealer/Authorised Repairer.
Do not place the removed lamp unit face
down on hard or abrasive surfaces.
Doing so may scratch the surface of the lens.
E94720
5
6
E94721
Page 131 of 391
131
Convenience features
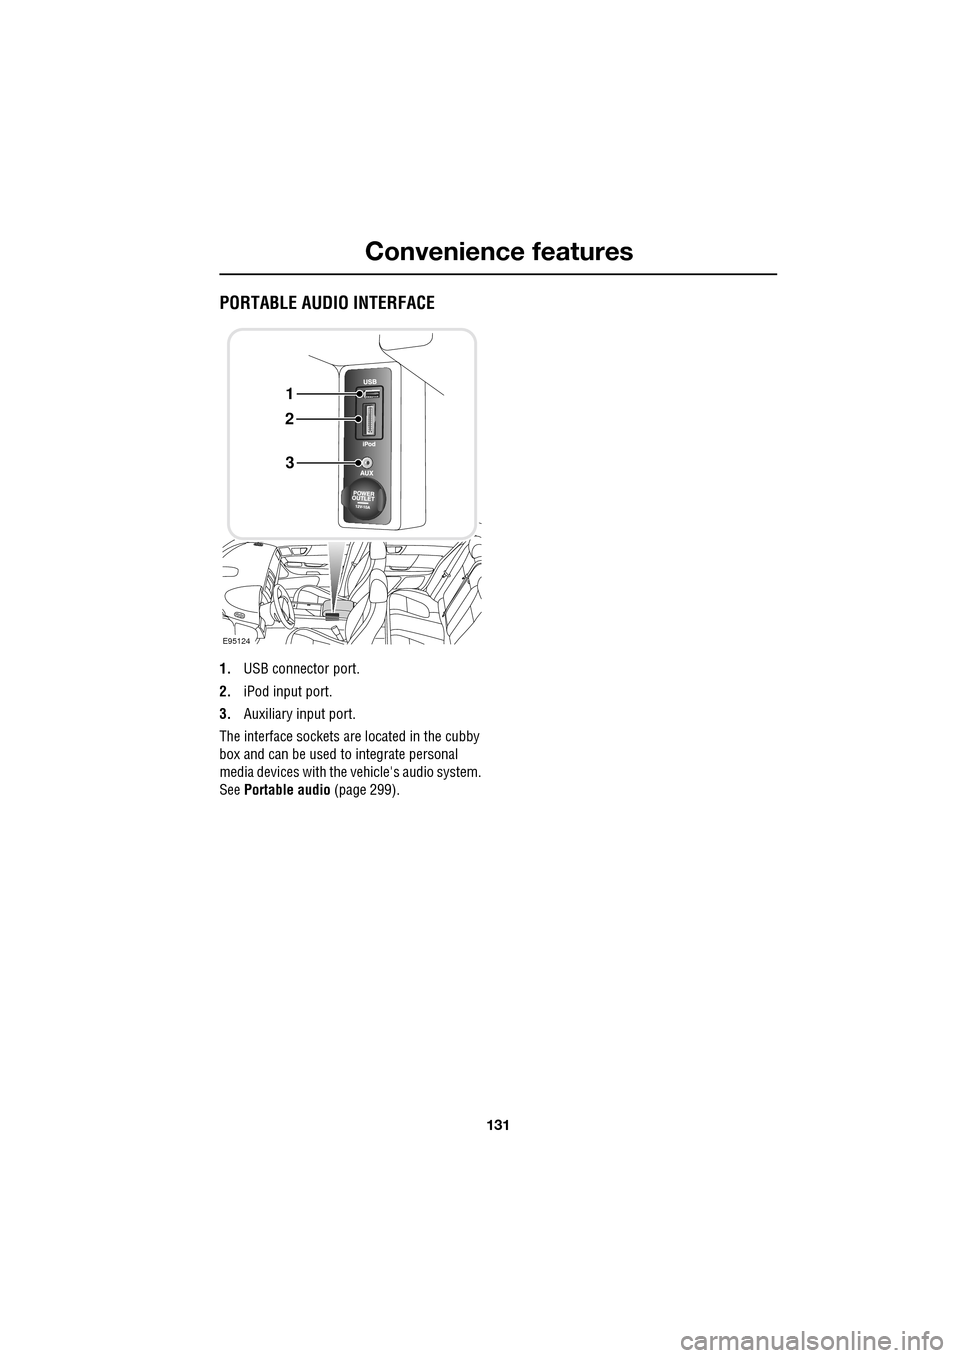
PORTABLE AUDIO INTERFACE
1.USB connector port.
2. iPod input port.
3. Auxiliary input port.
The interface sockets are located in the cubby
box and can be used to integrate personal
media devices with the vehicle's audio system.
See Portable audio (page 299).
E95124
1
2
3
Page 134 of 391
Starting the engine
134
Engine block heaters
Engines are more difficult to start when the
ambient temperature is very low. In
geographical areas where temperatures below
-10°C (14°F) are experienced frequently, it is
advisable to fit an engine block heater. The
block heater will have an insulated connector at
the front of the vehicle, which is connected to a
mains supply using a suitable extension cable.
The heater can remain in use overnight if
required. Typically, an e ngine block heater will
use between 400W and 1000W per hour.
For further information consult your Jaguar
Dealer/Authorised Repairer.
If the engine fails to start
When pressing the engine START/STOP button
to start the engine, if the security status
indicator lamp on the top surface of the
instrument panel rema ins flashing, a fault
condition is indicate d. Seek qualified
assistance as soon as possible.
Note: If the Jaguar Smart Key is placed in the
door pocket, it may be outside the range of the
sensors when the door is opened.
Note: If the fuel system inertia switch has
tripped, the ignition circuit will be isolated.
See FUEL CUT-OFF (page 177).
Petrol engines
If the engine persistently fails to start, press the
START/STOP button (without applying the
brake pedal) to return the ignition to
convenience mode. Slowly depress the
accelerator pedal fully, hold it in this position
and press the START/STOP button with the
brake pedal applied, the engine will start to
crank. Release the accelerator pedal when the
engine starts.
If the engine still fails to start, consult your
Dealer/Authorised Repairer.
Diesel engines
If the engine persistently fails to start, press
and hold the START/STOP button (with the
brake pedal applied). Keep the START/STOP
button and the brake pedal pressed until the
engine starts, then release.
If the engine still fails to start, consult your
Dealer/Authorised Repairer.
SWITCHING OFF THE ENGINE
With the gear selector in position P, press the
engine START/STOP button. The engine will
stop and the ignition syst em will return to
convenience mode. The audio, telephone and
touch-screen systems will revert to stand-by
mode and the JaguarDrive selector will retract
into the centre console. Pressing the
START/STOP button ag ain (without pressing
the brake pedal) will activate the systems.
CAUTION
The fitting of an engine block heater
does not eliminate the need for
antifreeze.
WARNING
Never switch off the engine when the
vehicle is in motion.
Page 144 of 391
Brakes
144
PRINCIPLE OF OPERATION
Brake pads
Brake pads require a period of bedding in when
new. Drive with extra caution for the first
500 km (300 miles) to avoid the need for heavy
braking.
Brake pad wear warning
When the brake pads are wearing low, the
warning message BRAKE PADS LOW is
displayed in the message centre. Arrange for
your vehicle to be se en by your Dealer/
Authorised Repairer at the earliest opportunity.
Wet conditions
Driving through heavy ra in or water can have
an adverse effect on braking efficiency. Under
such circumstances, it is recommended that
you lightly a pply the brakes intermittently to
dry the brakes.
ABS warning indicator
If this amber warning indicator
illuminates while driving and/or
ABS FAULT is displayed in the
message centre, drive with extra caution, avoid
heavy braking where possible, and seek
qualified assistance as soon as possible.
If this red warning indicator
illuminates while driving and/or the
message LOW BRAKE FLUID is
displayed in the message centre, check the
brake fluid level at the earliest opportunity and
top-up as required. See BRAKE FLUID CHECK
(page 206).
HINTS ON DRIVING WITH ABS
ABS (Anti-Lock Braking System) allows
maximum brake pressure, and thus maximum
braking efficiency, to be applied, and prevents
the road wheels locking. This allows the driver
to retain steering control during heavy braking
under most road conditions.
ABS optimises tyre to road adhesion under
maximum braking conditions, though it cannot
provide increased cornering ability.
WARNINGS
Do not rest your foot on the brake
pedal whilst the vehicle is in motion.
This may cause a light application of
the brakes, which can result in overheating,
reduced brake performance, and excessive
brake wear.
Never allow the vehicle to coast
(freewheel) with the engine turned
off. The engine must be running to
provide full braking assistance. The brakes will
still function with the e ngine off, but far more
pressure will be required to operate them.
If the red brake warning indicator
illuminates, safely bring the vehicle to
a stop, as quickly as possible. Seek
qualified assistance before proceeding.
Never place non-approved floor
matting or any ot her obstructions
under the brake pedal. This restricts
pedal travel and braking efficiency.
WARNINGS
ABS cannot overcome the physical
limitations of braking distance. Nor
can it overcome the lack of grip on a
road surface (e.g. aquaplaning on water).
Braking distance is increased on a
slippery surface. This applies to all
vehicles, even those fitted with ABS.
The driver should not be tempted to
take risks when driving, in the hope
that ABS will correct errors of
judgement. In all cases it remains the driver's
responsibility to driv e with due care and
attention, payi ng particular attention to the
effects of speed, weather, road conditions etc.
Page 148 of 391

Parking aid
148
PRINCIPLE OF OPERATION
Note: Once the system has been activated by
selecting reverse or using the switch, the front
and rear sensors are active when the gear
selector is in neutral. Therefore, if an obstacle
is detected an audible warning tone will sound.
The parking aid is automatically in standby
when the ignition is on and provides the driver
with information on most obstructions, and
their distance from the vehicle, when
manoeuvring. This is ac hieved by using four
ultrasonic sensors on each bumper.
When objects are detected the Park aid will
emit a warning tone which increases in
frequency and then becomes constant, as the
vehicle gets closer to the object.
USING THE PARKING AID
Touch-screen
To set the volume of the parking aid warning
tones:
• Select Vehicle from the touch-screen
Home menu, then select Veh. settings.
• Select Parking , then select Vol. presets.
Touch the Parking aid + or - button to increase
or decrease the warning tone volume.
Note: This adjusts both front and rear speaker
volume.
WARNINGS
It remains the driver’s responsibility
to be vigilant when reversing. Small
children or animals may not be
detected by the system.
It remains the driver’s responsibility
to detect obstacles and estimate the
vehicle’s distance from them. Some
overhanging objects , barriers, thin
obstructions or painted surfaces which could
possibly cause damage to the vehicle may not
be detected by the system. Always be vigilant
when reversing.
CAUTIONS
Objects moving away from the vehicle
will be reported. Howe ver, whilst driving
away, object warning may be temporarily
reported due to ground reflection.
Systems using the same frequency
band as the front parking sensors, may
cause irregular tones to be emitted.
mirror dip
Vol. presetsOff
On
Vehicle
Security
ParkingReverse
12 : 26 pm
Navigat
Phone
Vehicle
Display set.
Preferences
Button audioParking aid
Vol. presets
AVC Low
MediumHigh
12 : 26 pm
Valet mode
E94137
Page 170 of 391
Driving dynamics
170
DYNAMIC MODE
(V8 petrol and diesel vehicles only)
Press to operate. Dynamic mode
co-ordinates the vehicle's control
systems to deliver a high
performance driving experience. This setting
enhances key vehicle systems so that the
vehicle's full potential can be exploited. The
vehicle's responses are aimed at involving the
driver more in focused and purposeful driving,
helping swift progress.
Note: When the transmission is set to
permanent manual mode (i.e. using the
paddles to change gear while in Sport mode)
and Dynamic mode is selected, transmission
upshifts are fully controlled by the driver. This
means that the transmissi on will not change up
a gear automatically, even when the vehicle's
rev limit is reached. When the rev limit is
reached, the gear position indicator in the
message centre will glow amber, to indicate
that the next gear should be selected.
Note: Dynamic mode cannot be active at the
same time as Winter m ode. Dynamic mode will
remain selected for approximately six hours
after the ignition is swit ched off, after which
point it will need to be reselected if required.
STABILITY CONTROL
Dynamic Stability Control (DSC)
Dynamic Stability Contro l (DSC) is operational
whenever the engine is running, unless it has
been manually switched off. When the system
is operating, the warn ing indicator in the
instrument panel will flash.
The DSC system controls the Anti-lock Braking
System (ABS), traction control and yaw control
of the vehicle.
The DSC system assists the driver in retaining
directional control of th e vehicle in situations
where the vehicle is sliding (understeer or
oversteer). It must not encourage the driver to
drive beyond the limit of adhesion or at speeds
higher than those suitable for the prevailing
road and traffic conditions.
DSC applies braking pres sure to individual
wheels if excessive variation is detected. This
ensures that the vehicle follows the driver’s
intended direction of travel as closely as
possible.
Traction control will intervene to control wheel
spin by automatically reducing the power
output from the engine and applying braking to
individual wheels. This improves acceleration,
particularly on surfaces with uneven friction
(e.g. one wheel on ice with another on tarmac).
Note: For recommended DSC mode selection,
refer to the JaguarDri ve Control scenarios
section in this handbook.
WARNING
The fact that the vehicle is fitted with
DSC, must never allow the driver to
be tempted into taking risks which
could affect his or her sa fety or that of other
road users. In all cases, it remains the driver’s
responsibility to drive sa fely according to the
prevailing conditions.
Page 171 of 391
171
Driving dynamics
TracDSC
TracDSC is an alternative setting of DSC with
reduced system interventions. With TracDSC
engaged, traction may be somewhat increased,
although stability may be reduced compared to
normal DSC. TracDSC is intended for use only
on dry tarmac, by suitably experienced drivers
and should not be select ed for other surfaces
or by drivers with insufficient skill and training
to operate the vehicle safely with the TracDSC
function engaged.
The less restrictive TracDSC setting may be
preferred, for example, by expert drivers
engaged in high performance driving on dry
Tarmac surfaces such as tracks and circuits.
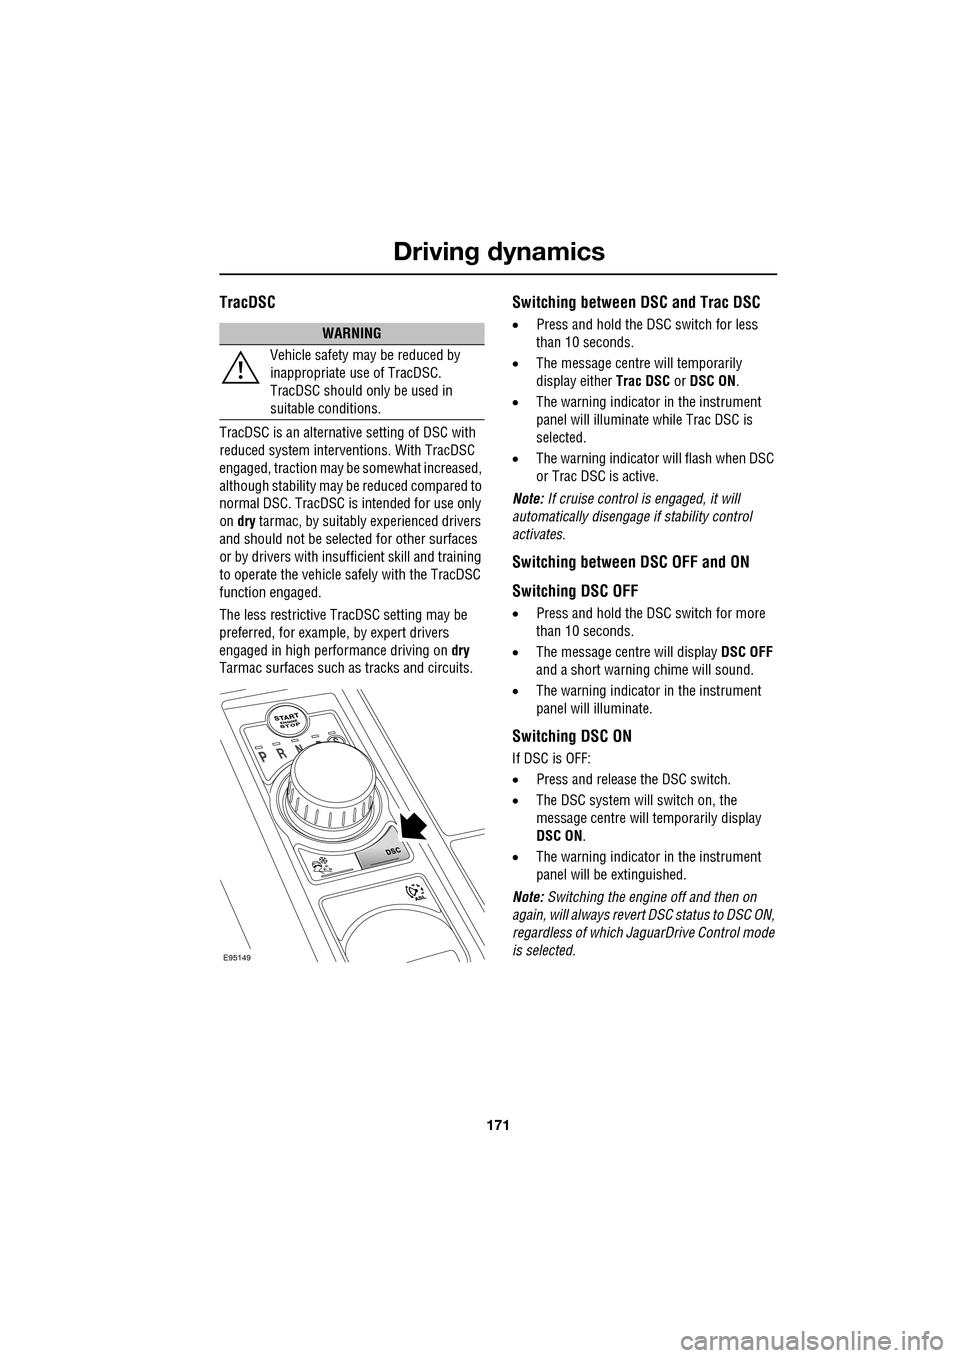
Switching between DSC and Trac DSC
• Press and hold the DSC switch for less
than 10 seconds.
• The message centre will temporarily
display either Trac DSC or DSC ON.
• The warning indicator in the instrument
panel will illuminate while Trac DSC is
selected.
• The warning indicator will flash when DSC
or Trac DSC is active.
Note: If cruise control is engaged, it will
automatically disengage if stability control
activates.
Switching between DSC OFF and ON
Switching DSC OFF
• Press and hold the DSC switch for more
than 10 seconds.
• The message centre will display DSC OFF
and a short warning chime will sound.
• The warning indicator in the instrument
panel will illuminate.
Switching DSC ON
If DSC is OFF:
• Press and release the DSC switch.
• The DSC system will switch on, the
message centre will temporarily display
DSC ON .
• The warning indicator in the instrument
panel will be extinguished.
Note: Switching the engine off and then on
again, will always revert DSC status to DSC ON,
regardless of which Ja guarDrive Control mode
is selected.
WARNING
Vehicle safety may be reduced by
inappropriate use of TracDSC.
TracDSC should only be used in
suitable conditions.
E95149