tyre pressure JAGUAR XF 2009 1.G Owners Manual
[x] Cancel search | Manufacturer: JAGUAR, Model Year: 2009, Model line: XF, Model: JAGUAR XF 2009 1.GPages: 391, PDF Size: 19.32 MB
Page 5 of 391
Contents
5
FUEL QUALITY .............................................. 174
ALTERNATIVE FUELS FOR PETROL ENGINES .....
175
DIESEL ENGINED VEHICLES......................... 176
RUNNING OUT OF FUEL ............................... 177
FUEL CUT-OFF .............................................. 177
FUEL FILLER FLAP........................................ 178
REFUELLING ................................................. 179
DIESEL MISFUELLING PROTECTION DEVICE......
180
FUEL CONSUMPTION ................................... 181
Load carrying
GENERAL INFORMATION ............................. 182
LUGGAGE ANCHOR POINTS ......................... 182
REAR UNDER FLOOR STORAGE ................... 182
Towing
TOWING A TRAILER (V6 petrol and diesel
vehicles only) ................................................ 183
LEVELLING ................................................... 184
RECOMMENDED TOWING WEIGHTS ........... 185
ESSENTIAL TOWING CHECKS ...................... 185
TOW BAR ...................................................... 186
Vehicle care
CLEANING THE ALLOY WHEELS .................. 187
CLEANING THE EXTERIOR ........................... 187
CLEANING THE INTERIOR ............................ 189
REPAIRING MINOR PAINT DAMAGE ............ 191
Maintenance
GENERAL INFORMATION ............................. 192
OPENING AND CLOSING THE BONNET ........ 195
ENGINE COMPARTMENT OVERVIEW ........... 196
ENGINE OIL CHECK - V6 Petrol engines ....... 197
ENGINE OIL CHECK - V8 Petrol engines ....... 199
ENGINE OIL CHECK - V6 Diesel engines ....... 201
ENGINE OIL SPECIFICATION ........................ 203
ENGINE COOLANT CHECK ............................ 204
BRAKE FLUID CHECK ................................... 206
POWER STEERING FLUID CHECK ................ 208
WASHER FLUID CHECK ................................ 209
TECHNICAL SPECIFICATIONS ...................... 210
Vehicle battery
BATTERY WARNING SYMBOLS ................... 212 BATTERY CARE ............................................ 212
USING BOOSTER CABLES ............................ 214
CHARGING THE VEHICLE BATTERY ............. 215
CHANGING THE VEHICLE BATTERY ............. 215
Wheels and tyres
GENERAL INFORMATION ............................. 216
TYRE CARE................................................... 217
USING WINTER TYRES ................................ 223
USING SNOW CHAINS ................................. 223
RUN FLAT TYRES ......................................... 224
TOOL KIT ...................................................... 224
CHANGING A ROAD WHEEL ......................... 225
TYRE REPAIR KIT......................................... 229
TYRE PRESSURE MONITORING SYSTEM.... 234
TYRE GLOSSARY ......................................... 238
TYRE SPECIFICATIONS - ARDUOUS TERRAIN ...
239
Fuses
CHANGING A FUSE....................................... 241
FUSE BOX LOCATIONS................................. 242
FUSE SPECIFICATION CHART ...................... 245
Emergency equipment
HAZARD WARNING FLASHERS.................... 250
WARNING TRIANGLE ................................... 250
FIRST AID KIT .............................................. 250
FIRE EXTINGUISHER .................................... 250
Status after a collision
DRIVING AFTER A COLLISION ..................... 251
INSPECTING SAFETY SYSTEM COMPONENTS ...
252
Vehicle recovery
TOWING POINTS .......................................... 253
TRANSPORTING THE VEHICLE .................... 254
TOWING THE VEHICLE ON FOUR WHEELS .. 256
Vehicle identification
VEHICLE IDENTIFICATION PLATE ................ 257
ENGINE NUMBER ......................................... 257
TRANSMISSION NUMBER ........................... 257
VEHICLE IDENTIFICATION
NUMBER (VIN)... 257
VEHICLE BUILD DATE PLATE ....................... 257
Page 10 of 391
Introduction
10
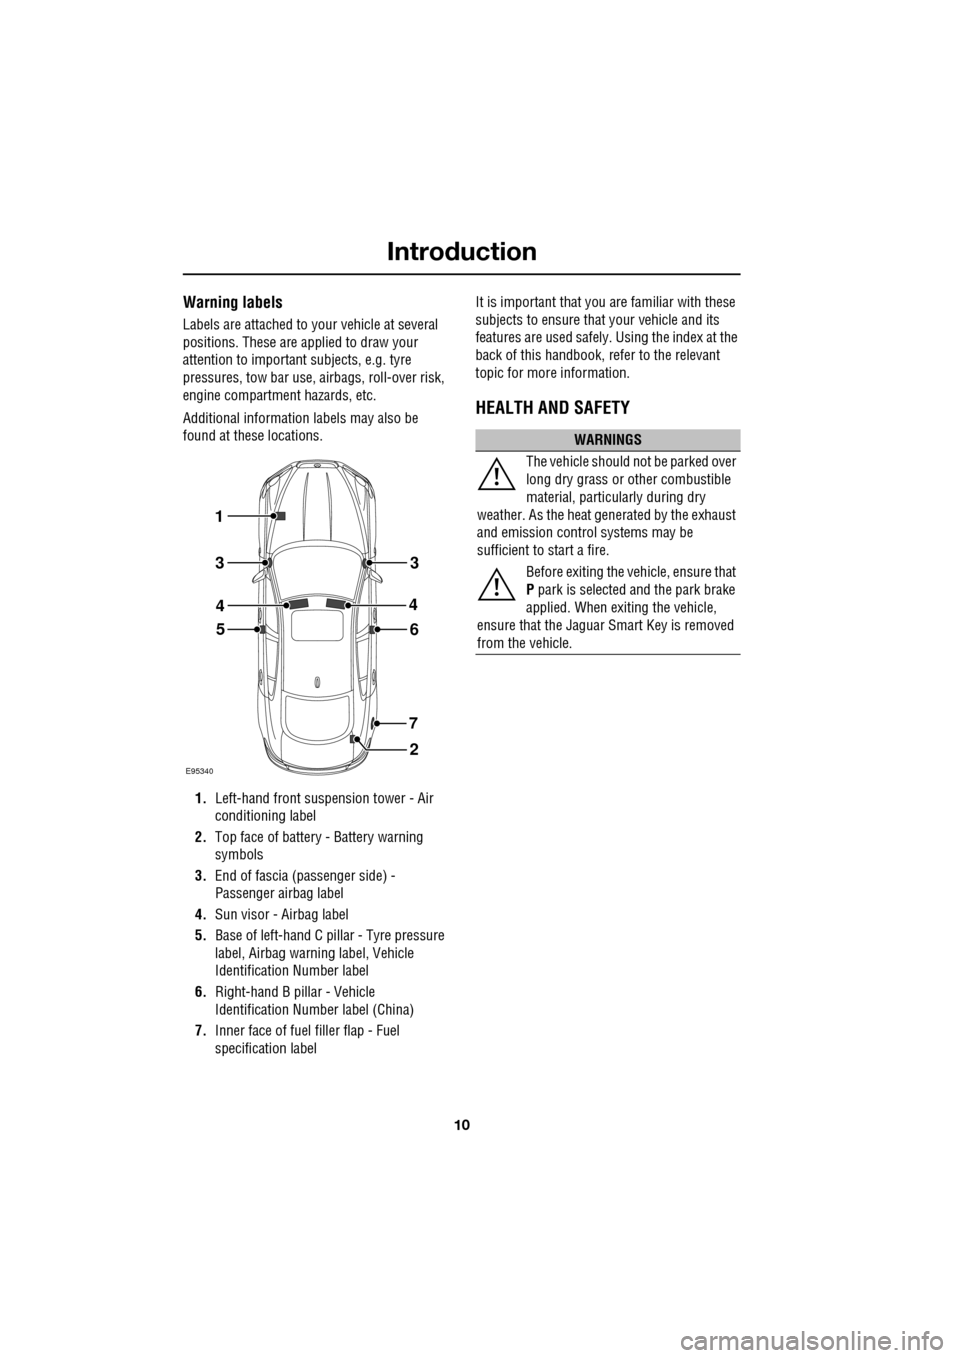
Warning labels
Labels are attached to your vehicle at several
positions. These are applied to draw your
attention to important subjects, e.g. tyre
pressures, tow bar use, airbags, roll-over risk,
engine compartment hazards, etc.
Additional information labels may also be
found at these locations.
1. Left-hand front suspension tower - Air
conditioning label
2. Top face of battery - Battery warning
symbols
3. End of fascia (passenger side) -
Passenger airbag label
4. Sun visor - Airbag label
5. Base of left-hand C p illar - Tyre pressure
label, Airbag warn ing label, Vehicle
Identification Number label
6. Right-hand B pillar - Vehicle
Identification Number label (China)
7. Inner face of fuel filler flap - Fuel
specification label It is important that you are familiar with these
subjects to ensure that your vehicle and its
features are used safely. Using the index at the
back of this handbook, re
fer to the relevant
topic for more information.
HEALTH AND SAFETY
E95340
1
2
56
7
3
4
3
4
WARNINGS
The vehicle should not be parked over
long dry grass or other combustible
material, particul arly during dry
weather. As the heat ge nerated by the exhaust
and emission control systems may be
sufficient to start a fire.
Before exiting the vehicle, ensure that
P park is selected and the park brake
applied. When exiting the vehicle,
ensure that the Jaguar Smart Key is removed
from the vehicle.
Page 100 of 391
Instruments
100
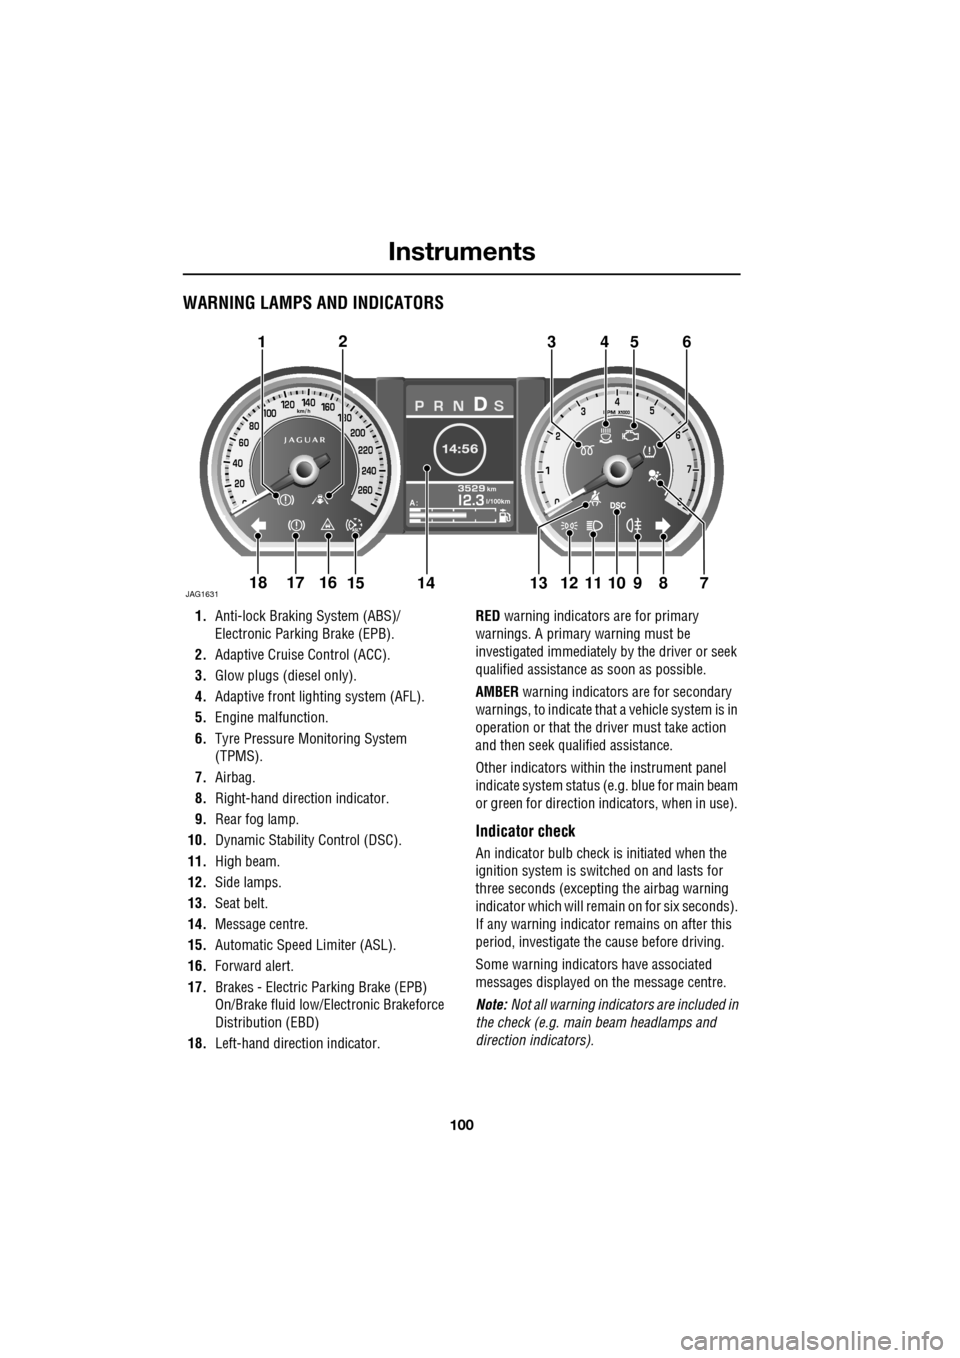
WARNING LAMPS AND INDICATORS
1.Anti-lock Braking System (ABS)/
Electronic Parking Brake (EPB).
2. Adaptive Cruise Control (ACC).
3. Glow plugs (diesel only).
4. Adaptive front lighting system (AFL).
5. Engine malfunction.
6. Tyre Pressure M onitoring System
(TPMS).
7. Airbag.
8. Right-hand direct ion indicator.
9. Rear fog lamp.
10. Dynamic Stability Control (DSC).
11. High beam.
12. Side lamps.
13. Seat belt.
14. Message centre.
15. Automatic Speed Limiter (ASL).
16. Forward alert.
17. Brakes - Electric Parking Brake (EPB)
On/Brake fluid low/El ectronic Brakeforce
Distribution (EBD)
18. Left-hand direction indicator. RED
warning indicators are for primary
warnings. A primary warning must be
investigated immediately by the driver or seek
qualified assistance as soon as possible.
AMBER warning indicators are for secondary
warnings, to indicate that a vehicle system is in
operation or that the driver must take action
and then seek qualified assistance.
Other indicators within the instrument panel
indicate system status (e .g. blue for main beam
or green for direction indicators, when in use).
Indicator check
An indicator bulb check is initiated when the
ignition system is switched on and lasts for
three seconds (excepting the airbag warning
indicator which will remain on for six seconds).
If any warning indicator remains on after this
period, investigate the cause before driving.
Some warning indicators have associated
messages displayed on the message centre.
Note: Not all warning indicators are included in
the check (e.g. main beam headlamps and
direction indicators).
Akm
l/100km
JAG1631
123456
789101817161514131211
Page 103 of 391
103
Instruments
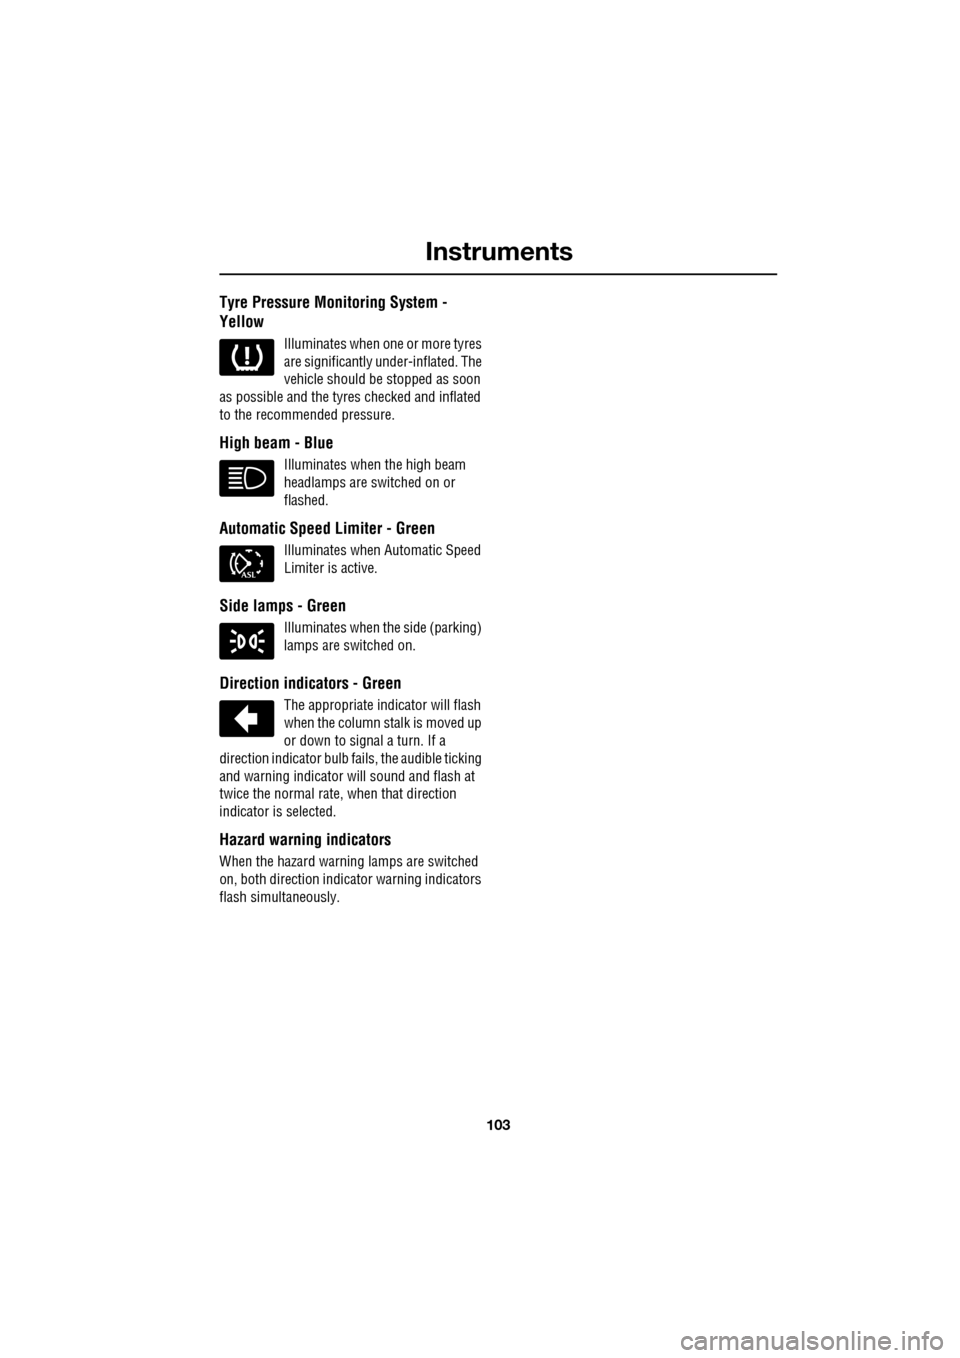
Tyre Pressure Monitoring System -
Yellow
Illuminates when one or more tyres
are significantly under-inflated. The
vehicle should be stopped as soon
as possible and the tyres checked and inflated
to the recommended pressure.
High beam - Blue
Illuminates when the high beam
headlamps are switched on or
flashed.
Automatic Speed Limiter - Green
Illuminates when Automatic Speed
Limiter is active.
Side lamps - Green
Illuminates when the side (parking)
lamps are switched on.
Direction indicators - Green
The appropriate indicator will flash
when the column stalk is moved up
or down to signal a turn. If a
direction indicator bulb fails, the audible ticking
and warning indicator wi ll sound and flash at
twice the normal rate, when that direction
indicator is selected.
Hazard warning indicators
When the hazard warning lamps are switched
on, both direction indica tor warning indicators
flash simultaneously.
Page 144 of 391
Brakes
144
PRINCIPLE OF OPERATION
Brake pads
Brake pads require a period of bedding in when
new. Drive with extra caution for the first
500 km (300 miles) to avoid the need for heavy
braking.
Brake pad wear warning
When the brake pads are wearing low, the
warning message BRAKE PADS LOW is
displayed in the message centre. Arrange for
your vehicle to be se en by your Dealer/
Authorised Repairer at the earliest opportunity.
Wet conditions
Driving through heavy ra in or water can have
an adverse effect on braking efficiency. Under
such circumstances, it is recommended that
you lightly a pply the brakes intermittently to
dry the brakes.
ABS warning indicator
If this amber warning indicator
illuminates while driving and/or
ABS FAULT is displayed in the
message centre, drive with extra caution, avoid
heavy braking where possible, and seek
qualified assistance as soon as possible.
If this red warning indicator
illuminates while driving and/or the
message LOW BRAKE FLUID is
displayed in the message centre, check the
brake fluid level at the earliest opportunity and
top-up as required. See BRAKE FLUID CHECK
(page 206).
HINTS ON DRIVING WITH ABS
ABS (Anti-Lock Braking System) allows
maximum brake pressure, and thus maximum
braking efficiency, to be applied, and prevents
the road wheels locking. This allows the driver
to retain steering control during heavy braking
under most road conditions.
ABS optimises tyre to road adhesion under
maximum braking conditions, though it cannot
provide increased cornering ability.
WARNINGS
Do not rest your foot on the brake
pedal whilst the vehicle is in motion.
This may cause a light application of
the brakes, which can result in overheating,
reduced brake performance, and excessive
brake wear.
Never allow the vehicle to coast
(freewheel) with the engine turned
off. The engine must be running to
provide full braking assistance. The brakes will
still function with the e ngine off, but far more
pressure will be required to operate them.
If the red brake warning indicator
illuminates, safely bring the vehicle to
a stop, as quickly as possible. Seek
qualified assistance before proceeding.
Never place non-approved floor
matting or any ot her obstructions
under the brake pedal. This restricts
pedal travel and braking efficiency.
WARNINGS
ABS cannot overcome the physical
limitations of braking distance. Nor
can it overcome the lack of grip on a
road surface (e.g. aquaplaning on water).
Braking distance is increased on a
slippery surface. This applies to all
vehicles, even those fitted with ABS.
The driver should not be tempted to
take risks when driving, in the hope
that ABS will correct errors of
judgement. In all cases it remains the driver's
responsibility to driv e with due care and
attention, payi ng particular attention to the
effects of speed, weather, road conditions etc.
Page 155 of 391
155
Driving hints
ECONOMICAL DRIVING
There are two main factors which influence fuel
economy, the way the vehicle is driven and
maintenance.
Driving tips for economy
•Avoid unnecessary jour neys, especially
short stop-start trips.
• Accelerate smoothly and gently from a
stand still.
• Allow time to brake gently and smoothly.
• Be aware of traffic and road conditions
ahead, and take action in time to avoid
hard braking or acceleration.
• When stationary apply the park brake, and
select neutral.
• Turn off the air conditioning when not
needed.
Maintenance and fuel economy
Regular servicing by a Dealer/Authorised
Repairer, along with regular checks by the
driver are essential fo r vehicle longevity and
fuel economy.
The condition of the engine (oils, filters, spark
plugs, settings etc.) tyre pressures, and wheel
alignment, will all have a bearing on fuel
economy. For this reason it is essential that the
vehicle is checked regularly by the driver and
serviced by an approved Dealer/Authorised
Repairer at the correct intervals.
Note: If you are in any doubt about the
maintenance requirement s, intervals, or
checks required, contact your Dealer/
Authorised Repairer for advice.
Page 185 of 391
185
Towing
RECOMMENDED TOWING WEIGHTS
Nose/tongue weight must be the greater of
50 kg (110 lbs) or 7% of the actual trailer
weight, up to the maximum tow hitch load.
Nose/tongue weight can be measured using a
proprietary brand of nose weight indicator.
If it is necessary to increase the nose/tongue
weight up to the maximu m allowed, the vehicle
load should be reduced accordingly. This
ensures that the Gross Vehicle Weight (GVW),
and maximum rear axle load, are not exceeded.
Note: When towing the maximum permissible
gross vehicle weight can be increased by a
maximum of 100 kg (220 lb.) provided that the
road speed is limited to 100 km/h (60 mph).
Note: When calculating rear axle loading,
remember that the trailer nose/tongue weight,
the load in the vehicle's luggage area and the
weight of rear seat pa ssengers must all be
added together.
Towing weights - Australia only
The weight of a traile r must not exceed 1.5
times the towing vehicle’s weight. The
nose/tongue weight must be a minimum of 7%
of gross caravan/trai ler weight, up to a
maximum of 350 kg (722 lbs).
ESSENTIAL TOWING CHECKS
• The trailer should be parallel to the ground
when loaded and connected to the vehicle.
• When calculating the laden weight of the
trailer remember to include the weight of
the trailer, plus the weight of the load.
• If the load can be divided between the
vehicle and trailer, loading more weight
into the vehicle will generally improve
stability. Do not exceed the vehicle's
weight limits. See WEIGHTS (page 259).
• Ensure that all applic able regulations and
legislation are complied with when loading
and towing a trailer.
• Increase rear tyre pressures of the towing
vehicle to those for maximum vehicle
loading conditions.
• Ensure trailer tyre pressures are set to
trailer manufacturer' s recommendations.
• If the vehicle is loaded to maximum Gross
Vehicle Weight (GVW) the nose weight is
limited (see Towi ng weights table).
• Ensure that a suitable breakaway cable or
secondary coupling is used. Refer to the
trailer manufacturer' s instructions for
guidance.
• Ensure that the tow ball is secure.
• Check the operation of all trailer lights.
Maximum permissible
towing weights
Unbraked trailers 750 kg (1653 lb.) Trailers with
overrun brakes 1850 kg (4080 lb.)
Nose/Tongue weight 75 kg (165 lb.)
WARNING
Do not exceed the Gross Vehicle
Weight (GVW), m aximum rear axle
weight, maximum trailer weight, or
nose/tongue weight. Exceeding any of these
limits could cause inst ability and loss of
control. See WEIGHTS (page 259).
WARNING
Do not loop the breakaway cable over
the tow ball as it may slide off.
Page 193 of 391
193
Maintenance
Weekly checks
•Engine oil level (non- electronic dipstick
vehicles). See ENGINE OIL CHECK - V6
Petrol engines (page 197).
• Engine coolant check. See ENGINE
COOLANT CHECK (page 204).
• Brake fluid level. See BRAKE FLUID
CHECK (page 206).
• Power steering fluid level. See POWER
STEERING FLUID CHECK (page 208).
• Screen washer fluid level. See WASHER
FLUID CHECK (page 209).
• Tyre pressures and condition. See TYRE
CARE (page 217).
• Operate air conditioning. See AUTOMATIC
CLIMATE CONTROL (page 116).
Note: The engine oil level on V6 petrol engines,
should be checked more frequently if the
vehicle is driven for prolonged periods at high
speeds. The engine oil level on diesel and V8
petrol engines is checked automatically at all
times by the electronic dipstick.
Severe driving conditions
When a vehicle is operated in severe
conditions, more frequent attention must be
paid to servicing requirements.
Severe driving conditions include:
• Driving in dusty and/or sandy conditions.
• Driving on rough and/or muddy roads
and/or wading. •
Driving in extremely hot or cold
conditions.
• Driving in areas using road salt or other
corrosive materials.
• Towing a trailer or driving in mountainous
conditions.
Contact your Dealer/Authorised Repairer for
advice.
Emission control
Your vehicle is fitted with various items of
emission and evaporati ve control equipment,
designed to meet specific territorial
requirements. You should be aware that
unauthorised replacemen t, modification or
tampering with this equipment by an owner or
repair shop, may be unlawful and subject to
legal penalties.
In addition, engine se ttings must not be
tampered with. These have been established to
ensure that your vehicle complies with
stringent exhaust em ission regulations.
Incorrect engine settings may adversely affect
exhaust emissi ons, engine performance and
fuel consumption. The y may also cause high
temperatures, which will result in damage to
the catalytic converter and the vehicle.
Road testing dynamometers (rolling
roads)
Because your vehicle is equipped with anti-lock
brakes, it is essential that any dynamometer
testing is carried out only by a qualified person,
familiar with the dynamometer testing and
safety procedures practised by
Dealers/Authorised Repairers.
CAUTION
Ensure that you take notice of any
message centre information and
warnings relating to engi ne oil level (V8 petrol
and diesel engines only). Top-up the level
when advised to do so. See ENGINE OIL
CHECK - V8 Petrol engines (page 199).
Page 217 of 391
217
Wheels and tyres
11.Wear rate indicator. A tyre rated at 400 for
example, will last twice as long as a tyre
rated at 200.
12. The traction rating grades a tyres
performance when stopping on a wet road
surface. The higher the grade the better the
braking performance. The grades from
highest to lowest are, AA, A, B, and C.
13. The maximum load which can be carried
by the tyre.
14. Heat resistance grading. The tyre's
resistance to heat is grade A, B, or C, with
A indicating the greatest resistance to heat.
This grading is provided for a correctly
inflated tyre, which is being used within its
speed and loading limits.
15. The maximum inflation pressure for the
tyre. This pressure should not be used for
normal driving.
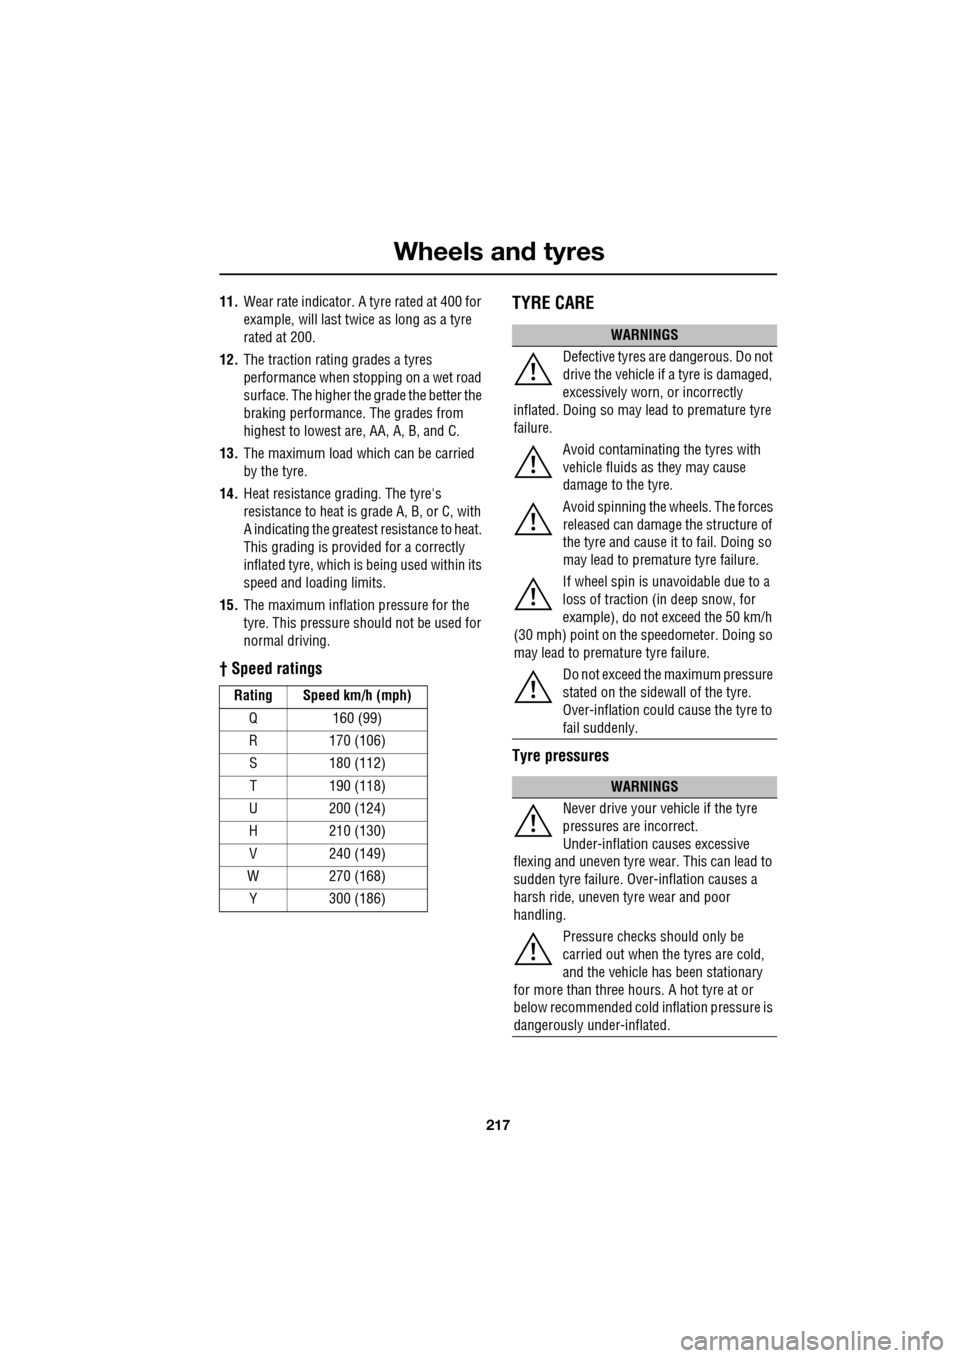
† Speed ratings
TYRE CARE
Tyre pressures
Rating Speed km/h (mph)
Q 160 (99)
R 170 (106)S 180 (112)
T 190 (118)
U 200 (124)
H 210 (130)
V 240 (149)
W 270 (168) Y 300 (186)
WARNINGS
Defective tyres are dangerous. Do not
drive the vehicle if a tyre is damaged,
excessively worn, or incorrectly
inflated. Doing so may lead to premature tyre
failure.
Avoid contaminating the tyres with
vehicle fluids as they may cause
damage to the tyre.
Avoid spinning the wh eels. The forces
released can damage the structure of
the tyre and cause it to fail. Doing so
may lead to premature tyre failure.
If wheel spin is unavoidable due to a
loss of traction (i n deep snow, for
example), do not exceed the 50 km/h
(30 mph) point on the speedometer. Doing so
may lead to premature tyre failure.
Do not exceed the maximum pressure
stated on the sidewall of the tyre.
Over-inflation could cause the tyre to
fail suddenly.
WARNINGS
Never drive your vehicle if the tyre
pressures are incorrect.
Under-inflation causes excessive
flexing and uneven tyre we ar. This can lead to
sudden tyre failure. Ov er-inflation causes a
harsh ride, uneven tyre wear and poor
handling.
Pressure checks should only be
carried out when the tyres are cold,
and the vehicle has been stationary
for more than three hours. A hot tyre at or
below recommended cold inflation pressure is
dangerously under-inflated.
Page 218 of 391
Wheels and tyres
218
All of the vehicle's tyres (including the spare)
should be checked regularly for damage, wear
and distortion. If you are in any doubt about the
condition of a tyre, have it checked immediately
by a tyre repair centre or your
Dealer/Authorised repairer.
Checking the tyre pressures
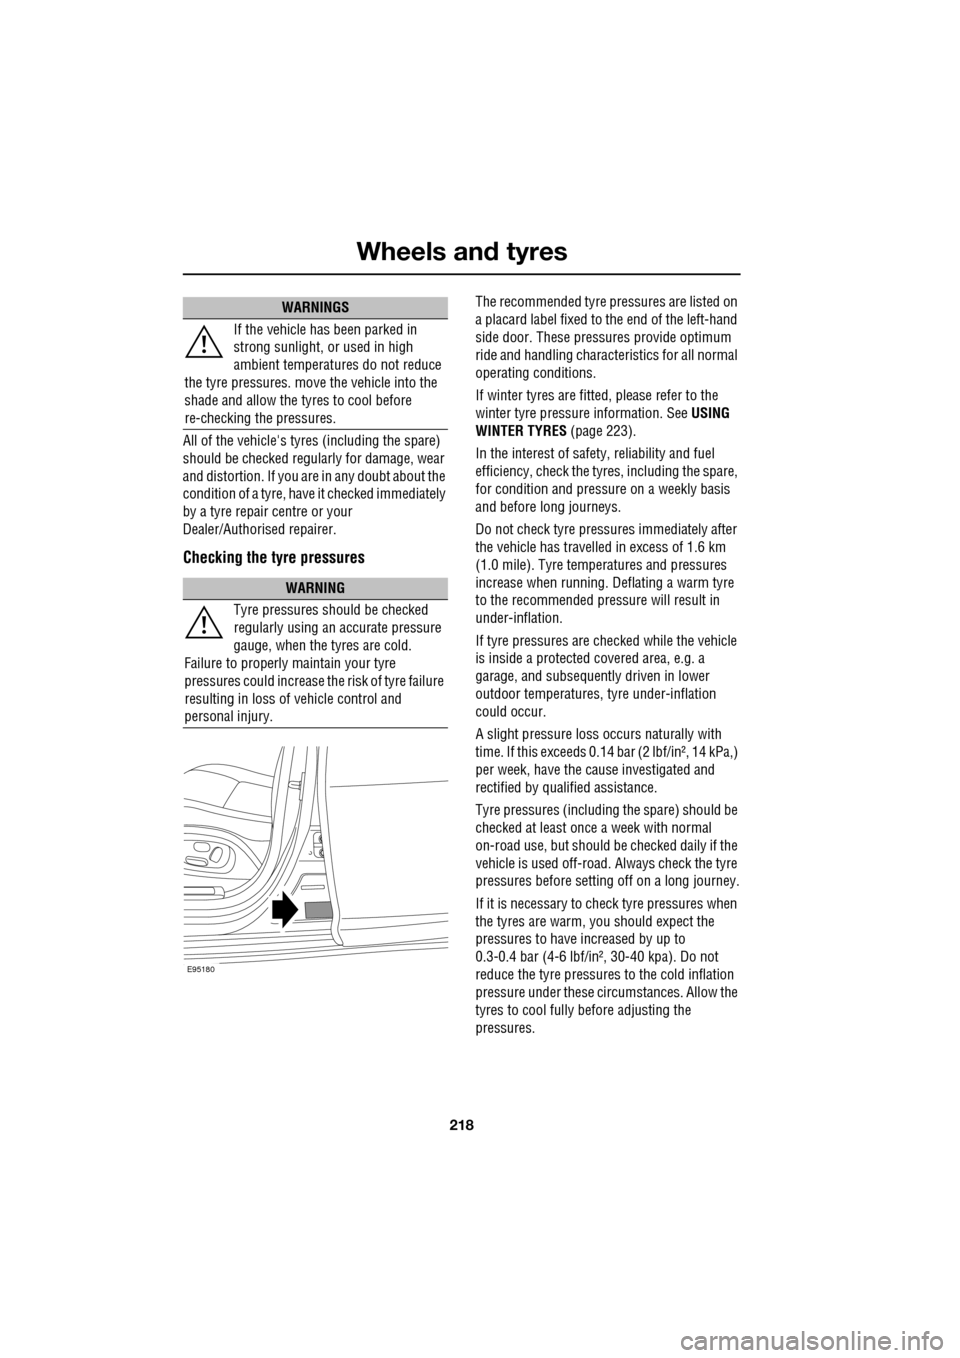
The recommended tyre pressures are listed on
a placard label fixed to the end of the left-hand
side door. These pressures provide optimum
ride and handling charac teristics for all normal
operating conditions.
If winter tyres are fitted, please refer to the
winter tyre pressure information. SeeUSING
WINTER TYRES (page 223).
In the interest of safe ty, reliability and fuel
efficiency, check the tyres, including the spare,
for condition and pressu re on a weekly basis
and before long journeys.
Do not check tyre pressures immediately after
the vehicle has travelled in excess of 1.6 km
(1.0 mile). Tyre temperatures and pressures
increase when running. Deflating a warm tyre
to the recommended pressure will result in
under-inflation.
If tyre pressures are checked while the vehicle
is inside a protected covered area, e.g. a
garage, and subsequent ly driven in lower
outdoor temperatures, tyre under-inflation
could occur.
A slight pressure loss occurs naturally with
time. If this exceeds 0.14 bar (2 lbf/in², 14 kPa,)
per week, have the cause investigated and
rectified by qualified assistance.
Tyre pressures (including the spare) should be
checked at least once a week with normal
on-road use, but should be checked daily if the
vehicle is used off-road. Always check the tyre
pressures before setti ng off on a long journey.
If it is necessary to check tyre pressures when
the tyres are warm, you should expect the
pressures to have increased by up to
0.3-0.4 bar (4-6 lbf/in², 30-40 kpa). Do not
reduce the tyre pressures to the cold inflation
pressure under these circumstances. Allow the
tyres to cool fully before adjusting the
pressures.
If the vehicle has been parked in
strong sunlight, or used in high
ambient temperatures do not reduce
the tyre pressures. move the vehicle into the
shade and allow the tyres to cool before
re-checking the pressures.
WARNING
Tyre pressures should be checked
regularly using an accurate pressure
gauge, when the tyres are cold.
Failure to properly maintain your tyre
pressures could increase the risk of tyre failure
resulting in loss of vehicle control and
personal injury.
WARNINGS
E95180