Engine JAGUAR XFR 2010 1.G Workshop Manual
[x] Cancel search | Manufacturer: JAGUAR, Model Year: 2010, Model line: XFR, Model: JAGUAR XFR 2010 1.GPages: 3039, PDF Size: 58.49 MB
Page 1276 of 3039
Published: 11-May-2011
Engine Ignition - V8 5.0L Petrol/V8 S/C 5.0L Petrol - Engine Ignition
Diagnosis and Testing
Principles of Operation
For a detailed description of the engine ignition system and operation, refer to the relevant Description and Operation section
of the workshop manual. REFER to: (303-07B Engine Ignition - V8 5.0L Petrol/V8 S/C 5.0L Petrol)
Engine Ignition (Description and Operation), Engine Ignition (Description and Operation), Engine Ignition (Description and Operation).
Inspection and Verification
CAUTION: Diagnosis by substitution from a donor vehicle is NOT acceptable. Substitution of control modules does not
guarantee confirmation of a fault and may also cause additional faults in the vehicle being checked and/or the donor vehicle.
NOTE: Check and rectify basic faults before beginning diagnostic routines involving pinpoint tests.
1. Verify the customer concern.
2. Visually inspect for obvious signs of mechanical and electrical damage.
Visual Inspection
Mechanical Electrical
Engine oil level
Cooling system coolant level
Fuel level
Fuel contamination/grade/quality
Exhaust gas recirculation (EGR) valves
Fuses
Wiring harness
Loose or corroded electrical connectors
Ignition coils
Sensor(s)
Engine Control Module (ECM)
Transmission Control Module (TCM)
3. If an obvious cause for an observed or reported concern is found, correct the cause (if possible) before proceeding to
the next step.
4. If the cause is not visually evident, verify the symptom and refer to the Symptom Chart, alternatively check for
Diagnostic Trouble Codes (DTCs) and refer to the DTC Index.
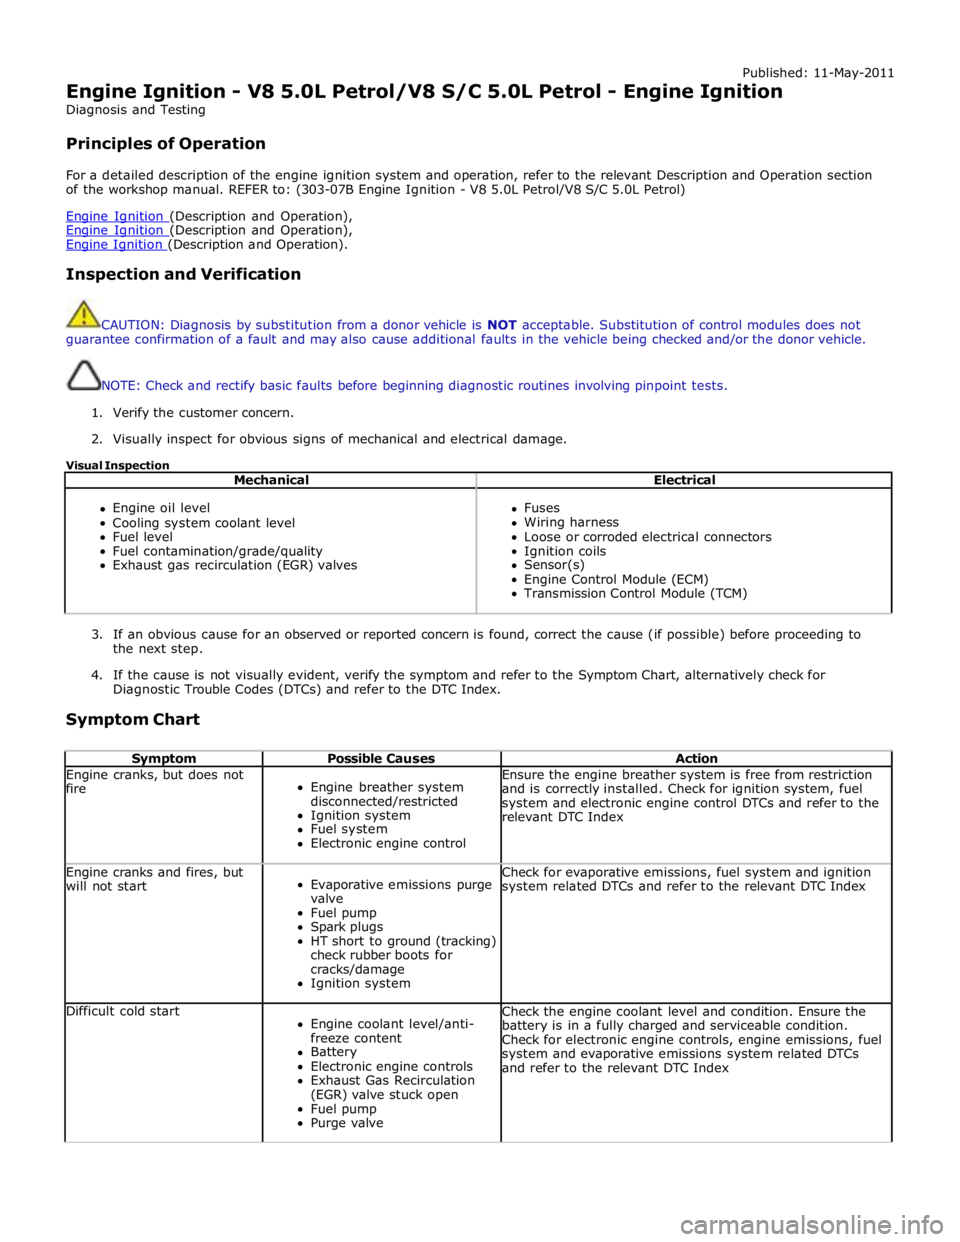
Symptom Chart
Symptom Possible Causes Action Engine cranks, but does not
fire
Engine breather system
disconnected/restricted
Ignition system
Fuel system
Electronic engine control Ensure the engine breather system is free from restriction
and is correctly installed. Check for ignition system, fuel
system and electronic engine control DTCs and refer to the
relevant DTC Index Engine cranks and fires, but
will not start
Evaporative emissions purge
valve
Fuel pump
Spark plugs
HT short to ground (tracking)
check rubber boots for
cracks/damage
Ignition system Check for evaporative emissions, fuel system and ignition
system related DTCs and refer to the relevant DTC Index Difficult cold start
Engine coolant level/anti-
freeze content
Battery
Electronic engine controls
Exhaust Gas Recirculation
(EGR) valve stuck open
Fuel pump
Purge valve Check the engine coolant level and condition. Ensure the
battery is in a fully charged and serviceable condition.
Check for electronic engine controls, engine emissions, fuel
system and evaporative emissions system related DTCs
and refer to the relevant DTC Index
Page 1277 of 3039

Symptom Possible Causes Action Difficult hot start
Injector leak
Electronic engine control
Purge valve
Fuel pump
Ignition system
EGR valve stuck open Check for injector leak, install new injector as required.
Check for electronic engine controls, evaporative emissions,
fuel system, ignition system and engine emission system
related DTCs and refer to the relevant DTC Index Difficult to start after hot
soak (vehicle standing,
engine off, after engine has
reached operating
temperature)
Injector leak
Electronic engine control
Purge valve
Fuel pump
Ignition system
EGR valve stuck open Check for injector leak, install new injector as required.
Check for electronic engine controls, evaporative emissions,
fuel system, ignition system and engine emission system
related DTCs and refer to the relevant DTC Index Engine stalls soon after start
Breather system
disconnected/restricted
ECM relay
Electronic engine control
Ignition system
Air intake system restricted
Air leakage
Fuel lines Ensure the engine breather system is free from restriction
and is correctly installed. Check for electronic engine
control, ignition system and fuel system related DTCs and
refer to the relevant DTC Index. Check for blockage in air
filter element and air intake system. Check for air leakage
in air intake system Engine hesitates/poor
acceleration
Fuel pressure, fuel pump,
fuel lines
Injector leak
Air leakage
Electronic engine control
Throttle motor
Restricted accelerator pedal
travel (carpet, etc)
Ignition system
EGR valve stuck open
Transmission malfunction Check for fuel system related DTCs and refer to the
relevant DTC Index. Check for injector leak, install new
injector as required. Check for air leakage in air intake
system. Ensure accelerator pedal is free from restriction.
Check for electronic engine controls, ignition, engine
emission system and transmission related DTCs and refer
to the relevant DTC Index Engine backfires
Fuel pump/lines
Air leakage
Electronic engine controls
Ignition system
Sticking variable camshaft
timing (VCT) hub Check for fuel system failures. Check for air leakage in
intake air system. Check for electronic engine controls,
ignition system and VCT system related DTCs and refer to
the relevant DTC Index Engine surges
Fuel pump/lines
Electronic engine controls
Throttle motor
Ignition system Check for fuel system failures. Check for electronic engine
controls, throttle system and ignition system related DTCs
and refer to the relevant DTC Index Engine detonates/knocks
Fuel pump/lines
Air leakage
Electronic engine controls
Sticking VCT hub Check for fuel system failures. Check for air leakage in
intake air system. Check for electronic engine controls and
VCT system related DTCs and refer to the relevant DTC
Index No throttle response
Electronic engine controls
Throttle motor Check for electronic engine controls and throttle system
related DTCs and refer to the relevant DTC Index Poor throttle response
Breather system
disconnected/restricted
Electronic engine control
Transmission malfunction
Traction control event Air
leakage Ensure the engine breather system is free from restriction
and is correctly installed. Check for electronic engine
controls, transmission and traction control related DTCs and
refer to the related DTC Index. Check for air leakage in
intake air system DTC Index
For a list of Diagnostic Trouble Codes (DTCs) that could be logged in the Engine Control Module (ECM), please refer to Section
303-14. REFER to:
Electronic Engine Controls (303-14C Electronic Engine Controls - V8 5.0L Petrol, Diagnosis and Testing), Electronic Engine Controls (303-14D Electronic Engine Controls - V8 S/C 5.0L Petrol, Diagnosis and Testing).
Page 1278 of 3039
Published: 11-May-2011
Engine Ignition - V8 5.0L Petrol/V8 S/C 5.0L Petrol - Ignition Coil-On-Plug V8 S/C 5.0L Petrol
Removal and Installation
Removal
NOTES:
Removal steps in this procedure may contain installation details.
Some variation in the illustrations may occur, but the essential information is always correct.
1. Refer to: Battery Disconnect and Connect (414-01, General Procedures).
2. Refer to: Engine Cover - 5.0L, Vehicles With: Supercharger (501-05,
Removal and Installation).
3. Refer to: Secondary Bulkhead Panel RH - 5.0L/3.0L Diesel (501-02,
Removal and Installation).
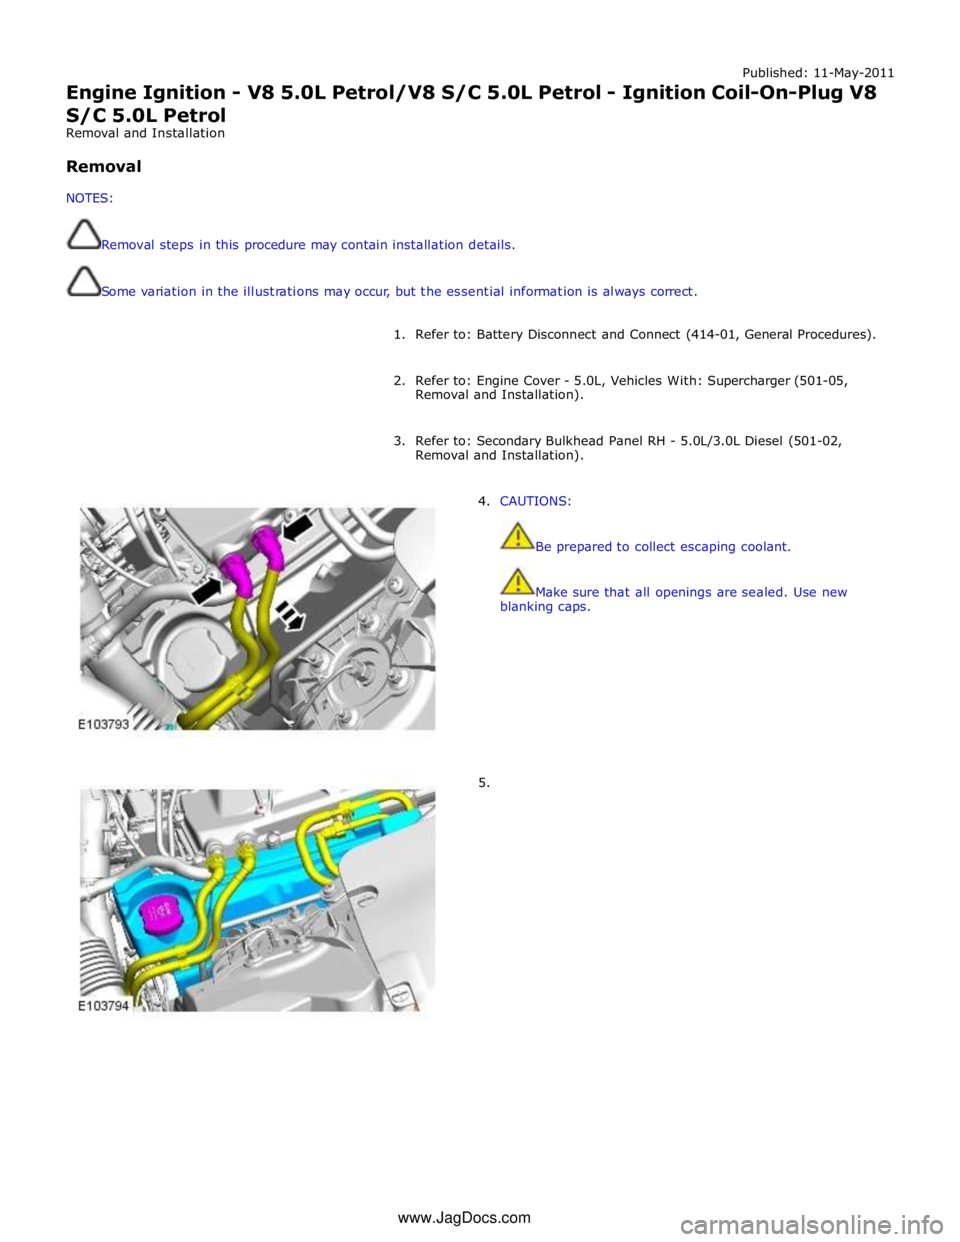
4. CAUTIONS:
Be prepared to collect escaping coolant.
Make sure that all openings are sealed. Use new
blanking caps.
5. www.JagDocs.com
Page 1280 of 3039

Published: 11-May-2011
Engine Emission Control - V8 5.0L Petrol/V8 S/C 5.0L Petrol - Engine Emission Control - Component Location
Description and Operation
www.JagDocs.com ItemDescription1Partloadbreather2FullloadbreatherCOMPONENTLOCATION-SUPERCHARGERVEHICLES
Page 1283 of 3039
Published: 11-May-2011
Engine Emission Control - V8 5.0L Petrol/V8 S/C 5.0L Petrol - Engine Emission
Control
Diagnosis and Testing
Principles of Operation
For a detailed description of the engine emission control system and operation, refer to the relevant Description and Operation
section of the workshop manual. REFER to: (303-08C Engine Emission Control - V8 5.0L Petrol/V8 S/C 5.0L Petrol)
Engine Emission Control (Description and Operation), Engine Emission Control (Description and Operation), Engine Emission Control (Description and Operation).
Inspection and Verification
CAUTION: Diagnosis by substitution from a donor vehicle is NOT acceptable. Substitution of control modules does not
guarantee confirmation of a fault and may also cause additional faults in the vehicle being checked and/or the donor vehicle.
NOTE: Check and rectify basic faults before beginning diagnostic routines involving pinpoint tests.
1. Verify the customer concern.
2. Visually inspect for obvious signs of mechanical or electrical damage.
Visual Inspection
Mechanical Electrical
Exhaust gas recirculation system
Breather hoses
Positive crankcase ventilation valve
Fuel level
Fuel contamination/grade/quality
Throttle body
Fuses
Loose or corroded electrical connectors
Exhaust Gas Recirculation (EGR) valve
Engine Control Module (ECM)
3. If an obvious cause for an observed or reported concern is found, correct the cause (if possible) before proceeding to
the next step.
4. If the cause is not visually evident, verify the symptom and refer to the Symptom Chart, alternatively check for
Diagnostic Trouble Codes (DTCs) and refer to the DTC Index.
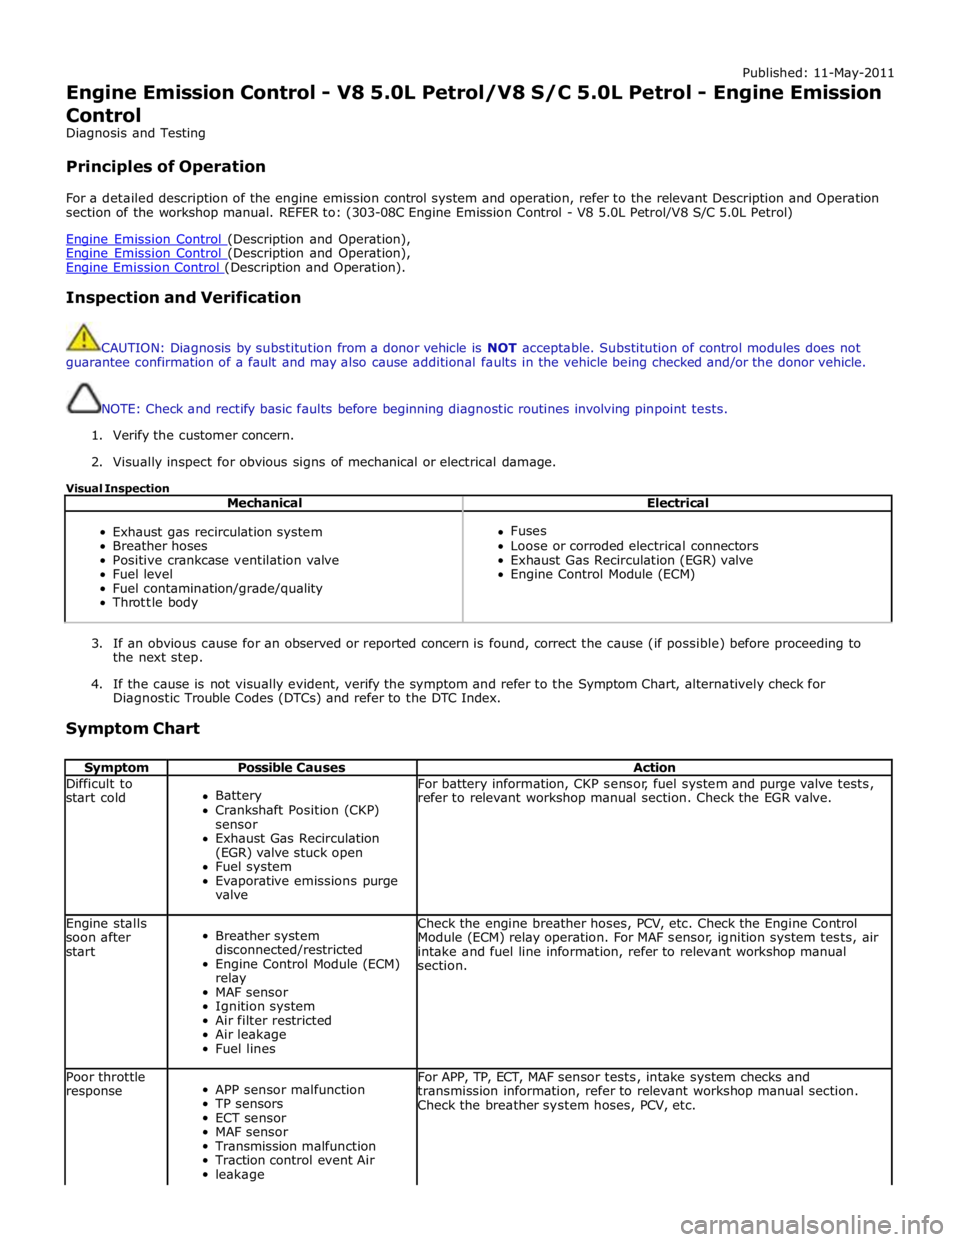
Symptom Chart
Symptom Possible Causes Action Difficult to
start cold
Battery
Crankshaft Position (CKP)
sensor
Exhaust Gas Recirculation
(EGR) valve stuck open
Fuel system
Evaporative emissions purge
valve For battery information, CKP sensor, fuel system and purge valve tests,
refer to relevant workshop manual section. Check the EGR valve. Engine stalls
soon after
start
Breather system
disconnected/restricted
Engine Control Module (ECM)
relay
MAF sensor
Ignition system
Air filter restricted
Air leakage
Fuel lines Check the engine breather hoses, PCV, etc. Check the Engine Control
Module (ECM) relay operation. For MAF sensor, ignition system tests, air
intake and fuel line information, refer to relevant workshop manual
section. Poor throttle
response
APP sensor malfunction
TP sensors
ECT sensor
MAF sensor
Transmission malfunction
Traction control event Air
leakage For APP, TP, ECT, MAF sensor tests, intake system checks and
transmission information, refer to relevant workshop manual section.
Check the breather system hoses, PCV, etc.
Page 1284 of 3039

Symptom Possible Causes Action Breather system
disconnected/restricted DTC Index
For a list of Diagnostic Trouble Codes (DTCs) that could be logged in the Engine Control Module (ECM), please refer to Section
303-14. REFER to:
Electronic Engine Controls (303-14C Electronic Engine Controls - V8 5.0L Petrol, Diagnosis and Testing), Electronic Engine Controls (303-14D Electronic Engine Controls - V8 S/C 5.0L Petrol, Diagnosis and Testing).
Page 1288 of 3039

Published: 11-May-2011
Intake Air Distribution and Filtering - V8 S/C 5.0L Petrol - Intake Air
Distribution and Filtering - System Operation and Component Description
Description and Operation
Control Diagram
NOTE: A = Hardwired
Item Description 1 Battery 2 BJB (battery junction box) (250 A megafuse) 3 EJB (engine junction box) (EMS high current relay) 4 Tuning valve 5 ECM (engine control module)
Page 1289 of 3039

SUPERCHARGER System Operation
At closed or partially open throttle positions, the bypass valve is fully open, allowing a flow of air from the SC (supercharger)
outlet back to the inlet side. This results in little or no pressure increase across the SC. Progressive opening of the throttle reduces the depression downstream of the electric throttle. This is sensed by the pneumatic actuator, which moves to close
the bypass valve. As the bypass valve closes there is a corresponding increase in the outlet pressure from the SC, which increases engine power output.
NOISE FEEDBACK SYSTEM
Sound waves from the RH (right-hand) intake manifold are filtered by the calibrated orifice in the inlet pipe connection on the
symposer. The sound waves make the paddle oscillate and generate pulsations in the outlet chambers. When the pneumatic
valve is open, the pulsations are transmitted through the outlet pipe and feedback tube to the resonator in the passenger
compartment.
The tuning valve of the noise feedback system receives a power feed from the power distribution box and is connected to
ground through the ECM (engine control module). At lower engine loads and speeds the ECM keeps the ground open circuit and the tuning valve is de-energized closed. Atmospheric pressure is sensed at the pneumatic valve through the vent cap on the
tuning valve, which keeps the pneumatic valve closed and prevents sound from the symposer entering the feedback system.
At higher engine loads and speeds the ECM connects the tuning valve to ground. The tuning valve energizes, blanks off the atmospheric vent and opens the vacuum line between the brake vacuum system and the pneumatic valve. The depression in
the brake vacuum system is sensed at the pneumatic valve, which opens and allows sound from the symposer into the
feedback system.
The status of the pneumatic valve at various engine loads and speeds is given below:
Pneumatic Valve Status
NOTE: Values are for valve opening with increasing engine load and speed. Deduct 0.05 g/rev and 50 rev/min for valve
closing with decreasing engine load and speed.
Engine Load: g/rev Engine Speed: rev/min 0 500 1000 2500 3000 4000 5800 6500 1.30 Closed Closed Closed Closed Closed Closed Closed Closed 1.35 Closed Closed Closed Closed Closed Closed Closed Closed 1.40 Closed Closed Closed Closed Closed Closed Closed Open 1.60 Closed Closed Closed Closed Closed Closed Closed Open 1.80 Closed Closed Closed Closed Closed Closed Closed Open 2.50 Closed Closed Closed Closed Closed Open Open Open 3.00 Closed Closed Closed Closed Closed Open Open Open 3.50 Closed Closed Closed Open Open Open Open Open
Page 1290 of 3039
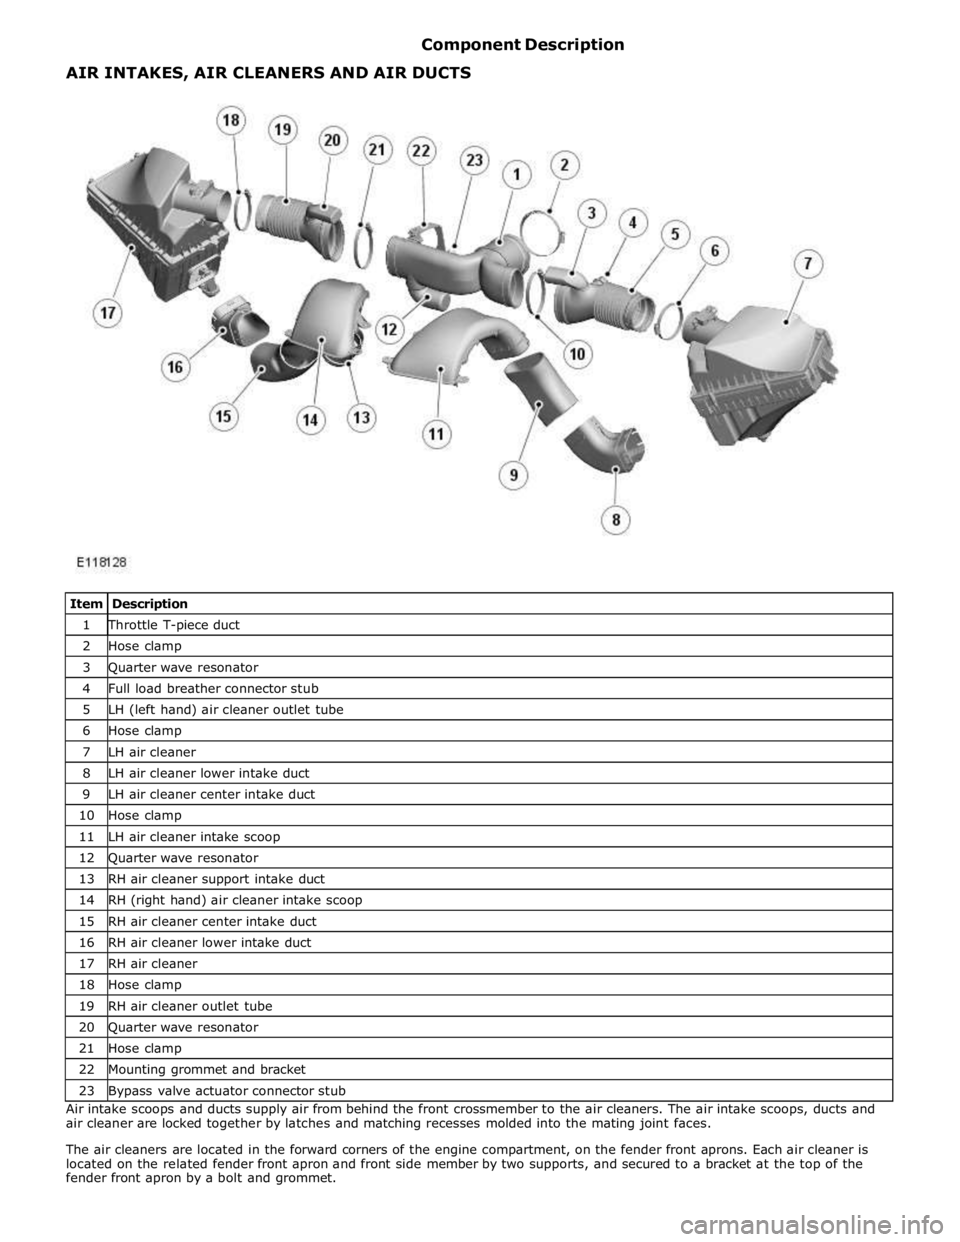
1 Throttle T-piece duct 2 Hose clamp 3 Quarter wave resonator 4 Full load breather connector stub 5 LH (left hand) air cleaner outlet tube 6 Hose clamp 7 LH air cleaner 8 LH air cleaner lower intake duct 9 LH air cleaner center intake duct 10 Hose clamp 11 LH air cleaner intake scoop 12 Quarter wave resonator 13 RH air cleaner support intake duct 14 RH (right hand) air cleaner intake scoop 15 RH air cleaner center intake duct 16 RH air cleaner lower intake duct 17 RH air cleaner 18 Hose clamp 19 RH air cleaner outlet tube 20 Quarter wave resonator 21 Hose clamp 22 Mounting grommet and bracket 23 Bypass valve actuator connector stub Air intake scoops and ducts supply air from behind the front crossmember to the air cleaners. The air intake scoops, ducts and
air cleaner are locked together by latches and matching recesses molded into the mating joint faces.
The air cleaners are located in the forward corners of the engine compartment, on the fender front aprons. Each air cleaner is
located on the related fender front apron and front side member by two supports, and secured to a bracket at the top of the
fender front apron by a bolt and grommet. AIR INTAKES, AIR CLEANERS AND AIR DUCTS
Page 1292 of 3039
9 Support 10 Inlet connection 11 Outlet connection 12 MAFT sensor The outlet tubes and T-piece duct direct the air from the air cleaners to the electric throttle. Hose clamps connect the outlet
tubes and T-piece duct together, and to the air cleaners and the electric throttle. A grommet and bracket attached the T-piece
duct to a bracket on the RH cylinder head. The two outlet tubes and the T-piece duct each incorporate a quarter wave resonator to reduce air induction noise.
The LH (left-hand) outlet tube incorporates a connector stub for the engine full load breather pipe.
The T-piece duct incorporates a connector stub for the vacuum tube of the bypass valve actuator on the supercharger.
SUPERCHARGER AND INTAKE MANIFOLDS
The SC increases the pressure, and thus mass, of the air supplied to the engine, to increase the engine's power output. Two separate intake manifolds direct air from the SC to the cylinder inlet ports.
The intake manifolds are attached to their related cylinder heads and the sides of the SC. Two dowels locate the SC in position on the cylinder block. A charge air cooler tank top is installed on top of the SC and intake manifolds to form the air duct from the SC outlet to the intake manifolds. A charge air cooler is installed in each intake manifold.
The charge air cooler tank top incorporates four studs for the attachment of the engine cover. A NVH (noise, vibration and
harshness) pad is attached to the side of each intake manifold.