display JAGUAR XJ 2004 X350 / 3.G Owner's Manual
[x] Cancel search | Manufacturer: JAGUAR, Model Year: 2004, Model line: XJ, Model: JAGUAR XJ 2004 X350 / 3.GPages: 227, PDF Size: 4.22 MB
Page 91 of 227
4-20 On the Road
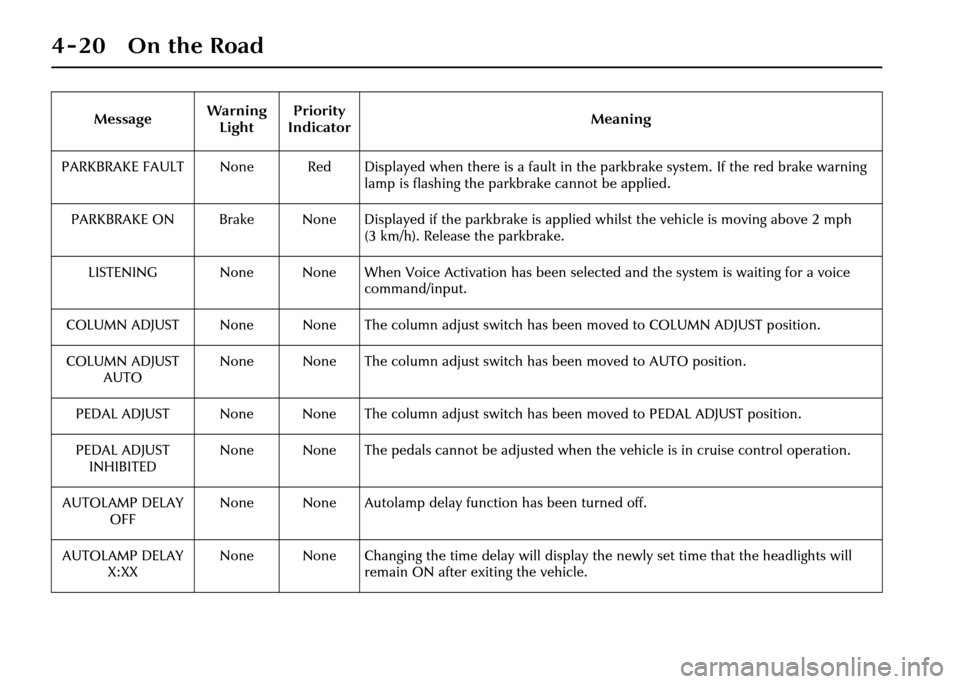
PARKBRAKE FAULT None Red Displayed when there is a fault in the parkbrake system. If the red brake warning lamp is flashing the parkbrake cannot be applied.
PARKBRAKE ON Brake None Displayed if the parkbrake is applied whil st the vehicle is moving above 2 mph
(3 km/h). Release the parkbrake.
LISTENING None None When Voice Activation has been selected and the system is waiting for a voice command/input.
COLUMN ADJUST None None The column adjust switch has been moved to COLUMN ADJUST position.
COLUMN ADJUST AUTO None None The column adjust switch
has been moved to AUTO position.
PEDAL ADJUST None None The column adjust switch has been moved to PEDAL ADJUST position.
PEDAL ADJUST INHIBITED None None The pedals cannot be adjusted when
the vehicle is in cruise control operation.
AUTOLAMP DELAY OFF None None Autolamp delay function has been turned off.
AUTOLAMP DELAY X:XX None None Changing the time delay will display
the newly set time that the headlights will
remain ON after exiting the vehicle.
Message
Warning
Light Priority
Indicator Meaning
Page 92 of 227
On the Road 4 - 21
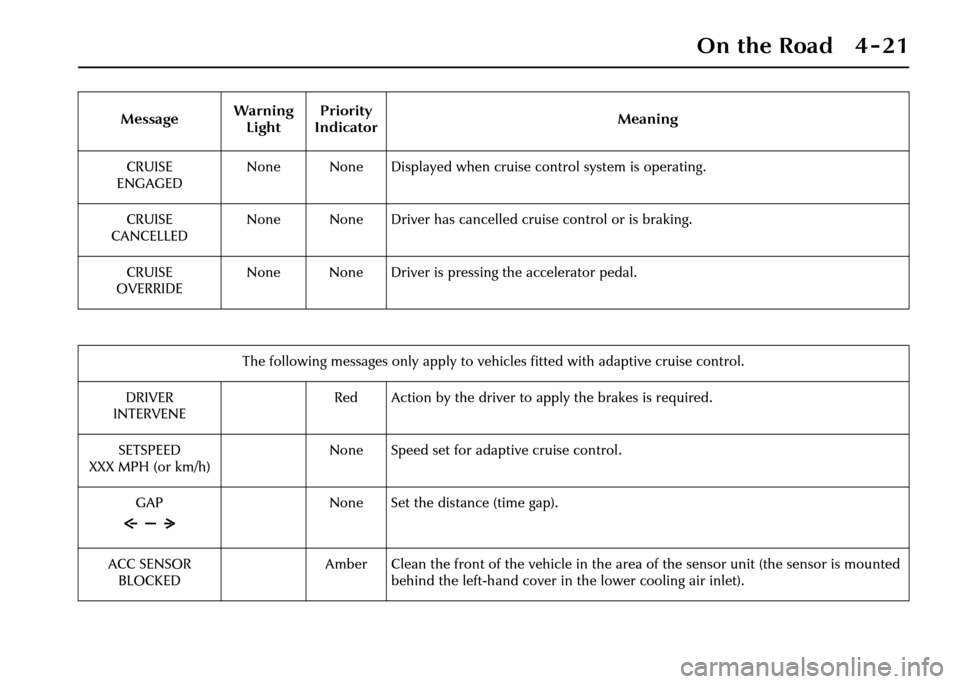
CRUISE
ENGAGED None None Displayed when cruise control system is operating.
CRUISE
CANCELLED None None Driver has cancelled cruise control or is braking.
CRUISE
OVERRIDE None None Driver is pressing the accelerator pedal.
The following messages only apply to vehi cles fitted with adaptive cruise control.
DRIVER
INTERVENE Red Action by the driver to ap
ply the brakes is required.
SETSPEED
XXX MPH (or km/h) None Speed set for adaptive cruise control.
GAP None Set the distance (time gap).
ACC SENSOR BLOCKED Amber Clean the front of the vehicle in the area of the sensor unit (the sensor is mounted
behind the left-hand cover in the lower cooling air inlet).
Message
Warning
Light Priority
Indicator Meaning
Page 105 of 227
4-34 On the Road
Parkbrake
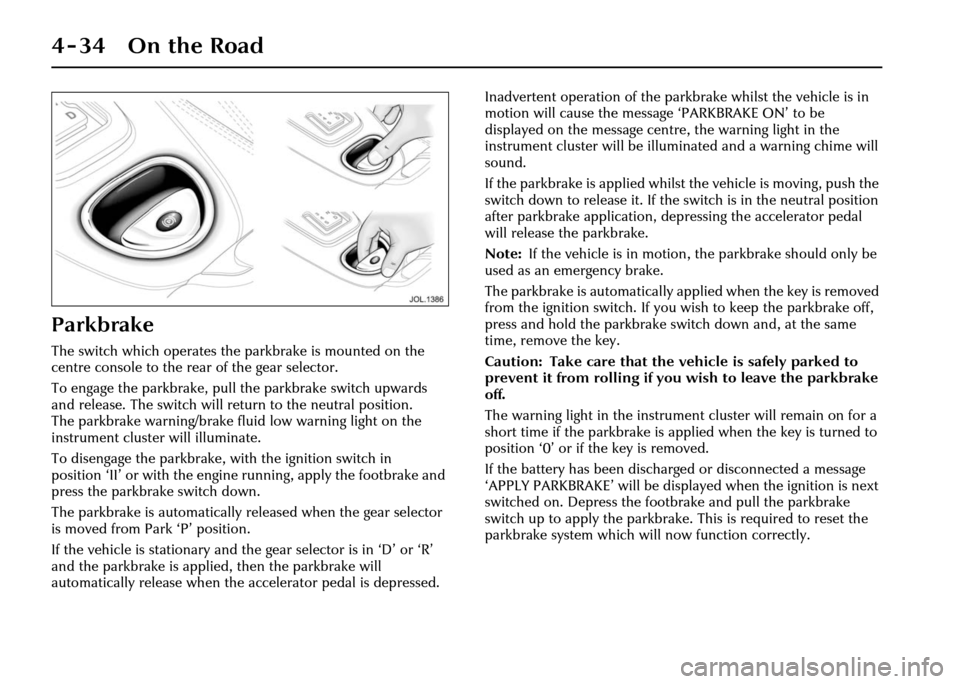
The switch which operates the parkbrake is mounted on the
centre console to the rear of the gear selector.
To engage the parkbrake, pull the parkbrake switch upwards
and release. The switch will return to the neutral position.
The parkbrake warning/brake fluid low warning light on the
instrument cluster will illuminate.
To disengage the parkbrake, with the ignition switch in
position ‘II’ or with the engine running, apply the footbrake and
press the parkbrake switch down.
The parkbrake is automatically released when the gear selector
is moved from Park ‘P’ position.
If the vehicle is stationary and the gear selector is in ‘D’ or ‘R’
and the parkbrake is applied, then the parkbrake will
automatically release when the accelerator pedal is depressed. Inadvertent operation of the parkbrake whilst the vehicle is in
motion will cause the message ‘PARKBRAKE ON’ to be
displayed on the message centre, the warning light in the
instrument cluster will be illuminated and a warning chime will
sound.
If the parkbrake is applied whilst
the vehicle is moving, push the
switch down to release it. If the switch is in the neutral position
after parkbrake application, depressing the accelerator pedal
will release the parkbrake.
Note: If the vehicle is in motion, the parkbrake should only be
used as an emergency brake.
The parkbrake is auto matically applied when the key is removed
from the ignition switch. If you wi sh to keep the parkbrake off,
press and hold the parkbrake switch down and, at the same
time, remove the key.
Caution: Take care that the vehicle is safely parked to
prevent it from rolling if you wish to leave the parkbrake
off.
The warning light in the instrument cluster will remain on for a
short time if the parkbrake is applied when the key is turned to
position ‘0’ or if the key is removed.
If the battery has been discharged or disconnected a message
‘APPLY PARKBRAKE’ will be displa yed when the ignition is next
switched on. Depress the footbrake and pull the parkbrake
switch up to apply the parkbrake. This is required to reset the
parkbrake system which will now function correctly.
Page 123 of 227
4-52 On the Road
• It is the drivers responsibility to stay alert, drive safely and be in control of
the vehicle at all times.
• Keep the front of the vehicle free from dirt, metal badges or objects,
including vehicle front protectors,
which may prevent the sensor from
operating.
• Do not use ACC when entering or leaving a motorway.
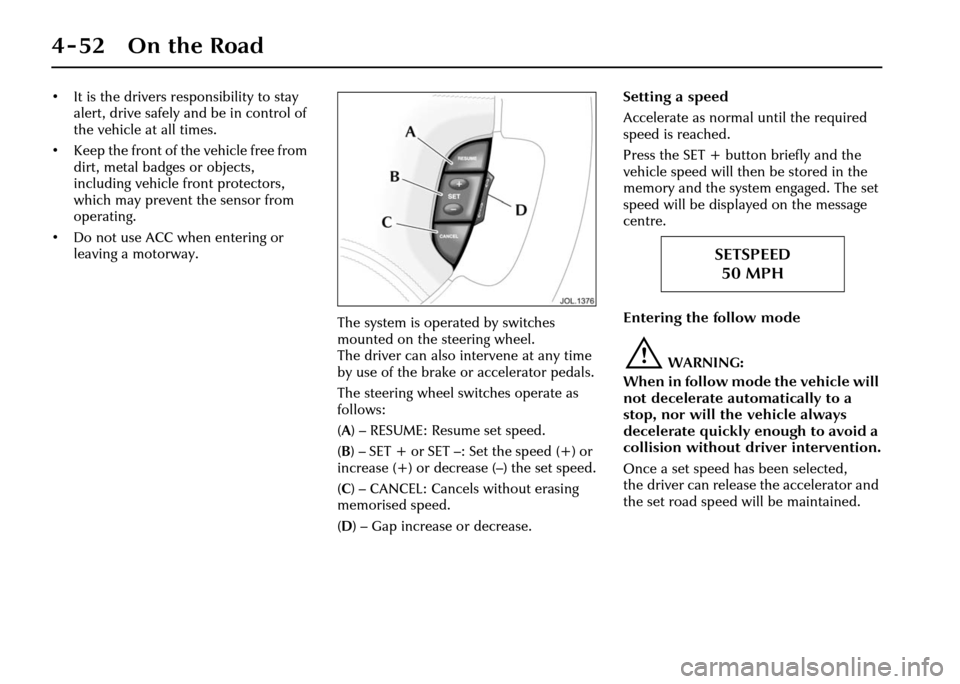
The system is operated by switches
mounted on the steering wheel.
The driver can also intervene at any time
by use of the brake or accelerator pedals.
The steering wheel switches operate as
follows:
(A ) – RESUME: Resume set speed.
( B )– SET+ or SET–: Setthe speed(+) or
increase (+) or decrease (–) the set speed.
( C ) – CANCEL: Cancels without erasing
memorised speed.
( D ) – Gap increase or decrease. Setting a speed
Accelerate as normal
until the required
speed is reached.
Press the SET + butto n briefly and the
vehicle speed will then be stored in the
memory and the system engaged. The set
speed will be displayed on the message
centre.
Entering the follow mode
!WARNING:
When in follow mode the vehicle will
not decelerate automatically to a
stop, nor will the vehicle always
decelerate quickly enough to avoid a
collision without driver intervention.
Once a set speed has been selected,
the driver can release the accelerator and
the set road speed will be maintained.
SETSPEED 50 MPH
Page 124 of 227
On the Road 4 - 53
When a vehicle ahead enters the same
lane or a slower vehicle is ahead in the
same lane, the vehicle speed will be
adjusted automatically until the gap to
the vehicle ahead corresponds to the
preset gap. The vehicle is now in ‘follow
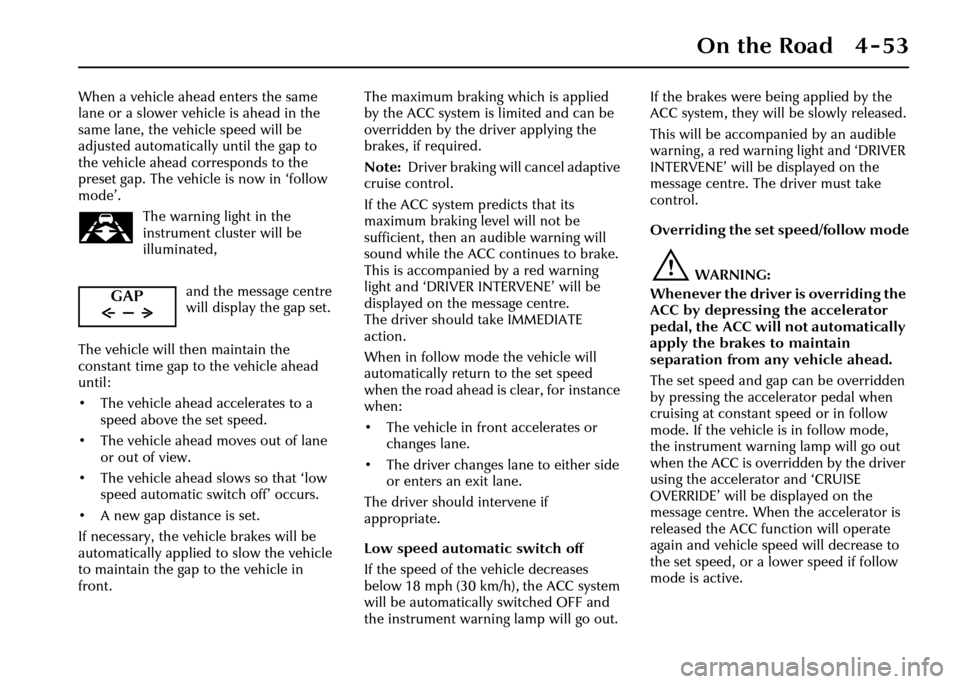
mode’.The warning light in the
instrument cluster will be
illuminated,
and the message centre
will display the gap set.
The vehicle will then maintain the
constant time gap to the vehicle ahead
until:
• The vehicle ahead accelerates to a speed above the set speed.
• The vehicle ahead moves out of lane or out of view.
• The vehicle ahead slows so that ‘low speed automatic switch off’ occurs.
• A new gap distance is set.
If necessary, the vehicle brakes will be
automatically applied to slow the vehicle
to maintain the gap to the vehicle in
front. The maximum braking which is applied
by the ACC system is limited and can be
overridden by the driver applying the
brakes, if required.
Note:
Driver braking will cancel adaptive
cruise control.
If the ACC system predicts that its
maximum braking level will not be
sufficient, then an audible warning will
sound while the ACC continues to brake.
This is accompanied by a red warning
light and ‘DRIVER INTERVENE’ will be
displayed on the message centre.
The driver should take IMMEDIATE
action.
When in follow mode the vehicle will
automatically return to the set speed
when the road ahead is clear, for instance
when:
• The vehicle in front accelerates or changes lane.
• The driver changes lane to either side or enters an exit lane.
The driver should intervene if
appropriate.
Low speed automatic switch off
If the speed of the vehicle decreases
below 18 mph (30 km/h), the ACC system
will be automatically switched OFF and
the instrument warning lamp will go out. If the brakes were
being applied by the
ACC system, they will be slowly released.
This will be accompanied by an audible
warning, a red warning light and ‘DRIVER
INTERVENE’ will be displayed on the
message centre. The driver must take
control.
Overriding the set speed/follow mode
!WARNING:
Whenever the driver is overriding the
ACC by depressing the accelerator
pedal, the ACC will not automatically
apply the brakes to maintain
separation from any vehicle ahead.
The set speed and gap can be overridden
by pressing the accelerator pedal when
cruising at constant speed or in follow
mode. If the vehicle is in follow mode,
the instrument warning lamp will go out
when the ACC is overridden by the driver
using the accelera tor and ‘CRUISE
OVERRIDE’ will be displayed on the
message centre. When the accelerator is
released the ACC function will operate
again and vehicle speed will decrease to
the set speed, or a lower speed if follow
mode is active.
GAP
Page 125 of 227
4-54 On the Road
Changing the set speed
There are three ways to change the set
speed:
1. Accelerate or brake to the required speed and press the ‘SET +’ button.
2. Increase or decrease the speed by pressing and holding either the
‘SET +’ or ‘–’ button until the required
set speed is shown on the message
centre. The vehicle speed will
gradually change to the selected
speed.
3. Increase or decrease the speed in steps of 1 mph (2 km/h) by briefly
pressing the ‘SET +’ or ‘–’ button.
ACC operates between approximately
20 mph and 110 mph (34 km/h and
180 km/h) dependent on the country
specification.
Set speeds outside this range will not be
captured.
The ACC may apply the brakes to slow
down the vehicle to the new set speed.
The new set speed will be displayed on
the message centre for four seconds after
it has been changed. Changing the gap
The gap from the vehicle ahead can be
decreased or increased by pressing the
gap setting rocker switch on the steering
wheel. Four gaps are available and the
selected gap setting will be displayed on
the message centre when the rocker
switch is pressed. After the ignition is
switched ON the default gap will be
automatically selected ready for ACC
operation.
Note:
It is the driver’s responsibility to
select a gap appropriate to the driving
conditions, and in accordance with
national driving regulations.
ACC automatic switch off
Adaptive cruise control will disengage,
but not clear the memory when:
• The CANCEL button is pressed.
• The brake pedal is pressed.
• The vehicle speed falls below 18 mph (30 km/h).
• Neutral, Park or Reverse gear positions are selected.
• The parkbrake is applied.
• DSC is activated. Adaptive cruise control will disengage,
and clear the memory when:
• The ignition switch is set to
position ‘0’.
• Maximum vehicle speed is reached.
• A fault occurs in the ACC system.
Resuming the set speed/follow mode
By pressing the RESUME button after ACC
has been cancelled, for example, after
braking, the ACC will become active
again provided that the set speed
memory has not been erased. The set
speed will be displayed for four seconds
and the original set speed will be
resumed, unless a vehicle ahead causes
the follow mode to become active.
Caution: ‘RESUME’ should only be
used if the driver is aware of the set
speed and intends to return to it.
Page 126 of 227
On the Road 4 - 55
Forward alert
Limited detection and warning of objects
ahead is provided during ACC operation
by the ACC ‘DRIVER INTERVENE’
warning.
The forward alert feature additionally
provides warnings whilst ACC is not
engaged, if an object is detected close
ahead then a warning tone and message
will be issued. The brakes will not be
applied.
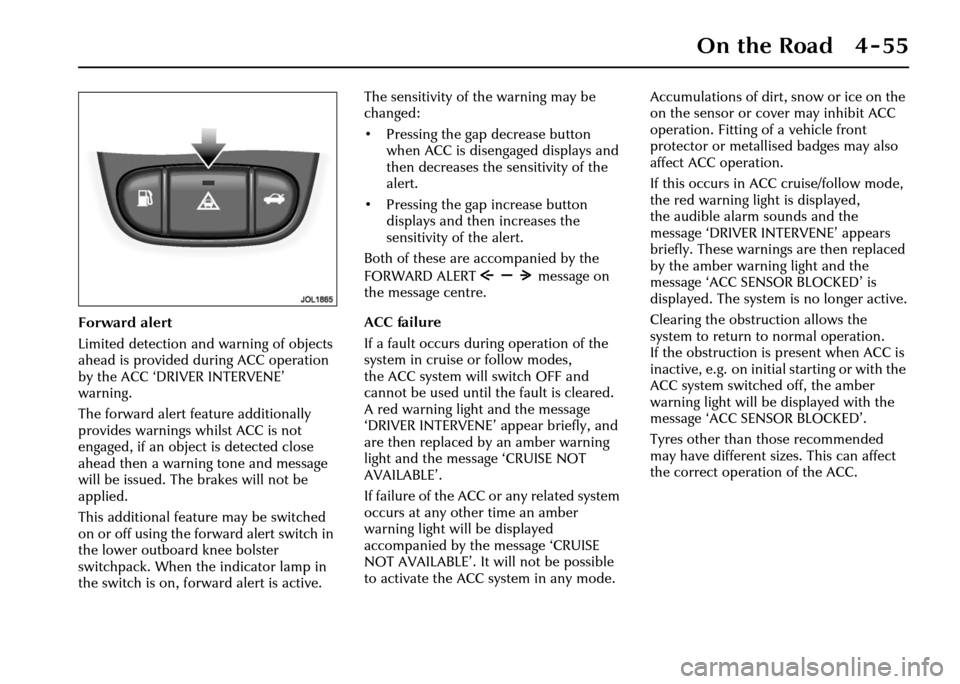
This additional feature may be switched
on or off using the forward alert switch in
the lower outboard knee bolster
switchpack. When the indicator lamp in
the switch is on, forward alert is active.The sensitivity of the warning may be
changed:
• Pressing the gap decrease button
when ACC is disengaged displays and
then decreases the sensitivity of the
alert.
• Pressing the gap increase button displays and then increases the
sensitivity of the alert.
Both of these are accompanied by the
FORWARD ALERT message on
the message centre.
ACC failure
If a fault occurs during operation of the
system in cruise or follow modes,
the ACC system will switch OFF and
cannot be used until the fault is cleared.
A red warning light and the message
‘DRIVER INTERVENE’ appear briefly, and
are then replaced by an amber warning
light and the message ‘CRUISE NOT
AVAILABLE’.
If failure of the ACC or any related system
occurs at any other time an amber
warning light will be displayed
accompanied by th e message ‘CRUISE
NOT AVAILABLE’. It will not be possible
to activate the ACC system in any mode. Accumulations of dirt, snow or ice on the
on the sensor or cover may inhibit ACC
operation. Fitting of a vehicle front
protector or metallis
ed badges may also
affect ACC operation.
If this occurs in ACC cruise/follow mode,
the red warning light is displayed,
the audible alarm sounds and the
message ‘DRIVER INTERVENE’ appears
briefly. These warnings are then replaced
by the amber warning light and the
message ‘ACC SENSOR BLOCKED’ is
displayed. The system is no longer active.
Clearing the obstruction allows the
system to return to normal operation.
If the obstruction is present when ACC is
inactive, e.g. on initial starting or with the
ACC system switched off, the amber
warning light will be displayed with the
message ‘ACC SENSOR BLOCKED’.
Tyres other than those recommended
may have different sizes. This can affect
the correct operation of the ACC.
Page 129 of 227
4-58 On the Road
Vehicle Suspension
This vehicle is fitted with a fully
automatic air suspension system.
It ensures that the vehicle is always at the
correct ride height with varying load
conditions, including luggage
compartment load or when towing.
The system will automatically adjust the
amount of air in the springs to level the
vehicle. Air is supplied either from an air
reservoir or a compressor.
The compressor will run periodically to
refill the reservoir.
Changes in ambient temperature will also
have an effect on vehicle height when the
vehicle is parked.
Caution:
1. Do not overload the vehicle. Vehicle load weights are shown
on page 8 - 4.
2. A slight air loss is expected over time causing the vehicle to lower,
so do not store or place anything
under the vehicle if it is to be left
for an extended period. Speed lowering
When driving at motorway speeds,
the system will lower the vehicle to
improve aerodynamics and vehicle
stability. The suspension will
automatically return the vehicle to the
normal height when the vehicle slows.
Caution: Speed lowering is
undesirable when towing.
Only Jaguar approved towing
equipment will not allow this feature.
Warning messages
If the message ‘VEHICLE TOO LOW’ is
displayed when the ignition is switched
on, start the engine and wait for the
suspension to raise. The vehicle should
not be driven until the message is
cleared.
If the message ‘VEHICLE TOO LOW’ is
displayed when driv
ing, restrict the
vehicle speed and wait for the system to
regain the correct height and the message
will then clear. If the message is displayed
frequently, it is advisable to inform your
Retailer to have the system attended to.
If the message ‘AIR SUSPENSION FAULT’
is displayed at any time, drive with
caution. Have the vehicle checked by a
Retailer at the earliest opportunity.
Note: If your vehicle needs to be
recovered by a roadside emergency
service ensure that the vehicle is securely
lashed by the wheels and NOT the body.
Page 142 of 227
Climate Control 5 - 3
5 Climate Control
Introduction
The cabin is supplied with filtered air
from a fully automatic electronic climate
control system with manual overrides.
Two systems are available:
• A two zone system which allows the front occupants to set individual
temperatures for the left and right
sides of the interior.
• A four zone system which allows front and rear occupants to set individual
temperatures, i.e. two front zones and
two rear zones.
Occupant controls
The main climate control panel is located
in the centre console above the radio and
audio controls. There are two types of
control panel for either two or four zone
systems:
• A dedicated control panel with LCD (liquid crystal display) screen
(see page 5 - 6).
• A multi-function touch control and display unit shared with navigation
and other systems. Where this control
unit is fitted, refer to the Jaguar
Touch-screen Handbook for the
detailed operating instructions. Where the four zone climate control
system is fitted, an additional control/
display panel for rear passenger use is
located at the rear of the centre console,
between the front seats.
Voice control
The climate control system may also be
operated by spoken commands if the
optional voice activation system is fitted.
For full information on the use of this
system refer to the JaguarVoice
Handbook.
Recommended Operation
Automatic climate control
Automatic climate control provides
efficient regulation of the vehicle
environment without constant
adjustments from the occupant.
Sensors inside the vehicle monitor
temperature, humidity and direct
sunlight. In response, the electronic
control system automatically adjusts the
heat input, blower speed, air intake and
airflow distribution so as to maintain the
selected temperature(s) and reduce
misting.
Automatic operation provides optimum
comfort under most driving conditions. It is recommended that automatic
control (AUTO) is selected as the
normal operating mode.
Use of air conditioning
Air conditioning is an integral part of the
climate control system, providing cooled
and dehumidified
air for occupant
comfort; the dry airflow is also effective
in preventing misting of the windows.
While the air conditioner can be
manually switched off, it is recommended
that it is used in all climatic conditions
throughout the year, preferably in AUTO
mode.
Close all windows and the sunroof when
the air conditioning is on to ensure
satisfactory operation.
Use of air recirculation
The air conditioner/heater system is
supplied with fresh air via an intake flap.
Closing the flap causes the air inside the
vehicle to be recirculated. This helps to
prevent unpleasant odours from being
drawn into the vehicle and also to
improve the performance of the air
conditioner in very hot conditions.
However, the use of recirculated air will
cause screen misting after a short period
and should only be used as necessary.
Page 145 of 227
5 - 6 Climate Control
Front Climate Controls
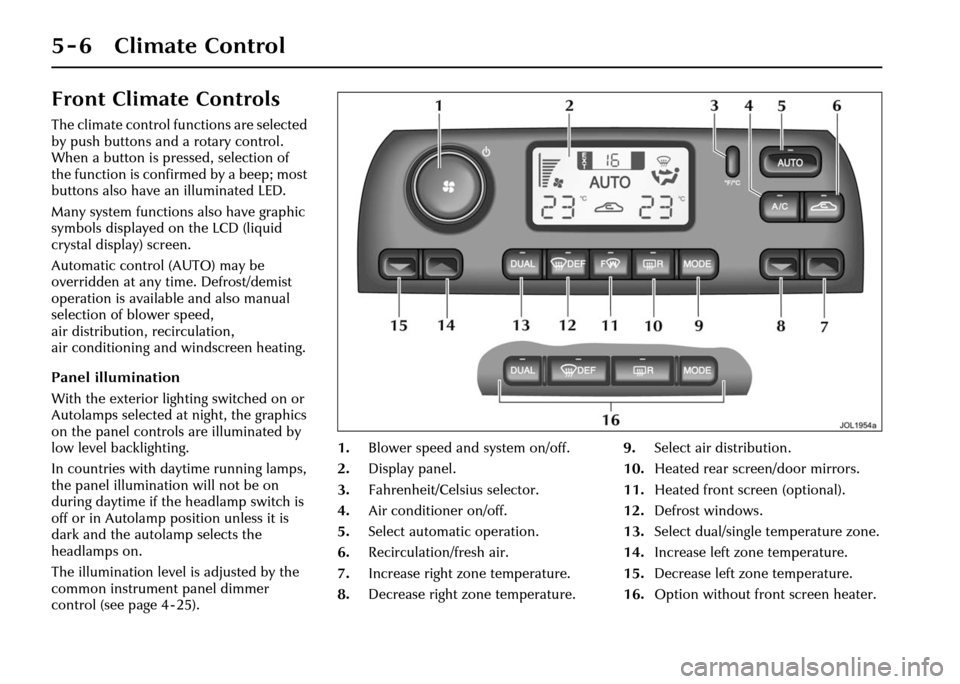
The climate control functions are selected
by push buttons and a rotary control.
When a button is pressed, selection of
the function is confirmed by a beep; most
buttons also have an illuminated LED.
Many system functions also have graphic
symbols displayed on the LCD (liquid
crystal display) screen.
Automatic control (AUTO) may be
overridden at any time. Defrost/demist
operation is available and also manual
selection of blower speed,
air distribution, recirculation,
air conditioning and windscreen heating.
Panel illumination
With the exterior lighting switched on or
Autolamps selected at night, the graphics
on the panel controls are illuminated by
low level backlighting.
In countries with daytime runnin g lamps,
the panel illumination will not be on
during daytime if the headlamp switch is
off or in Autolamp position unless it is
dark and the autolamp selects the
headlamps on.
The illumination level is adjusted by the
common instrument panel dimmer
control (see page 4 - 25). 1.
Blower speed and system on/off.
2. Display panel.
3. Fahrenheit/Celsius selector.
4. Air conditioner on/off.
5. Select automatic operation.
6. Recirculation/fresh air.
7. Increase right zone temperature.
8. Decrease right zone temperature. 9.
Select air distribution.
10. Heated rear screen/door mirrors.
11. Heated front screen (optional).
12. Defrost windows.
13. Select dual/single temperature zone.
14. Increase left zone temperature.
15. Decrease left zone temperature.
16. Option without fron t screen heater.