reset JAGUAR XJ 2011 X351 / 4.G Quick Start Guide
[x] Cancel search | Manufacturer: JAGUAR, Model Year: 2011, Model line: XJ, Model: JAGUAR XJ 2011 X351 / 4.GPages: 16, PDF Size: 1.06 MB
Page 4 of 16
4
J A G U A R X JJ A G U A R X J J A G U A R X J
Comfort adjustments
Driver’s seat
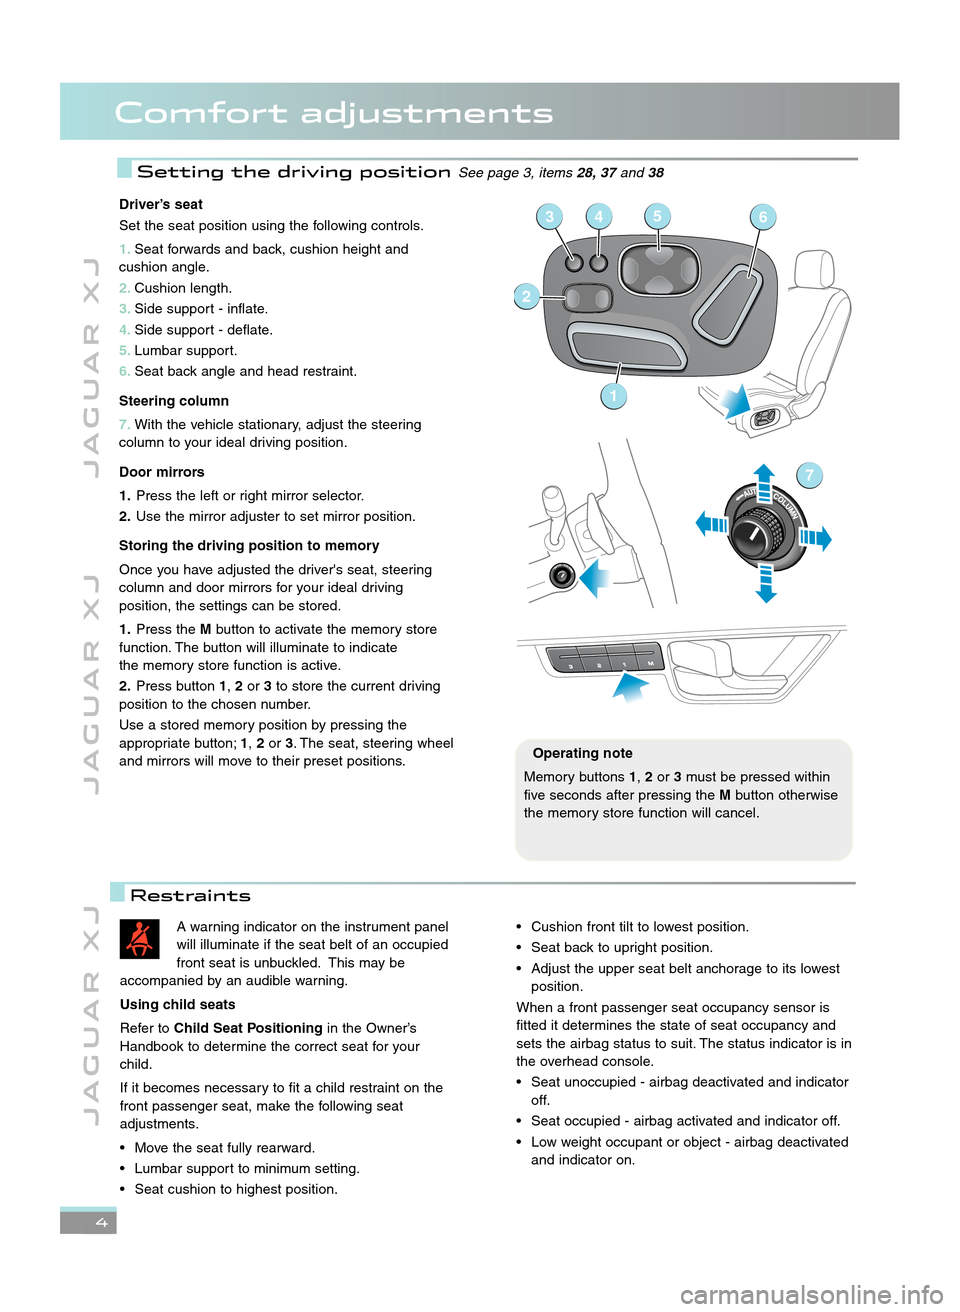
Set the seat position using the following controls.
1\bSeat forwards and back, cushion height and
cushion angle.
\f\b Cushion length.
3\b Side support \b inflate.
4\b Side support \b deflate.
5\b Lumbar support.
6\b Seat back angle and head restraint.
Steering column
7\b With the vehicle stationary, adjust the steering
column to your ideal driving position.
Door mirrors
1\b Press the left or right mirror selector.
\f\b Use the mirror adjuster to set mirror position.
Storing the driving position to memory
Once you have adjusted the driver's seat, steering
column and door mirrors for your ideal driving
position, the settings can be stored.
1\b Press the Mbutton to activate the memory store
function. The button will illuminate to indicate
the memory store function is active.
\f\b Press button 1,\for 3to store the current driving
position to the chosen number.
Use a stored memory position by pressing the
appropriate button; 1,\for 3. The seat, steering wheel
and mirrors will move to their preset positions.
1
2
3456
7
A warning indicator on the instrument panel
will illuminate if the seat belt of an occupied
front seat is unbuckled. This may be
accompanied by an audible warning.
Using child seats
Refer to Child Seat Positioning in the Owner’s
Handbook to determine the correct seat for your
child.
If it becomes necessary to fit a child restraint on the
front passenger seat, make the following seat
adjustments.
• Move the seat fully rearward.
• Lumbar support to minimum setting.
• Seat cushion to highest position.• Cushion front tilt to lowest position.
• Seat back to upright position.
• Adjust the upper seat belt anchorage to its lowest position.
When a front passenger seat occupancy sensor is
fitted it determines the state of seat occupancy and
sets the airbag status to suit. The status indicator is in
the overhead console.
• Seat unoccupied \b airbag deactivated and indicator off.
• Seat occupied \b airbag activated and indicator off.
• Low weight occupant or object \b airbag deactivated and indicator on.
Operating note
Memory buttons 1,\for 3must be pressed within
five seconds after pressing the Mbutton otherwise
the memory store function will cancel.
Setting the driving positionSee page 3, items 28, 37and38
Restraints
JJM 18 96 34 111:X351 10MY.qxd 05/07/2010 15:04 Page 4
Page 8 of 16
8
J A G U A R X JJ A G U A R X J J A G U A R X J
Driving aids
Automatic speed limiter (ASL)See page 3, items14and 28
Trip computer and message centerSee page 3, items 1, 3and 2\b
ASL allows any speed between \f8 and \f50 mph (30
km/h and 240 km/h) to be set as a maximum speed.
This is useful to ensure any given speed limit is not
exceeded.
Setting a speed
The setting procedure can be made
while the vehicle is stationary.
1. Press the ASL button. An ASL warning lamp illuminates in the
speedometer.
\f. Use the cruise control + and \b controls to set a speed. The
message centre will display the set
speed. Adjustment can be made at
any time to suit variable speed
limits.If ASL is cancelled due to kick down acceleration or
by pressing the cruise control CAN, the message
center will display a ‘LIMITER CANCELLED’
message.
Press the REScontrol to reinstate the ASL set
speed.
Operating note
When negotiating a steep downhill gradient,
vehicle speed may exceed the set speed. The
message center will display a warning. Driver
intervention may be required to reduce speed.
2588kmOdo237kmRange
2.30pm 23°C
CD 2 Groove Armada
Tr
3/15 Mix CD
02:32
Text line 1
Text line 2 Press OK
to hide message
Trip computer
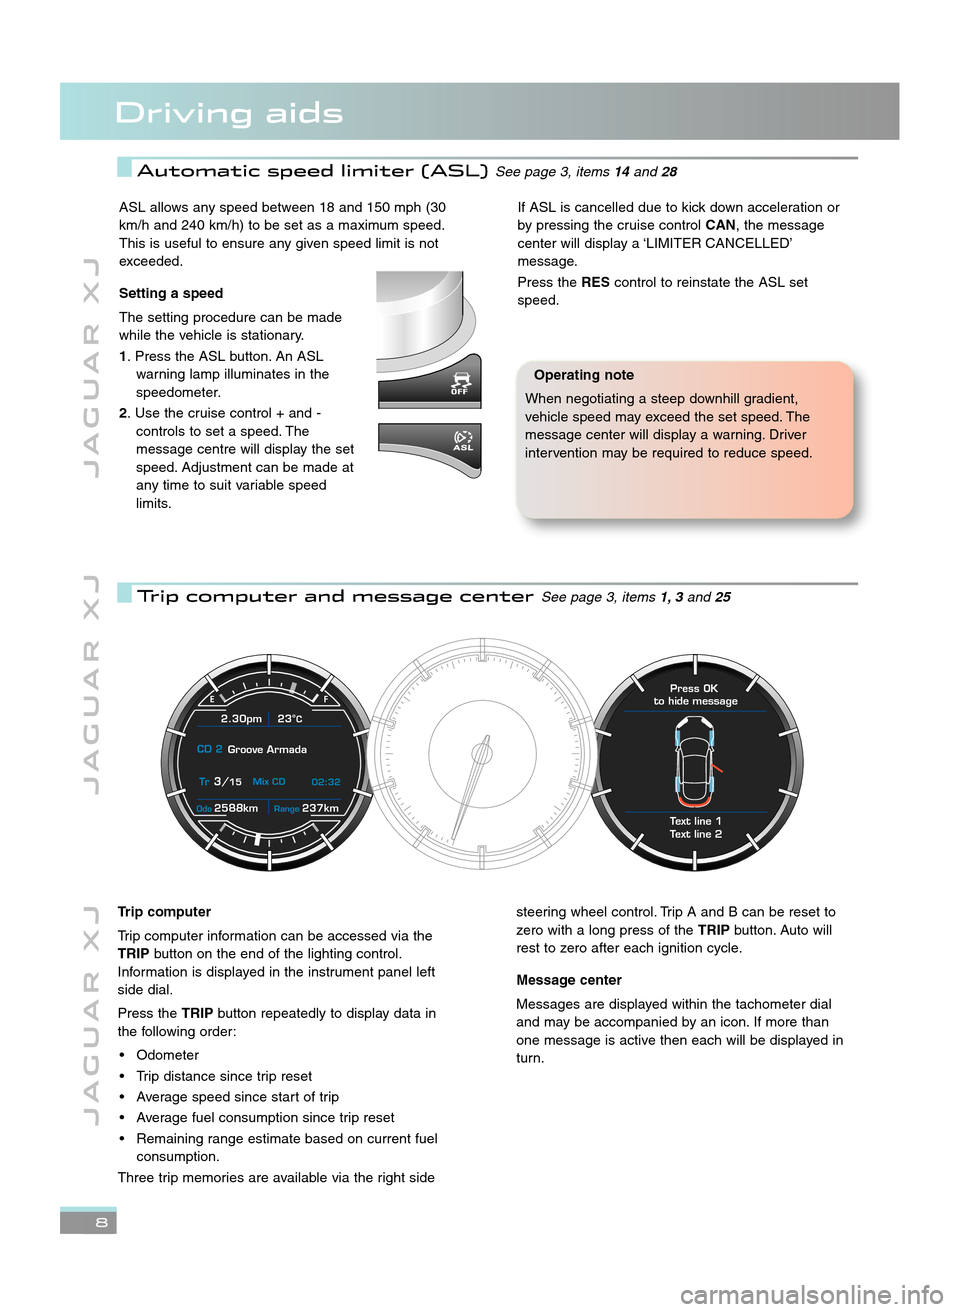
Trip computer information can be accessed via the
TRIP button on the end of the lighting control.
Information is displayed in the instrument panel left
side dial.
Press the TRIPbutton repeatedly to display data in
the following order:
• Odometer
• Trip distance since trip reset
• Average speed since start of trip
• Average fuel consumption since trip reset
• Remaining range estimate based on current fuel consumption.
Three trip memories are available via the right sidesteering wheel control. Trip A and B can be reset to
zero with a long press of the TRIPbutton. Auto will
rest to zero after each ignition cycle.
Message center
Messages are displayed within the tachometer dial
and may be accompanied by an icon. If more than
one message is active then each will be displayed in
turn.
JJM 18 96 34 111:X351 10MY.qxd 05/07/2010 15:04 Page 8
Page 9 of 16
J A G U A R X JJ A G U A R X J J A G U A R X J
9
Driving aids
Winter mode, Dynamic mode and Dynamic Stability
Control (DSC) allow the driver to more finely tune the
vehicle driving characteristics to suit prevailing
conditions.
When Reverse is selected, the rear and front parking
aids and rear view camera will activate.
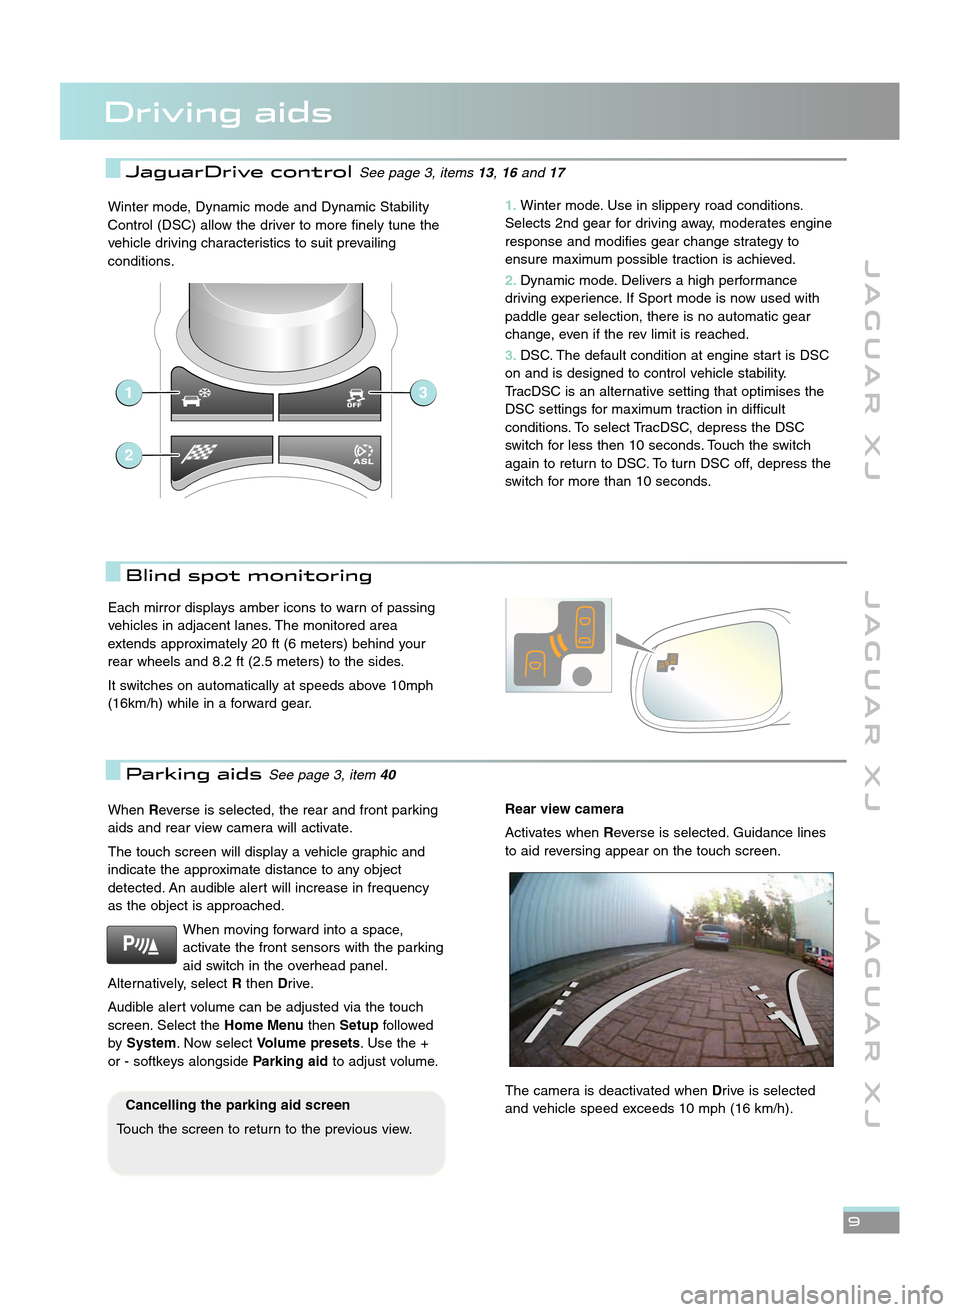
The touch screen will display a vehicle graphic and
indicate the approximate distance to any object
detected. An audible alert will increase in frequency
as the object is approached.
When moving forward into a space,
activate the front sensors with the parking
aid switch in the overhead panel.
Alternatively, select Rthen Drive.
Audible alert volume can be adjusted via the touch
screen. Select the Home MenuthenSetup followed
by System . Now select Volume presets. Use the +
or \b softkeys alongside Parking aidto adjust volume.Rear view camera
Activates when Reverse is selected. Guidance lines
to aid reversing appear on the touch screen.
The camera is deactivated when Drive is selected
and vehicle speed exceeds \f0 mph (\f6 km/h).
Blind spot monitoring
Cancelling the parking aid screen
Touch the screen to return to the previous view.
Each mirror displays amber icons to warn of passing
vehicles in adjacent lanes. The monitored area
extends approximately 20 ft (6 meters) behind your
rear wheels and 8.2 ft (2.5 meters) to the sides.
It switches on automatically at speeds above \f0mph
(\f6km/h) while in a forward gear.
Parking aidsSee page 3, item 40
1\bWinter mode. Use in slippery road conditions.
Selects 2nd gear for driving away, moderates engine
response and modifies gear change strategy to
ensure maximum possible traction is achieved.
\f\b Dynamic mode. Delivers a high performance
driving experience. If Sport mode is now used with
paddle gear selection, there is no automatic gear
change, even if the rev limit is reached.
3\b DSC. The default condition at engine start is DSC
on and is designed to control vehicle stability.
TracDSC is an alternative setting that optimises the
DSC settings for maximum traction in difficult
conditions. To select TracDSC, depress the DSC
switch for less then \f0 seconds. Touch the switch
again to return to DSC. To turn DSC off, depress the
switch for more than \f0 seconds.
1
2
3
JaguarDrive controlSee page 3, items 13,16and 17
JJM 18 96 34 111:X351 10MY.qxd 05/07/2010 15:04 Page 9
Page 10 of 16
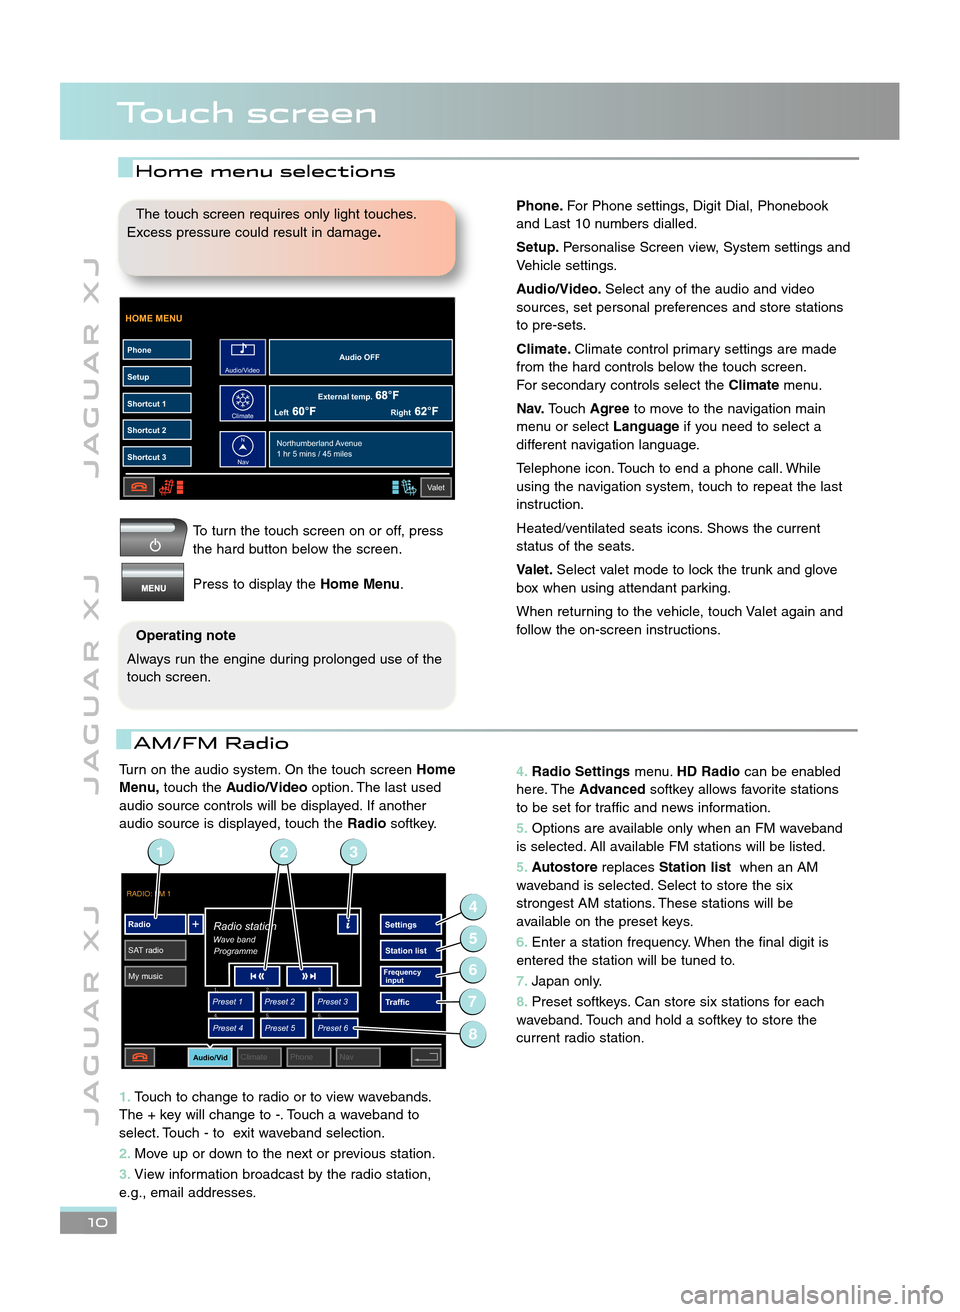
Turn on the audio system. On the touch screenHome
Menu, touch the Audio/Video option. The last used
audio source controls will be displayed. If another
audio source is displayed, touch the Radiosoftkey.
1\b Touch to change to radio or to view wavebands.
The + key will change to \b. Touch a waveband to
select. Touch \b to exit waveband selection.
\f\b Move up or down to the next or previous station.
3\b View information broadcast by the radio station,
e.g., email addresses.
J A G U A R X J J A G U A R X J J A G U A R X J
Touch screen
\b0
To turn the touch screen on or off, press
the hard button below the screen.
Press to display the Home Menu.
HOME MENU
External temp.Audio OFF
Left Right
PhoneSetup
Shortcut 1
Shortcut 2
Shortcut 3
Valet
Northumberland Avenue
1 hr 5 mins / 45 miles
Audio/Video
Climate
Nav
N
The touch screen requires only light touches.
Excess pressure could result in damage \b
Operating note
Always run the engine during prolonged use of the
touch screen.
AM/FM Radio
4\b Radio Settings menu.HD Radio can be enabled
here. The Advanced softkey allows favorite stations
to be set for traffic and news information.
5\b Options are available only when an FM waveband
is selected. All available FM stations will be listed.
5\b Autostore replacesStation list when an AM
waveband is selected. Select to store the six
strongest AM stations. These stations will be
available on the preset keys.
6\b Enter a station frequency. When the final digit is
entered the station will be tuned to.
7\b Japan only.
8\b Preset softkeys. Can store six stations for each
waveband. Touch and hold a softkey to store the
current radio station.
RADIO: FM 1
Radio
SAT radio My music Settings
Station list
Traffic
Preset 1
Preset 3
Preset 2
Audio/VidClimate Phone Nav
Wave bandRadio station
Programme
Preset 4
Preset 6
Preset 5
Frequency
input1. 2.
3.
4. 5.
6.
2
4
6
5
7
13
8
Home menu selections
Phone\bFor Phone settings, Digit Dial, Phonebook
and Last \f0 numbers dialled.
Setup\b Personalise Screen view, System settings and
Vehicle settings.
Audio/Video\b Select any of the audio and video
sources, set personal preferences and store stations
to pre\bsets.
Climate\b Climate control primary settings are made
from the hard controls below the touch screen.
For secondary controls select the Climatemenu.
Nav\b Touch Agree to move to the navigation main
menu or select Languageif you need to select a
different navigation language.
Telephone icon. Touch to end a phone call. While
using the navigation system, touch to repeat the last
instruction.
Heated/ventilated seats icons. Shows the current
status of the seats.
Valet\b Select valet mode to lock the trunk and glove
box when using attendant parking.
When returning to the vehicle, touch Valet again and
follow the on\bscreen instructions.
JJM 18 96 34 111:X351 10MY.qxd 05/07/2010 15:04 Page 10
Page 11 of 16
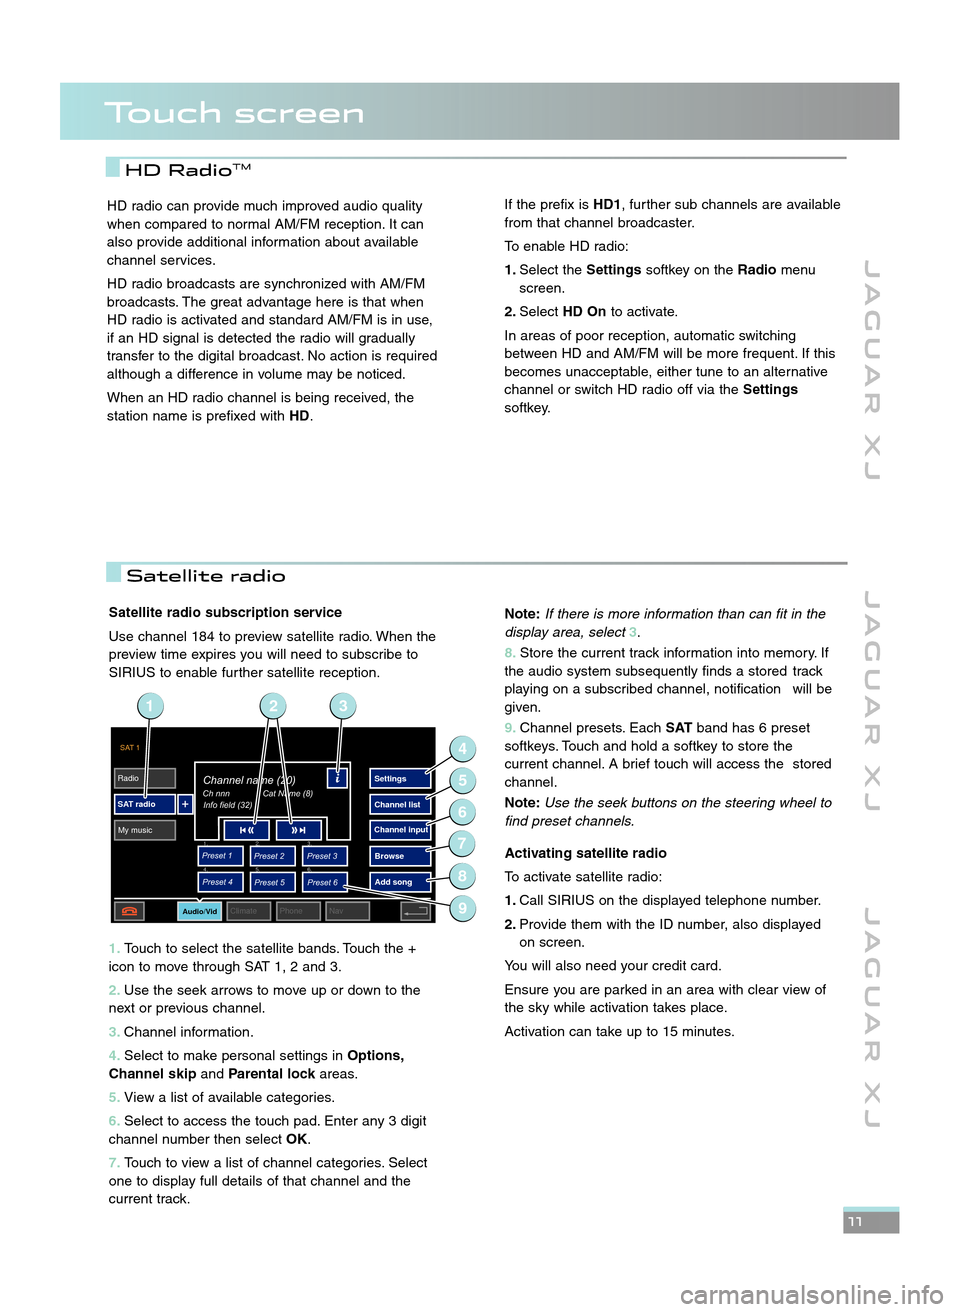
Satellite radio subscription service
Use channel \f84 to preview satellite radio. When the
preview time expires you will need to subscribe to
SIRIUS to enable further satellite reception.
1\b Touch to select the satellite bands. Touch the +
icon to move through SAT \f, 2 and 3.
\f\b Use the seek arrows to move up or down to the
next or previous channel.
3\b Channel information.
4\b Select to make personal settings in Options,
Channel skip andParental lock areas.
5\b View a list of available categories.
6\b Select to access the touch pad. Enter any 3 digit
channel number then select OK.
7\b Touch to view a list of channel categories. Select
one to display full details of that channel and the
current track.
J A G U A R X J J A G U A R X J J A G U A R X J
\b\b
HD RadioTM
SAT 1
Radio
SAT radio My music Settings
Channel list
Browse
Preset 1
Preset 3
Preset 2
Audio/VidClimate Phone Nav
Ch nnnChannel name (20)
Info field (32)
Preset 4
Preset 6
Preset 5
1. 2.
3.
4. 5.
6.
Add song
Channel input
Cat Name (8)
9
4
6
5
7
8
231
HD radio can provide much improved audio quality
when compared to normal AM/FM reception. It can
also provide additional information about available
channel services.
HD radio broadcasts are synchronized with AM/FM
broadcasts. The great advantage here is that when
HD radio is activated and standard AM/FM is in use,
if an HD signal is detected the radio will gradually
transfer to the digital broadcast. No action is required
although a difference in volume may be noticed.
When an HD radio channel is being received, the
station name is prefixed with HD.If the prefix isHD1, further sub channels are available
from that channel broadcaster.
To enable HD radio:
1\b Select the Settingssoftkey on the Radiomenu
screen.
\f\b Select HD On to activate.
In areas of poor reception, automatic switching
between HD and AM/FM will be more frequent. If this
becomes unacceptable, either tune to an alternative
channel or switch HD radio off via the Settings
softkey.
Touch screen
Note: If there is more information than can fit in the
display area, select 3.
8\b Store the current track information into memory. If
the audio system subsequently finds a stored track
playing on a subscribed channel, notification will be
given.
9\b Channel presets. Each SATband has 6 preset
softkeys. Touch and hold a softkey to store the
current channel. A brief touch will access the stored
channel.
Note: Use the seek buttons on the steering wheel to
find preset channels.
Activating satellite radio
To activate satellite radio:
1\b Call SIRIUS on the displayed telephone number.
\f\b Provide them with the ID number, also displayed
on screen.
You will also need your credit card.
Ensure you are parked in an area with clear view of
the sky while activation takes place.
Activation can take up to \f5 minutes.
Satellite radio
JJM 18 96 34 111:X351 10MY.qxd 05/07/2010 15:04 Page 11
Page 12 of 16
\b2
J A G U A R X JJ A G U A R X J J A G U A R X J
Touch screen
CD player and portable media
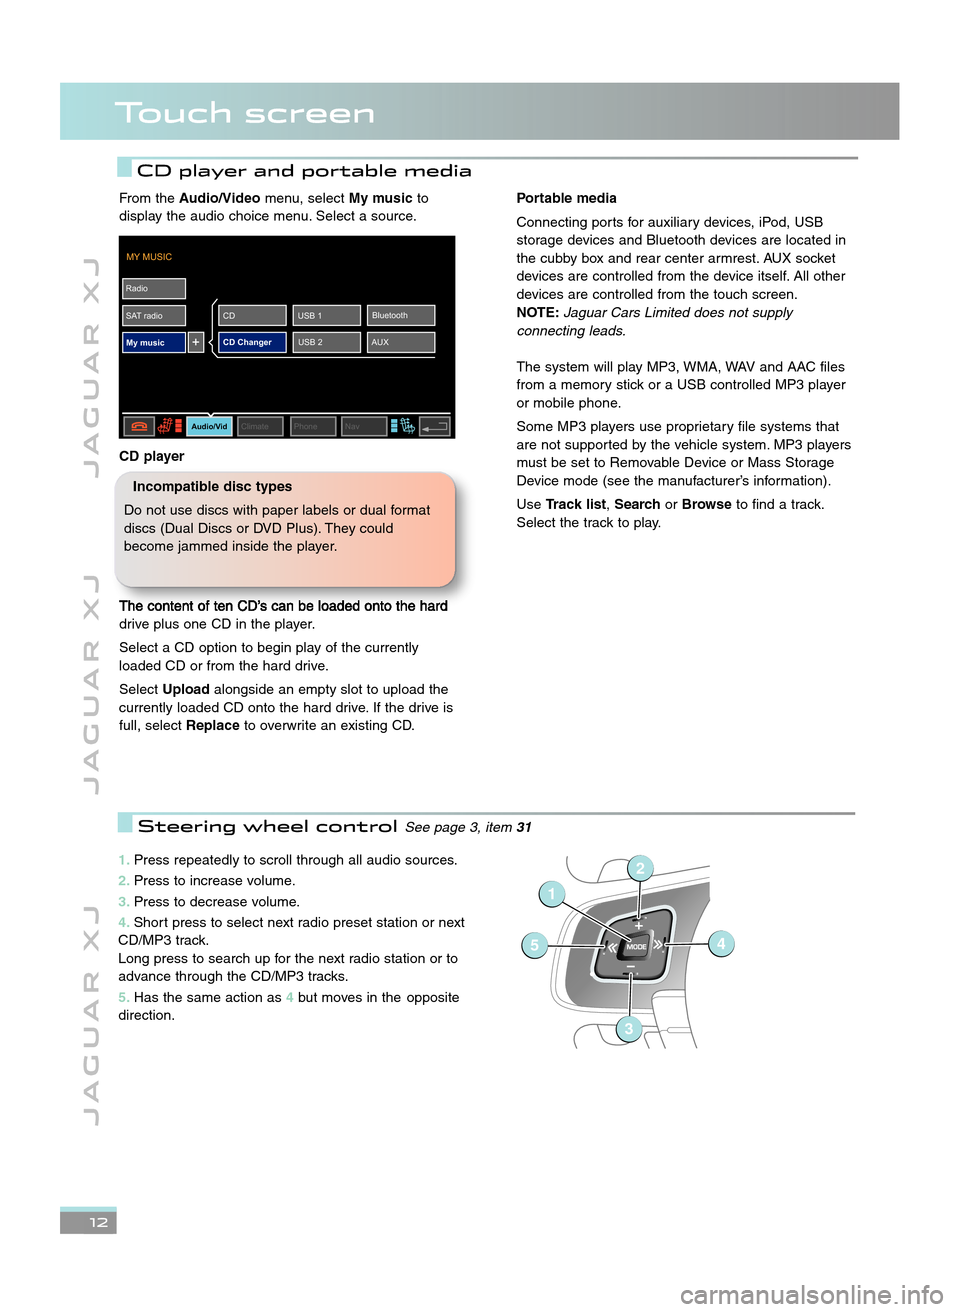
1\bPress repeatedly to scroll through all audio sources.
\f\b Press to increase volume.
3\b Press to decrease volume.
4\b Short press to select next radio preset station or next
CD/MP3 track.
Long press to search up for the next radio station or to
advance through the CD/MP3 tracks.
5\b Has the same action as 4but moves in the opposite
direction.
1
54
2
3
Steering wheel controlSee page 3, item 31
From theAudio/Video menu, selectMy musicto
display the audio choice menu. Select a source.
CD player
The content of ten CD’s can be loaded onto the hard
drive plus one CD in the player.
Select a CD option to begin play of the currently
loaded CD or from the hard drive.
Select Upload alongside an empty slot to upload the
currently loaded CD onto the hard drive. If the drive is
full, select Replaceto overwrite an existing CD.
MY MUSIC
Radio
SAT radio My music
Audio/VidClimate Phone Nav
CD Changer AUXBluetooth
USB 1
CD
USB 2
Portable media
Connecting ports for auxiliary devices, iPod, USB
storage devices and Bluetooth devices are located in
the cubby box and rear center armrest. AUX socket
devices are controlled from the device itself. All other
devices are controlled from the touch screen.
NOTE: \faguar Cars Limited does not supply
connecting leads.
The system will play MP3, WMA, WAV and AAC files
from a memory stick or a USB controlled MP3 player
or mobile phone.
Some MP3 players use proprietary file systems that
are not supported by the vehicle system. MP3 players
must be set to Removable Device or Mass Storage
Device mode (see the manufacturer’s information).
Use Track list, SearchorBrowse to find a track.
Select the track to play.
Incompatible disc types
Do not use discs with paper labels or dual format
discs (Dual Discs or DVD Plus). They could
become jammed inside the player.
JJM 18 96 34 111:X351 10MY.qxd 05/07/2010 15:04 Page 12